Hi all!
Just one last thing to sort out and I can get my recently purchased darkside teener inspected!
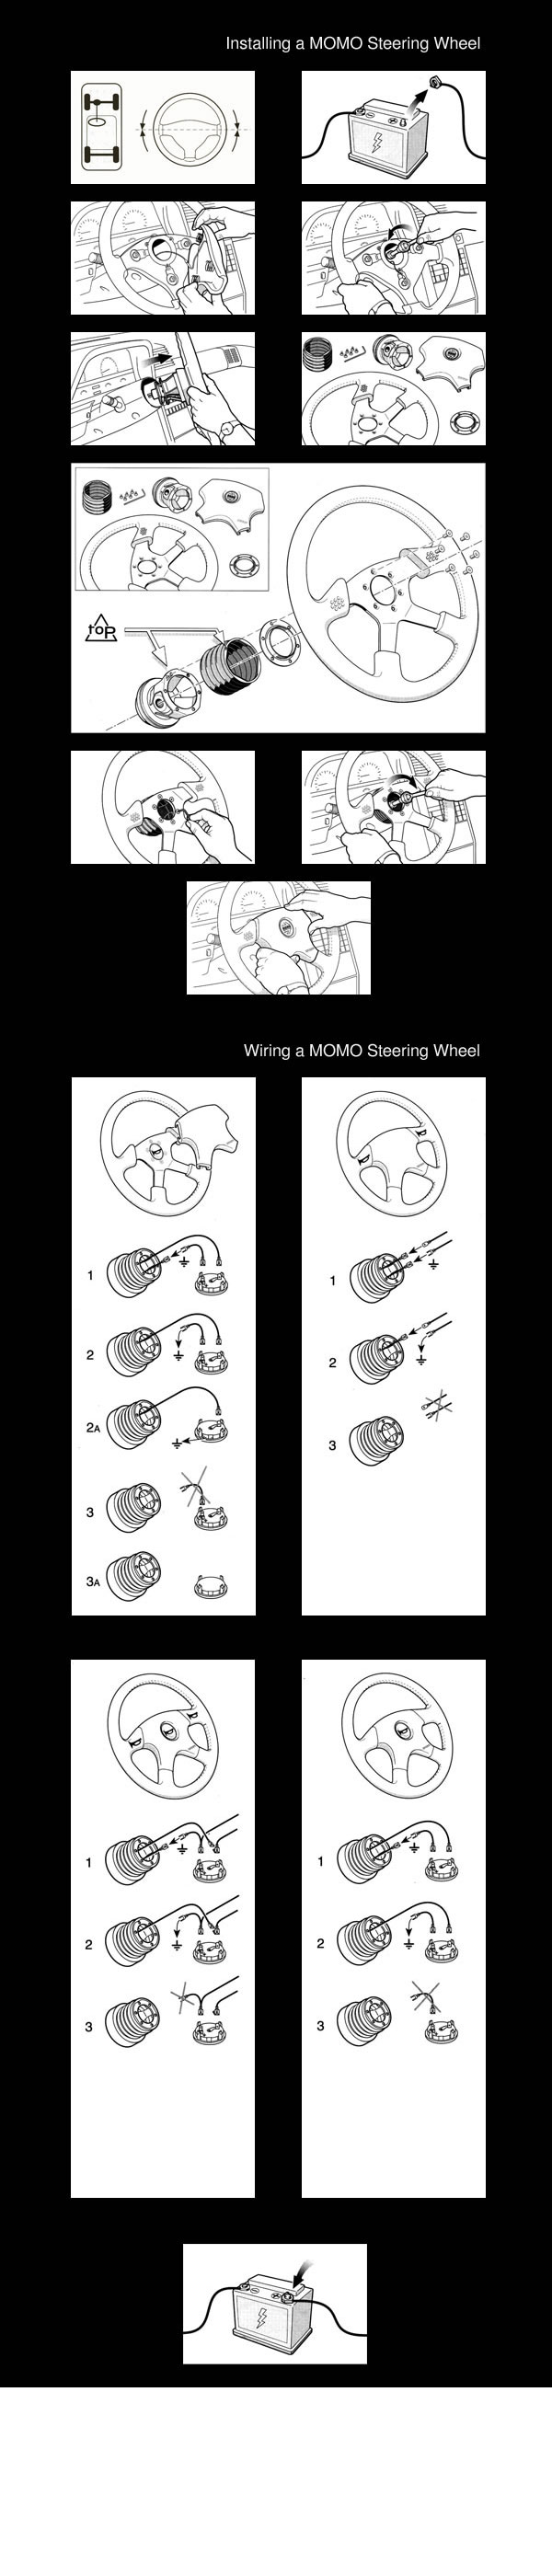
I need to install on the Momo steering wheel the PO supplied Momo horn button and hook up the horns I sourced from a 928 I had laying around.
I think I've found the black/yellow or is it black/orange wire in the front harness, but when I looked for a wire in the steering colum I didn't find one. I removed the steering wheel and figured I'd reverse engineer to try and find the green/white striped wire that needs to be attatched to the horn button.
I removed the 4 retaining screws for the switches but the switches would not come out all the way :-(
Haynes doesn't describe the exact procedure. Does anyone know the trick for removing the steering colum switches from a 1973? Keep in mind 73 had some changes and what may work for a 72 or 74 could very possibly NOT work on my 73.
And, of course if anyone happens to have the install instructions from Momo that would be of great help (although I sent them a email request just today).
Thanks everyone! We've gotten alot done sorting this car for inspection in WV :-)
Pix attatched.
Click to view attachment
Click to view attachment
Click to view attachment
Full Version: 1973 steering colum switch removal-RESOLVED
Look at the hub from the stock wheel.
The ground wire should be on there.
The ground wire should be on there.
The horn wire is brown/white NOT green/white. You cannot see it from there anyway. The big C shaped contact it for the horn. It touches the hub that has a wire that connects to the button you have.
Put the steering column back together. No need to take it apart.
Put the steering column back together. No need to take it apart.
Yes, black/yellow from the horn to the relay. Look for a Brown/White from the relay to the steering column. The concept is when the horn button is depressed the brown/white wire goes to ground blowing the horn. As Mike says, you cant see it.
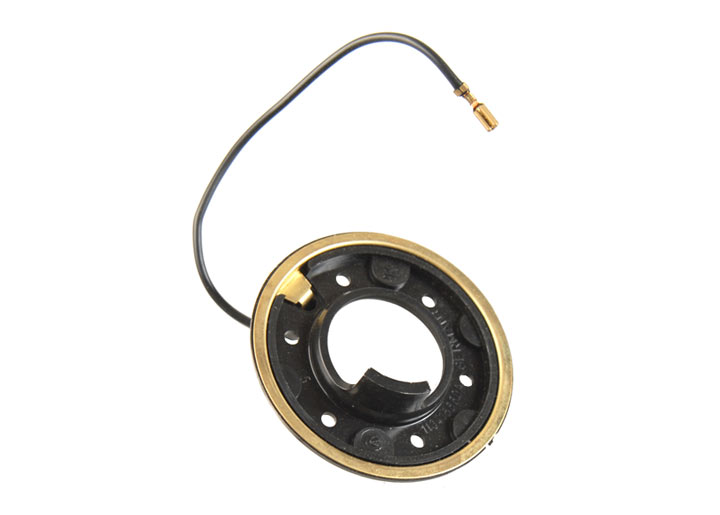
The OEM contact ring (has a wire on it) screws onto the back side of the MOMO adapter with three self tapping screws included with the hub, then pass the wire thru the hole, and it hooks up to the horn button
Included with the horn button should be a snap ring which is an "expansion ring" that puts tension on the 'fingers' of the horn button to stay put inside the hub.
On the horn button- one spade connector should be labeled ground, and one is for the button itself. The ground spade should connect to the adapter. The other spade connects to the contact ring with a wire.
The switch is probably hold in there by the windshield washer rubber hoses. If you pull hard, it will come off but you'll need to remove the column covers to reassemble.
Anyway, you don't need to remove it. The horn button makes contact by grounding the C shaped stripes around the switch. You should use the canceling ring and horn contact that's on the original steering wheel. Take it off and mount it on the Momo wheel.
regarding the wires, you'll find 2 sets of wires behind the front bumper grill: one for the horn and the other for the fog lights. The wires are all there even if you don't have the lights.
The horn wire goes through a relay between the button and the horn. The horn wires in the bumper are black/yellow (+) and brown (-). The foglight wires are white/yellow (+) and brown (-).
Hope it helps.
QUOTE(r_towle @ Aug 12 2013, 07:14 PM) 
Look at the hub from the stock wheel.
The ground wire should be on there.
I don't have the stock wheel :-(
QUOTE(kg6dxn @ Aug 12 2013, 07:27 PM)
The horn wire is brown/white NOT green/white. You cannot see it from there anyway. The big C shaped contact it for the horn. It touches the hub that has a wire that connects to the button you have.
Put the steering column back together. No need to take it apart.
I broke a contact on the wiper switch so I will need to take it apart and repair that. How do you remove it though?
QUOTE(bulitt @ Aug 12 2013, 07:35 PM)
Yes, black/yellow from the horn to the relay. Look for a Brown/White from the relay to the steering column. The concept is when the horn button is depressed the brown/white wire goes to ground blowing the horn. As Mike says, you cant see it.
The OEM contact ring (has a wire on it) screws onto the back side of the MOMO adapter with three self tapping screws included with the hub, then pass the wire thru the hole, and it hooks up to the horn button
Included with the horn button should be a snap ring which is an "expansion ring" that puts tension on the 'fingers' of the horn button to stay put inside the hub.
On the horn button- one spade connector should be labeled ground, and one is for the button itself. The ground spade should connect to the adapter. The other spade connects to the contact ring with a wire.
Nothing like that was included. What you see is what I have to work with.
Click to view attachment
QUOTE(bulitt @ Aug 12 2013, 07:35 PM)
Yes, black/yellow from the horn to the relay. Look for a Brown/White from the relay to the steering column. The concept is when the horn button is depressed the brown/white wire goes to ground blowing the horn. As Mike says, you cant see it.
The OEM contact ring (has a wire on it) screws onto the back side of the MOMO adapter with three self tapping screws included with the hub, then pass the wire thru the hole, and it hooks up to the horn button
Included with the horn button should be a snap ring which is an "expansion ring" that puts tension on the 'fingers' of the horn button to stay put inside the hub.
On the horn button- one spade connector should be labeled ground, and one is for the button itself. The ground spade should connect to the adapter. The other spade connects to the contact ring with a wire.
I gather that I'm missing some components of the Momo installation kit? The adaptor ring which you spoke of that would mount on the bottom of the Momo hub? See pix
Click to view attachment
Do you have this OEM contact ring?
Number four in the exploded parts view- click this link
Steering diagram
Number four in the exploded parts view- click this link
Steering diagram
looks like the tension circlips are not for every wheel. Newer buttons just pop in
Look down about 4 pics and there is a round ring which fits between the hub and the wheel. This is the MOMO ground ring. This is where the ground wire from the horn button spade goes. (there is a spade on this ring) however you can attach the horn button ground anywhere on the hub.
So, you should have the following.
1) OEM contact ring fastened to bottom of MOMO hub with wire going up through hub to horn button.
2) Hub
3) MOMO ground ring
4) Wheel
5) possibly a round cinching ring that all the bolts go through (can see you dont need it with your wheel)
6) Horn button
QUOTE(bulitt @ Aug 12 2013, 08:44 PM)
Do you have this OEM contact ring?
Number three in the explode parts view- click this link
Steering diagram
Dang! Nope I don't have this part. PO had mounted the Momo steering wheel but this wasn't part of his installation.
place an ad in the classifieds-someone must have one, or 29$ at Auto atlanta
QUOTE(bulitt @ Aug 12 2013, 08:51 PM)
looks like the tension circlips are not for every wheel. Newer buttons just pop in
Look down about 4 pics and there is a round ring which fits between the hub and the wheel. This is the MOMO ground ring. This is where the ground wire from the horn button spade goes. (there is a spade on this ring) however you can attach the horn button ground anywhere on the hub.
So, you should have the following.
1) OEM contact ring fastened to bottom of MOMO hub with wire going up through hub to horn button.
2) Hub
3) MOMO ground ring
4) Wheel
5) possibly a round cinching ring that all the bolts go through (can see you dont need it with your wheel)
6) Horn button
Extremely valuable intel! Thanks!
A 924 ring will also fit if you can't find a 914. It mounts with the 3 tiny screw holes on the bottom of your hub.
The guts for the column should pull right out. It will be snug as there is a connector below that is a tight fit. Pull it straight up and out.
The guts for the column should pull right out. It will be snug as there is a connector below that is a tight fit. Pull it straight up and out.
QUOTE(HalfMoon @ Aug 12 2013, 09:10 PM)
QUOTE(bulitt @ Aug 12 2013, 08:44 PM)
Do you have this OEM contact ring?
Number three in the explode parts view- click this link
Steering diagram
Dang! Nope I don't have this part. PO had mounted the Momo steering wheel but this wasn't part of his installation.
COOL! I looked through some parts the PO sent along with the car and found THIS!
Didn't find the Momo adaptor ring though :-(
Click to view attachment
Really dont need the MOMO ground ring. Just drill and tap a small hole in some unobtrusive place in the inside bottom of the hub to connect the button ground wire ?
QUOTE(bulitt @ Aug 12 2013, 09:43 PM)
Really dont need the MOMO ground ring. Just drill and tap a small hole in some unobtrusive place in the inside bottom of the hub to connect the button ground wire ?
Read my mind Brudda! First thing in the morning I'm gonna git my horn a workin! Yeehaw ;-)
QUOTE(kg6dxn @ Aug 12 2013, 09:25 PM)
A 924 ring will also fit if you can't find a 914. It mounts with the 3 tiny screw holes on the bottom of your hub.
The guts for the column should pull right out. It will be snug as there is a connector below that is a tight fit. Pull it straight up and out.
Crap. Had I not broken a connection on the wiper switch I'd not have to remove the entire switch to facilitate a repair :-(
Grrrr. Mebbe I can get a soildering iron on it without totally removing the bugger?
In the morning...tarred (but not feathered). Must eat and sleep.
QUOTE(bulitt @ Aug 12 2013, 09:43 PM)
Really dont need the MOMO ground ring. Just drill and tap a small hole in some unobtrusive place in the inside bottom of the hub to connect the button ground wire ?
Actually I was thinking I could just use a flat eye connector with a line on it and attatch it to one of the OEM hub mounting holes. That'll ground it. Run the wire up through the hole and connect to the ground on the button.
QUOTE(HalfMoon @ Aug 12 2013, 09:53 PM)
QUOTE(kg6dxn @ Aug 12 2013, 09:25 PM)
A 924 ring will also fit if you can't find a 914. It mounts with the 3 tiny screw holes on the bottom of your hub.
The guts for the column should pull right out. It will be snug as there is a connector below that is a tight fit. Pull it straight up and out.
Crap. Had I not broken a connection on the wiper switch I'd not have to remove the entire switch to facilitate a repair :-(
Grrrr. Mebbe I can get a soildering iron on it without totally removing the bugger?
In the morning...tarred (but not feathered). Must eat and sleep.
How do you know you broke a connection on the wiper switch?
QUOTE(Valy @ Aug 12 2013, 08:10 PM)
...regarding the wires, you'll find 2 sets of wires behind the front bumper grill: one for the horn and the other for the fog lights. The wires are all there even if you don't have the lights.
The horn wire goes through a relay between the button and the horn. The horn wires in the bumper are black/yellow (+) and brown (-). The foglight wires are white/yellow (+) and brown (-).
Hope it helps.
Wish it were so easy. PO cut all the wires. The only wire I've found so far that I can read (color blind) looks like black/orange, but I s'pose it could be black/yellow and just faded. I've enclosed a picture.
After I disconnect the battery I should be able to use a test light at the common ground and identify the brown (ground) wire. Reckon I'll use the same method to find the black/yellow off the relay....Did I say test light? Meant circuit tester.
Poop, that looks like Black/red....Grrr. Color blindness and wiring suk
Click to view attachment
QUOTE(bulitt @ Aug 12 2013, 09:57 PM)
QUOTE(HalfMoon @ Aug 12 2013, 09:53 PM)
QUOTE(kg6dxn @ Aug 12 2013, 09:25 PM)
A 924 ring will also fit if you can't find a 914. It mounts with the 3 tiny screw holes on the bottom of your hub.
The guts for the column should pull right out. It will be snug as there is a connector below that is a tight fit. Pull it straight up and out.
Crap. Had I not broken a connection on the wiper switch I'd not have to remove the entire switch to facilitate a repair :-(
Grrrr. Mebbe I can get a soildering iron on it without totally removing the bugger?
In the morning...tarred (but not feathered). Must eat and sleep.
How do you know you broke a connection on the wiper switch?
I can see it. Might not be the wiper switch. I think it's maybe the C hub. Lemme take a quick pic. Crap blurry pic but it was the C ring hub where I poped a wire :-(
Now the whole crappin things gotta come out, so I can fix it :-(
Click to view attachment
QUOTE(HalfMoon @ Aug 12 2013, 06:51 PM)
QUOTE(bulitt @ Aug 12 2013, 09:43 PM)
Really dont need the MOMO ground ring. Just drill and tap a small hole in some unobtrusive place in the inside bottom of the hub to connect the button ground wire ?
Read my mind Brudda! First thing in the morning I'm gonna git my horn a workin! Yeehaw ;-)
If I'm not mistaking, the Momo horn button grounds itself to the wheel. Just look at the terminals and you'll see that one of them is made to touch the wheel body. Leave that one unconnected.
QUOTE(Valy @ Aug 12 2013, 11:31 PM)
QUOTE(HalfMoon @ Aug 12 2013, 06:51 PM)
QUOTE(bulitt @ Aug 12 2013, 09:43 PM)
Really dont need the MOMO ground ring. Just drill and tap a small hole in some unobtrusive place in the inside bottom of the hub to connect the button ground wire ?
Read my mind Brudda! First thing in the morning I'm gonna git my horn a workin! Yeehaw ;-)
If I'm not mistaking, the Momo horn button groups itself tithe wheel. Just look at the terminals and you'll see that one of them is made to touch the wheel body. Leave that one unconnected.
Not the one I have. See previous picture. Easy enough to ground though.
Just installed a Momo hub today on my car. For the ground wire I stripped about an inch of shielding. I then put the hub on and saw there was space where the splines are on the hub between it and the column shaft below where the washer sits for bolting the hub down. I gently seated some of the stripped wire into that space to kind of secure it before putting the washer on the shaft. Held it in place, put the washer and nut on, and torqued it down nicely. You will still need the contact ring piece with the turn signal cancel tab to supply power through the hub to the switch. Hope this helps for you figuring out the grounding part of it....
"Power"? There's NO power to the horn button/switch. It's a ground circuit. Power there will let the smoke out and you'll be screwed.
The Cap'n
The Cap'n
Now that I think about it the Cap'n is correct. Factory horn contact ring has a brown(ground) wire on it. But you can use my install for a guide to complete the ground circuit if that works out for you.
Welp got the horn hub ring installed, grounded and the button on. Did a circuit test and all good.
I had to pull the switches cause I fubared yesterday and broke a contact off the wiper switch. Soldiered it back to it's contact point then realized one of the plastic wire dividers was hinky (cracked), so decided to repair with a touch of epoxy. Won't be able to re-install the switches until tomorrow :-(
But then I can zip this up and hopefully locate the infamous black/yellow and ground wire to hook to the 928 horn I installed.
Then can I go get it inspected?
Doubtful, I'm sure I'll find something else (sigh).
Oh, btw-I'm exceptionally color blind so I think I'll take a few pictures later and post em up in the hopes ya'll can help me identify the black yellow. I found one that I think is it, but it looks more black/orange to my eye
Thanks everyone for helping me get this figured out.
As an aside and while I have the switches out of the steering colum, I'd heard you can break the tab on the wiper switch and wire in a relay to gain a 3rd switch position for intermittent wipers.
Truth?
Truth?
I guess you know there is a color id APP for Iphone. Point the camera at an object and it speaks the color. Doubt it would work on a small wire???
QUOTE(bulitt @ Aug 13 2013, 07:32 PM)
I guess you know there is a color id APP for Iphone. Point the camera at an object and it speaks the color. Doubt it would work on a small wire???
Lol! Dood like most things around here, my phone belongs in the Smithsonian. It wouldn't know an ap from a hole in the ground (chuckle), but thanks for the thought. I'll post some pix once my camera's battery has a charge on it :-)
QUOTE(HalfMoon @ Aug 13 2013, 07:44 PM)
QUOTE(bulitt @ Aug 13 2013, 07:32 PM)
I guess you know there is a color id APP for Iphone. Point the camera at an object and it speaks the color. Doubt it would work on a small wire???
Lol! Dood like most things around here, my phone belongs in the Smithsonian. It wouldn't know an ap from a hole in the ground (chuckle), but thanks for the thought. I'll post some pix once my camera's battery has a charge on it :-)
I took a picture of the wires coming out of the firewall and I think the wire I have tageed "F" is the balck/yellow wire that would go to the positive spade of the horn. I'm quite color blind so if anyone could verify that I'd appreciate it. Also, of the tagged wires, does anyone see a brown wire? That'd be the wire that hooks up to the ground spade of the horn.
Thanks all
Image below. Crap, the tag letters are kinda small. Hope you can read em? A, B, C, D, E, F six wires.
Click to view attachment
Click to view attachment
Looks like black yellow but the picture is very blurry. Try a macro setting on your camera.
I agree, looks like F.
D&E are both brown but they do not connect to the horn. Most likely they go to the brake master cylinder. The horn ground connects to the ground post behind the headlight. The ground wire should be loose around the drivers headlight somewhere.
QUOTE(kg6dxn @ Aug 13 2013, 09:54 PM)
Looks like black yellow but the picture is very blurry. Try a macro setting on your camera.
Better shot. What think we now?
Also, any of these look like the brown wire that would be ground?
Click to view attachment
QUOTE(kg6dxn @ Aug 13 2013, 10:58 PM)
D&E are both brown but they do not connect to the horn. Most likely they go to the brake master cylinder. The horn ground connects to the ground post behind the headlight. The ground wire should be loose around the drivers headlight somewhere.
Well I know where it's supposed to co9nnect to the common ground behind the drivers side headlight.
The image I just uploaded doesn't show it, but my thumb is where a PO cut the harness. Just loose wires coming off the main harness from the firewall.
I was hoping to avoid opening the harness from the common ground at the drivers headlight :-(
A= delay wiper wire (optional)
B&C= Fog light wire. Maybe, schematic shows only one wire through the firewall.
D&E= look like grounds. If they are solid brown they are grounds. If they have a white or yellow stripe, they are switched grounds.
F= Black/yellow, hot to horn from the relay. Ground for the horn is local at the horn. does not go through the firewall.
I like this schematic better... Take this to a Kinkos and blow it up to 3 or 4 feet wide.
Click to view attachment
Click to view attachment
QUOTE(kg6dxn @ Aug 13 2013, 11:21 PM)
A= delay wiper wire (optional)
B&C= Fog light wire. Maybe, schematic shows only one wire through the firewall.
D&E= look like grounds. If they are solid brown they are grounds. If they have a white or yellow stripe, they are switched grounds.
F= Black/yellow, hot to horn from the relay. Ground for the horn is local at the horn. does not go through the firewall.
Well it's good to know I found the black/yellow! I'll just have to trace the ground back from the common ground at the drivers side headlight. The wiring from the grill (horns, fogs) has been removed

Btw, the wire "A", you say that's the optional delay for the wiper? So since I have the switches out, I could break the tab and use this optional wire to wire in the intermittent relay? Must look at the schematic to see how complicated this would be....
Thanks for the help everyone. Should be able to get horny tomorrow

Happy to say this situation is resolved. Thanks to all that lent a hand :-)
I now have horns!
Which means....finally I can go have my new teener inspected! Woohoo!
Still lots more stuff to go.....
I now have horns!
Which means....finally I can go have my new teener inspected! Woohoo!
Still lots more stuff to go.....
This is a "lo-fi" version of our main content. To view the full version with more information, formatting and images, please click here.