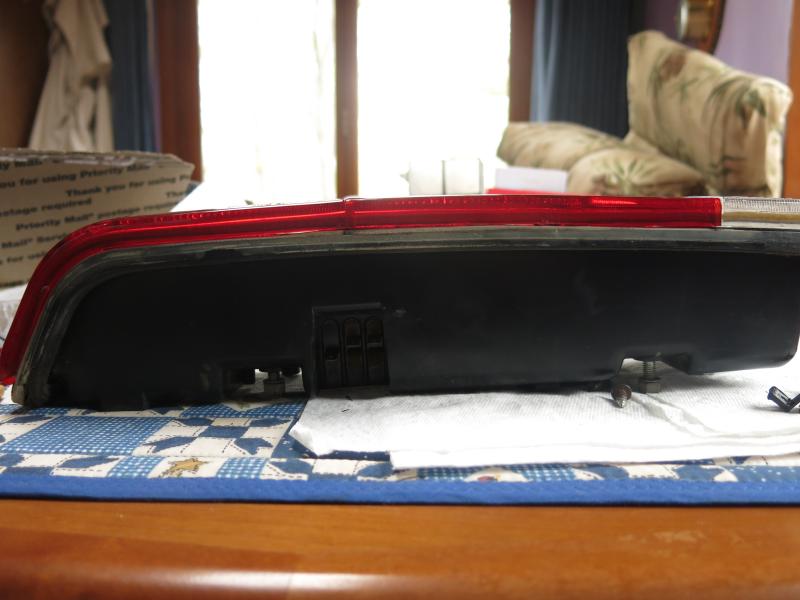
This is a group buy of what I have referred to as the 5mm LED rev 2 Brake/Taillight PCB.
These are hand assembled one by one, tested, and will be delivered as they are produced. I have made a list of folks who have shown interest in purchase from my other thread. That list is in the next post.
No need to re-request purchase if you are on the list. I will PM each member in turn. I will not request payment until your PCBs are to be assembled.
The list is in chronological order and purchase requests will be handled in order. Please be patient. If you requested boards in that thread but are not on the list, please PM me and your name will be inserted appropriately.
If you haven't previously requested a purchase and are not on the list in the next post please respond to this thread.
Many folks are familiar with work done to develop LED brake and turnsignal lights from the LED developmental thread. See the last few pages for current info as I've tried several different configurations before arriving at the 5mm rev 2 PCBs.
LED Taillight Development Thread
This 5mm rev 2 PCB is available in 3 different configurations:
1) Brake Light: RED LEDs: Price: $90/pair
2) Turnsignal: RED LEDs: Price: $90/pair
3) Turnsignal: AMBER LEDs: Price: $90/pair
Shipping:
CONUS: $10
Outside CONUS: Determined at purchase.
Each pair includes:
2 PCBs with 56 rearward facing 5mm LEDs each.
Turnsignal configuration has 8 extra side-facing LEDs to replace the small side running light. Side LEDs will be AMBER color to match your taillight lens.
Brake: Pigtail with 1157 base to plug directly into existing bulb socket.
Turnsignal: Pigtail with 1156 base (turnsignal) and 5007 base (small side light)
6 clips for each pair to mount the boards to existing taillight housing for plug-n-play installation.
1 year guarantee
Electrical Characteristics:
Brake/Turnsignal: 0.35A @ 14V (4.9Watt) each PCB
Taillight: 0.06A @ 14V (0.8Watt) each PCB
Brake Configuration:
Click to view attachment
RED Turnsignal Configuration:
Click to view attachment
Actual Boards and clips:
Click to view attachment
Full Version: LED Brake/Taillight Group Buy
This is the list of folks who have requested purchase or shown interest. As best I could determine, this list is in chronological order. If I missed you please PM me.
Starting at the top, I will PM each of you as assembled PCBs are available. Please be patient.

Cairo94507
gothspeed
d914
Chris H.
no1uno
Monkeyboy
ruby914
zymurgist
Speeedmster
charliew
Harpo
cconcepcion
Type 47
mrbubblehead
PThompson509
StratPlayer
montoya 73 2.0
mrholland2
synackack
Speedmster
McMark
effutuo101
Jeffs9146
cary
kansas 914
Tomeric914
Zimms
Chads74
FlatIV
Rleog
mikesmith
aharder
SirAndy
ClayPerrine
914coop
sportlicherFahrer
dw914six
smj
barebrad
shawn914
kid914
r_towle
JmuRiz
SJM
Zimms
clapeza
rnellums
JRust
porsche_dreamer
Dec
Starting at the top, I will PM each of you as assembled PCBs are available. Please be patient.
Cairo94507
gothspeed
d914
Chris H.
no1uno
Monkeyboy
ruby914
zymurgist
Speeedmster
charliew
Harpo
cconcepcion
Type 47
mrbubblehead
PThompson509
StratPlayer
montoya 73 2.0
mrholland2
synackack
Speedmster
McMark
effutuo101
Jeffs9146
cary
kansas 914
Tomeric914
Zimms
Chads74
FlatIV
Rleog
mikesmith
aharder
SirAndy
ClayPerrine
914coop
sportlicherFahrer
dw914six
smj
barebrad
shawn914
kid914
r_towle
JmuRiz
SJM
Zimms
clapeza
rnellums
JRust
porsche_dreamer
Dec
You can add me to the list for a set of the red brakes and a set of the amber turns
Thanks for doing these,
Jim
Thanks for doing these,
Jim
I'm in for a set of brakes and red turn signals please. Awesome work Spoke! you got a nice list going there
Add me for a set of the brake lights and the amber turns too.
Thanks
John
Thanks
John
I want my oompa loompa NOWWWWW
or at least at Hershey
I can wait....no big deal, car wont be on the road for a while.
rich
or at least at Hershey
I can wait....no big deal, car wont be on the road for a while.
rich
Those are awesome! Please add me to the list for a set of brakes and red blinkers. Thanks!
Can't wait for the PM. I am excited to get these on the car
if I could get in on this, pair of brake lights and pair of amber turn indicators would be awesome.
thanks
scott
thanks
scott
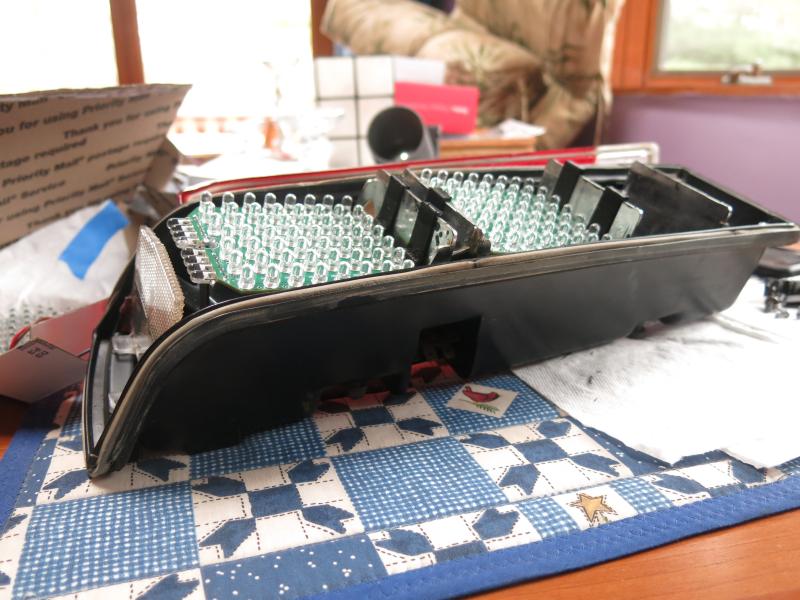
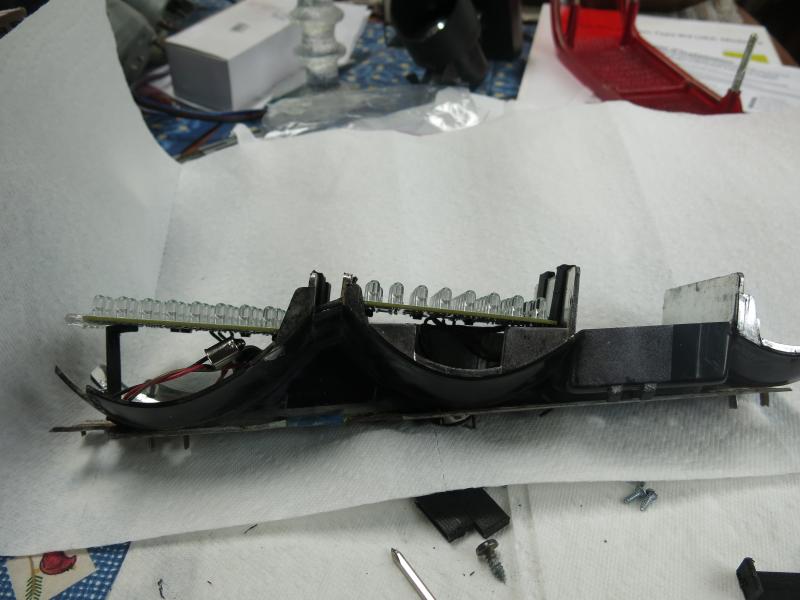
One set of Brake Lights and clips.
Click to view attachment
One set of Turnsignal Lights and clips. Note 2 bulb bases. The large one replaces the turnsignal light and the small one replaces the side light.
Click to view attachment
Click to view attachment
One set of Turnsignal Lights and clips. Note 2 bulb bases. The large one replaces the turnsignal light and the small one replaces the side light.
Click to view attachment
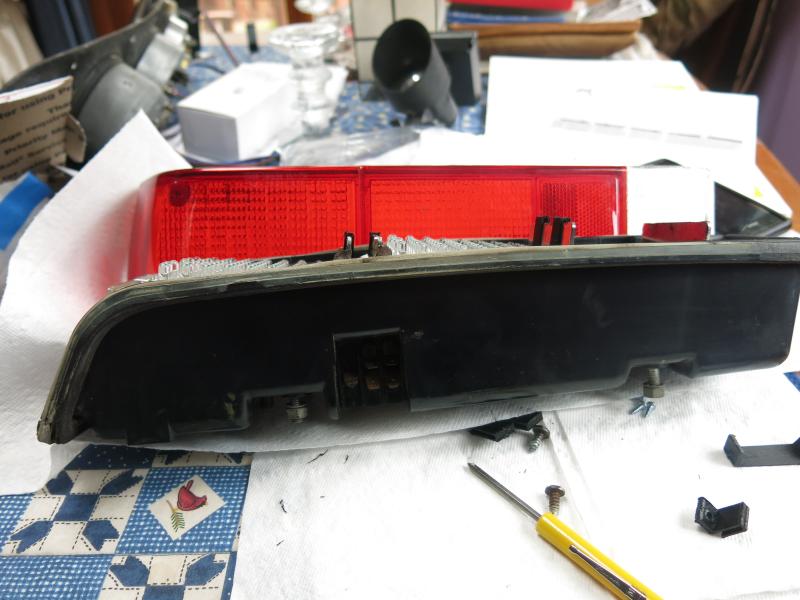
Installation of the brake light.
Remove the bulb and place the bulb base in the socket. Use the base of your finger to insert the bulb base.
Click to view attachment
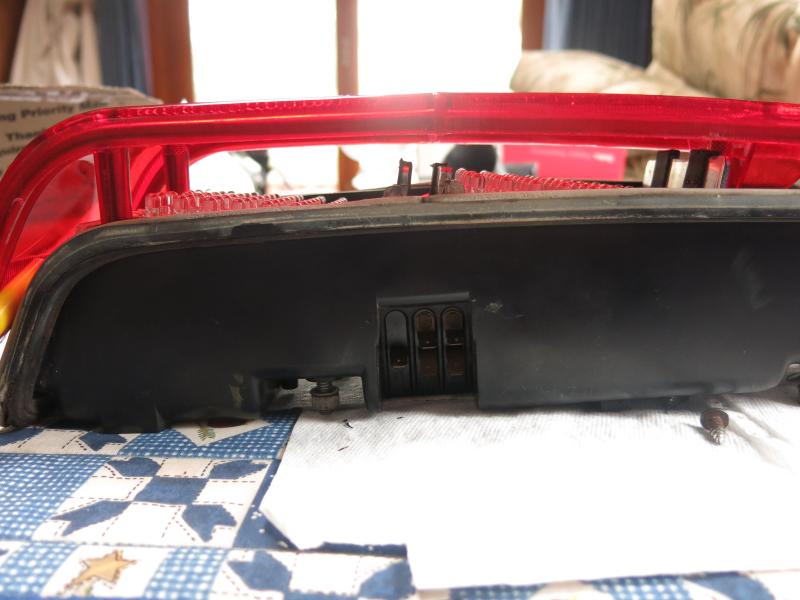
Bulb base connected.
Click to view attachment
Coil the excess wire under the board. Make sure the wire doesn't hang out beside the board.
Install the clips on the board; 2 longer clips go toward the inside of the vehicle. Single small clip towards the outside of the vehicle.
Click to view attachment
Gently start all three clips. Use a small screwdriver to open the clips if they won't fit over the divider. The clips are brass and very malleable. Go easy on the clips. If they open up too much and are loose, they can be tightened up with needle nose pliers. Again, be gentle with the brass clips. They have enough spring to hold the boards in place.
Click to view attachment
Using a screwdriver to open the clips for insertion.
Click to view attachment
Work all the clips in at the same time.
Done.
Click to view attachment
Remove the bulb and place the bulb base in the socket. Use the base of your finger to insert the bulb base.
Click to view attachment
Bulb base connected.
Click to view attachment
Coil the excess wire under the board. Make sure the wire doesn't hang out beside the board.
Install the clips on the board; 2 longer clips go toward the inside of the vehicle. Single small clip towards the outside of the vehicle.
Click to view attachment
Gently start all three clips. Use a small screwdriver to open the clips if they won't fit over the divider. The clips are brass and very malleable. Go easy on the clips. If they open up too much and are loose, they can be tightened up with needle nose pliers. Again, be gentle with the brass clips. They have enough spring to hold the boards in place.
Click to view attachment
Using a screwdriver to open the clips for insertion.
Click to view attachment
Work all the clips in at the same time.
Done.
Click to view attachment
Installation of the Turnsignal lights.
Remove both bulbs and insert the bulb bases into the sockets.
Click to view attachment
The outside clip is a bit tricky. It will be inserted to the electrical connector for the small bulb. It may be easier to start with this clip. It will only insert about 3/16 inch or so into the connector but should have a good bit of friction. You may need to support the metal rail with one hand when inserting the clip. Hold the clip on the flat sides. The edges are sharp so don't grasp them by the edges.
Click to view attachment
Angle the board down into the base of the reflector and insert the clip into the single board hole. Again be gentle with the clips. They won't break but may bend.
Click to view attachment
Outside clip inserted into board.
Click to view attachment
Insert the two clips on the other end of the board. Do not install on the divider yet. The outside clip needs to be bent into shape.
Click to view attachment
It is important that the board rest upon the divider so the outside clip needs to be bent into place. Gently bend the clip until the board rests upon the divider between the turnsignal and brake lights. The board needs to be close to this divider since the outside of the board barely clears the mounting studs of the lens.
Click to view attachment
Insert the inside clips onto the divider and fully seat the clips. The boards needed to be filed a bit on the edges to clear the reflector dividers. If yours doesn't fit, it may need a bit more filing. Each board will be filed before shipping.
Click to view attachment
The outside clip may open up a bit at the board so a little pressure with a screwdriver will tighten up the clip if loose.
Click to view attachment
Here's how the boards look when installed. The outside edges of the boards stick out a bit from the housing but fit under the lens. This angle is needed so the LEDs point directly to the rear of the car.
Click to view attachment
Click to view attachment
When installing the lens, start with the outside posts. The side LEDs are very close to the posts and every bit of clearance when installing the lens is needed. If the board isn't centered well enough the outside side LED may be bent. It can be easily straightened if it bends.
Click to view attachment
And done. If you have good dexterity, this job can be done with the housing on the car. Just take your time and get into a comfortable position when performing the installation.
Click to view attachment
Should be no questions about this installation. Nicely illustrated.
Well done!
Fantastic! I'll pay you today.
EDIT: All paid up! Thanks again Spoke.
EDIT: All paid up! Thanks again Spoke.
add me for one set of brake and red turn signal.
thx
thx
Please add me for a set of brake light and turn signals with RED LEDs. Thanks for doing these - great safety upgrade.
-Scott
-Scott
Please put me down for red brake lights. 
I would like a set of brake lights and a set of amber turn signals please, excellent installation instructions 
Please put me in for brake lights and amber turn signals -- great job developing -- very innovative --jim dorociak
I will get a set of the brake and red turn signals also.
thanks for doing this for the community!
Pete
thanks for doing this for the community!
Pete
A pair of brake and a pair of red turn signals please.
Thanks much.
Thanks much.
Guys thanks for all the support.
I will contact you for payment when your boards are being built. To speed things up I have a buddy at work who will build boards too.
Some comparisons with standard bulbs in daylight at about 25 feet away. Turnsignals:
https://www.youtube.com/watch?v=w7A5dOW1Fjs
Brakes in daylight. Brake lights were connected to flasher wire since my wife said sitting in the car hitting the brakes while I shoot the video was "stupid".
https://www.youtube.com/watch?v=1UFYirXKzI4
Turnsignals and Brakes in the dark:
https://www.youtube.com/watch?v=zBjzT9Fye3o
Well done Spoke! Can't wait! 
These LED tail lights are awesome. Do you have plans to do anything with the reverse lights? Mine work but put out so little light they are not helpful other than letting people behind me know that I'm backing up.
Experimenting with plastic clips. My colleague is printing these on his 3D printer.
Also will add some heat shrink tubing to the turnsignal end clip so no one cuts themselves on it.
Click to view attachment
Click to view attachment
Also will add some heat shrink tubing to the turnsignal end clip so no one cuts themselves on it.
Click to view attachment
Click to view attachment
QUOTE(lonewolfe @ Apr 6 2014, 10:13 PM) 
These LED tail lights are awesome. Do you have plans to do anything with the reverse lights? Mine work but put out so little light they are not helpful other than letting people behind me know that I'm backing up.
Someone else asked about the reverse lights. I could do it if there's enough demand. Would have to figure out some attachment method since there's no divider on the one side of the reverse light.
QUOTE(Spoke @ Apr 7 2014, 06:00 PM)
QUOTE(lonewolfe @ Apr 6 2014, 10:13 PM)
These LED tail lights are awesome. Do you have plans to do anything with the reverse lights? Mine work but put out so little light they are not helpful other than letting people behind me know that I'm backing up.
Someone else asked about the reverse lights. I could do it if there's enough demand. Would have to figure out some attachment method since there's no divider on the one side of the reverse light.
Since the reverse lights are simple, I just figured a set of Cree replacement bulbs are fine there. They aren't nearly as important as the taillights. Probably going to do the same with the side warts.
QUOTE(monkeyboy @ Apr 7 2014, 10:25 PM)
QUOTE(Spoke @ Apr 7 2014, 06:00 PM)
QUOTE(lonewolfe @ Apr 6 2014, 10:13 PM)
These LED tail lights are awesome. Do you have plans to do anything with the reverse lights? Mine work but put out so little light they are not helpful other than letting people behind me know that I'm backing up.
Someone else asked about the reverse lights. I could do it if there's enough demand. Would have to figure out some attachment method since there's no divider on the one side of the reverse light.
Since the reverse lights are simple, I just figured a set of Cree replacement bulbs are fine there. They aren't nearly as important as the taillights. Probably going to do the same with the side warts.
What are Cree's? Is that a brand? I've not heard of them.
Yes. They are one of the brands that just aren't putting out crap LED replacements.
Can't say I have used these, but these guys use Cree...
http://www.carhidkits.com/1156-7506-cree-r...2-pack-474.html
Can't say I have used these, but these guys use Cree...
http://www.carhidkits.com/1156-7506-cree-r...2-pack-474.html
Please add me to the list.
Red Brake lights - go course
Amber Turns
Soke, thank you for building these.
Red Brake lights - go course
Amber Turns
Soke, thank you for building these.
I'd like to be added to the list for the red brake lights & amber turn signals.
Thanks,
Mark
Thanks,
Mark
I just say this thread and WANT IN. Can I still get in?
Zach
Zach
QUOTE(Vacca Rabite @ Apr 20 2014, 09:55 PM)
I just say this thread and WANT IN. Can I still get in?
Zach
Zach, for you, yes we will let you in. Just when is it you will have your car on the road?
We're switching the clips from the brass clips to plastic clips. These work well as they do not scratch the housing and hold the boards very securely. It is likely these will change as we figure out better ways to hold the boards.
Screws are 4x3/8. For the brake lights, the short clip screws to the single hole side and long clips to the 2 hole side. These clips will strip easy so tighten very very lightly and make sure the clips are close to the board as the clips and board are a very tight fit in the housing.
Click to view attachment
Click to view attachment
When putting the brake board in, start the all three clips then push in all together. The screws may need just a little twist. Go easy as these strip easily. Ok if they do strip a bit as there is a lot of friction holding the board in.
Click to view attachment
Click to view attachment
For the turnsignal boards, 2 long clips are used on the 2 hole side and one very long clip on the single hole side. Again tighten the screws very lightly.
Click to view attachment
Click to view attachment
The 2 long clips go on the inside of the housing and the longer clip attaches to the bulb reflector.
Click to view attachment
With both boards in place, there is very little play between the brake and turnsignal clips and the lens where the parts of the lens are glued together. Care must be taken to make sure the lens fits between the clips. If you have trouble with this, give me a shout and we'll work it out.
Click to view attachment
Click to view attachment
Click to view attachment
The 2 long clips go on the inside of the housing and the longer clip attaches to the bulb reflector.
Click to view attachment
With both boards in place, there is very little play between the brake and turnsignal clips and the lens where the parts of the lens are glued together. Care must be taken to make sure the lens fits between the clips. If you have trouble with this, give me a shout and we'll work it out.
Click to view attachment
Is it to late to get added to the list?
If not I will take the red stop and amber turn signals
Thanks!!!
If not I will take the red stop and amber turn signals
Thanks!!!
I'm in also. Love the new clips and the side signal LED's. Fantastic product.
If this group buy is still being offered I'd like to be put down for a set of red tail lights / amber turn signals. If the group buy has ended, I'd still like a set of red tail lights / amber turn signals.
Any way of having black colored clips printed instead of blue? I have clear tail lights, and I believe the blue would stand out more than necessary..
Any way of having black colored clips printed instead of blue? I have clear tail lights, and I believe the blue would stand out more than necessary..
Very cool, I'm in for red brakes and turns...but I'll wait until the front sets are ready (to save on shipping )
)
Spoke can you add me for a set of the red turn signals to go with the brake lights?
Thanks
Thanks
QUOTE(Spoke @ Apr 20 2014, 09:56 PM)
QUOTE(Vacca Rabite @ Apr 20 2014, 09:55 PM)
I just say this thread and WANT IN. Can I still get in?
Zach
Zach, for you, yes we will let you in. Just when is it you will have your car on the road?
Sweet. Let me know where to send money.
The car will be on the road "one day."
That day is nearer then it was last week. I want to drive it this spring and summer and fall, and then tear it apart again for the next batch of changes...
Very nice, I'd like to get in on the compleat package with red turn signals and backup if possible.
Updated the clips again. The inside turnsignal clips were modified with a slight bend to better fit the contour of the reflector housing. The small clips for the brakes were also changed a bit. The perch of clips were angled an additional 3.5 degrees to better match the board angle.
Also the clips are now in black because black looks cool.
Click to view attachment
The boards were updated to fix a few issues with the rev 2 boards. First the rev 2 boards were a bit too long given the thickness of the plastic clips. So the rev 3 boards are now 35mil (0.9mm) shorter.
Also the side facing LEDs on rev 2 interfered with the lens posts. On rev 3 the LEDs are pushed side by side to clear the lens posts.
Click to view attachment
Can I get a new set of clips? Those look a lot better than my brass ones.
Great work!
Great work!
QUOTE(CptTripps @ May 7 2014, 11:05 PM)
Can I get a new set of clips? Those look a lot better than my brass ones.
Great work!
Sure thing Doug. I'll try to get them out to you next week.
If anyone who has brass clips and wants the latest plastic clips, just give me a shout and I'll send them to you.
If the group buy is still open, I'm in for a pair of brakes and red turns. Thanks,
-Dave
-Dave
I watched the development of these boards and was impressed with the attention paid to details involved in getting them to work, then in getting them to fit correctly within the taillight assembly. My boards arrived a couple of days ago so I tried a test fit on my boards with plastic clips.
The 3D printed plastic clips allow the boards to settle deeply enough to clear the lens.
While I did not deal with the metal clips, I can add that I had very little difficulty adjusting the plastic clips to get a correct fit.
Nicely done, Spoke! Your time and attention to detail is greatly appreciated.


The 3D printed plastic clips allow the boards to settle deeply enough to clear the lens.

While I did not deal with the metal clips, I can add that I had very little difficulty adjusting the plastic clips to get a correct fit.


Nicely done, Spoke! Your time and attention to detail is greatly appreciated.
I received mine in the mail yesterday, I was so excited I couldn't wait to get them in the car. Turned out to be one of the easiest things I have fiber on the car for a long time. Thanks for making a great product for us.
Click to view attachment
Click to view attachment
Bumping this back up to the top. Just installed mine tonight and am ecstatic about them. If you haven't already, BUY SOME NOW. These are incredibly well built, install easily, are a perfect fit and work as advertised! AWESOME job Spoke!

This is a "lo-fi" version of our main content. To view the full version with more information, formatting and images, please click here.