Obviously at this point I just need to leave my engine work to the pro's however I simply enjoy working on the engine.
I rebuilt my /6 engine as a 9.5:1 compression 2.7l. When I first put the engine in the car and tried to start it a few months back, I had found that my kids managed to get a 13mm into the #5 cylinder which damaged the head. I had the head repaired and put everything back together and started the engine. It starts ok however there is a very loud noise which is obvious in the video.
Background- I put oil fed tensioners in as part of the upgrade. I did not prime them with oil on installation. When I had my issue with a mug in cyl #5, I did not replace the piston cause there was minimal visible damage. There was no apparent damage to the cylinder jug. I did not check the con rod cause I didn't remove the cylinder and piston when I was fixing this issue.
Any ideas of what could be the issue? To me, it sounds like the chain is rubbing on the case or something like that. It is so loud though that I cannot really tell where it is coming from other than the drivers side of the engine. My big concern is- did I damage my con rod when I had my 13mm in cyl 5 issue. I did the test where you pull the spark plug wire on the cylinder that has the con rod issue and there was no difference in the sound.
http://youtu.be/X7Y2XqGN3Fc
Full Version: /6 loud noise after rebuild
Hard to tell because it doesn't run long enough, but first guess is the tensioners are slack.
I suspected the tensioners also. It does sound like it's coming from the front of the engine so that would make sense. How can I check to see if it actually is the tensioners.
That's the timing chains slapping around and most likely hitting the cam housings inside. Did you upgrade the idlers to the late style or use the spacers if old style?
All the chain ramps in the right place and facing the right way?
Did you prime the tensioners prior to installing them?
Where the chains tight when you put it together ?
Worn chains ?
Put the plug back in and keep it running for a little longer then take another video.
I bet it's all in the timing chains.
QUOTE(Luke M @ Jul 10 2015, 05:09 PM) 
That's the timing chains slapping around and most likely hitting the cam housings inside. Did you upgrade the idlers to the late style or use the spacers if old style?
All the chain ramps in the right place and facing the right way?
Did you prime the tensioners prior to installing them?
Where the chains tight when you put it together ?
Worn chains ?
Put the plug back in and keep it running for a little longer then take another video.
I bet it's all in the timing chains.
I used old style idlers and I did use spacers. The ramps are going the right direction. I DID NOT PRIME THE TENSIONERS prior to installation. This is my first /6 rebuild so I am not sure about the tightness of the chains. They seemed tight but could have been much tighter. How do I know if the chains were worn? I didn't see visible wear on them.
QUOTE(tornik550 @ Jul 10 2015, 02:56 PM)
QUOTE(Luke M @ Jul 10 2015, 05:09 PM)
That's the timing chains slapping around and most likely hitting the cam housings inside. Did you upgrade the idlers to the late style or use the spacers if old style?
All the chain ramps in the right place and facing the right way?
Did you prime the tensioners prior to installing them?
Where the chains tight when you put it together ?
Worn chains ?
Put the plug back in and keep it running for a little longer then take another video.
I bet it's all in the timing chains.
I used old style idlers and I did use spacers. The ramps are going the right direction. I DID NOT PRIME THE TENSIONERS prior to installation. This is my first /6 rebuild so I am not sure about the tightness of the chains. They seemed tight but could have been much tighter. How do I know if the chains were worn? I didn't see visible wear on them.
You need to prime the tensioners to get any air out of them. Best way to do this is submerge them in a clean bucket with new oil and push the piston in and release a few times. keep doing this until there's no more bubbles coming from the feed port. The chain are hard to tell if they are worn out just by looking at them. The best way to tell is by watching to see how far up/out the tensioner piston goes. If there's a lot of the piston showing then more then likely the chains are streached too much. The tensioners may reach their extend limit and you will still have chain slack. I always replace the chains in a rebuild . They aren't that much and a real pain if you have to later deal with it. If you do have worn chains you could get the master link type but I do not like using them. Take the chain covers off and look at thinks closely. Take pics too and post them. You maybe able to see where the chains are hitting as well. I wouldn't run the engine too long if the chain are rubbing against the housings. You will have metal shavings in your oil too.
The other thing I forgot to mention in crack the feed line to the tensioner ports and turn the engine over (do not start it so disable ignition) make sure you have pressure/oil coming out.
QUOTE(Luke M @ Jul 10 2015, 06:46 PM)
QUOTE(tornik550 @ Jul 10 2015, 02:56 PM)
QUOTE(Luke M @ Jul 10 2015, 05:09 PM)
That's the timing chains slapping around and most likely hitting the cam housings inside. Did you upgrade the idlers to the late style or use the spacers if old style?
All the chain ramps in the right place and facing the right way?
Did you prime the tensioners prior to installing them?
Where the chains tight when you put it together ?
Worn chains ?
Put the plug back in and keep it running for a little longer then take another video.
I bet it's all in the timing chains.
I used old style idlers and I did use spacers. The ramps are going the right direction. I DID NOT PRIME THE TENSIONERS prior to installation. This is my first /6 rebuild so I am not sure about the tightness of the chains. They seemed tight but could have been much tighter. How do I know if the chains were worn? I didn't see visible wear on them.
You need to prime the tensioners to get any air out of them. Best way to do this is submerge them in a clean bucket with new oil and push the piston in and release a few times. keep doing this until there's no more bubbles coming from the feed port. The chain are hard to tell if they are worn out just by looking at them. The best way to tell is by watching to see how far up/out the tensioner piston goes. If there's a lot of the piston showing then more then likely the chains are streached too much. The tensioners may reach their extend limit and you will still have chain slack. I always replace the chains in a rebuild . They aren't that much and a real pain if you have to later deal with it. If you do have worn chains you could get the master link type but I do not like using them. Take the chain covers off and look at thinks closely. Take pics too and post them. You maybe able to see where the chains are hitting as well. I wouldn't run the engine too long if the chain are rubbing against the housings. You will have metal shavings in your oil too.
The other thing I forgot to mention in crack the feed line to the tensioner ports and turn the engine over (do not start it so disable ignition) make sure you have pressure/oil coming out.
Is it difficult to remove the chain housing covers with the engine in the car? Seems easy?
QUOTE(tornik550 @ Jul 10 2015, 04:03 PM)
QUOTE(Luke M @ Jul 10 2015, 06:46 PM)
QUOTE(tornik550 @ Jul 10 2015, 02:56 PM)
QUOTE(Luke M @ Jul 10 2015, 05:09 PM)
That's the timing chains slapping around and most likely hitting the cam housings inside. Did you upgrade the idlers to the late style or use the spacers if old style?
All the chain ramps in the right place and facing the right way?
Did you prime the tensioners prior to installing them?
Where the chains tight when you put it together ?
Worn chains ?
Put the plug back in and keep it running for a little longer then take another video.
I bet it's all in the timing chains.
I used old style idlers and I did use spacers. The ramps are going the right direction. I DID NOT PRIME THE TENSIONERS prior to installation. This is my first /6 rebuild so I am not sure about the tightness of the chains. They seemed tight but could have been much tighter. How do I know if the chains were worn? I didn't see visible wear on them.
You need to prime the tensioners to get any air out of them. Best way to do this is submerge them in a clean bucket with new oil and push the piston in and release a few times. keep doing this until there's no more bubbles coming from the feed port. The chain are hard to tell if they are worn out just by looking at them. The best way to tell is by watching to see how far up/out the tensioner piston goes. If there's a lot of the piston showing then more then likely the chains are streached too much. The tensioners may reach their extend limit and you will still have chain slack. I always replace the chains in a rebuild . They aren't that much and a real pain if you have to later deal with it. If you do have worn chains you could get the master link type but I do not like using them. Take the chain covers off and look at thinks closely. Take pics too and post them. You maybe able to see where the chains are hitting as well. I wouldn't run the engine too long if the chain are rubbing against the housings. You will have metal shavings in your oil too.
The other thing I forgot to mention in crack the feed line to the tensioner ports and turn the engine over (do not start it so disable ignition) make sure you have pressure/oil coming out.
Is it difficult to remove the chain housing covers with the engine in the car? Seems easy?
Easily done in the car. Remove the front engine tin, tensioner hard lines, all the nuts/bolts to the covers, and remove. When you go to install the covers you will need new gaskets, maybe new tensioner inlet port o-ring & crush washers. Take a real good look at the travel of the tensioner pistons. See how far out they are compared to how far they are when removed. That should give you an idea how much the chains have stretched. Whatever you do try to keep the chains from jumping time. Mark everything before you remove the tensioners. If all possible keep some tension on the chain idler arms.
recheck your valve lash first
QUOTE(sixnotfour @ Jul 10 2015, 05:52 PM)
recheck your valve lash first
I maybe hearing things wrong but I heard a different pitch sound which led me to the chains. To me when the engine shuts down sounds like chains slapping. The rockers/valve lash needs to be adjusted that I heard. Did you Install that plug/wire and run it again?
Did you check the alignment of the cam sprockets before assembly? If spacing isn't correct I think the chain can rub on case
Just popped off the valve covers. Looks like the exhaust valve adjuster on cyl 4 backed out. Not sure how that happened but at least that's an easy fix.
QUOTE(tornik550 @ Jul 10 2015, 08:54 PM)
Just popped off the valve covers. Looks like the exhaust valve adjuster on cyl 4 backed out. Not sure how that happened but at least that's an easy fix.
How's it sound now with the rockers adjusted ?
Can you hear any chain slap?
QUOTE(Luke M @ Jul 11 2015, 08:22 AM)
QUOTE(tornik550 @ Jul 10 2015, 08:54 PM)
Just popped off the valve covers. Looks like the exhaust valve adjuster on cyl 4 backed out. Not sure how that happened but at least that's an easy fix.
How's it sound now with the rockers adjusted ?
Can you hear any chain slap?
I haven't had a chance to get everything adjusted yet. I'll post an update when I do.
There is also a mod to make your hydraulic tensioners fail proof .
Look at post #43 here:
http://forums.pelicanparts.com/porsche-911...r-update-3.html
Look at post #43 here:
http://forums.pelicanparts.com/porsche-911...r-update-3.html
Install the little collars on the tensioners so if they ever did fail (hydraulically), they still keep adequate tension on the chains.
I corrected the valve lash, bolted everything then started it. Still mad the same noise. I then took off the drivers side tensioner hoisin cover (I could hear the sound was coming from that side). The chain was very tense (no slack) so I would doubt that it was an issue with the tensioners not being primed. I did not see any metal shavings and couldn't find any rub marks.
One thing that I did find was that the chain was touching the chain guide. I thought there should be at least a little space between the chain and guide. I would assume that could make the noise. Is it normal that the chain rests on the guide? I would have to reference a book and check tomorrow to see if I have the chain guide installed in the right direct- if the guide was in backwards could that cause the noise?
One thing that I did find was that the chain was touching the chain guide. I thought there should be at least a little space between the chain and guide. I would assume that could make the noise. Is it normal that the chain rests on the guide? I would have to reference a book and check tomorrow to see if I have the chain guide installed in the right direct- if the guide was in backwards could that cause the noise?
QUOTE(euro911 @ Jul 11 2015, 01:44 PM)
Install the little collars on the tensioners so if they ever did fail (hydraulically), they still keep adequate tension on the chains.
He said he has the "oil fed tensioners", I'm assuming Carrera tensioners, so those collars will not work.
The mod link I posted is the only way I know to do the pressure fed style Carrera tentioners.
QUOTE(tornik550 @ Jul 14 2015, 07:59 PM)
I corrected the valve lash, bolted everything then started it. Still mad the same noise. I then took off the drivers side tensioner hoisin cover (I could hear the sound was coming from that side). The chain was very tense (no slack) so I would doubt that it was an issue with the tensioners not being primed. I did not see any metal shavings and couldn't find any rub marks.
One thing that I did find was that the chain was touching the chain guide. I thought there should be at least a little space between the chain and guide. I would assume that could make the noise. Is it normal that the chain rests on the guide? I would have to reference a book and check tomorrow to see if I have the chain guide installed in the right direct- if the guide was in backwards could that cause the noise?
The long side of the rail goes to the gear and make sure you're set square to the chains. Only one bolt has the snap retainer to locate the ramp with.
With a light you can see the nipple from the bolt through the back side of the rail on both bolts. Make sure the ramps are all mounted this way. Google the ramp install direction for pics.
https://books.google.com/books?id=rOKlQ0ZzL...ion&f=false
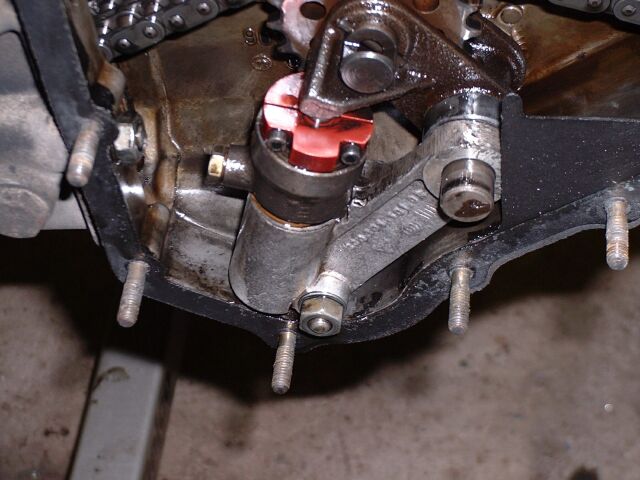
I took a picture just before I put the housing covers on and installed the engine. It looks like the ramp in question is pointing the correct direction. Does everything look right in the picture? The red arrow points to the area where the ramp touches the chain. Could that be causing the noise?
Normal, that's not the cause of the noise.
The ramps are subject to wear and the old ones were known for pitting, but not noise.
The main noise would be from tensioner issues. slack chain. etc.
The ramps are subject to wear and the old ones were known for pitting, but not noise.
The main noise would be from tensioner issues. slack chain. etc.
Could it still be the tensioners even though the chain is very tight currently? I am almost not able to push the chain up or down at all- essentially no slack.
QUOTE(tornik550 @ Jul 15 2015, 01:08 PM)
Could it still be the tensioners even though the chain is very tight currently? I am almost not able to push the chain up or down at all- essentially no slack.
That's about right for tension. What made you sure it was this side? On my
car I can't pinpoint noises that well. Check other side?
I would also take the opportunity to get the idler wheels with the long bushing
and lose the spacer. Some people think that the geometry was part of the
failed tensioner problem.
If it's not valves or tensioners, maybe check if the fan is rubbing.
I went over everything again. I found that I had the two red arrowed ramps switched. They are pointing the right way but they are in the wrong position.
I never noticed that there was a difference in the ramps. Is it nexcesary to change them? Is there really that much of a difference in the ramps? Could that be causing my issue?
I never noticed that there was a difference in the ramps. Is it nexcesary to change them? Is there really that much of a difference in the ramps? Could that be causing my issue?
QUOTE(tornik550 @ Jul 15 2015, 09:24 PM)
I went over everything again. I found that I had the two red arrowed ramps switched. They are pointing the right way but they are in the wrong position.
I never noticed that there was a difference in the ramps. Is it nexcesary to change them? Is there really that much of a difference in the ramps? Could that be causing my issue?
Oh wow really ?

I thought of that and then said nahhh.... can't be....
Yes, it is very important the brown one is thicker IIRC.
You have to switch them to the correct order.
In your pic I couldn't have said that rasmp was brown, looked black to me.
QUOTE(mskala @ Jul 16 2015, 06:54 AM)
In your pic I couldn't have said that rasmp was brown, looked black to me.
That's what I thought....
QUOTE(mskala @ Jul 16 2015, 06:54 AM)
In your pic I couldn't have said that rasmp was brown, looked black to me.
I hate to say it but it looks black just cause of the lighting. I took a different picture. It was hard to get a good picture of all three ramps with the engine in the car. The picture is bad however it shows the three colors (in the wrong positions).
QUOTE(tornik550 @ Jul 15 2015, 06:24 PM)
I went over everything again. I found that I had the two red arrowed ramps switched. They are pointing the right way but they are in the wrong position.
I never noticed that there was a difference in the ramps. Is it nexcesary to change them? Is there really that much of a difference in the ramps? Could that be causing my issue?
It's easy to put the ramps in the wrong location/direction that's why I asked about it.
So did you swap them around and run it ?
Any more noise ?
QUOTE(Luke M @ Jul 18 2015, 09:22 AM)
QUOTE(tornik550 @ Jul 15 2015, 06:24 PM)
I went over everything again. I found that I had the two red arrowed ramps switched. They are pointing the right way but they are in the wrong position.
I never noticed that there was a difference in the ramps. Is it nexcesary to change them? Is there really that much of a difference in the ramps? Could that be causing my issue?
It's easy to put the ramps in the wrong location/direction that's why I asked about it.
So did you swap them around and run it ?
Any more noise ?
When I put the engine together I did not replace the ramps. I thought now was a good time to replace with new ones so I haven't moved them yet. The new ones should arrive one Monday. I'll post a response as soon as I get them in.
go through procedure for TDC, place pin in cam sprocket to keep it from moving.
replace your chain rails and ensure that your spacer is behind the rightside
tensioner, aligning the chains parallel.
~
Pressure fed kit comes with new cover plates, hoses and tensioners.
Just trying to help, Good luck with your problem...
Click to view attachment
replace your chain rails and ensure that your spacer is behind the rightside
tensioner, aligning the chains parallel.
~
Pressure fed kit comes with new cover plates, hoses and tensioners.
Just trying to help, Good luck with your problem...
Click to view attachment
QUOTE(dlestep @ Jul 18 2015, 03:38 PM)
go through procedure for TDC, place pin in cam sprocket to keep it from moving.
replace your chain rails and ensure that your spacer is behind the rightside
tensioner, aligning the chains parallel.
~
Pressure fed kit comes with new cover plates, hoses and tensioners.
Just trying to help, Good luck with your problem...
Click to view attachment
Interesting point. I thoroughly measured for proper alignment when I first installed everything however I had to remove the heads. I assumed that the alignment would be the same and I did not recheck. I used the same so spacers that I used with my first measurement. Is it possible that alignment could be that far off from removing the heads? Since everything is out. I probably need to re measure.
How many miles does the motor have where you thought it was good to reuse the ramps?
QUOTE(396 @ Jul 18 2015, 04:16 PM)
How many miles does the motor have where you thought it was good to reuse the ramps?
I'd prefer not to answer that question
 Just kidding
I do not know how many miles were on the engine. The ramps appeared fairly new and were defiantly not the originals. The engine is practically brand new now which is why I clearly should have replaced the ramps.
now its time to check cam timing..and in relation to #1 maybe 180 out
This is a "lo-fi" version of our main content. To view the full version with more information, formatting and images, please click here.