tat2dphreak
May 5 2005, 09:16 PM
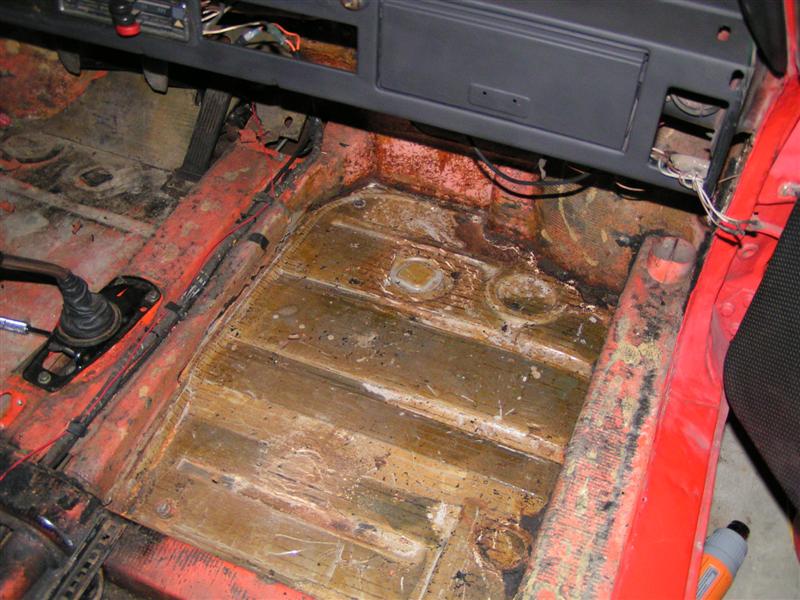
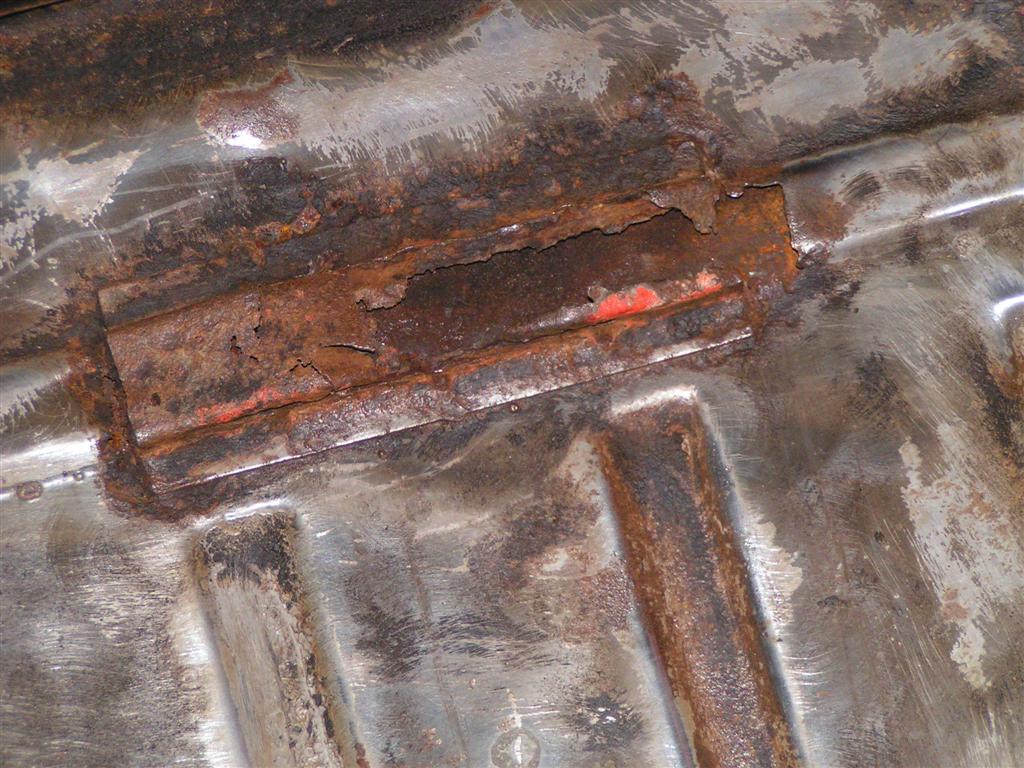
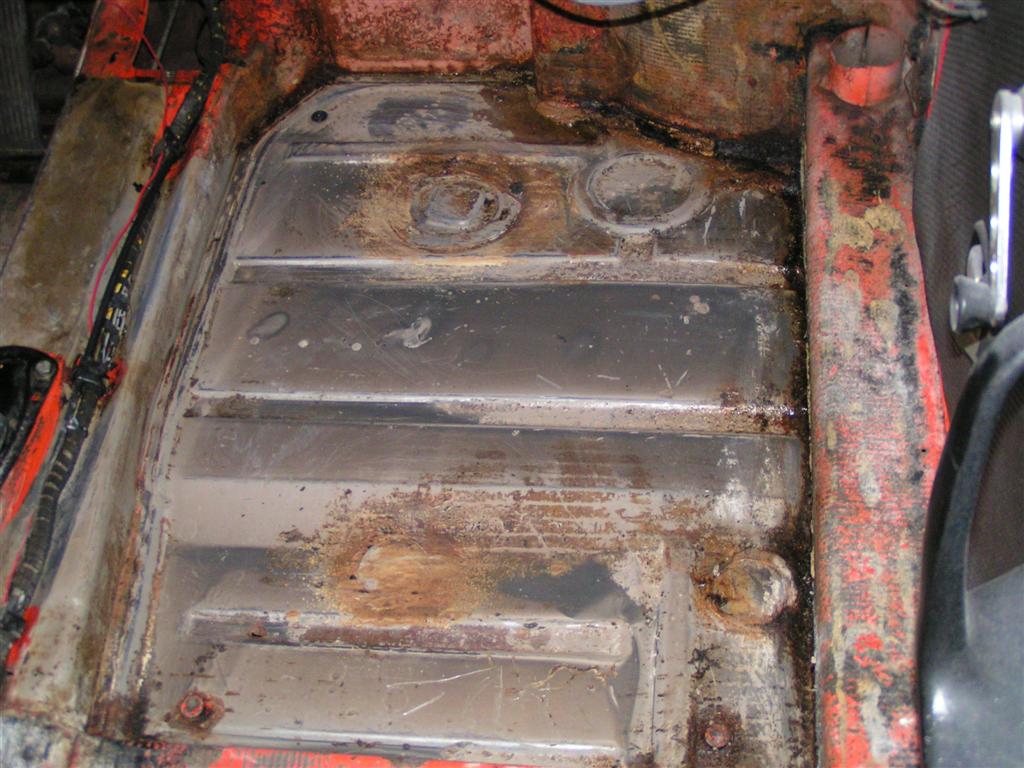
ok, I did the passenger side floor pan today after I got off work, before sundown(need more lights in the garage), removed all the tar(about 2 1/2 hours, a heat gun and a putty knife)
there is some funky "glue" looking stuff under the tar paper... what gets this off? aircraft paint stripper did nothing to it...
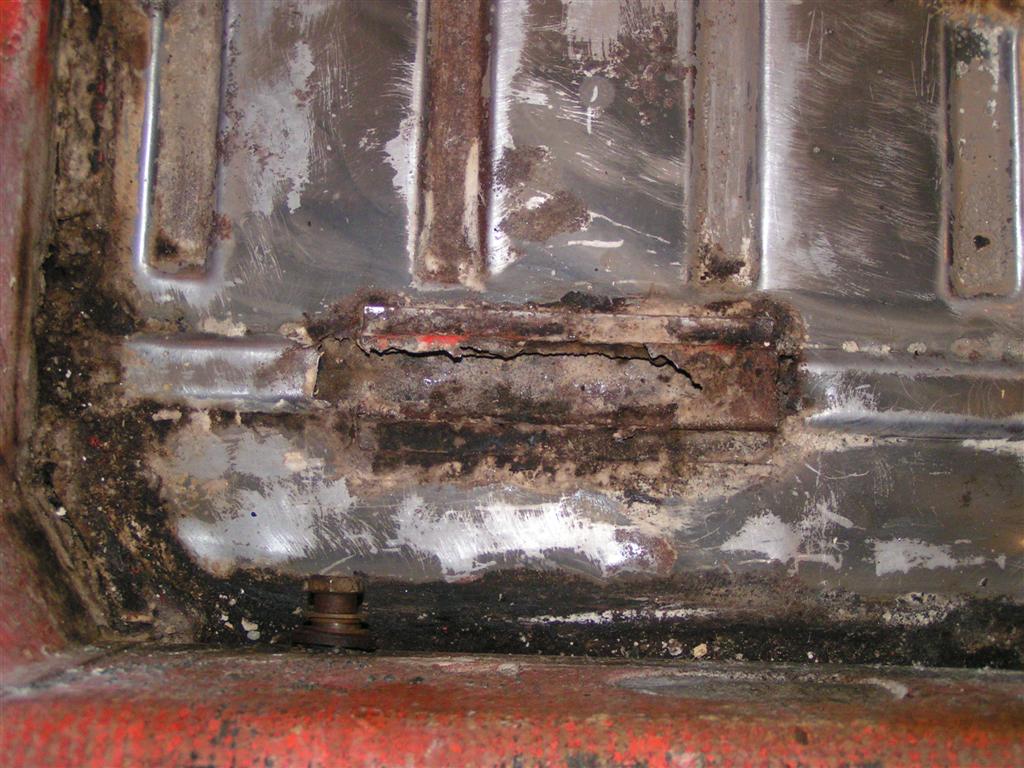
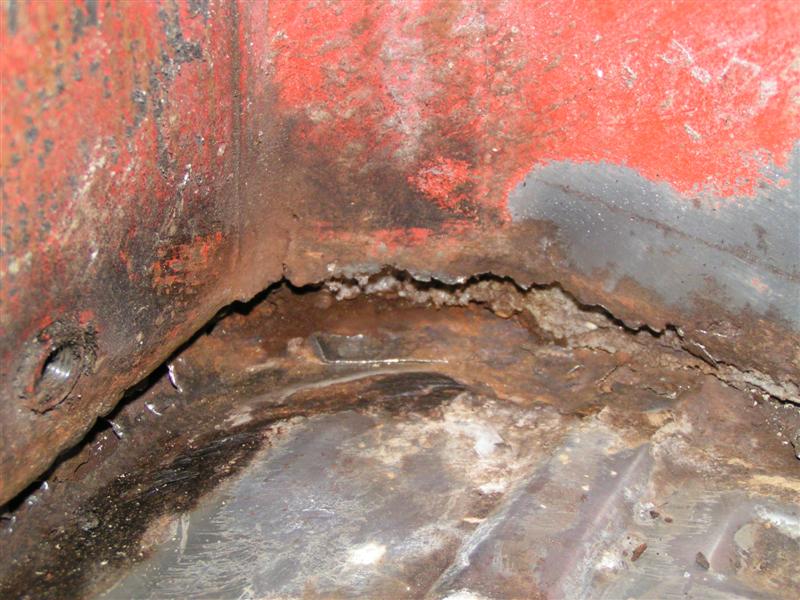
there is a little rust along the horizontal support... where the tar met the weld... the area is very small, and doesn't extend "up" onto the cross piece... how should I fix this? I'm thinking of rust killer, and then weld in a little angle-piece for extra support... is this ok, or do I need to cut all of this and weld in a new piece ?
here are a few pics, there are more in the BLOG, please give me your opinions...


yes, I finally started to use the BLOG as my progress documentation... I have been assimilated...

xsboost90
May 5 2005, 09:19 PM
ahhhhh! flassh backkkkssss! Try a little torch and scraper action on that glue.
RON S.
May 6 2005, 05:03 AM
Gint
May 6 2005, 07:13 AM
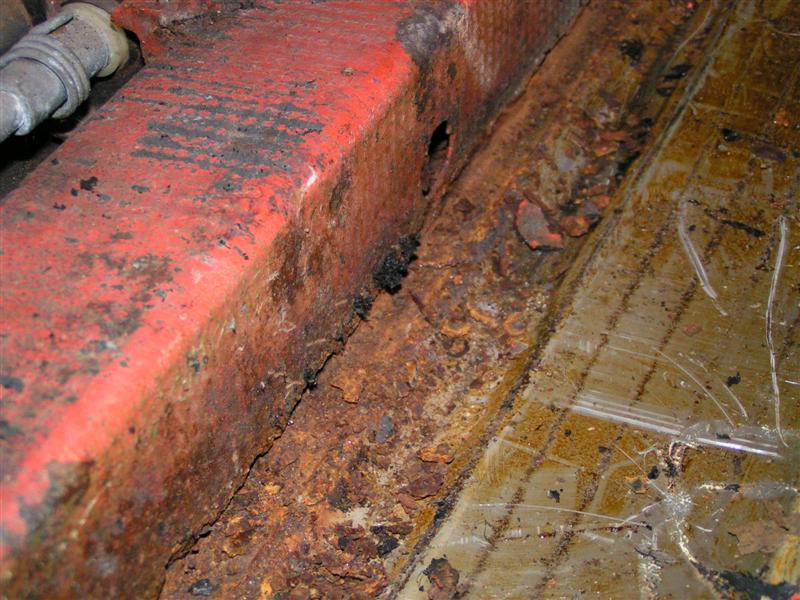
That rust looks a little nasty to me. Do yourself a favor (it won't seem like it at first, but you'll thank me later) and start digging into that rust with a grinder a large 4" wire brush. Dig in there good and hard. Get it all out and then post some pics. You'll probably find that it extends further than you think. Get it all out and then repair it.

That glue is a royal PITA. I let the acid dipo take care of it on my tub.

tat2dphreak
May 6 2005, 07:25 AM
| QUOTE (Gint @ May 6 2005, 08:13 AM) |
That rust looks a little nasty to me. Do yourself a favor (it won't seem like it at first, but you'll thank me later) and start digging into that rust with a grinder a large 4" wire brush. Dig in there good and hard. Get it all out and then post some pics. You'll probably find that it extends further than you think. Get it all out and then repair it.
That glue is a royal PITA. I let the acid dipo take care of it on my tub. |
yea, I was thinking of getting in there with a grinder around all the edges, then seeing where I am... last thing I want to do is to have to go BACK!
I'm not acid dipping the tub... it's not getting a piant job yet...
this is just search and destroy for rust...
dakotaewing
May 6 2005, 07:36 AM
Wayne,
I am in the same situation with my car... While you are at it, it is time to clean out the center tunnel. Dont pass the oppurtunity to do it now - you will be amazed at how much crap is in there - use a shop vac!
As far as the glue goes, it take a combination of things... Angle grinder w/4" cup brush, acetone, Por -15 cleaner, Por-15 metal ready, angle grinder with 4" cup...
You get the idea -
Thom
tat2dphreak
May 6 2005, 07:45 AM
yea, I should have done the center tunnel last year before installing the new engine... I had planning on the car beconming a driving-resto, but that didn't happen...
other than the front and rear access panels(which I don't have covers for

) what is the best way to get in there?
also, can the fuel lines be changed with the engine in? I figure while I'm in there... may as well. I'll also change the accel and clutch cables and fix any broke cable holds...
on the drivers side... does the pedal cluster need to be removed to get all the shitty tar up?
I had a 30 minute discussion with my wife last night... even she can't understand why they would put something semi-porus down as a protectant... knowing rust could occur... I just said "well, they weren't thinking 30 years ahead, I guess" although I really only see rust on the one edge... so, I'm not complaining... I've heard the stories of pulling up the tar and the metal coming too... in rust flakes
Verruckt
May 6 2005, 07:54 AM
I have your thread bookmarked, im in the same boat as you. Getting ready to replace my floorpans hopefully this next week.
Not to steal your thunder here, but when welding in the new pans, do you just stich weld every so often, or weld all the way around??? I'm jumping the gun a bit, I still have to get my tar up at the seams first.

My center tunnel looks good on the outside, but I will probably find some nastiness on the inside hidden away. Will need to invest in some metal ready and POR15. I already have the wire brushes in anticipation.
tat2dphreak
May 6 2005, 08:00 AM
| QUOTE (Verruckt @ May 6 2005, 08:54 AM) |
I have your thread bookmarked, im in the same boat as you. Getting ready to replace my floorpans hopefully this next week.
Not to steal your thunder here, but when welding in the new pans, do you just stich weld every so often, or weld all the way around??? I'm jumping the gun a bit, I still have to get my tar up at the seams first.
My center tunnel looks good on the outside, but I will probably find some nastiness on the inside hidden away. Will need to invest in some metal ready and POR15. I already have the wire brushes in anticipation. |
personally, I sport weld and get it like I want, and then go back with a full bead... maby not the right way, I don't know...
I'm also taking a welding class presently, to get to know these things better...
spare time toys
May 6 2005, 08:10 AM
| QUOTE (tat2dphreak @ May 6 2005, 09:00 AM) |
| I'm also taking a welding class presently, to get to know these things better... |
Where are you doing the class at? Do they teach tig? I was hoping to pick that up at work but one of the guys zapped himself good when he touched the electrode to the tip 
 so they went back to just the one old guy doing it.
tat2dphreak
May 6 2005, 08:21 AM
| QUOTE (spare time toys @ May 6 2005, 09:10 AM) |
| QUOTE (tat2dphreak @ May 6 2005, 09:00 AM) | | I'm also taking a welding class presently, to get to know these things better... |
Where are you doing the class at? Do they teach tig? I was hoping to pick that up at work but one of the guys zapped himself good when he touched the electrode to the tip so they went back to just the one old guy doing it. |
it's in Garland, at the continuing ed program at the HS... they do not teach TIG though... check Collin county community college or one of the other Comm. colleges, someone told me they DO teach TIG and a lot more... this is a basics/refresher class I'm in...
I took welding classes in HS, (Ag/FFA) but that was 12 years ago... and we only had 1 MIG in my little po-dunk school... so I always got a lot more stick practice... if stick could weld on thin stuff... I would be all set... but alas, it doesn't do well on 18 ga. *sigh*
tat2dphreak
May 6 2005, 02:23 PM
is tar under the pedal cluster?
if I have to remove the pedal cluster, perhaps I need to call on my good friend Eric Shea...

while it's out...
gklinger
May 6 2005, 02:33 PM
| QUOTE (tat2dphreak @ May 6 2005, 06:45 AM) |
| also, can the fuel lines be changed with the engine in? |
I don't see how. I just did mine with the engine out, and that was a PITA. I redid them with stainless tubing and needed WAY more room than you'd have with the engine in. If you're gonna do it, drop it...
| QUOTE |
| on the drivers side... does the pedal cluster need to be removed to get all the shitty tar up? |
Nope. The pedal board does, but you oughta take the cluster out anyway. Never know what might be lurking under there...
SirAndy
May 6 2005, 03:02 PM
is that what i think it is ???? ( a rusted through center tunnel ) ...

Andy
dakotaewing
May 6 2005, 03:10 PM
| QUOTE (tat2dphreak @ May 6 2005, 08:45 AM) |
yea, I should have done the center tunnel last year before installing the new engine... I had planning on the car beconming a driving-resto, but that didn't happen...
other than the front and rear access panels(which I don't have covers for :rolleyes: ) what is the best way to get in there?
|
Wayne,
I removed EVERYTHING in my tunnel, and then stuck a shop vac in where the shifter bolts down, and then went in on the front end with the pedal cluster and all the cables removed. It's a lot more work, but its is a lot easier to get it cleaned out -
TE
tat2dphreak
May 6 2005, 03:12 PM
| QUOTE (SirAndy @ May 6 2005, 04:02 PM) |
is that what i think it is ???? ( a rusted through center tunnel ) ...
Andy |
no, it looks like that in the pic, but there's no rust there...
I think that is where the tar is torn...
tat2dphreak
May 6 2005, 03:14 PM
| QUOTE (dakotaewing @ May 6 2005, 04:10 PM) |
| QUOTE (tat2dphreak @ May 6 2005, 08:45 AM) | yea, I should have done the center tunnel last year before installing the new engine... I had planning on the car beconming a driving-resto, but that didn't happen...
other than the front and rear access panels(which I don't have covers for :rolleyes: ) what is the best way to get in there?
|
Wayne,
I reomoved EVERYTHING in my tunnel, and then stuck a shop vac in where the shifter bolts down, and then went in on the front end with the pedal cluster and all the cables removed. It's a lot more work, but its is a lot easier to get it cleaned out -
TE |
ok, the only thing I didn't do was take the cables out... I vaccuumed once in there already... pretty clean...
dakotaewing
May 6 2005, 03:16 PM
| QUOTE (tat2dphreak @ May 6 2005, 04:14 PM) |
| QUOTE (dakotaewing @ May 6 2005, 04:10 PM) | | QUOTE (tat2dphreak @ May 6 2005, 08:45 AM) | yea, I should have done the center tunnel last year before installing the new engine... I had planning on the car beconming a driving-resto, but that didn't happen...
other than the front and rear access panels(which I don't have covers for :rolleyes: ) what is the best way to get in there?
|
Wayne,
I removed EVERYTHING in my tunnel, and then stuck a shop vac in where the shifter bolts down, and then went in on the front end with the pedal cluster and all the cables removed. It's a lot more work, but its is a lot easier to get it cleaned out -
TE |
ok, the only thing I didn't do was take the cables out... I vaccuumed once in there already... pretty clean... |
Did you put any Metal ready or other rust converter in there? What I stated was just the Cleanup, not any of the preventative maintenance -
TE
tat2dphreak
May 6 2005, 03:18 PM
no, it will get the OSPHO treatment with everything else...

tat2dphreak
May 6 2005, 07:21 PM
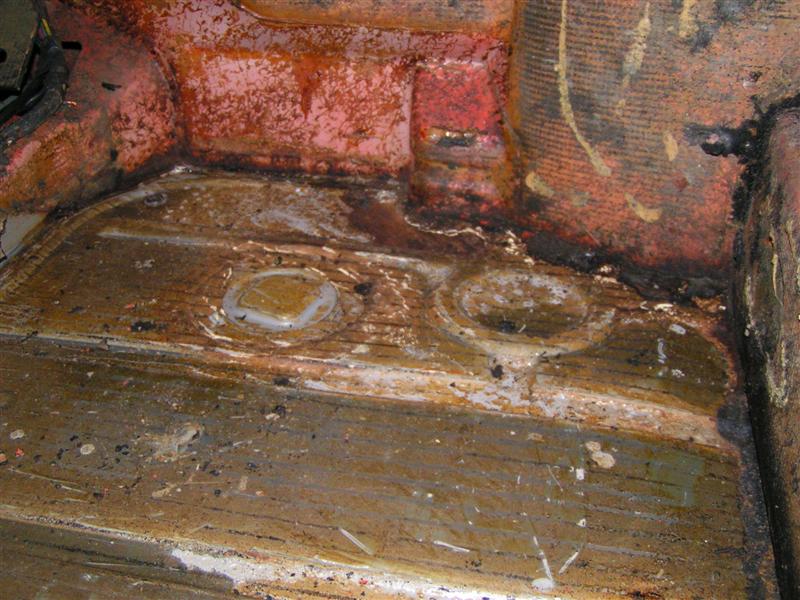
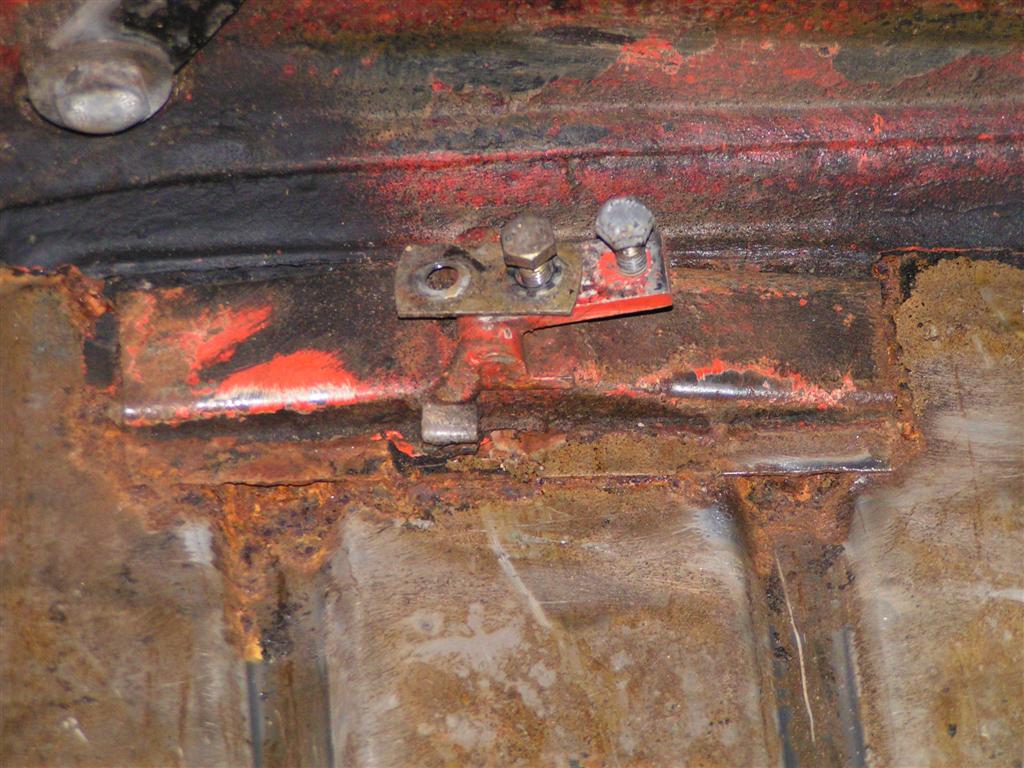
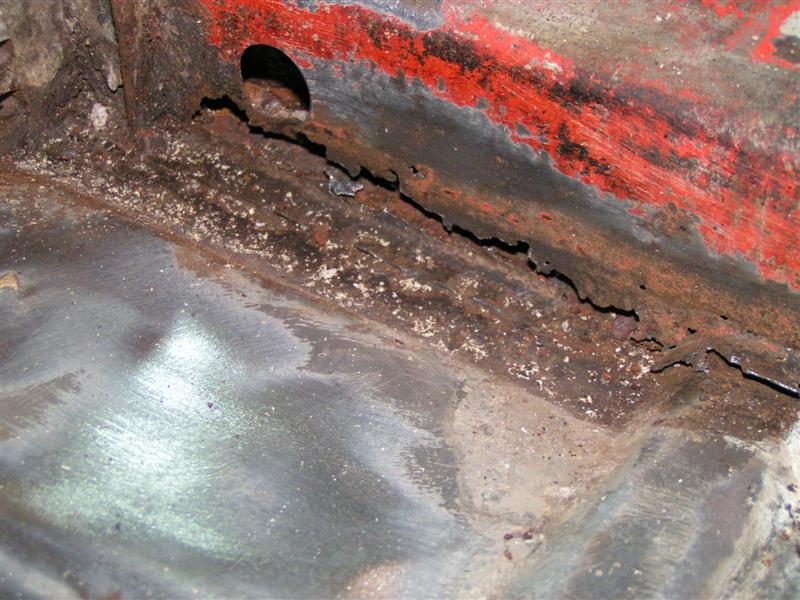
ok, I worked on the "back" part of the passenger floor pan... not looking great back there, but not terrible... both seat hinge spots are rusted, the PO welded one side of the seat rail brackets down, so THAT wasn't good...
I did grind along the edge of the spot I found yesterday... it is solid right up to the edge... so there's SOME good news... but I want to fix it right... the back side of that metal piece had some surface rust, but it brushed up good... I am going to get a different brush attachment... right now I am using a 2" brush on my drill... I am going to get one for the angle grinder...
I hadn't realized that the center tunnel had tar paper on as well...so that isn't going to be fun... what do you guys think about turning on a halogen lamp and leave it pointing at the center tunnel for a few hours to warm that stuff up good... safe?
anyway, more pics from the blog:

btw, the blog is a great workaround for posting multiple pics!! thanks admins!
tat2dphreak
May 6 2005, 08:07 PM
next week I'll work on stripping the center and the driver's side... too bad I'm going out of town this weekend...
is there anything you guys see in the pics that I should check on?
I double checked the spot Andy pointed out... that seems good, the tar is still there and all of the tarhad a nasty carpt glued to it... think astroturf... it was very similar to what you would put on a deck... if your deck was attached to a double-wide trailer...
Gint
May 6 2005, 10:33 PM
You're doing fine. Get yourself a heat gun. That tar comes right off after it's heated a little. Even on the center tunnel. A heat lamp would work, but it's only gonna heat up a small area at a time and take a while to do each area.
jonwatts
May 6 2005, 11:41 PM
Hey Wayne,
Did you find something to clean up the residue from the tar paper yet? If not then use brake cleaner aerosol, it's the secret weapon of 914 restorers everywhere.
So far it's looking pretty good.
Jon
tat2dphreak
May 7 2005, 07:06 AM
I have been using a heat gun, but it only does a small area, I thought the halogen would do more space and I could leave it while working on something else...
heat+wirebrush on drill was getting up the glue, but I ALWAYS like to use chemicalsto help cut the manual part.. I'll try brake ceaner! thanks!
thanks for the encouragement!! once I get the tar off I'll start cutting away the rust and see where it leads... does the rust look BAD? repairable?
SirAndy
May 7 2005, 10:55 AM
| QUOTE (tat2dphreak @ May 7 2005, 05:06 AM) |
| repairable? |
as for the seat brackets, they're available NEW ...
get yourself a spot-weld drilbit and drill the old ones out, clean up the floor board, then weld new ones in.
BTDT
 Andy
Andy
jonwatts
May 7 2005, 12:36 PM
Oh, and a propane torch will put out more heat than a heat gun so you can cover larger areas at a time. It also will ignite the tar so that's a bonus for most guys.

Keep a damp rag nearby.
Plus it's hard to get the smell to totally permeate the whole house unless you use the torch. Gotta make sure the whole family shares in the experience.
i love porsche
May 7 2005, 05:44 PM
i agree with the propane torch..ive been using it to strip everything...works really really well
tat2dphreak
May 8 2005, 11:45 AM
my torch is a cheapo... the kind that just attaches to a bottle... it goes out when you turn it upside down...
I tried it first, but it kept going out... :|
I don't care about the smell... my garage is detached... the whole neighborhood can smell it for all I give a damn about!

thanks guys... I appreciate the BTDT experience...
tat2dphreak
May 8 2005, 07:44 PM
great!! I'll pick up a case of brake cleaner then...
question: was there tar on the cross-member? there doesn't SEEM to be on mine... just paint/carpet glue(to hold down the trailer carpet this car used to have)...
jr91472
May 8 2005, 08:04 PM
Hey Wayne,
Not sure if you got an answer yet, but as I recall the tar mat does NOT extend underneath the pedal cluster.
But I would take it out anyway as rust likes to live under there and you will want to POR that area as well. Besides it not really all that difficult and it will help with the center tunnel clean out.
lookin good. I did the same thing last summer.

Oh yeah, my cheapo propane torch did the trick with that sealer.
later
tat2dphreak
May 8 2005, 08:07 PM
| QUOTE (jr91472 @ May 8 2005, 09:04 PM) |
Hey Wayne,
Not sure if you got an answer yet, but as I recall the tar mat does NOT extend underneath the pedal cluster.
But I would take it out anyway as rust likes to live under there and you will want to POR that area as well. Besides it not really all that difficult and it will help with the center tunnel clean out.
lookin good. I did the same thing last summer.
Oh yeah, my cheapo propane torch did the trick with that sealer.
later |
yea, I figure I'll use this as an excuse to have Eric rebuild my cluster...
why does my torch go out when it's upside down?!?! I have barely used it since replacing the bottle...
jr91472
May 8 2005, 08:14 PM
| QUOTE (tat2dphreak @ May 8 2005, 06:07 PM) |
| why does my torch go out when it's upside down?!?! I have barely used it since replacing the bottle... |
I got nothing 
tat2dphreak
May 10 2005, 12:15 PM
| QUOTE (SirAndy @ May 7 2005, 11:55 AM) |
| QUOTE (tat2dphreak @ May 7 2005, 05:06 AM) | | repairable? |
as for the seat brackets, they're available NEW ...
get yourself a spot-weld drilbit and drill the old ones out, clean up the floor board, then weld new ones in.
BTDT
Andy |
where can you get these hinge brackets?
PP, GPR, and Restoration design does not show them...
I'm not making much progress this week, unfortunately, I have a sinus infection beating me down... it started on friday, but I thought it was just from breathing fumes in the garage while melting the tar... but it only got worse all weekend... 
maf914
May 10 2005, 02:14 PM
| QUOTE (jr91472 @ May 8 2005, 06:14 PM) |
| QUOTE (tat2dphreak @ May 8 2005, 06:07 PM) | | why does my torch go out when it's upside down?!?! I have barely used it since replacing the bottle... |
I got nothing |
Good question.
Propane in a full bottle or tank is liquid. The vapor pressure of the vapor which forms at the top as the bottle absorbs heat is what pushes the gaseous propane out of the bottle.
When inverted does gas continue to come out of the torch burner? If so, could the liquid propane being pushed from the tank to the torch burner creates a fuel/air mixture that is too rich to burn?
Or, if no flow, I wonder if there is some sort of check valve device that prevents liquid from being forced out when the bottle is inverted?
tat2dphreak
May 14 2005, 07:12 PM
ok, little more progress today...
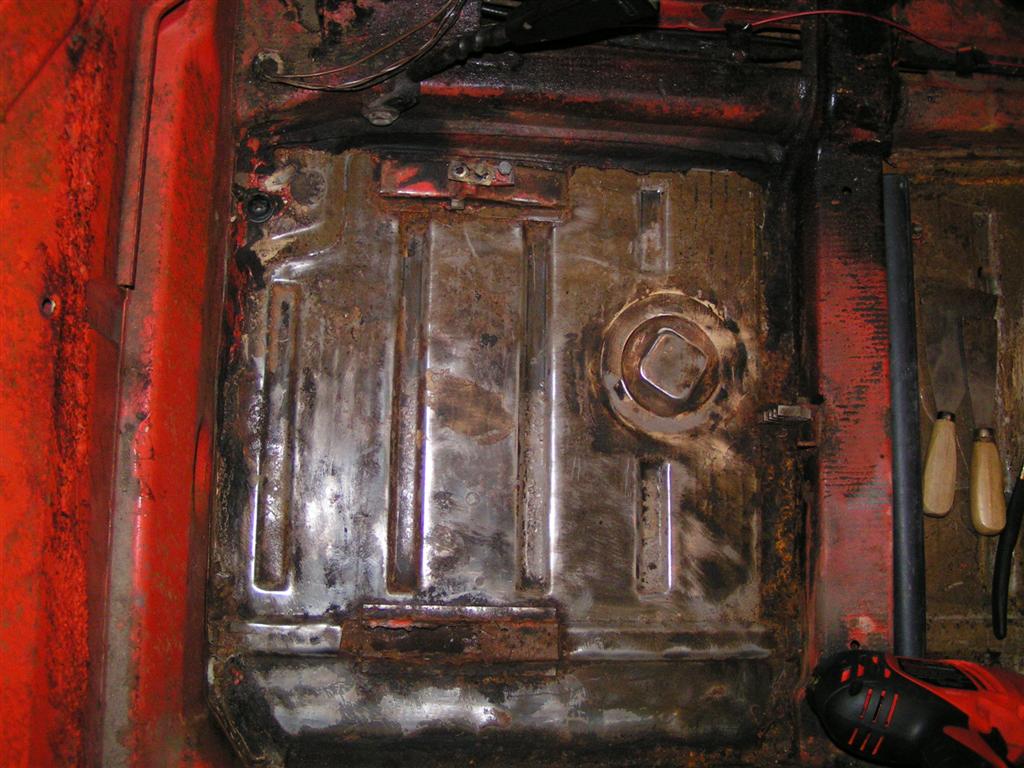
I got a small butane torch to get up close and personal with the tar... worked great!!
then I soaked up some glue with brake cleaner and a rag... it too worked great...
then, my mind shut off and I did something stupid... I was going to back to torching the tar... BUT I didn't wash the clean floor pan with water after using the brake cleaner...
it burst into flanes singing the hair on my arm and catching a shop rag(soaked with brake cleaner) on fire in the pan... I put the fire out quickly(had the extinguisher close already)... no damage was done, but I wasted most of the rest of the day cleaning up the fire ex. residue

yes, I know, it was DUMB!! I was lucky no one or nothing was hurt... I have pics(not of the fire or what I had to clean up, I was too pissed at myself), I'll post them soon...
tat2dphreak
May 14 2005, 07:34 PM
ok picture time:
does brake cleaner work? damn straight it does!
BEFORE:
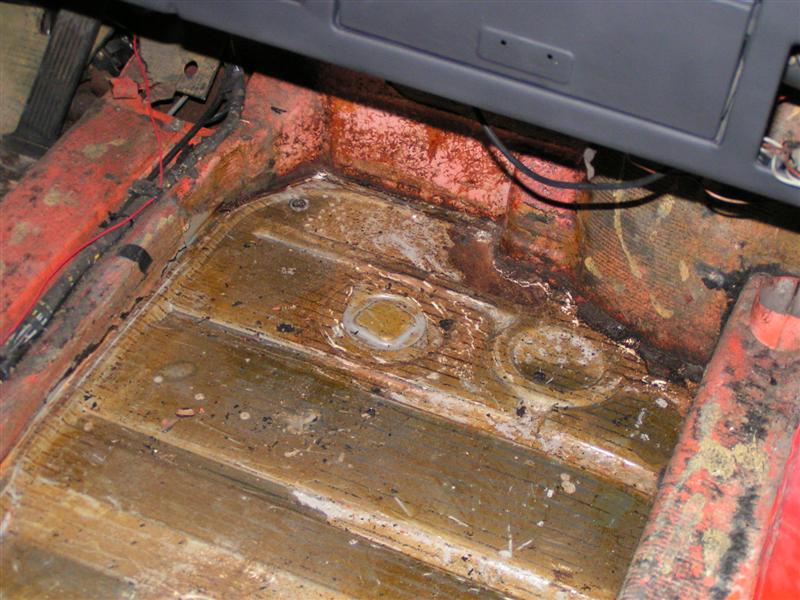
AFTER:
how much of the sealer that is still there do I need to get up?
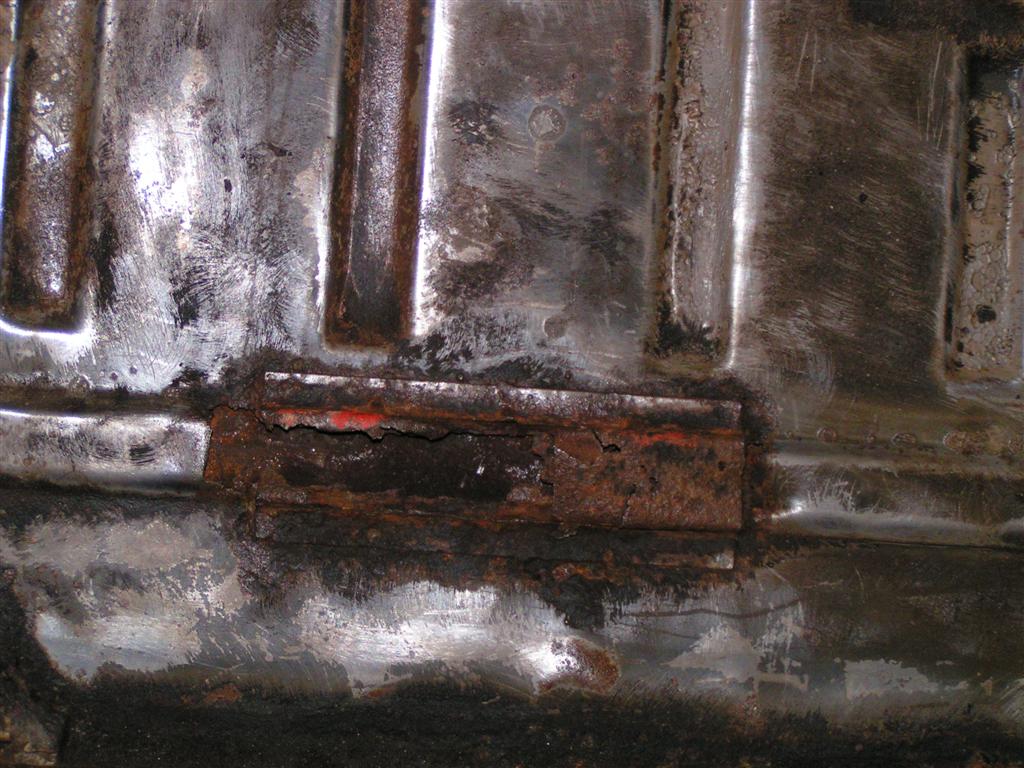
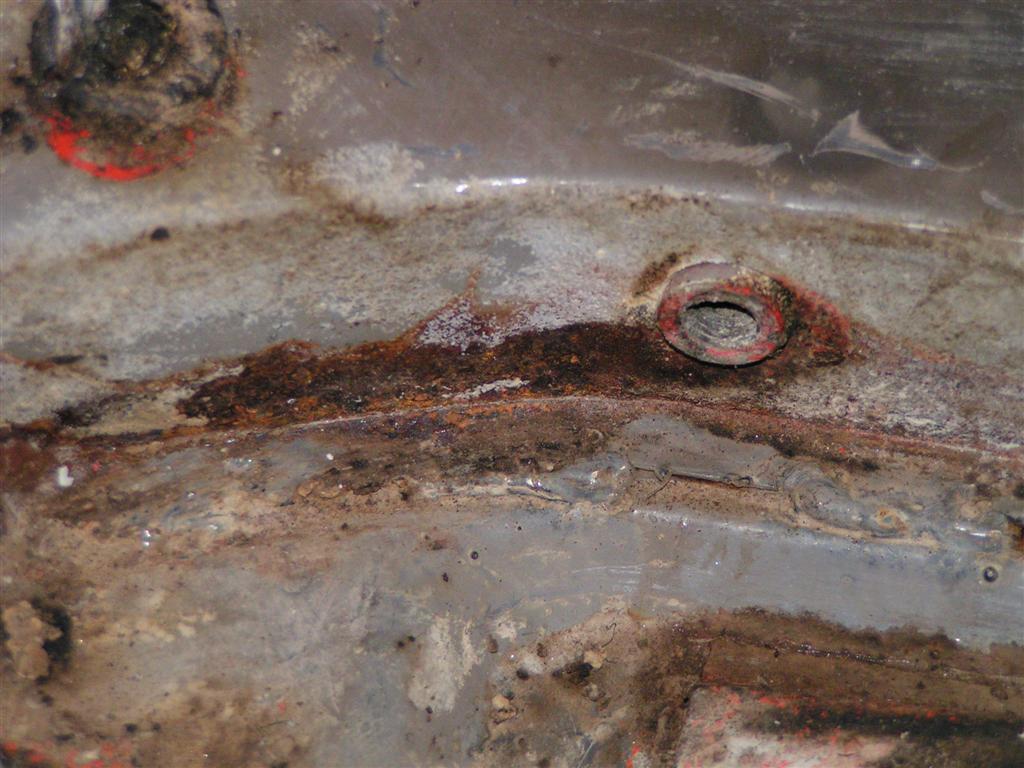
a better pic of where the rusted out hinge was... I plan to cut part of the pan out here too and weld in a new piece of sheet metal...
cleaned under the wiring harness by loosening it and lifting it up long enough to torch/putty knife under...

last pic: a little surface rust where the seat belt attachment was all the rust I found today... I'll treat this and it is still solid...
tat2dphreak
May 15 2005, 04:26 PM
nothing to add today, took the day off and saw hitchhiker's guide...
jr91472
May 15 2005, 06:43 PM
looking good!!!
we have all done stupid things, the point is: how do you handle the situation......good call on the fire ex.
tat2dphreak
May 15 2005, 08:00 PM
lol, yea... I bought 2 more extinguishers... just in case!
tat2dphreak
May 21 2005, 01:45 PM
ok, tar and glue up... I started working on the sealant and brushing those rusty spots up...
a few bad things:
1)pedal cluster looks like crap... Eric will be getting a PM from me VERY soon...
2) I checked the ball joints, one doesn't look bad, but the rubber seemed a little dry, the other is seperated though...
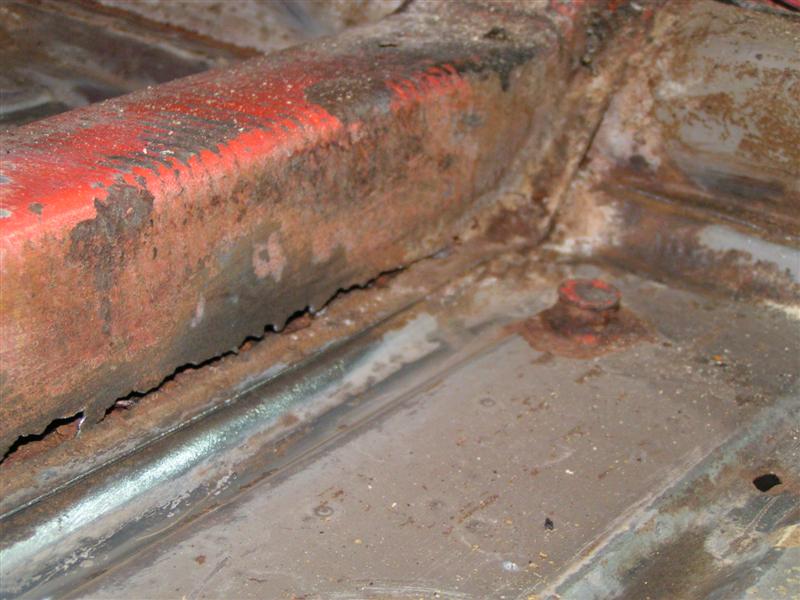
3) the rust on the center cross brace is not good, the edge on the drivers and passenger side looks very much bad... you'll see pics where I went at it with a wire brush on my angle grinder... how should I fix this? cut out and weld in new pieces? are new pieces even available? where? how much $$?
4) found another spot of rustiness... in the corner by the firewall... how do I fix this?
I stopped for a while to eat lunch and I'll go back and grind more later, when it cools off some... today is a record high for May! 97 degress, NO wind and high humidity!!

that corner looks bad but away from the corner is only some surface rust...
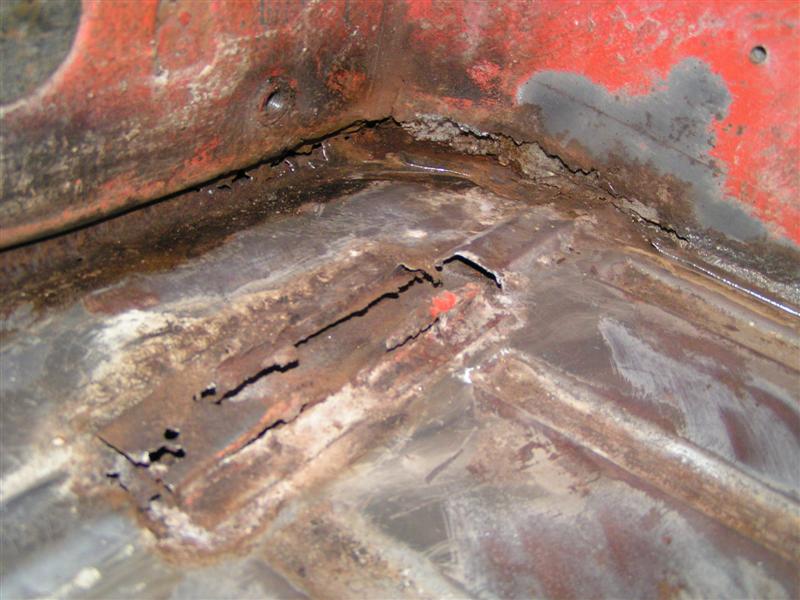

the "seat side" of the center brace
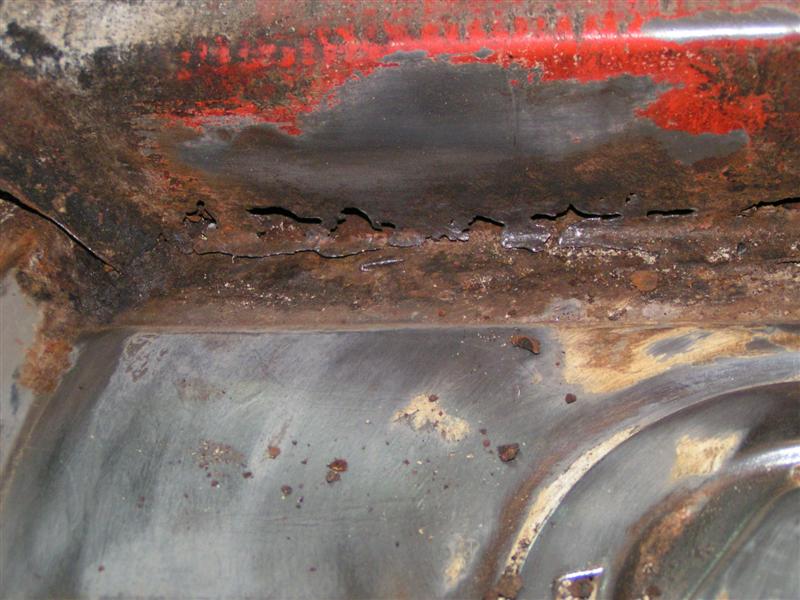
the "front side"

more pics in the blog... but nothing pretty :|
tat2dphreak
May 21 2005, 05:04 PM
update, I'm not going to make it back to the garage yet... it broke triple digits here... still humid and muggy
tat2dphreak
May 22 2005, 09:33 AM
so, is killing the rust and then putting sheet metal braces a good plan for that corner? cross-brace?
do I have to cut out the cross brace?
Verruckt
May 22 2005, 09:50 AM
I spoke with Dave @ GPR and he has those parts (back piece, and center brace). My rust was pretty much exactly like yours. I'm just going to replace them rather than fight with them. I tried several times to get a hold of Resto Design but havent been successful... I'm going to replace my floors too. Somewhere along the line, someone jacked up the car via the floorpans
Could be hobbled back somewhat into its original shape with a BFH, but I want it to be "nice". Besides, that cutoff tool is so damn cool
tat2dphreak
May 22 2005, 01:31 PM
my floors them selves are fine... I just din't want the added expense of replacing the parts with exact matches... they won't be seen once the carpet and interior are put back in...
tat2dphreak
May 22 2005, 06:20 PM
after a nice visit with James Adams today, I think I have a plan:
I plan to use some angle cut steel for the cross piece... I may cut the bottom of this off to be sure and treat under it with ospho...
then I plan a temp fix of the corner... until next year, when I'll weld in the correct pieces, and probably an engman chassis kit...
is this a sound plan? or am I making things harder to save a few bucks?
tat2dphreak
May 25 2005, 06:26 PM
ok, so I got home early today, ready to go at it, it's a great day weather-wise, it rained earlier so it was almost "cool" (80s, compared to hi 90s), even got my rebuilt pedal assembly from Eric in the mail! perfect right? well, almost... I get home, and look for the garage opener... it's in my daily driver... problem is: I dropped that POS off at the shop today to get a tune up and have them check out why it's idling rough, before I take it out of town this weekend... and the shop didn't get around to it today
so, here I am, perfect day to be in the garage, and no way in hell to get into the fucker!!
the apartments only issue one opener, and they don't have another way in.. so I'm here:


when I should be:


tat2dphreak
Jun 2 2005, 08:24 PM
ok, I've got ALMOST all of the seam sealer crap off... how much do I really NEED to remove? all thats left is some hard to reach spots up under the driver's side dash... no rust has been under any of it...
also, there *WERE* 2 black plastic screw looking things near the center tunnel in the back... I THOUGHT these were metal and was cleaning the sealant from around them... they got chewed the fuck up and are no longer with us... what was the purpose of these? and can I just put a bolt in their place?
tat2dphreak
Jun 3 2005, 02:03 PM
one more thing... there seems to be some dents and dings inside the door(inner long)... semi-normal? need to be fixed?
Yellowbeard
Jun 9 2005, 07:33 PM
I think this is the first thing I am going to do when I bring Bruenhilda home. I have thought about doing it several times and just never got around to it (like many things in life).
This is /very/ helpful and I will be looking at it a lot over the coming months.
Pray (to whatever god(s) you wish or exert your will or what have you) for me that the place where my drivers side seat punched through the floor (inboard rear) is the only real rust I have (I know it won't be, but I can hope).
Thanks for the valuable blog - I will try and do the same when I get my project started.
God DAMN I love this site!
This is a "lo-fi" version of our main content. To view the full version with more information, formatting and images, please
click here.
 brake cleaner works great!
