In doing my research prior to replacing the original fuel lines with stainless ones, I've gotten the impression that the originals were installed with a couple sets of metal hold-down tabs inside the center tunnel. With my shifter removed, I've found one set immediately adjacent to the shifter towards the passenger-side door. But is there a 2nd set, and if so, where is it located?
Thanks
Full Version: Replacing Fuel Lines
QUOTE(Coloradocurt @ Feb 2 2018, 03:31 PM) 
In doing my research prior to replacing the original fuel lines with stainless ones, I've gotten the impression that the originals were installed with a couple sets of metal hold-down tabs inside the center tunnel. With my shifter removed, I've found one set immediately adjacent to the shifter towards the passenger-side door. But is there a 2nd set, and if so, where is it located?
Thanks
If there's a second clip its toward the rear, accessed from one of the wiring holes in the tunnel IIRC.
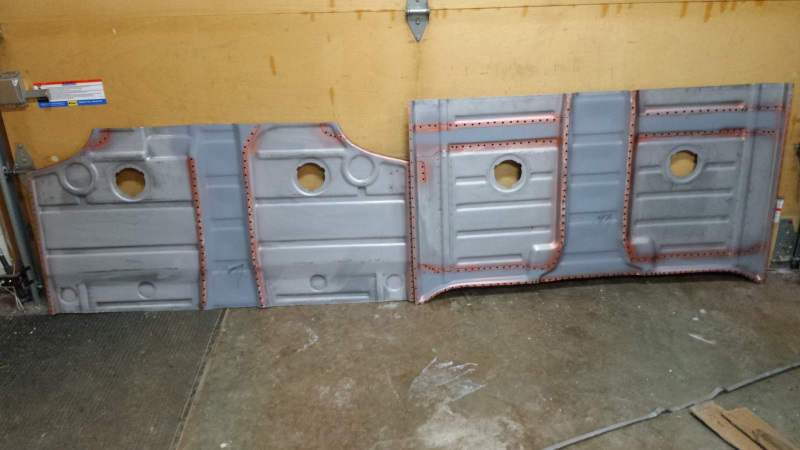
I guess one good thing about having a car all rusted to hell is that when you cut it open to repair, you wind up with lots of photos showing these hidden bits. You should be able to make out the tabs on the right side of the tunnel 2 channel beads up on the right hand panel.
Click to view attachment
Click to view attachment
QUOTE(bbrock @ Feb 2 2018, 02:09 PM)
I guess one good thing about having a car all rusted to hell is that when you cut it open to repair, you wind up with lots of photos showing these hidden bits. You should be able to make out the tabs on the right side of the tunnel 2 channel beads up on the right hand panel.
Ok, that makes it easy to figure out thanks.
So that I am clear the panel on the left would be the front of car (footwell) and the panel on the right is the back 1/2 under the seats ?
Do I see clips actually on both of those panels ?
So 2 sets of clips ...
QUOTE(Wyvern @ Feb 2 2018, 03:17 PM)
QUOTE(bbrock @ Feb 2 2018, 02:09 PM)
I guess one good thing about having a car all rusted to hell is that when you cut it open to repair, you wind up with lots of photos showing these hidden bits. You should be able to make out the tabs on the right side of the tunnel 2 channel beads up on the right hand panel.
Ok, that makes it easy to figure out thanks.
So that I am clear the panel on the left would be the front of car (footwell) and the panel on the right is the back 1/2 under the seats ?
Do I see clips actually on both of those panels ?
So 2 sets of clips ...
Yes to all of the above. This was on a '73 so I put the clips on the new panels where they were on the original. I don't know if the number and location changed over time.
I just took a peek at mine to be sure. The front clip is accessed through the hole for the shifter plate. The rear one is under the rear hole where the wire harness enters the tunnel before going through the fire wall. That probably isn't great news if you harness is in the car, but might help you locate it at least.
QUOTE(bbrock @ Feb 2 2018, 03:09 PM)
I guess one good thing about having a car all rusted to hell is that when you cut it open to repair, you wind up with lots of photos showing these hidden bits. You should be able to make out the tabs on the right side of the tunnel 2 channel beads up on the right hand panel.
Thanks.
It would sure help if with the help of Photoshop (or some other graphic software) those locations could be circled.
Do the new SS fuel lines utilize the original clips ?
* Nice pics
* Nice pics
Useful info here: http://www.914world.com/bbs2/index.php?showtopic=168383
QUOTE(Coloradocurt @ Feb 2 2018, 04:17 PM)
Thanks.
It would sure help if with the help of Photoshop (or some other graphic software) those locations could be circled.
I replaced the image in my original post. Just a little larger and added arrows to the hold-downs.

Thanks.
It would sure help if with the help of Photoshop (or some other graphic software) those locations could be circled.
[/quote]
It would sure help if with the help of Photoshop (or some other graphic software) those locations could be circled.
[/quote]
Awesome info ... Thanks to all.
I am doing my lines next week.
1 question:
I got the "standard" kit from rotary . The 2 long lines are different sizes (Diameter) any help as to placement of those ? Large diameter on the Drivers side or Passengers side ?
Tnks
I am doing my lines next week.
1 question:
I got the "standard" kit from rotary . The 2 long lines are different sizes (Diameter) any help as to placement of those ? Large diameter on the Drivers side or Passengers side ?
Tnks
Thanks so much.
QUOTE(Wyvern @ Feb 2 2018, 05:20 PM)
Awesome info ... Thanks to all.
I am doing my lines next week.
1 question:
I got the "standard" kit from rotary . The 2 long lines are different sizes (Diameter) any help as to placement of those ? Large diameter on the Drivers side or Passengers side ?
Tnks
From what I've found, the larger supply line is on the passenger side (the return on the driver's side), but in my case with the pump having been moved up to the front under the tank, I don't think it would make any difference with the supply fuel under pressure back to the engine, rather depending on gravity (and a larger line) to carry fuel back to a pump in the back.
QUOTE(Wyvern @ Feb 2 2018, 05:20 PM)
Awesome info ... Thanks to all.
I am doing my lines next week.
1 question:
I got the "standard" kit from rotary . The 2 long lines are different sizes (Diameter) any help as to placement of those ? Large diameter on the Drivers side or Passengers side ?
Tnks
Like I said, rusted to hell and you get to see all its private parts. Looks like the large one goes on the passenger side. Do you have a link to that kit? I'll be doing mine in a few months and still shopping options.
Click to view attachment
I got my line kit from Rotary'14 he is a member here.
rsmoy914@gmail.com (Robert) he has a post here on the lines.
2 long lines, 2 short lines, grommets, tank filter and he has clamps as well.
Everything looks very well done.
I did also purchase the large 9mm and small 7mm diameter braided hoses for the lines to tank (you need 22" of each to coil correctly) the hose came from the "bird"
QUOTE(Wyvern @ Feb 2 2018, 06:00 PM)
I got my line kit from Rotary'14 he is a member here.
rsmoy914@gmail.com (Robert) he has a post here on the lines.
2 long lines, 2 short lines, grommets, tank filter and he has clamps as well.
Everything looks very well done.
I did also purchase the large 9mm and small 7mm diameter braided hoses for the lines to tank (you need 22" of each to coil correctly) the hose came from the "bird"
Perfect! I've seen references to a member who offered steel line kits but hadn't tracked down who yet. You saved me some work! Thanks.
Don't use the braided line unless it's rated for ethanol. I won't use it period! They leak.
QUOTE(The Cabinetmaker @ Feb 2 2018, 07:33 PM)
Don't use the braided line unless it's rated for ethanol. I won't use it period! They leak.
Thank you ... now you got me worried ...
Cohline 2122 is rated
German OEM, rated for up to 50% ethanol mixture, E10 up to a maximum of E50.
Working Temperature -22F to 150F
Working Pressure at ambient temperature (68F) is 101 psi / 7 bar.
Should I be using something else ?
QUOTE(Wyvern @ Feb 2 2018, 04:20 PM)
Awesome info ... Thanks to all.
I am doing my lines next week.
1 question:
I got the "standard" kit from rotary . The 2 long lines are different sizes (Diameter) any help as to placement of those ? Large diameter on the Drivers side or Passengers side ?
Tnks
If you look at the front gromet under the fuel tank, the passenger side of the oval gromet for fuel lines has a bigger diameter. That will give u idea that the fuel line is on the passenger side.
^ great .
Thanks
I thought there may be a clue once I was in there .
Or I could have looked at the new grommet
Sometime the ol "Cant see the trees for the forrest" thing is true ..
Thanks
I thought there may be a clue once I was in there .
Or I could have looked at the new grommet
Sometime the ol "Cant see the trees for the forrest" thing is true ..
To answer my original question - at least on my '74 914 - the 2nd set of hold-down tabs is located about 10" forward of the firewall along the passenger side of the tunnel. Can be accessed thru the opening in the top of the tunnel where the wiring bundle comes up from inside of the tunnel and then travels along the top side.
This is a "lo-fi" version of our main content. To view the full version with more information, formatting and images, please click here.