BPic
Mar 25 2018, 03:31 PM
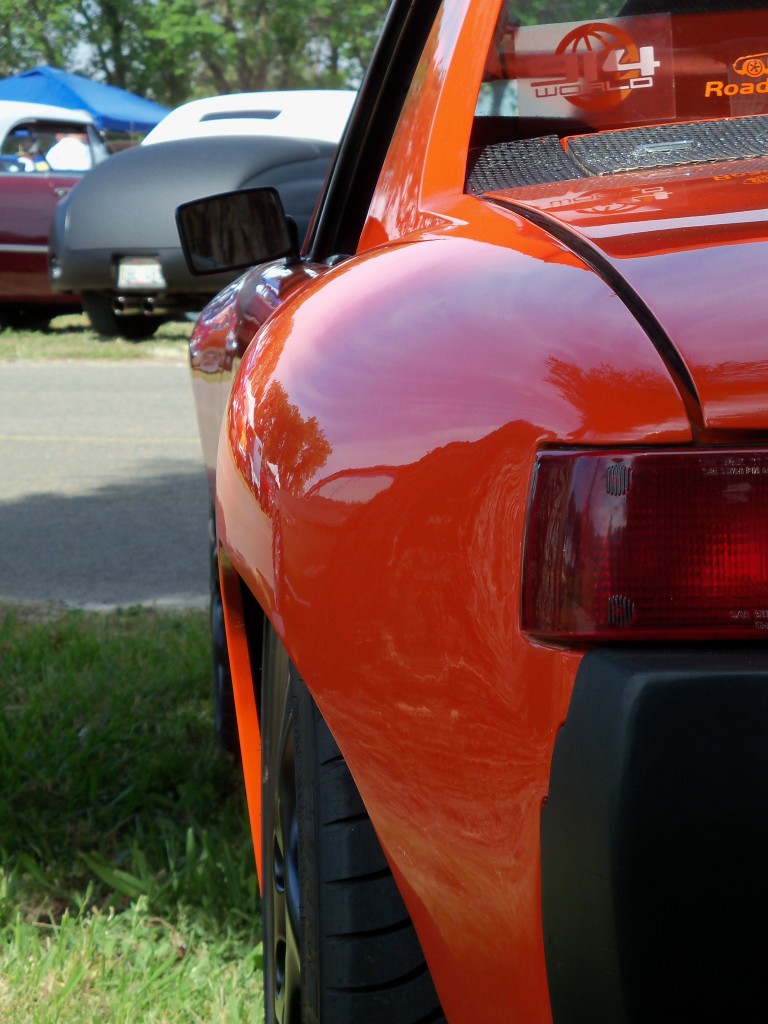
My first thought on this build was to restore to original. However the engine has been swap as well as the trans. (to a side shift so not to bad) With that info. I'm considering doing some slight modifications, engine upgrade etc. With regards to the body my thought was to eliminate the chrome trim around the roll bar and shave the lip around the roll bar. The reason is to just do a slight mod that not everyone would notice and keep it classy. Have any of you seen this done and if so what are the thing I need to watch for. I'm sure welding that area is gonna be touchy but I think it would look great in the end.


See pic of were I'm thinking of. Any thoughts or comments would be appreciated.
Sorry about the sideways shot.
Click to view attachment
Rand
Mar 25 2018, 03:38 PM
I shaved the targa lip on my last 914. It is indeed very touchy welding as it's thin. I enjoyed the project and loved the results, but it's meticulous.
BPic
Mar 25 2018, 03:49 PM
QUOTE(Rand @ Mar 25 2018, 05:38 PM)

I shaved the targa lip on my last 914. It is indeed very touchy welding as it's thin. I enjoyed the project and loved the results, but it's meticulous.
Hey Rand do you have pics? I'd love to see it.
Rand
Mar 25 2018, 04:08 PM
I'm not sure if I have pics

but I'll post if I find them.
Just be careful with the cutting because when you cut it flush it's easy to leave a bit of gap that's difficult to fill with weld. Do your best to minimize that gap (which is a balancing act between making the surface flat and cutting too much of the flange away). Use low heat tacks to close because it will want to melt holes. Grind flat and hopefully only a thin skim coat of bondo will be needed to make it perfect.
mepstein
Mar 25 2018, 04:16 PM
I'm pretty sure JP Stein did it early on, on his yellow auto x car. It is a lot of work to make it look nice.
Rand
Mar 25 2018, 04:17 PM
A former old timer around here, JP Stein (who sadly is no longer with us) shaved his Targa on "the Shitbox" and there are pics here somewhere. I'll share if I find.
[edit: Funny timing Mark. I didn't see your post when I wrote mine.]
914werke
Mar 25 2018, 05:06 PM
Keep in mind, removal of that seam & the trim that would have covered it across the top of the targa eliminates the area on which the rear targa SEAL rides. Or at the very least significantly reduces the seal area.
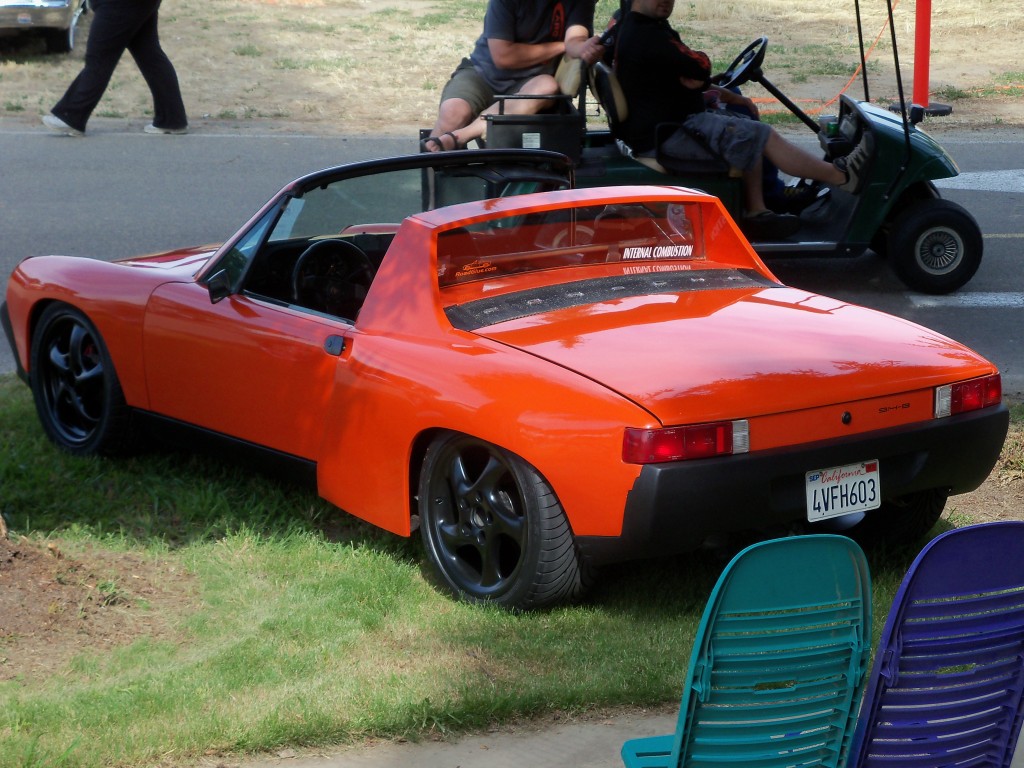
tygaboy
Mar 25 2018, 05:51 PM
This is Andy (Kreiger)'s car. I think it's a great looking mod.
worn
Mar 25 2018, 06:01 PM
QUOTE(tygaboy @ Mar 25 2018, 03:51 PM)
This is Andy (Kreiger)'s car. I think it's a great looking mod.
Wow! I wouldn’t have thought that would make such a difference. But it does.
Mueller
Mar 25 2018, 06:04 PM
QUOTE(tygaboy @ Mar 25 2018, 04:51 PM)
This is Andy (Kreiger)'s car. I think it's a great looking mod.
Dang that looks good, okay Chris, can you whip that out on Saturday, hahahha
Krieger
Mar 25 2018, 06:17 PM
QUOTE(tygaboy @ Mar 25 2018, 04:51 PM)
This is Andy (Kreiger)'s car. I think it's a great looking mod.

hahahaha
Thanks Chris!
windforfun
Mar 25 2018, 06:32 PM
Why bother?
Andyrew
Mar 25 2018, 06:51 PM
I did it on my car. Took a LONG time. I did it the long way around and its process is detailed in my thread. Probably took me 100hrs. If I did it again it would probably take me 20. Lots of cutting and welding and cutting and welding then grinding and welding and grinding... I did about 6 inches at a time.
 http://www.914world.com/bbs2/index.php?s=&...t&p=1427889
Rand
Mar 25 2018, 06:57 PM
QUOTE(windforfun @ Mar 25 2018, 04:32 PM)
Why bother?
If you don't get it, do not bother.
If you get it, such a nice clean mod!!!
Andyrew
Mar 25 2018, 07:24 PM
If you dont read my thread ill tell you. As you get to where the two pieces of metal come together there is another piece that will want to fall in (3 layers). Youll need to weld this in at least a couple takes.
The metal is super thin. I cut to 1/8" of the main metal then welded all around. Then ground it down in small sections to the exposed pieces in 1/4" incraments and welded. Repeat till done. Then grind and weld your hairline seams. The point where the fender meets the bar is difficult to get right.
Rand
Mar 25 2018, 07:29 PM
QUOTE(Andyrew @ Mar 25 2018, 05:24 PM)
If you dont read my thread ill tell you. As you get to where the two pieces of metal come together there is another piece that will want to fall in (3 layers). Youll need to weld this in at least a couple takes.
The metal is super thin. I cut to 1/8" of the main metal then welded all around. Then ground it down in small sections to the exposed pieces in 1/4" incraments and welded. Repeat till done. Then grind and weld your hairline seams. The point where the fender meets the bar is difficult to get right.
Those thin layers are what makes it tricky to weld for sure. But such a fun project and I love losing the goofy trim bits. Not a mod for everyone, but rewarding if you want it.
Krieger
Mar 25 2018, 08:11 PM
If your good, it's done in a day. Chicks dig it!
n2j2ryan
Mar 25 2018, 09:34 PM
I have gone part way between. I removed the small trim piece at the top which was easy but then painted the rear trim pieces black. I have not got it back together but I really like the look.
bandjoey
Mar 26 2018, 05:26 PM
Only 100 hours?

d
Rand
Mar 26 2018, 09:10 PM
I hear the envy so loud and clear. Freaking slackers. Real men do this.

There are those who talked about it. And there are those who DID it.
Krieger
Mar 26 2018, 11:39 PM
QUOTE(Rand @ Mar 26 2018, 08:10 PM)
I hear the envy so loud and clear. Freaking slackers. Real men do this.
There are those who talked about it. And there are those who DID it.

sixnotfour
Aug 24 2018, 03:44 AM
I didn't remove the pinch weld , but put some black push on trim,, I did shorten the roof 1 inch and added some to the corners to give some curve to follow the body line...the rear seal now rests on the body..yup wasting time

Larmo63
Aug 24 2018, 08:39 PM
Kudos to those who have done this and made it look right. I think it is a bitcoin mod, not for my car, but for a car like Gary's wild Subaru custom? YES.
porschetub
Aug 24 2018, 08:55 PM
QUOTE(windforfun @ Mar 26 2018, 12:32 PM)
Why bother?
see little point in doing this really,the look isn't an improvement IMO.
This is a "lo-fi" version of our main content. To view the full version with more information, formatting and images, please
click here.