First engine/tranny drop was successful.
Click to view attachment
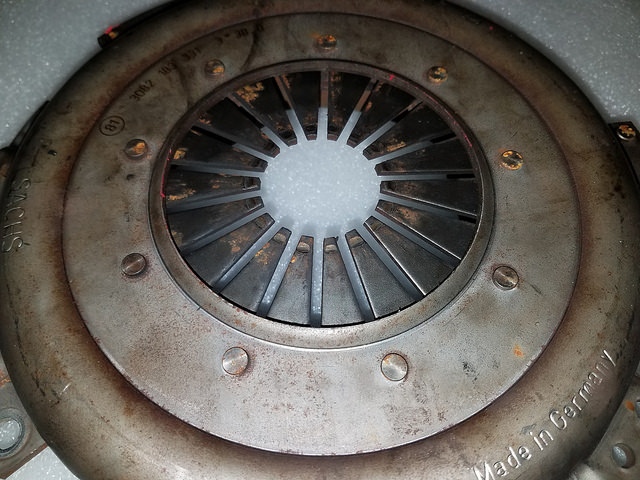
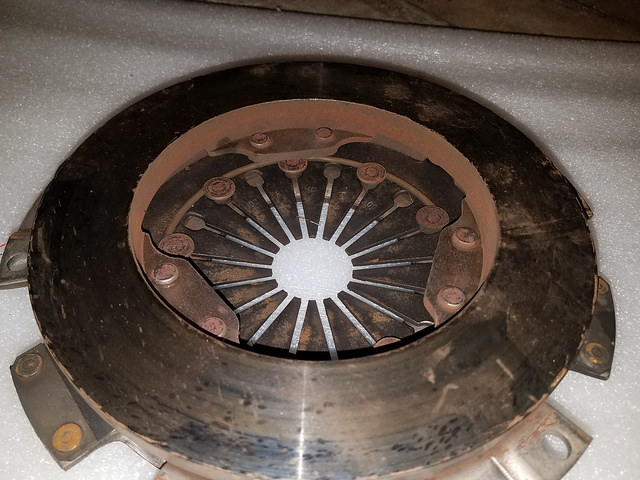
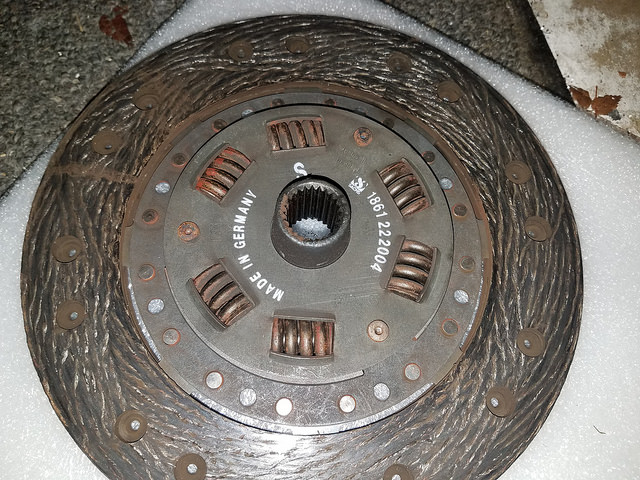
Pulled the clutch and found this...
Click to view attachment
Click to view attachment
The adventure begins...
Full Version: Uncharted Territory
I think you got your money’s worth out of those parts as the pressure plate definitely is worn out and the springs gave up in the clutch plate. Don’t forget to take the chance to clean the engine compartment and engine while it’s out as it’s a lot easier than when it’s installed.
That's messy,don't often see a disk do that,have found weak loose springs before takes a bit for them to break away like that,any damage to the inside of the flywheel?.
Judging by the wear on the pressure plate I would say its on its second (and last) life,make sure you carefully inspect/measure flywheel to make sure it is suitable for resurfacing,post a pic of it that would help,good luck.
Judging by the wear on the pressure plate I would say its on its second (and last) life,make sure you carefully inspect/measure flywheel to make sure it is suitable for resurfacing,post a pic of it that would help,good luck.
Throw in some SS fuel lines while the engine's out.
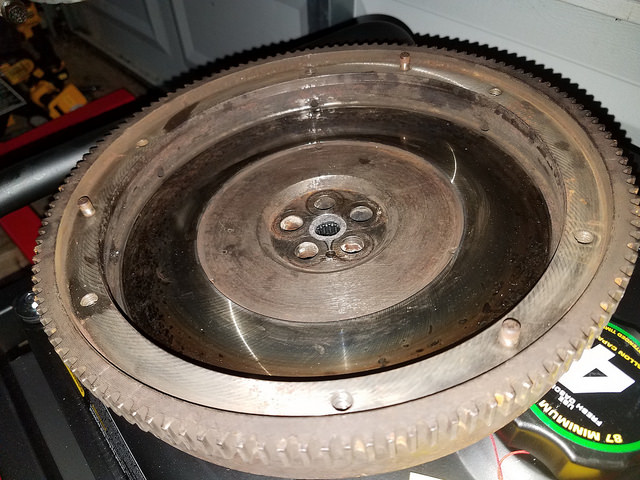
Here’s the flywheel. Plan to remove and have it checked out.
Click to view attachment
Other progress today:
Click to view attachment
Learning that engine tin screws can be quite stubborn
Click to view attachment
Other progress today:
Click to view attachment
Learning that engine tin screws can be quite stubborn
Just don’t understand why it would run hot.... 
Click to view attachment Click to view attachmentClick to view attachment
Click to view attachment Click to view attachmentClick to view attachment
Going to do my clutch (pushrod tube seals, rear main seal) also. I'm learning a lot from these photos.
Best to drop the engine too?
Best to drop the engine too?
QUOTE(98101 @ Apr 22 2018, 02:42 PM) 
Going to do my clutch (pushrod tube seals, rear main seal) also. I'm learning a lot from these photos.
Best to drop the engine too?
I dont know if it’s best or not as I figured on pulling both to check a few things out.
(aka risk falling into the “while I’m in there” rabbit hole)
SS fuel lines
Find where all this oil is coming from
Clean and powder coat tin
Glad I did, hope to get it good and clean. Maybe air will actually move thru the thing an it will run cooler.
Ok. This is hopefully as far as I will go.
Click to view attachment
Having trouble confirming the source of all the oil on top as it is literally everywhere. Possibly coming from loose vacuum connections?
Leak on the bottom is from my arch nemesis the taco plate. Pushrod tubes seem to be holding their own.
Looking for thoughts on how best to clean all the crap off and out of the fins??
Can the oil cooler be cleaned or is it a lost cause?
Thanks.
QUOTE(loco914 @ Apr 22 2018, 07:04 PM)
Ok. This is hopefully as far as I will go.
Click to view attachment
Having trouble confirming the source of all the oil on top as it is literally everywhere. Possibly coming from loose vacuum connections?
Leak on the bottom is from my arch nemesis the taco plate. Pushrod tubes seem to be holding their own.
Looking for thoughts on how best to clean all the crap off and out of the fins??
Can the oil cooler be cleaned or is it a lost cause?
Thanks.
Some oil is over the tin, some under.
I'd do OP switch, every seal on the oil filler tower and check the seals on the
cooler.
Make sure your crankcase is vented properly.
Get the cheapest piece of 4' x 8' plywood and a gallon of mineral spirits
and get busy with any brush you can find. The filth will transfer from the engine
onto you.
Find some plugs for the cooler and wash it with mineral spirits, it will come clean.
Not trying to hijack, but can someone tell me how my clutch looks? Do I need to replace? Also flywheel?
QUOTE(loco914 @ Apr 23 2018, 06:12 AM)
Here’s the flywheel. Plan to remove and have it checked out.
Click to view attachment
Learning that engine tin screws can be quite stubborn
Ok flywheel appears ok,any ridges you can feel on the surface with your fingernail generally means it will need to be refaced if still in spec.
You can hit on the top the engine tin screws with a hammer and punch then use an impact tool on them ,if the slots are chewed out use some visegrips on them as a final solution.
To clean the long block completely seal off the inlet/exhaust ports ,etc,buy lots of decreaser and brush it on with a wash brush,let it soak it then hose or waterblast off.
If it was my engine I would take the cooler off after you have cleaned the block and have it ultrasonically cleaned,they get really dirty inside also.
Do all seals on the engine "while in there" you will thank yourself later
 .
.
You are going to run much cooler with all the motor smeg cleaned off.
If you pull the flywheel make sure you use a Sabo seal. Don't score the seal bore or you can make an oil leak.
You want a full flywheel package and replace the pilot bearing and felt washer too.
The plate under the flywheel bolts is a one and done, so make sure you get one of those too.
If you pull the flywheel make sure you use a Sabo seal. Don't score the seal bore or you can make an oil leak.
You want a full flywheel package and replace the pilot bearing and felt washer too.
The plate under the flywheel bolts is a one and done, so make sure you get one of those too.
Thanks for all the tips! Keep them coming. It may be a couple of weeks before I get some free time to work on it, but will post on any progress.
Don't forget the TOB and to see if you need to change the input seal to the trans since you are right there. Might as well check the output flange seals as well. The hard part has been done.
QUOTE(nditiz1 @ Apr 22 2018, 04:38 PM)
Not trying to hijack, but can someone tell me how my clutch looks? Do I need to replace? Also flywheel?
Looks almost new.
Steel wool the flywheel and pressure plate to remove rust on the friction surfaces, and brake clean on the clutch disk.
A little progress last night and today. Got the muck off all the engine tin and got some pieces blasted. Using medium glass beads and it seems to work well.
Click to view attachment
Thinking about painting the impeller housing any thoughts? Still a ways away as it doesn’t want to let go of 44 years of crap. Could blast as well, but figure it is too soft for glass. Would walnut shell media be good for this?
Click to view attachment
Click to view attachment
Thinking about painting the impeller housing any thoughts? Still a ways away as it doesn’t want to let go of 44 years of crap. Could blast as well, but figure it is too soft for glass. Would walnut shell media be good for this?
Click to view attachment
A good clean on the housing you will be good,if you really prefer paint you have to clean more,total clean after prep with paint pre cleaner,heat it up a bit then apply etch primer let that dry for while (slow to dry) and apply few coats of Plasticote high temp wheel silver,its kind off a a mid gloss and looks great.
Get that shortblock cleaned right up,you have a nice looking car it all needs to be back in the engine bay ASAP
Get that shortblock cleaned right up,you have a nice looking car it all needs to be back in the engine bay ASAP
Fun stuff. Did mine about a year ago.
There are 1-tins that sit right against cylinders. Use high temp paint on those as powder coat could melt.
If you get flywheel resurfaced, have them tell you how much they took off so you can use washers to adjust ball cup.
One thing missed is gasket between oil filter mount and engine. If course that is where I have some seeping.
Lots of good threads to follow including my own. People here are great at answwering questions as you go along.
BTW, I replaced all if the awful cheese head tin screws with stainless he screws.
Regarding oil cooler. They are not expensive. I got new one at busdepot.com (I went with genuine be part, they also sell aftermarket).
Here is my housing cleaned up and painted with Eastwood alumablast.
http://www.914world.com/bbs2/index.php?sho...=279204&hl=
Here is my housing cleaned up and painted with Eastwood alumablast.
http://www.914world.com/bbs2/index.php?sho...=279204&hl=
QUOTE(Amphicar770 @ May 6 2018, 10:53 AM)
Regarding oil cooler. They are not expensive. I got new one at busdepot.com (I went with genuine be part, they also sell aftermarket).
Here is my housing cleaned up and painted with Eastwood alumablast.
http://www.914world.com/bbs2/index.php?sho...=279204&hl=
Thanks! I knew I had seen that somewhere on this site, exactly what I had in mind.
Slow, but making progress. Estimating the equivalent of 5 hp gain just from the weight of all the crap coming off 
Click to view attachment
Any tips for getting deep it the fpiston an head cooling fins???
Click to view attachment
Any tips for getting deep it the fpiston an head cooling fins???
Steam cleaner. Under 100 bucks at HF.
https://www.harborfreight.com/1500-watt-ste...-kit-63042.html
+1 on painting the fan shroud with alumiblast. Looks great.
Click to view attachment
https://www.harborfreight.com/1500-watt-ste...-kit-63042.html
+1 on painting the fan shroud with alumiblast. Looks great.
Click to view attachment
I just finished cleaning my engine up. Took about a month a cleaning, sand blasting, and steam. I used alumi blast on the fan shroud and hi temp enamel rattle can paint for the tins. Engine case is original finish.
Going to address clutch, pressure plate and fly wheel next.
Going to address clutch, pressure plate and fly wheel next.
Very nice! Much needed motivation.

If you look at the spring fingers in this pic they are badly worn, wear here is one of the things you look for when inspecting your pressure plate.
On the shoe of the PP you don't want to see groves or hot spots.
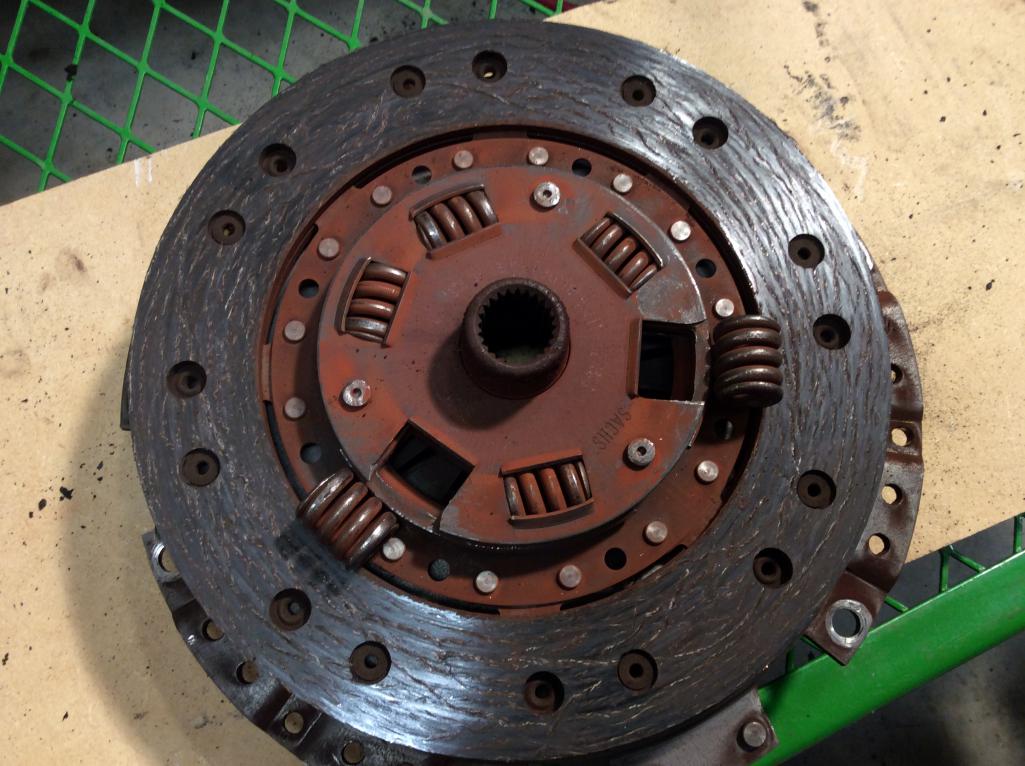
The springs broke likely because they were hitting the flywheel/crank bolts, often you have to grind the tops down on the bolts for clearance, plus a bit for disc wear.
Especially important check if the flywheel is reground.
Grinding the bolts doesn't hurt the strength, you can only go so far as you still need to get a socket on them.
Almost 2 years to the day, I finally have my 914 back in working order! A few little bits to tidy up, but what started as a clutch replacement turned into a longer journey than I expected. Forgive the shameless plugs here... 
Complete engine rebuild by DC Racing and Performance in Irving, TX.
Kept the fuel injection so no radical changes.
All engine tin blasted and powder coated.
New SS fuel lines from Tangerine Racing.
Cleaned and resealed fuel tank.
New fuel pump and replaced all rubber lines.
Various bits and pieces from AA and 914 Rubber.
Cleaned, inspected/re-packed CV joints.
New trans seals.
Rebuilt pedal board
Blasted and repainted too many parts to list.
Oh yeah...new clutch, pressure plate and throw out bearing too, since I was in there.
QUOTE(loco914 @ Apr 22 2018, 02:41 PM)
Just don’t understand why it would run hot....
Click to view attachment Click to view attachmentClick to view attachment

There are so many 914's out there running around with oil coolers just like this one and folks wondering why they run hot.
Great job taking advantage of the engine drop to get in there and get this stuff cleaned up.

Before.
Before.
After.
Before. For the 3rd time.
Rebuilt pedal board.
Ready to install
All buttoned up.
Off the ramps and ready to roll, 
This is a "lo-fi" version of our main content. To view the full version with more information, formatting and images, please click here.