Help - Search - Members - Calendar
Full Version: Broken exhaust stud
914World.com > The 914 Forums > 914World Garage
VaccaRabite
I have an exhaust stud snapped about 2 threads below the surface of the head.

My plan was to use a left twist drill bit to drill it out, and use an Irwin extractor (easy out, recommended by Project Farm)
https://www.youtube.com/watch?v=XVTn6wI4g6s


I saw in another recent thread about building it up with weld.

Here is where I am:
IPB Image

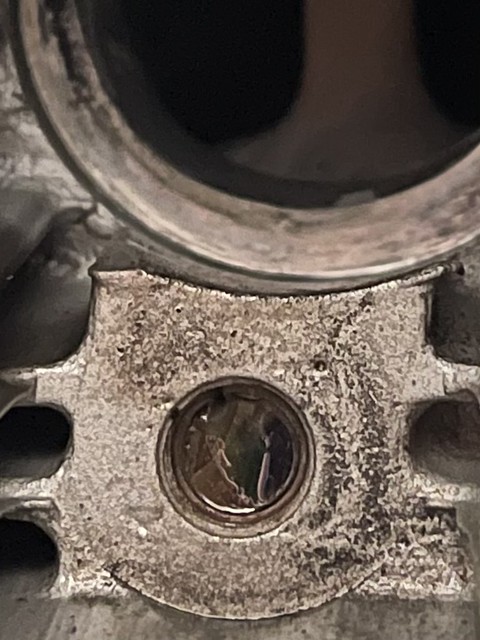
The stud broke 2mm (~.10 inch) below the surface of the head.
Head is on the car, exhaust is off.
I have been brushing my usual penetrant oil (50/50 acetone/ATF) on it 2x a day for three days.

Questions:

1) weld up? I've not done this before on a stud that is so far under the surface. Would this work here? Usually when I weld a broken stud its proud a little of the surface and I can weld a nut on. That very well could be an option here, but I don't want to hurt/melt the head.

2) left hand drill? Mark center, drill a pilot hole and then drill the stud out with a left hand twist bit. How deep do I need to set my drill stop to make sure I don't go through the stud into head.

3) combine the LHD and an easy out and hope for the best? If the extractor breaks the head has to come off and the car may be down for most of the summer. Risky.

4) LHD, and keep going bigger till I can tap for a step stud or insert?

And there is another option that I have considered but would leave the car down and I may miss the NE Gathering this summer:
The 2.3 that @Eric_Shea is building for me will be done sometime this summer. I could just go ahead and pull this engine now. Then wait and install the new engine when it gets here and fix this issue with the head off the motor and on a workbench.
But, again - the issue is that the global supply crunch is effecting the FI bits to my motor, and it may not be ready till fall for install. So the risk here is I miss the NE Gathering. Ugh.

So. What does the brain-trust think?

Zach
Superhawk996
yikes.gif

@vaccarabite

To repeat previous post . . . .No ... no .. and no to EZ Out extractors. See post #5 for reason why and alternate solution to drill out with LEFT hand drills.

http://www.914world.com/bbs2/index.php?showtopic=359455

Best Option-- take head to local machine shop. It will be very easy to drill out directly on center with a proper vertical mill. It should be about a 2 hour job and it will be done properly.

Option 2 you outlined is next best solution.

Make / borrow a drill index fixture - someone here must have one to help drill on center. Note: an old OEM heat exchanger can be used as a drill fixture. SSI or headers with the loop ears are not as good but are still a better guide than nothing . I apologize I don't have any on hand or I would FedEx it to you in an instant
Superhawk996
Regarding pulling the head -- this is when 914's suck.

But -- about 1 1/2 hours of your time to drop engine. Let's call it another hour to strip 1/2 of fuel injection to remove that head. 1/2 hour to pull the tin. 1/2 to pull head.

About 3 hours off and about the same time to reassemble. One day "wasted"

I have lived exactly with what you have about 30 years ago. Tried to drill it, got off center working upside down & in the recessed thread hole that makes it about impossible to get a clean center punch directly on center.

Then I broke an EZ out in it.

Then I spent about $35 in 1990 money on a carbide drill to try to drill the EZ out. Doesn't work with a hand drill (too fast & too unstable). Chipped the carbide drill in about 5 minutes. (side note -- I still have that drill -- resharpened -- as a reminder of youthful ignorance).

Point being it seems like a waste to pull the head but in hindsight it would have been so much easier . . . . and would have resulted in a successful repair.
Superhawk996
Questions:

1) weld up? I've not done this before on a stud that is so far under the surface. Would this work here? Usually when I weld a broken stud its proud a little of the surface and I can weld a nut on. That very well could be an option here, but I don't want to hurt/melt the head.

Agree -- trying to get a weld on that recessed stud has high chance of damaging the head.

EDIT: I tried this on a 2.4L 911 head that had broken studs. it doesn't work. I have TIG and can control current in a way MIG can't. As soon as I lit the arc, I could see the arc jumping out to the pointed threads and melting them. I immediately stopped. Ended up sending the heads to Ollies for other work and gladly paid for them the drill the studs out. Heads came back in perfect condition!

2) left hand drill? Mark center, drill a pilot hole and then drill the stud out with a left hand twist bit. How deep do I need to set my drill stop to make sure I don't go through the stud into head.

Yes -- 2nd best option (pull head is 1st)

If you decide to go this route, I can go measure the depth of the bore for you on a head I have sitting around-- PM me

3) combine the LHD and an easy out and hope for the best? If the extractor breaks the head has to come off and the car may be down for most of the summer. Risky.

Double risky. Once you have an EZ out broken in there - Electrical Discharge Machining is really the only good way. EZ out is basically "burned" out of the hole. EDM is typcally one of the most expensive services in a machine shop -- and that's assuming you can first find a shop with an EDM machine.

There is a minute chance that a vertical mill and a carbide drill can drill the EZ out but I've had about 50/50 success. EZ outs are rock hard. The carbide has to be run super slow and since the EZ out breaks off in a jagged way, it often chips the carbide drill -- even with a vertical mill holding it all.


4) LHD, and keep going bigger till I can tap for a step stud or insert?

This is sort of tied to #2. But yes, oversize with insert will work if you end up slightly off center and/or oversize on the hole to salvage the original hole and threads.
nditiz1
Zach,

I'm not sure if Stomski's stud extractor works on 914 heads, but you are more than welcome to barrow it/try it. I'm only about an hour drive from you.

Nick
rhodyguy
The Stromski I tried didn't work.
Superhawk996
Found this thread and successful creation of drill index and a success story of the step drilling method (option #2) in car by @Saigon71 (COM smilie_pokal.gif) along with dimensions for the home made drill index.

http://www.914world.com/bbs2/lofiversion/i...hp?t248544.html

If I recall @bdstone914 might have posted a while back that he keeps a few heat exchanger stubs around as drill fixtures. Might PM him.
rhodyguy
Has anyone used the helicoil flange nuts?
VaccaRabite
QUOTE(Superhawk996 @ May 3 2022, 11:13 AM) *

Found this thread and successful creation of drill index and a success story of the step drilling method (option #2) in car by @Saigon71 (COM smilie_pokal.gif) along with dimensions for the home made drill index.

http://www.914world.com/bbs2/lofiversion/i...hp?t248544.html

If I recall @bdstone914 might have posted a while back that he keeps a few heat exchanger stubs around as drill fixtures. Might PM him.


You win the internet for today! Bob lives one town over from me. I texted him and he's going to let me borrow the jigs he made for drilling it out.

And, yes, when you have a moment please let me know the depth you have on the studs.

Zach
Root_Werks
I'll second using reverse (left) drill bits. Start small and upsize as little as possible with each bit. Heat and left TQ almost always get the offending stud to turn left.
914werke
I made one of these. I drilled up the bosses to accept graduated drill guides (pic)
Superhawk996
QUOTE(VaccaRabite @ May 3 2022, 11:58 AM) *

. . . let me know the depth you have on the studs.

Zach


@VaccaRabite

Measured off good non-molested 2.0L heads 23.71 mm deep on side with valve guides. 23.5mm deep on the other side.

Believe it or not I still have the 1.7L head that I sheeplove.gif all those years ago. Has been a practice piece for learning to weld heads, pull valve seats, flycut combustion chambers. Apparently I'm a hoarder slap.gif

1.7L Head appears to be roughly the same. 23 mm or so.

If anything, err toward the side of stopping a couple millimeters short.

If you have to run a tap in there to clean up threads - buy a bottoming tap or make one by sacrificing one you already have by grinding off the initial tapered partial threads on the tap so you can get almost all the way to the bottom of the bore.
Superhawk996
QUOTE(914werke @ May 3 2022, 01:10 PM) *

I made one of these. I drilled up the bosses to accept graduated drill guides (pic)


smilie_pokal.gif nice - well done!
Root_Werks
QUOTE(Superhawk996 @ May 3 2022, 10:31 AM) *

QUOTE(914werke @ May 3 2022, 01:10 PM) *

I made one of these. I drilled up the bosses to accept graduated drill guides (pic)


smilie_pokal.gif nice - well done!


agree.gif

That is a cool tool Rich!

Extracting studs sucks, broken studs = even worse.
914werke
ya when your trying to drill straight..upside down, you need all the help you can get. biggrin.gif
flyer86d
I’ll repeat what we said last evening. Get a washer and weld it to the broken stud. You’ll have to start the weld on the stud and build it up to attach it to the washer. Then weld a nut to the washer. Try to back it out. If it breaks, do it again until you get it out. Don’t be afraid to turn the heat up on your welder. The application of heat helps break the bonds. I know that welding upside down presents an additional challenge but this method is safer that easy outs and trying to drill a hard stud stuck in a soft material.

Charlie
930cabman
Best of luck with this repair, it's possible to do this in the car, but I recommend to sent it off to the machine shop.

I had a used engine come to me awhile ago, PO attempted the same repair and drilled through the whole thing and ended up in the combustion chamber. My local guy made things like new.

Many mechanics "practice" similar to your doctor
VaccaRabite
QUOTE(flyer86d @ May 3 2022, 06:05 PM) *

I’ll repeat what we said last evening. Get a washer and weld it to the broken stud. You’ll have to start the weld on the stud and build it up to attach it to the washer. Then weld a nut to the washer. Try to back it out. If it breaks, do it again until you get it out. Don’t be afraid to turn the heat up on your welder. The application of heat helps break the bonds. I know that welding upside down presents an additional challenge but this method is safer that easy outs and trying to drill a hard stud stuck in a soft material.


The issue is how deep the stud is into the head where it broke. If it was flush to the head or a little proud welding would be the go-to. Deep in the head though it’s too easy to mess up the threads in the head while welding.

Zach
914werke
QUOTE(930cabman @ May 3 2022, 03:05 PM) *
Best of luck with this repair, it's possible to do this in the car, but I recommend to sent it off to the machine shop.
I had a used engine come to me awhile ago, PO attempted the same repair and drilled through the whole thing and ended up in the combustion chamber.
There is no argument that if you have exhaust studs that have pulled or worse case broken off the best course of action is remove the head & correct.
I always give the customer the information & options to make a informed decision.
Quite often the total cost of that repair is a significant deciding factor. sunglasses.gif
As for the low tech approach, The drill guides prevent wandering off the stud centerline & some simple tape will keep you from drilling too deep & breaking through. happy11.gif
VaccaRabite
For resolution, the car is back on the road. Bobs drill guides got me really close to not having to use a step stud, but in the end I did not trust my threads and went ahead and drilled and tapped for a step stud. Having a more or less perfect pilot hole the step stud was easy.

Exhaust went back on w/o problems. Did a valve job (they were all in spec!) and wire wheeled my spark plugs. Easy.

Just took the car on a test drive and I don’t have any obvious issues.

Before this engine goes in the bus (or goes up for sale) I’m going to pull the head and inspect my work a little closer. But for the rest of the season it’s fine until the next thing. :-)

I still am suspicious of that hanger. But I welded it back together and I know my welds have good penetration. Still, I’m going to add that to my check list just to be sure. This could have been a lot worse then it was, that’s for sure.

Zach
Superhawk996
smilie_pokal.gif Nice job -- so glad any potential EZ out fiasco was avoided and now you have the job done right. That is something to be proud of! pray.gif
PatMc
Nice repair.

I'll add...in my years of working on VW and Porsche stuff, tool clearance always seems to be an issue on exhaust and intake manifolds. I use these toyota exhaust nuts...run a tap through them to rid them of the locking feature, and use some 3M copper antiseize, and have never been disappointed.

90179-10128

https://www.yotashop.com/exhaust-nut-toyota...01-90179-10128/
Van B
Question:
Why not switch to manifold bolts instead of the stud/nut combo?
Superhawk996
QUOTE(Van B @ May 14 2022, 09:53 AM) *

Question:
Why not switch to manifold bolts instead of the stud/nut combo?


Now you've gone and done it. stirthepot.gif That topic is worthy of its own thread. There will be lots of debate with at least 1/3 of it being erroneous.

You could accept the answer that Porsche, VW, and many other OEM's have engineers dedicated to making that fastener design decision as well as doing testing to validate the integrity and serviceability of the joint.

or . . . let the debate begin. happy11.gif
Geezer914
Always something and it's never easy! Nice job on the repair.
JamesM
QUOTE(PatMc @ May 13 2022, 06:37 PM) *

Nice repair.

I'll add...in my years of working on VW and Porsche stuff, tool clearance always seems to be an issue on exhaust and intake manifolds. I use these toyota exhaust nuts...run a tap through them to rid them of the locking feature, and use some 3M copper antiseize, and have never been disappointed.

90179-10128

https://www.yotashop.com/exhaust-nut-toyota...01-90179-10128/


You could save yourself some money and the hassle of having to tap the nuts with these

http://vwparts.aircooled.net/ACN-Flanged-R...-p/acn-nuts.htm

TheCabinetmaker
Way back in the beginning of the club days, we were getting ready for our first MUSR and l dropped a valve seat the day before we were leaving. We pulled the engine and swapped on a head from the shelf. 12 hours later, we were on our way. Brad lit a fire under my ass and l got it done! Just do it, Zach!
VaccaRabite
QUOTE(TheCabinetmaker @ May 14 2022, 10:05 PM) *

Way back in the beginning of the club days, we were getting ready for our first MUSR and l dropped a valve seat the day before we were leaving. We pulled the engine and swapped on a head from the shelf. 12 hours later, we were on our way. Brad lit a fire under my ass and l got it done! Just do it, Zach!

Fixed it three days ago.

Also did a valve adjustment while the butt of the car was up in the air.

Test drove it Friday and all was well.

Zach
rhodyguy
A bump for the latest exhaust stud drama.
bkrantz
QUOTE(Van B @ May 14 2022, 07:53 AM) *

Question:
Why not switch to manifold bolts instead of the stud/nut combo?


I would guess to avoid unscrewing/screwing steel studs into aluminum threads, especially in a location with extreme heat cycles and potential for corrosion.
This is a "lo-fi" version of our main content. To view the full version with more information, formatting and images, please click here.
Invision Power Board © 2001-2024 Invision Power Services, Inc.