This was brought us as an issue and I'm really trying to figure this out. Any ideas of why the window would look lower and have a gap here.
Here were my thoughts -
I keep looking at this and something doesn't look right. Given that the blocks are identical to the factory ones in shape and durometer, what would the solution be here?
There appears to be a 1/2" section of rubber not fully seated, Is it holding it out?
Could the amount of butyl behind the "chrome" be holding it down slightly? I don't think that would be the whole story.
The triangle window looks like the top is seated deeper than the cap. Almost like if the top of the triangle window was shimmed out more it would push the bottom of the cap out more to "close the gap". This appears to be where the failure is - at least in my eyes. I've seen many of the caps worn and look slightly deformed from the top of the glass pushing it out, but not here. It looks like it's barely engaged.
Why it would sit lower is beyond me. The initial complaint was it was too tight, which would hold it up.
Submitted to the brain trust
Full Version: Help me help you Seal fitment
QUOTE(Mikey914 @ Aug 10 2022, 04:50 PM) 
There appears to be a 1/2" section of rubber not fully seated, Is it holding it out?
Just replied on the other thread, but I think the above is the bulk of the issue. If you look at the pic, the seal does not tightly follow the contour of the chrome channel on the windshield from where it makes the tight bend at the top. The seal block is too stiff to hold that shape. That makes the triangle cap contact the windshield seal farther rearward than it should and the resistance is enough to defect the triangle channel similarly rearward to prevent a good seal. Curious what others with first-hand experience think.
Hi, Mark. That's my right side in the photo.
I tried all sorts of adjustment, with the front channel base all the way back (pushing the top forward) and all the way front (with the top rearward), along with the inward-outward adjustment. The photo shows the best fit I could get: top forward and inward. I even thought about enlarging the adjustment hole for the base inside the door, but the angle of the rear edge of the window was already a bit tilted forward relative to the seal on the targa sail. I did remove and reinstall the main seal I got from you.
When I look at the gap again, it makes me want to reshape the aluminum trim piece on the A-pillar. I installed that with a thin butyl tape, and it seems to be parallel to the pillar.
My right side is also off and always thought it was a door shim issue as I ran out of adjustment of the triangle window frame. I would love to see a solution for this.
Funny I just looked into this this morning.
Short answer... top of the glass channel needs to be moved forward til the rear edge aligns with the rear point of the frame seal molding. It's not the seal, it's the alignment of the glass channel.
Short answer... top of the glass channel needs to be moved forward til the rear edge aligns with the rear point of the frame seal molding. It's not the seal, it's the alignment of the glass channel.
If you follow the leading edge of the glass, it looks like if it were 1/4" higher it woud fit perfectly.
A picture is worth 35 words
can anyone add the dimensions of the roof opening?
thinking that if the A pillar is moved back, the triangle window would not be able to be adjusted to fit right.
I know in my younger, more foolish days, i had jumped into the car without opening the door. and probably had my hand on the A pillar when doing so. Which would have pushed it down.
thinking that if the A pillar is moved back, the triangle window would not be able to be adjusted to fit right.
I know in my younger, more foolish days, i had jumped into the car without opening the door. and probably had my hand on the A pillar when doing so. Which would have pushed it down.
QUOTE(Olympic 914 @ Aug 11 2022, 09:18 AM)
can anyone add the dimensions of the roof opening?
thinking that if the A pillar is moved back, the triangle window would not be able to be adjusted to fit right.
I know in my younger, more foolish days, i had jumped into the car without opening the door. and probably had my hand on the A pillar when doing so. Which would have pushed it down.
The dimension is "f" -- 25 1/8"
Click to view attachment
Side note: Not sure why we now have two threads going on the same topic.
QUOTE(Olympic 914 @ Aug 11 2022, 07:18 AM)
can anyone add the dimensions of the roof opening?
thinking that if the A pillar is moved back, the triangle window would not be able to be adjusted to fit right.
I know in my younger, more foolish days, i had jumped into the car without opening the door. and probably had my hand on the A pillar when doing so. Which would have pushed it down.
It's true that the rake of the A pillar will affect the fit as you say, but in my case, the car was braced and adjusted to dial in the roof dimension to exact factory spec during restoration.
The problem I have is that adjusting the triangle channel forward to fit as @Chris914n6 shows doesn't work because the seal simply pushes it back when the door is shut. As I tried to explain in the other thread, if I could adjust so the channel and window cap were just a little shorter, then I think it would work, but I couldn't find a way to do that.
QUOTE(Chris914n6 @ Aug 10 2022, 07:04 PM)
Funny I just looked into this this morning.
Short answer... top of the glass channel needs to be moved forward til the rear edge aligns with the rear point of the frame seal molding. It's not the seal, it's the alignment of the glass channel.
This is what I was asking. My cars the old cap is actually deformed from holding the glass on, where it looks like this one is a bit short.
My experience with these cars is that it's not always as it appears. Sometimes a little change can affect other parts in ways that are not apparent.
There does seem to be a theme. So we will need to do a video of how we install and adjust to fit. I will begin this this next week.
QUOTE(Superhawk996 @ Aug 11 2022, 06:29 AM)
QUOTE(Olympic 914 @ Aug 11 2022, 09:18 AM)
can anyone add the dimensions of the roof opening?
thinking that if the A pillar is moved back, the triangle window would not be able to be adjusted to fit right.
I know in my younger, more foolish days, i had jumped into the car without opening the door. and probably had my hand on the A pillar when doing so. Which would have pushed it down.
The dimension is "f" -- 25 1/8"
Click to view attachment
Side note: Not sure why we now have two threads going on the same topic.
I started this thread with a new title to specifically ask for help from the community to address the problem. Calling that out specifically. It has yielded some different responses that are valid. I have posted up in the other thread as well. Explaining what the process is that we use, as well as how we size the seal and determine material specifications.
I do believe there is an issue here. It is definitely a compound question that the answer is not apparent. It's not as simple as make it softer, make it taller, install like this, not like that.
This is the main reason I'm seeking community input.
@Mikey914
There are a few good pictures and the first one of the yellow 914 to me doesn't look adjusted correctly. Most 914's were not fixed correctly after being bumped or worse, mine wasn't. But my door posts line up just fine.
I think your seal is okay, not perfect, but works. It takes time to adjust not only the door correctly, but the post and the window so it doesn't pull back or push the post.
I'll see if I can get a picture or two of my 914....
QUOTE(Mikey914 @ Aug 11 2022, 05:30 PM)
It is definitely a compound question that the answer is not apparent. It's not as simple as make it softer, make it taller, install like this, not like that.
This is the main reason I'm seeking community input.

Now I understand the 2nd thread. Thanks!
The picture with the yellow 914 the post looks too high and too far back. Should be closer to this:
QUOTE(Root_Werks @ Aug 11 2022, 04:46 PM)
The picture with the yellow 914 the post looks too high and too far back. Should be closer to this:
I agree completely with this, but IIRC, there is no vertical adjustment for the post. There is fore-aft adjustment at the bottom that pivots the top of the post fore-aft but I believe the pivot also determines the height of the post which is not adjustable. Did I miss that?

My car looks like the yellow car pic and all of the opening dimensions are right at factory spec. I'd love to drop that post down a smidge but the gods are witness that I tried.
Here is my car. Don't care for the fit. I am now all about just driving it with these wonky fit ups. Click to view attachment
QUOTE(bbrock @ Aug 11 2022, 05:34 PM)
QUOTE(Root_Werks @ Aug 11 2022, 04:46 PM)
The picture with the yellow 914 the post looks too high and too far back. Should be closer to this:
I agree completely with this, but IIRC, there is no vertical adjustment for the post. There is fore-aft adjustment at the bottom that pivots the top of the post fore-aft but I believe the pivot also determines the height of the post which is not adjustable. Did I miss that?
My car looks like the yellow car pic and all of the opening dimensions are right at factory spec. I'd love to drop that post down a smidge but the gods are witness that I tried.
I will repeat what I tried (on both sides) on my yellow car. The photo shows the fit with the top of the channel adjusted all the way forward and all the way inward. This means the adjustment at the base of the channel in the door bottom is all the way rearward and outward. I even tried to use all the freeplay in the holes at the top of the door to shove the channel forward.
And that is correct about adjustment: nothing for up and down.
QUOTE(Mikey914 @ Aug 11 2022, 03:30 PM)
QUOTE(Superhawk996 @ Aug 11 2022, 06:29 AM)
QUOTE(Olympic 914 @ Aug 11 2022, 09:18 AM)
can anyone add the dimensions of the roof opening?
thinking that if the A pillar is moved back, the triangle window would not be able to be adjusted to fit right.
I know in my younger, more foolish days, i had jumped into the car without opening the door. and probably had my hand on the A pillar when doing so. Which would have pushed it down.
The dimension is "f" -- 25 1/8"
Side note: Not sure why we now have two threads going on the same topic.
I started this thread with a new title to specifically ask for help from the community to address the problem. Calling that out specifically. It has yielded some different responses that are valid. I have posted up in the other thread as well. Explaining what the process is that we use, as well as how we size the seal and determine material specifications.
I do believe there is an issue here. It is definitely a compound question that the answer is not apparent. It's not as simple as make it softer, make it taller, install like this, not like that.
This is the main reason I'm seeking community input.
Mark, I appreciate your interest and effort.
It might be that the vent window glass is sitting too far rearward at the top. In my yellow car I used factory vent window rubber, and I think I set the glass fully into the groove along the channel as well as the groove along the top of the door.
I can try to answer any other questions you have.
Bob
QUOTE(mb911 @ Aug 11 2022, 05:50 PM)
Here is my car. Don't care for the fit. I am now all about just driving it with these wonky fit ups. Click to view attachment
This is a matter of not centering the seal on install. Put it in on the middle, then work your way out. It is possible to pull to one side. Should be able to pull off and reset.
QUOTE(bkrantz @ Aug 11 2022, 08:00 PM)
QUOTE(Mikey914 @ Aug 11 2022, 03:30 PM)
QUOTE(Superhawk996 @ Aug 11 2022, 06:29 AM)
QUOTE(Olympic 914 @ Aug 11 2022, 09:18 AM)
can anyone add the dimensions of the roof opening?
thinking that if the A pillar is moved back, the triangle window would not be able to be adjusted to fit right.
I know in my younger, more foolish days, i had jumped into the car without opening the door. and probably had my hand on the A pillar when doing so. Which would have pushed it down.
The dimension is "f" -- 25 1/8"
Side note: Not sure why we now have two threads going on the same topic.
I started this thread with a new title to specifically ask for help from the community to address the problem. Calling that out specifically. It has yielded some different responses that are valid. I have posted up in the other thread as well. Explaining what the process is that we use, as well as how we size the seal and determine material specifications.
I do believe there is an issue here. It is definitely a compound question that the answer is not apparent. It's not as simple as make it softer, make it taller, install like this, not like that.
This is the main reason I'm seeking community input.
Mark, I appreciate your interest and effort.
It might be that the vent window glass is sitting too far rearward at the top. In my yellow car I used factory vent window rubber, and I think I set the glass fully into the groove along the channel as well as the groove along the top of the door.
I can try to answer any other questions you have.
Bob
Thanks ,
I will contact you this next week as I work my way through the install on another car.
Mark
QUOTE(Mikey914 @ Aug 11 2022, 07:43 PM)
QUOTE(mb911 @ Aug 11 2022, 05:50 PM)
Here is my car. Don't care for the fit. I am now all about just driving it with these wonky fit ups. Click to view attachment
This is a matter of not centering the seal on install. Put it in on the middle, then work your way out. It is possible to pull to one side. Should be able to pull off and reset.
Maybe but will still have excess material that I will have to deal with. This I presume is if we are talking about where the roof portion of the seal portion.
Just a word or caution. It's not just about whether or not the window cap triangle fits into the windshield header radius.
As was the case in Bbrock's original post, it's about whether or not the seal is actually sealing to the window and the triangle - sealing out water and preventing wind-noise.
In my case, when I was able to get the seal fitting into the windshield header radius, it does not simultaneously seal. If you are on the inside, you can look out and see a sliver of daylight.
Like Brent, I feel I could get a better seal if I could shorten the window channel a smidge but the way the adjustment is you either get an inboard outboard adjustment or a fore/aft adjustment. Each alters the height of the channel ever so slightly but not enough to make a difference to the fit.
Unfortunately like a couple of other pictures here, I didn't take one showing the visible light gap between the seal and the glass / triangle. You have to be at just the right angle to see it and/or be inside the car looking out to a bright exterior - but the gap is there.
Tipping the window channel inboard just results in the seal pushing it out and increasing door closing efforts yet the seal gap to the triangle window and window cap never seals.
Click to view attachment
This is a picture before I was "finished" but the amount of glycerin all over everything speaks to how much fitting, refitting, etc., was required and it gives a view that the window channel seems just a bit too high. Also dimension "f" was verified throughout my build at 25 1/8".
In the view below - this is before the window channel was moved inboard as show above.
Click to view attachment
@Superhawk996 hit on an important adjustment I forgot to mention. The piece on the A pillar has the slightest adjustment in or out. I had to pull mine in on the drivers side as far as I could. Otherwise the glass would not tuck under the seal as shown in Superhawk996's picture.
Lots of really good information here and lessons learned!
Others have said as well, it takes quite a few adjustments to get things close enough to call good.
Lots of really good information here and lessons learned!
Others have said as well, it takes quite a few adjustments to get things close enough to call good.
Just took these pictures today. Click to view attachment
Ok, there is obviously and adjustment issue here. The seal (on the windscreen) is in the track. It looks to be seated correctly. Can you shoot some pics of what is going on on the triangle window seal? At the base inside and outside?
Looking at post 25 and 26, you can see what I was talking about when I mentioned the glass on mine seemed to push out the top cap. Unlike what you can see in the top on the 1st picture, now it looks like the glass is holding the top away creating a gap instead of the glass not being all the way up.
Looking at post 25 and 26, you can see what I was talking about when I mentioned the glass on mine seemed to push out the top cap. Unlike what you can see in the top on the 1st picture, now it looks like the glass is holding the top away creating a gap instead of the glass not being all the way up.
Ben, those are raked really far back.
It's hard to explain, but there is a tiny bit of up/down, mostly rake that can be adjusted. It requires the door panel be off. There is the bolt towards the top that needs to be slightly snug, then the adjuster at the bottom which should slide back/forth a little and of course use the adjusting screw to pull in/out. (Jeezuz that was a long sentence!)
It's a 3 dimensional adjustment which makes it harder. Your glass should seat much further into the cap.
Someone needs to make a video!
And that's the conclusion I'm coming to.
There are 2 videos that I need to make.
The 1st is for the triangle window seal install that is difficult enough, the second is for the main targa seal.
If the base is not seated fully, it obviously will not allow for the window to seat into the main seal properly. This compounds the level of difficulty for the installation.
It's a bitch to adjust but I've never had a problem with it. My can has a factory seal, not a 914rubber repo, but I don't see anything particularly wrong with it. Maybe it's the triangle seal? Mine are factory original, I have the 914rubber but haven't installed yet.
lower bolt hole with lots of movement.
upper bolt hole, pretty much fixed. you might need to loosen the bolt to get the guide to pivot.
lower bolt hole with lots of movement.
upper bolt hole, pretty much fixed. you might need to loosen the bolt to get the guide to pivot.
I don't want to speak for Ben but I ran into this situation like this along the way.
When the window channel is pushed forward - the triangle glass starts hitting the seal too high on the seal. Not on the bulb - where it's supposed to - but on the vertical square edge of the seal. (yellow arrow) that runs the whole length of the triangle glass.
At that point the seal is hard enough that the door / glass won't close properly and/or it will hold the triangle glass outboard.
It was a lot of trial and error trying to find a position between the window channel fit, the door fit, the seal fit itself within the channel and then finally the movement of the aluminum channels inboard/outboard.
I still never got to a really happy place with mine but did at least get to a point where the glass will (more or less) tuck under the square edge of the seal when the door is closed. If the seal has been in the sun, it seems to be better (seal gets softer) and if it's cold it tends to hang up about 10% of the time.
Click to view attachment
QUOTE(Chris914n6 @ Aug 12 2022, 12:09 PM)
It's a bitch to adjust but I've never had a problem with it. My can has a factory seal, not a 914rubber repo, but I don't see anything particularly wrong with it. Maybe it's the triangle seal? Mine are factory original, I have the 914rubber but haven't installed yet.
lower bolt hole with lots of movement.
upper bolt hole, pretty much fixed. you might need to loosen the bolt to get the guide to pivot.
Should be a nut on the adjustment at the bottom, this would allow for the movement up and back
QUOTE(Superhawk996 @ Aug 12 2022, 12:10 PM)
I don't want to speak for Ben but I ran into this situation like this along the way.
When the window channel is pushed forward - the triangle glass starts hitting the seal too high on the seal. Not on the bulb - where it's supposed to - but on the vertical square edge of the seal. (yellow arrow) that runs the whole length of the triangle glass.
At that point the seal is hard enough that the door / glass won't close properly and/or it will hold the triangle glass outboard.
It was a lot of trial and error trying to find a position between the window channel fit, the door fit, the seal fit itself within the channel and then finally the movement of the aluminum channels inboard/outboard.
I still never got to a really happy place with mine but did at least get to a point where the glass will (more or less) tuck under the square edge of the seal when the door is closed. If the seal has been in the sun, it seems to be better (seal gets softer) and if it's cold it tends to hang up about 10% of the time.
Click to view attachment
This is why I think we need to do a good quality video that breaks down what the adjustment do and maybe a flowchart.
As you can see the problems are
it's too far forward,
it's too far back,
the angle isn't correct,
the glass pushes on the seal at the windscreen as it's catches it.
there's a gap between the glass at the base of the end cap.
Some of these problems are opposite of each other. Leading me to believe it's not one thing that needs to be changed specifically, but a series of issues that can be created / resolved using installation technique.
We may make some changes if we can determine exactly what needs to be changed in all cases.
interesting discussion.
a dead german architect used to say, "god is in the details".
its a mind bogglingly beautiful detail - the triangle window.
half a century later when i pop the door open on the car it gets peoples attention.
looking at photos that are up previous it looks to like the critical alignment, at least when the factory did it is to have the cap on the triangle pillar line with the rear of the windscreen frame exactly. this does not appear to be the case with some of the examples up.
it looks like folks might have that cap aligning further back towards the rear of car.
not saying that will work.
these are the ones on my car.
lhs untouched from factory.
rhs door was off 30 years ago to do rhd conversion but we only drove the hinge pins out and did not touch the hinge brackets themselves.
interestingly there is a little bit of difference side to side in how much the pillar seal is compressed at the top but on both sides the back of the triangle window cap is in the same spot.
Click to view attachment
Click to view attachment
Click to view attachment
dunno if that helps.
the rubber is still in good condition in my car. it has not seen a lot of UV and weather.
its very soft and supple that particular seal.
Thanks,
Took a look at a few of my cars the dull red one is a 71 that is all factory and the gas are off with the pillar outside the edge more than some. There is a small gap at the top too. This car is bone stock. Unmolested.
Took a look at a few of my cars the dull red one is a 71 that is all factory and the gas are off with the pillar outside the edge more than some. There is a small gap at the top too. This car is bone stock. Unmolested.
Have another 74 black that had been repainted. Looks like they reused the original seals.
It was adjusted up too high and eventually wore out the seal. I think I may look at the install on this car.
It was adjusted up too high and eventually wore out the seal. I think I may look at the install on this car.
Here is my 72 that I put my seals on. I'm happy with the alignment.
I have 3 other cars I can look at, but I'm thinking that I've got enough examples in various conditions so figure this out and do a good video. Just spent a few hours today working on getting our "studio" ready.
QUOTE(Mikey914 @ Aug 12 2022, 06:50 PM)
Here is my 72 that I put my seals on. I'm happy with the alignment.
I could be wrong, but I think I see daylight through that seal.
@Mikey914
that second image of faded red car looks pretty much exactly the same as mine.
in terms of the rear of the triangle post cap and the windscreen frame and chrome trim.
nothings easy with this sort of stuff.
so much of it is down to the nature of the original materials themselves.
i'll bet this beautiful little detail gave VW and porsche a headache at the time getting it just right. especially in terms of not having to do too much fiddling on the assembly line.
QUOTE(bbrock @ Aug 12 2022, 06:27 PM)
QUOTE(Mikey914 @ Aug 12 2022, 06:50 PM)
Here is my 72 that I put my seals on. I'm happy with the alignment.
I could be wrong, but I think I see daylight through that seal.
It's not, you see the back part of the seal that the top is resting against. However, these are all new seals, the others are factory. I didn't even have to adjust a thing when I put the new ones on. I simply marked where everything was at disassembled and reassembled. I may have just got lucky, as I do believe that there is enough adjustment to get myself in trouble here.
I do think this is one of those cases where they did design it like the V2 rocket.
QUOTE(Mikey914 @ Aug 13 2022, 12:01 PM)
QUOTE(bbrock @ Aug 12 2022, 06:27 PM)
QUOTE(Mikey914 @ Aug 12 2022, 06:50 PM)
Here is my 72 that I put my seals on. I'm happy with the alignment.
I could be wrong, but I think I see daylight through that seal.
It's not, you see the back part of the seal that the top is resting against. However, these are all new seals, the others are factory. I didn't even have to adjust a thing when I put the new ones on. I simply marked where everything was at disassembled and reassembled. I may have just got lucky, as I do believe that there is enough adjustment to get myself in trouble here.
I do think this is one of those cases where they did design it like the V2 rocket.
Click to view attachment
VS.
Click to view attachment
Not trying to be a jackass but it doesn't seem to me that the 1st image is fit properly?
When I fit my targa seal, it seems to me that the aluminum channel ought to be all the way forward in the narrow groove so that is where I put it. Likewise, I personally would not accept the gapping between the header and the targa seal.
Not sure if this 1st picture is the finished result of the fitting, but I can't see myself accepting that.
From my fitment:
Click to view attachment
I think in having to close that narrow channel gap, and getting the targa to seal to the header, the seal moves forward which then puts a portion of the harder "corner block" in a situation where it is now starting to engage with the aluminum header channel. And more of that harder corner block now has to engage with the top of the triangle cap?
Moving that corner block of the seal forward also involved cutting about 1/8" off the tab of my aluminum channels that fit inside the corner block. I actually felt like I probably needed to cut another 1/16" off since I could still see that the seal wasn't quite as far forward as it seemed to want to be in order to get the seal to engage the bottom corner of the windshield header - yellow highlight. I didn't like having to trim the aluminum tabs at all but that seemed the only way to get a reasonable fit.
I still wasn't thrilled with the fit in the yellow highlighted oval. It seemed like there wasn't quite enough rubber there.
As a result of moving the corner block forward to get rid of the narrow channel gap, it seemed to me that I was forcing too much base of the seal into the aluminum channel which then resulted in a sort of buckling/compression of the corner block that is shown in the orange oval. It sort of tries to roll that area of the seal inward.
i'm starting to notice some things here.
starting with.
1) roof to windscreen seal. that doesn't look quite like my factory seal.
or at least my 74 factory seal. see back on page 2.
my factory seal does not seem to have that single large curve bump at the windscreen frame edge like the examples you guys are posting up. where its running across the top of the windscreen.
???????
since this is all a one piece seal bonded at corners (? have i got that right) i think the problem you guys might be having is that roof seal portion is kind of dragging the windscreen pillar seal backwards towards rear of car out of the pillar. because it won't compress nicely when it gets to either end of windscreen top.
as well i'm looking at my factory seal and it has a very elaborate kind of double-back mitre where they joined the windscreen pillar moulding to the top moulding right up near the top corner there. its a very tricky little joint in the original factory moulding. assuming it is a joint. i'd have to study it more. it sure is more complex than an 0-ring on a space shuttle booster.
maybe i am not seeing things right with the 914 rubber seal in some of these photos here?
@mikey914 . there is devil in the detail of the moulding itself that lets it negotiate the corner and rest at ease?
i was peering into the interior of the corners of that seal on my car thanks to you guys.
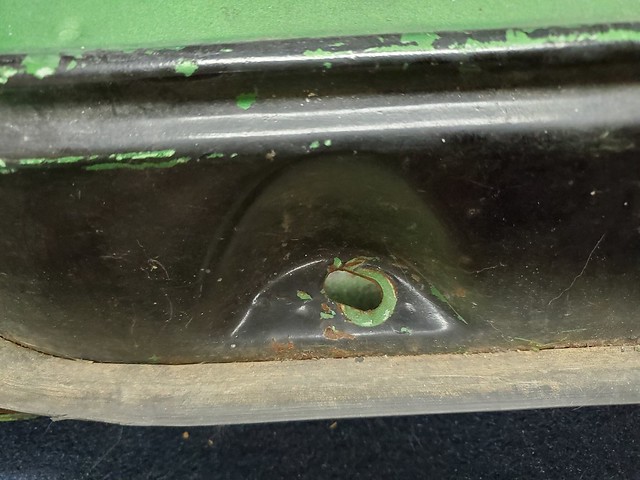
had a .
factory workers hacked a good portion of the interior liner away where you can't see it to do a bit of japanese origami and not foul or push against rubber seal in any way !
never looked in there before. classic shadow detail. hides a million sins if you don't look into infinity.
one last thought. the upper windscreen rubber is just the right dimension to be slightly in tension (or stretched) in order to pull those top corners in and never let them push out, even a tiny amount.
i dunno.
Click to view attachment
Click to view attachment
starting with.
1) roof to windscreen seal. that doesn't look quite like my factory seal.
or at least my 74 factory seal. see back on page 2.
my factory seal does not seem to have that single large curve bump at the windscreen frame edge like the examples you guys are posting up. where its running across the top of the windscreen.
???????
since this is all a one piece seal bonded at corners (? have i got that right) i think the problem you guys might be having is that roof seal portion is kind of dragging the windscreen pillar seal backwards towards rear of car out of the pillar. because it won't compress nicely when it gets to either end of windscreen top.
as well i'm looking at my factory seal and it has a very elaborate kind of double-back mitre where they joined the windscreen pillar moulding to the top moulding right up near the top corner there. its a very tricky little joint in the original factory moulding. assuming it is a joint. i'd have to study it more. it sure is more complex than an 0-ring on a space shuttle booster.
maybe i am not seeing things right with the 914 rubber seal in some of these photos here?
@mikey914 . there is devil in the detail of the moulding itself that lets it negotiate the corner and rest at ease?
i was peering into the interior of the corners of that seal on my car thanks to you guys.
had a
.factory workers hacked a good portion of the interior liner away where you can't see it to do a bit of japanese origami and not foul or push against rubber seal in any way !
never looked in there before. classic shadow detail. hides a million sins if you don't look into infinity.
one last thought. the upper windscreen rubber is just the right dimension to be slightly in tension (or stretched) in order to pull those top corners in and never let them push out, even a tiny amount.
i dunno.
Click to view attachment
Click to view attachment
I have given some thought here to why mine fits the way it does. My car was a mess prior to my restoration and that could have changed the basic shape of the opening even though my car meets the factory spec measurements. The biggest issue for my particular car is the "pinch" point at the front of the triangle window to the windshield frame. The seal is a bit harder than I think it should be or at least on my car. This then effects the adjustments and balance of adjustments needed to get the door to properly shut. For my car I believe I need a softer seal. Again I am thinking something like what a 60s or 70s domestic car seals would be made of. I think of my buddies GTO that has very soft seals.
So to conclude my thoughts on this each car is likely different and thus the seals fit fine for some and others not.
So to conclude my thoughts on this each car is likely different and thus the seals fit fine for some and others not.
![popcorn[1].gif](http://www.914world.com/bbs2/style_emoticons/default/popcorn[1].gif)
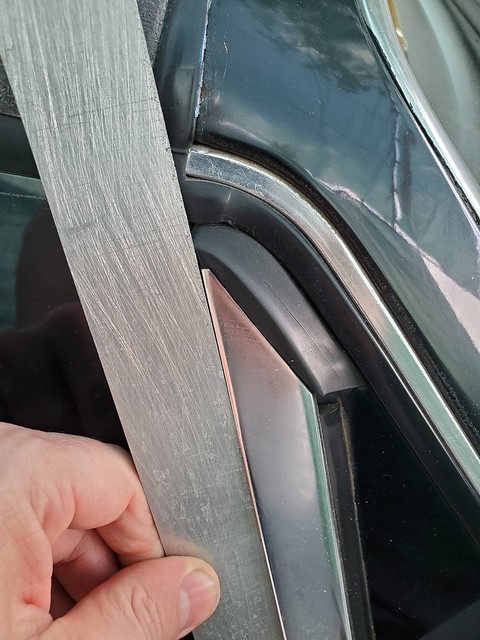
Looking at this photo, and assuming this is an original factory seal, I see something: the thickness of the seal is about the same as the sides of the aluminum retaining strip.
I am thinking that if the rubber seal is too thick, it will prevent the triangle from seating properly.
I am thinking that if the rubber seal is too thick, it will prevent the triangle from seating properly.
QUOTE(bkrantz @ Aug 14 2022, 09:14 PM)
Looking at this photo, and assuming this is an original factory seal, I see something: the thickness of the seal is about the same as the sides of the aluminum retaining strip.
I am thinking that if the rubber seal is too thick, it will prevent the triangle from seating properly.
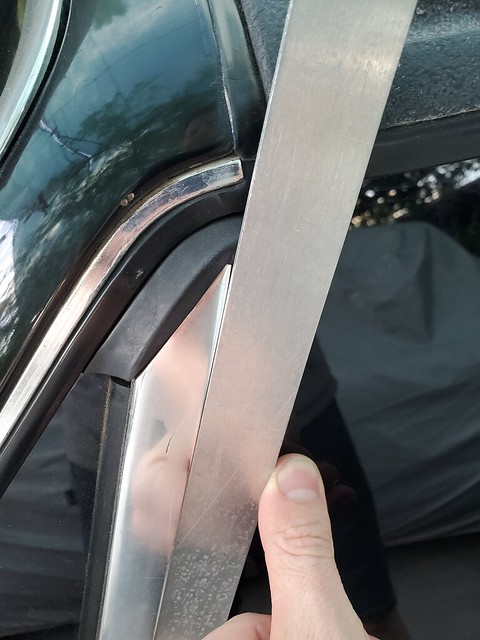
maybe
but i've still got very good condition factory seals and they are a bit bigger than the alum retaining strip, so maybe this example of mikey914's is just a bit more dried out.
but i have noticed something else.
the joint between upper windscreen moulding and the pillar trim.
except i don't know if its a joint, it would take @mikey914 to explain it properly in terms of how he manufactures these mouldings (or what he knows about the original factory mouldings).
i think there is some kind of joint in the original factory moulding too.
but maybe somehow they moulded these complex rubber pieces as a single part and what i am looking at are mould section marks. i don't know enough.
here are the two factory mouldings.
mine and mikey's example.
you can see the joint line or the mould section line which indicates where the profile of the mould changes. this joint/change in profile occurs right in line with windscreen frame rear (and back of triangle pillar cap).
Click to view attachment
Click to view attachment
with the 914 rubber moulding this isn't the same. the end of screen moulding profile appears to have a leg on it and the join or change (?) in profile is further forward.
Click to view attachment
thats definitely going to have an effect on the way that pillar moulding wants to behave as it turns the curve at the top of the windscreen pillar and seats into the alum channel. it won't go around that bend in the same way the originals did?
The rubber is bonded. There are 2 extrusions that join into the corner block. the block itself has an internal plug that the extrusion "fits" onto to be bonded. It has to have enough material to "grab" onto. To make a good bond. There this becomes critical is the curve.
In addition, some of what you are seeing is the tool that is used, it's not necessarily the edge of the part. Our early seals had this about 2" from the block until we made the tool.
In addition, some of what you are seeing is the tool that is used, it's not necessarily the edge of the part. Our early seals had this about 2" from the block until we made the tool.
Hi. This will take a few minutes
This is a "lo-fi" version of our main content. To view the full version with more information, formatting and images, please click here.