Help - Search - Members - Calendar
Full Version: How To: Swivel foot valve adjusters on a 74-76 2.0L?
914World.com > The 914 Forums > 914World Garage
JeffBowlsby
So those in the know...how is this conversion done? I don't now the specifics so please tell me. I understand that the stock 74-76 2.0L cars use a larger-diameter adjuster and cannot accept the swivel foot adjusters because they are smaller. The needed parts as I understand it are:

* Rocker arms/shaft assemblies from a 1.7L engine
* Swivel feet valve adjusters (10mm?)
* Shims

Is all the above correct?
What shims do I need and where are they installed?
Is there further machining to do to the rocker arms?

All details please...Thanks in advance biggrin.gif
Twystd1
Yup... You have the right parts.

Now you need to mill or sand off about 60 thou from the UNDERSIDE of the rocker where the swivel foot is threaded in.

REASON.... it gives you 60 thou more of adjustment room.

And you are going to need it. As the swivel foot part of the adjuster is longer than a stocker. Therefore you need the additional room.

You are also going to need an adjustable pushrod and a dial indicator and a degree wheel to set em up right. Plus rocker spacers to get it nats ass correct. Thats all cheap stuff.

Go to Jakes forum and read his 9000 word dissertation on how to do this.

If ya want.... send me the rockers and I will clearance them for you for nothing. it's easy. takes about 30 min to 45 min for all eight.

Now.. Aaron.... Did you beat me too the response...??????????

Ya little shit..

Clayton
JeffBowlsby
Clayton...you are golden...PM me your address and I will get them off to you. I will include some 'appreciation'...for your trouble.

QUOTE(Twystd1 @ Jan 10 2007, 04:32 PM) *

Yup... You have the right parts.

Now you need to mill or sand off about 60 thou from the UNDERSIDE of the rocker where the swivel foot is threaded in.

REASON.... it gives you 60 thou more of adjustment room.

And you are going to need it. As the swivel foot part of the adjuster is longer than a stocker. Therefore you need the additional room.

You are also going to need an adjustable pushrod and a dial indicator and a degree wheel to set em up right. Plus rocker spacers to get it nats ass correct. Thats all cheap stuff.

Go to Jakes forum and read his 9000 word dissertation on how to do this.

If ya want.... send me the rockers and I will clearance them for you for nothing. it's easy. takes about 30 min to 45 min for all eight.

Now.. Aaron.... Did you beat me too the response...??????????

Ya little shit..

Clayton

Twystd1
PMing you now...

C
gregrobbins
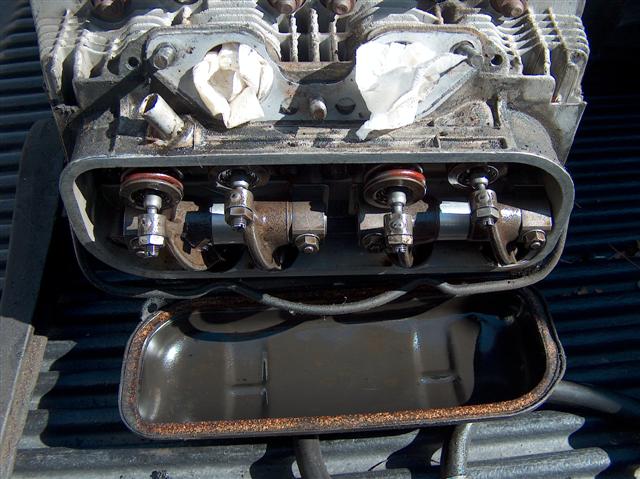
Here's a photo I copied from somewhere.
Twystd1
Thats the exact photo I was searching for..... Thanks Greg..!!!!!

Jeff... I hope those are REAL PORSCHE GENUINE swivel feet.

As everything else is sub par. IMHO
Aaron Cox
QUOTE(Twystd1 @ Jan 10 2007, 06:52 PM) *

Thats the exact photo I was searching for..... Thanks Greg..!!!!!

Jeff... I hope those are REAL PORSCHE GENUINE swivel feet.

As everything else is sub par. IMHO


word.... clayton did mine too...

to get my geometry gnats ass... i had to use .060" rocker shims to shim the assemblies out....

i also set the rocker adjusters mid way in.... (thus part of the spacer requirement) so i would have ample adjustment either way.

i also bought solid rocker spacers as my engine regularly sees 6000 rpms...

IPB Image

see my blog H E R E for more complete pics
morph
where did you get the spacers to replace the springs?
or where can i find them ?
james
Twystd1
Heee..Heeee

Aaron said his engine sees 6000 rpms.

I have been with him driving... he spins it faster than that getting out of his driveway...

AND his lash hasn't changed much to my knowledge.

That means he did it right.... (Lucky bastard)

Cheers,

Clayton
swood
QUOTE(morph @ Jan 10 2007, 10:11 PM) *

where did you get the spacers to replace the springs?
or where can i find them ?
james


I got mine from a later model hydraulic bus engine. Check with a Vdub shop.
Twystd1
The Jakester and aircooled.net sells em also..

C
Aaron Cox
i got mine off ebay and clearanced em to .004" side to side play
CHAFF
Hi Aaron, Let me get this straight....if you grind the rockers down...do you still need the shims? If so do you have a pic of where the shims go?


-L

QUOTE(Aaron Cox @ Jan 10 2007, 09:53 PM) *

QUOTE(Twystd1 @ Jan 10 2007, 06:52 PM) *

Thats the exact photo I was searching for..... Thanks Greg..!!!!!

Jeff... I hope those are REAL PORSCHE GENUINE swivel feet.

As everything else is sub par. IMHO


word.... clayton did mine too...

to get my geometry gnats ass... i had to use .060" rocker shims to shim the assemblies out....

i also set the rocker adjusters mid way in.... (thus part of the spacer requirement) so i would have ample adjustment either way.

i also bought solid rocker spacers as my engine regularly sees 6000 rpms...

IPB Image

see my blog H E R E for more complete pics
914Mike
QUOTE(Aaron Cox @ Jan 10 2007, 11:28 PM) *

i got mine off ebay and clearanced em to .004" side to side play


I just used the Hydro spacers and the shims and spring washers that came with them.

The shims go under the rocker stands to give the swivels enough room, I got mine from Bugformance on Capitol Ave, they're hanging on the carded wall on the right as you go in... (I'm sure Jeff knows where this place is.)

Either way you need to make custom length pushrods to get the geometry right once you put the 50-60 thou shims under the rocker stands. If you don't set it up so that the first half of the lift is pushing up on the valve stem, and the second half pushing it down, you will get premature wear on the valve guides. The stock length pushrods will be pushing mostly up on the valve stems...
CHAFF

Could you not just grind the face of the swivel foot down?

-L
Dave_Darling
QUOTE(CHAFF @ Feb 26 2007, 07:19 PM) *

Could you not just grind the face of the swivel foot down?


That would probably go through the hardening on the swivel foot, and get to a part that would wear quickly. It might also weaken the foot so that it breaks after a while...

Decking the rockers is a known quantity; they are more than beefy enough in that area to take it.

--DD
CHAFF

Man, there sure seems to be alot of misleading information regarding this upgrade. I think I will just stick to the good ol' 8mm stock adjusters.

-L

QUOTE(Dave_Darling @ Feb 26 2007, 07:33 PM) *

QUOTE(CHAFF @ Feb 26 2007, 07:19 PM) *

Could you not just grind the face of the swivel foot down?


That would probably go through the hardening on the swivel foot, and get to a part that would wear quickly. It might also weaken the foot so that it breaks after a while...

Decking the rockers is a known quantity; they are more than beefy enough in that area to take it.

--DD

jd74914
QUOTE(CHAFF @ Feb 26 2007, 10:40 PM) *

Man, there sure seems to be alot of misleading information regarding this upgrade. I think I will just stick to the good ol' 8mm stock adjusters.

-L

QUOTE(Dave_Darling @ Feb 26 2007, 07:33 PM) *

QUOTE(CHAFF @ Feb 26 2007, 07:19 PM) *

Could you not just grind the face of the swivel foot down?


That would probably go through the hardening on the swivel foot, and get to a part that would wear quickly. It might also weaken the foot so that it breaks after a while...

Decking the rockers is a known quantity; they are more than beefy enough in that area to take it.

--DD


Chaff,

What are you confused about? This is a known good upgrade. smile.gif
Aaron Cox
You need to clearance 60 tho off the rocker face. gives you enough adjustment room without having to use a bazillion shims to get it out that far.

you sometimes have to use shims (NOT always) to get the rocker arm geom. perfect. that is, the rocker adjuster is CO LINEAR with the valve stem (directly in line with) at HALF LIFT.

you will also need to use cut to length pushrods in conjunction with shims to achieve that.

really simple.
CHAFF

Ok here is my deal.

I understand that this will require cutting back the rocker....

But here is the question no one wants to answer....you still need to shim up the mounting block? If so then doesn't the old push rod become too short hence you need a new set of longer pushrods?

-L


[/quote]

Chaff,

What are you confused about? This is a known good upgrade. smile.gif
[/quote]
Aaron Cox
[quote name='CHAFF' date='Feb 26 2007, 08:19 PM' post='868303']
Ok here is my deal.

I understand that this will require cutting back the rocker....

But here is the question no one wants to answer....you still need to shim up the mounting block? If so then doesn't the old push rod become too short hence you need a new set of longer pushrods?

-L


[/quote]

Chaff,

What are you confused about? This is a known good upgrade. smile.gif
[/quote]
[/quote]

YES. you need new pushrods to do it RIGHT.

IPB Image
CHAFF

Thanks Aaron, that answers it.

QUOTE(Aaron Cox @ Feb 26 2007, 08:10 PM) *

You need to clearance 60 tho off the rocker face. gives you enough adjustment room without having to use a bazillion shims to get it out that far.

you sometimes have to use shims (NOT always) to get the rocker arm geom. perfect. that is, the rocker adjuster is CO LINEAR with the valve stem (directly in line with) at HALF LIFT.

you will also need to use cut to length pushrods in conjunction with shims to achieve that.

really simple.

Jake Raby
I have a 9,000 word step by step valve train geometry article on my forums...


Its a must read.

Shimming rockers is 98% of the time NOT the correct method to attain proper geometry. Read my article to find out why.

I also had a Radio Show in December that went over all these things step by step!
Dave_Darling
QUOTE(CHAFF @ Feb 26 2007, 08:19 PM) *

But here is the question no one wants to answer....you still need to shim up the mounting block? If so then doesn't the old push rod become too short hence you need a new set of longer pushrods?


It will work if you don't put any shims between the rocker shaft and the head. However, the rocker arms will not line up very well with the valves, which will lead to accelerated wear. Since one of the main reasons to do this mod is to cut down on the wear on your valves and valve guides, having mis-aligned adjusters is rather counterproductive.

To get everything set up "perfectly" (or at least close!), you need to set up some measuring jigs and fiddle with at least two measurements that I can think of off the top of my head. One is how far away from the head the rocker shaft is, and that's where the shims come in. Another is the pushrod length--which is where an adjustable pushrod comes in handy. You also, at least sometimes, need to mess a little more with the part of the rocker closest to the valve.

Google "rocker arm geometry" and you can probably dig up a few articles about the subject. Or head over to Jake's to read about the application specifically to the Type IV engine with swivel-foot adjusting lugs.

--DD
914werke
I thought Id update the descriptive image. smile.gif
maf914
Rich, Nice clarification to the earlier posted photo. May I ask why you indicate the countersink? idea.gif
914Sixer
10mm swivel foot German adjusters are now available for about $100
914werke
good to know, source?
bbrock
Here's a machining service and source for swivel feet.

https://www.thesamba.com/vw/classifieds/det....php?id=2060099

Or here is the link to direct ordering the adjusters from the manufacturer.

http://www.tp-technologie.de/produkte%20ve...ellsch%20en.htm

Not Genuine Porsche but have gotten good reviews. I think @nditiz1 installed them. If so, maybe we can get an update.
nditiz1
They worked out great. I saw no issues while using them. The machining was also done well. I had the same guy machine the stock pushrods so as to get the correct rocker geometry.
Mark Henry
Yes you have to machine and countersink the rockers.
Yes you have to use custom pushrods, I only use Manton PR's.
You may also have to shorten the SF adjuster 8mm threaded section.

IMHO Swivel foot adjusters are not required for a stock/stock cammed engine.
But they're required for engines with higher lift cams or HD springs.
This is a "lo-fi" version of our main content. To view the full version with more information, formatting and images, please click here.
Invision Power Board © 2001-2024 Invision Power Services, Inc.