|
|
|
|
|
|
22June06 - 38854: Inspected front outside bearings. NEED REPLACING! Naturally, so will the inners. Pitted and rusty. Cleaned and repacked with synthetic grease. Front left was originally too loose. No more grumbly sounds coming from the front end, yeay! Brake pads are meaty, look new. Did I replace them? Gonna have to check my paper records...somewhere... 20June06 - 38790: Swapped in my previous rebuilt 914 tranny. Current tranny needs new synchros, minimum, and seal(s?) around the shift lever as it has a slow leak...more so when hot of course. "New" tranny is niiiice! Also had to replace original rear shift rod with my previous 914 unit as the original unit was hitting the lower cooling tin and disallowing 4th gear shifts. All new bushings from firewall to tranny for shifting. New cone screws used with blue Loctite to keep things held together. Used inner star washers on CV bolts as I couldn't locally get the stock-style (serated) washers. DOH...just occured to me I could've hit the local Porsche dealership that's 2 miles from my house...idiot! Oh well, ordered 16 of them and a new rear shift cover from PelicanParts. Also got an extra pair of CV gaskets. Now I'm prepared for another CV disassembly should I need one.
I was having troubles shifting into 4th gear, like, it simply wouldn't happen. 5th gear was beginning to become difficult as well. [version=long] Since the tranny was very well worn I decided to finally swap in my rebuilt unit. I finally got to the point of adjusting the shifter and I decided to keep the rear shift cover off so I could see the positioning of the shift lever on the tranny, to verify I was in the correct gear. Nope, couldn't get 4th I thought that maybe it was my shifter so I swapped the original unit back in. Nope. Still no 4th. I slipped under her and began manually shifting using adjustable hose plyers on the tranny shift lever. Ahh...the shift rod was pushing against the lower left engine cooling tin! Hmm, I could beat the living daylights out of the tin because I was now in that mood And I really didn't feel like disconnecting the rear shift rod and trying to bend the shift rod. Then I remembered I had my previous teener shift rod ('75 1.8L). I placed it under the installed unit and it looked pretty dang close so I thought it wouldn't make a difference. Well, I had nothing to loose but time so I took out the original shift rod and installed my old rod. BINGO! Manually shifting at the tranny was easy So I then connected the shifter to the shift rod up in the cabin and bah-damn! she was shifting sooo smoooothly A quick test drive around the neighborhood without a muffler/header (damn they sound good that way!) and shifting was just like the car was new [/version] [version=short] Check that the shift rod DOES NOT TOUCH any part of the engine. This is the most prevalent when shifting into 4th gear. If the rear shift rod touches the engine or front engine support then you won't be able to select the gear you want...or have a very difficult and likely inconsistent time of doing so (due to engine & tranny movements). If there is contact, make sure the cooling tin is straight and all bolted to the engine. If it's the engine bar then make sure it's installed vertically level (not angled) and perpendicular to the longs. If the engine/engine bar passes those tests then swap out the rear shift rod for a known good unit (like I did). It's actually pretty easy to swap out the rear shift rod after you've done it a couple times [/version]
Drove the car with the roof off to the DMV for new year stickers for the registration. Then drove to the shop reaching speeds up to 70mph, trying to burn off the previous oil/gunk on the drive train. Worked and still no leaks. Now the underbody doesn't smoke  Timed the ignition and set idle speed. The AAR (aux. air regulator) is kaput so I have it clamped off until I can fix it so cold starts require my foot on the gas until the car warms up. Otherwise she's running great! Lowered the front end via the torsion adjusters so the ride is now level. Timed the ignition and set idle speed. The AAR (aux. air regulator) is kaput so I have it clamped off until I can fix it so cold starts require my foot on the gas until the car warms up. Otherwise she's running great! Lowered the front end via the torsion adjusters so the ride is now level.
Drove home with the heater on full blast and windows down to burn out the oil in the driver's side heat exchanger. No forced air to the passenger side yet so hopefully that will slowly burn out. Drives really well. Taking some getting used to on shifting and 1st will grind if not engaged slowly and pretty much stopped. Down shifting 5th to 4th is tough...still figuring out how she likes to be shifted. Sure do like driving her...couldn't stop smiling...even with the front hood missing!
Engine bay with new hoses and running engine! The battery tray was a quick and sloppy fix in order to get the battery in there. Also, the area where the fuel pump is supposed to mount in the stock location is gone...rust  So it's in the location that it's in until I can get things fixed with the VERY limited budget I have (unemployment money doesn't even cover the mortgage ). Hey, she drives. So it's in the location that it's in until I can get things fixed with the VERY limited budget I have (unemployment money doesn't even cover the mortgage ). Hey, she drives. Attached thumbnail(s) 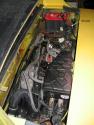 
Hell, where to start? It was actually a full day for seeminly little work but I'm pretty anal about stuff (sometimes over-thinking, actually) and the no starting issue took time to trouble-shoot.
Replaced the non-cork valve cover gaskets with cork ones. Used Gas-A-Cinch to hold the gasket to the cover -- works GREAT! The oil leaks were definitely coming from the lower valve covers and it looks like the cork replacements are holding the oil back now. Replaced ALL of the hoses/vacuum lines in the engine compartment and the ones used up front for the fuel emissions stuff. I hooked up a couple of wires near the dizzy: The aux. air regulator (AAR) and the thermo switch used for the cold start injector. Popped the fuel pump fuse  After much searching & reading (and cussing) of the FI system I removed the thermo wire, replaced the fuse and started the car. POP! Okay, re-attached the wire since that wasn't the cause and removed the AAR wire and replaced the fuse. Car started and continued to run -- SUCCESS! Also, after the engine warmed up the idle kept rising until it hit 2000rpm!! I clamped the AAR hose off and the idle dropped to 1000rpm. I adjusted the dizzy timing to drop the idle to 925rpm and called it good enough. After much searching & reading (and cussing) of the FI system I removed the thermo wire, replaced the fuse and started the car. POP! Okay, re-attached the wire since that wasn't the cause and removed the AAR wire and replaced the fuse. Car started and continued to run -- SUCCESS! Also, after the engine warmed up the idle kept rising until it hit 2000rpm!! I clamped the AAR hose off and the idle dropped to 1000rpm. I adjusted the dizzy timing to drop the idle to 925rpm and called it good enough.
Obviously gotta fix some things but she runs and so far no oil leaks. She'll make a good non-rainy-day car until I can get the seals and body rust fixed. 
These just show how the retaining wire mounts in the head. Very glad I took these pictures because I didn't remember exactly how they went in and my manuals weren't very helpful.
Picture of the clutch cable assembly is for reference of part locations...like the cable securing parts to the clutch lever  Even the simplest, smallest things that you'd think would be easy to remember how they go together...don't. That's why I have the pictures, to cover what the manuals don't Even the simplest, smallest things that you'd think would be easy to remember how they go together...don't. That's why I have the pictures, to cover what the manuals don't  Attached thumbnail(s) 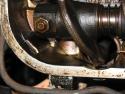 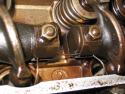 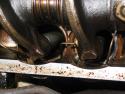 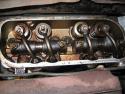 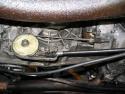
New seals on the push rod tubes (and one replaced tube ). Glad I adjusted the valves cuz they were all off and most of them were VERY tight! Point gap set and remaining cooling tin placed along with most of the heating system. Missing some parts for the right side but I don't remember if those were missing when I bought the car or I removed them and they're hiding in a box somewhere...
Made a quick battery tray. Not pretty but functional. Right engine console still needs replacing but no job, no money... I just wanna get this engine running and -- I hope -- without all of the oil leaks. That'll be a nice accomplishment alone and then the car will be driveable. Assuming those hard-to-push brakes still work...and I can get the shift linkage adjusted this time... 
The two pictures are of the warm air guides that go BEHIND the engine. The Haynes did a crappy job showing where they go cuz I forgot where they went, so this is a supplement to the Haynes  After playing puzzle-pieces with the tin and mounting holes I obviously figured out where they went. After playing puzzle-pieces with the tin and mounting holes I obviously figured out where they went. Attached thumbnail(s) 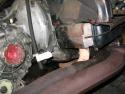 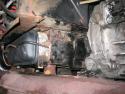 |


 Jun 23 2006, 01:05 AM