|
|
|
Porsche, and the Porsche crest are registered trademarks of Dr. Ing. h.c. F. Porsche AG.
This site is not affiliated with Porsche in any way. Its only purpose is to provide an online forum for car enthusiasts. All other trademarks are property of their respective owners. |
|
|

  |

| Twystd1 |
 Dec 9 2007, 12:59 AM Dec 9 2007, 12:59 AM
Post
#141
|
|
You don't want to know... really.....  Group: Members Posts: 2,515 Joined: 12-September 04 From: Newport Beach, California Member No.: 2,743 |
Hi Jeff,
Kinda been 2 busy to respond lately. The follow up pics and explanation was PURRRFECT. That exactly what I needed to show someone. I am most grateful for the answers you provided. Now where the hell are we gunna put the Cellete bench?????? I came up with a number he liked. (Stupid Cheap) Now I just need a Christmas ferry to show up and make it real. Jeff... The bench is in this guys HOME Garage. WITH all the 914 and 911 jigs. It isn't the small bench. It's the medium size one for 9elebens on down. He wants it gone by February... HHHmmmm... Can we put a room addition on your house by then...???? Cheers and maximum thanks bro. Clayton |
   |

 
|
| Jeff Hail |
Dec 9 2007, 05:54 PM
Post
#142
|
|
Senior Member Group: Members Posts: 1,141 Joined: 3-May 07 From: LA/ CA Member No.: 7,712 |
Clayton,
I will pass on the Celette. No room! My avatar signature says it all. Thanks buddy. |
|
|
|
| Jeff Hail |
Dec 9 2007, 06:28 PM
Post
#143
|
|
Senior Member Group: Members Posts: 1,141 Joined: 3-May 07 From: LA/ CA Member No.: 7,712 |
HOW TO BUILD A CLUTCH TUBE
Choose your steel wisely. Once it's in the last thing you need is a problem. The original OEM tube is metric and some weird stuff. I thought at first it may be stainless. Stainless does rust by the way. Nope not stainless. Then maybe something else. Finally ended up taking a sample to friend who is a machinist. Pretty sure it's chromemoly. Who knows what alloy though? Have you ever priced SAE tube versus Metric? Same alloy's although Metric is about 3-5 times more. Organized crime! The OEM clutch tube is: .470 OD .040 Wall McMaster-Carr 4130 Chromemoly Aircraft Grade Structural tubing. Inside has to be seamless DOM or honed. You do not want a weld burr fraying your cable. Even with the a cable liner a burr will chew it up. .438 OD .065 Wall Thicker wall and a hair smaller OD diameter (0.032). I will be using a heavy duty clutch cable and fit is loose inside the tube. Good to go. First to make the flare. It's really not a flare. It's more of a fishmouth- flare. Chromemoly is fairly tough. I do not have a flaring tool this large. I also do not want to flare it cold because I think it will split the opening. 0.065 wall tube is thick. Crank up the fire stick and get the end cherry red all the way around........ In the background you will see a blue punch laying on the bench. It has a perfect taper mid way up the shank that match's the original tube's contour. After heating the tube until it glows I slide the punch into the tube and let the taper do the work with the assistance of a 5lb hammer. I did not have to beat it to death. Just work the punch in gently. Keep it under heat (not enough to melt) and drive the punch in little deeper. Took about 5 minutes. Attached image(s) 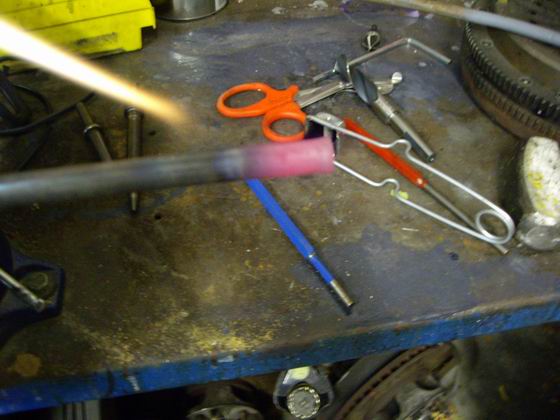 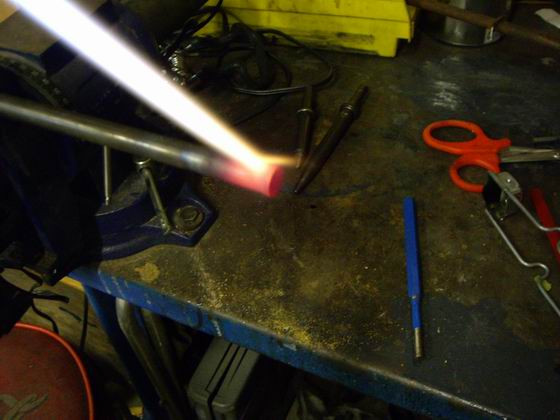
|
|
|
|
| Jeff Hail |
Dec 9 2007, 06:35 PM
Post
#144
|
|
Senior Member Group: Members Posts: 1,141 Joined: 3-May 07 From: LA/ CA Member No.: 7,712 |
HOW TO BUILD A CLUTCH TUBE -Cont'd
Once I was happy with the contour I smoothed the entrance of the flare to remove any burrs. I first used a small round stone (for porting) on a shank to round the mouth beyond what the punch would do. Then I took a smaller stone and rounded the opening a little more. A dab of valve grinding compound provides a final finish. The old tube (right) and the new one (left) Attached image(s) 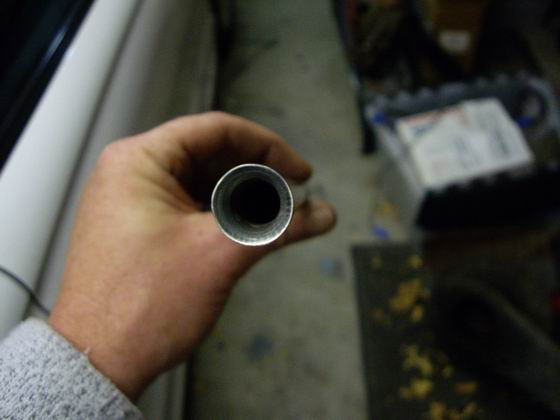 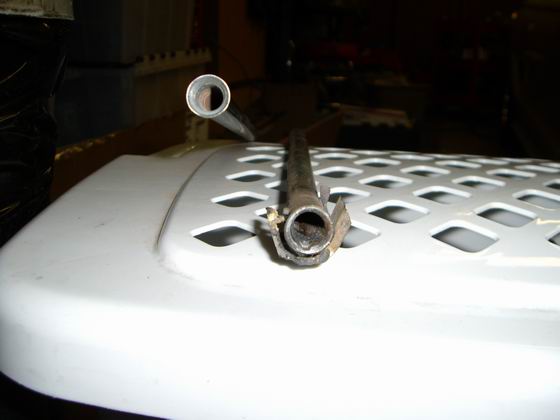
|
|
|
|
| Jeff Hail |
Dec 9 2007, 07:01 PM
Post
#145
|
|
Senior Member Group: Members Posts: 1,141 Joined: 3-May 07 From: LA/ CA Member No.: 7,712 |
HOW TO BUILD A CLUTCH TUBE -Cont'd
Too cold to do any welding outside today (yes this is SoCal) It's 40 degrees. Inside a garage with torch's is a great idea! I have to bend the tube. It also needs to match the original arc so I have correct cable length on both ends. I little trick I learned in the aircraft industry (cheating). If you put a tube in a vise you don't want to crush the tube use a collar or sleeve around the tube. The tube you are working with can remain free or if you tighten it up enough it can secure the tube without crushing it. It also will not leave tool marks or sharp edges. With the new tube in the collar I heated the tube again until it has a soft red glow. (not cherry) I keep the heat moving in the span of the arc I want to create. Once the tube is warmed up I apply presure as I walk the tube thru the collar at about 3/4 inch intervals to create the arc. With each step thru the collar a light tug makes a nice round bend. The actual radius of the bend is large so a tubing bender didnt make sense. This has to be done slowly and gently otherwise the tube will kink or collapse and end up oval shape pinching the cable. Attached image(s) 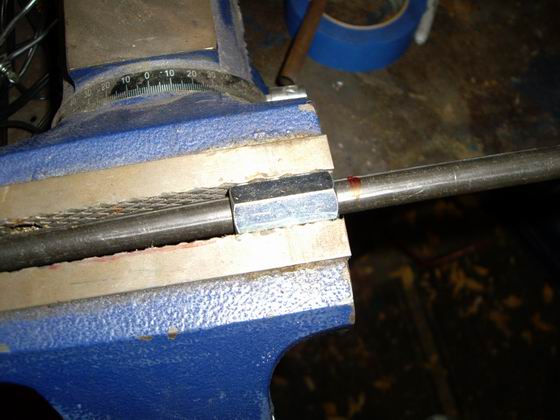 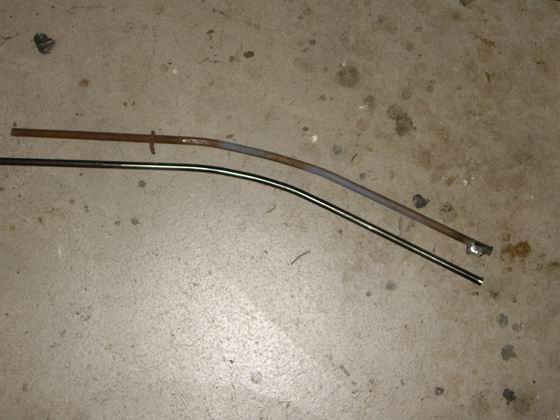 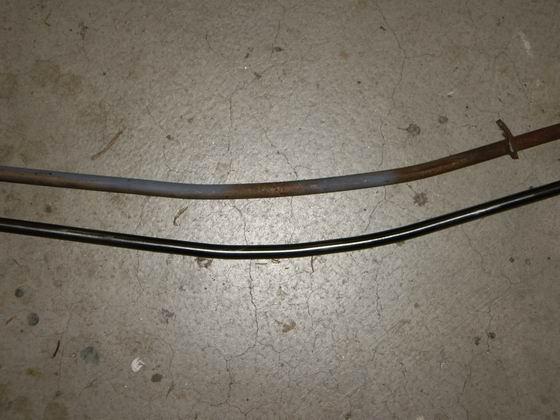
|
|
|
|
| Jeff Hail |
Dec 9 2007, 07:04 PM
Post
#146
|
|
Senior Member Group: Members Posts: 1,141 Joined: 3-May 07 From: LA/ CA Member No.: 7,712 |
HOW TO BUILD A CLUTCH TUBE -Cont'd
Last picture is the cable (engine side) in the opposite end of the tube. Cable and liner travel freely. Once installed in the car I will size the rear end of the tube to 32-34mm protrusion at the lower firewall. Whole process took about twenty minutes. Attached image(s) 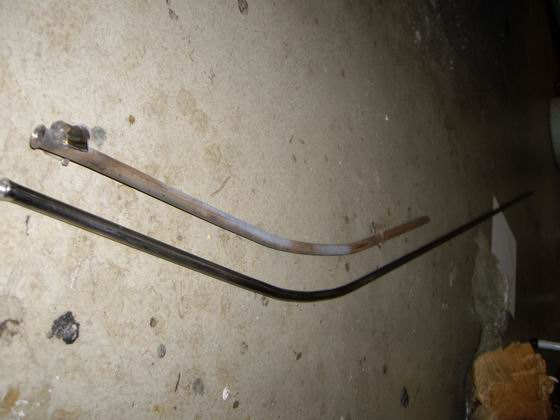 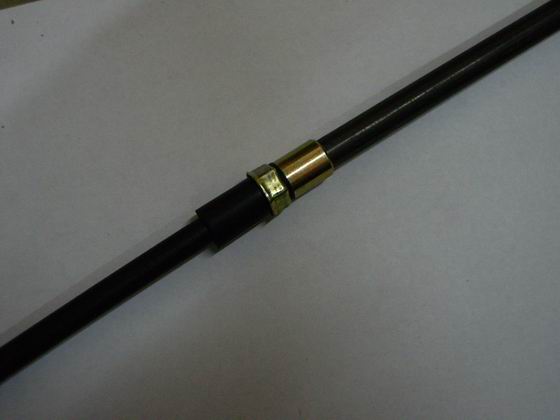
|
|
|
|
| Jeff Hail |
Dec 30 2007, 10:13 PM
Post
#147
|
|
Senior Member Group: Members Posts: 1,141 Joined: 3-May 07 From: LA/ CA Member No.: 7,712 |
Holidays, birthdays, anniversaries, end of the year, and business are not conducive to project progress. They each have a place though. Throw in a little 10 day vacation for myself and back to work.
Split the tunnel open at the shifter to get the old conduits out. Good bye to that rusty rat's nest of tubes out. The original throttle cable conduit was rusted and broken midway at the support. This was like dental work as the confines were tight and I really didn’t want to butterfly the entire tunnel open. Time and patience make the end result worthwhile. First photo shows the cut. The shifter opening is reinforced. It is doubled layered and has the three nutplates wekled on the underside. First peel the tunnel back and then cut the right front of the reinforcement out. Second photo all the old conduits are out. Third photo........by the way the site just burped and I had to re-post again. Third photo I have welded the shifter reinforcement back in. After grinding I couldnt even find the seam. Attached image(s)  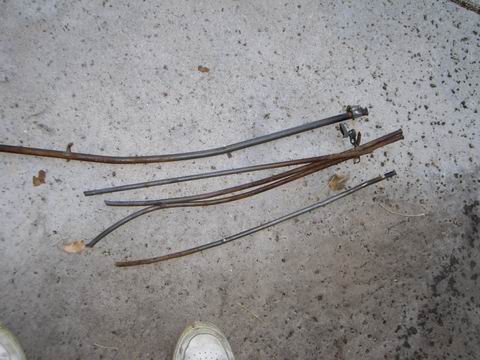 
|
|
|
|
| Jeff Hail |
Dec 30 2007, 10:31 PM
Post
#148
|
|
Senior Member Group: Members Posts: 1,141 Joined: 3-May 07 From: LA/ CA Member No.: 7,712 |
Inside the tunnel running on the left side is a shield that the throttle cable conduit runs through along side the shifter. To remove the old conduit I had to drill the spot welds only at the bottom to get the tube out. It is brazed at the rear and a twist of the tube with pliers breaks the braze with ease.
First and second photo shows the red punches and vise grips holding the shield in alignment for welding. I stuck a piece of tubing in the cavity to make sure I have enough clearance to fit the throttle cable conduit later. Third photo shows the fabbed conduits sticking out the back of the tunnel. These will get cut to fit once the lower firewall is in place. Last photo shows the throttle and clutch cable conduits at the front of the tunnel properly spaced. Always take measurements before you swap something as critical as these. The tunnel and conduits do not give second chances once everything is sealed up. Now that everything is fit I will fab a couple more brackets to locate and secure the conduits permanently inside the tunnel. Attached image(s) 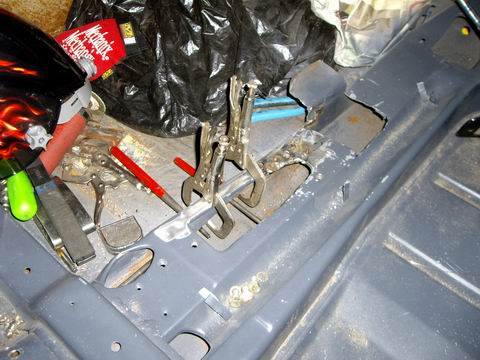 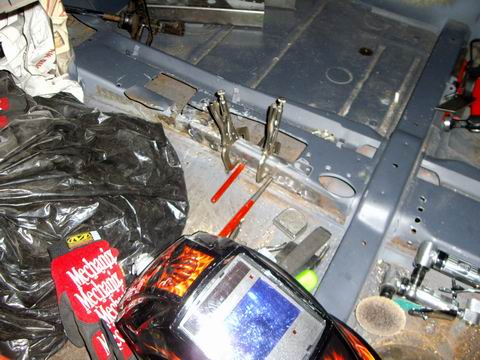 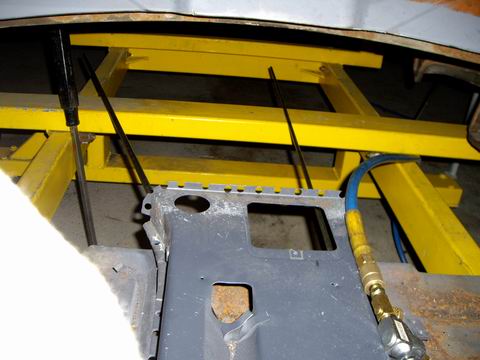 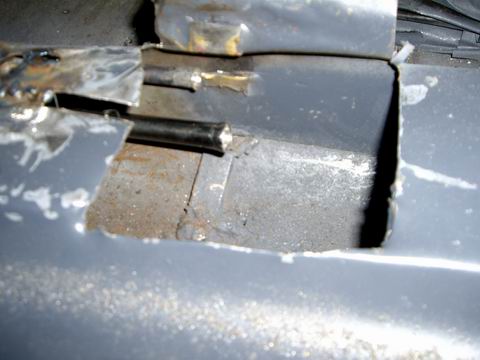
|
|
|
|
| Jeff Hail |
Jan 14 2008, 12:29 AM
Post
#149
|
|
Senior Member Group: Members Posts: 1,141 Joined: 3-May 07 From: LA/ CA Member No.: 7,712 |
Since I havent been getting a lot done on the tub lately I might as well post something of interest. Consider it like "Intermission at the Drive In Movie" without the popcorn.
Porsche Factory Tools, Gauges, Chassis Fixtures. Since most of these tools are NLA and long gone unless used for other models like the 911 most people have never seen. Some of the manuals have poor pictures of them but most of what you see here will be the first time. Enjoy! Starting off with the simple ones: 1) Rear hinge tool 2) Wheel bearing installation tool (love the mallet) 3) Shifter bushing driver (metal dowel) 3-4) Strut alignment gauge Attached image(s) 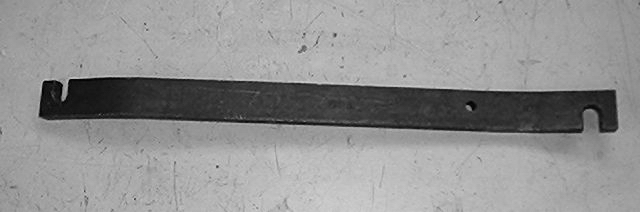 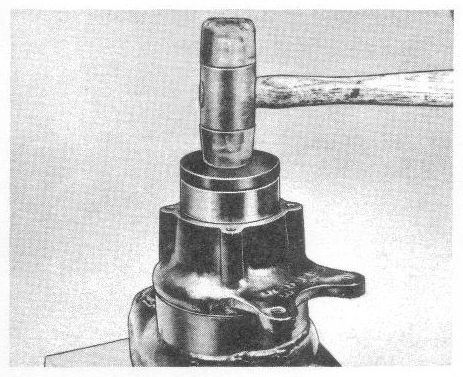 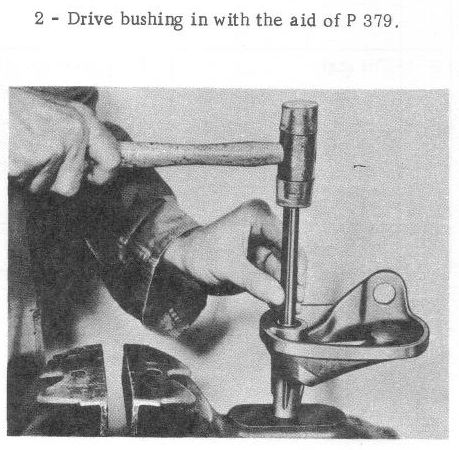  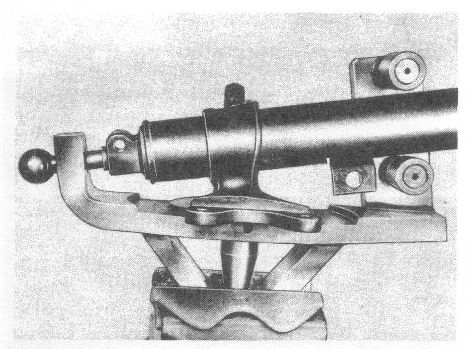
|
|
|
|
| Jeff Hail |
Jan 14 2008, 12:31 AM
Post
#150
|
|
Senior Member Group: Members Posts: 1,141 Joined: 3-May 07 From: LA/ CA Member No.: 7,712 |
5-6) Rear caliper vent clearance gauge (Erics going to make one of these)
Attached image(s) 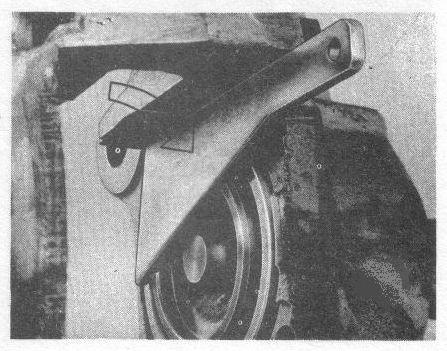 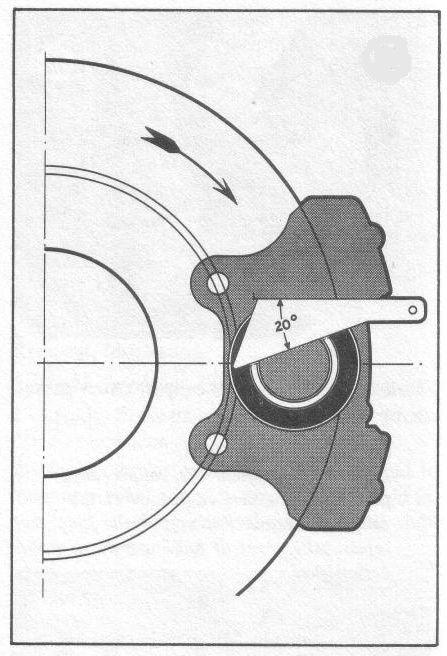
|
|
|
|
| Jeff Hail |
Jan 14 2008, 12:36 AM
Post
#151
|
|
Senior Member Group: Members Posts: 1,141 Joined: 3-May 07 From: LA/ CA Member No.: 7,712 |
And the more complex tools and fixtures for the chassis.
I actually saw this set back in 1981. The front suspension fixture is also used 911's. Today it it considered priceless. To think some shop owners in the 1990's probably ended up throwing them out of scrapping them because they were old and insurance companies were totalling all the late 60's and 70's Porsches because the market was soft. Ugghhhhhhh!!!! Attached image(s) 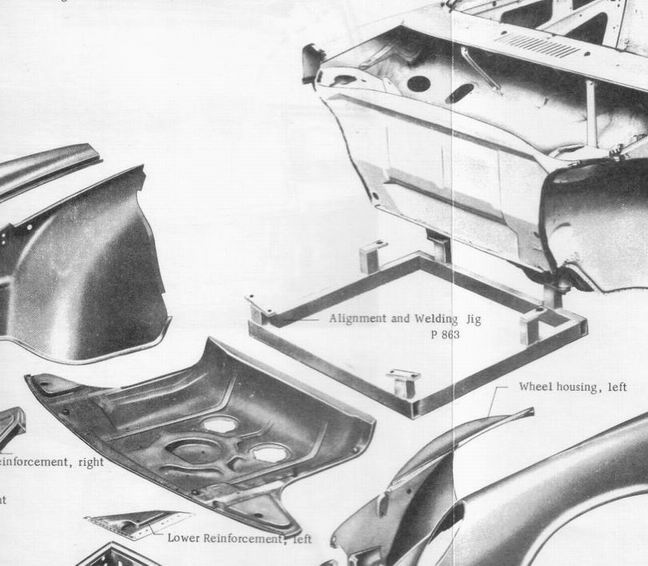 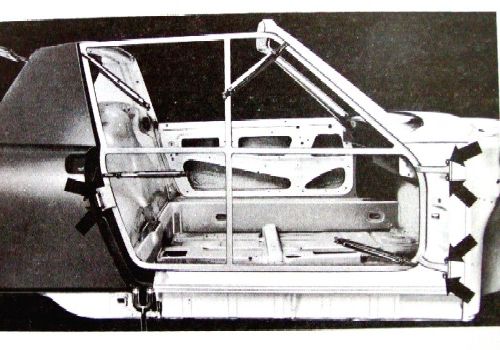 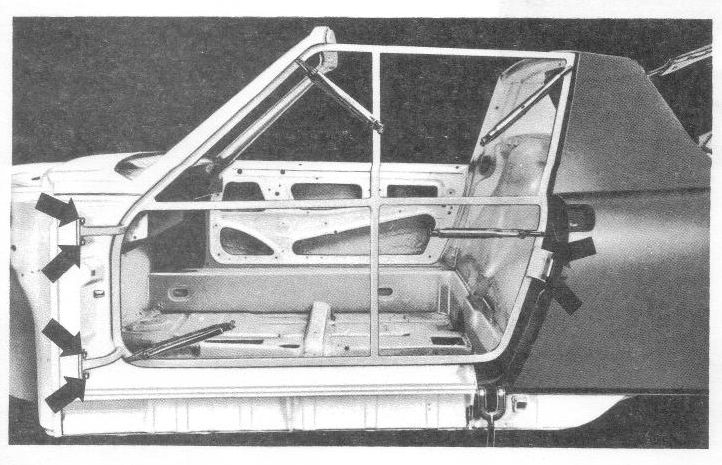 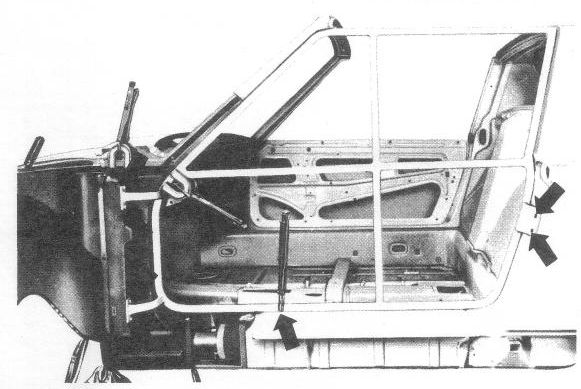 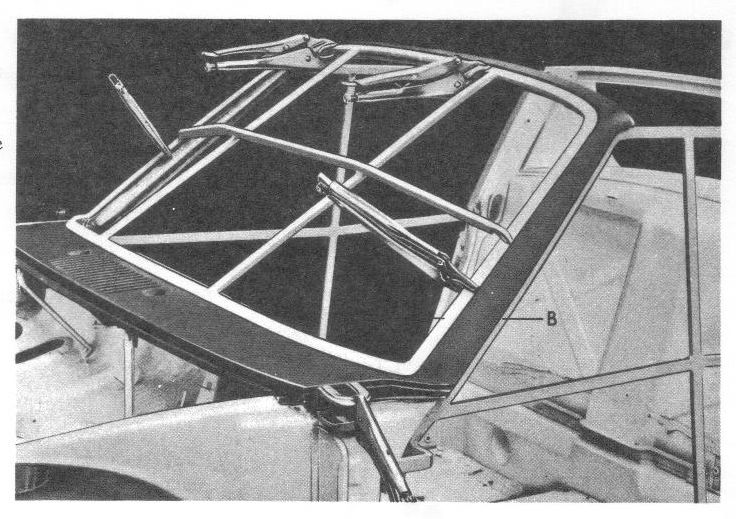
|
|
|
|
| Jeff Hail |
Jan 14 2008, 12:38 AM
Post
#152
|
|
Senior Member Group: Members Posts: 1,141 Joined: 3-May 07 From: LA/ CA Member No.: 7,712 |
Contd
Attached thumbnail(s)  Attached image(s) 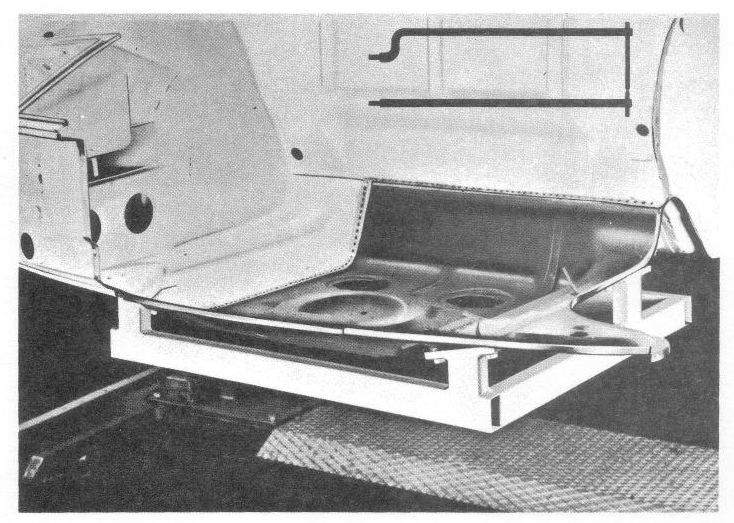 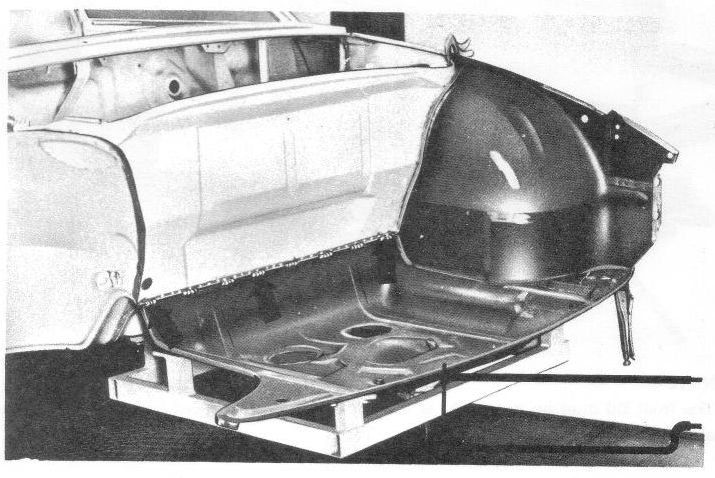
|
|
|
|
| Jeff Hail |
Jan 14 2008, 12:50 AM
Post
#153
|
|
Senior Member Group: Members Posts: 1,141 Joined: 3-May 07 From: LA/ CA Member No.: 7,712 |
Technical documentation:
Porsche new early on the 914 was prone to rust. 1) Dealer Bulletin on Corrosion 2) Detailed schematic of where foam, sealant and undercoating locations were along with grommets and hole plugs. This document is scary! Every where there is foam we now have rust! Attached thumbnail(s) 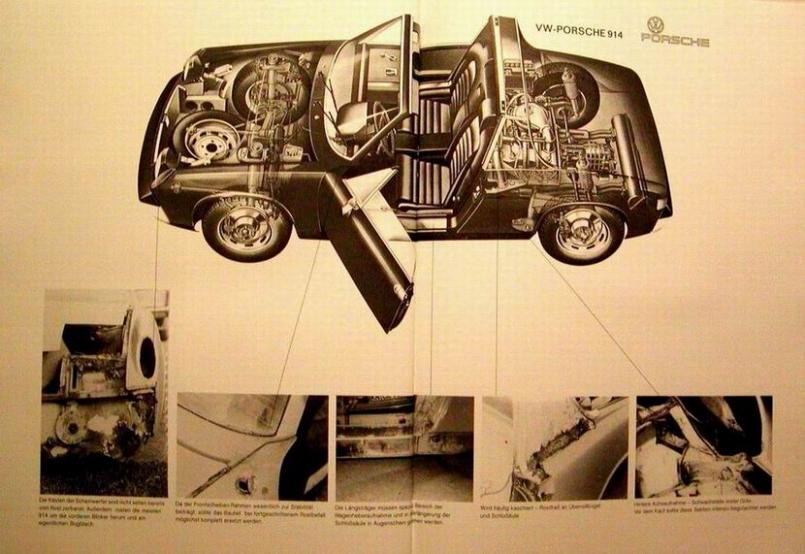 Attached image(s) 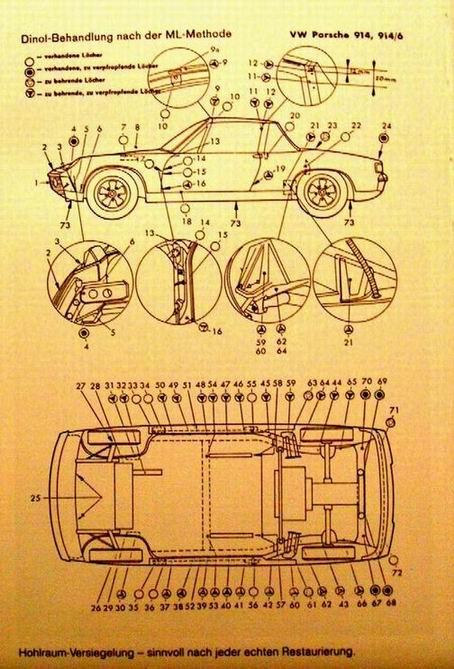
|
|
|
|
| Twystd1 |
Jan 14 2008, 01:05 AM
Post
#154
|
|
You don't want to know... really..... Group: Members Posts: 2,515 Joined: 12-September 04 From: Newport Beach, California Member No.: 2,743 |
Jeff,
I am dam glad you posted. As I was considering creating a new post with the byline of "WHERE THE HELL IS HAIL...?????" And here ya are... !!!! Ya must of heard me. Jeff, Can ya PM me your phone number? I might be coming up your way next weekend. And hoped I might drop by again and check in with you. You supply the coffee. I supply the smokes. You should be shooting video of this build. Think about it for minute Jeff. We could sell a "HOW TO RE-BUILD A 914 BODY VIDEO" And sell it hand in hand with my soon to be famous and forthcoming, "HOW NOT TO BUILD A TYPE IV ENGINE". Dude... We could be in the bucks real quick me thinks. I still have to get my video cam repaired, as I was trying to fix the power supply section of my camera. And apparently I did something a bit wrong. (I thought they plugged into the wall socket... But no.. It takes battery's. Who woulda thunk...????????) (Must be a Chinese thing) Bottom line.. Good to have ya back. Cheers, Clayton |
|
|
|
| Jeff Hail |
Jan 14 2008, 01:47 AM
Post
#155
|
|
Senior Member Group: Members Posts: 1,141 Joined: 3-May 07 From: LA/ CA Member No.: 7,712 |
QUOTE(Twystd1 @ Jan 13 2008, 11:05 PM)  Jeff, I am dam glad you posted. As I was considering creating a new post with the byline of "WHERE THE HELL IS HAIL...?????" And here ya are... !!!! Ya must of heard me. Jeff, Can ya PM me your phone number? I might be coming up your way next weekend. And hoped I might drop by again and check in with you. You supply the coffee. I supply the smokes. You should be shooting video of this build. Think about it for minute Jeff. We could sell a "HOW TO RE-BUILD A 914 BODY VIDEO" And sell it hand in hand with my soon to be famous and forthcoming, "HOW NOT TO BUILD A TYPE IV ENGINE". Dude... We could be in the bucks real quick me thinks. I still have to get my video cam repaired, as I was trying to fix the power supply section of my camera. And apparently I did something a bit wrong. (I thought they plugged into the wall socket... But no.. It takes battery's. Who woulda thunk...????????) (Must be a Chinese thing) Bottom line.. Good to have ya back. Cheers, Clayton Clayton! Whats up dude? Yeah been kind of quiet on the tub lately. Busy at the day job. Damn cold up in these hills. At least for this California boy. 30-40 degree's is too cold for me. I would never make it on the east coast unless I had a heated garage. Today it crept up to a high of 60 and me with an empty cylinder of C02/Argon. I have been picking up a bunch of parts for the build and getting other things done. Foley has my suspension pickups done. Should be here Tuesday or so. All is not idle. Little things have to get done too. When its done its done. No hurry. Video of the 914 chassis reconstruction? It would be up there with the greatest story ever told. At least as long! And I have the perfect title! "IT'S ONLY MONEY". Pm sent |
|
|
|
| Jeff Hail |
Jan 14 2008, 10:21 AM
Post
#156
|
|
Senior Member Group: Members Posts: 1,141 Joined: 3-May 07 From: LA/ CA Member No.: 7,712 |
This is what I am going with for shifting the 915. PMS supplied and they also built the trans mount hoop. Lighweight and stout.
Attached image(s) 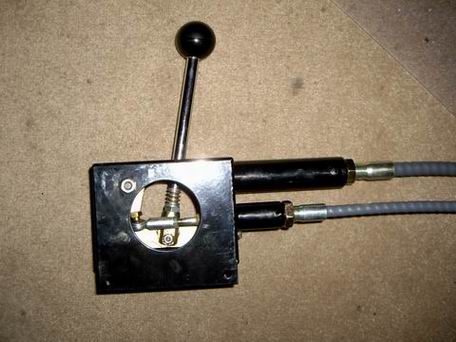 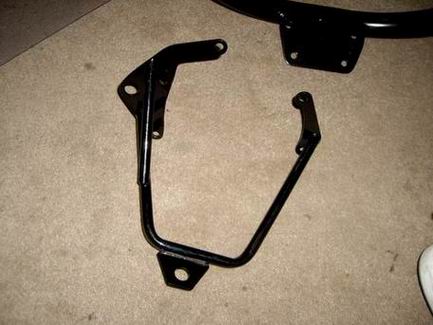 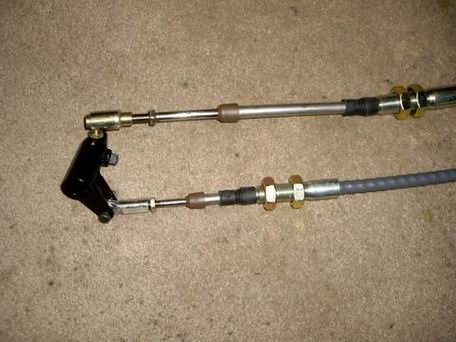 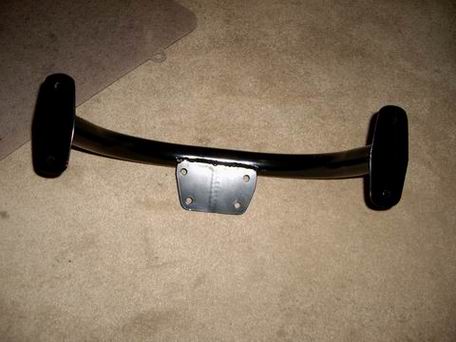
|
|
|
|
| Jeff Hail |
Jan 17 2008, 12:54 AM
Post
#157
|
|
Senior Member Group: Members Posts: 1,141 Joined: 3-May 07 From: LA/ CA Member No.: 7,712 |
The Fedex and UPS guys are beggining to get suspicious. Many large boxes arrived yesterday all at once.
Suspension pickups from Mr. Foley and the Rota's came in. These are the Rota Fox (Fuchs Repros) in 7-1/2 x 17 and 9x 17. I ordered them unfinished (comes in primer). I will have them powdercoated in mat black on the entire wheel. No shiney stuff on this build! It's only metal and money. You can't take it with you. Attached image(s) 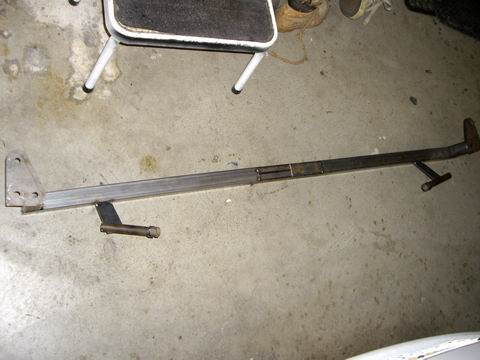 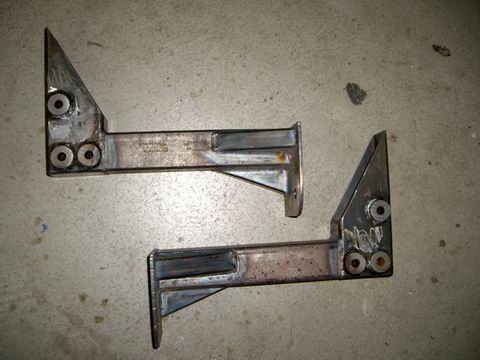 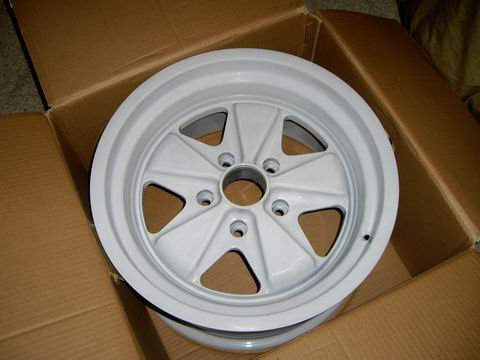 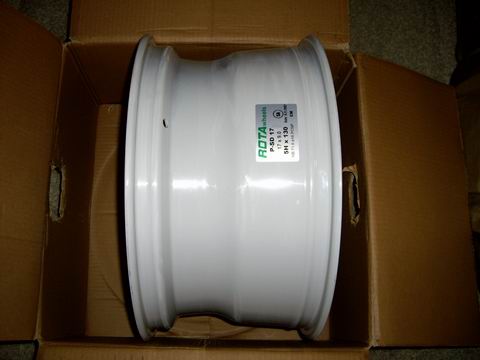
|
|
|
|
| tdgray |
Jan 17 2008, 02:33 PM
Post
#158
|
|
Thank God Nemo is not here to see this Group: Members Posts: 9,706 Joined: 5-August 03 From: Akron, OH Member No.: 984 Region Association: None |
Ooooohhh Pretty (IMG:style_emoticons/default/wub.gif)
|
|
|
|
| Jeff Hail |
Jan 19 2008, 06:16 PM
Post
#159
|
|
Senior Member Group: Members Posts: 1,141 Joined: 3-May 07 From: LA/ CA Member No.: 7,712 |
Kept the Powder Coat and Blaster guy busy for a couple of hours.
Old grungy pedal assembly and the new and improved model Why silver? The coater was doing a large job and did it for free. Once they are under the pedal board you won't see much. (RAL Anodized Silver) Attached image(s) 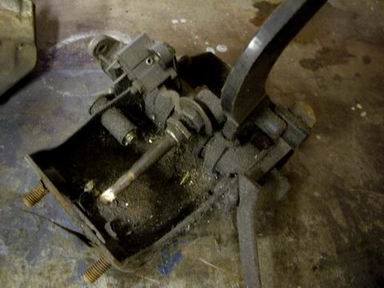 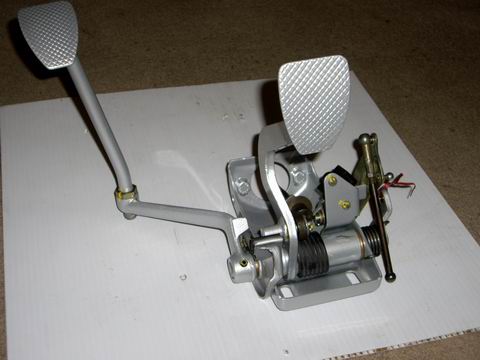 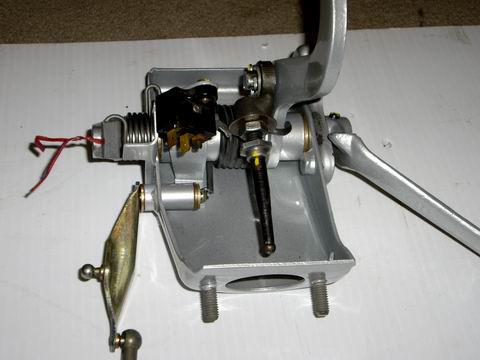 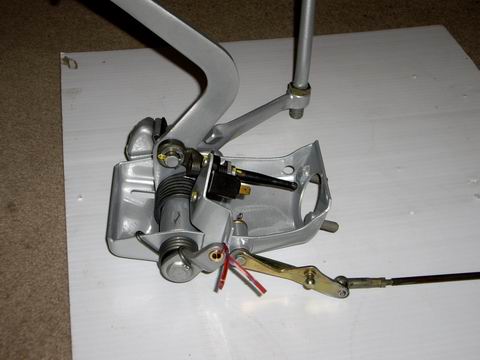 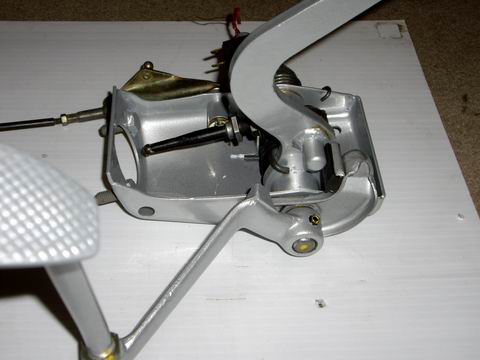
|
|
|
|
| Jeff Hail |
Jan 19 2008, 06:23 PM
Post
#160
|
|
Senior Member Group: Members Posts: 1,141 Joined: 3-May 07 From: LA/ CA Member No.: 7,712 |
Naked trailing arms
Attached image(s) 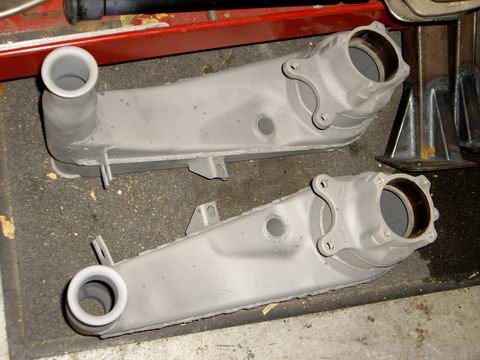
|
|
|
|
|
3 User(s) are reading this topic (3 Guests and 0 Anonymous Users)
0 Members:

|
Lo-Fi Version | Time is now: 24th June 2026 - 10:12 AM |
Invision Power Board
v9.1.4 © 2026 IPS, Inc.