|
|
|
Porsche, and the Porsche crest are registered trademarks of Dr. Ing. h.c. F. Porsche AG.
This site is not affiliated with Porsche in any way. Its only purpose is to provide an online forum for car enthusiasts. All other trademarks are property of their respective owners. |
|
|

  |

| jd74914 |
 Oct 1 2007, 11:52 PM Oct 1 2007, 11:52 PM
Post
#6
|
|
Its alive  Group: Members Posts: 4,871 Joined: 16-February 04 From: CT Member No.: 1,659 Region Association: North East States |
Nice work, I can't wait to see more . . . and
:welcome: |
   |

 
|
| Jeff Hail |
Oct 1 2007, 11:57 PM
Post
#7
|
|
Senior Member Group: Members Posts: 1,141 Joined: 3-May 07 From: LA/ CA Member No.: 7,712 |
Interior stripped.
Odometer? DMV say its for real and so do the prior owners receipts. (least of my concerns) Its about the fun! Attached image(s) 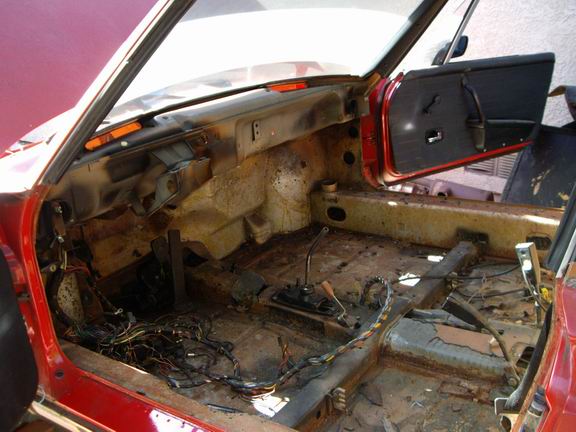 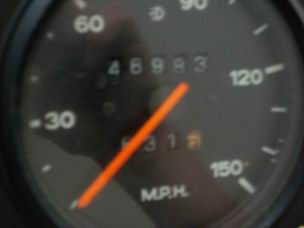
|
|
|
|
| Jeff Hail |
Oct 2 2007, 12:08 AM
Post
#8
|
|
Senior Member Group: Members Posts: 1,141 Joined: 3-May 07 From: LA/ CA Member No.: 7,712 |
Moving along into the rocker and longs. This was how car was received.
The good. Right upper wheelhouse is sound and so is the outer suspension perch. Left rocker/ outer long. Pretty normal for an east coaster. Right side is another story. Ugly. Outer is shot. Corner of the floor is gone. Inner long lower gone. Inner console has been seem welded prior due to rust and it is going to metal heaven. Attached image(s) 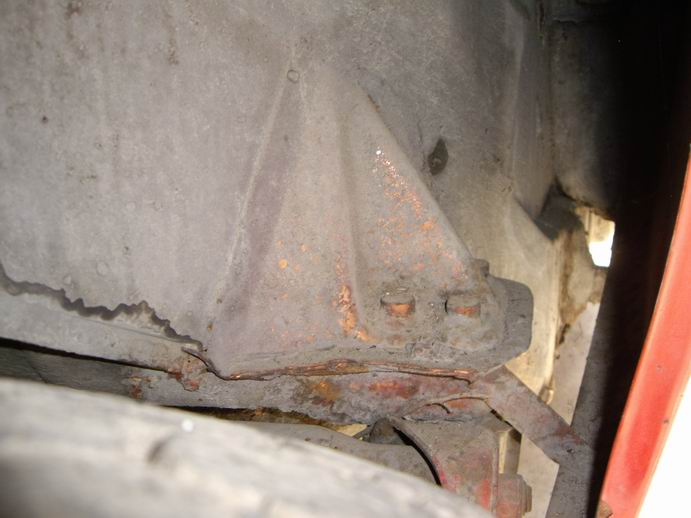 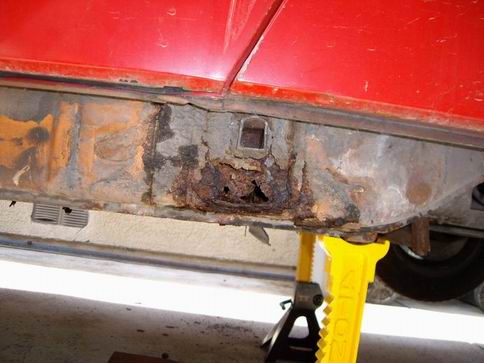 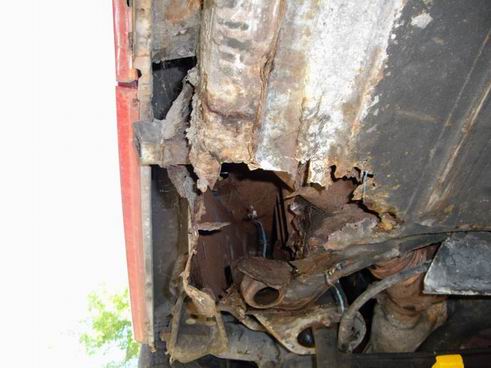
|
|
|
|
| Jeff Hail |
Oct 2 2007, 12:17 AM
Post
#9
|
|
Senior Member Group: Members Posts: 1,141 Joined: 3-May 07 From: LA/ CA Member No.: 7,712 |
Cut out the rusted outer. Actually only the rear 1/4 was bad. Since I have a replacement and need access to the inner long whole piece is getting replaced
Media blasted the inner long and only the area around 4 inches in front of the jackpost/ seatbelt anchor is bad. I will fabricate, section and sleeve that in back to behind the firewall. I have a new outer wheelhouse which provides half the box on the outside which will make that area and rearward easier to repair. Attached image(s) 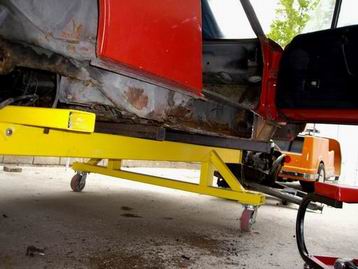 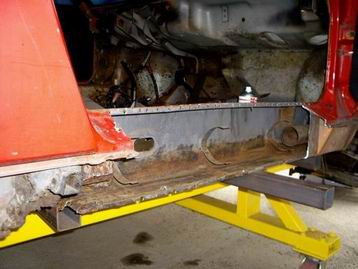 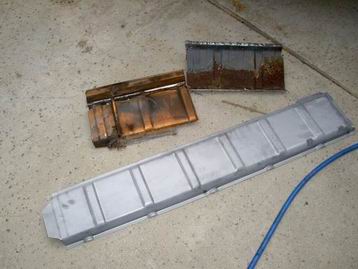 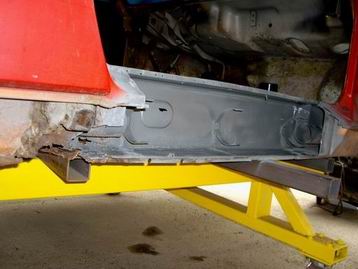
|
|
|
|
| KELTY360 |
Oct 2 2007, 12:42 AM
Post
#10
|
|
914 Neferati Group: Members Posts: 5,180 Joined: 31-December 05 From: Pt. Townsend, WA Member No.: 5,344 Region Association: Pacific Northwest |
(IMG:style_emoticons/default/welcome.png)
Are you the Jeff Hail of the Mulholland thread on Pelican? I've read the whole thing and follow it constantly. Best thread ever. Nice work on your teener. |
|
|
|
| Twystd1 |
Oct 2 2007, 12:48 AM
Post
#11
|
|
You don't want to know... really..... Group: Members Posts: 2,515 Joined: 12-September 04 From: Newport Beach, California Member No.: 2,743 |
Were you part of the Mulholland crew back in the day?
Clayton |
|
|
|
| Jeff Hail |
Oct 2 2007, 12:54 AM
Post
#12
|
|
Senior Member Group: Members Posts: 1,141 Joined: 3-May 07 From: LA/ CA Member No.: 7,712 |
Floor metal finished and primed. No filler.
I did end up installing the entire floor as it comes from Bill at RD. The old floor had some minor rust at the weld tracks near the rear of the structural crossmember underneath. That 4 extra inches of sheetmetal is easier to lap weld in then butt weld to dirty steel. It makes my finish work less time consuming also. I treated the inside of the crossmember and sealed that up prior to welding in the new panel. The entire trunk will be media stripped. I just threw some primer on for now until this weekend. I will hit it will some Starblast media (DuPont), epoxy prime and then seal all the seams with Wurth Sprayable Seam Sealer for that oem look and texture. Attached image(s) 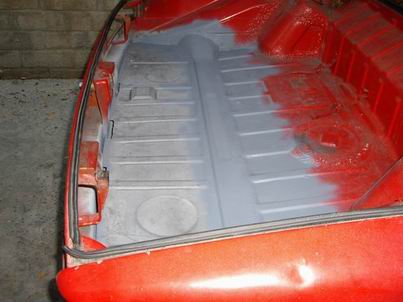 
|
|
|
|
| Jeff Hail |
Oct 2 2007, 01:00 AM
Post
#13
|
|
Senior Member Group: Members Posts: 1,141 Joined: 3-May 07 From: LA/ CA Member No.: 7,712 |
QUOTE(KELTY360 @ Oct 1 2007, 11:42 PM)  (IMG:style_emoticons/default/welcome.png) Are you the Jeff Hail of the Mulholland thread on Pelican? I've read the whole thing and follow it constantly. Best thread ever. Nice work on your teener. Yours truly one and the same.... |
|
|
|
| Jeff Hail |
Oct 2 2007, 01:19 AM
Post
#14
|
|
Senior Member Group: Members Posts: 1,141 Joined: 3-May 07 From: LA/ CA Member No.: 7,712 |
QUOTE(Twystd1 @ Oct 1 2007, 11:48 PM) Were you part of the Mulholland crew back in the day? Clayton Yes- One of many groups over the years. |
|
|
|
| Lou W |
Oct 2 2007, 03:07 AM
Post
#15
|
|
"Here Kitty Kitty" my ass...... Group: Members Posts: 4,109 Joined: 9-May 04 From: Roseburg, OR. Member No.: 2,039 Region Association: Spain |
(IMG:style_emoticons/default/welcome.png) Keep the pctures coming. (IMG:style_emoticons/default/smile.gif)
|
|
|
|
| jtf914 |
Oct 2 2007, 08:18 AM
Post
#16
|
|
Member Group: Members Posts: 428 Joined: 31-December 02 From: Burlington, CT Member No.: 58 Region Association: North East States |
(IMG:style_emoticons/default/welcome.png) Wow, that was some introduction. Keep the pics coming, great project!!
|
|
|
|
| SGB |
Oct 2 2007, 08:27 AM
Post
#17
|
|
just visiting Group: Members Posts: 4,086 Joined: 8-March 03 From: Huntsville, AL Member No.: 404 Region Association: South East States |
shhhh.
Artist at work. Thats really impressive. |
|
|
|
| pin31 |
Oct 2 2007, 10:11 AM
Post
#18
|
|
Member Group: Members Posts: 398 Joined: 30-January 07 From: Newport, Rhode Island Member No.: 7,492 Region Association: North East States |
Very cool !!!
Someone should write a book. (IMG:style_emoticons/default/welder.gif) (IMG:style_emoticons/default/welcome.png) |
|
|
|
| Jeff Hail |
Oct 6 2007, 09:22 PM
Post
#19
|
|
Senior Member Group: Members Posts: 1,141 Joined: 3-May 07 From: LA/ CA Member No.: 7,712 |
This weeks installment of Bringing out the dead
Attacking the firewall. This car had rust at the bottom of the lower firewall. Prior repairs included welding in plumbers tape with what looks like an arc welder of all things. Seems the floor rusted along with the firewall at the bottom seem and it was held together with "L" shaped pumbers tape or and angle iron/ shelf bracket. I assessed the firewall at the long junction which is also prone to rust from leaks at the window and hell pit. Cut the corners out to access the inner longs which require some work anyways. It's only metal..... Attached image(s) 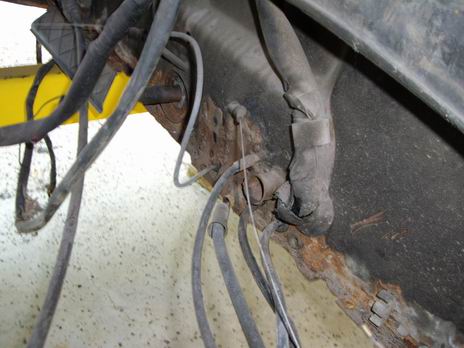 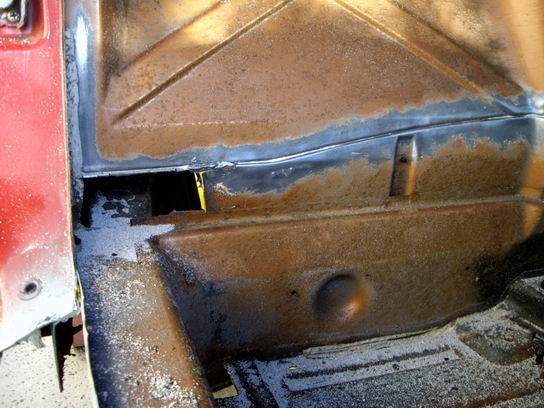 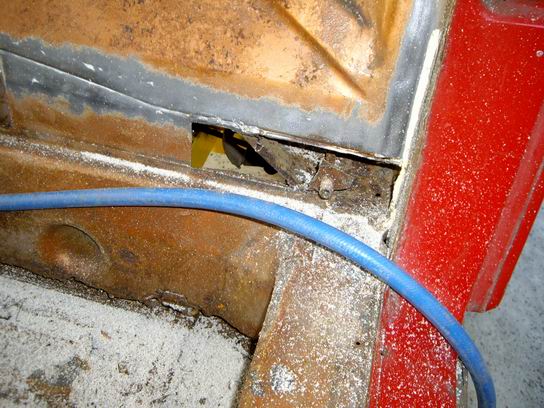
|
|
|
|
| Jeff Hail |
Oct 6 2007, 09:32 PM
Post
#20
|
|
Senior Member Group: Members Posts: 1,141 Joined: 3-May 07 From: LA/ CA Member No.: 7,712 |
Some great tools to have are the Astro Scraper. Its like a minature air chisel except has super high speed short strokes and does not damage the surface underneath. Comes with an assortment of blades and scrapers included. They run $40. I stripped the entire floor tar pads in about 7 minutes flat.
The other tool I have and is worth it weight in gold is the Wurth Master. It is pretty much a flail with the needle brush mounted. Different wheels are for stripe and double sided tape removal but the flail wheel removes the factory seam sealer with zero effort. Everyone knows the oem seam sealers can be like concrete. These are expensive so it pays if you know someone who has one for limited use versus purchasing one. Attached image(s) 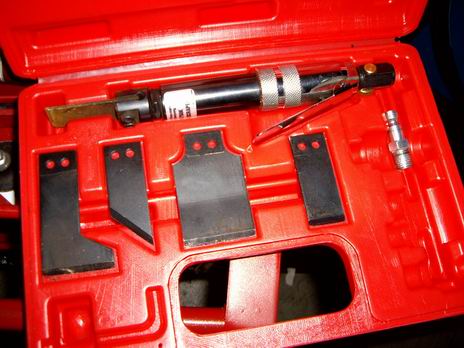 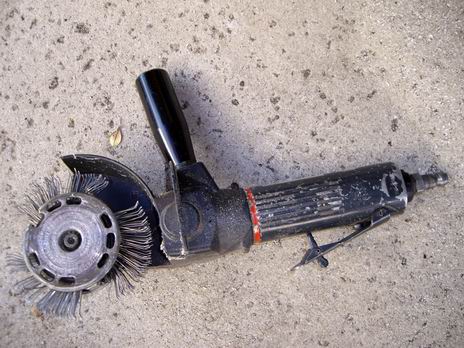
|
|
|
|
| sixnotfour |
Oct 6 2007, 09:36 PM
Post
#21
|
|
914 Wizard Group: Members Posts: 11,153 Joined: 12-September 04 Member No.: 2,744 Region Association: NineFourteenerVille |
I am in shock that some one in CA would take on this project.
We have seen countless Less rusty cars been cut up down there. (CA.) My Hat is off to you, Great Job. |
|
|
|
| Jeff Hail |
Oct 6 2007, 09:50 PM
Post
#22
|
|
Senior Member Group: Members Posts: 1,141 Joined: 3-May 07 From: LA/ CA Member No.: 7,712 |
Seam sealer stripped off the inner firewall with the Wurth Master. Leaves a clean bare metal surface.
I will say removing the wiring harness is a pain in the ass. I have come to the conclusion that the factory fed it through the tunnel and out the rear firewall without the sheath with the two big grommets that plug the firewall and front shelf. I think they installed that sheath from the back end after the loom was routed. Just my opinion. I am actually thinking about modular-izing the loom. Wouldnt take much to do it. I have to unwrap it anyhow because I has some areas that need repair and shrink tube. I also cut a little insulation here and there doing the removal. Must be wondering why I removed the the seam sealer on the inside of the firewall??? Thanks to Perry I have a NOS lower firewall and it will get replaced. This is actually an early firewall but will adapt to the 75' easily with little modification. I will reinforce the e-brake and clutch and cable junctions on the inside of the panel prior to the installation. I will make it stronger than the factory did and it will all be hidden. This area is one of the 914's design flaws. Part of my project is improving on some of the factory shortcomings. Making improvements invisible or at least less visible is the challenge. Stay tuned! Attached image(s) 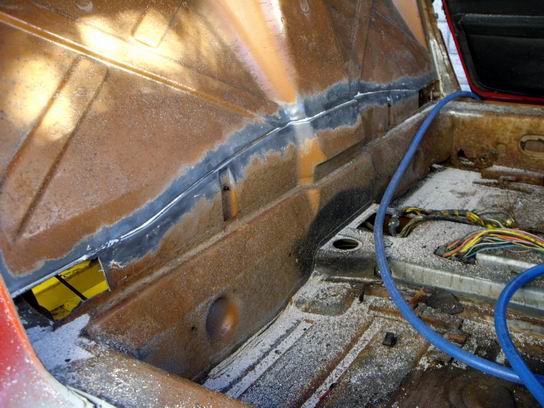 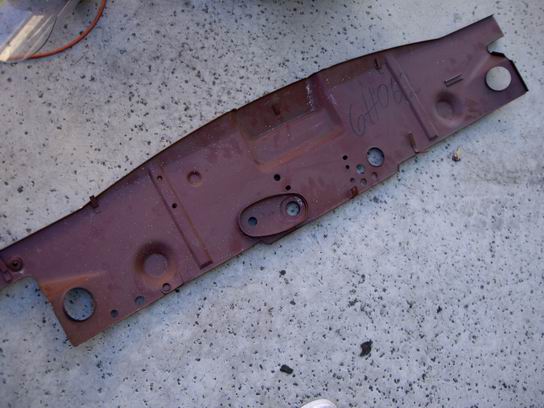
|
|
|
|
| Jeff Hail |
Oct 6 2007, 11:00 PM
Post
#23
|
|
Senior Member Group: Members Posts: 1,141 Joined: 3-May 07 From: LA/ CA Member No.: 7,712 |
QUOTE(sixnotfour @ Oct 6 2007, 08:36 PM) I am in shock that some one in CA would take on this project. We have seen countless Less rusty cars been cut up down there. (CA.) My Hat is off to you, Great Job. Thanks, back at ya! I have looked at countless 914 tubs. Very few are truly rust free. This tub cost me nothing. It has never been in a collision and the upper body is straight. It has rust issues that are all easily corrected. It is really not as bad as it looks. Time consuming yes but easily corrected. In the end I will know every square inch of this car is sound and "clean". I have seen too many so called rust free tubs that have surprises in them. I could have spent top dollar on someone else's car not knowing what went into it. Then tearing it down and starting from scratch. This car has some issues but what 914 doesnt? Taking a step back I could have found a perfect car. Considering the modifications planned I would still have to perform sheetmetal work. This is all part of the game plan. Just a few extra steps to take. Of course it also saves another 914! (sort of) This project isn't about time or cost. In fact I do not have that much into it. It is about the goal. I am not restoring a 914. I am building a Porsche the way the factory intended but Volkswagon got in the way. A few special "options" thrown in that were not available will be added. The basic build plan: Mid Engine Configuration Short wheelbase Under 2000 lbs Low CG 250+ HP flat six A car that can be street driven and tracked A whole heap of aftermarket performance vendors at my disposal..... A build that generates "smiles per hour"........and spanks the unsuspecting. I considered just buying a car. The mid engine ones I want are out of my price range with the Prancing Horse emblems. I considered buying an Elise that fit my build plan but I think I can do better for less. Besides I hate English cars. Throttle on! |
|
|
|
| Jeff Hail |
Oct 7 2007, 12:06 AM
Post
#24
|
|
Senior Member Group: Members Posts: 1,141 Joined: 3-May 07 From: LA/ CA Member No.: 7,712 |
You gotta have bars. Keep those gaps in check when performing any major work on the longs or floor. Even with the body fully supported from below the roof/ hinge pillars need to be kept under flex control at all times when replacing sheetmetal.
I made these to work with the doors on the car. You cannot check the door gaps while in progress without doors mounted. It makes the job easier and I know what the end product will be. Heat during welding makes metal expand and contract. Anyone who has ever replaced a rocker panel on any car (even with a full roof) knows how important this is. If a 914 left the factory out of spec (yes they have) this is where it can be corrected. The door bars can be adjusted to put the windshield header and roll bar in perfect spec. If it starts straight it will end up straight! Attached image(s) 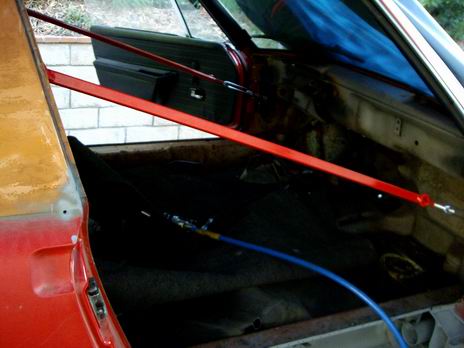
|
|
|
|
| Jeff Hail |
Oct 7 2007, 12:13 AM
Post
#25
|
|
Senior Member Group: Members Posts: 1,141 Joined: 3-May 07 From: LA/ CA Member No.: 7,712 |
This is an original Coppertone car that was re-painted red later in its life. Its a little hard to tell rust from paint in photos.
|
|
|
|
|
2 User(s) are reading this topic (2 Guests and 0 Anonymous Users)
0 Members:

|
Lo-Fi Version | Time is now: 9th March 2026 - 12:24 PM |
Invision Power Board
v9.1.4 © 2026 IPS, Inc.