|
|
|
Porsche, and the Porsche crest are registered trademarks of Dr. Ing. h.c. F. Porsche AG.
This site is not affiliated with Porsche in any way. Its only purpose is to provide an online forum for car enthusiasts. All other trademarks are property of their respective owners. |
|
|

  |

| Spoke |
 Feb 28 2006, 10:46 PM Feb 28 2006, 10:46 PM
Post
#21
|
|
Jerry  Group: Members Posts: 7,399 Joined: 29-October 04 From: Allentown, PA Member No.: 3,031 Region Association: None |
It's just a little hole.
Attached image(s) 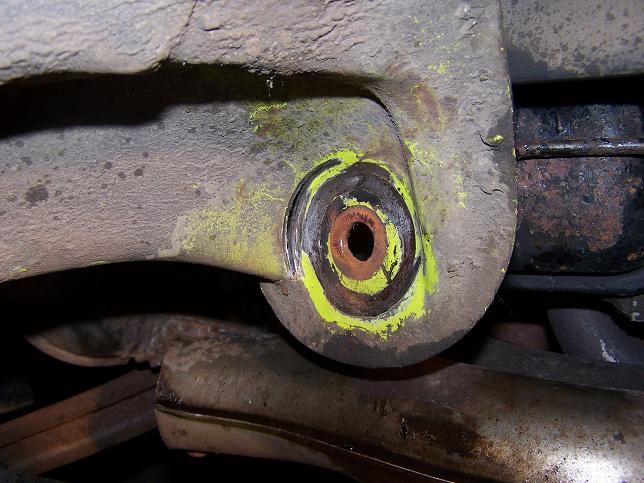
|
   |

 
|
| Spoke |
Feb 28 2006, 10:47 PM
Post
#22
|
|
Jerry Group: Members Posts: 7,399 Joined: 29-October 04 From: Allentown, PA Member No.: 3,031 Region Association: None |
It used to be a hole. I think I could identify my welding almost anywhere. I really need to learn how to weld correctly.
Attached image(s) 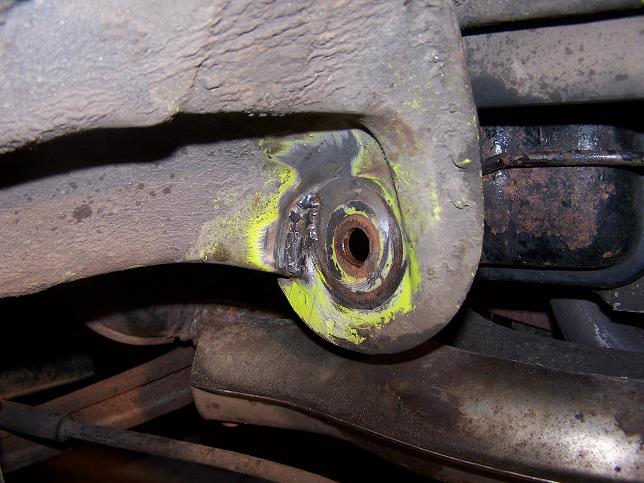
|
|
|
|
| ChrisFoley |
Mar 1 2006, 06:23 AM
Post
#23
|
|
I am Tangerine Racing Group: Members Posts: 8,031 Joined: 29-January 03 From: Bolton, CT Member No.: 209 Region Association: None |
That "used to be a bushing" is one of the Weltmeister polygraphite pieces of sh!t. When the flange breaks off the inner portion of the bushing is free to move deeper inside the trailing arm and no longer provide support.
Those bushings require a lot of effort to even make them marginally acceptable imo. Part of the problem is that the hole in the trailing arm isn't round. That's why I offer the Delrin bushing installation service. |
|
|
|
| Rusty |
Mar 1 2006, 06:27 AM
Post
#24
|
||
|
914 Guru Group: Retired Admin Posts: 7,993 Joined: 24-December 02 From: North Alabama Member No.: 6 Region Association: South East States |
Probably three hours per side... unless you're like me and need to sandblast and powdercoat everything in sight. Then, add all kinds of stupid-time to the project. Hey, since you have the arm off, check out the axle. Doesn't that need cleaning and powercoating, too. Oh, wow... calipers could get a freshening up. Hey, I wonder if I could pull the exhaust and steam clean the underside? There's some sheet metal under here with flaking paint... hmmm... (IMG:http://www.914world.com/bbs2/html/emoticons/blink.gif) -Rusty (IMG:http://www.914world.com/bbs2/html/emoticons/smoke.gif) |
||
|
|
|
||
| Eric_Shea |
Mar 1 2006, 11:00 AM
Post
#25
|
||
|
PMB Performance Group: Admin Posts: 19,304 Joined: 3-September 03 From: Salt Lake City, UT Member No.: 1,110 Region Association: Rocky Mountains |
That's not a 'bad' bushing... that's a 'gone' bushing! (IMG:http://www.914world.com/bbs2/html/emoticons/laugh.gif) Chris... looks like factory to me (IMG:http://www.914world.com/bbs2/html/emoticons/confused24.gif) Just judging by the way the rubber is fractured in the pic. All the Welts. I've installed have been a press in fit meaning that inner portion should stay... (IMG:http://www.914world.com/bbs2/html/emoticons/confused24.gif) |
||
|
|
|
||
| Gint |
Mar 1 2006, 11:12 AM
Post
#26
|
|
Mike Ginter Group: Admin Posts: 16,108 Joined: 26-December 02 From: Denver CO. Member No.: 20 Region Association: Rocky Mountains |
Slap that used control arm in it and be on your way. Grind down that weld forst so the mating surface is flat.
|
|
|
|
| Spoke |
Mar 1 2006, 01:19 PM
Post
#27
|
|
Jerry Group: Members Posts: 7,399 Joined: 29-October 04 From: Allentown, PA Member No.: 3,031 Region Association: None |
Update:
I picked up the used control arm last night. Primed and painted (black) the repaired area on the suspension ear. Repacked the wheel bearing, cleaned all of the lug bolt and caliper mount threads, installed unit; wheel is nice and solid now. Added a heat flapper for heat, got registered, insured, and I'm on the road now!! There is a big difference in power between my single-center-carbed-1.7L and this FI 2.0L. It is quite refreshing. Gotta go, I got some (IMG:http://www.914world.com/bbs2/html/emoticons/driving.gif) to do. Spoke |
|
|
|
| Jaiden |
Mar 1 2006, 01:26 PM
Post
#28
|
|
Member Group: Members Posts: 346 Joined: 13-January 05 From: Stroudsburg PA Member No.: 3,443 |
Damn your fast!!!! What did you take off of work to get the new car on the road????
Great Job (IMG:http://www.914world.com/bbs2/html/emoticons/smilie_pokal.gif) Now go enjoy (IMG:http://www.914world.com/bbs2/html/emoticons/driving.gif) |
|
|
|
|
1 User(s) are reading this topic (1 Guests and 0 Anonymous Users)
0 Members:

|
Lo-Fi Version | Time is now: 30th June 2026 - 10:15 AM |
Invision Power Board
v9.1.4 © 2026 IPS, Inc.