|
|
|
Porsche, and the Porsche crest are registered trademarks of Dr. Ing. h.c. F. Porsche AG.
This site is not affiliated with Porsche in any way. Its only purpose is to provide an online forum for car enthusiasts. All other trademarks are property of their respective owners. |
|
|

  |

| Trekkor |
 Oct 20 2004, 12:40 PM Oct 20 2004, 12:40 PM
Post
#1
|
|
I do things...  Group: Members Posts: 7,809 Joined: 2-December 03 From: Napa, Ca Member No.: 1,413 Region Association: Northern California |
i'm sure this has been covered already.
I'll be trying it today and then dialing the carbs after. easier to do on the ground instead of in the car... I know that much. (IMG:style_emoticons/default/wink.gif) KT |
   |

 
|
| Dr Evil |
Oct 20 2004, 12:41 PM
Post
#2
|
|
Send me your transmission! Group: Members Posts: 23,041 Joined: 21-November 03 From: Loveland, OH 45140 Member No.: 1,372 Region Association: MidAtlantic Region |
Make sure you look for and adjust the two extra cylinders (IMG:style_emoticons/default/wink.gif)
|
|
|
|
| ArtechnikA |
Oct 20 2004, 12:47 PM
Post
#3
|
|
rich herzog Group: Members Posts: 7,390 Joined: 4-April 03 From: Salted Roads, PA Member No.: 513 Region Association: None |
been documented here - i think it's a Lawrence thread - might be Classic by now ...
get yourself one of those feeler gauges that looks like a question mark -> ? make sure you know what your 3 TDC marks look like on the fan pulley. best to drain the oil first... 1-6-2-4-3-5 |
|
|
|
| Trekkor |
Oct 20 2004, 12:48 PM
Post
#4
|
|
I do things... Group: Members Posts: 7,809 Joined: 2-December 03 From: Napa, Ca Member No.: 1,413 Region Association: Northern California |
What?! (IMG:style_emoticons/default/ohmy.gif)
Cut me a break... This is hard. (IMG:style_emoticons/default/lol2.gif) KT |
|
|
|
| Root_Werks |
Oct 20 2004, 12:52 PM
Post
#5
|
|
Village Idiot Group: Members Posts: 8,904 Joined: 25-May 04 From: About 5NM from Canada Member No.: 2,105 Region Association: Pacific Northwest |
If you are using a feeler gauge, there is a certain "feel" when you slide the feeler through the gap. Of course, pull the covers off by cracking each nut loose from the inside out, then take them all the way off. Helps to reduce warpage.
You should be able to slide the feeler gauge around with a little resistance. If this is your first sixer adjustment, go through it twice. While the engine is out, don't forget to mark the three spot on the crank pulley on the flywheel as well. It may take a few tries to really get it right, but a good valve adjust will have a "tickle, tickle, tickle" sound to it, not a "tac,tac,tac". Have fun! (IMG:style_emoticons/default/biggrin.gif) |
|
|
|
| Trekkor |
Oct 20 2004, 01:01 PM
Post
#6
|
|
I do things... Group: Members Posts: 7,809 Joined: 2-December 03 From: Napa, Ca Member No.: 1,413 Region Association: Northern California |
My pulley has the marks already. Yay!
KT |
|
|
|
| ArtechnikA |
Oct 20 2004, 01:09 PM
Post
#7
|
|
rich herzog Group: Members Posts: 7,390 Joined: 4-April 03 From: Salted Roads, PA Member No.: 513 Region Association: None |
QUOTE(trekkor @ Oct 20 2004, 11:01 AM) My pulley has the marks already. of course it does.. now, take advantage of the opportunity to mark Z1 with a bright color, and the other two with a different bright color. (like - DayGlo orange and green) that way the next time you're trying this with the engine in the car and you're wedging your head in past the battery and using a flashlight and mirror to verify TDC, you'll have a chance of doing it... and of course Z1 is TDC #1 -and- #4, so you still get to pull the dizzy cap to verify your start place ... |
|
|
|
| Trekkor |
Oct 20 2004, 01:29 PM
Post
#8
|
|
I do things... Group: Members Posts: 7,809 Joined: 2-December 03 From: Napa, Ca Member No.: 1,413 Region Association: Northern California |
|
|
|
|
| Root_Werks |
Oct 20 2004, 02:08 PM
Post
#9
|
|
Village Idiot Group: Members Posts: 8,904 Joined: 25-May 04 From: About 5NM from Canada Member No.: 2,105 Region Association: Pacific Northwest |
Don't forget the flywheel, mark that as well. You don't have to wedge you head between anything to see marks on the flywheel once the engine is installed. Stock 914-6 flywheels have the marks that the pulley does. (IMG:style_emoticons/default/boldblue.gif)
|
|
|
|
| ArtechnikA |
Oct 20 2004, 02:16 PM
Post
#10
|
|
rich herzog Group: Members Posts: 7,390 Joined: 4-April 03 From: Salted Roads, PA Member No.: 513 Region Association: None |
QUOTE(Root_Werks @ Oct 20 2004, 12:08 PM) Stock 914-6 flywheels have the marks that the pulley does. i don't remember the TDC marks besides Z1... been too long... |
|
|
|
| Root_Werks |
Oct 20 2004, 02:21 PM
Post
#11
|
|
Village Idiot Group: Members Posts: 8,904 Joined: 25-May 04 From: About 5NM from Canada Member No.: 2,105 Region Association: Pacific Northwest |
QUOTE(ArtechnikA @ Oct 20 2004, 12:16 PM) QUOTE(Root_Werks @ Oct 20 2004, 12:08 PM) Stock 914-6 flywheels have the marks that the pulley does. i don't remember the TDC marks besides Z1... been too long... Ya know, it has been a while since I have seen a stock 914-6 flywheel myself. But I can remember adjusting the valves by one as well as setting the timing by one. Doesn't mean they came with them I guess? Either way, it rocks to add the marks because the little hole in the top back of the engine is easy to look at. Like a complete dummy, I marked mine with a sharpe and forgot to scribe the marks. I will be surprised of the marks are still there when it comes to the next valve adjustment. Derrr. (IMG:style_emoticons/default/rolleyes.gif) |
|
|
|
| Sammy |
Oct 20 2004, 02:29 PM
Post
#12
|
|
. Group: Members Posts: 1,190 Joined: 21-January 03 From: Orange, Ca Member No.: 178 |
I'd say the feeler has to offer resistance, if it slides easily you are too loose.
The feeler gauge is .004", the spec calls for just slightly tighter than that so the feel should be best described as "stiff". I use a dial indicator myself, I get a more accurate setting and I absolutely hate the factory feeler gauge. The blade is too damn long IMO. |
|
|
|
| Cap'n Krusty |
Oct 20 2004, 02:54 PM
Post
#13
|
|
Cap'n Krusty Group: Members Posts: 10,794 Joined: 24-June 04 From: Santa Maria, CA Member No.: 2,246 Region Association: Central California |
Now that all the blather is done, you wanna know the REAL way to do it?
Once you've mastered this simple technique, you'll wonder why anybody does it any other way ............. - Remove the valve covers. - Leave the spark plugs in (this is to prevent carbon flakes from falling into the exhaust valve seats). - Turn the engine over by hand (or with a starter button if it's in the car) until one valve is fully open. Makes sense to pick one on the end and establish a system. - Adjust the valve exactly opposite that open valve. If #1 intake valve is fully open, adjust #4 intake valve. - Proceed to adjust them all, turning the engine until another is rocked open. This works for T4 motors as well, and T1s, 356s, Brit iron, Volvos, Japanese engines, whatever .................... It works during engine assembly even before the distributor is installed. You don't have to worry about where TDC is, or which cylinder you're on. No climbing up and down, something that's important to us olepharts, and it's foolproof. Well, maybe not completely foolproof, those fools have a way of finding new tricks! Takes me less than 10 minutes to do a 914 motor (in the car) if I have to adjust every valve, and usually less than 5 minutes. In fact, it often takes more time to clean and re-gasket the valve covers than it does to set the valves! If you need clarification, just ask! The Cap'n This post has been edited by Lawrence: Oct 22 2004, 07:48 AM |
|
|
|
| Root_Werks |
Oct 20 2004, 03:25 PM
Post
#14
|
|
Village Idiot Group: Members Posts: 8,904 Joined: 25-May 04 From: About 5NM from Canada Member No.: 2,105 Region Association: Pacific Northwest |
Advise from the Krust, even easier. Just look at all these choices! (IMG:style_emoticons/default/biggrin.gif)
|
|
|
|
| TimT |
Oct 20 2004, 04:07 PM
Post
#15
|
|
retired Group: Members Posts: 4,033 Joined: 18-February 03 From: Wantagh, NY Member No.: 313 |
Ive been doing it in the manner crusty describes for years.. once your comfortable and realize what is happening with the cams and valves, this streamlines the adjustment quites a bit.
|
|
|
|
| Aaron Cox |
Oct 20 2004, 04:21 PM
Post
#16
|
|
Professional Tinkerer Group: Retired Admin Posts: 24,548 Joined: 1-February 03 From: Corona, CA Member No.: 219 Region Association: Southern California |
QUOTE(Cap'n Krusty @ Oct 20 2004, 01:54 PM) Now that all the blather is done, you wanna know the REAL way to do it? Once you've mastered this simple technique, you'll wonder why anybody does it any other way ............. - Remove the valve covers. - Leave the spark plugs in (this is to prevent carbon flakes from falling into the exhaust valve seats). - Turn the engine over by hand (or with a starter button if it's in the car) until one valve is fully open. Makes sense to pick one on the end and establish a system. - Adjust the valve exactly opposite that open valve. If #1 intake valve is fully open, adjust #4 intake valve. - Proceed to adjust them all, turning the engine until another is rocked open. This works for T4 motors as well, and T1s, 356s, Brit iron, Volvos, Japanese engines, whatever .................... It works during engine assembly even before the distributor is installed. You don't have to worry about where TDC is, or which cylinder you're on. No climbing up and down, something that's important to us olepharts, and it's foolproof. Well, maybe not completely foolproof, those fools have a way of finding new tricks! Takes me less than 10 minutes to do a 914 motor (in the car) if I have to adjust every valve, and usually less than 5 minutes. In fact, it often takes more time to clean and re-gasket the valve covers than it does to set the valves! If you need clarification, just ask! The Cap'n thats how i do my 914/4..... |
|
|
|
| Trekkor |
Oct 20 2004, 05:46 PM
Post
#17
|
|
I do things... Group: Members Posts: 7,809 Joined: 2-December 03 From: Napa, Ca Member No.: 1,413 Region Association: Northern California |
Yes, I've always made adjustments as long as the valve is sitting fully closed. closed is closed. (IMG:style_emoticons/default/wink.gif)
KT |
|
|
|
| ArtechnikA |
Oct 20 2004, 07:35 PM
Post
#18
|
|
rich herzog Group: Members Posts: 7,390 Joined: 4-April 03 From: Salted Roads, PA Member No.: 513 Region Association: None |
QUOTE(Sammy @ Oct 20 2004, 12:29 PM) The feeler gauge is .004", the spec calls for just slightly tighter than that so the feel should be best described as "stiff". I absolutely hate the factory feeler gauge. The blade is too damn long IMO. for those who may be inexperienced at discovering the 'feel' - here's what you do... get a micrometer and set it at whatever you want to set you valves at. 0,10mm for a /6 (0,003937"). or 0.006" or whatever. then, stick in the feeler gauge you're trying for. that's what it should feel like. Eurometrix used to sell a feeler gauge fixture for this purpose, but i asked many professional mechanics and none of them liked it - especially in a 914.6 where there really isn;t a lot of room, especially with the HE's in place... i'm glad Mr Larson posted 'his' method - i was going to allude to it, and some day i'll grow more comfortable using it, but i'm glad your got it exactly fro the horse's mouth. this is the 'question mark' feeler gauge i use; i have a couple of spare blades for when the original eventually breaks... Attached image(s) 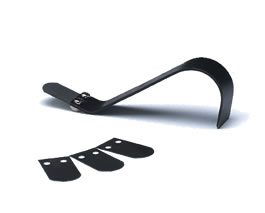
|
|
|
|
| Trekkor |
Oct 20 2004, 09:29 PM
Post
#19
|
|
I do things... Group: Members Posts: 7,809 Joined: 2-December 03 From: Napa, Ca Member No.: 1,413 Region Association: Northern California |
I did it...Yippee (IMG:style_emoticons/default/boldblue.gif)
Took about 2 hours. I took off valve covers, cleaned 'em, cleaned off the heads. Adjusted 'em all, and painted my headers. Open sez me... KT Attached image(s) 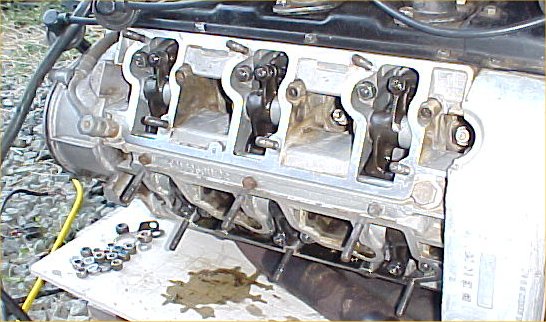
|
|
|
|
| Aaron Cox |
Oct 20 2004, 10:21 PM
Post
#20
|
|
Professional Tinkerer Group: Retired Admin Posts: 24,548 Joined: 1-February 03 From: Corona, CA Member No.: 219 Region Association: Southern California |
nice... first time ive ever seen the inside of a 911 head
|
|
|
|
|
1 User(s) are reading this topic (1 Guests and 0 Anonymous Users)
0 Members:

|
Lo-Fi Version | Time is now: 4th March 2026 - 06:51 AM |
Invision Power Board
v9.1.4 © 2026 IPS, Inc.