|
|
|
Porsche, and the Porsche crest are registered trademarks of Dr. Ing. h.c. F. Porsche AG.
This site is not affiliated with Porsche in any way. Its only purpose is to provide an online forum for car enthusiasts. All other trademarks are property of their respective owners. |
|
|


| Gudhjem |
 Feb 1 2011, 11:03 PM Feb 1 2011, 11:03 PM
Post
#1
|
|
Member  Group: Members Posts: 133 Joined: 29-March 07 From: Castro Valley, CA Member No.: 7,629 Region Association: Northern California |
Here's my story so far.
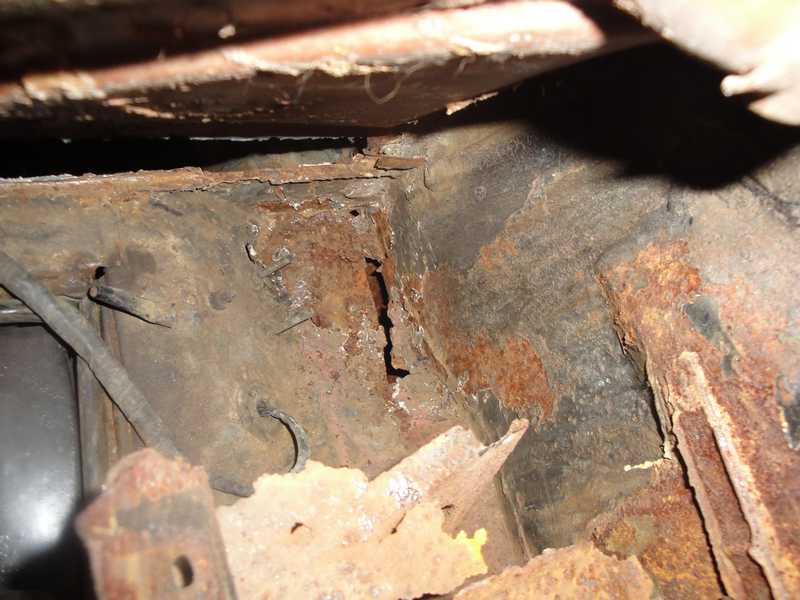
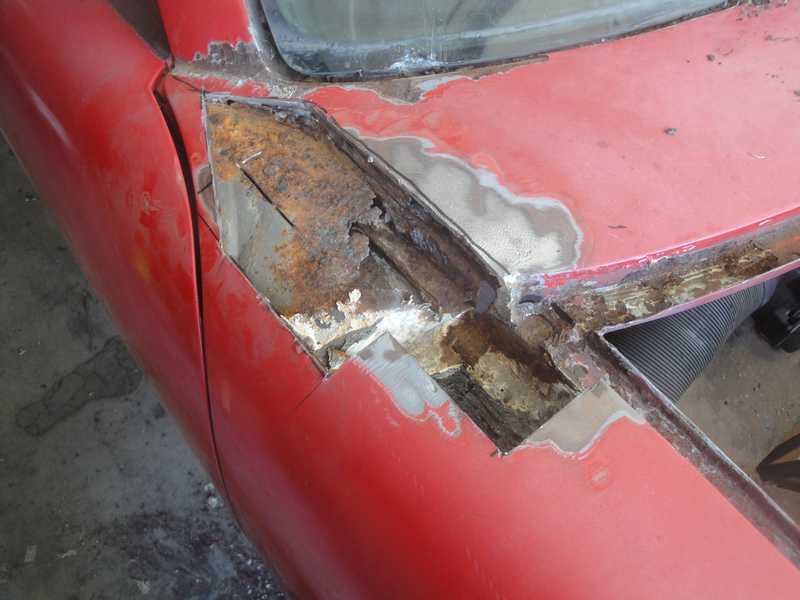
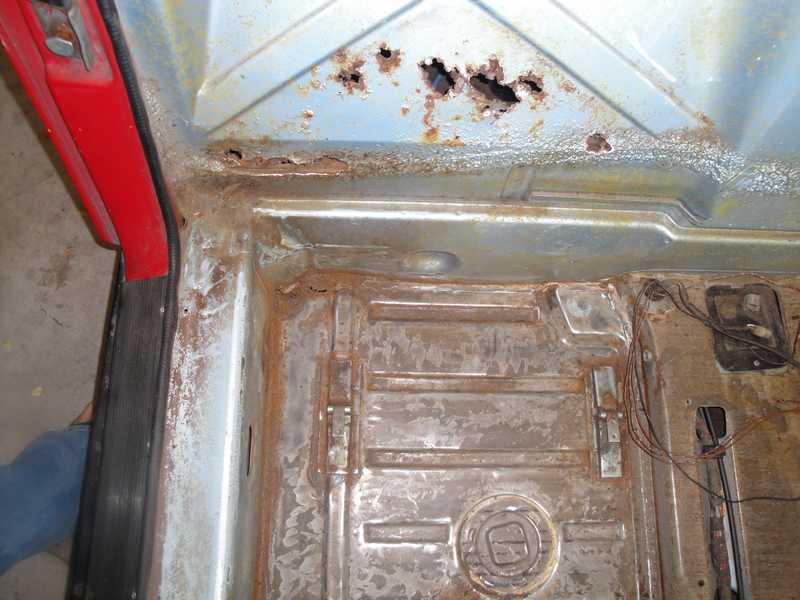
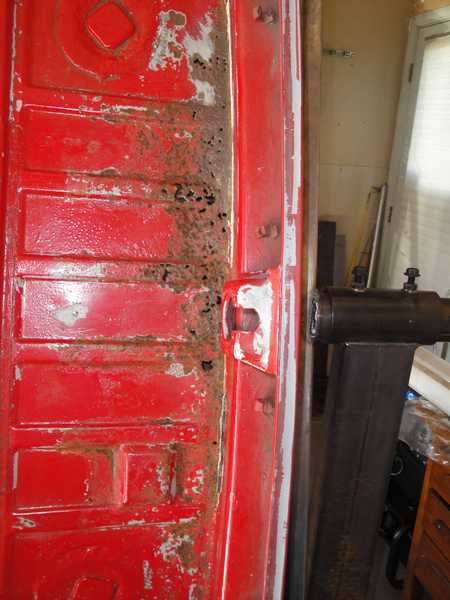
Last summer I noticed this creeping up my driver’s side long: 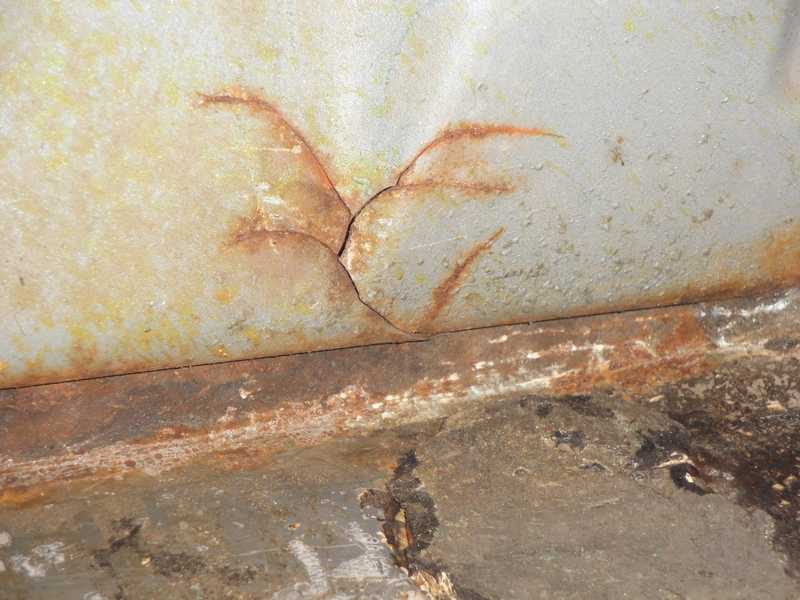 So I decided I had to fix that, and then noticed this a little flaking of the tar under the driver’s seat: 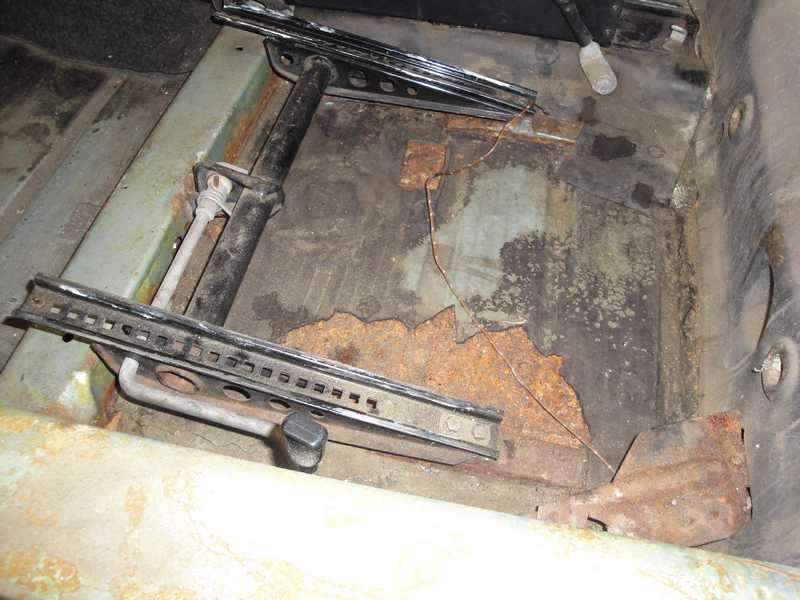 A little poking around and cleaning revealed this: 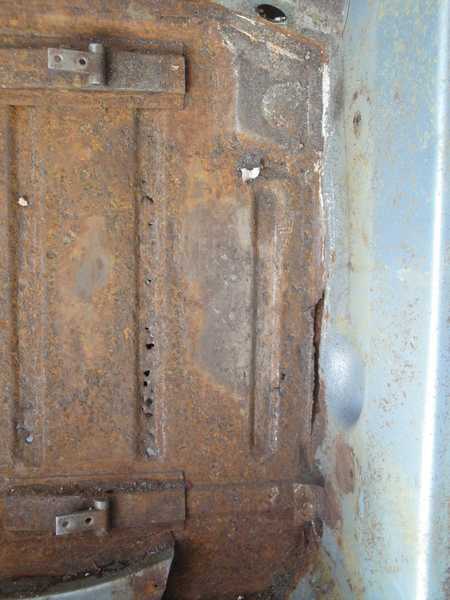 And while I’m fixing those, the PO’s repair of the passenger suspension console looked a little suspect: 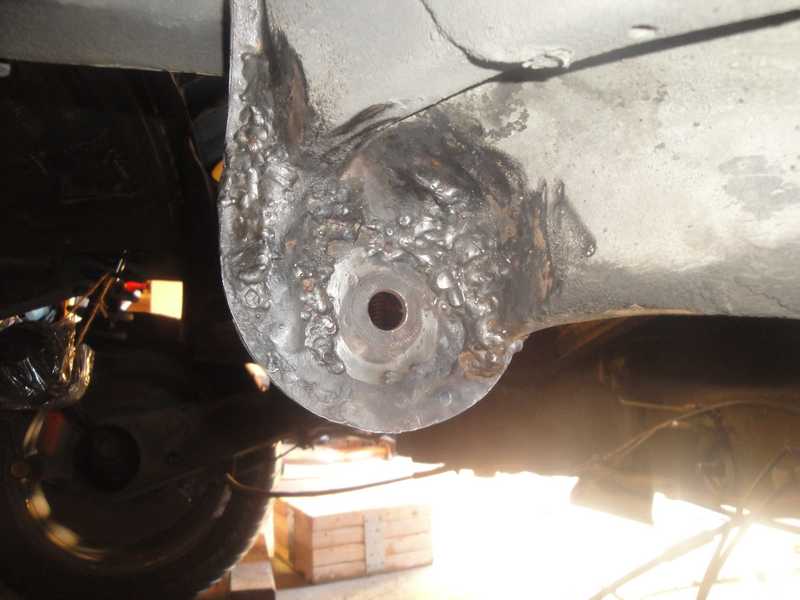 and I should probably figure out why I occasionally smell gasoline, and While I’m in There ™ …… so these things go, until I arrive here: 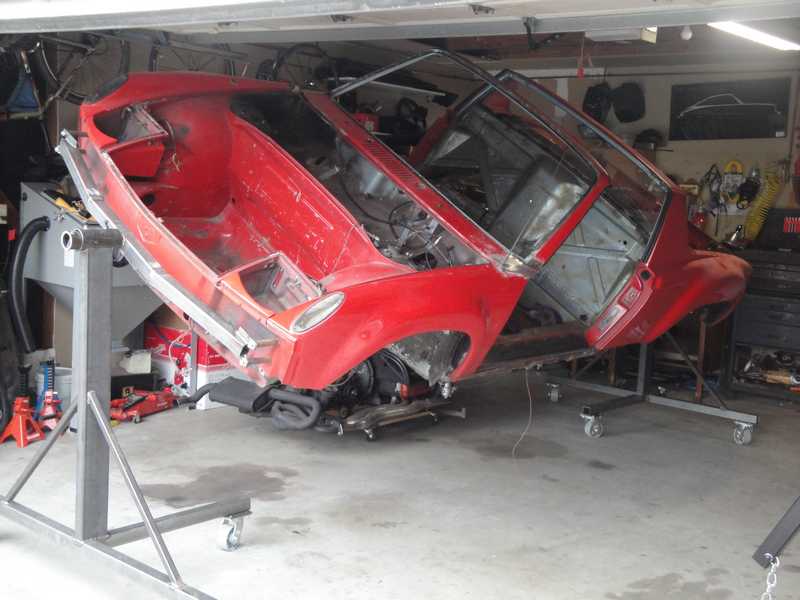 (IMG:style_emoticons/default/confused24.gif) (IMG:style_emoticons/default/confused24.gif) I discovered enough rust and other issues that I’ve decided to strip her down to the bare tub, and do everything right. I’ve been at it since July 2010, and figured I’d make a progress thread since all the cool kids are doing it. Besides, I rely on this site a lot, and it will be easier to explain what I’m asking when I come up with lame questions (and there will be many of those). About the car: It’s a 1973 2.0 that’s pretty much stock except for the FG flares a PO put on and the unusual 4-bolt wheels. 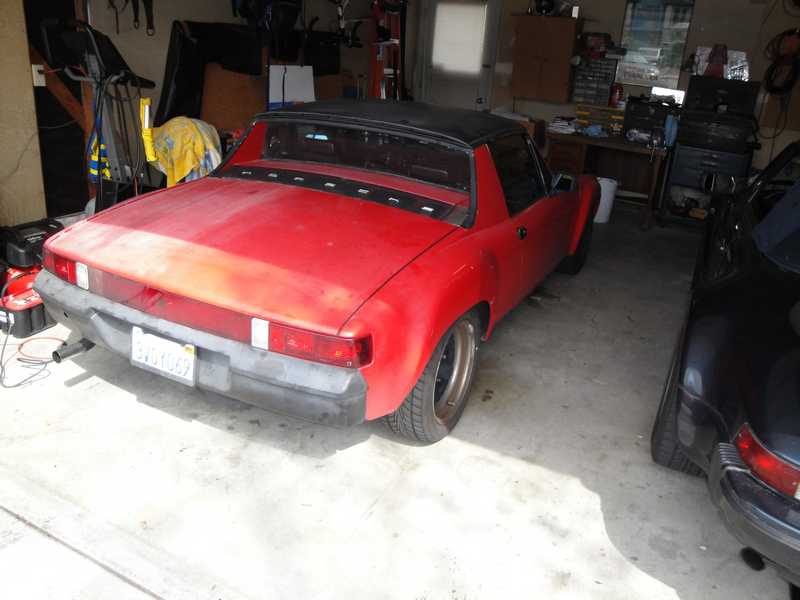 As far as I can tell it’s straight and never been in an accident, unless you count a dent in the bottom of the front trunk. It started out as a Florida car, but as far as I can tell from the title it came to California in the 70’s. I’ve owned it since 1996. I rebuilt the engine from the bottom up in 1998 (back when there were sites like the 2-trunk tribune and roadglue was big). continued... |
   |

 
|
  |
Replies(1 - 19)
| Gudhjem |
Feb 1 2011, 11:09 PM
Post
#2
|
|
Member Group: Members Posts: 133 Joined: 29-March 07 From: Castro Valley, CA Member No.: 7,629 Region Association: Northern California |
The car has, I’ve now discovered, a few rust issues:
    About me: I’m no mechanic . But did work my way through college as a metal fabricator and building and maintaining industrial machinery. That means I know how to weld a bit, or at least used to – mostly Tig, but also stick, never Mig until recently – and also means I’ve worked on machines. I’ve also rebuilt a couple engines besides the 914. But that’s the extent of my experience, and I have pretty much zero body work and car painting experience. My day job is Paper Pusher. I’m also married with 2 kids under the age of 2. So, this restoration will be a challenge, and will be a long process. Here’s the basic plan: Replace the FG flares with steel flares. The FG flares are cracked, and I got in on the last group buy. Install Engman long kit Repair hell hole and surrounding area Repair firewall 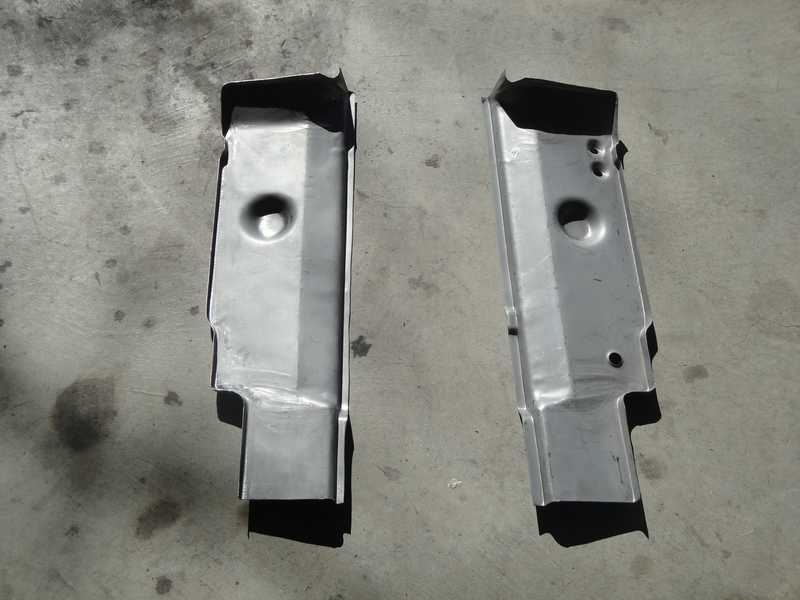 Replace and repair floorpan Repair trunk 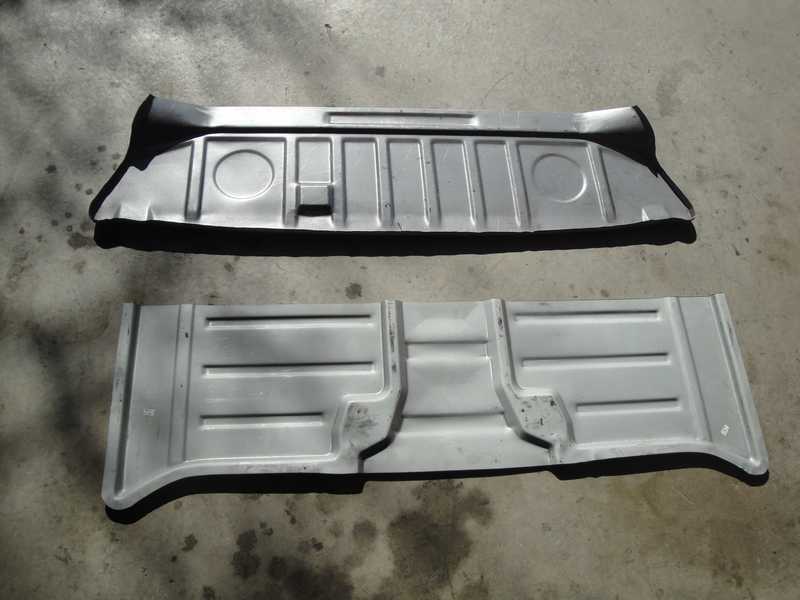 Repair cowl/fender areas Strip the 4 or 5 layers of existing paint and repaint . I think I’ve narrowed it down to orange/red like the Erich Strenger car, or else the original Marathon Blue Metallic, which you can see on the firewall behind my wife here: 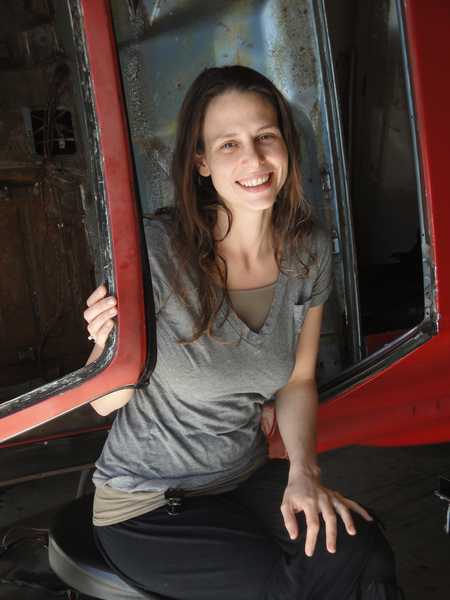 5-lug suspension (already got pretty much everything I need from Eric Shea, I’ll show some Shea Pr0n when I get to installing it) Transmission rebuild (got the Doc’s video!, how hard can it be?) J. West Rennshifter and linkage (I think) Lots of other things that will get done while I’m at it, like SS fuel lines, backpad refurb, Dynamat on floor, new carpet, rebuild doors, etc. The engine itself I’ll leave alone, for now. It’s running great, and I think I have a long enough list of things to do before I get to drive her again. The plan is to put in a 3.2, but that’s for another day, and another thread. My progress so far: I built a rotisserie using the excellent plans over at Roadglue. It went together without much trouble. As I said, I’d never Mig welded before, but figured it couldn’t be that tough to learn for someone who can Tig, so I went out and bought a little Miller Mig welder. Mig is no doubt much faster than Tig. My welds are pretty mediocre, so I’m glad I’m getting to practice on this before the car. So far the rotisserie has been great. The materials cost a lot more than I expected they would ($500), but I ordered them online, and probably went overboard on the casters ($100 just for them). I think if I had it to do it over again, I might make the rotisserie have a height adjustment. It would make loading the car much easier. Getting the car loaded was dicey, and I nearly had it fall off the blocks I had stacked underneath it. I finally lost my nerve and bought this: 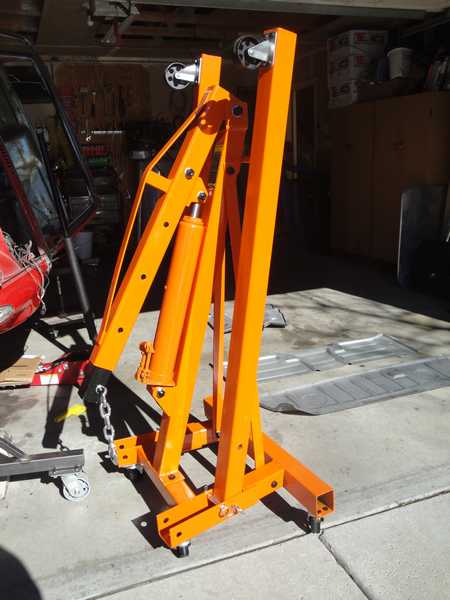 The crane made lifting it very easy – just hoisted the whole tub at once using the seat adjuster mounting holes. Of course, if you have a few friends handy, you could easily lift it and don’t need a crane. I have the car pretty much stripped. Just need to finish removing the wire harness and a few odds and ends. I’ve also removed most of the floorboard tar. Once I finish that I’ll install the supports I bought from Chris at Tangerine, orient the car rightside up, put bottle jacks under the front and back of each long, check dimensions (I measured before I put it on the rotisserie) and start to work on the hell hole. When I started I figured I could have things done my this summer, but based on how slowly things are moving, I’ve stopped kidding myself. No finish target, and I’ll just enjoy a little progress here and there as time allows. --Steve |
|
|
|
| silver74insocal |
Feb 1 2011, 11:38 PM
Post
#3
|
|
Senior Member Group: Members Posts: 736 Joined: 26-November 09 From: rancho cucamonga Member No.: 11,073 Region Association: Southern California |
looks great dude!! my vote is for the metallic blue..those cars are stunning in person and i,ve never seen one in flares..
|
|
|
|
| hot_shoe914 |
Feb 1 2011, 11:52 PM
Post
#4
|
|
on ramp passer Group: Members Posts: 3,807 Joined: 20-November 07 From: Earle, Ar. Member No.: 8,354 Region Association: None |
QUOTE(silver74insocal @ Feb 1 2011, 11:38 PM)  looks great dude!! my vote is for the metallic blue..those cars are stunning in person and i,ve never seen one in flares.. I have seen one in flares with a nice six in it, beautiful car. I painted my last one that color but then sold it. It is still a possible color choice for my soon to be flared car, but not sure yet. |
|
|
|
| orange914 |
Feb 1 2011, 11:55 PM
Post
#5
|
|
http://5starmediaworks.com/index.html Group: Members Posts: 3,371 Joined: 26-March 05 From: Ceres, California Member No.: 3,818 Region Association: Northern California |
i look forward to watching the passion and progress of your build. looks like your doing it right (IMG:style_emoticons/default/beerchug.gif)
|
|
|
|
| Gudhjem |
Feb 7 2011, 06:24 PM
Post
#6
|
|
Member Group: Members Posts: 133 Joined: 29-March 07 From: Castro Valley, CA Member No.: 7,629 Region Association: Northern California |
A little progress this past weekend:
I was able to remove the wiring harness. Not an easy task, but not as hard as I feared either. Getting the snorkel through the firewall and tunnel was the trickiest part. As in so many things, lube helped:  I Managed to ease it through the tunnel with no tearing beyond what was already there: 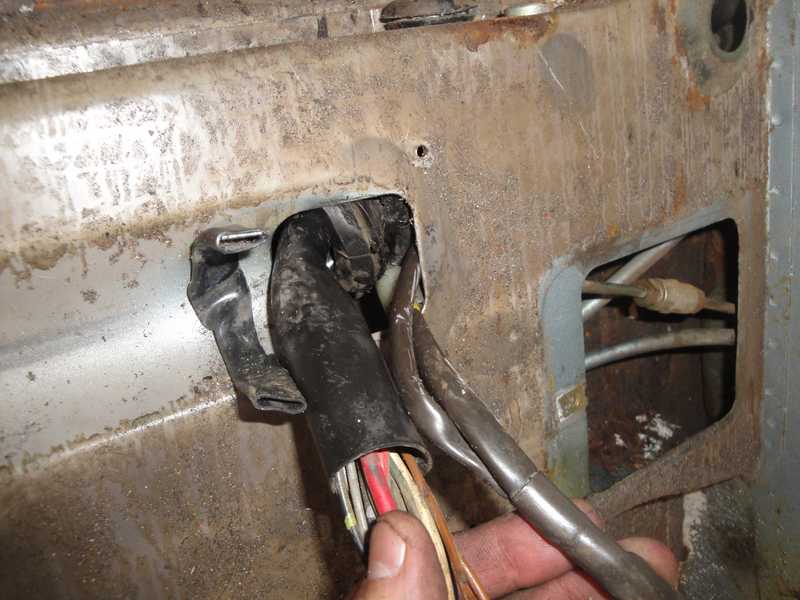 Anyone know of a source for these snorkels? Guiding through the rest of the harness, from both trucks, so everything sat in the driver’s foot well. 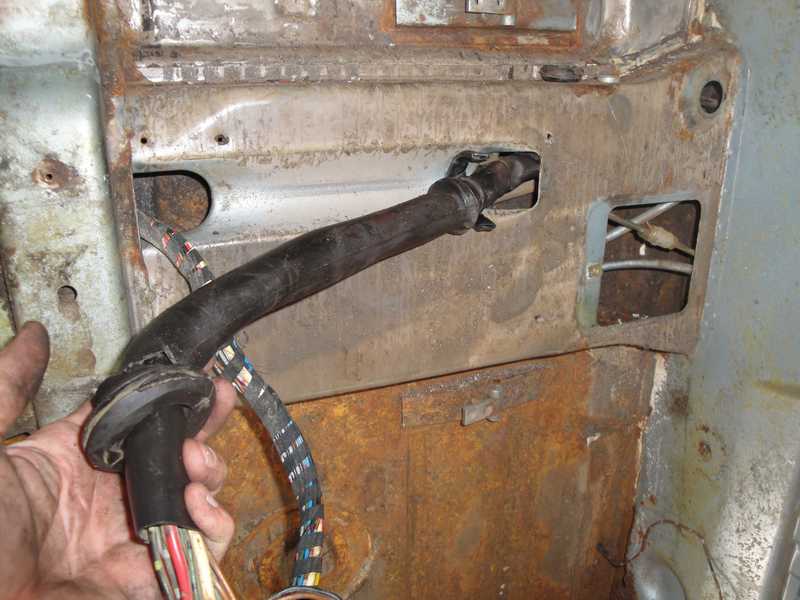 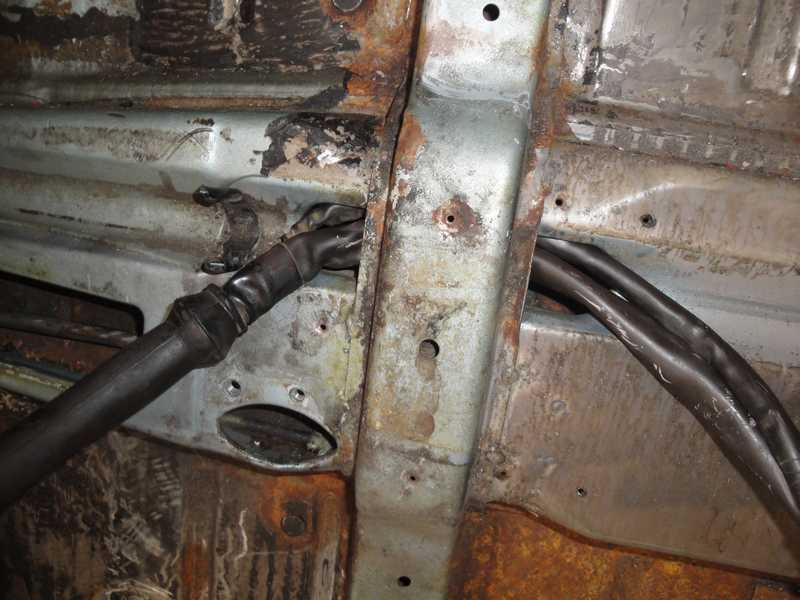 Looks like a serious mess. Hopefully I’ll be able to sort it out when it goes back in:  I also removed the factory front and rear sway bars. The front bar was confusing until I learned (from this site) the rubber bushing is split: 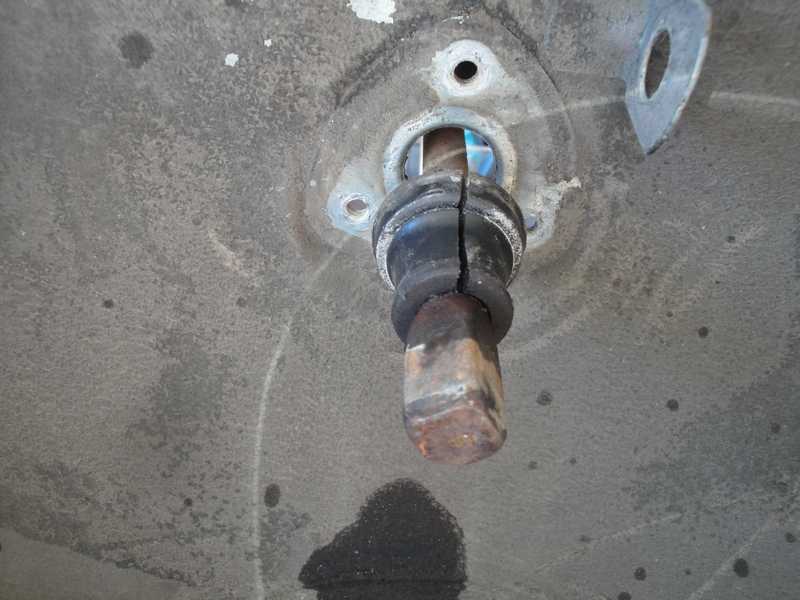 Pulling the bushing bracket over the bushing was pretty easy with lots of lube and a gear puller. While I had the car upside down, I took a closer look at the driver’s side long where the jacking hole sits. I knew it was rusted and have the replacements pieces ready to go, so I cut a hole in it to see how bad it was on the inside:  After a little poking: 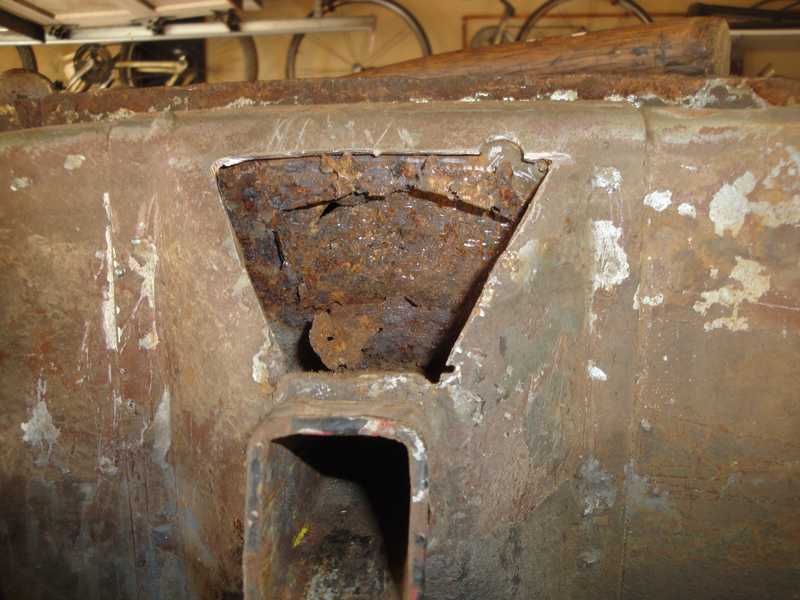 It’s hard to see, but the first layer of metal is mostly rusted away behind the jack support, and the second layer is pretty thin in the worst spot. Looks like I’ll have a little more metal work to do here than I originally thought. I still haven’t figured out how to replace those brackets without removing a part of the fender. All the build threads I’ve read involve cutting away the fender, which I’d of course prefer to avoid. I’m not actual digging into that or cutting away any more metal though until I have the car upright and the supports installed to set the gap dimensions. Next up is finishing the floorboard tar removal (about ¾ done with that) and removing a few odds and ends like brake lines. I’m getting very close to a milestone: finally fixing things and putting things on the car, instead of taking things off… |
|
|
|
| FourBlades |
Feb 7 2011, 06:55 PM
Post
#7
|
|
From Wreck to Rockin Group: Members Posts: 2,056 Joined: 3-December 07 From: Brevard, FL Member No.: 8,414 Region Association: South East States |
Your build is looking good. You got a lot of rust to deal with, but not more than many people here have successfully tackled. Cutting off a generous piece of the rear fender will make repairing the long and hell hole area so much easier that it is worth the hassle of welding the fender back on. It is so hard to access a lot of that area to clean it or weld on it that you really can't do a very neat job of it. John |
|
|
|
| SirAndy |
Feb 7 2011, 07:03 PM
Post
#8
|
|
Resident German Group: Admin Posts: 42,245 Joined: 21-January 03 From: Oakland, Kalifornia Member No.: 179 Region Association: Northern California |
QUOTE(Gudhjem @ Feb 7 2011, 04:24 PM) Looks like a serious mess. Hopefully I’ll be able to sort it out when it goes back in This should help: http://www.914world.com/bbs2/index.php?showtopic=13582 Also, before you do any more cutting, add some bracing to the door openings. Especially since the long is already cracked in the middle ... These should help too: http://www.914world.com/specs/bodydims.php http://www.914world.com/specs/underdims.php (IMG:style_emoticons/default/smash.gif) |
|
|
|
| Krieger |
Feb 7 2011, 07:28 PM
Post
#9
|
|
Advanced Member Group: Members Posts: 4,808 Joined: 24-May 04 From: Santa Rosa CA Member No.: 2,104 Region Association: None |
May the force be with you...
|
|
|
|
| TargaToy |
Feb 7 2011, 08:23 PM
Post
#10
|
|
-NONSOLIS RADIOS SEDIOUIS FULMINA MITTO- Group: Members Posts: 713 Joined: 26-March 10 From: DelMarVa Peninsula Member No.: 11,509 Region Association: MidAtlantic Region |
What's the piece that spans from the tab where your e-brake cables come through the firewall to the little tunnel on the floor? I'm also stripping my floors of tar and there was no cover over my cables.
|
|
|
|
| SirAndy |
Feb 7 2011, 09:04 PM
Post
#11
|
|
Resident German Group: Admin Posts: 42,245 Joined: 21-January 03 From: Oakland, Kalifornia Member No.: 179 Region Association: Northern California |
QUOTE(TargaToy @ Feb 7 2011, 06:23 PM) What's the piece that spans from the tab where your e-brake cables come through the firewall to the little tunnel on the floor? I'm also stripping my floors of tar and there was no cover over my cables. That's the ebrake cable cover ... (IMG:style_emoticons/default/biggrin.gif) |
|
|
|
| Gudhjem |
Oct 24 2012, 02:37 PM
Post
#12
|
|
Member Group: Members Posts: 133 Joined: 29-March 07 From: Castro Valley, CA Member No.: 7,629 Region Association: Northern California |
It’s been a long, long time since my last update – another new baby, a few other things, but my build is still happening and still moving along, every bit as slowly as I thought it would.
Progress in the past 18 months: I have the car on a rotisserie. While I’m making the structural repairs I have the door gaps supported: 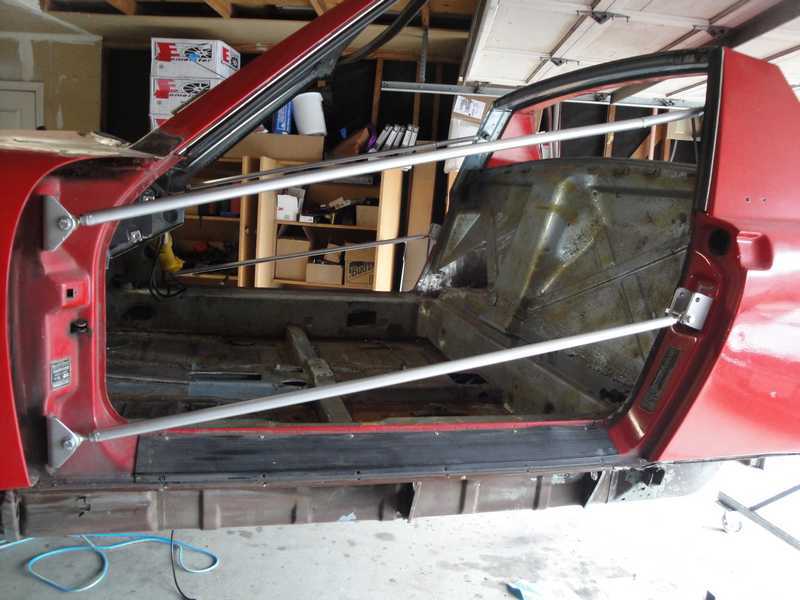 I also have the car supported in several spots under the longs. I started digging into the hell hole and discovered tinworm between the panels near the outer suspension console, so ended up removing the inner wheelhouse all the way past the where the outer suspension console mounts, and forward to the passenger long. My plan is to leave the engine compartment inner long in place. Doing that would allow me to use it to locate the other half that sits on the outside (what Restoration Design calls the inner wheelhouse). The engine compartment long had some pitting and the “floor” of it, below the hell hole and up as high as the hot air duct, was hopeless. So I cut out the rusted parts, fabricated and welded in some patches, and was able to keep the original . I am replicating the 2-ply approach of the original in all replacement pieces. A couple of pieces I fabricated: Hell hole patch, goes below battery: 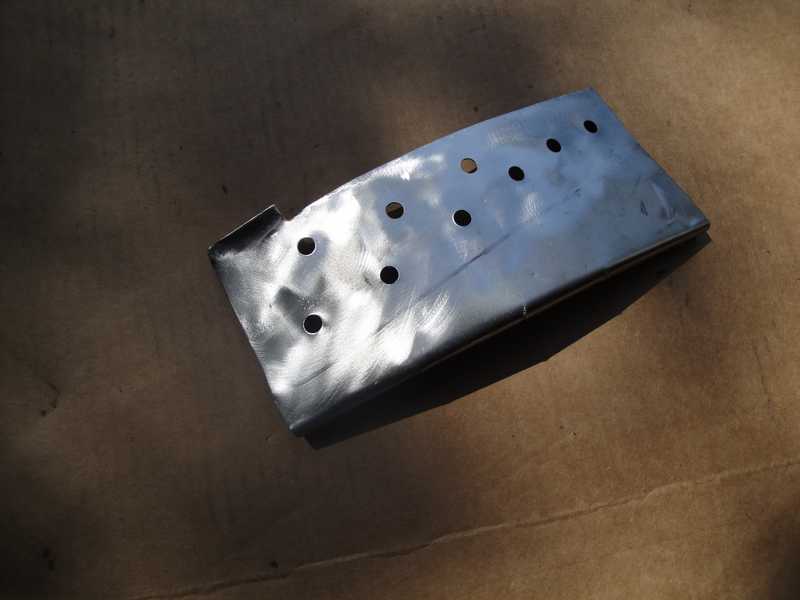 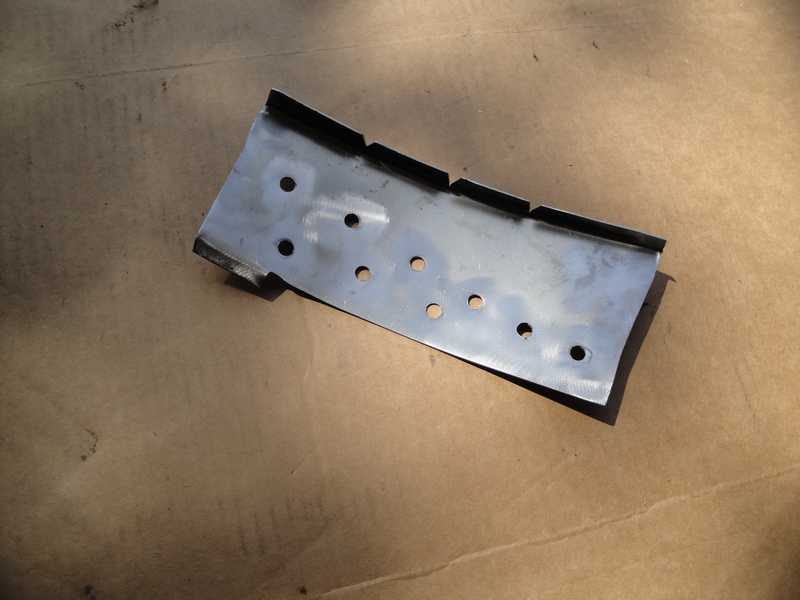 The piece that patch sits on top of, already in place: 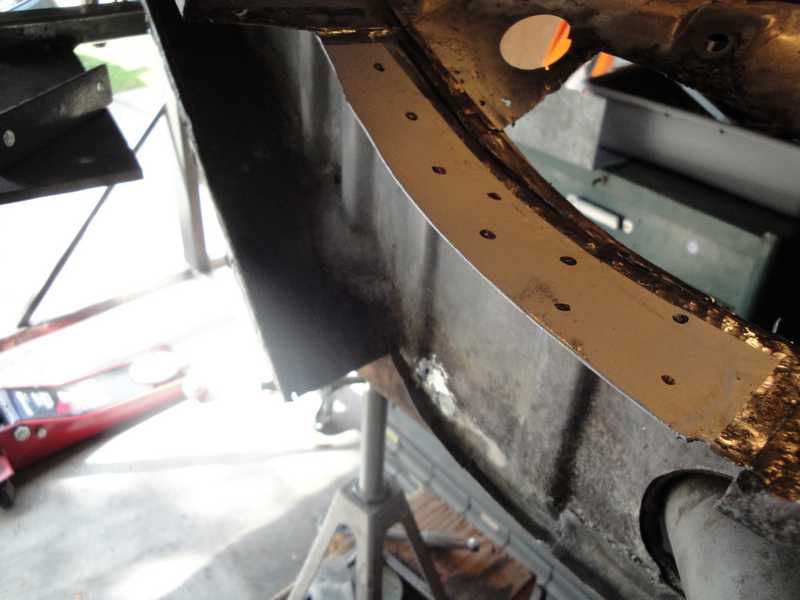 The patches welded together: 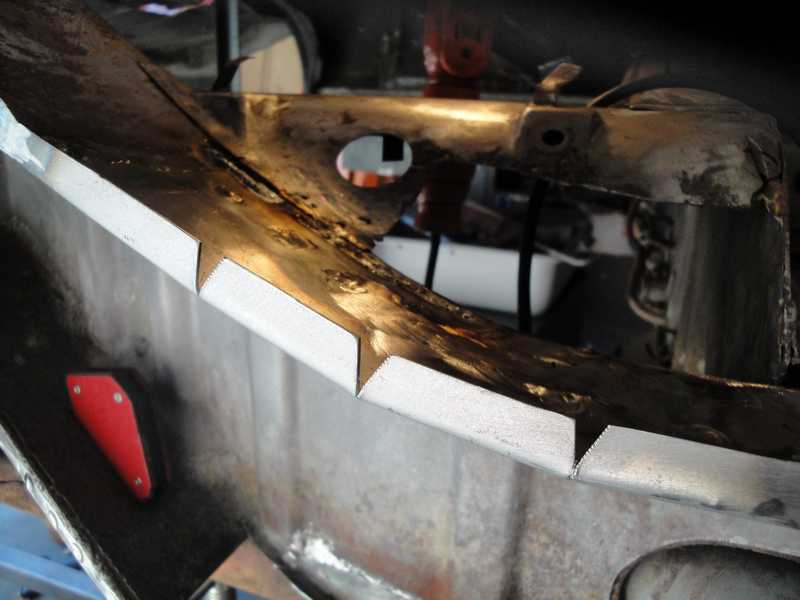 I added this piece to the RD inner wheelhouse, just below the jack receiver, so I would have material to tap into when I get to mounting the rocker panel. 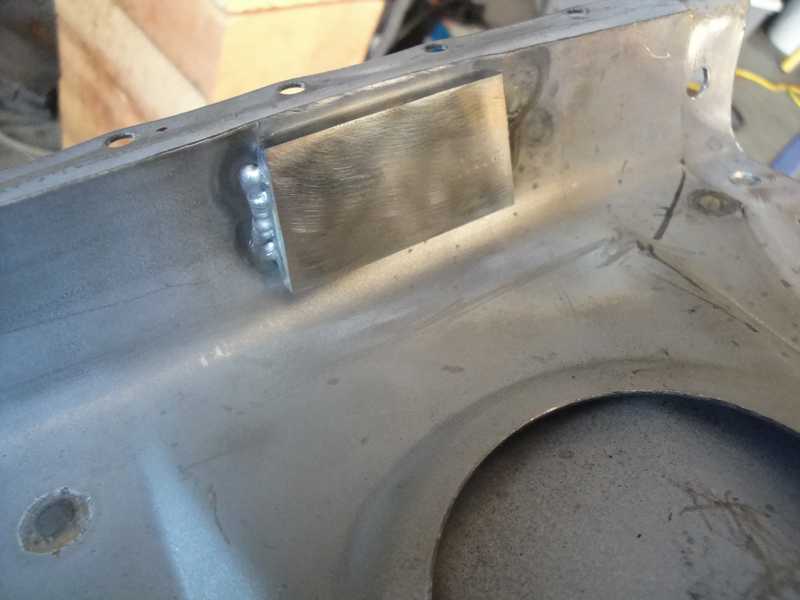 I fabricated and welded on a splice plate to back up the butt weld when I put the wheelhouse piece on. It has an odd shape to accommodate the shape of the RD piece, which is double-walled: 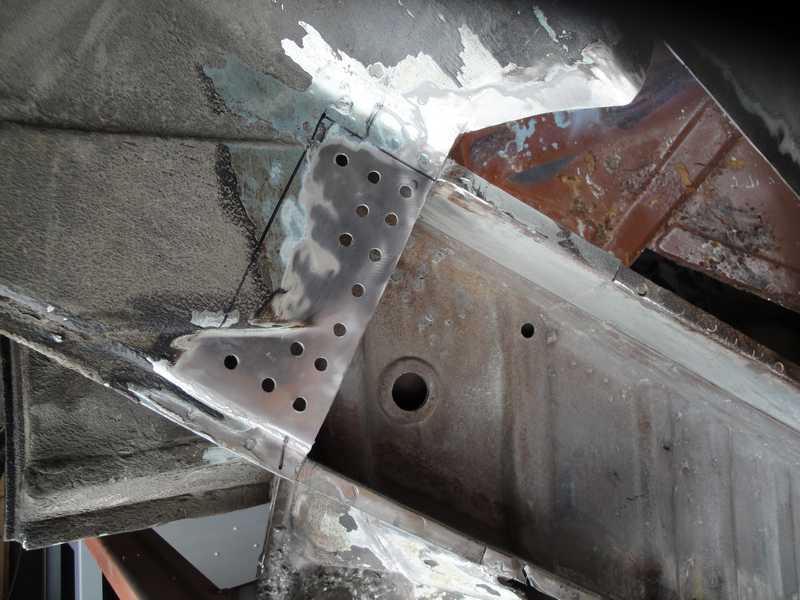  In the below pic you can see a couple of other patches below the air duct, and a patch for the internal portion of the long floor (the external ply will go on later). The splice plate is upper left: 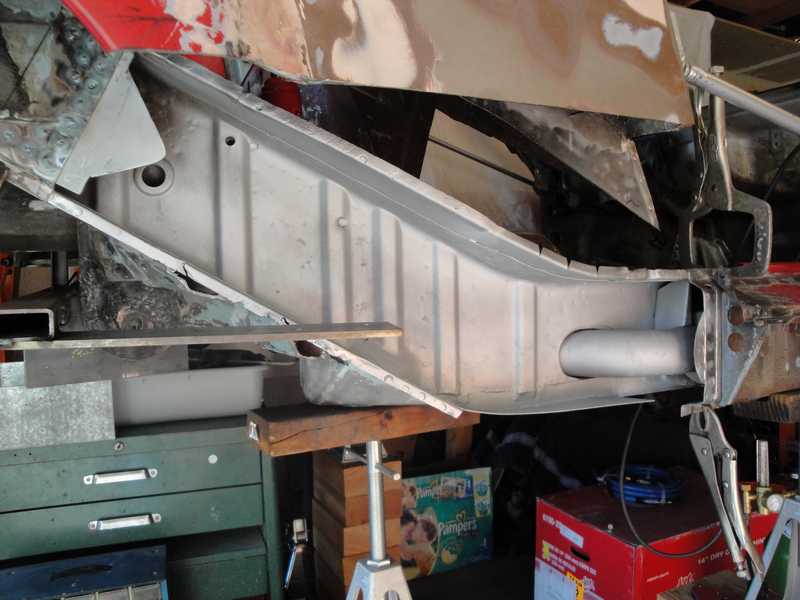 Here’s the RD piece clamped in place: 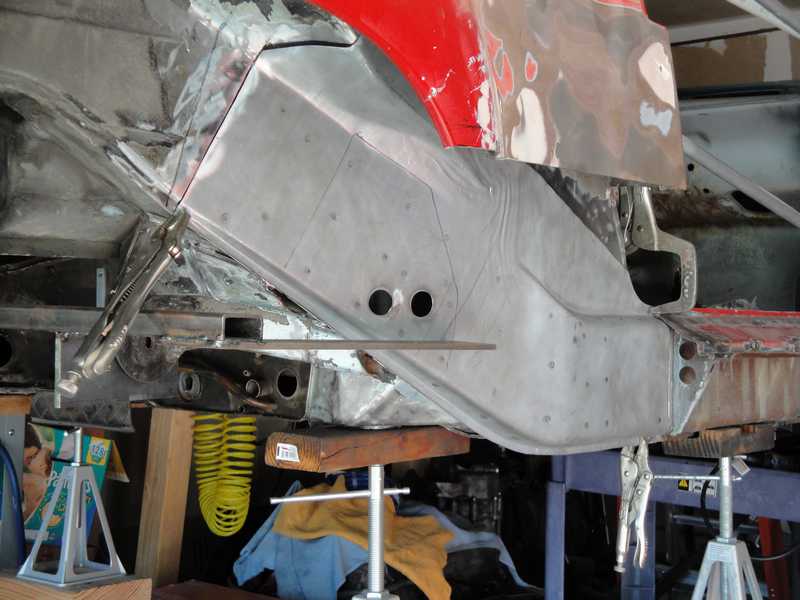 And here it is tacked: 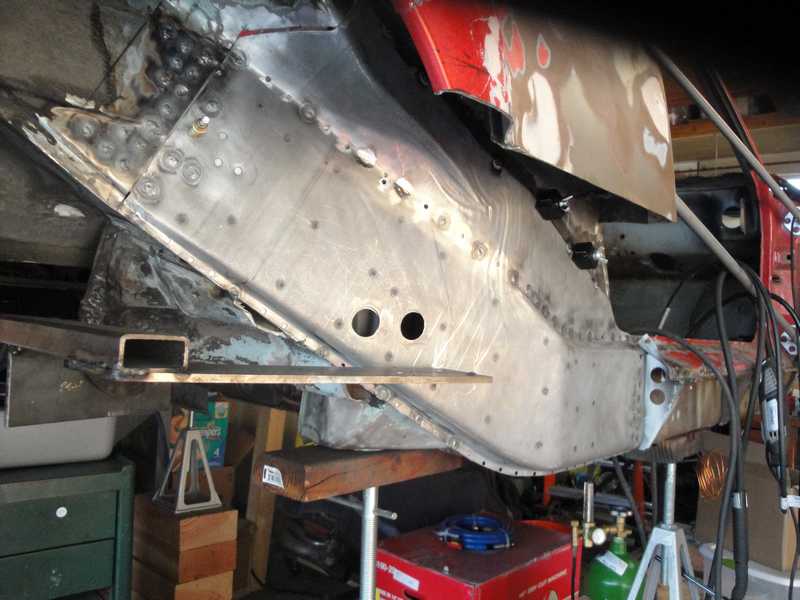 The fit is generally pretty good. You can see a gap in the upper left where the bend in the RD piece does not match the counter of the existing wall, but that’ll be easy enough to patch. For placement, I am relying mostly on the fact that I was able to leave the other half mostly in place, and so could locate this piece on its counterpart. The angle remains consistent, as near as I can measure it. My focus is getting correct placement of the outer console. You can see my jig in the pic. It’s attached to the inner console, and the inner and outer on the driver’s side. I am confident I will be able to accurately place the outer console front-to-back, since my jig has no play for this dimension. Up down has some play in the jig, but that ‘s dictated by having to sit flush with the wheelhouse anyway. Same goes for vertical and horizontal orientation. As I mentioned in this thread: http://www.914world.com/bbs2/index.php?showtopic=140467 The outer console will sit too far away from the inner console, and from the drive’s side suspension, by about 3/16”. 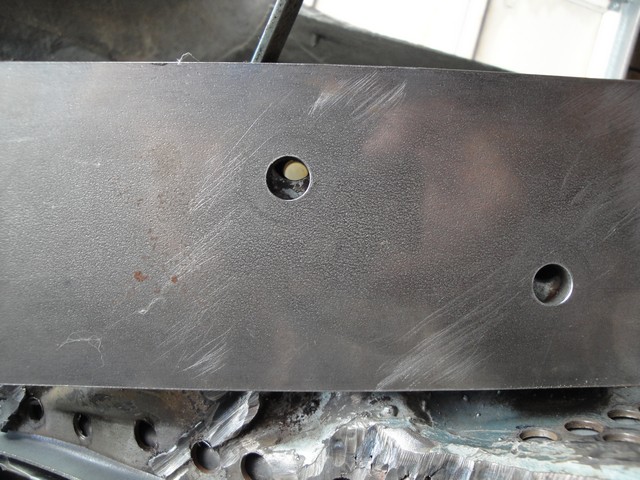 The only explanation I can come up with is that the RD piece is that much wider than my original piece. Since there is no real way to rework the piece to remove that difference, I plan to live with it. I’m really not sure what this will impact in terms of alignment, and whether it will be a problem when I mount my trailing arms (what will take up the slack?). Happy to receive any more input on this. Hopefully the next updates is weeks, not 18 months, away. My helper: 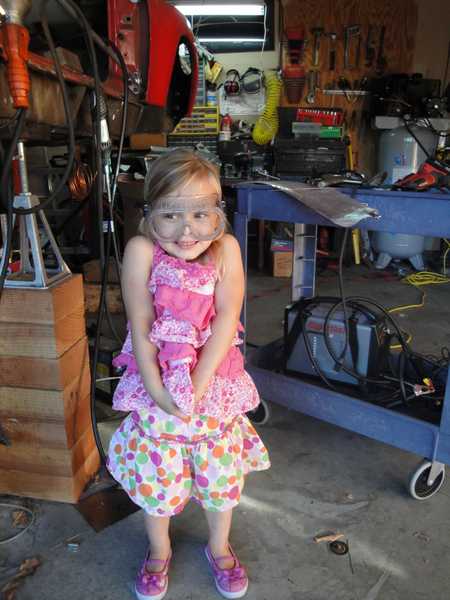 |
|
|
|
| FourBlades |
Oct 24 2012, 03:24 PM
Post
#13
|
|
From Wreck to Rockin Group: Members Posts: 2,056 Joined: 3-December 07 From: Brevard, FL Member No.: 8,414 Region Association: South East States |
Very nice work man! (IMG:style_emoticons/default/smilie_pokal.gif) It is very rewarding when you get stuff done. John |
|
|
|
| ThePaintedMan |
Oct 24 2012, 06:08 PM
Post
#14
|
|
Advanced Member Group: Members Posts: 3,887 Joined: 6-September 11 From: St. Petersburg, FL Member No.: 13,527 Region Association: South East States |
Steve,
Great work, I envy what youre doing and how you're doing it - the right way. I hope one day my metal work is as pretty as yours. Regarding the console, I did not use a jig when I repaired mine, but rather relied on the dimensions in the "914 Info" Section of the site. I was off by a little, but was still able to get the camber straightened out with thicker shims. I think there is a little more play here than most people realize. However, I was able to find a good used console, and did not use a RD piece, so I'm having a hard time visualizing your problem. Good luck! |
|
|
|
| doug_b_928 |
Feb 1 2013, 08:43 PM
Post
#15
|
|
Senior Member Group: Members Posts: 714 Joined: 17-January 13 From: Winnipeg Member No.: 15,382 Region Association: Canada |
This looks terrific, Steve. The braces for the door areas you made are really neat. Are they adjustable? Also, is that all of the bracing that one needs? That is, with this setup one doesn't need to support the back and front of the car too?
|
|
|
|
| jeeperjohn56 |
Feb 2 2013, 03:41 AM
Post
#16
|
|
Member Group: Members Posts: 479 Joined: 9-July 06 From: Antioch,Ca. Member No.: 6,407 Region Association: None |
Your doing a great job Steve, keep the picture.s coming. you have a cute little helper. John
|
|
|
|
| Cairo94507 |
Feb 2 2013, 08:26 AM
Post
#17
|
|
Michael Group: Members Posts: 10,379 Joined: 1-November 08 From: Auburn, CA Member No.: 9,712 Region Association: Northern California |
Great thread and it looks like you have the support of your wife and the help of at least one daughter. Your progress looks terrific - keep up the good work and soon enough it will be rust-free.
|
 |
|
| sixnotfour |
Feb 2 2013, 04:52 PM
Post
#18
|
|
914 Wizard Group: Members Posts: 10,908 Joined: 12-September 04 From: Life Elevated..planet UT. Member No.: 2,744 Region Association: Rocky Mountains |
|
|
|
|
| Krieger |
Feb 3 2013, 08:42 AM
Post
#19
|
|
Advanced Member Group: Members Posts: 4,808 Joined: 24-May 04 From: Santa Rosa CA Member No.: 2,104 Region Association: None |
Nice work! Your daughters still smiling so you must still be hanging out with her enough.
|
|
|
|
| Gudhjem |
Feb 5 2013, 11:30 AM
Post
#20
|
|
Member Group: Members Posts: 133 Joined: 29-March 07 From: Castro Valley, CA Member No.: 7,629 Region Association: Northern California |
Thanks for the encouragement!
I've made some progress since my last post in October. I'll post pics soon. We moved in December, so that's put the work on hold for a while - still need to get my air and a few other things hooked up in the new garage (which is bigger! (IMG:style_emoticons/default/piratenanner.gif) ) NOTE: Moving a tub with no wheels using a closed-bed truck is not fun. If faced with that prospect, don't be a cheap#$@# like me and just rent a flatbed. Doug B: I didn't make those braces, they came from Tangerine Racing, a member vendor. It's a well-made product, and they are adjustable. No, I don' t think the braces alone are enough support, at least not if you're going to cut into the longs. The car is supported front and back by the rotisserie, and also was supported underneath the longs by jackstands on blocks in several places (the non-hydraulic adjustable kind used for leveling RVs). Those stayed there and I didn't rotate or move the car until I closed up the longs and the car had some structural integrity back. I was trying to get that far before having to move the tub, and just managed it. |
|
|
|
|
1 User(s) are reading this topic (1 Guests and 0 Anonymous Users)
0 Members:

|
Lo-Fi Version | Time is now: 8th July 2025 - 10:28 AM |
Invision Power Board
v9.1.4 © 2025 IPS, Inc.