|
|
|
Porsche, and the Porsche crest are registered trademarks of Dr. Ing. h.c. F. Porsche AG.
This site is not affiliated with Porsche in any way. Its only purpose is to provide an online forum for car enthusiasts. All other trademarks are property of their respective owners. |
|
|


| timothy_nd28 |
 Aug 11 2013, 05:42 PM Aug 11 2013, 05:42 PM
Post
#1
|
|
Advanced Member  Group: Members Posts: 2,299 Joined: 25-September 07 From: IN Member No.: 8,154 Region Association: Upper MidWest |
First I would like to give thanks to Terry, my uncle, for his time on this and my other RGB backlighting project. He has spent more time working on this than he cares to admit. He's more of a Corvette guy, but his vast knowledge and willingness to help, transcends which benefits our community.
Okay, so I have been told that our tachometer has a problem with bouncing. I personally have never seen this problem and I have to admit that I've never really paid much attention to the tach while driving, so I decided to put the signal generator on the tach and see how it performs. This signal generator bypasses the ignition system and provides a clean signal. This also serves as a control because a bad condenser on the dizzy can cause problems as well. This video shows the untouched tach in its original state running on a function generator. As you will see, it does bounce and over shoot during the sweeps. https://www.youtube.com/watch?v=rbC37l1z_oA This next video shows our tach but with a cheap modern 30 dollar tach stuffed inside. The bounce seems to have disappeared, and there is no more overshoot during the sweeps. https://www.youtube.com/watch?v=cmk1lSop_iE The VDO tach was designed for mass production and had a very simple but effective design. This modern tach uses an air core massless motor which is controlled by sine/cosine inputs which tends to be a bit more responsive and accurate. The original vdo design is a motor/spring contraption which will always have some bounce. Over time, capacitors and dampening fluid may leak or fatigue which will aggravate the problem. In this write up, I will show how to incorporate a off the shelf 30 dollar tachometer commonly found at the auto parts store, and make it work with our VDO gauge can. |
   |

 
|
  |
Replies
| timothy_nd28 |
Aug 11 2013, 05:43 PM
Post
#2
|
|
Advanced Member Group: Members Posts: 2,299 Joined: 25-September 07 From: IN Member No.: 8,154 Region Association: Upper MidWest |
Now the fun stuff. You will need one of these.
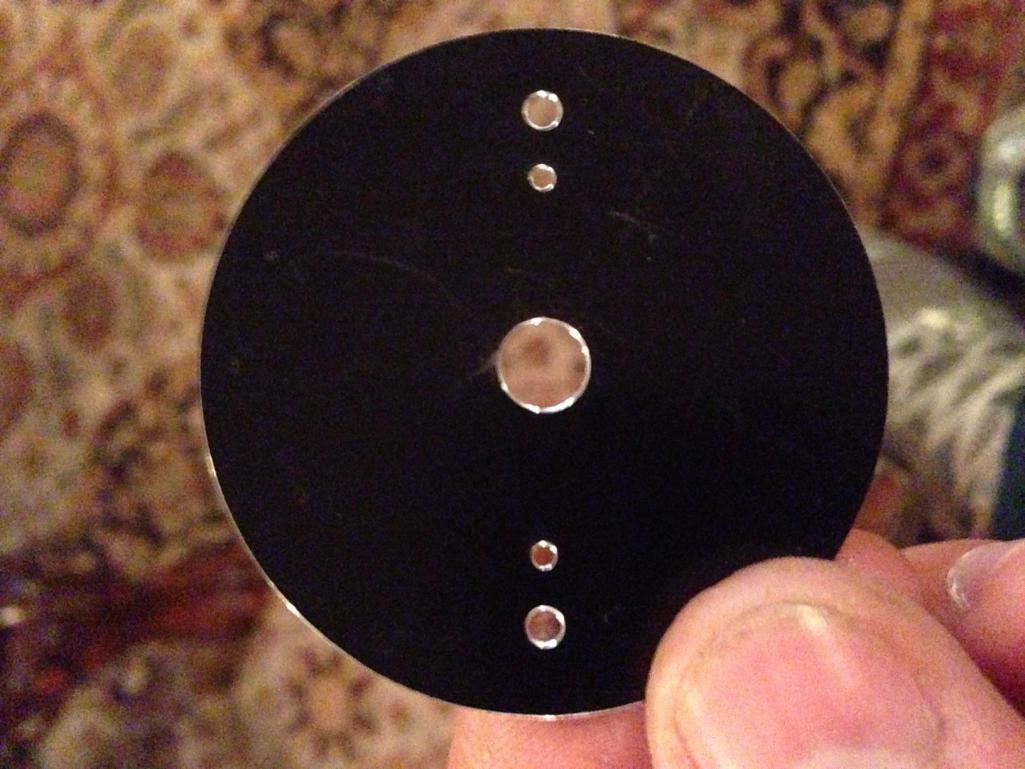 This is a adapter bracket that will mount to the modern circuit board, but will also allow you to mount the 914 face dial to it. Below is the specs for this bracket. Take this drawing to any machine shop, they should have no problem making you one. 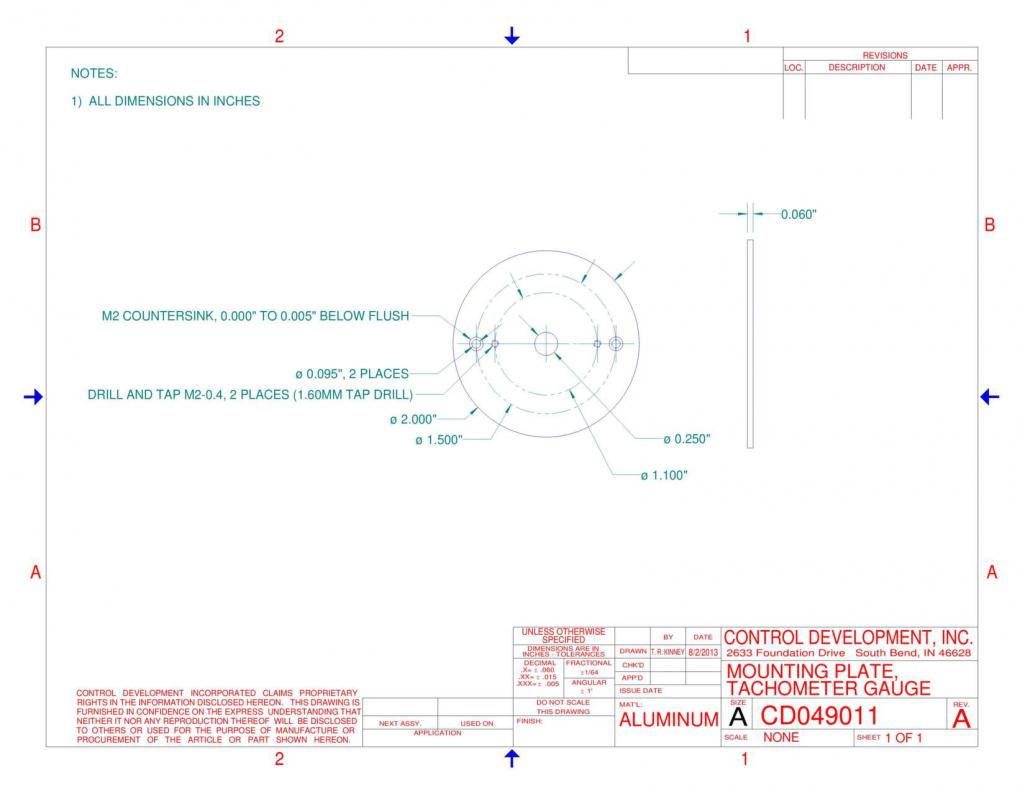 I am very fortunate to have a family member that happens to own a machine shop. This particular bracket was made via a waterjet machine. After you have obtained said bracket, you will need to remove the plastic bracket on the sunpro's motor. See picture below. Remove this bracket and discard of it. 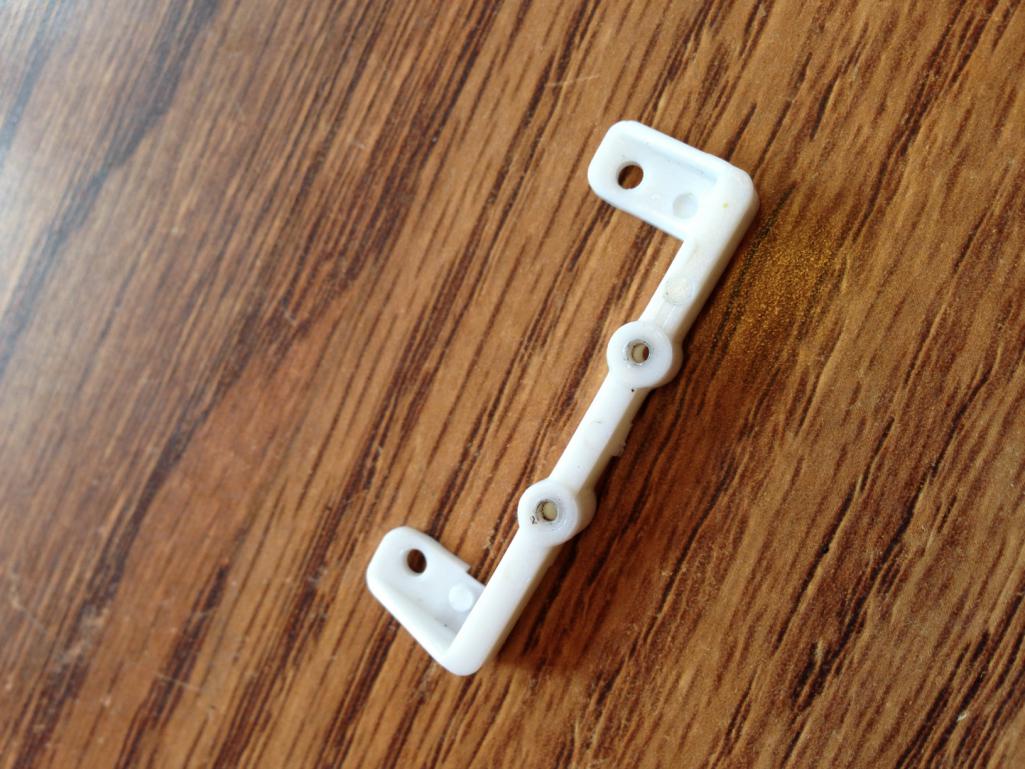 Now grab the old tachometer that you pulled apart earlier. Carefully, (can't stress this enough) pull the needle straight up. Some force might be involved to remove this needle. Next, remove the 2 screws (some have 3) that are on the 914's face dial. With the face dial removed, go ahead and wipe it off and remove any oily finger prints. The sunpro tachometer will need to have its threads re-tapped to accommodate the new screws for the mounting bracket. Use this tap on the sunpro's motor plastic bracket: 8305A77 Metric high speed steel hand tap 2x.4mm, D3 pitch diameter, 3 flute After these 2 holes are re-tapped go ahead and counter sink the 2 holes with this counter sinking bit: 2846A124 Single-Flute high speed steel countersink 90 degree angle, 3/8" body diameter, 1/4" shank diameter. Next, mount the adapter plate on the sunpro tach mounting plate. Use these screws: 91698A202 metric 18-8 stainless steel flat head phillips machine screw black-oxide M2 size, 6mm length, .4mm pitch. Make sure the holes on the adapter plate are counter sunk, and the screws are flush with this bracket. Now mount the 914 face dial to the adapter plate. You can re-use your old screws if they aren't too scratched up. Or you can use these screws: 95836A105 metric pan head phillips machine screw black-oxide 18-8 stainless steel M2 size, 4mm length, .4mm pitch It should start looking pretty good. You should now have the modern circuit board mounted to the 914 face dial. There is one last thing you'll need to do with machining, the needle. The needle won't simply push back on the shaft. You will need to drill the hole a size bigger. Obtain a 0.037" drill bit, and chuck it up to a dremil. After the needle has been honed out, hold off from re-installing the needle. We will need to calibrate it first. So now we need to assemble this back into the can. Use this hole to loom the wires thru the back of the can. 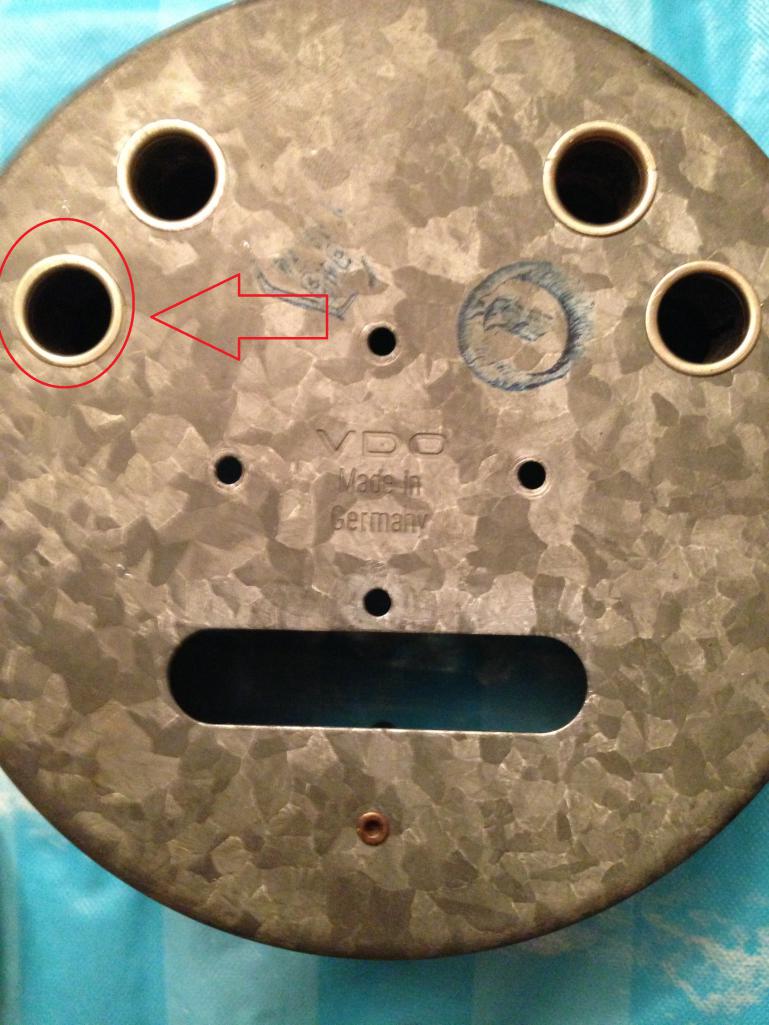 This mod was intended to re-use holes and doesn't require you to drill new ones which will ruin your gauge can. If you use this hole, you will lose one light port for your tach. This is a great time to upgrade to LED lighting. See my topic "custom gauge backlighting" for further explanation. This is a picture with the wires running thru the back of the gauge can 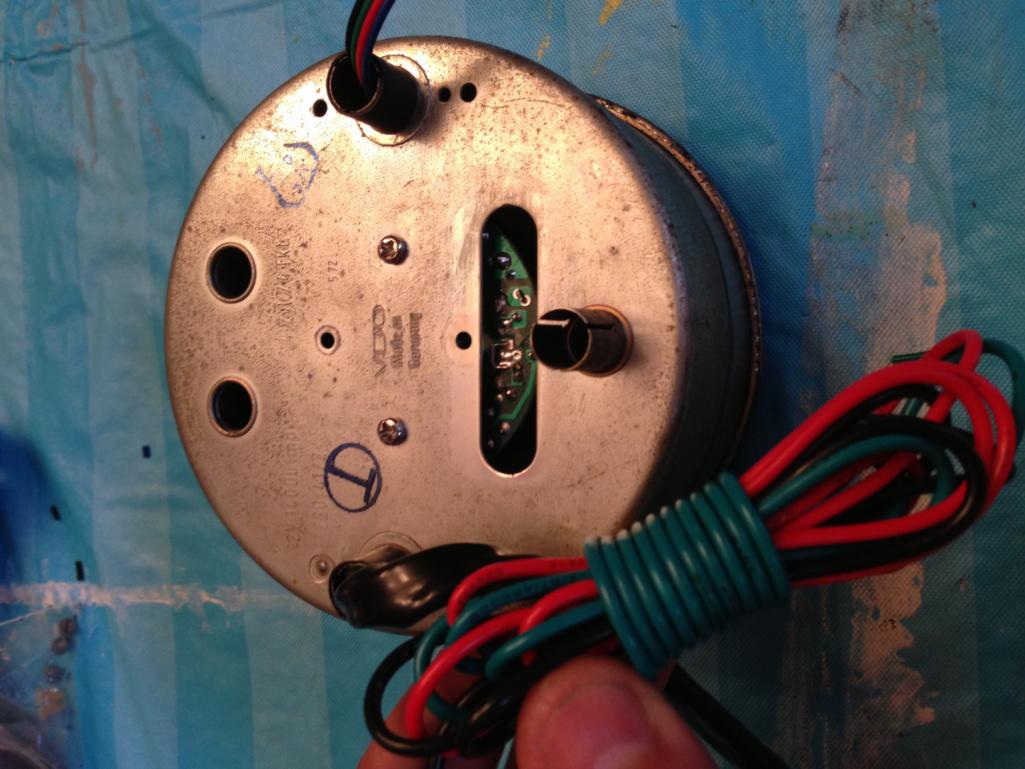 Put a couple nylon washers between the back of the gauge can and the circuit board. This spaces the circuit board, so nothing shorts out. I ended up using 2 nylon washers per screw. |
|
|
|
Posts in this topic
 timothy_nd28 Upgrading the tachometer Aug 11 2013, 05:42 PM
 timothy_nd28 First we need to purchase this cheap 30 dollar tac... Aug 11 2013, 05:42 PM timothy_nd28 After the jumper has been soldered, we need to cha... Aug 11 2013, 05:42 PM timothy_nd28 Now the machining part. Go ahead and remove the g... Aug 11 2013, 05:43 PM timothy_nd28
Now we need to apply power to this. The red an... Aug 11 2013, 08:26 PM Dave_Darling Very cool! Have you verified this with the po... Aug 11 2013, 10:04 PM
timothy_nd28 First we need to purchase this cheap 30 dollar tac... Aug 11 2013, 05:42 PM timothy_nd28 After the jumper has been soldered, we need to cha... Aug 11 2013, 05:42 PM timothy_nd28 Now the machining part. Go ahead and remove the g... Aug 11 2013, 05:43 PM timothy_nd28
Now we need to apply power to this. The red an... Aug 11 2013, 08:26 PM Dave_Darling Very cool! Have you verified this with the po... Aug 11 2013, 10:04 PM
 timothy_nd28
Very cool! Have you verified this with the p... Aug 11 2013, 10:42 PM mikelsr Looks really nice and thanks for the work. Do you ... Aug 11 2013, 11:09 PM monkeyboy Wow. Thank you for the amazing work.
Will the new... Aug 11 2013, 11:06 PM timothy_nd28 Here's the manual for this unit tach manual
... Aug 11 2013, 11:32 PM Chris H. How much for you to do it Tim? Not sure how bounc... Aug 12 2013, 08:30 AM timothy_nd28
How much for you to do it Tim? Not sure how boun... Aug 12 2013, 11:26 AM ThePaintedMan Tim,
You are unstoppable. Nice work man. I like... Aug 12 2013, 11:45 AM timothy_nd28 The video below shows the tachometer running on 5v... Aug 12 2013, 03:52 PM monkeyboy Now I need a motor that will run through the gears... Aug 12 2013, 11:05 PM McMark Just ordered my Sunpro CP7911 off Amazon. This is... Aug 13 2013, 12:59 AM timothy_nd28
Just ordered my Sunpro CP7911 off Amazon. This i... Sep 9 2013, 07:41 PM McMark Got it modded and installed. Had to order the 49... Oct 15 2013, 08:58 PM timothy_nd28 Nice. One minor flaw has been found with this ret... Oct 15 2013, 09:40 PM McMark Yeah, I installed mine with the factory connector ... Oct 15 2013, 09:48 PM Vacca Rabite I'll be ordering one of these tachs today. Aw... Oct 16 2013, 06:01 AM McMark Not particularly interesting, but here's mine ... Oct 25 2013, 10:26 PM timothy_nd28 Not bad at all :beer2: Is this running off a 5v... Oct 26 2013, 09:21 AM McMark Not sure. I'll have to look at how I have the... Oct 26 2013, 09:32 AM CptTripps Hmmm. Now this has me thinking about gutting the r... Nov 1 2013, 04:13 AM timothy_nd28 For the price, it's a great project to do. I... Nov 1 2013, 08:06 AM timothy_nd28 I just finished a tach conversion for a V-8. R9 n... Nov 13 2013, 08:51 PM McMark Does this mean that the switch on the back is alwa... Nov 13 2013, 09:04 PM timothy_nd28
Does this mean that the switch on the back is alw... Nov 13 2013, 09:05 PM McMark Can you edit you original thread at the R9 step an... Nov 13 2013, 09:11 PM timothy_nd28 Edited the values Nov 13 2013, 09:27 PM Dr Evil Reviving from the dead due to awesomeness! Thi... Sep 20 2014, 10:57 AM timothy_nd28 Thanks :) Yes, R9 can be configured from a 2 cy... Sep 20 2014, 12:05 PM tomrev Hi Tim, Reading thru this post, did you decide to... Jan 22 2016, 03:23 PM 914Bryan This is awesome! Glad to see you are offering ... Jan 22 2016, 04:37 PM rnellums Tim's service is great. I had him do high inte... Jan 22 2016, 05:14 PM tomrev
Tim's service is great. I had him do high int... Jan 22 2016, 06:09 PM timothy_nd28 As a HVAC tech, I've been busy with this recen... Jan 23 2016, 11:29 AM tomrev
As a HVAC tech, I've been busy with this rece... Jan 23 2016, 01:47 PM ThePaintedMan Might as well take the chance to give another bump... Jan 23 2016, 04:15 PM timothy_nd28 I have some bad news as it seems that AutoZone has... May 30 2016, 02:22 PM craig downs I got mine thru Summit a few months back and it wa... May 31 2016, 09:07 AM Optimusglen Good news for anyone wanting to do this. I recentl... Mar 14 2018, 11:48 AM Optimusglen Packaging and face
. Mar 14 2018, 12:00 PM Optimusglen Taking another approach. Thought I would share.
... Mar 15 2018, 01:01 PM Bartlett 914 This is a good approach. This would also work with... Mar 16 2018, 05:17 PM mepstein I'm giving it a shot. Still have a lot to lear... Mar 16 2018, 10:11 AM timothy_nd28 Wow, i thought the sunpro's were long gone. T... Mar 16 2018, 02:03 PM Bartlett 914 I purchased the Bosch 7904 and it does look like t... Apr 7 2018, 08:15 AM Montreal914 Added small detail to this excellent thread :trop... Mar 6 2022, 03:52 PM Dominic @timothy_nd28
Tim,
Are you still in the... Oct 29 2023, 09:54 AM FlacaProductions It appears that Tim hasn't logged on here sinc... Oct 29 2023, 10:00 AM fiacra
It appears that Tim hasn't logged on here sin... Oct 29 2023, 01:06 PM
timothy_nd28
Very cool! Have you verified this with the p... Aug 11 2013, 10:42 PM mikelsr Looks really nice and thanks for the work. Do you ... Aug 11 2013, 11:09 PM monkeyboy Wow. Thank you for the amazing work.
Will the new... Aug 11 2013, 11:06 PM timothy_nd28 Here's the manual for this unit tach manual
... Aug 11 2013, 11:32 PM Chris H. How much for you to do it Tim? Not sure how bounc... Aug 12 2013, 08:30 AM timothy_nd28
How much for you to do it Tim? Not sure how boun... Aug 12 2013, 11:26 AM ThePaintedMan Tim,
You are unstoppable. Nice work man. I like... Aug 12 2013, 11:45 AM timothy_nd28 The video below shows the tachometer running on 5v... Aug 12 2013, 03:52 PM monkeyboy Now I need a motor that will run through the gears... Aug 12 2013, 11:05 PM McMark Just ordered my Sunpro CP7911 off Amazon. This is... Aug 13 2013, 12:59 AM timothy_nd28
Just ordered my Sunpro CP7911 off Amazon. This i... Sep 9 2013, 07:41 PM McMark Got it modded and installed. Had to order the 49... Oct 15 2013, 08:58 PM timothy_nd28 Nice. One minor flaw has been found with this ret... Oct 15 2013, 09:40 PM McMark Yeah, I installed mine with the factory connector ... Oct 15 2013, 09:48 PM Vacca Rabite I'll be ordering one of these tachs today. Aw... Oct 16 2013, 06:01 AM McMark Not particularly interesting, but here's mine ... Oct 25 2013, 10:26 PM timothy_nd28 Not bad at all :beer2: Is this running off a 5v... Oct 26 2013, 09:21 AM McMark Not sure. I'll have to look at how I have the... Oct 26 2013, 09:32 AM CptTripps Hmmm. Now this has me thinking about gutting the r... Nov 1 2013, 04:13 AM timothy_nd28 For the price, it's a great project to do. I... Nov 1 2013, 08:06 AM timothy_nd28 I just finished a tach conversion for a V-8. R9 n... Nov 13 2013, 08:51 PM McMark Does this mean that the switch on the back is alwa... Nov 13 2013, 09:04 PM timothy_nd28
Does this mean that the switch on the back is alw... Nov 13 2013, 09:05 PM McMark Can you edit you original thread at the R9 step an... Nov 13 2013, 09:11 PM timothy_nd28 Edited the values Nov 13 2013, 09:27 PM Dr Evil Reviving from the dead due to awesomeness! Thi... Sep 20 2014, 10:57 AM timothy_nd28 Thanks :) Yes, R9 can be configured from a 2 cy... Sep 20 2014, 12:05 PM tomrev Hi Tim, Reading thru this post, did you decide to... Jan 22 2016, 03:23 PM 914Bryan This is awesome! Glad to see you are offering ... Jan 22 2016, 04:37 PM rnellums Tim's service is great. I had him do high inte... Jan 22 2016, 05:14 PM tomrev
Tim's service is great. I had him do high int... Jan 22 2016, 06:09 PM timothy_nd28 As a HVAC tech, I've been busy with this recen... Jan 23 2016, 11:29 AM tomrev
As a HVAC tech, I've been busy with this rece... Jan 23 2016, 01:47 PM ThePaintedMan Might as well take the chance to give another bump... Jan 23 2016, 04:15 PM timothy_nd28 I have some bad news as it seems that AutoZone has... May 30 2016, 02:22 PM craig downs I got mine thru Summit a few months back and it wa... May 31 2016, 09:07 AM Optimusglen Good news for anyone wanting to do this. I recentl... Mar 14 2018, 11:48 AM Optimusglen Packaging and face
. Mar 14 2018, 12:00 PM Optimusglen Taking another approach. Thought I would share.
... Mar 15 2018, 01:01 PM Bartlett 914 This is a good approach. This would also work with... Mar 16 2018, 05:17 PM mepstein I'm giving it a shot. Still have a lot to lear... Mar 16 2018, 10:11 AM timothy_nd28 Wow, i thought the sunpro's were long gone. T... Mar 16 2018, 02:03 PM Bartlett 914 I purchased the Bosch 7904 and it does look like t... Apr 7 2018, 08:15 AM Montreal914 Added small detail to this excellent thread :trop... Mar 6 2022, 03:52 PM Dominic @timothy_nd28
Tim,
Are you still in the... Oct 29 2023, 09:54 AM FlacaProductions It appears that Tim hasn't logged on here sinc... Oct 29 2023, 10:00 AM fiacra
It appears that Tim hasn't logged on here sin... Oct 29 2023, 01:06 PM |
1 User(s) are reading this topic (1 Guests and 0 Anonymous Users)
0 Members:

|
Lo-Fi Version | Time is now: 8th July 2026 - 12:57 PM |
Invision Power Board
v9.1.4 © 2026 IPS, Inc.