|
|
|
Porsche, and the Porsche crest are registered trademarks of Dr. Ing. h.c. F. Porsche AG.
This site is not affiliated with Porsche in any way. Its only purpose is to provide an online forum for car enthusiasts. All other trademarks are property of their respective owners. |
|
|


| Spoke |
 Feb 22 2016, 10:47 PM Feb 22 2016, 10:47 PM
Post
#1
|
|
Jerry  Group: Members Posts: 6,991 Joined: 29-October 04 From: Allentown, PA Member No.: 3,031 Region Association: None |
This is a group buy for front bucket LED boards. Please respond here if interested. I will PM you with payment details.
Available in two configurations: 1) US Version: 69 AMBER LEDs: $125/pair 2) Euro Version - w/Blanking: 21 WHITE LEDs in clear of lens; 48 AMBER LEDs: Price: $145/pair Shipping: CONUS: $10 Canada: $25 Outside CONUS: Determined at purchase. CONUS payment examples: US Version: $125 + $10 = $135 Euro Version - w/Blanking: $145 + $10 = $155 Each pair includes: o 2 PCBs o US Version: 69 AMBER LEDs. o Euro Version: 21 WHITE LEDS (Running lights) and 48 AMBER LEDs (Turnsignal). Euro Version with blanking will turn off WHITE LEDs when turnsignal is engaged. Pigtail with 1157 base to plug directly into existing bulb socket. 4 clips for each pair to mount the boards to existing front bucket housing for plug-n-play installation. 4 screws for clips + 1 extra 1 piggyback spade connector if existing turnsignal flasher is replaced by EP36 LED flasher from your FLAPS. 1 year guarantee Electrical Characteristics US version: Turnsignal: 0.39A @ 14V (5 Watt) each PCB Running light: 0.07A @ 14V (1 Watt) each PCB Example front LED board shown with only tools needed: large Philips screwdriver for lens screws and smaller Philips screwdriver for PCB mounting screw. 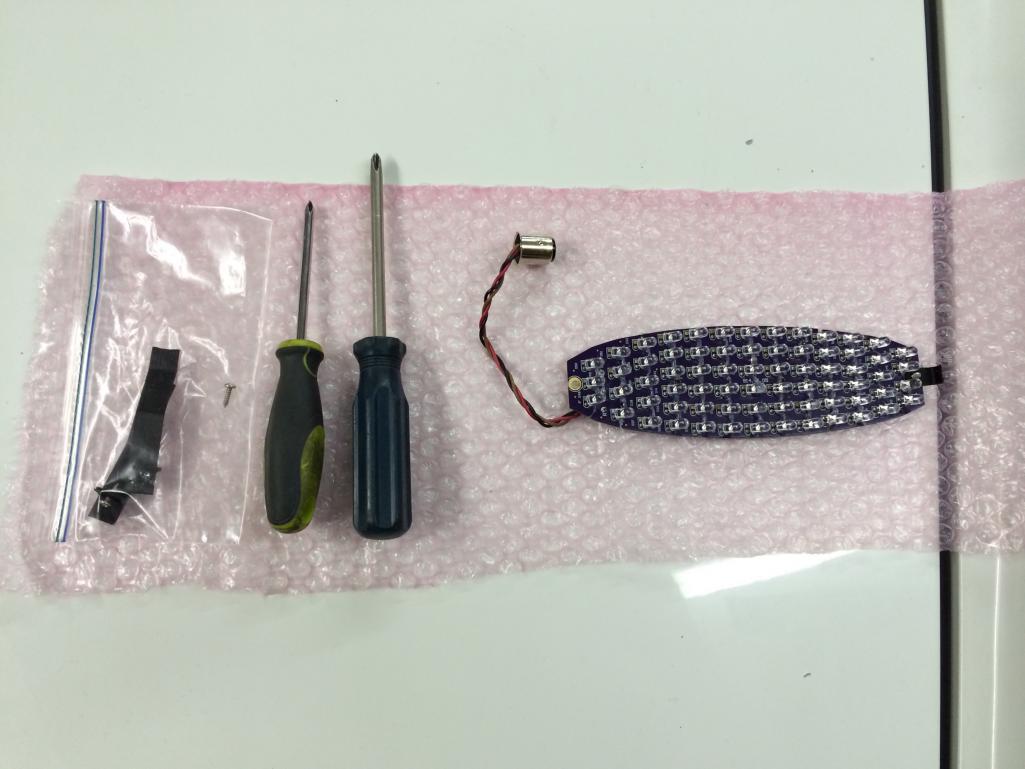 Installation of the front turnsignal bucket LED boards. There are 2 clips for each board. The small one goes in front the the long one on the rear. 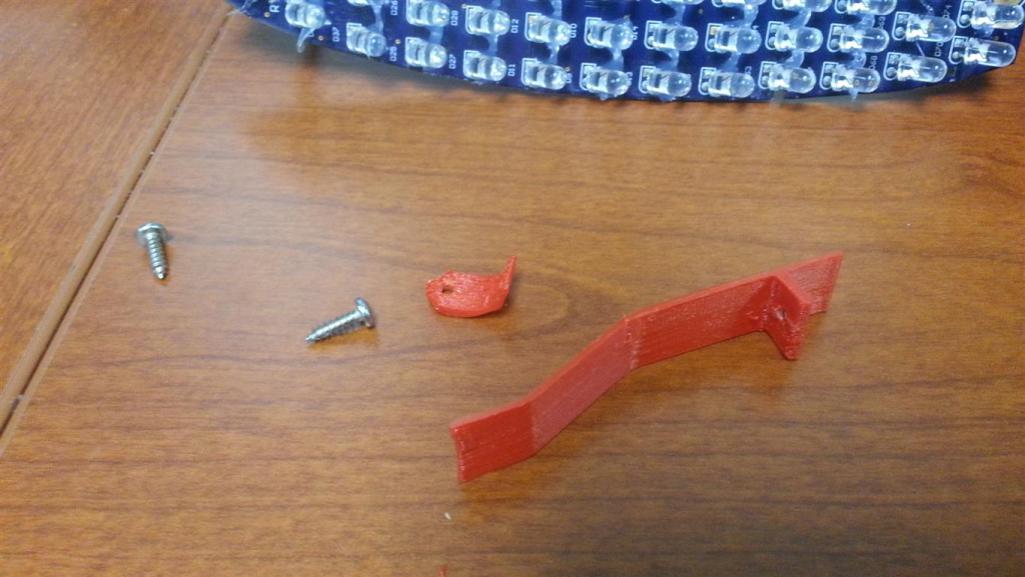 Screw in the rear clip. 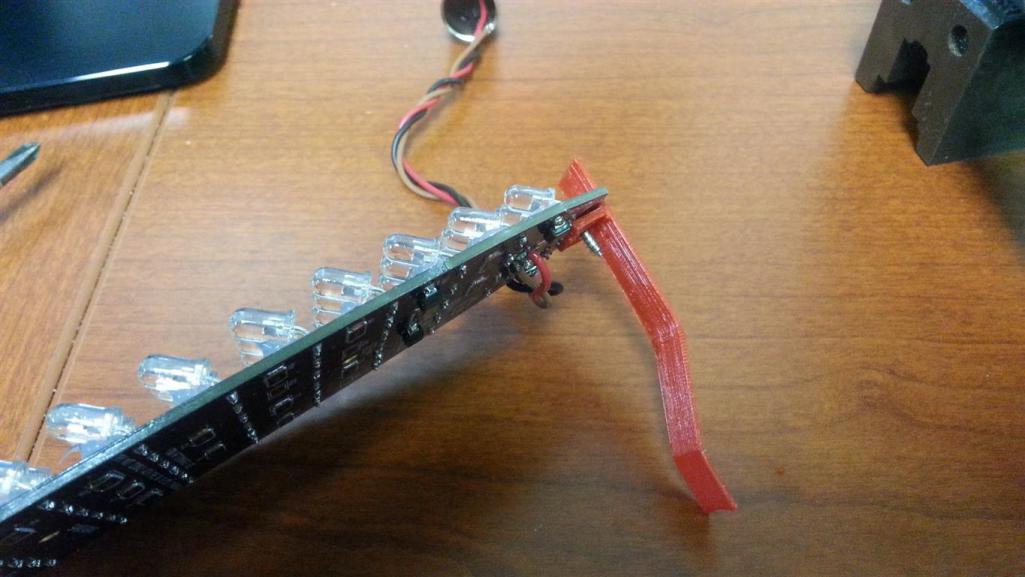 The small front clip mounts on the top of the board. These will be screwed in when I build the board. The bottom of the board will contact the bucket base to keep the board straight. 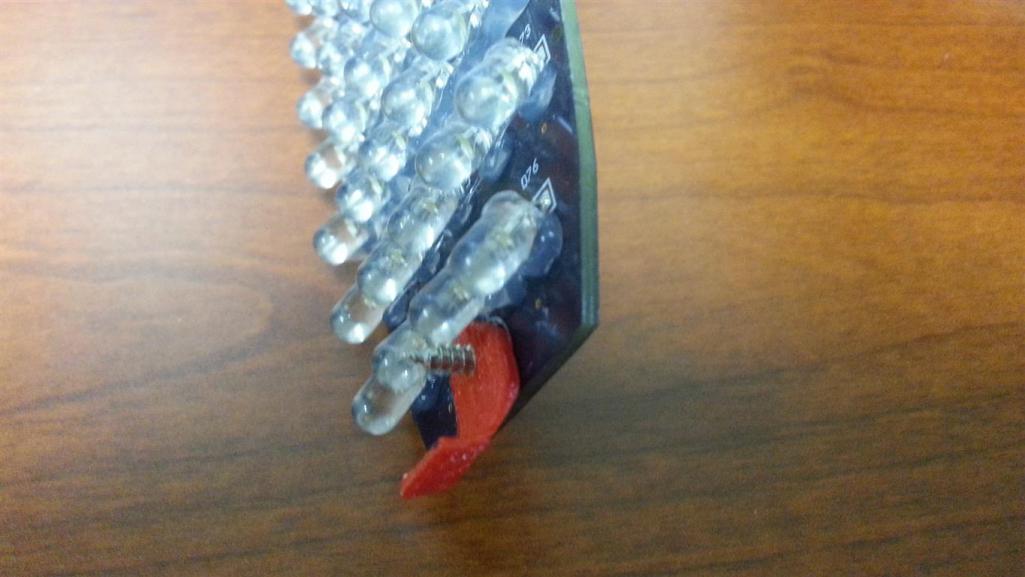 Here's the board ready for installation with the bulb base connected. 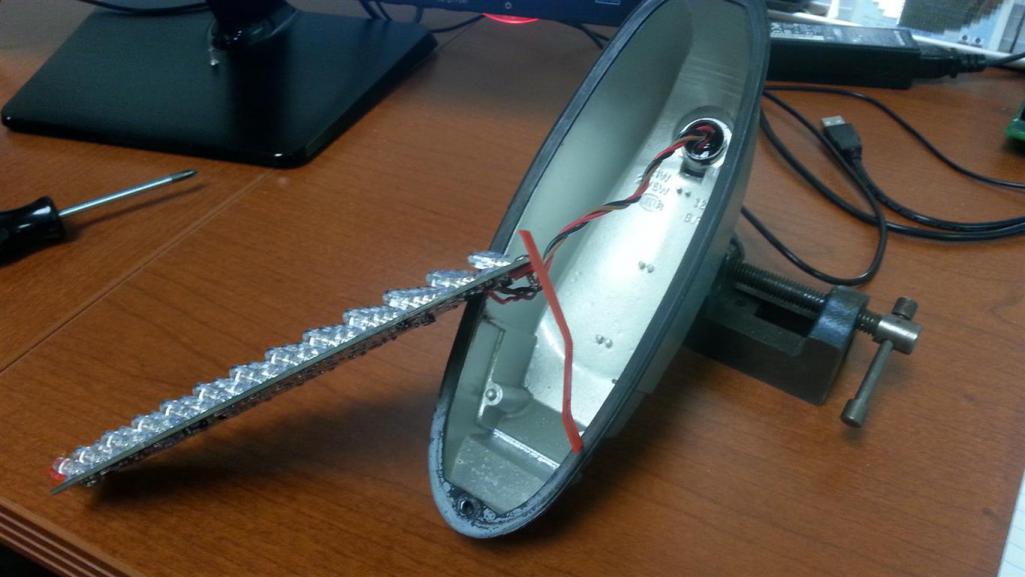 When installing the board, make sure the pigtail does not interfere with the rear clip. 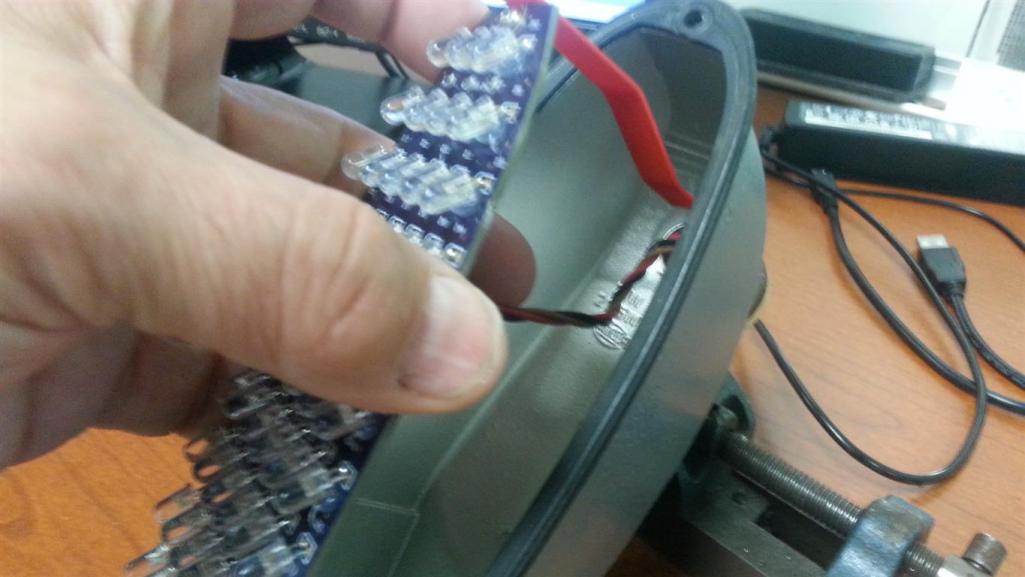 Gently slide the board in. There are slots on either side of the board to clear the guides on the sides of the bucket. 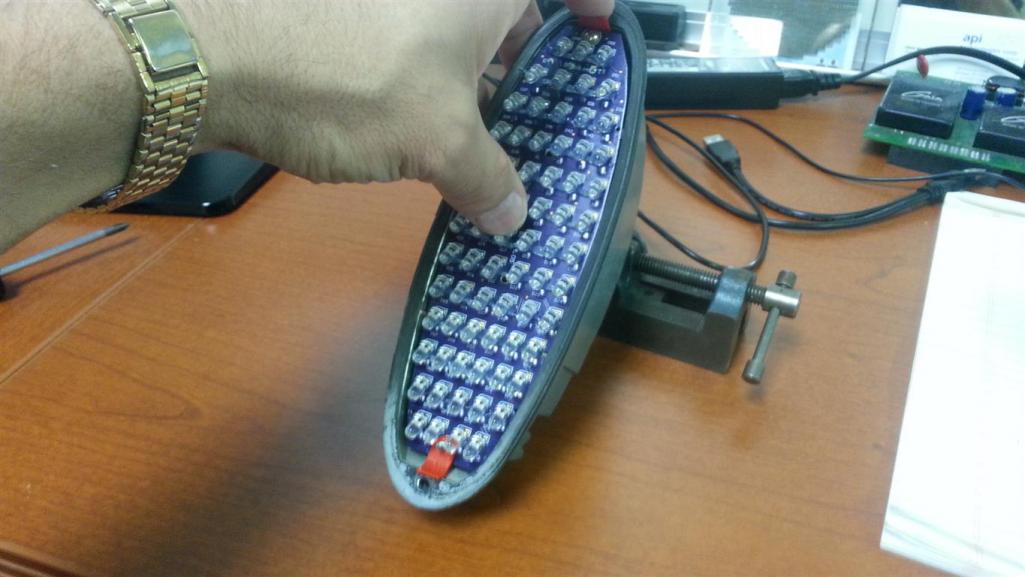 Ready for the lens. The lens will hold the board in place. If you need to reposition the board, do not grab the LEDs as they will move. Use a paper clip or similar wire to pull the board out. 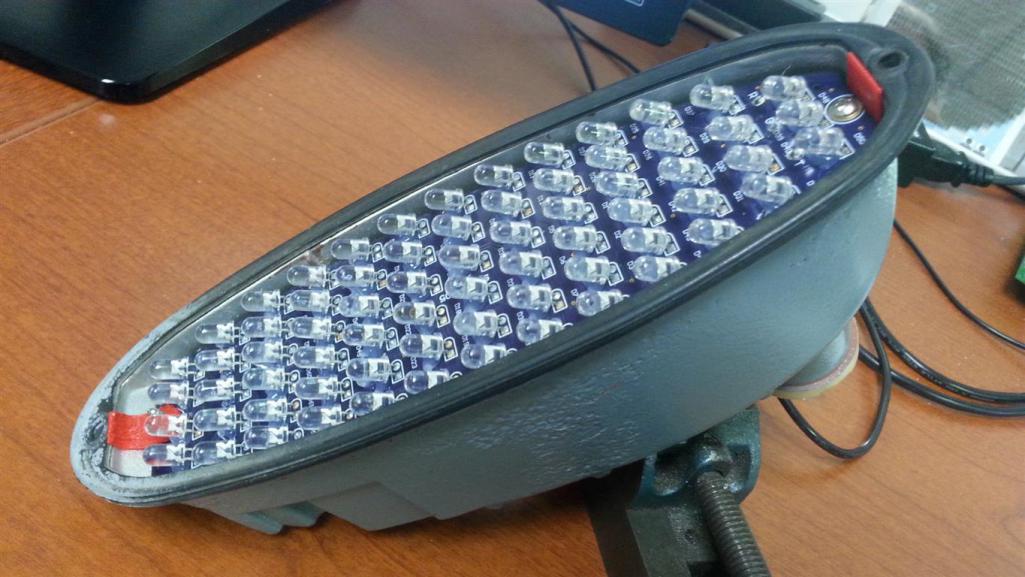 |
   |

 
|
  |
Replies
| bandjoey |
Mar 2 2016, 08:46 PM
Post
#2
|
|
bandjoey Group: Members Posts: 4,926 Joined: 26-September 07 From: Bedford Tx Member No.: 8,156 Region Association: Southwest Region |
US set only. I guess this is plug and play...no relay or other electrical change? I'm electrical illeeterette.
How do you compare the brightness to just the bulb? Pictures online anywhere? Also while I'm in there...can you give me an LED side marker bulb number that will also plug and play the side markers?? Thanks Bill |
|
|
|
| Spoke |
Mar 3 2016, 03:28 PM
Post
#3
|
|
Jerry Group: Members Posts: 6,991 Joined: 29-October 04 From: Allentown, PA Member No.: 3,031 Region Association: None |
QUOTE(bandjoey @ Mar 2 2016, 09:46 PM)  US set only. I guess this is plug and play...no relay or other electrical change? I'm electrical illeeterette. How do you compare the brightness to just the bulb? Pictures online anywhere? Also while I'm in there...can you give me an LED side marker bulb number that will also plug and play the side markers?? Thanks Bill Yes, the boards are plug and play. However, there is a chance that your hazard flasher may have difficulty either flashing or flashing the dash indicators properly. Most folks have rewired the dash indicators (this can be done by pulling the tach out and this mostly has worked correctly. If the flasher needs replacing, there are 2 types readily available at your FLAPS. The EP26 and EP36 flashers are compatible with the 914 and LEDs but still may need to rewire the ground wires on the dash indicators. Some videos of the front LEDs. This is the Euro version. First the turnsignals; then just the running light. For the turnsignal, the US lens is on. For the running light, the lens is removed. I wanted to observe the angle of incidence on the LEDs. These LEDs have 30 degree 1/2 power angle. So for the turnsignals and running lights, I varied the angle of viewing from about +/- 45 degrees from the front of the car. I was about 30 feet away. https://www.youtube.com/watch?v=KEIcKTeHoa0 Now the running light with the US lens off. https://www.youtube.com/watch?v=1xe09_u_dSg Below are graphs showing the relative light intensity between a US LED board and the standard 1157 bulb. The first graph is the difference between the turnsignals and the second between the running lights. Each graph shows the intensity as one moved from in front of the car (0 degrees) to the side of the car. For turnsignals, the bulb puts out about 12 LUX and the LED about 82 LUX or greater than 6x brighter. For running lights, the bulb puts out less than 2 LUX and the LED board over 12 LUX, again more the 6x brighter. Notice that the LED running light is as bright as the bulb on turnsignals (12 LUX). 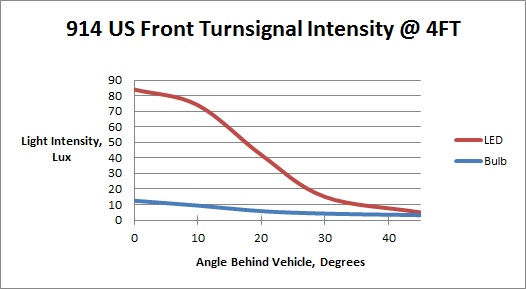 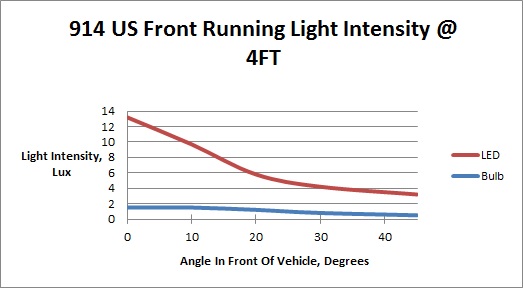 |
|
|
|
Posts in this topic
 Spoke GB: LED Boards:Front LED Turnsignals Feb 22 2016, 10:47 PM
 bahnzai Hi Jerry,
I will take a set of the US version -all... Feb 23 2016, 05:43 AM 914forme :Qarl:
Front Euro w/Blanking
Thank you very muc... Feb 23 2016, 06:21 AM Olympic 1.7 Put me down for 1 set. US version - all amber.
T... Feb 23 2016, 07:14 AM Coondog Euro set with blanking please.......thank you Feb 23 2016, 08:03 AM 76-914 I'm in for a pr of the Euro's. Feb 23 2016, 09:27 AM Rotary'14 Hi I want a pair of the fronts Euro style,,, also ... Feb 23 2016, 10:47 AM Shadowfax I'm in for an amber U.S. set. Thanks, Jerry... Feb 23 2016, 11:59 AM BillC I'd like a US (amber-only) set. Thanks! Feb 23 2016, 01:39 PM bahnzai Paypal sent.
US- all amber set
Thanks!! Feb 23 2016, 07:13 PM whitetwinturbo I want US pair :beer3: Feb 26 2016, 05:01 PM flmont I want 1 set Euro style Pls Feb 26 2016, 06:37 PM dangerranger01 Count me in for the Euro Version - w/Blanking: ... Feb 27 2016, 05:28 PM
bahnzai Hi Jerry,
I will take a set of the US version -all... Feb 23 2016, 05:43 AM 914forme :Qarl:
Front Euro w/Blanking
Thank you very muc... Feb 23 2016, 06:21 AM Olympic 1.7 Put me down for 1 set. US version - all amber.
T... Feb 23 2016, 07:14 AM Coondog Euro set with blanking please.......thank you Feb 23 2016, 08:03 AM 76-914 I'm in for a pr of the Euro's. Feb 23 2016, 09:27 AM Rotary'14 Hi I want a pair of the fronts Euro style,,, also ... Feb 23 2016, 10:47 AM Shadowfax I'm in for an amber U.S. set. Thanks, Jerry... Feb 23 2016, 11:59 AM BillC I'd like a US (amber-only) set. Thanks! Feb 23 2016, 01:39 PM bahnzai Paypal sent.
US- all amber set
Thanks!! Feb 23 2016, 07:13 PM whitetwinturbo I want US pair :beer3: Feb 26 2016, 05:01 PM flmont I want 1 set Euro style Pls Feb 26 2016, 06:37 PM dangerranger01 Count me in for the Euro Version - w/Blanking: ... Feb 27 2016, 05:28 PM
 Spoke
US set only. I guess this is plug and play...no ... Mar 15 2016, 08:00 AM Rotary'14 :Qarl: :Qarl:
A really well packed package was ... Mar 3 2016, 10:59 PM bandjoey I'll take a us set. Mar 4 2016, 08:26 AM rgolia I have a question for the brain trust here. I hav... Mar 4 2016, 01:24 PM Spoke
My question is can this be coated in a silver or ... Mar 4 2016, 03:44 PM bandjoey Maybe..he can make up a black board for you, and s... Mar 4 2016, 06:09 PM Spoke
Maybe..he can make up a black board for you, and ... Mar 5 2016, 01:20 PM Spoke Had a question about blanking for the Euro version... Mar 5 2016, 09:33 PM whitetwinturbo :beer1: :beer1: :beer1:
......just paid for my... Mar 6 2016, 10:42 AM rgolia I think black would look good. Remember I have th... Mar 7 2016, 12:46 PM Spoke
Spoke...let me know if you think we can pull this... Mar 8 2016, 10:35 PM rgolia
Spoke...let me know if you think we can pull thi... Mar 9 2016, 10:44 AM bandjoey Can you tell us about when these will be ready? C... Mar 13 2016, 12:07 AM Spoke
Can you tell us about when these will be ready? ... Mar 14 2016, 07:28 PM 76-914
Can you tell us about when these will be ready? ... Mar 14 2016, 07:47 PM bandjoey I haven't been billed yet. Where do I send mon... Mar 14 2016, 11:21 PM 76-914 Bill, send your $$ first then wait ~3 we... Mar 15 2016, 07:21 AM Spoke Just got the black boards from the fab. They look ... Mar 20 2016, 08:45 PM rgolia Are you making a replacement set in black for me? ... Mar 21 2016, 09:24 AM Spoke
Are you making a replacement set in black for me?... Mar 21 2016, 11:12 AM Spoke
Are you making a replacement set in black for me?... Apr 17 2016, 05:59 PM drem914 So if we want a set of black with the euro set up ... Mar 21 2016, 10:31 AM Spoke
So if we want a set of black with the euro set up... Mar 22 2016, 10:42 AM 76-914 Got my Euro Style today. Very nice. Thx Jerry Mar 21 2016, 09:54 PM whitetwinturbo :beer2: Apr 18 2016, 10:17 AM rgolia Those do look good...are they mine? :Qarl: Apr 18 2016, 10:22 AM jbachert Spoke - I totally missed this. Did I miss the boat... Apr 21 2016, 07:25 PM Spoke
Spoke - I totally missed this. Did I miss the boa... Apr 21 2016, 07:46 PM jbachert
Spoke - I totally missed this. Did I miss the bo... Apr 22 2016, 07:31 PM whitetwinturbo .......my fronts are great. Any rears left? Apr 22 2016, 10:44 AM Spoke
.......my fronts are great. Any rears left?
Go... Apr 22 2016, 11:19 AM SirAndy I'll take a set of the Euro's with the bla... Apr 22 2016, 07:41 PM lonewolfe I'd like a set of the Euro front signals as we... Apr 22 2016, 07:48 PM Spoke
I'd like a set of the Euro front signals as w... Apr 22 2016, 08:04 PM rgolia Thank you Spoke for the black front boards....they... Apr 28 2016, 09:29 AM eric9144 Spoke--question on the Euro fronts--is the amber s... Apr 28 2016, 11:45 AM Spoke
Spoke--question on the Euro fronts--is the amber ... Apr 29 2016, 06:16 AM Spoke I have the one set of Euro boards from Ralph's... Apr 30 2016, 10:09 PM abes914 spoke, i'll take ralphs slightly used euro tur... May 3 2016, 01:09 AM JimmyG I would like a front euro set in green if possible... May 17 2016, 07:27 AM Spoke I finally have a website to make the selection and... Jun 22 2016, 12:13 PM Spoke I never planned to make a front sidemarker LED boa... Jul 13 2016, 10:45 PM Spoke I now have front sidemarker boards in stock. These... Jul 22 2016, 10:57 PM Cairo94507 Jerry - Excellent news. I already placed an order ... Jul 23 2016, 07:03 AM siverson i just got around to installing these... i have a ... Nov 28 2017, 01:01 AM Spoke That is weird. The reverse light is independent of... Nov 28 2017, 05:31 AM
Spoke
US set only. I guess this is plug and play...no ... Mar 15 2016, 08:00 AM Rotary'14 :Qarl: :Qarl:
A really well packed package was ... Mar 3 2016, 10:59 PM bandjoey I'll take a us set. Mar 4 2016, 08:26 AM rgolia I have a question for the brain trust here. I hav... Mar 4 2016, 01:24 PM Spoke
My question is can this be coated in a silver or ... Mar 4 2016, 03:44 PM bandjoey Maybe..he can make up a black board for you, and s... Mar 4 2016, 06:09 PM Spoke
Maybe..he can make up a black board for you, and ... Mar 5 2016, 01:20 PM Spoke Had a question about blanking for the Euro version... Mar 5 2016, 09:33 PM whitetwinturbo :beer1: :beer1: :beer1:
......just paid for my... Mar 6 2016, 10:42 AM rgolia I think black would look good. Remember I have th... Mar 7 2016, 12:46 PM Spoke
Spoke...let me know if you think we can pull this... Mar 8 2016, 10:35 PM rgolia
Spoke...let me know if you think we can pull thi... Mar 9 2016, 10:44 AM bandjoey Can you tell us about when these will be ready? C... Mar 13 2016, 12:07 AM Spoke
Can you tell us about when these will be ready? ... Mar 14 2016, 07:28 PM 76-914
Can you tell us about when these will be ready? ... Mar 14 2016, 07:47 PM bandjoey I haven't been billed yet. Where do I send mon... Mar 14 2016, 11:21 PM 76-914 Bill, send your $$ first then wait ~3 we... Mar 15 2016, 07:21 AM Spoke Just got the black boards from the fab. They look ... Mar 20 2016, 08:45 PM rgolia Are you making a replacement set in black for me? ... Mar 21 2016, 09:24 AM Spoke
Are you making a replacement set in black for me?... Mar 21 2016, 11:12 AM Spoke
Are you making a replacement set in black for me?... Apr 17 2016, 05:59 PM drem914 So if we want a set of black with the euro set up ... Mar 21 2016, 10:31 AM Spoke
So if we want a set of black with the euro set up... Mar 22 2016, 10:42 AM 76-914 Got my Euro Style today. Very nice. Thx Jerry Mar 21 2016, 09:54 PM whitetwinturbo :beer2: Apr 18 2016, 10:17 AM rgolia Those do look good...are they mine? :Qarl: Apr 18 2016, 10:22 AM jbachert Spoke - I totally missed this. Did I miss the boat... Apr 21 2016, 07:25 PM Spoke
Spoke - I totally missed this. Did I miss the boa... Apr 21 2016, 07:46 PM jbachert
Spoke - I totally missed this. Did I miss the bo... Apr 22 2016, 07:31 PM whitetwinturbo .......my fronts are great. Any rears left? Apr 22 2016, 10:44 AM Spoke
.......my fronts are great. Any rears left?
Go... Apr 22 2016, 11:19 AM SirAndy I'll take a set of the Euro's with the bla... Apr 22 2016, 07:41 PM lonewolfe I'd like a set of the Euro front signals as we... Apr 22 2016, 07:48 PM Spoke
I'd like a set of the Euro front signals as w... Apr 22 2016, 08:04 PM rgolia Thank you Spoke for the black front boards....they... Apr 28 2016, 09:29 AM eric9144 Spoke--question on the Euro fronts--is the amber s... Apr 28 2016, 11:45 AM Spoke
Spoke--question on the Euro fronts--is the amber ... Apr 29 2016, 06:16 AM Spoke I have the one set of Euro boards from Ralph's... Apr 30 2016, 10:09 PM abes914 spoke, i'll take ralphs slightly used euro tur... May 3 2016, 01:09 AM JimmyG I would like a front euro set in green if possible... May 17 2016, 07:27 AM Spoke I finally have a website to make the selection and... Jun 22 2016, 12:13 PM Spoke I never planned to make a front sidemarker LED boa... Jul 13 2016, 10:45 PM Spoke I now have front sidemarker boards in stock. These... Jul 22 2016, 10:57 PM Cairo94507 Jerry - Excellent news. I already placed an order ... Jul 23 2016, 07:03 AM siverson i just got around to installing these... i have a ... Nov 28 2017, 01:01 AM Spoke That is weird. The reverse light is independent of... Nov 28 2017, 05:31 AM |
1 User(s) are reading this topic (1 Guests and 0 Anonymous Users)
0 Members:

|
Lo-Fi Version | Time is now: 7th June 2024 - 03:34 PM |
Invision Power Board
v9.1.4 © 2024 IPS, Inc.