|
|
|
Porsche, and the Porsche crest are registered trademarks of Dr. Ing. h.c. F. Porsche AG.
This site is not affiliated with Porsche in any way. Its only purpose is to provide an online forum for car enthusiasts. All other trademarks are property of their respective owners. |
|
|


| johannes |
 Oct 25 2015, 04:46 AM Oct 25 2015, 04:46 AM
Post
#1
|
|
Club Porsche 914 France member since 2005  Group: Members Posts: 3,092 Joined: 13-January 06 From: France Member No.: 5,409 Region Association: France |
THIS ITEM IS NO MORE AVAILABLE. NEW DESIGN IS AVAILABLE HERE
https://www.youtube.com/watch?v=yDaeY1dAp0M I just finished and tested the first prototype of the 3D printed cell phone / smartphone mount. The mount replaces the ashtray. This is available as a kit. You will have to order the 3D parts directly from the printer. The 3D printing is made with Polyamide. Its a white, very fine, granular powder. The result is a strong, somewhat flexible material that can take impacts and resist pressure while being bent. The surface has a sandy, granular look, and is slightly porous. The material can be painted. To complete the kit you will also have to source or order 4x M4x12 screws and nuts 1x M4x15 screw 2x 5x70mm rubberbands 2x small pieces of 10x3mm rubber windows seal (see ordering post below) - Fits most phones from the small I-Phone to the large Galaxy from 6 to 8 cm wide (2.3/8 to 3.1/4) THIS ITEM IS NO MORE AVAILABLE. NEW DESIGN IS AVAILABLE HERE 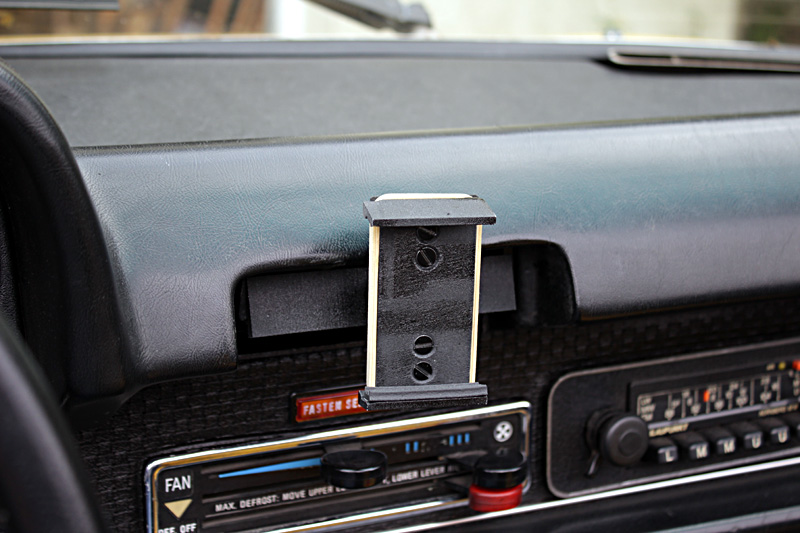   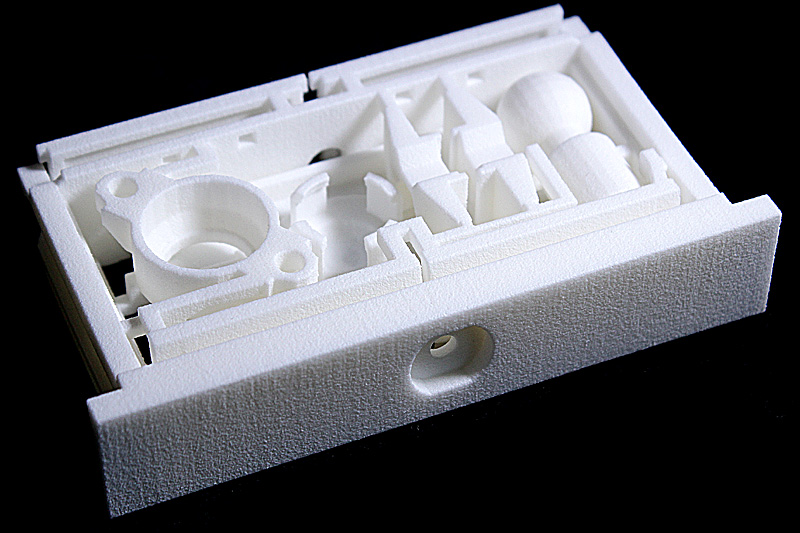 THIS ITEM IS NO MORE AVAILABLE. NEW DESIGN IS AVAILABLE HERE 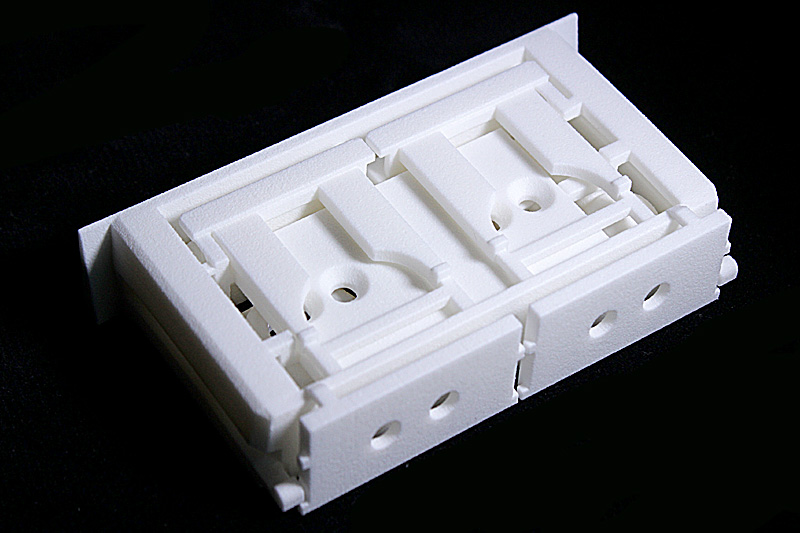 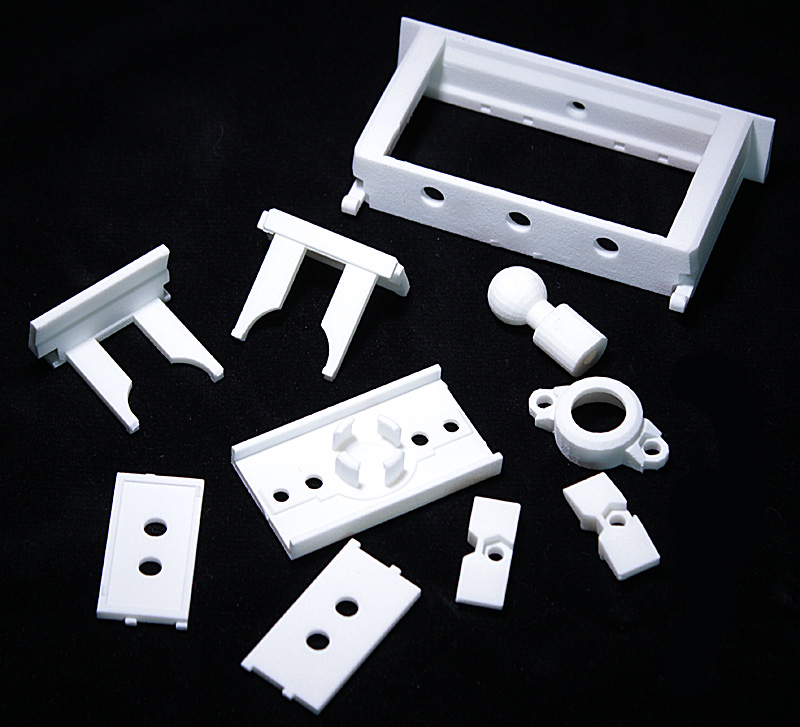  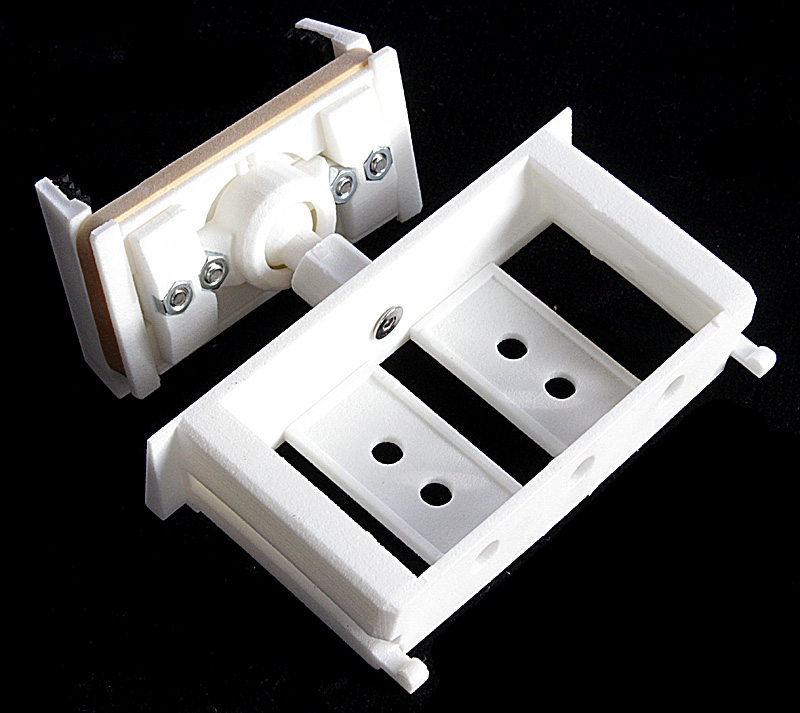 THIS ITEM IS NO MORE AVAILABLE. NEW DESIGN IS AVAILABLE HERE ... |
   |

 
|
  |
Replies
| johannes |
Oct 25 2015, 04:46 AM
Post
#2
|
|
Club Porsche 914 France member since 2005 Group: Members Posts: 3,092 Joined: 13-January 06 From: France Member No.: 5,409 Region Association: France |
ASSEMBLY INSTRUCTIONS
1- With a small plier, cut and remove all the parts that are shown in red. Wear safety goggles as parts will jump all over the place. 2- Use a cutter to remove all the excess material. 3- Clean the parts as powder may stick on the surface and in the holes. You can paint the parts but be carefull to not put too much paint on contact surface of the moving parts. 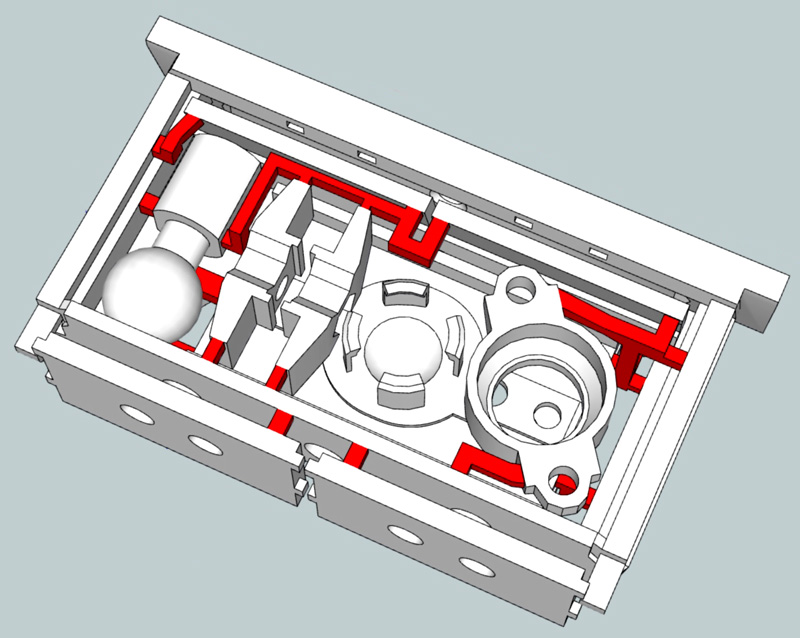 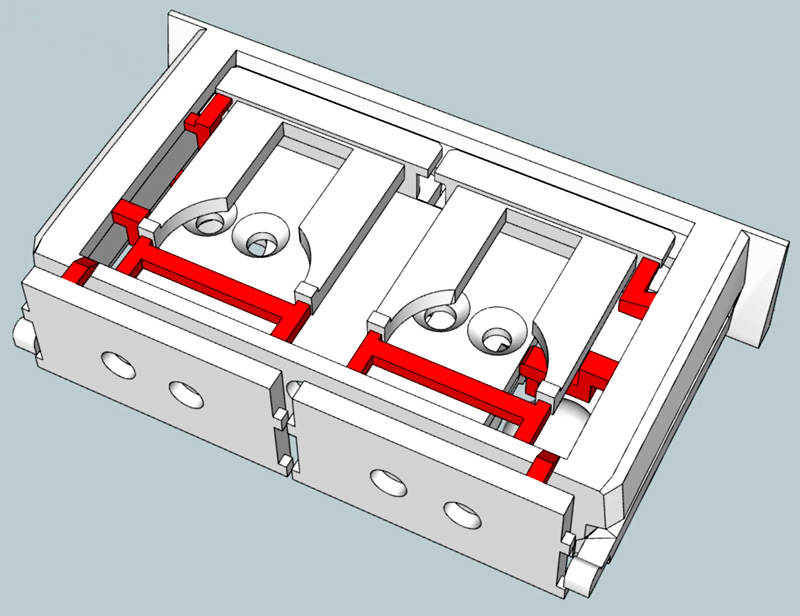 4- Assemble the parts as shown using 4x m4x12 and 1x m4x15 screws and nuts. Tight the screws gently. Overtighting will bend the parts and damage the plastic thread in the ball joint. 5- Glue the black joints 6- wrap a rubberband as shown on the pictures. A second rubberband is provided as a spare. The two rubberbands can be monted together if clamping force is not enough to maintain small phones. IMPORTANT: One of the clamps always travels free, the other has to be set up to fit the size of the phone then tightened with the screw. 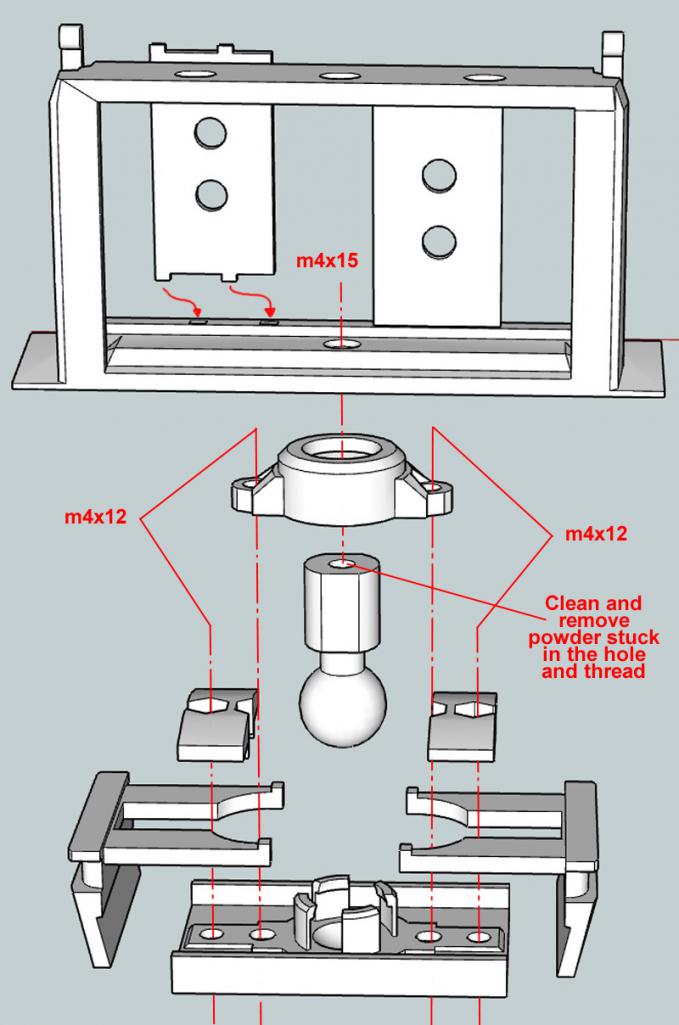 |
|
|
|
| 23e Heure |
Jan 28 2018, 06:09 AM
Post
#3
|
|
Busy overtaking 911s Group: Members Posts: 323 Joined: 13-August 15 From: London Member No.: 19,057 Region Association: England |
Hi Johannes,
I'm putting my kit together. Question: Instructions say "glue the black joints". I don't see any black joints in the instruction pictures. Sorry if I'm being dim! Thanks, QUOTE(johannes @ Oct 25 2015, 10:46 AM)  ASSEMBLY INSTRUCTIONS 1- With a small plier, cut and remove all the parts that are shown in red. Wear safety goggles as parts will jump all over the place. 2- Use a cutter to remove all the excess material. 3- Clean the parts as powder may stick on the surface and in the holes. You can paint the parts but be carefull to not put too much paint on contact surface of the moving parts. 4- Assemble the parts as shown using 4x m4x12 and 1x m4x15 screws and nuts. Tight the screws gently. Overtighting will bend the parts and damage the plastic thread in the ball joint. 5- Glue the black joints 6- wrap a rubberband as shown on the pictures. A second rubberband is provided as a spare. The two rubberbands can be monted together if clamping force is not enough to maintain small phones. IMPORTANT: One of the clamps always travels free, the other has to be set up to fit the size of the phone then tightened with the screw. |
|
|
|
| johannes |
Jan 29 2018, 03:58 AM
Post
#4
|
|
Club Porsche 914 France member since 2005 Group: Members Posts: 3,092 Joined: 13-January 06 From: France Member No.: 5,409 Region Association: France |
QUOTE(23e Heure @ Jan 28 2018, 05:09 AM) Hi Johannes, I'm putting my kit together. Question: Instructions say "glue the black joints". I don't see any black joints in the instruction pictures. Sorry if I'm being dim! Thanks, Those are the black joints that are glued on the claws. You can see them on the pictures (they are not shown on the drawings). Sorry I am french and my english is not always understandable. |
|
|
|
Posts in this topic
 johannes Cell phone / Smartphone mount for Porsche 914 Oct 25 2015, 04:46 AM
 johannes THIS ITEM IS NO MORE AVAILABLE. NEW DESIGN IS AVAI... Oct 25 2015, 04:46 AM
 GregAmy Finally got around to assembling mine today (we hi... Mar 8 2016, 03:39 PM johannes
Finally got around to assembling mine today (we h... Mar 8 2016, 04:04 PM Harpo Very interested. Thanks for doing this
David Oct 25 2015, 05:59 AM cary
Very interested. Thanks for doing this
David
... Oct 25 2015, 06:53 AM Steve Interested also Oct 25 2015, 08:16 AM Bossman December seems so far away! Oct 25 2015, 09:20 PM johannes
December seems so far away!
I may sell a fe... Oct 26 2015, 03:43 AM Steve Just in time for Christmas!! Now everyone... Oct 25 2015, 10:58 PM johannes Some more news
I made some refinements on the des... Oct 26 2015, 04:02 AM sb914 I'm in for one with hardware ,thanks Oct 26 2015, 09:47 AM 76-914 +1 here, as well. Oct 26 2015, 09:59 AM MrHyde I'm in for one with the hardware if you can sh... Oct 26 2015, 10:46 AM johannes
I'm in for one with the hardware if you can s... Oct 26 2015, 10:56 AM wes I like it and want one as a kit! thanks Oct 26 2015, 12:36 PM zipedadoo One for me please....:) Oct 26 2015, 01:40 PM Chris Pincetich :woohoo: :beer2: Oct 26 2015, 08:36 PM db9146 Looks good to me!! Oct 26 2015, 09:14 PM 914-300Hemi Count me in for one. Looks pretty cool. Oct 26 2015, 09:27 PM Eric_Shea Consider cord storage for a charger application.
... Oct 27 2015, 08:08 AM ben*james
Consider cord storage for a charger application. ... Oct 27 2015, 08:23 AM johannes
Consider cord storage for a charger application. ... Oct 27 2015, 03:31 PM PThompson509 Also very interested! Oct 27 2015, 09:21 AM dflesburg if you can do that, it shouldn't take you any ... Oct 27 2015, 11:41 AM clapeza Instead of having to source it out to a local thir... Oct 27 2015, 12:12 PM johannes
Instead of having to source it out to a local thi... Oct 27 2015, 03:47 PM GregAmy Subscribing...CLEVER! Excellent mount for the ... Oct 28 2015, 12:57 PM 1972 914 2.0 This is a good thing you're doing. I've ju... Oct 29 2015, 07:26 PM johannes I just ordered the 3D print with the cord storage.... Oct 30 2015, 03:19 AM johannes ...
[b]The kit is now available. Read post 2 on ... Nov 10 2015, 10:55 AM Kansas 914 Order placed! Nov 10 2015, 11:39 AM Steve Order placed!! Thanks!! Nov 10 2015, 04:35 PM Harpo Ordered mine. Thanks Nov 11 2015, 08:58 AM 76-914 The order form would not recognize the USA phone f... Nov 11 2015, 09:32 AM johannes
The order form would not recognize the USA phone ... Nov 11 2015, 09:36 AM malcolm2 very cool. Nov 11 2015, 10:10 AM 76-914 Done. Thx for doing this, Johannes. Our phones hav... Nov 11 2015, 10:14 AM rgolia Just ordered mine....thank you much for this... :b... Nov 11 2015, 02:48 PM KELTY360 Ordered 1 + kit with black screws. Great looking i... Nov 11 2015, 06:09 PM johannes Started to ship the ancillary parts ... Still miss... Nov 13 2015, 11:17 AM Kansas 914 WOW! Fast shipping to the US. I just received ... Nov 20 2015, 05:48 PM Steve I also got mine today. Just waiting for the screw... Nov 20 2015, 06:50 PM johannes
I also got mine today. Just waiting for the scre... Nov 22 2015, 03:39 PM 76-914 Hah! I received the screw kit but not the hold... Nov 21 2015, 09:09 AM JoeD Super cool! I ordered the kit and it's sup... Nov 21 2015, 10:22 AM karmann Will these be available in black in the near futur... Nov 21 2015, 01:42 PM johannes
Will these be available in black in the near futu... Nov 22 2015, 01:28 PM johannes Information about ancillaries.
There next to no de... Nov 22 2015, 01:30 PM 76-914 OK, what am I missing? The grip range is too large... Nov 23 2015, 10:33 PM johannes
OK, what am I missing? The grip range is too larg... Nov 24 2015, 03:17 AM 76-914
OK, what am I missing? The grip range is too lar... Nov 24 2015, 10:56 AM JoeD Johannes, I received my kit from iMaterialize yest... Nov 24 2015, 07:33 AM johannes Thank you for your message JoeD. Yes it was very c... Nov 24 2015, 07:49 AM 76-914 Made those two mods and luv it :wub: Also hit it ... Nov 25 2015, 05:27 PM johannes Looking good. For small phone I suggest you put tw... Nov 25 2015, 05:38 PM cary Screw kit arrived yesterday. Hopefully the mount w... Nov 26 2015, 10:24 AM johannes
Screw kit arrived yesterday. Hopefully the mount ... Nov 26 2015, 10:37 AM johannes Just got a mail from IMaterialise the company tha... Nov 27 2015, 02:07 AM Harpo Good evening guys,
I ordered one but received thr... Nov 27 2015, 05:59 PM johannes
Good evening guys,
I ordered one but received th... Nov 28 2015, 09:26 AM 76-914
Good evening guys,
I ordered one but received t... Nov 28 2015, 09:53 AM cary Hmmm............ David, I was at work and didn... Nov 27 2015, 07:57 PM Steve Great product. I used a dremel tool with cutoff w... Nov 28 2015, 09:35 AM johannes
Great product. I used a dremel tool with cutoff ... Nov 28 2015, 09:52 AM Steve
Great product. I used a dremel tool with cutoff ... Nov 28 2015, 10:12 AM Harpo I just mailed Cary's cell phone holder. It sh... Nov 30 2015, 09:46 AM cary Finally put mine together. The precision is amazin... Jan 9 2016, 07:27 PM johannes
Finally put mine together. The precision is amazi... Jan 10 2016, 06:19 AM cary Cool
Sliding portion will need to be cut with a... Jan 22 2016, 10:05 PM johannes That is glossy ! ;) Jan 23 2016, 01:46 AM cary Home Depot only had flat and gloss. :(
Stopped a... Jan 23 2016, 10:38 PM kellygeorge Just placed my orders for the mount and Ancillary ... Feb 18 2016, 07:07 PM johannes
Just placed my orders for the mount and Ancillary... Feb 18 2016, 07:20 PM kellygeorge
Received all my parts and assembled today. It... Feb 29 2016, 09:53 PM 76-914 A pleasant addition and worth the $$. Feb 19 2016, 09:33 AM iwanta914-6 This is amazing. If i had a 914 I would be buying... Feb 19 2016, 09:53 AM johannes Looks interesting. I will give it a try Mar 1 2016, 05:45 AM cary Here's a shot of my mount is use on the way to... May 23 2016, 08:38 PM johannes Are you using Google Maps ? May 23 2016, 11:41 PM cary Yep ............. May 23 2016, 11:47 PM matthepcat Oops. My question was asked earlier.... Free bump. May 24 2016, 09:24 AM cary New modification ......................
Jun 24 2016, 09:27 PM BillC I ordered one of these mounts last year, but never... Apr 23 2017, 08:41 AM johannes
I ordered one of these mounts last year, but neve... Apr 23 2017, 09:08 AM mepstein I just purchased a kit and hardware. :) Apr 23 2017, 11:19 AM johannes THIS ITEM IS NO MORE AVAILABLE. NEW DESIGN COMMING Mar 12 2018, 03:20 AM drem914
THIS ITEM IS NO MORE AVAILABLE. NEW DESIGN COMMIN... Feb 22 2020, 04:56 PM johannes Prototype done. Works fine. Looks great.
Productio... Feb 23 2020, 04:51 AM barefoot My I phone 6 sits nicely in the ash tray when held... Feb 23 2020, 08:11 AM drem914
My I phone 6 sits nicely in the ash tray when hel... Feb 23 2020, 09:33 AM 76-914
My I phone 6 sits nicely in the ash tray when hel... Feb 23 2020, 09:52 AM GregAmy I have one of the older design that someone can ha... Feb 23 2020, 04:47 PM 914bub
I have one of the older design that someone can h... Apr 12 2020, 10:42 PM tyfighter123 Any more news on these? Apr 12 2020, 09:47 PM forrestkhaag THIS ITEM IS NO MORE AVAILABLE.
NEW DESIGN... Oct 23 2020, 03:35 PM dangrouche here's an alternative solution I've employ... Oct 23 2020, 07:25 PM
GregAmy Finally got around to assembling mine today (we hi... Mar 8 2016, 03:39 PM johannes
Finally got around to assembling mine today (we h... Mar 8 2016, 04:04 PM Harpo Very interested. Thanks for doing this
David Oct 25 2015, 05:59 AM cary
Very interested. Thanks for doing this
David
... Oct 25 2015, 06:53 AM Steve Interested also Oct 25 2015, 08:16 AM Bossman December seems so far away! Oct 25 2015, 09:20 PM johannes
December seems so far away!
I may sell a fe... Oct 26 2015, 03:43 AM Steve Just in time for Christmas!! Now everyone... Oct 25 2015, 10:58 PM johannes Some more news
I made some refinements on the des... Oct 26 2015, 04:02 AM sb914 I'm in for one with hardware ,thanks Oct 26 2015, 09:47 AM 76-914 +1 here, as well. Oct 26 2015, 09:59 AM MrHyde I'm in for one with the hardware if you can sh... Oct 26 2015, 10:46 AM johannes
I'm in for one with the hardware if you can s... Oct 26 2015, 10:56 AM wes I like it and want one as a kit! thanks Oct 26 2015, 12:36 PM zipedadoo One for me please....:) Oct 26 2015, 01:40 PM Chris Pincetich :woohoo: :beer2: Oct 26 2015, 08:36 PM db9146 Looks good to me!! Oct 26 2015, 09:14 PM 914-300Hemi Count me in for one. Looks pretty cool. Oct 26 2015, 09:27 PM Eric_Shea Consider cord storage for a charger application.
... Oct 27 2015, 08:08 AM ben*james
Consider cord storage for a charger application. ... Oct 27 2015, 08:23 AM johannes
Consider cord storage for a charger application. ... Oct 27 2015, 03:31 PM PThompson509 Also very interested! Oct 27 2015, 09:21 AM dflesburg if you can do that, it shouldn't take you any ... Oct 27 2015, 11:41 AM clapeza Instead of having to source it out to a local thir... Oct 27 2015, 12:12 PM johannes
Instead of having to source it out to a local thi... Oct 27 2015, 03:47 PM GregAmy Subscribing...CLEVER! Excellent mount for the ... Oct 28 2015, 12:57 PM 1972 914 2.0 This is a good thing you're doing. I've ju... Oct 29 2015, 07:26 PM johannes I just ordered the 3D print with the cord storage.... Oct 30 2015, 03:19 AM johannes ...
[b]The kit is now available. Read post 2 on ... Nov 10 2015, 10:55 AM Kansas 914 Order placed! Nov 10 2015, 11:39 AM Steve Order placed!! Thanks!! Nov 10 2015, 04:35 PM Harpo Ordered mine. Thanks Nov 11 2015, 08:58 AM 76-914 The order form would not recognize the USA phone f... Nov 11 2015, 09:32 AM johannes
The order form would not recognize the USA phone ... Nov 11 2015, 09:36 AM malcolm2 very cool. Nov 11 2015, 10:10 AM 76-914 Done. Thx for doing this, Johannes. Our phones hav... Nov 11 2015, 10:14 AM rgolia Just ordered mine....thank you much for this... :b... Nov 11 2015, 02:48 PM KELTY360 Ordered 1 + kit with black screws. Great looking i... Nov 11 2015, 06:09 PM johannes Started to ship the ancillary parts ... Still miss... Nov 13 2015, 11:17 AM Kansas 914 WOW! Fast shipping to the US. I just received ... Nov 20 2015, 05:48 PM Steve I also got mine today. Just waiting for the screw... Nov 20 2015, 06:50 PM johannes
I also got mine today. Just waiting for the scre... Nov 22 2015, 03:39 PM 76-914 Hah! I received the screw kit but not the hold... Nov 21 2015, 09:09 AM JoeD Super cool! I ordered the kit and it's sup... Nov 21 2015, 10:22 AM karmann Will these be available in black in the near futur... Nov 21 2015, 01:42 PM johannes
Will these be available in black in the near futu... Nov 22 2015, 01:28 PM johannes Information about ancillaries.
There next to no de... Nov 22 2015, 01:30 PM 76-914 OK, what am I missing? The grip range is too large... Nov 23 2015, 10:33 PM johannes
OK, what am I missing? The grip range is too larg... Nov 24 2015, 03:17 AM 76-914
OK, what am I missing? The grip range is too lar... Nov 24 2015, 10:56 AM JoeD Johannes, I received my kit from iMaterialize yest... Nov 24 2015, 07:33 AM johannes Thank you for your message JoeD. Yes it was very c... Nov 24 2015, 07:49 AM 76-914 Made those two mods and luv it :wub: Also hit it ... Nov 25 2015, 05:27 PM johannes Looking good. For small phone I suggest you put tw... Nov 25 2015, 05:38 PM cary Screw kit arrived yesterday. Hopefully the mount w... Nov 26 2015, 10:24 AM johannes
Screw kit arrived yesterday. Hopefully the mount ... Nov 26 2015, 10:37 AM johannes Just got a mail from IMaterialise the company tha... Nov 27 2015, 02:07 AM Harpo Good evening guys,
I ordered one but received thr... Nov 27 2015, 05:59 PM johannes
Good evening guys,
I ordered one but received th... Nov 28 2015, 09:26 AM 76-914
Good evening guys,
I ordered one but received t... Nov 28 2015, 09:53 AM cary Hmmm............ David, I was at work and didn... Nov 27 2015, 07:57 PM Steve Great product. I used a dremel tool with cutoff w... Nov 28 2015, 09:35 AM johannes
Great product. I used a dremel tool with cutoff ... Nov 28 2015, 09:52 AM Steve
Great product. I used a dremel tool with cutoff ... Nov 28 2015, 10:12 AM Harpo I just mailed Cary's cell phone holder. It sh... Nov 30 2015, 09:46 AM cary Finally put mine together. The precision is amazin... Jan 9 2016, 07:27 PM johannes
Finally put mine together. The precision is amazi... Jan 10 2016, 06:19 AM cary Cool
Sliding portion will need to be cut with a... Jan 22 2016, 10:05 PM johannes That is glossy ! ;) Jan 23 2016, 01:46 AM cary Home Depot only had flat and gloss. :(
Stopped a... Jan 23 2016, 10:38 PM kellygeorge Just placed my orders for the mount and Ancillary ... Feb 18 2016, 07:07 PM johannes
Just placed my orders for the mount and Ancillary... Feb 18 2016, 07:20 PM kellygeorge
Received all my parts and assembled today. It... Feb 29 2016, 09:53 PM 76-914 A pleasant addition and worth the $$. Feb 19 2016, 09:33 AM iwanta914-6 This is amazing. If i had a 914 I would be buying... Feb 19 2016, 09:53 AM johannes Looks interesting. I will give it a try Mar 1 2016, 05:45 AM cary Here's a shot of my mount is use on the way to... May 23 2016, 08:38 PM johannes Are you using Google Maps ? May 23 2016, 11:41 PM cary Yep ............. May 23 2016, 11:47 PM matthepcat Oops. My question was asked earlier.... Free bump. May 24 2016, 09:24 AM cary New modification ......................
Jun 24 2016, 09:27 PM BillC I ordered one of these mounts last year, but never... Apr 23 2017, 08:41 AM johannes
I ordered one of these mounts last year, but neve... Apr 23 2017, 09:08 AM mepstein I just purchased a kit and hardware. :) Apr 23 2017, 11:19 AM johannes THIS ITEM IS NO MORE AVAILABLE. NEW DESIGN COMMING Mar 12 2018, 03:20 AM drem914
THIS ITEM IS NO MORE AVAILABLE. NEW DESIGN COMMIN... Feb 22 2020, 04:56 PM johannes Prototype done. Works fine. Looks great.
Productio... Feb 23 2020, 04:51 AM barefoot My I phone 6 sits nicely in the ash tray when held... Feb 23 2020, 08:11 AM drem914
My I phone 6 sits nicely in the ash tray when hel... Feb 23 2020, 09:33 AM 76-914
My I phone 6 sits nicely in the ash tray when hel... Feb 23 2020, 09:52 AM GregAmy I have one of the older design that someone can ha... Feb 23 2020, 04:47 PM 914bub
I have one of the older design that someone can h... Apr 12 2020, 10:42 PM tyfighter123 Any more news on these? Apr 12 2020, 09:47 PM forrestkhaag THIS ITEM IS NO MORE AVAILABLE.
NEW DESIGN... Oct 23 2020, 03:35 PM dangrouche here's an alternative solution I've employ... Oct 23 2020, 07:25 PM |
1 User(s) are reading this topic (1 Guests and 0 Anonymous Users)
0 Members:

|
Lo-Fi Version | Time is now: 15th June 2026 - 05:36 AM |
Invision Power Board
v9.1.4 © 2026 IPS, Inc.