|
|
|
Porsche, and the Porsche crest are registered trademarks of Dr. Ing. h.c. F. Porsche AG.
This site is not affiliated with Porsche in any way. Its only purpose is to provide an online forum for car enthusiasts. All other trademarks are property of their respective owners. |
|
|


| Jeff Hail |
 Oct 1 2007, 11:35 PM Oct 1 2007, 11:35 PM
Post
#1
|
|
Senior Member  Group: Members Posts: 1,141 Joined: 3-May 07 From: LA/ CA Member No.: 7,712 |
Bringing Out The Dead.....or how to restore a rusty 914 and convert it to a street/track car when I have time after dealing with everyone elses stuff.
My background is collision and restoration (day job) of high end automobiles for 28 years in addition to race fabrication. I jumped the fence and left that industry to pursue pretty much the same thing except on the paperwork end which is really boring and thankless. (another day job) I look at rust like a diamond in the rough. Rust is afraid of me because it know's it cannot live in my world. Metal becomes submissive because I have confidence in my metal working talents. I will add to this post as work progress's. I hope my years of experience can help others as I add. I believe there is a right way to repair a car and wrong way. I metal finish because in the end its cleaner, lighter and stronger. I was taught old school techniques with new school technology. A great combination. I also believe in doing a job once correctly using the highest quality materials and proper tools. Many ways to skin a cat I say. If you hold it by the tail it can still bite! Good advice to follow: Take measurements of the door openings and targa bar to windshield header. Cross measure then do it again to confirm. Recheck your measurements against the factory figures. Make a couple of adjustable braces for each side that attach from the upper seat belt anchors to the door hinges. I recommend cross braces also right to left. These can be made from rod or tube and turnbuckles for cheap. Racer Chris has some really nice ones with rod ends. Support the car from below equally on both sides of the undercarriage and front and rear. I do not believe jack stands can hold the proper tolerances at 4 points. It takes a minimum of 6 and preferably 8. These are all easy to do and are essential to a square and level chassis. Not everyone can afford a Cellete bench or hourly frame time at a shop for these type of do it yourself repairs. Impovisation can be done correctly and for a lot less money. Make sure your floor or platform is level. Keep in mind that tolerances for the 914 were 7-9mm from the factory so anything you can do to make it better is worth it. 7mm by today’s standards is huge. 9mm is a Grand Canyon. Anything you can do to tighten the tolerances will provide a better end product. Exterior panels were fit with the adjust and weld method and are only a skin. My 914 had measurements all over the place on the front end and the rust issues were all in the rear that needed correction. Car was never in any collisions. 90% of the measurements were factory assembly tolerances. Porsche's aint perfect. I made my own dedicated bench for 911's and 914's. By some stroke of luck I ended up with a 1 mm variance in height (datum) and 2mm in length and width is zero with my own fixtures. This has been substantiated with endless anal cross measuring and factory manuals. I used a steel front suspension cross member as a front body holding fixture. I went through 4 before I found an acceptable one. The first 3 were so far off factory tolerances (4-6 mm out of square) I rejected them before I found a good one. My bench is not for pulling. It was designed for assembly and replacement of structural parts. It will support 3,000 pounds. $350 worth of steel and another $175 in industrial castors was worth it considering its use. A stripped 914 shell is a feather and easy to roll around. When you cut and replace structural parts recheck your measurements. Control points change when you remove, replace and weld in new parts. They are easily controlled with patience. If it does not come out perfect do not lose sleep. Remember tolerance and variance was not perfect from the factory. If you have a control point locating hole that is 14 mm a dowel or pin of 9-10mm was used during birth. That is why suspension systems are adjustable for variance and wear. You will also find center indexing points on the front and rear of the body. Easy tools to use are plumb lines, tape measures and levels if you do not have access to high end measuring equipment. You can locate and make symmetrical measurements throughout repairs. If you have one side that is undamaged or not rusted use that side as a starting point for measurements. Use panel gaps as a visual indicator during repairs and welding. 3 important factors- height, length and width. If you are me then there are 4 (Z axis) and that one will make you lose sleep! Some pics of the beggining: A back east 914 comes to California. Attached image(s) 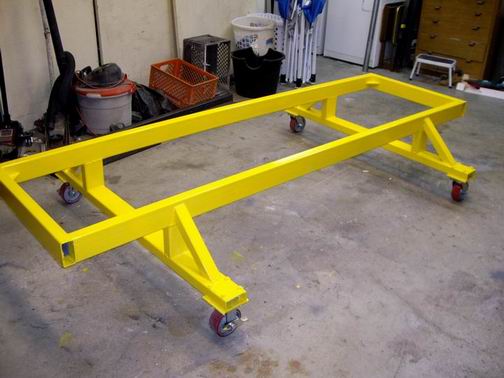 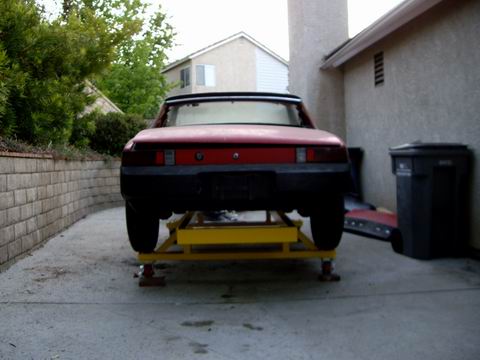  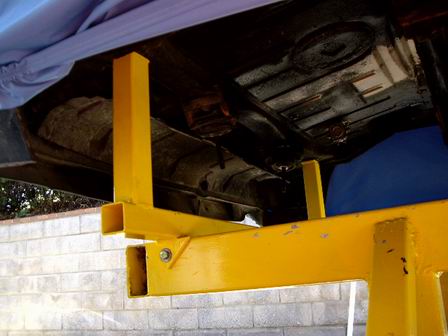
|
   |

 
|
  |
Replies
| stateofidleness |
Nov 10 2007, 11:15 PM
Post
#2
|
|
Senior Member Group: Members Posts: 810 Joined: 1-September 07 From: Canyon Lake, Texas! Member No.: 8,065 Region Association: None |
hey jeff, question. you are about where im at on my interior and im a complete noob to this stuff.
now that i know that it is ok to primer a little at a time, will you go back and reprimer the entire thing when you're done or only the areas not done? another thing, those removable hole covers in the pans on mine are all bent and mis-shaped. is it better to try to reshape them and get a good seal on the hole (while also needs to be straightened out) or just weld a piece of flat sheet metal over the hole? i did 2 coats of this rust converter which turned the "rust" to a primer black color. so all i need to do is light sand it and then prime? or should i do that acid thing and then sand? really impressed with your work and focus. very inspirational. |
|
|
|
| Jeff Hail |
Nov 11 2007, 12:30 AM
Post
#3
|
|
Senior Member Group: Members Posts: 1,141 Joined: 3-May 07 From: LA/ CA Member No.: 7,712 |
QUOTE(stateofidleness @ Nov 10 2007, 09:15 PM)  hey jeff, question. you are about where im at on my interior and im a complete noob to this stuff. now that i know that it is ok to primer a little at a time, will you go back and reprimer the entire thing when you're done or only the areas not done? another thing, those removable hole covers in the pans on mine are all bent and mis-shaped. is it better to try to reshape them and get a good seal on the hole (while also needs to be straightened out) or just weld a piece of flat sheet metal over the hole? i did 2 coats of this rust converter which turned the "rust" to a primer black color. so all i need to do is light sand it and then prime? or should i do that acid thing and then sand? really impressed with your work and focus. very inspirational. Being it is winter hours I find my daylight is short. I try to set a goal I know I can complete in a given amount of time. When I repair an area such as the right front floor I knew I am going to have some overlap into an adjacent area. No big deal. Any primer overlap/overspray will sand off and be re-applied for instance when I do the drivers floor. I am only talking a few inches of coating so I do not worry about masking anything off here. The need to get this area primed was it is bare and we have been having humidity in the air lately in sunny California. Moist cold air and bare metal are not friends even if it has a zinc coating. As far as the factory resistance welder access covers I did not remove them. I removed most of the surface sealer around them but did not find any scale or corrosion. Obviously they have not leaked. I left them in and primered over them. I will apply some sealer to replace what was removed. The small 3 inch cover next to the long on mine was a little tweaked. I just took a hammer and dolly to flatten it out. No rust so no need to remove it. These will also have new seam sealer applied over these. Rust converter is the "acid thing". You are two step's ahead. I have to say this rust converters are a misconception. They do not turn rust back to good metal. All that is happening is the iron oxide (rust) is being converted to an iron phosphate "layer" ( a different kind of rust) similar to rust bluing on a firearm. The key to rust converters are the chemical conversion of surface scaling and then sealing it from oxygen via zinc phosphate. Without oxygen rust cannot continue. Adding a zinc layer by conversion is part of the sealing process. Zinc does not oxidize like iron will. Zinc is also used for adhesion. Best bet is to remove as much rust as possible with wire wheels, conditioning and grinding disc's. If metal has become structurally unsound, brittle or weakened due to corrosion the only way to properly repair it is to replace it. A good example is if you look at metal that is rusted and it looks like a bunch of rotten leaves in layers it is done and cannot be saved. Pits and deep scale are another thing. These can be normally ground away and or filled with welding if enough metal is present. Ok - If it looks like all the rust is converted to rough black primer I would use an abrasive from 150 to 220 grit paper on it and score the surface lighly, just skim it. If you start seeing carrot colored rust again it was not treated sufficiently. If you see this do the conversion again. Then lightly go over it with 320. Do not worry if you remove a little of the coating. Then prime it quickly. Another thing on converters make sure it is nutralized correctly. If it is not done right you will end up fighting two kinds or corrosion. Rust and chemical. Can you tell I am not a big fan of rust converters? They do have there place though. Something I learned a long time ago welding. Steel melts and rust will burn (oxide). |
|
|
|
Posts in this topic
Jeff Hail Bringing out the dead Oct 1 2007, 11:35 PM Jeff Hail Contd Oct 1 2007, 11:37 PM
 Jeff Hail
Contd
Rear floor replacement. An yes the RD flo... Oct 1 2007, 11:41 PM Eric_Shea Wow :o
:wttc:
This'll be a fun one to watch. Oct 1 2007, 11:43 PM Jeff Hail
Wow :o
:wttc:
This'll be a fun one to watch... Oct 1 2007, 11:47 PM Jeff Hail Interior stripped.
Odometer? DMV say its for real ... Oct 1 2007, 11:57 PM Jeff Hail Moving along into the rocker and longs. This was h... Oct 2 2007, 12:08 AM Jeff Hail Cut out the rusted outer. Actually only the rear 1... Oct 2 2007, 12:17 AM Jeff Hail Floor metal finished and primed. No filler.
I did ... Oct 2 2007, 12:54 AM jd74914 Nice work, I can't wait to see more . . . and
... Oct 1 2007, 11:52 PM KELTY360 :wttc:
Are you the Jeff Hail of the Mulholland ... Oct 2 2007, 12:42 AM Jeff Hail
:wttc:
Are you the Jeff Hail of the Mulholland... Oct 2 2007, 01:00 AM Twystd1 Were you part of the Mulholland crew back in the d... Oct 2 2007, 12:48 AM Jeff Hail
Were you part of the Mulholland crew back in the ... Oct 2 2007, 01:19 AM Lou W :wttc: Keep the pctures coming. :) Oct 2 2007, 03:07 AM Justin Fischer :wttc: Wow, that was some introduction. Keep th... Oct 2 2007, 08:18 AM SGB shhhh.
Artist at work.
Thats really impressive. Oct 2 2007, 08:27 AM pin31 Very cool !!!
Someone should write a ... Oct 2 2007, 10:11 AM Jeff Hail This weeks installment of Bringing out the dead
A... Oct 6 2007, 09:22 PM Jeff Hail Some great tools to have are the Astro Scraper. It... Oct 6 2007, 09:32 PM sixnotfour I am in shock that some one in CA would take on th... Oct 6 2007, 09:36 PM Jeff Hail
I am in shock that some one in CA would take on t... Oct 6 2007, 11:00 PM Jeff Hail Seam sealer stripped off the inner firewall with t... Oct 6 2007, 09:50 PM Jeff Hail You gotta have bars. Keep those gaps in check when... Oct 7 2007, 12:06 AM Jeff Hail This is an original Coppertone car that was re-pai... Oct 7 2007, 12:13 AM stateofidleness even if you're just cutting out small patches ... Oct 7 2007, 01:11 AM Jeff Hail
even if you're just cutting out small patches... Oct 7 2007, 01:41 AM watsonrx13 Very nice photo-documentary on the restoration of ... Oct 7 2007, 07:30 AM Jeff Hail
Very nice photo-documentary on the restoration of... Oct 7 2007, 02:52 PM KELTY360 That lower firewall is serious sheetmetal porn. ... Oct 7 2007, 10:07 AM Jeff Hail The lower outer firewall is out. I didn't even... Oct 7 2007, 07:49 PM Jeff Hail Didn't get much done with the car this week. B... Oct 14 2007, 09:08 PM Jeff Hail I could have repaired and sectioned the right inne... Oct 14 2007, 09:18 PM Jeff Hail The outer wheelhouse metal is sound. I was surpise... Oct 14 2007, 09:35 PM type11969 Jeff- nice work, just figured out that you were th... Oct 14 2007, 09:50 PM Jeff Hail
Jeff- nice work, just figured out that you were t... Oct 14 2007, 11:11 PM type11969 Jeff-
Thanks for the info. I've tried us... Oct 15 2007, 08:11 AM tdgray Great work Jeff.... great when you get to say... ... Oct 15 2007, 07:56 AM Jeff Hail A couple of hours to play today.
Cut the old inne... Oct 16 2007, 09:19 PM Jeff Hail Rust is a crafty beast. If you can see rust you ar... Oct 16 2007, 09:30 PM Jeff Hail I mentioned the other day double walled panels. Th... Oct 16 2007, 09:48 PM Jeff Hail A mock up shot from underneath. Oct 16 2007, 10:01 PM Jeff Hail An important note I would like to mention: "I... Oct 16 2007, 10:35 PM SirAndy very nice! you have some skillz, sir ... :wor... Oct 16 2007, 10:36 PM Jeff Hail We always can use tutorials with pics. Here is a c... Oct 16 2007, 11:08 PM type11969 Jeff-
Seriously nice work, thanks for the in... Oct 17 2007, 09:13 AM Jeff Hail Don't you love it when you are making a new po... Oct 18 2007, 09:34 PM nola914 Jeff:
Is there a source for the horizontal and v... Oct 19 2007, 12:28 AM watsonrx13
Jeff:
Is there a source for the horizontal and ... Oct 19 2007, 05:11 AM Jeff Hail
Jeff:
Is there a source for the horizontal and ... Oct 19 2007, 09:52 AM Jeff Hail Second time the site went down trying to post pict... Oct 20 2007, 09:57 PM degreeoff :beer2: I just have to say....'right on my man... Oct 20 2007, 10:28 PM Jeff Hail Threw a second coat of primer on before it got dar... Oct 20 2007, 10:45 PM Jeff Hail A little more on welding thin sheetmetal:
Use wel... Oct 20 2007, 11:13 PM rjames Any advice on which brand of weld through primer t... Oct 21 2007, 12:24 AM Jeff Hail
Any advice on which brand of weld through primer ... Oct 21 2007, 12:35 AM rhodyguy this thread NEVER ceases to amaze!! wow. t... Oct 21 2007, 10:18 AM majkos :agree:
Your tips has saved me 20 years of trial... Oct 21 2007, 10:30 AM Thomas J Bliznik Mr. Jeff Hail
Your metal work is magnificent :wor... Oct 21 2007, 10:51 AM StratPlayer This is truely amazing stuff here. My hats off to... Oct 21 2007, 01:25 PM Gint :agree: Nice work. I wish I had the talent to do... Oct 21 2007, 05:22 PM Jeff Hail A valid PM was sent to me by Wes in reference to m... Oct 21 2007, 06:37 PM Wes V
A valid PM was sent to me by Wes in reference to ... Oct 21 2007, 07:46 PM Jeff Hail Another example of double walled panels.
The right... Oct 21 2007, 07:47 PM Jeff Hail type11969 has a few questions regarding Roloc disc... Oct 26 2007, 11:50 PM type11969 Thanks Jeff! Oct 28 2007, 08:22 AM Jeff Hail Didnt get anything done for two weeks. Fire's,... Nov 3 2007, 07:45 PM Jeff Hail Prepped the flanges and seams for the inner and ou... Nov 3 2007, 07:47 PM Jeff Hail Passenger side of the tunnel was just surface rust... Nov 3 2007, 07:50 PM Rand Just wanted to give you a virtual high five here J... Nov 3 2007, 07:58 PM Jeff Hail
Just wanted to give you a virtual high five here ... Nov 3 2007, 09:01 PM Jeff Hail Mocked up the inner and outer firewalls to see how... Nov 3 2007, 08:06 PM Jeff Hail Kind of looks like a 914 again!
Still lots to... Nov 3 2007, 08:08 PM Jeff Hail One last thing for the day. It is possible to get ... Nov 3 2007, 08:26 PM Jeff Hail Anyone with an early car know what these holes are... Nov 3 2007, 09:12 PM 1970 Neun vierzehn
Anyone with an early car know what these holes ar... Nov 3 2007, 11:58 PM sixnotfour Yes, that hole is for a pivot ball , But for 4 cyl... Nov 4 2007, 10:40 AM Wes V For those that may not know;
Clecos are clamps th... Nov 4 2007, 12:11 PM davep Jeff, can you take some good photos of that panel ... Nov 4 2007, 01:32 PM Jeff Hail Stuff that is easier to do now than later.
I am u... Nov 4 2007, 07:41 PM Jeff Hail Wondering how I flaired the tube? After rummaging ... Nov 4 2007, 07:46 PM Jeff Hail Mig welded the spigot to the firewall and some pri... Nov 4 2007, 07:48 PM Jeff Hail Moving along to the E-Brake Cable delete.
Cut out... Nov 4 2007, 07:55 PM Jeff Hail A little finishing with a grinder and conditioning... Nov 4 2007, 08:03 PM Jeff Hail Some more holes that need to go away.
The mystery... Nov 4 2007, 08:20 PM Jeff Hail Corrosion Protection:
I cannot stress enough abou... Nov 4 2007, 08:30 PM Jeff Hail I decided to leave the early boot cup on the shift... Nov 4 2007, 08:38 PM Jeff Hail Didnt get any work done on the tub during the week... Nov 10 2007, 09:50 PM Jeff Hail Again the rear floor behind the seat crossmember i... Nov 10 2007, 10:14 PM Jeff Hail Once everything has sat a little while it is then ... Nov 10 2007, 10:24 PM Jeff Hail Working in smaller area's makes it easier to m... Nov 10 2007, 10:48 PM restore2seater
Helpful advise....DO NOT SPRAY THIS TYPE OF PRODU... Nov 11 2007, 12:27 PM Jeff Hail
[quote name='Jeff Hail' post='965475' date='Nov 1... Nov 11 2007, 02:43 PM Twystd1 Jeff,
When I was up at your house checking out yo... Nov 11 2007, 01:54 AM Twystd1 Before I forget............
I owe you a cup ... Nov 11 2007, 01:55 AM Jeff Hail
Before I forget............
I owe you a cup ... Nov 11 2007, 03:11 PM HalM Just tuned into this thread and al I can say is WO... Nov 11 2007, 08:29 AM Jeff Hail "While you're in there"
Had second t... Nov 11 2007, 10:49 PM
Jeff Hail
Contd
Rear floor replacement. An yes the RD flo... Oct 1 2007, 11:41 PM Eric_Shea Wow :o
:wttc:
This'll be a fun one to watch. Oct 1 2007, 11:43 PM Jeff Hail
Wow :o
:wttc:
This'll be a fun one to watch... Oct 1 2007, 11:47 PM Jeff Hail Interior stripped.
Odometer? DMV say its for real ... Oct 1 2007, 11:57 PM Jeff Hail Moving along into the rocker and longs. This was h... Oct 2 2007, 12:08 AM Jeff Hail Cut out the rusted outer. Actually only the rear 1... Oct 2 2007, 12:17 AM Jeff Hail Floor metal finished and primed. No filler.
I did ... Oct 2 2007, 12:54 AM jd74914 Nice work, I can't wait to see more . . . and
... Oct 1 2007, 11:52 PM KELTY360 :wttc:
Are you the Jeff Hail of the Mulholland ... Oct 2 2007, 12:42 AM Jeff Hail
:wttc:
Are you the Jeff Hail of the Mulholland... Oct 2 2007, 01:00 AM Twystd1 Were you part of the Mulholland crew back in the d... Oct 2 2007, 12:48 AM Jeff Hail
Were you part of the Mulholland crew back in the ... Oct 2 2007, 01:19 AM Lou W :wttc: Keep the pctures coming. :) Oct 2 2007, 03:07 AM Justin Fischer :wttc: Wow, that was some introduction. Keep th... Oct 2 2007, 08:18 AM SGB shhhh.
Artist at work.
Thats really impressive. Oct 2 2007, 08:27 AM pin31 Very cool !!!
Someone should write a ... Oct 2 2007, 10:11 AM Jeff Hail This weeks installment of Bringing out the dead
A... Oct 6 2007, 09:22 PM Jeff Hail Some great tools to have are the Astro Scraper. It... Oct 6 2007, 09:32 PM sixnotfour I am in shock that some one in CA would take on th... Oct 6 2007, 09:36 PM Jeff Hail
I am in shock that some one in CA would take on t... Oct 6 2007, 11:00 PM Jeff Hail Seam sealer stripped off the inner firewall with t... Oct 6 2007, 09:50 PM Jeff Hail You gotta have bars. Keep those gaps in check when... Oct 7 2007, 12:06 AM Jeff Hail This is an original Coppertone car that was re-pai... Oct 7 2007, 12:13 AM stateofidleness even if you're just cutting out small patches ... Oct 7 2007, 01:11 AM Jeff Hail
even if you're just cutting out small patches... Oct 7 2007, 01:41 AM watsonrx13 Very nice photo-documentary on the restoration of ... Oct 7 2007, 07:30 AM Jeff Hail
Very nice photo-documentary on the restoration of... Oct 7 2007, 02:52 PM KELTY360 That lower firewall is serious sheetmetal porn. ... Oct 7 2007, 10:07 AM Jeff Hail The lower outer firewall is out. I didn't even... Oct 7 2007, 07:49 PM Jeff Hail Didn't get much done with the car this week. B... Oct 14 2007, 09:08 PM Jeff Hail I could have repaired and sectioned the right inne... Oct 14 2007, 09:18 PM Jeff Hail The outer wheelhouse metal is sound. I was surpise... Oct 14 2007, 09:35 PM type11969 Jeff- nice work, just figured out that you were th... Oct 14 2007, 09:50 PM Jeff Hail
Jeff- nice work, just figured out that you were t... Oct 14 2007, 11:11 PM type11969 Jeff-
Thanks for the info. I've tried us... Oct 15 2007, 08:11 AM tdgray Great work Jeff.... great when you get to say... ... Oct 15 2007, 07:56 AM Jeff Hail A couple of hours to play today.
Cut the old inne... Oct 16 2007, 09:19 PM Jeff Hail Rust is a crafty beast. If you can see rust you ar... Oct 16 2007, 09:30 PM Jeff Hail I mentioned the other day double walled panels. Th... Oct 16 2007, 09:48 PM Jeff Hail A mock up shot from underneath. Oct 16 2007, 10:01 PM Jeff Hail An important note I would like to mention: "I... Oct 16 2007, 10:35 PM SirAndy very nice! you have some skillz, sir ... :wor... Oct 16 2007, 10:36 PM Jeff Hail We always can use tutorials with pics. Here is a c... Oct 16 2007, 11:08 PM type11969 Jeff-
Seriously nice work, thanks for the in... Oct 17 2007, 09:13 AM Jeff Hail Don't you love it when you are making a new po... Oct 18 2007, 09:34 PM nola914 Jeff:
Is there a source for the horizontal and v... Oct 19 2007, 12:28 AM watsonrx13
Jeff:
Is there a source for the horizontal and ... Oct 19 2007, 05:11 AM Jeff Hail
Jeff:
Is there a source for the horizontal and ... Oct 19 2007, 09:52 AM Jeff Hail Second time the site went down trying to post pict... Oct 20 2007, 09:57 PM degreeoff :beer2: I just have to say....'right on my man... Oct 20 2007, 10:28 PM Jeff Hail Threw a second coat of primer on before it got dar... Oct 20 2007, 10:45 PM Jeff Hail A little more on welding thin sheetmetal:
Use wel... Oct 20 2007, 11:13 PM rjames Any advice on which brand of weld through primer t... Oct 21 2007, 12:24 AM Jeff Hail
Any advice on which brand of weld through primer ... Oct 21 2007, 12:35 AM rhodyguy this thread NEVER ceases to amaze!! wow. t... Oct 21 2007, 10:18 AM majkos :agree:
Your tips has saved me 20 years of trial... Oct 21 2007, 10:30 AM Thomas J Bliznik Mr. Jeff Hail
Your metal work is magnificent :wor... Oct 21 2007, 10:51 AM StratPlayer This is truely amazing stuff here. My hats off to... Oct 21 2007, 01:25 PM Gint :agree: Nice work. I wish I had the talent to do... Oct 21 2007, 05:22 PM Jeff Hail A valid PM was sent to me by Wes in reference to m... Oct 21 2007, 06:37 PM Wes V
A valid PM was sent to me by Wes in reference to ... Oct 21 2007, 07:46 PM Jeff Hail Another example of double walled panels.
The right... Oct 21 2007, 07:47 PM Jeff Hail type11969 has a few questions regarding Roloc disc... Oct 26 2007, 11:50 PM type11969 Thanks Jeff! Oct 28 2007, 08:22 AM Jeff Hail Didnt get anything done for two weeks. Fire's,... Nov 3 2007, 07:45 PM Jeff Hail Prepped the flanges and seams for the inner and ou... Nov 3 2007, 07:47 PM Jeff Hail Passenger side of the tunnel was just surface rust... Nov 3 2007, 07:50 PM Rand Just wanted to give you a virtual high five here J... Nov 3 2007, 07:58 PM Jeff Hail
Just wanted to give you a virtual high five here ... Nov 3 2007, 09:01 PM Jeff Hail Mocked up the inner and outer firewalls to see how... Nov 3 2007, 08:06 PM Jeff Hail Kind of looks like a 914 again!
Still lots to... Nov 3 2007, 08:08 PM Jeff Hail One last thing for the day. It is possible to get ... Nov 3 2007, 08:26 PM Jeff Hail Anyone with an early car know what these holes are... Nov 3 2007, 09:12 PM 1970 Neun vierzehn
Anyone with an early car know what these holes ar... Nov 3 2007, 11:58 PM sixnotfour Yes, that hole is for a pivot ball , But for 4 cyl... Nov 4 2007, 10:40 AM Wes V For those that may not know;
Clecos are clamps th... Nov 4 2007, 12:11 PM davep Jeff, can you take some good photos of that panel ... Nov 4 2007, 01:32 PM Jeff Hail Stuff that is easier to do now than later.
I am u... Nov 4 2007, 07:41 PM Jeff Hail Wondering how I flaired the tube? After rummaging ... Nov 4 2007, 07:46 PM Jeff Hail Mig welded the spigot to the firewall and some pri... Nov 4 2007, 07:48 PM Jeff Hail Moving along to the E-Brake Cable delete.
Cut out... Nov 4 2007, 07:55 PM Jeff Hail A little finishing with a grinder and conditioning... Nov 4 2007, 08:03 PM Jeff Hail Some more holes that need to go away.
The mystery... Nov 4 2007, 08:20 PM Jeff Hail Corrosion Protection:
I cannot stress enough abou... Nov 4 2007, 08:30 PM Jeff Hail I decided to leave the early boot cup on the shift... Nov 4 2007, 08:38 PM Jeff Hail Didnt get any work done on the tub during the week... Nov 10 2007, 09:50 PM Jeff Hail Again the rear floor behind the seat crossmember i... Nov 10 2007, 10:14 PM Jeff Hail Once everything has sat a little while it is then ... Nov 10 2007, 10:24 PM Jeff Hail Working in smaller area's makes it easier to m... Nov 10 2007, 10:48 PM restore2seater
Helpful advise....DO NOT SPRAY THIS TYPE OF PRODU... Nov 11 2007, 12:27 PM Jeff Hail
[quote name='Jeff Hail' post='965475' date='Nov 1... Nov 11 2007, 02:43 PM Twystd1 Jeff,
When I was up at your house checking out yo... Nov 11 2007, 01:54 AM Twystd1 Before I forget............
I owe you a cup ... Nov 11 2007, 01:55 AM Jeff Hail
Before I forget............
I owe you a cup ... Nov 11 2007, 03:11 PM HalM Just tuned into this thread and al I can say is WO... Nov 11 2007, 08:29 AM Jeff Hail "While you're in there"
Had second t... Nov 11 2007, 10:49 PM |
2 User(s) are reading this topic (2 Guests and 0 Anonymous Users)
0 Members:

|
Lo-Fi Version | Time is now: 17th July 2026 - 07:41 PM |
Invision Power Board
v9.1.4 © 2026 IPS, Inc.