|
|
|
Porsche, and the Porsche crest are registered trademarks of Dr. Ing. h.c. F. Porsche AG.
This site is not affiliated with Porsche in any way. Its only purpose is to provide an online forum for car enthusiasts. All other trademarks are property of their respective owners. |
|
|

  |

| Luke M |
 Apr 21 2013, 06:05 AM Apr 21 2013, 06:05 AM
Post
#1
|
|
Senior Member  Group: Members Posts: 1,497 Joined: 8-February 05 From: WNY Member No.: 3,574 Region Association: North East States |
I'm getting ready to work on the 6 now that the weather is getting nice again.
One of the major projects that needs to be done is the repair of the r/r outer long. I have most of the metal to start the repair but need some advice on the installation of the frame stiffener kit. This is also known as the clam shells and sold by restoration design. Has anyone done a step by step install for these? I thought there was something on the r/d website but it's no longer there. I know that I need to measure several points on the car prior to welding to confirm it's straight. I'll post pics as I go along with this repair. |
   |

 
|
| Luke M |
Apr 21 2013, 06:21 AM
Post
#2
|
|
Senior Member Group: Members Posts: 1,497 Joined: 8-February 05 From: WNY Member No.: 3,574 Region Association: North East States |
Some pics of what I have to deal with.
Attached thumbnail(s)  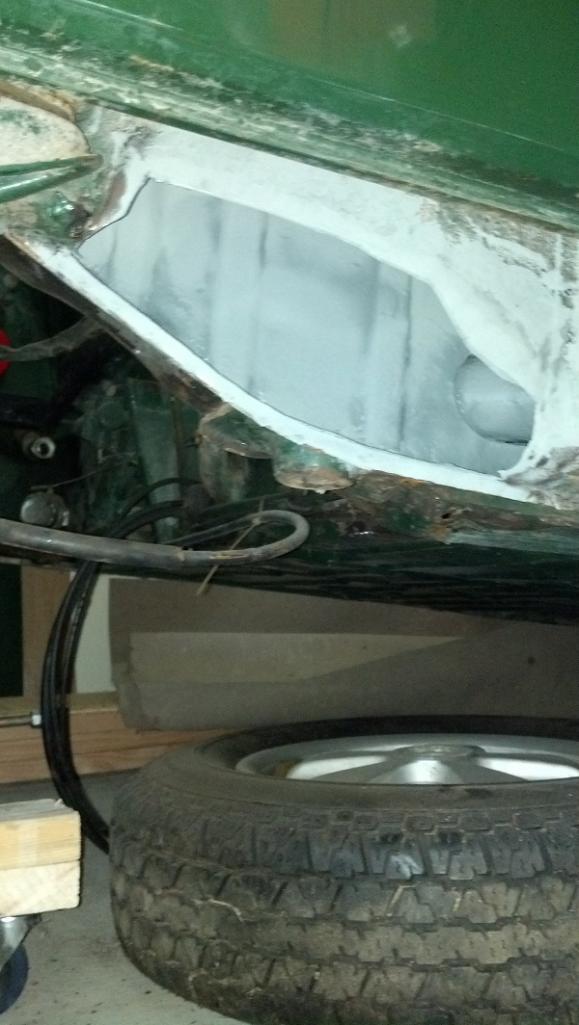 Attached image(s) 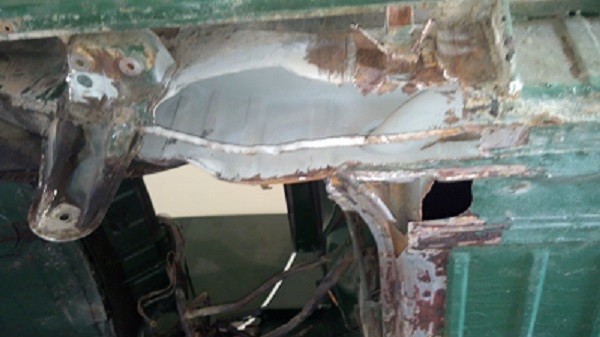 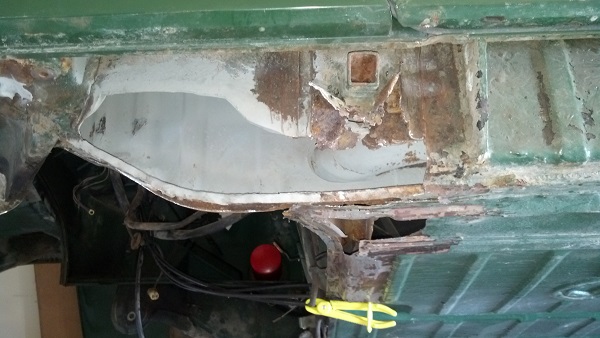 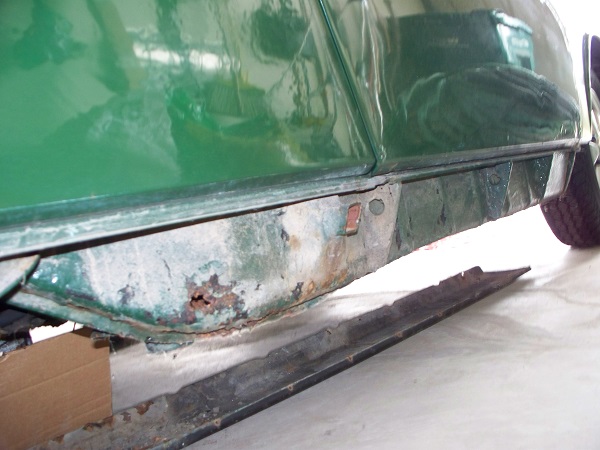 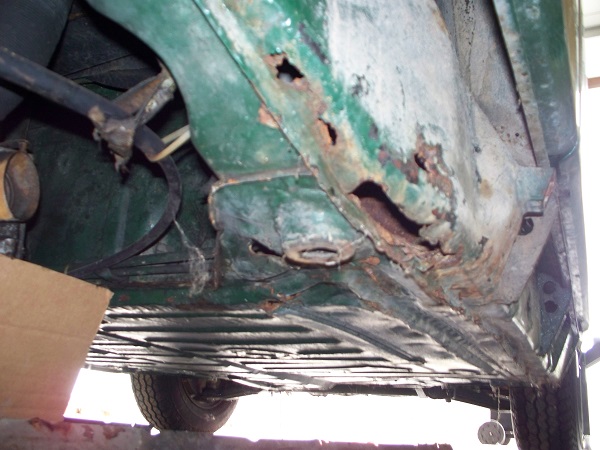 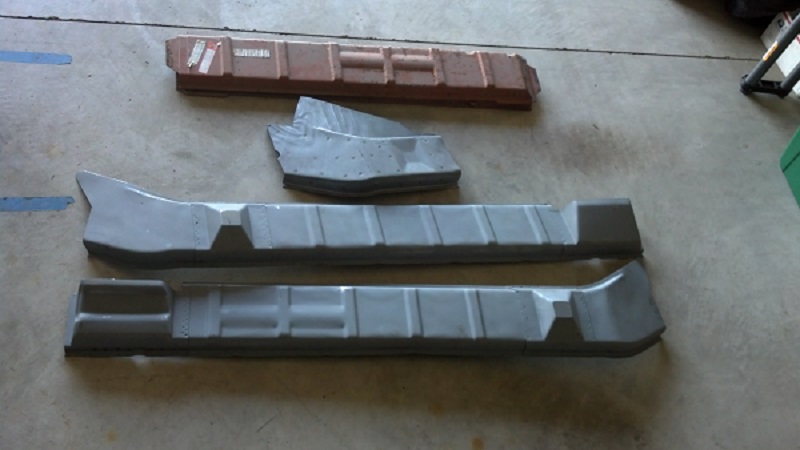
|
|
|
|
| injunmort |
Apr 21 2013, 07:21 AM
Post
#3
|
|
Senior Member Group: Members Posts: 1,024 Joined: 12-April 10 From: sugarloaf ny Member No.: 11,604 Region Association: North East States |
r/d does have an outer long overlay that goes from the front of the door post back to the outer suspension console. I have them but have not yet installed them.
|
|
|
|
| Luke M |
Apr 21 2013, 07:44 AM
Post
#4
|
|
Senior Member Group: Members Posts: 1,497 Joined: 8-February 05 From: WNY Member No.: 3,574 Region Association: North East States |
QUOTE(injunmort @ Apr 21 2013, 06:21 AM)  r/d does have an outer long overlay that goes from the front of the door post back to the outer suspension console. I have them but have not yet installed them. I have them too. I'm looking to see if someone has installed a set. Figure I'd ask before digging into it. I'm not sure if there's problems that I may encounter while installing these. They look like a straight forward install but who knows until I get started. |
|
|
|
| cary |
Apr 21 2013, 08:03 AM
Post
#5
|
|
Advanced Member Group: Members Posts: 3,900 Joined: 26-January 04 From: Sherwood Oregon Member No.: 1,608 Region Association: Pacific Northwest |
I have a set on my rack of parts to be used on my restoration.
I'm not seeing folks using them much. Now a days. Folks dig a little deeper than they did a few years back. They want to cut all the rust out. I don't think I'll use the set I have at this point I see the stiffener as more of a band-aid for the person not wanting to get to the bottom of the problem. Short term fix If you don't cut out all the rust. It will continue the eat the car apart. My .02c. IMHO you wouldn't want to use them on a 914-6. It will create additional issues when the increasing value on the car warrants a complete restoration. Once again, my .02c. As for installing it. The door sills have to come out so you can weld the top seams. Looking at mine a couple times. The biggest issue I see is getting a good surface on the bottom seam. Pretty bumpy It needs a good flat surface. Drill your spot weld holes and your good to go. Don't forget to use weld thru primer. Sorry for being so blunt. But I play all my cards face up ............... |
|
|
|
| Rleog |
Apr 21 2013, 08:05 AM
Post
#6
|
|
Senior Member Group: Members Posts: 611 Joined: 12-October 03 From: Middleton, MA Member No.: 1,239 Region Association: North East States |
I know that Chris Foley from Tangerine Racing has installed clamshells. He's at Hersey now. He's likely to eventually see your post/pics. Perhaps you could PM him and ask for his evaluation of clamshells.
|
|
|
|
| Dasnowman |
Apr 21 2013, 11:36 AM
Post
#7
|
|
You miss 100% of shots you don't take! Group: Members Posts: 265 Joined: 24-May 12 From: Tricities, B.C./ Lake Whatcom Member No.: 14,477 Region Association: Canada |
I'm in the same situation, as the bottom wheel house has rot and also the upper wheel house rust where the battery bracket was. The biggest problem is the bottom wheel house has all the suspension mounted to it. On my car the suspension mounts are in very good shape so I was just going to cut the AA wheelhouse around the suspension mount then weld it in then put the GT 914-6 reinforcement over it. I have a buddy that work in the auto collision industry for many years coming over to have a look at it so that this is the correct way to tackle this or not. I'll run down stairs and take some pictures.. here is a couple for now (IMG:http://www.914world.com/bbs2/uploads_offsite/i156.photobucket.com-14477-1366565797.1.jpg) (IMG:http://www.914world.com/bbs2/uploads_offsite/i156.photobucket.com-14477-1366565797.2.jpg) |
|
|
|
| Dasnowman |
Apr 21 2013, 12:23 PM
Post
#8
|
|
You miss 100% of shots you don't take! Group: Members Posts: 265 Joined: 24-May 12 From: Tricities, B.C./ Lake Whatcom Member No.: 14,477 Region Association: Canada |
(IMG:http://www.914world.com/bbs2/uploads_offsite/i156.photobucket.com-14477-1366568596.1.jpg) (IMG:http://www.914world.com/bbs2/uploads_offsite/i156.photobucket.com-14477-1366568596.2.jpg) SO I was think about trimming the AA wheelhouse repair piece like this but like I said before I'm going to have a collision buddy check it out first to see what is the best way to tackle this. I really rather not have to take the suspension mounts all apart as it's really solid and seems to be true. (IMG:http://www.914world.com/bbs2/uploads_offsite/i156.photobucket.com-14477-1366568597.3.jpg) |
|
|
|
| peteyd |
Apr 21 2013, 01:57 PM
Post
#9
|
|
Senior Member Group: Members Posts: 743 Joined: 27-March 08 From: Elora, Ontario, Canada Member No.: 8,858 Region Association: Canada |
This is pretty good timing.
We did take the old installation pictures off of the website. They were dated and we felt that an updated how to install video would help the masses. Right now the chassis we will install the overlays on, is at the sandblaster. It then needs a quick primer coat and then we will have the car back here. We plan to get the video taken this week or next and then come out with the video shortly after. Stay tuned and I will let everyone know when we have completed the install. Pete |
|
|
|
| Luke M |
Apr 21 2013, 02:17 PM
Post
#10
|
|
Senior Member Group: Members Posts: 1,497 Joined: 8-February 05 From: WNY Member No.: 3,574 Region Association: North East States |
QUOTE(peteyd @ Apr 21 2013, 12:57 PM) This is pretty good timing. We did take the old installation pictures off of the website. They were dated and we felt that an updated how to install video would help the masses. Right now the chassis we will install the overlays on, is at the sandblaster. It then needs a quick primer coat and then we will have the car back here. We plan to get the video taken this week or next and then come out with the video shortly after. Stay tuned and I will let everyone know when we have completed the install. Pete Hi Pete, Yeah, that would be great. I'll wait it out until I see your video. Meantime I can fix a few other issues.. You'll be hearing from me as I need to place an order. |
|
|
|
| Luke M |
Apr 21 2013, 02:19 PM
Post
#11
|
|
Senior Member Group: Members Posts: 1,497 Joined: 8-February 05 From: WNY Member No.: 3,574 Region Association: North East States |
QUOTE(Dasnowman @ Apr 21 2013, 11:23 AM) (IMG:http://www.914world.com/bbs2/uploads_offsite/i156.photobucket.com-14477-1366568596.1.jpg) (IMG:http://www.914world.com/bbs2/uploads_offsite/i156.photobucket.com-14477-1366568596.2.jpg) SO I was think about trimming the AA wheelhouse repair piece like this but like I said before I'm going to have a collision buddy check it out first to see what is the best way to tackle this. I really rather not have to take the suspension mounts all apart as it's really solid and seems to be true. (IMG:http://www.914world.com/bbs2/uploads_offsite/i156.photobucket.com-14477-1366568597.3.jpg) I'm doing the same thing. I cut my new metal to fit around the outer control arm mount. I don't see a problem with doing it this way. I'll post a few pics later tonight. |
|
|
|
| rjames |
Apr 21 2013, 04:52 PM
Post
#12
|
|
I'm made of metal Group: Members Posts: 4,447 Joined: 24-July 05 From: Shoreline, WA Member No.: 4,467 Region Association: Pacific Northwest |
Luke,
I would echo what Cary said. Fix the rust, don't just cover it up! |
|
|
|
| Dasnowman |
Apr 21 2013, 05:31 PM
Post
#13
|
|
You miss 100% of shots you don't take! Group: Members Posts: 265 Joined: 24-May 12 From: Tricities, B.C./ Lake Whatcom Member No.: 14,477 Region Association: Canada |
[/quote] I'm doing the same thing. I cut my new metal to fit around the outer control arm mount. I don't see a problem with doing it this way. I'll post a few pics later tonight. [/quote] That would be great did you end up taking the door sill off or cut the metal to fit before it? |
|
|
|
| Luke M |
Apr 21 2013, 05:44 PM
Post
#14
|
|
Senior Member Group: Members Posts: 1,497 Joined: 8-February 05 From: WNY Member No.: 3,574 Region Association: North East States |
[quote name='Dasnowman' date='Apr 21 2013, 04:31 PM' post='1853335']
[/quote] I'm doing the same thing. I cut my new metal to fit around the outer control arm mount. I don't see a problem with doing it this way. I'll post a few pics later tonight. [/quote] That would be great did you end up taking the door sill off or cut the metal to fit before it? [/quote] I'm still working on that part. Looks like I'm going to have to remove the sills. Yes, I'm going to repair all the rust issues not just covering it up. I got the clam shells to stiffen the chassis up. It was the shells or engman like kit. I went with the clam shells. |
|
|
|
| mepstein |
Apr 21 2013, 06:20 PM
Post
#15
|
|
914-6 GT in waiting Group: Members Posts: 20,587 Joined: 19-September 09 From: Landenberg, PA/Wilmington, DE Member No.: 10,825 Region Association: MidAtlantic Region |
I think you have to remove the consoles since they are bare metal inside and rust from the inside out.
|
 |
|
|
1 User(s) are reading this topic (1 Guests and 0 Anonymous Users)
0 Members:

|
Lo-Fi Version | Time is now: 2nd April 2026 - 09:36 AM |
Invision Power Board
v9.1.4 © 2026 IPS, Inc.