|
|
|
Porsche, and the Porsche crest are registered trademarks of Dr. Ing. h.c. F. Porsche AG.
This site is not affiliated with Porsche in any way. Its only purpose is to provide an online forum for car enthusiasts. All other trademarks are property of their respective owners. |
|
|


| ericread |
 Mar 7 2010, 01:42 PM Mar 7 2010, 01:42 PM
Post
#1
|
|
The Viper Blue 914  Group: Members Posts: 2,177 Joined: 7-December 07 From: Irvine, CA (The OC) Member No.: 8,432 Region Association: Southern California |
I am installing my PMB 914-4 rear calipers today and ran into a small issue. On the inside side of the brakes there is the inside clearanceadjuster. Once I remove the dist cover, I do not see a set screw to adjust. So what tool do I use to adjust the inner clearance???
My thanks in advance. Eric Read |
   |

 
|
  |
Replies(1 - 13)
| ConeDodger |
Mar 7 2010, 01:51 PM
Post
#2
|
|
Apex killer! Group: Members Posts: 23,589 Joined: 31-December 04 From: Tahoe Area Member No.: 3,380 Region Association: Northern California |
It should be an allen screw that has to be released by the nut that is on the outside. I forget the size but 4mm comes to mind. Once adjusted you lock the nut again and you are good to go. I think Eric has a Classic thread on this adjustment as well.
|
|
|
|
| ericread |
Mar 7 2010, 01:57 PM
Post
#3
|
|
The Viper Blue 914 Group: Members Posts: 2,177 Joined: 7-December 07 From: Irvine, CA (The OC) Member No.: 8,432 Region Association: Southern California |
QUOTE(ConeDodger @ Mar 7 2010, 11:51 AM)  It should be an allen screw that has to be released by the nut that is on the outside. I forget the size but 4mm comes to mind. Once adjusted you lock the nut again and you are good to go. I think Eric has a Classic thread on this adjustment as well. I have a new set of calipers from Eric Shea. Once the cover on the inside adjuster comes off, there is an empty chamber... So how do I adjust this? |
|
|
|
| ConeDodger |
Mar 7 2010, 02:00 PM
Post
#4
|
|
Apex killer! Group: Members Posts: 23,589 Joined: 31-December 04 From: Tahoe Area Member No.: 3,380 Region Association: Northern California |
QUOTE(ericread @ Mar 7 2010, 11:57 AM) QUOTE(ConeDodger @ Mar 7 2010, 11:51 AM) It should be an allen screw that has to be released by the nut that is on the outside. I forget the size but 4mm comes to mind. Once adjusted you lock the nut again and you are good to go. I think Eric has a Classic thread on this adjustment as well. I have a new set of calipers from Eric Shea. Once the cover on the inside adjuster comes off, there is an empty chamber... So how do I adjust this? It sounds like what you are telling us is that the adjuster is missing. The cover actually attaches to the nut that locks the adjuster so I am not sure how that could be. Got a picture? You might be missing parts. Not sure how that would have gotten by Eric's quality control He never makes mistakes. (IMG:style_emoticons/default/huh.gif) Here is the Lapuwali Classic Thread that outlines the procedure. http://www.914world.com/bbs2/index.php?showtopic=90625 Click and enjoy... |
|
|
|
| ericread |
Mar 7 2010, 02:19 PM
Post
#5
|
|
The Viper Blue 914 Group: Members Posts: 2,177 Joined: 7-December 07 From: Irvine, CA (The OC) Member No.: 8,432 Region Association: Southern California |
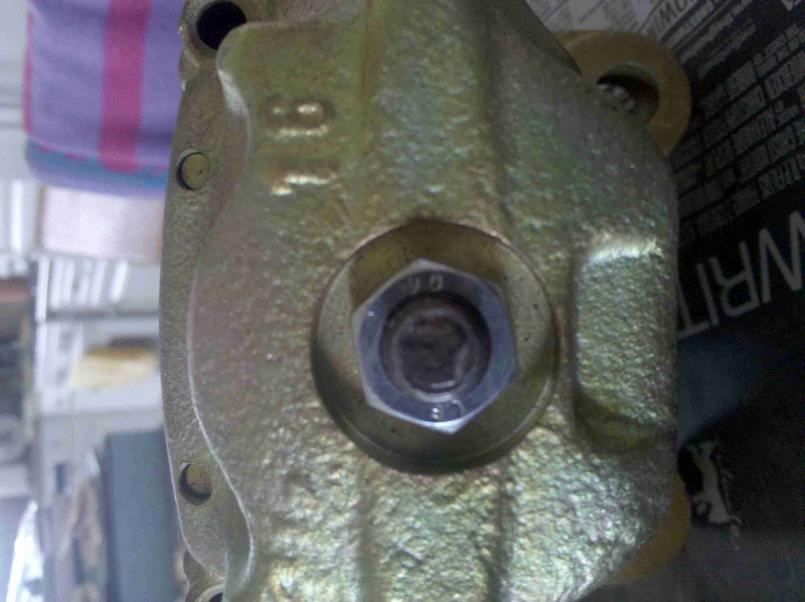
Here are the pics:
This is the inside adjuster cover: 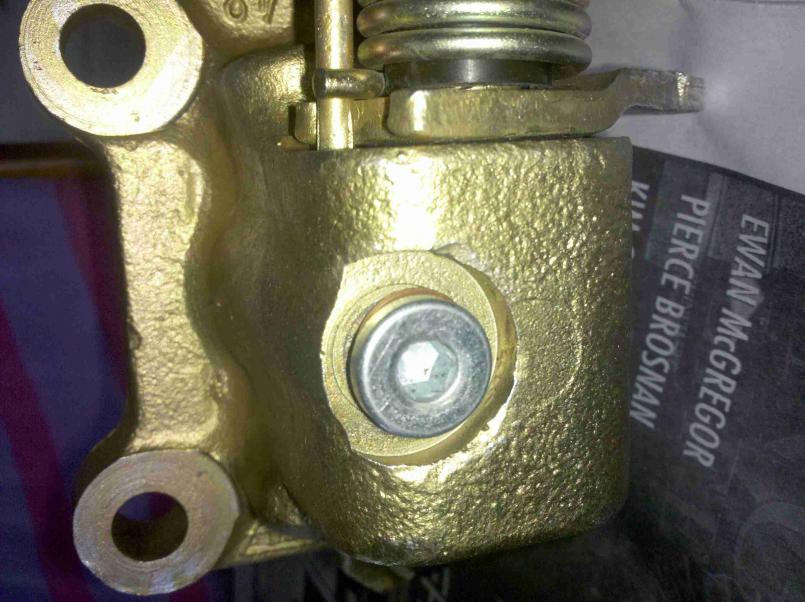 And this is what's inside: 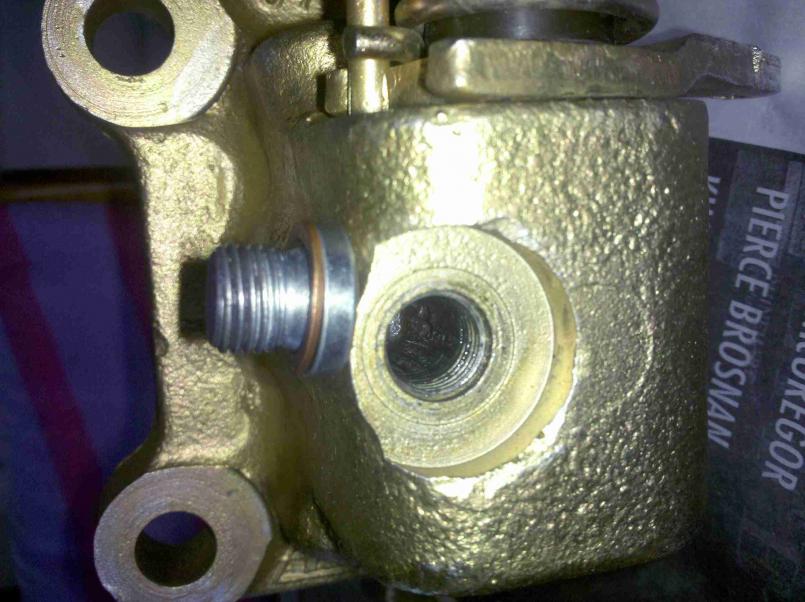 Sooo.... What am I doing wrong? |
|
|
|
| ericread |
Mar 7 2010, 02:20 PM
Post
#6
|
|
The Viper Blue 914 Group: Members Posts: 2,177 Joined: 7-December 07 From: Irvine, CA (The OC) Member No.: 8,432 Region Association: Southern California |
And just for reference, here's a pic out the outside adjuster:
 |
|
|
|
| underthetire |
Mar 7 2010, 02:28 PM
Post
#7
|
|
914 Guru Group: Members Posts: 5,062 Joined: 7-October 08 From: Brentwood Member No.: 9,623 Region Association: Northern California |
It's not as visible as the outside, it's wayyy down the hole.
|
|
|
|
| ericread |
Mar 7 2010, 02:30 PM
Post
#8
|
|
The Viper Blue 914 Group: Members Posts: 2,177 Joined: 7-December 07 From: Irvine, CA (The OC) Member No.: 8,432 Region Association: Southern California |
QUOTE(underthetire @ Mar 7 2010, 12:28 PM) It's not as visible as the outside, it's wayyy down the hole. Any chance you know the allen size? Thanks!!! Eric |
|
|
|
| Eric_Shea |
Mar 7 2010, 02:41 PM
Post
#9
|
|
PMB Performance Group: Admin Posts: 19,275 Joined: 3-September 03 From: Salt Lake City, UT Member No.: 1,110 Region Association: Rocky Mountains |
The email I sent you on Feb. 26th entitled "Pad Bedding and Gears" had this install sheet in it:
 Caliper_Installation.doc ( 52.5k )
Number of downloads: 163
Caliper_Installation.doc ( 52.5k )
Number of downloads: 163It tells you what to do with the inner adjuster cavity. (IMG:style_emoticons/default/wink.gif) I even highlighted it in RED and circled it for ya! (IMG:style_emoticons/default/av-943.gif) |
|
|
|
| ericread |
Mar 7 2010, 02:45 PM
Post
#10
|
|
The Viper Blue 914 Group: Members Posts: 2,177 Joined: 7-December 07 From: Irvine, CA (The OC) Member No.: 8,432 Region Association: Southern California |
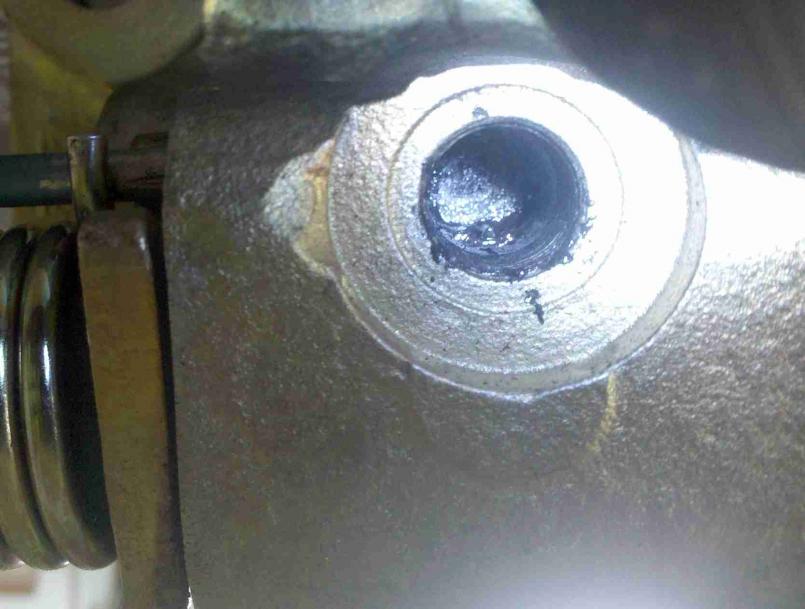
Here a picture of the inside of the adjuster. I just don't see anywhere to adjust...
 |
|
|
|
| underthetire |
Mar 7 2010, 02:47 PM
Post
#11
|
|
914 Guru Group: Members Posts: 5,062 Joined: 7-October 08 From: Brentwood Member No.: 9,623 Region Association: Northern California |
Looks like it's packed full of grease to me. Think it was a 13mm socket and a 4mm allen socket.
|
|
|
|
| ericread |
Mar 7 2010, 02:48 PM
Post
#12
|
|
The Viper Blue 914 Group: Members Posts: 2,177 Joined: 7-December 07 From: Irvine, CA (The OC) Member No.: 8,432 Region Association: Southern California |
QUOTE(Eric_Shea @ Mar 7 2010, 12:41 PM) The email I sent you on Feb. 26th entitled "Pad Bedding and Gears" had this install sheet in it:
Caliper_Installation.doc ( 52.5k )
Number of downloads: 163It tells you what to do with the inner adjuster cavity. (IMG:style_emoticons/default/wink.gif) I even highlighted it in RED and circled it for ya! (IMG:style_emoticons/default/av-943.gif) Got it Eric... My thanks!!! So the covers you provide are just temporary dust covers that are replaced by my adjuster screws? Sounds good. Eric Edit: First I send you my money. Then I act as a seasoned "wrench" (which I am not). Now you expect me to read???? (IMG:style_emoticons/default/lol3.gif) |
|
|
|
| Eric_Shea |
Mar 7 2010, 03:09 PM
Post
#13
|
|
PMB Performance Group: Admin Posts: 19,275 Joined: 3-September 03 From: Salt Lake City, UT Member No.: 1,110 Region Association: Rocky Mountains |
QUOTE So the covers you provide are just temporary dust covers that are replaced by my adjuster screws? No... those are permanent covers, in fact, their better than the stock covers. The factory covers suck because they have a shallow 4mm hex that almost "never" has the wrench engagement surface area to overcome the gummed up, rusty 10x1 threads. This is a new 10x1 cover with a deep 5mm hex. The other 10mm 10x1 cap head covers that are commonly sold in the marketplace get in the way of mounting your calipers on your arms (small issue but these are the best). You should find my thread on "Adjusting Rear Calipers" and read up (or just look at the pictures) on how to get your old covers off so you can get your gears out. It will be a task. (IMG:style_emoticons/default/biggrin.gif) (thread is in the Classics section) So... it goes like this: 1. Get your old covers off so you can get at your gears (the gears are 4mm BTW) 2. Yank out your gears and drop them in the new calipers (they should slide out). 3. Mount up your new calipers. 4. Bleed. 5. Adjust using the procedures in that thread. 6. Put the new dust caps back on (they're not temporary). Hope that helps. |
|
|
|
| ericread |
Mar 7 2010, 06:32 PM
Post
#14
|
|
The Viper Blue 914 Group: Members Posts: 2,177 Joined: 7-December 07 From: Irvine, CA (The OC) Member No.: 8,432 Region Association: Southern California |
Actually, the front covers came off pretty easily - both sides. I've really never had any significant problems with corrosion on my 914. Nothing I have worked on thus far has been "welded" closed.
Anyway, the rear calipers are on and adjusted. Once I understood that I needed to transfer the inner adjusters to the new calipers, everything went pretty smoothly. Of course it was a PIA to replace the flexibe lines for the rear brakes, but nothing I wasn't expecting. I plan on installing the Porterfields on the front tomorrow. Then the front brake adjustments and it's time to bleed the lines with ATE gold brake fluid (I alternate between the blue and gold so that I am assured the fluid has been completely replaced). The new calipers look pretty nice (I still wish they were red (IMG:style_emoticons/default/lol3.gif)). And I carefully had read your adjustment documents and I adjusted the pads to .006. OK, settle down, I was just kidding (IMG:style_emoticons/default/lol2.gif). I adjusted them to your specified .004. I'm hoping for some dry weather on Monday (it rained again this afernoon) so that I can seat the pads correctly. My thanks to Eric, Conehead and Tirebottom for their assistance! Eric Read |
|
|
|
|
1 User(s) are reading this topic (1 Guests and 0 Anonymous Users)
0 Members:

|
Lo-Fi Version | Time is now: 18th May 2024 - 10:21 AM |
Invision Power Board
v9.1.4 © 2024 IPS, Inc.