|
|
|
Porsche, and the Porsche crest are registered trademarks of Dr. Ing. h.c. F. Porsche AG.
This site is not affiliated with Porsche in any way. Its only purpose is to provide an online forum for car enthusiasts. All other trademarks are property of their respective owners. |
|
|

  |

| Andyrew |
 Jan 1 2016, 12:26 PM Jan 1 2016, 12:26 PM
Post
#461
|
|
Spooling.... Please wait  Group: Members Posts: 13,380 Joined: 20-January 03 From: Riverbank, Ca Member No.: 172 Region Association: Northern California |
My final update for December 2015 is below (IMG:style_emoticons/default/smile.gif)
Guess who welded up the engine/trani mounts for their final position?  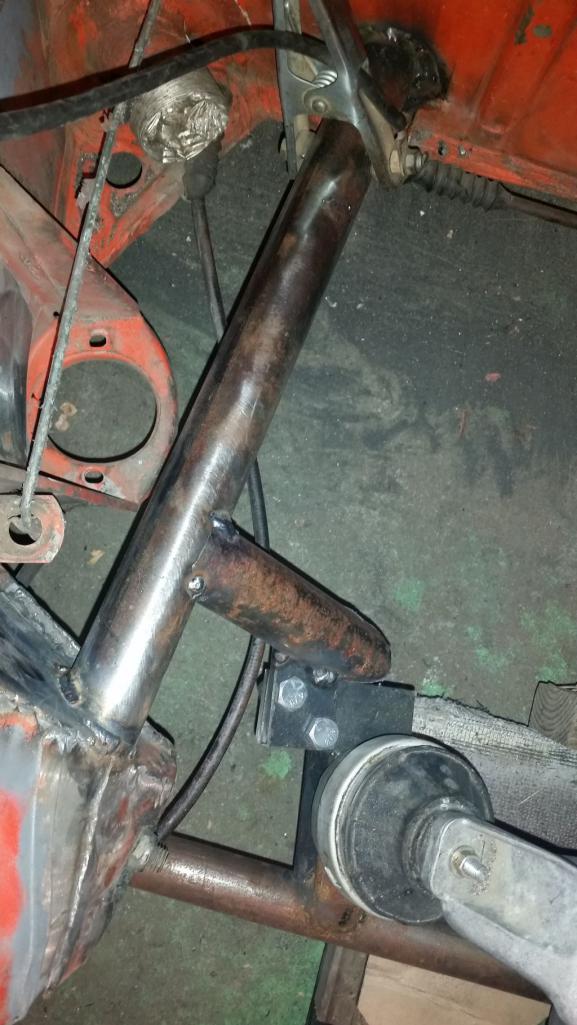 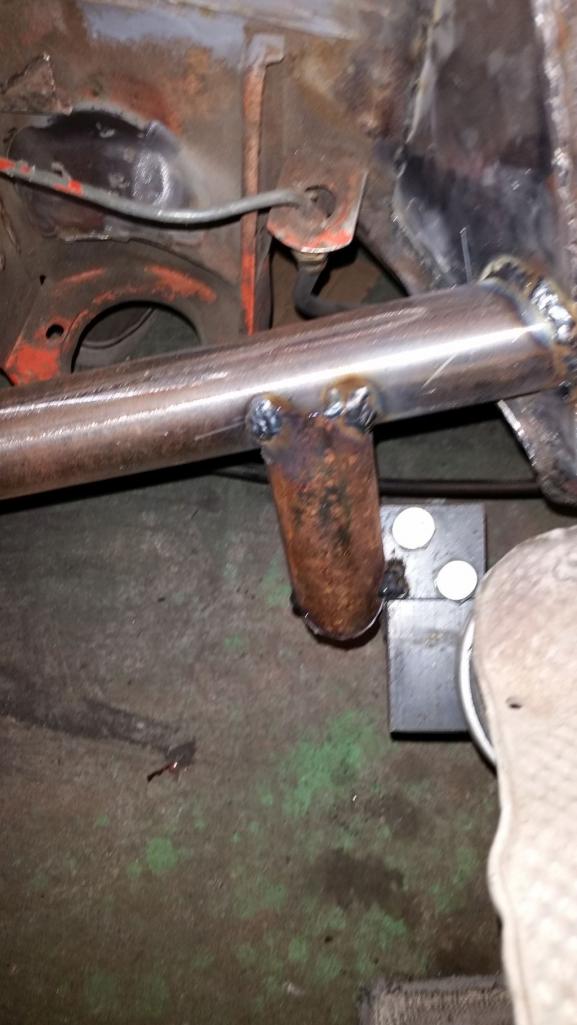 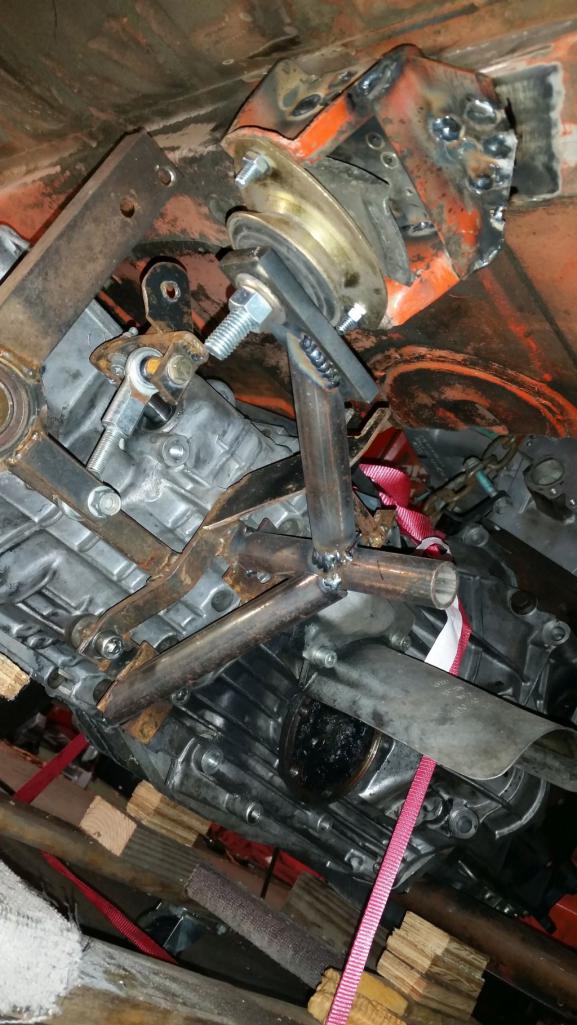  I'll add one support to this, I dont have any bolts on the trani closer up top that will triangulate this for load so I am going to use the hoist hole for one.  This is immediately after tack welds, They are all 90% welded now, but will finish that up in January. I was able to remove the 8 bolts holding it all together (4 up front and the 4 trani bolts for the oem mounts) and raise the car up in a couple minutes. Really happy with how that turned out (IMG:style_emoticons/default/smile.gif) |
   |

 
|
| 76-914 |
Jan 1 2016, 02:34 PM
Post
#462
|
|
Repeat Offender & Resident Subaru Antagonist Group: Members Posts: 13,908 Joined: 23-January 09 From: Temecula, CA Member No.: 9,964 Region Association: Southern California |
Muy congrats, Andrew. Question. In your last pic, I see you cut out the piece adjacent to the trunk light and then welded a piece back in the same spot? Re-enforcement or change of plans? More pics, pls. (IMG:style_emoticons/default/beerchug.gif)
|
 |
|
| Andyrew |
Jan 1 2016, 02:42 PM
Post
#463
|
|
Spooling.... Please wait Group: Members Posts: 13,380 Joined: 20-January 03 From: Riverbank, Ca Member No.: 172 Region Association: Northern California |
That 1' cutout is for the distributor on a SBC conversion. Different clearancing is needed for the Audi engine.
|
|
|
|
| dan10101 |
Jan 1 2016, 03:03 PM
Post
#464
|
|
TORQUE-o-holic Group: Members Posts: 1,140 Joined: 29-April 03 From: Eagle Point, Or Member No.: 626 Region Association: Pacific Northwest |
Looking good. Progress!
|
|
|
|
| Mike Bellis |
Jan 1 2016, 09:17 PM
Post
#465
|
|
Resident Electrician Group: Members Posts: 8,348 Joined: 22-June 09 From: Midlothian TX Member No.: 10,496 Region Association: None |
|
|
|
|
| Andyrew |
Jan 2 2016, 11:49 AM
Post
#466
|
|
Spooling.... Please wait Group: Members Posts: 13,380 Joined: 20-January 03 From: Riverbank, Ca Member No.: 172 Region Association: Northern California |
 From yesterday, Finished off the welding on the body and the mounts, added the support, cutoff the excess and welded plugs to prevent rusting.  Bench tested my boost controller finally and its bad.... (IMG:style_emoticons/default/headbang.gif) Trying to get a refund from ebay but the guy that sold it to me didnt sell me the wiring harness (he played stupid in his auction, stating it was something else...) so I had to wait for a harness from China to come in and when I tested it well... ya. Dead LCD. (IMG:http://www.914world.com/bbs2/uploads_offsite/www.usrallyteam.com-172-1451756993.1.jpg) So there happens to be a sale going on right now for another EBC that I am interested in. 6 settings (Which I like....) and its programed via computer. Gear based, RPM based, speed based, and can control my water injection as well (awesome!) Its very small so it would fit with my dash layout much better than the other one as well which I like. http://www.usrallyteam.com/index.php?main_...roducts_id=2017 |
|
|
|
| paroxysm |
Jan 2 2016, 09:19 PM
Post
#467
|
|
Member Group: Members Posts: 81 Joined: 4-April 04 From: chilliwack bc canada Member No.: 1,888 |
Not trying to hijack your thread
It looks very similar to my build, but for my rear tranny mount I just built an adapter. I certainly need to upgrade my shifter assembly to be more rugged like yours mine was just some spare VW mk3 parts I had laying around. (IMG:http://www.914world.com/bbs2/uploads_offsite/i106.photobucket.com-1888-1451791151.1.jpg) (IMG:http://www.914world.com/bbs2/uploads_offsite/i106.photobucket.com-1888-1451791151.2.jpg) (IMG:http://www.914world.com/bbs2/uploads_offsite/i106.photobucket.com-1888-1451791151.3.jpg) I hope to just finish this car enough to drive the bugs out of it this year. Anyone know if I can drive on a base stage 3 big turbo tune? Or should I try and dyno tune this thing without any of the bugs worked out? |
|
|
|
| Andyrew |
Jan 2 2016, 10:51 PM
Post
#468
|
|
Spooling.... Please wait Group: Members Posts: 13,380 Joined: 20-January 03 From: Riverbank, Ca Member No.: 172 Region Association: Northern California |
Awesome!
Do you have an active build thread on here? If not you should really make one, your build looks interesting! I think you have your engine about 2" forward of mine, do you have any cv issues and what cvs are you using? What turbo are you using and what turbo is your stage 3 file for? I ran my turbo on my apr stage 3 file(made for a gr28rs) and didnt have any issues at 10psi but I was getting stuttering above that. You can get it tuned by some online tuners that give you a base tune and then fine tune it from logs you run. |
|
|
|
| paroxysm |
Jan 3 2016, 12:17 PM
Post
#469
|
|
Member Group: Members Posts: 81 Joined: 4-April 04 From: chilliwack bc canada Member No.: 1,888 |
QUOTE(Andyrew @ Jan 2 2016, 08:51 PM)  Awesome! Do you have an active build thread on here? If not you should really make one, your build looks interesting! I think you have your engine about 2" forward of mine, do you have any cv issues and what cvs are you using? What turbo are you using and what turbo is your stage 3 file for? I ran my turbo on my apr stage 3 file(made for a gr28rs) and didnt have any issues at 10psi but I was getting stuttering above that. You can get it tuned by some online tuners that give you a base tune and then fine tune it from logs you run. http://www.914world.com/bbs2/index.php?sho...0stuka&st=0 This should be my build thread. The turbo is a gt28rs, my program is revo stage 3 for the turbo. My motor is an AWW 2001 with only 7000 kilometers on it, I paid $1200 for it. The motor came with a electronic boost controller(not hooked up yet), walboro fuel pump, wideband O2 sensor, genesis 500cc fuel injectors, all new never used. Now for the CV passenger side is a stock 911 with a empty CV case from a passat B5 used as a spacer, drivers side is a bmw 540i that was the correct length. Don't know how long they last but I had to go cheap for now and that setup only cost $10. Only problem I've been experiencing is sometimes the car refuses to shut off, place the key in the off position car tries to shut down but then it revs up and continues running, also if I put the car in reverse with the ignition off the backup lights are on. |
|
|
|
| Andyrew |
Jan 3 2016, 01:22 PM
Post
#470
|
|
Spooling.... Please wait Group: Members Posts: 13,380 Joined: 20-January 03 From: Riverbank, Ca Member No.: 172 Region Association: Northern California |
Ill continue this post on your thread (IMG:style_emoticons/default/smile.gif)
|
|
|
|
| Justinp71 |
Jan 5 2016, 12:05 AM
Post
#471
|
|
Senior Member Group: Members Posts: 1,647 Joined: 11-October 04 From: Sacramento, CA Member No.: 2,922 Region Association: None |
|
|
|
|
| Andyrew |
Jan 5 2016, 08:33 AM
Post
#472
|
|
Spooling.... Please wait Group: Members Posts: 13,380 Joined: 20-January 03 From: Riverbank, Ca Member No.: 172 Region Association: Northern California |
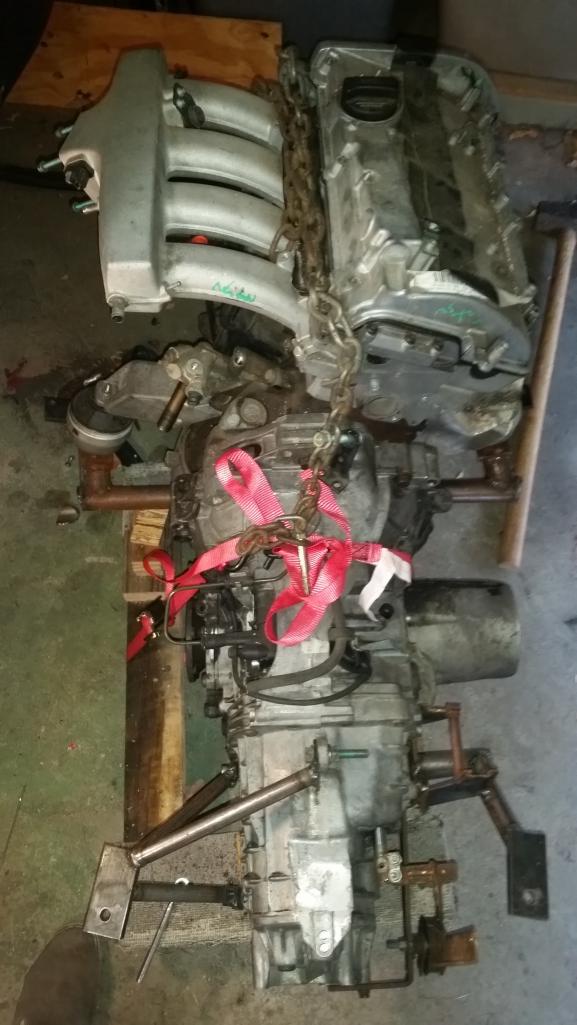
Separated the engine from the trans last night and removed the intake and cylinder head
 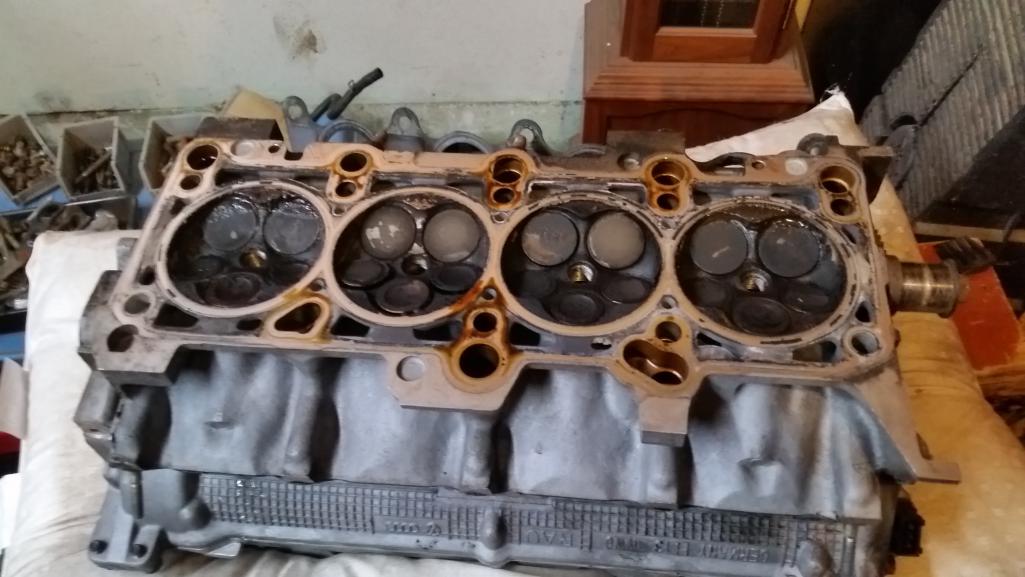 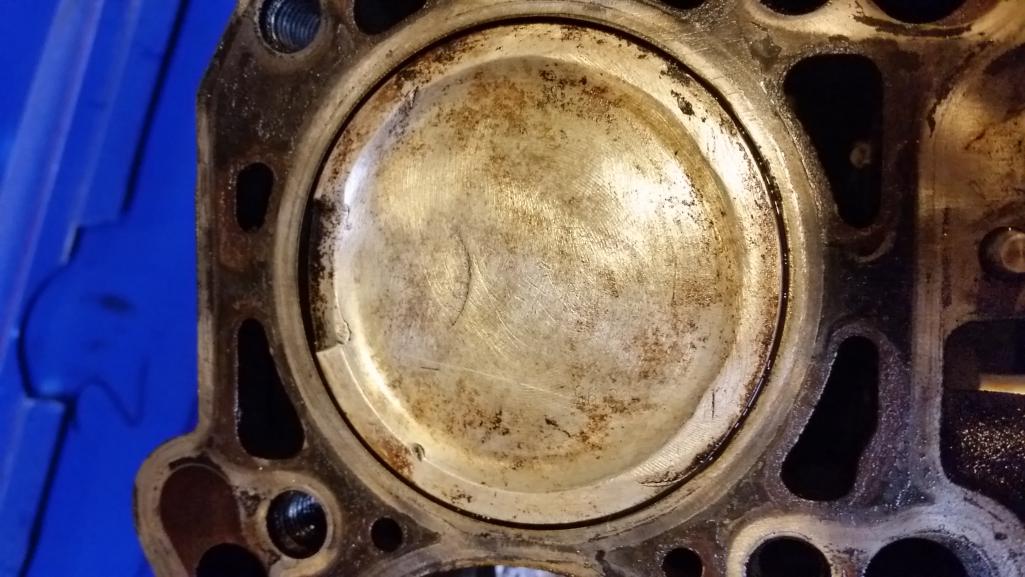 It appears as if the valves have been in contact with the pistons, you can see the mark on the piston in the center and 4 small nicks on the corners (think a square) The engine builders are telling me to grind off the nicks and use the pistons but the valves need to be gone through. Im going to take the cams off and do a leakdown on the valves then determine how much valvework I want to do. I have a line on titanium valves and springs that will help me push up the rev limiter to 9k but the turbo will die off after 8k(unless I put a larger exhaust housing on it..) Trying to keep my engine work under 1500, but I am not sure if I will make it. |
|
|
|
| Andyrew |
Jan 10 2016, 10:18 PM
Post
#473
|
|
Spooling.... Please wait Group: Members Posts: 13,380 Joined: 20-January 03 From: Riverbank, Ca Member No.: 172 Region Association: Northern California |
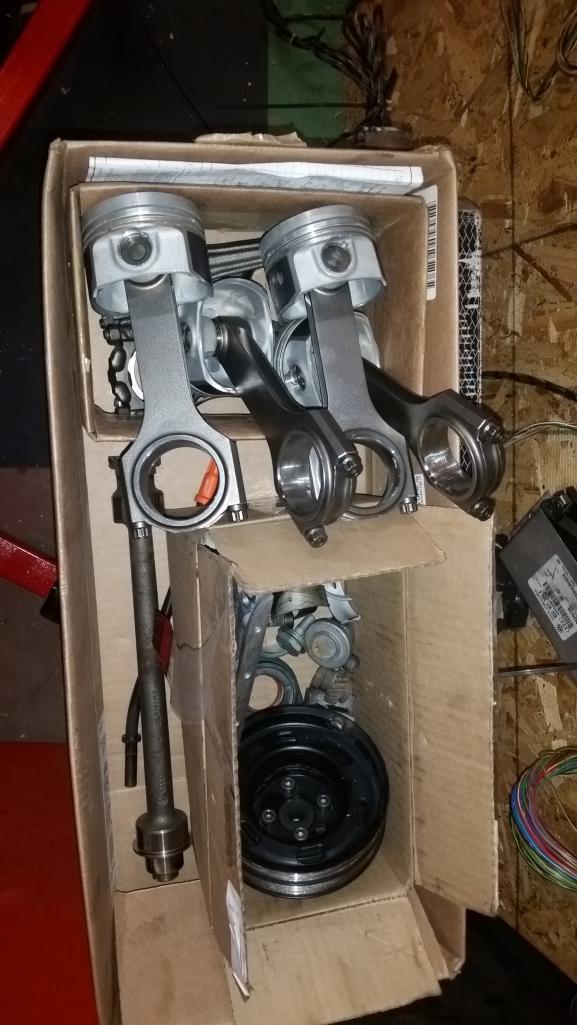
Finalized the disassembly of the engine and dropped off the engine at the engine shop.
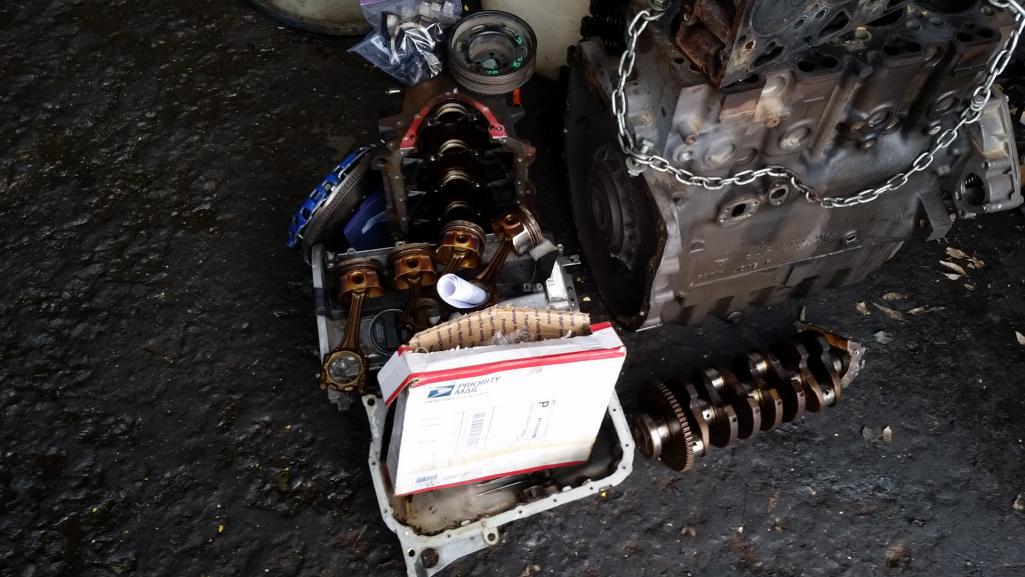 Work to be done by the engine shop: Clean block/head Surface block/head Hone cylinders Install H beam rods on factory forged pistons Balance Rotating assembly Polish crank Should be done in about 2-3 weeks. I will assemble the engine at that point. Also BIG thanks to Mike Bellis for stopping by today and dropping off these MUCH NEEDED 100mm stub axles! 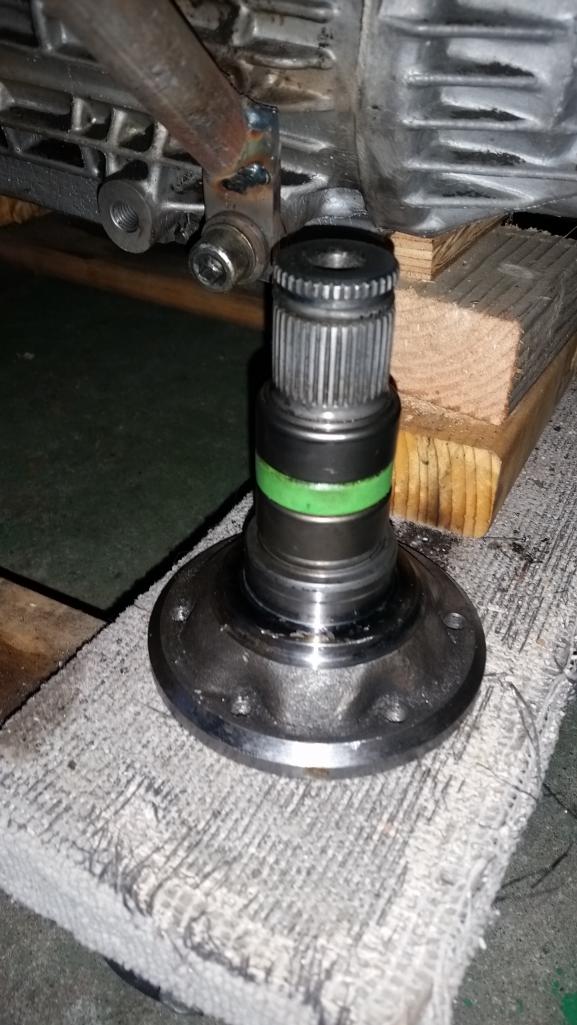 |
|
|
|
| Dion |
Jan 11 2016, 04:55 PM
Post
#474
|
|
RN Group: Members Posts: 2,931 Joined: 16-September 04 From: Shepherdstown, WV Member No.: 2,766 Region Association: MidAtlantic Region |
Andrew, wow! Just wow. Impressive project. Keep going, baby.
Having seen what goes into bodywork in person with 914Daves project, I've a new appreciation for anyone who tackles bodywork that doesn't do it for a living and does it properly. Very nice. |
|
|
|
| Andyrew |
Jan 16 2016, 03:19 AM
Post
#475
|
|
Spooling.... Please wait Group: Members Posts: 13,380 Joined: 20-January 03 From: Riverbank, Ca Member No.: 172 Region Association: Northern California |
Progress:
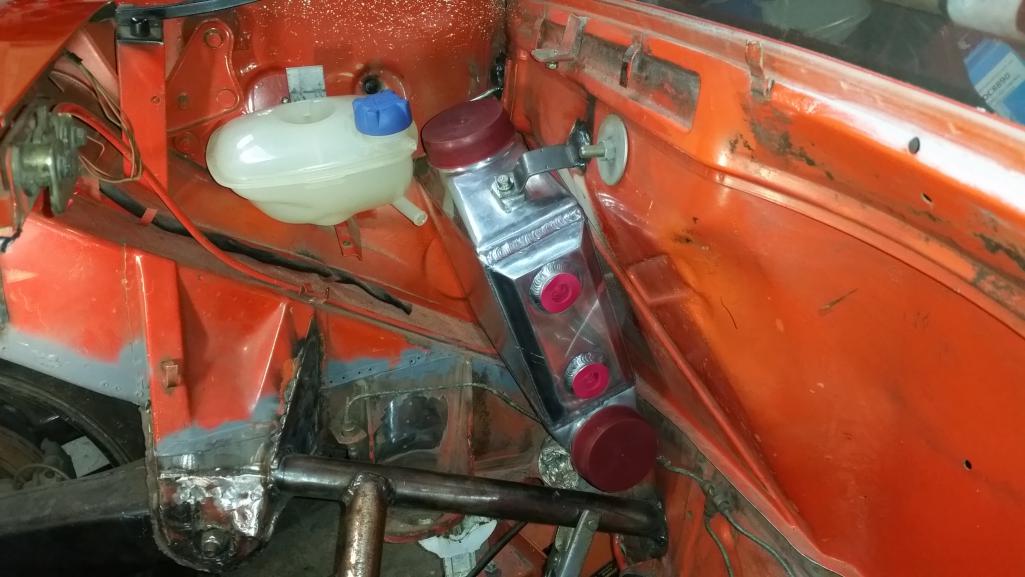 Mounted my intercooler and one of my tanks. Machine shop kicked it up a notch and pushed the engine assembly out in a week! 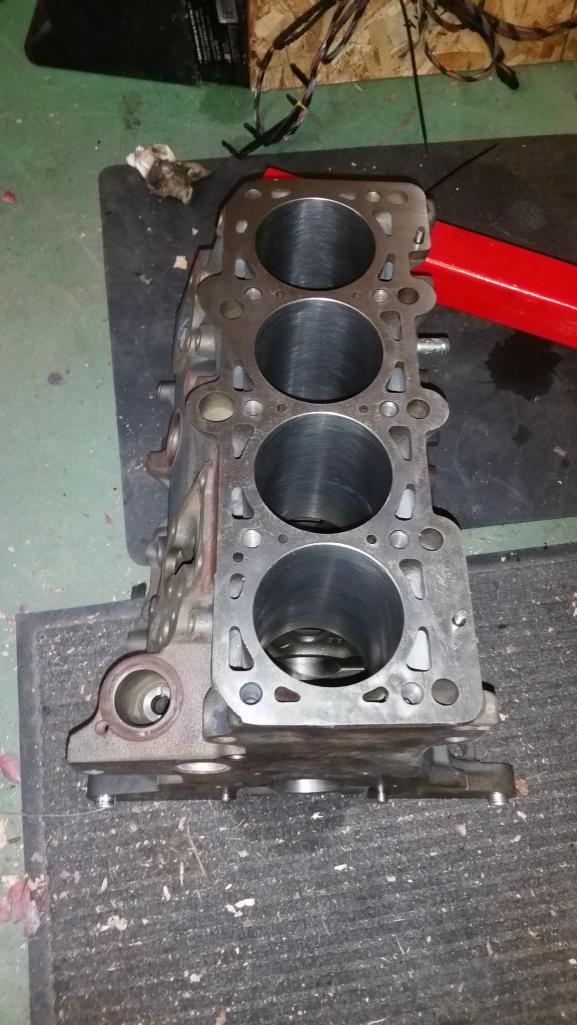 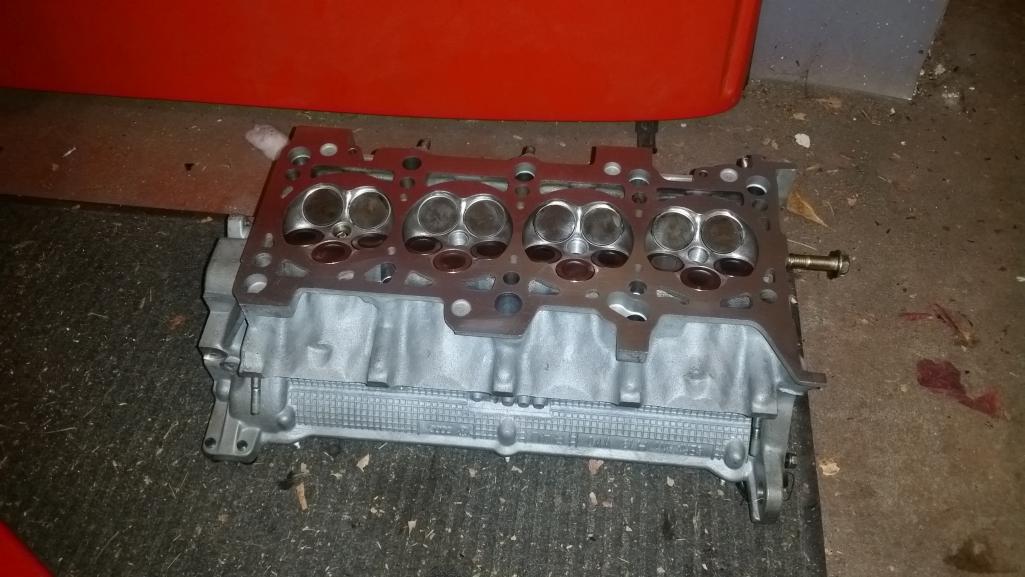 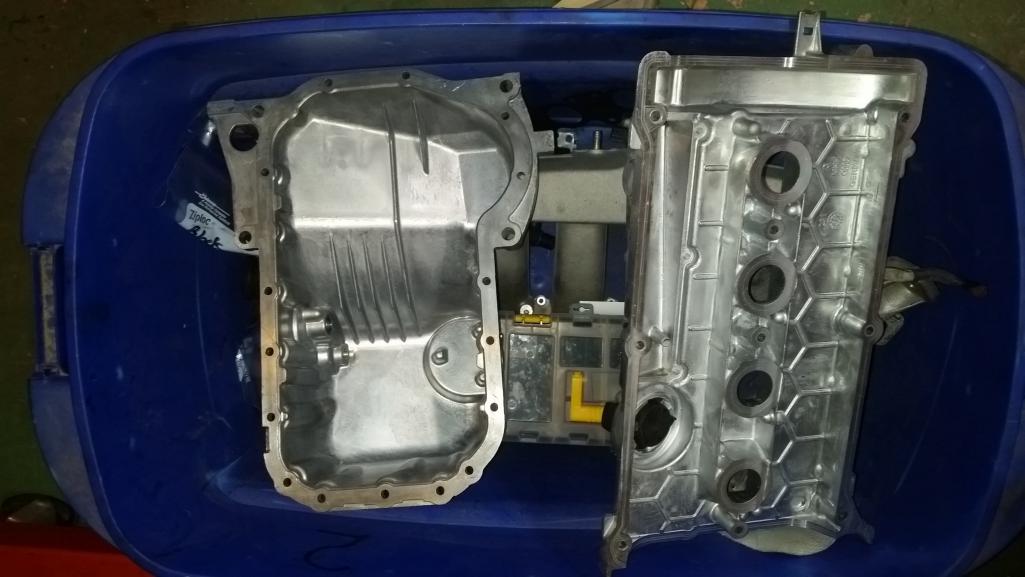 Got it back today and everything looks so clean! (IMG:style_emoticons/default/biggrin.gif) |
|
|
|
| Andyrew |
Jan 16 2016, 03:23 AM
Post
#476
|
|
Spooling.... Please wait Group: Members Posts: 13,380 Joined: 20-January 03 From: Riverbank, Ca Member No.: 172 Region Association: Northern California |
More of all the bits.
  Removed the valves and cleaned up all the carbon deposits the hot tank didnt take off. 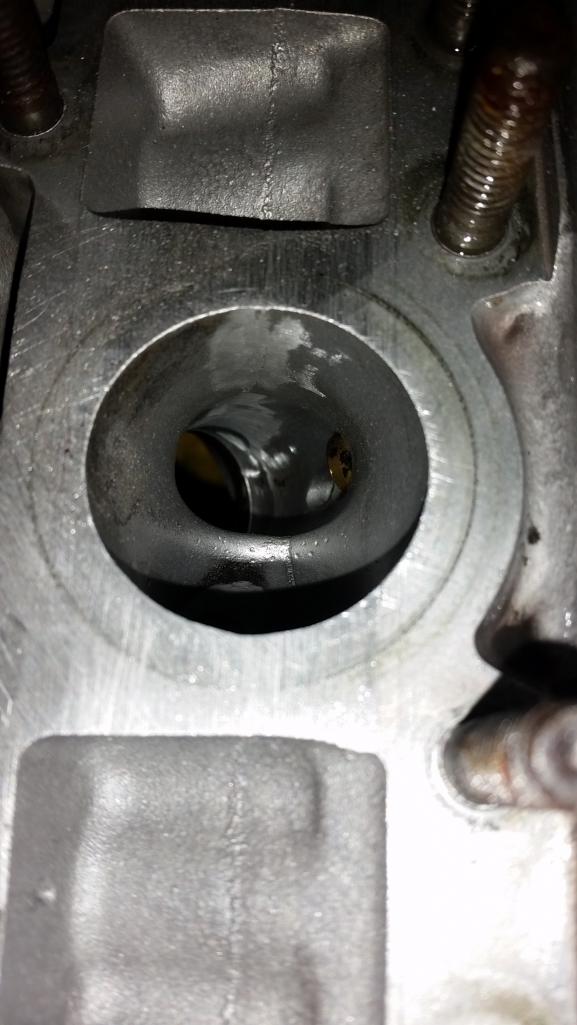 Removed the casting marks from the exhaust side, I'll hit the intake side this weekend. 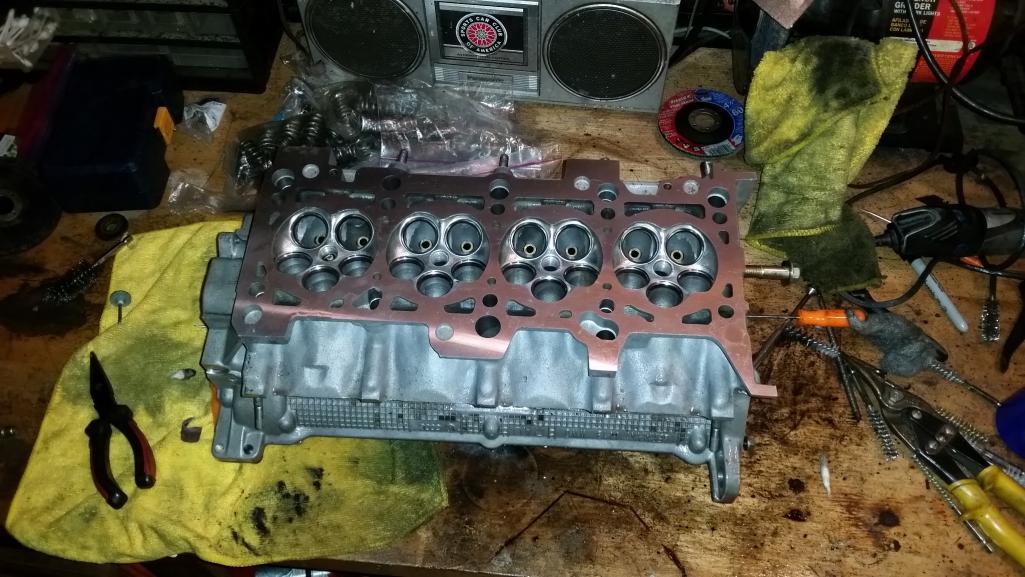 Mmm looks so nice! |
|
|
|
| Andyrew |
Jan 24 2016, 04:44 PM
Post
#477
|
|
Spooling.... Please wait Group: Members Posts: 13,380 Joined: 20-January 03 From: Riverbank, Ca Member No.: 172 Region Association: Northern California |
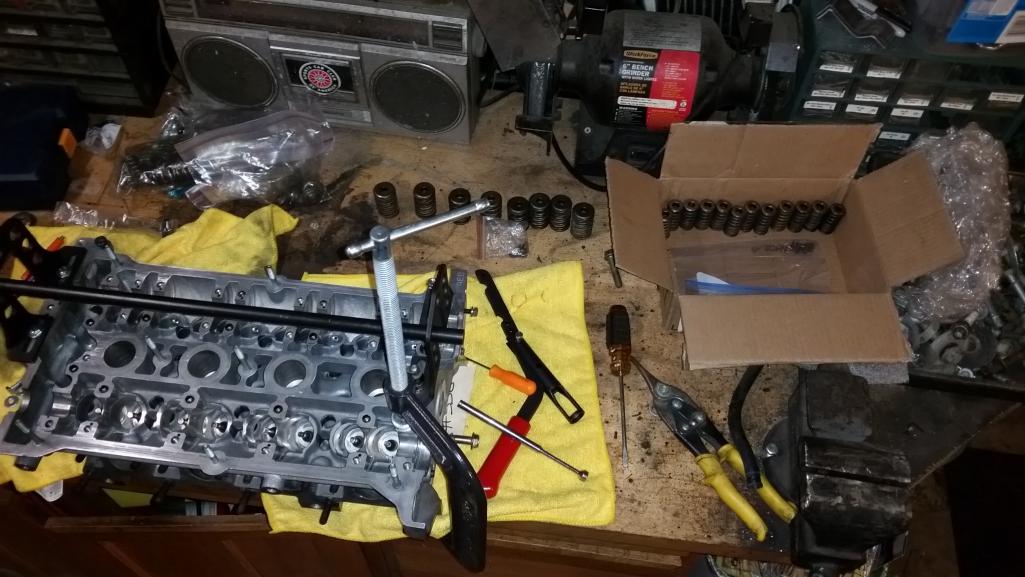
All the casting marks are removed from both intake/exhaust side (IMG:style_emoticons/default/smile.gif)
Not sure it'll do anything but its at least a step forward on the head build. In a couple years when I build a full stroker motor I'll do a full blown port + polish head. My Supertech high spring pressure valves and nitrite coated exhaust valves came in! However I had one hickup. I picked up this set new in bag from a Audi community member, apparently it had swapped hands quite a bit and the original owner back in ~08-09 was going to put it in his race car 914 1.8T swap! I have a feeling it was the white race car that was in Excellence mag. I lapped all the valves just for safety and everything seemed just perfect. Then I replaced all the valve guide seals and started to install all the valve springs. So onto the valve spring hiccup. I went to install all the springs (If you've done this on an OHV head you'll notice the TINY amount of room on the intake valves... This task took me hours.... Ugh, tiniest of screwdrivers and ~ 1/4" room to work in at a severe angle) and when I got to the exhaust side I noticed that one of the exhaust inner springs was sitting a bit taller than the rest, took it out and I think the manufacturer packaged it wrong and put an intake spring instead of an exhaust inner spring (IMG:style_emoticons/default/dry.gif). 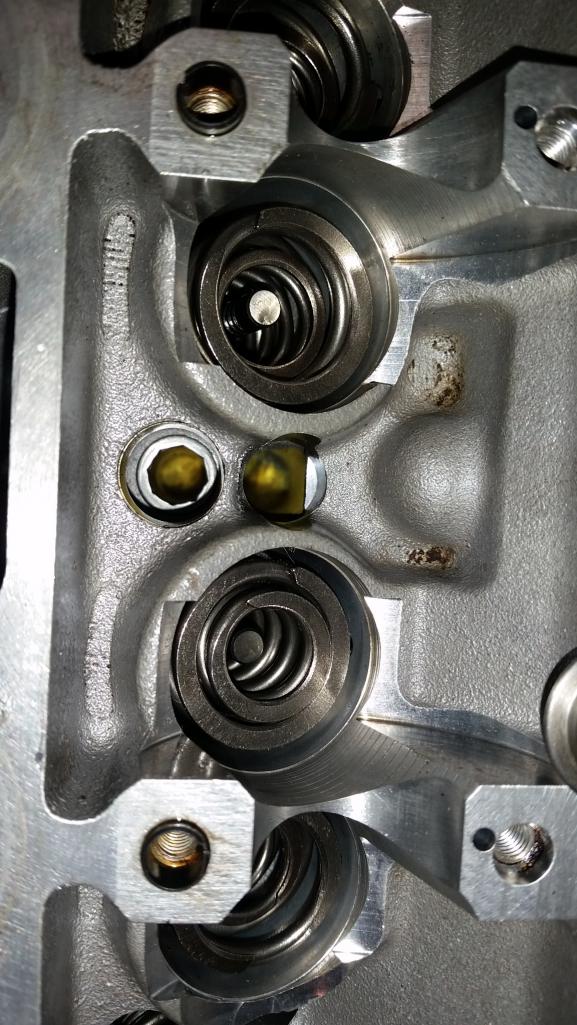 Quick email to Supertech and after $12 for the spring and shipping I had it the next day! (IMG:style_emoticons/default/cheer.gif) 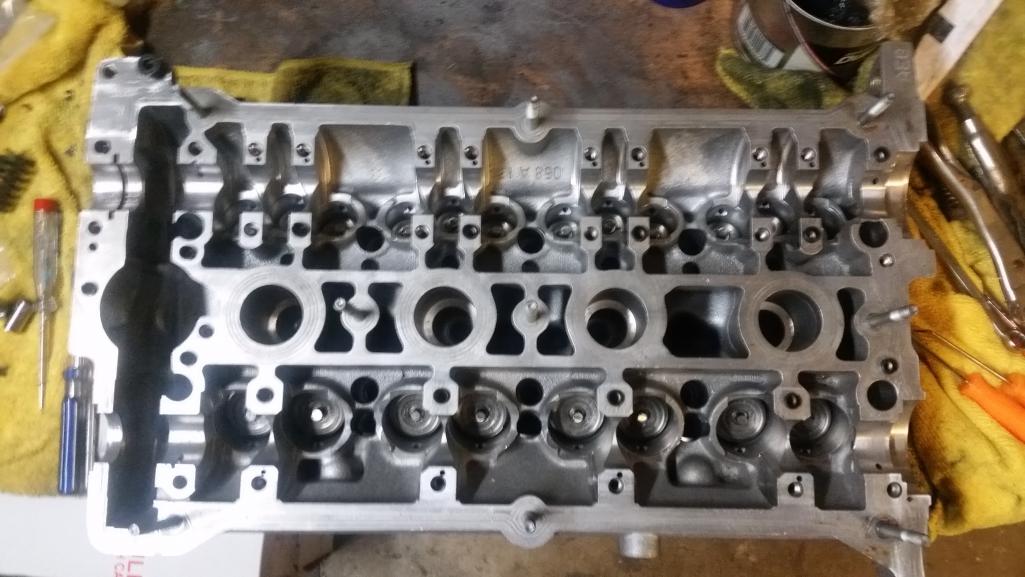 Finalized the install on the valves and springs and went to put in the stock hydraulic lifters but noticed that a few of the lifters wouldnt spring very well even though they had been sitting for a week. I let them sit in some ATF to try and loosen them but no luck. So a quick youtube search lead me here. https://www.youtube.com/watch?v=ySf0r8GGMOY So I went and disassembled all my problem lifters and any I thought were not perfect, Labeled them in a bag per lifter hole and let them soak for 6 hours in some Purple Power. 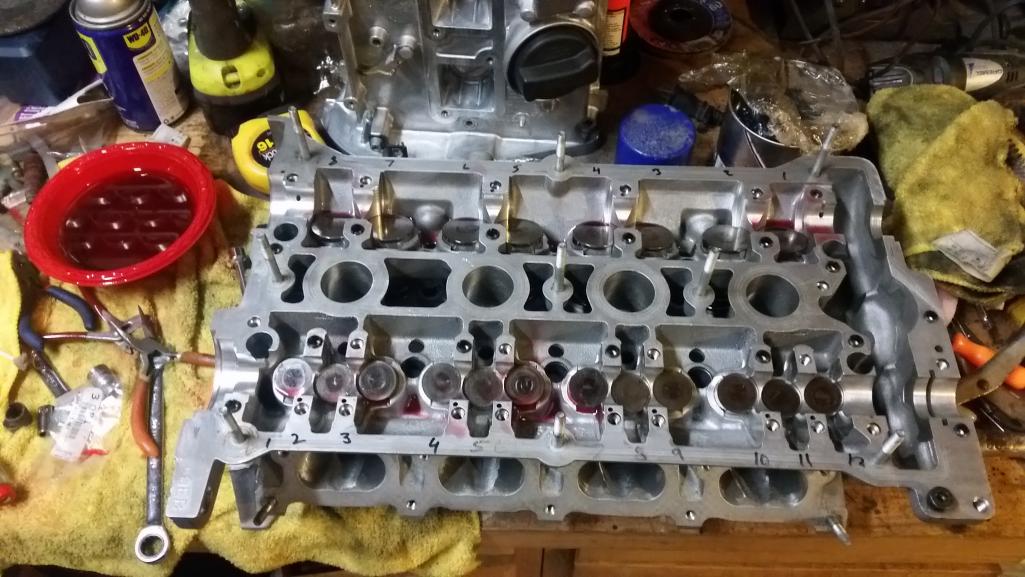 After 6 hours the lifters themselves were very clean and I could see gunk floating at the top of the bags. Cleaned everything up and lubed them with some ATF and sunk them back in the holes they are for. |
|
|
|
| Andyrew |
Jan 24 2016, 04:45 PM
Post
#478
|
|
Spooling.... Please wait Group: Members Posts: 13,380 Joined: 20-January 03 From: Riverbank, Ca Member No.: 172 Region Association: Northern California |
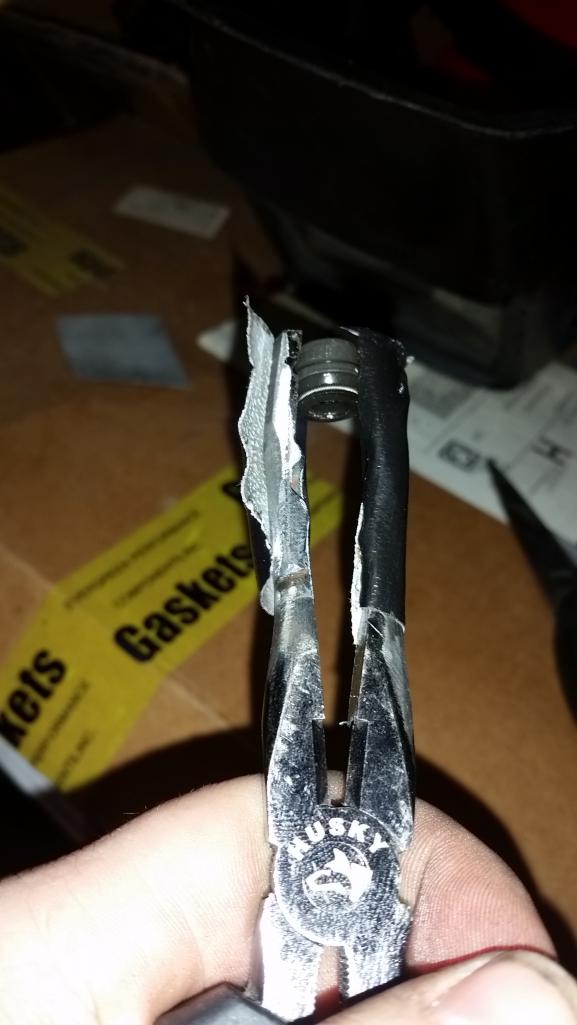
Oh and the tool I made for the valve guide seals.
 |
|
|
|
| dan10101 |
Jan 24 2016, 07:09 PM
Post
#479
|
|
TORQUE-o-holic Group: Members Posts: 1,140 Joined: 29-April 03 From: Eagle Point, Or Member No.: 626 Region Association: Pacific Northwest |
QUOTE(Andyrew @ Jan 24 2016, 02:45 PM) Oh and the tool I made for the valve guide seals. I love to make tools from tools, tools into parts, parts into tools and of course, parts into parts. Hey, make sure you didn't swap springs with another cylinder. I'm sure you checked, but that's what I would have done... |
|
|
|
| Andyrew |
Jan 24 2016, 07:21 PM
Post
#480
|
|
Spooling.... Please wait Group: Members Posts: 13,380 Joined: 20-January 03 From: Riverbank, Ca Member No.: 172 Region Association: Northern California |
All the springs were new high strength, intake and exhaust, so no worries there (That said I still have them in line in a box).
I looked up a couple of valve guide seal removers and couldnt find what I wanted so this seemed like the best idea. Which was good because I really didnt have a lot of room to work with. Tape was there to prevent marring of the lifter walls. |
|
|
|
|
192 User(s) are reading this topic (192 Guests and 0 Anonymous Users)
0 Members:

|
Lo-Fi Version | Time is now: 30th June 2026 - 10:57 PM |
Invision Power Board
v9.1.4 © 2026 IPS, Inc.