|
|
|
Porsche, and the Porsche crest are registered trademarks of Dr. Ing. h.c. F. Porsche AG.
This site is not affiliated with Porsche in any way. Its only purpose is to provide an online forum for car enthusiasts. All other trademarks are property of their respective owners. |
|
|

  |

| billh1963 |
 Jan 14 2014, 08:43 AM Jan 14 2014, 08:43 AM
Post
#281
|
|
Car Hoarder!  Group: Members Posts: 3,410 Joined: 28-March 11 From: North Carolina Member No.: 12,871 Region Association: South East States |
I may be missing the point but should the bolt heads be facing you instead of the bolts? I would think you would want any pointy parts away from you
|
   |

 
|
| ThePaintedMan |
Jan 14 2014, 09:51 AM
Post
#282
|
|
Advanced Member Group: Members Posts: 3,887 Joined: 6-September 11 From: St. Petersburg, FL Member No.: 13,527 Region Association: South East States |
I'll probably just use tractor paint, or some kind of durable epoxy paint. Getting it over to a powdercoating shop would be a pain in the ass.
Bill, that's a good call. But this is only how the guys at the hot rod shop put it together after they did the tube bending. I have to disassemble it all and do some other work, then put it back together. Then, I'll make sure all of the pointy things are out of the way (IMG:style_emoticons/default/beerchug.gif) |
|
|
|
| chads74 |
Jan 14 2014, 10:02 AM
Post
#283
|
|
Member Group: Members Posts: 386 Joined: 13-March 12 From: Tampa, FL Member No.: 14,252 Region Association: South East States |
Well if you get into it this weekend let me know
|
|
|
|
| Jetsetsurfshop |
Jan 14 2014, 07:56 PM
Post
#284
|
|
Senior Member Group: Members Posts: 815 Joined: 7-April 11 From: Marco Island Florida Member No.: 12,907 Region Association: South East States |
Hey George,
What your plans for bolting the roof down? (IMG:style_emoticons/default/confused24.gif) Our factory latches won't pass tech for Chump. (IMG:style_emoticons/default/driving.gif) |
|
|
|
| ThePaintedMan |
Jan 14 2014, 08:10 PM
Post
#285
|
|
Advanced Member Group: Members Posts: 3,887 Joined: 6-September 11 From: St. Petersburg, FL Member No.: 13,527 Region Association: South East States |
QUOTE(Jetsetsurfshop @ Jan 14 2014, 08:56 PM)  Hey George, What your plans for bolting the roof down? (IMG:style_emoticons/default/confused24.gif) Our factory latches won't pass tech for Chump. (IMG:style_emoticons/default/driving.gif) Custom "solid" latches - no drilling necessary! (IMG:style_emoticons/default/biggrin.gif) |
|
|
|
| ThePaintedMan |
Jan 15 2014, 09:21 AM
Post
#286
|
|
Advanced Member Group: Members Posts: 3,887 Joined: 6-September 11 From: St. Petersburg, FL Member No.: 13,527 Region Association: South East States |
Latest project. Came out pretty good and took very little effort/time... which is rare for most of my projects.
Attached thumbnail(s) 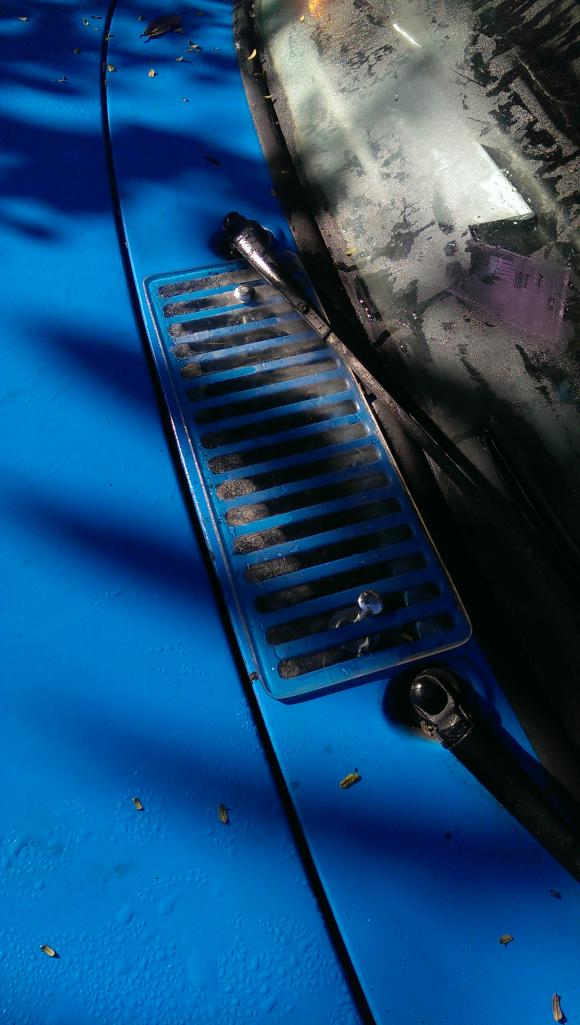
|
|
|
|
| chads74 |
Jan 15 2014, 09:35 AM
Post
#287
|
|
Member Group: Members Posts: 386 Joined: 13-March 12 From: Tampa, FL Member No.: 14,252 Region Association: South East States |
Did you use plexiglass? How did you cut it?
|
|
|
|
| ThePaintedMan |
Jan 15 2014, 09:46 AM
Post
#288
|
|
Advanced Member Group: Members Posts: 3,887 Joined: 6-September 11 From: St. Petersburg, FL Member No.: 13,527 Region Association: South East States |
I believe it's 1/4 inch acrylic. It's what I had sitting here at the time (not even sure where I got it.) I cut it with a Dremel and a little saw blade attachment I got at Harbor Freight. Ideally, I think the best way to cut it is with a band saw. I have some leftover if you want to experiment Chad.
|
|
|
|
| chads74 |
Jan 15 2014, 09:02 PM
Post
#289
|
|
Member Group: Members Posts: 386 Joined: 13-March 12 From: Tampa, FL Member No.: 14,252 Region Association: South East States |
Sounds good, I am tired of worrying about water leaking in there
|
|
|
|
| ThePaintedMan |
Jan 19 2014, 11:11 PM
Post
#290
|
|
Advanced Member Group: Members Posts: 3,887 Joined: 6-September 11 From: St. Petersburg, FL Member No.: 13,527 Region Association: South East States |
Chad stopped by on Saturday morning to help me drop the transmission and replace the throwout bearing and wheel bearing. The man is a beast! He had it out in 30 minutes and still had a good attitude despite having a radiator hose blow off of his V8 car on the way over (IMG:style_emoticons/default/smile.gif)
Attached thumbnail(s) 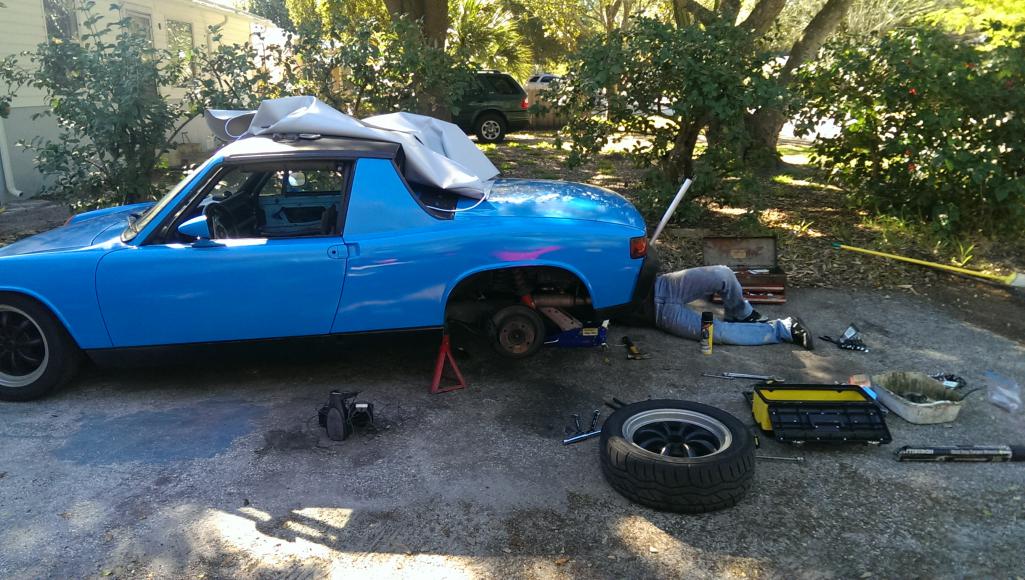
|
|
|
|
| ThePaintedMan |
Jan 19 2014, 11:17 PM
Post
#291
|
|
Advanced Member Group: Members Posts: 3,887 Joined: 6-September 11 From: St. Petersburg, FL Member No.: 13,527 Region Association: South East States |
Chad had to run, but I was able to tackle the wheel bearing. Of course Eric Shea's beautiful press method is probably preferred, but I tackled it on the car since I've done it multiple times on Miatas and other vehicles. This allowed me to avoid re-aligning the car (at least for the time being) as well.
First, I removed the rear hub nut, wheel and caliper and used an impact screwdriver to remove the two screws retaining the rear disc to the hub. Then I borrowed a slide hammer (part #27033) and hub puller attachment (part #27032) from Autozone. This can all be seen below. Attached thumbnail(s) 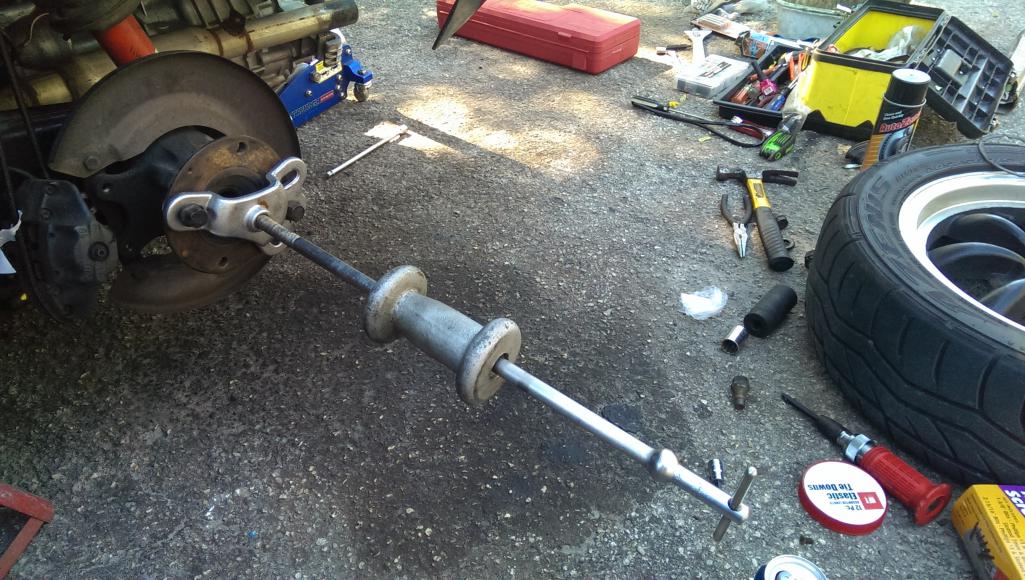
|
|
|
|
| ThePaintedMan |
Jan 19 2014, 11:24 PM
Post
#292
|
|
Advanced Member Group: Members Posts: 3,887 Joined: 6-September 11 From: St. Petersburg, FL Member No.: 13,527 Region Association: South East States |
...Gave it a couple pops and it came right off, and even left the inner race inside the bearing, which is nice (often times you'll end up having to drive/split the race off of the hub).
The bearing had a decent amount of play in it, which explains the squealing. These are SKFs, and I believe them to be original to the car. Not bad to get 40 years out of one of these puppies. Notice that the outer seal is completely dried up and shrank from the outer race. 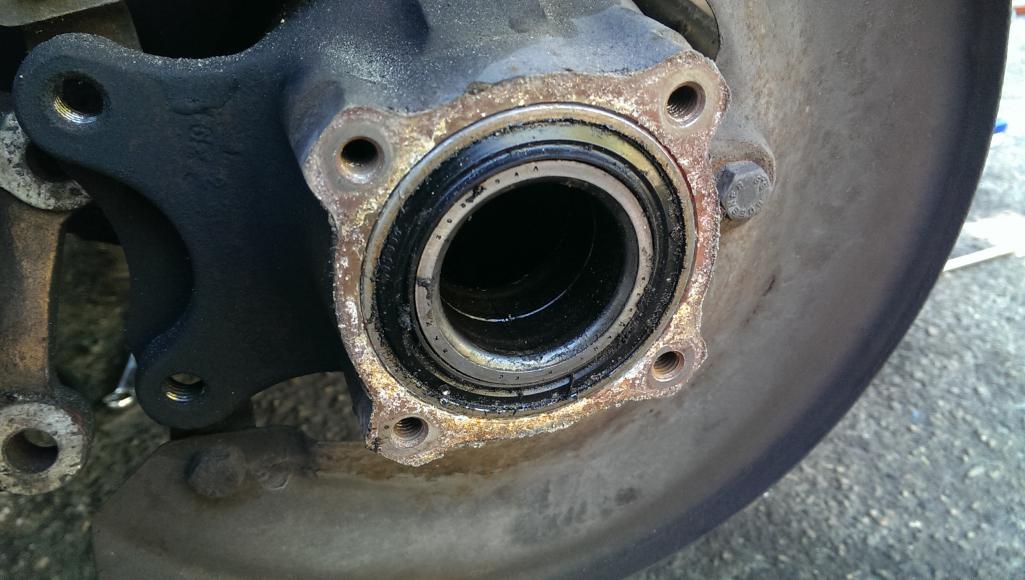 Next I removed the bearing retainer plate. While it is possible to drive the bearing out of the arm from the backside, there is limited space to work, so I put my threaded rod to use with a large socket behind the inner bearing race. I used the the weight portion of the slide hammer on the threaded rod to pull the bearing out. 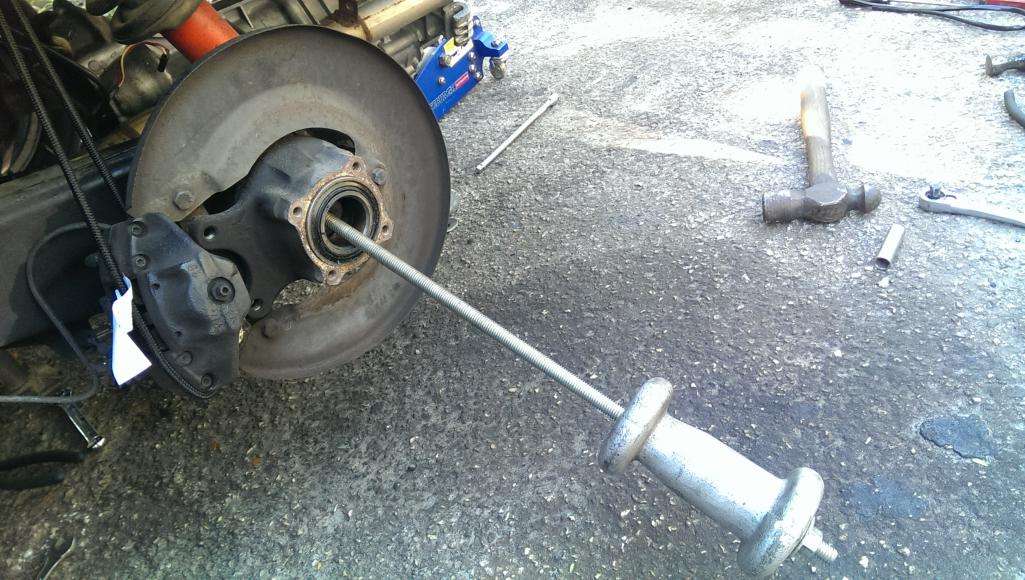 |
|
|
|
| ThePaintedMan |
Jan 19 2014, 11:33 PM
Post
#293
|
|
Advanced Member Group: Members Posts: 3,887 Joined: 6-September 11 From: St. Petersburg, FL Member No.: 13,527 Region Association: South East States |
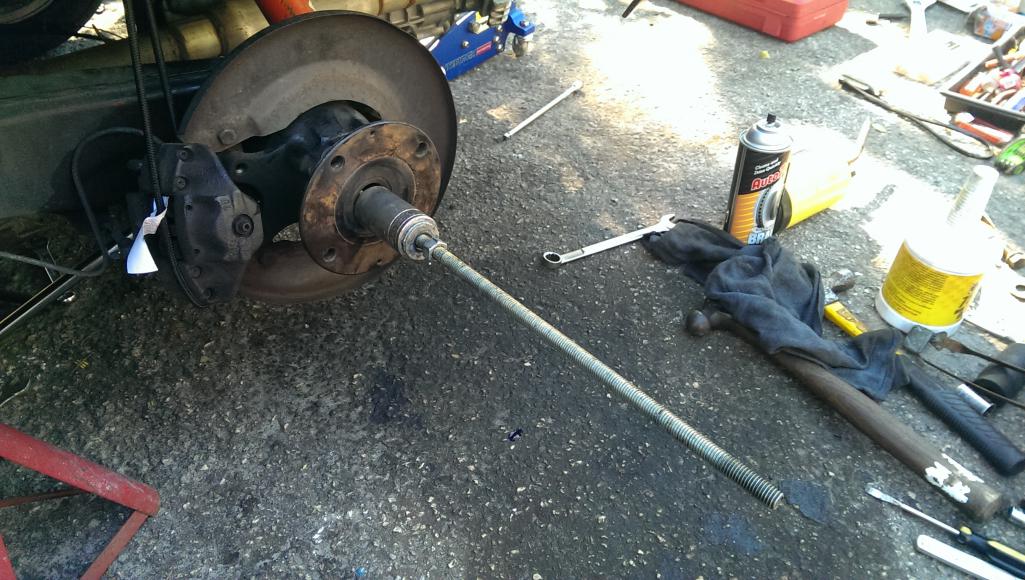
Here is the whole assembly out of the car.
 Then, after freezing the new bearing for a few hours and heating up the trailing arm recess, I lightly began to tap it in. Once it was in fairly straight, I used the old bearing to drive it the rest of the way how. ONLY tap the outer race - do not touch the inner race or risk having to do this all over again in a short amount of time. 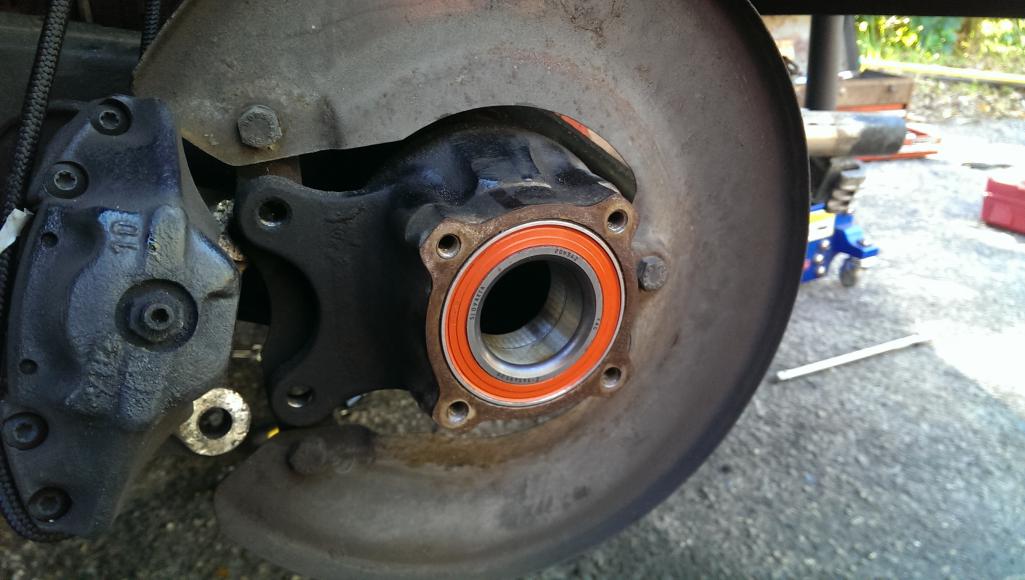 |
|
|
|
| ThePaintedMan |
Jan 19 2014, 11:34 PM
Post
#294
|
|
Advanced Member Group: Members Posts: 3,887 Joined: 6-September 11 From: St. Petersburg, FL Member No.: 13,527 Region Association: South East States |
Then I used the threaded rod to pull the hub into the bearing. A little bit of leftover Redline rear end grease made this a piece of cake. (IMG:style_emoticons/default/beerchug.gif)
 The rest is pretty boring (IMG:style_emoticons/default/smile.gif) Reassemble in reverse order and torque the rear hub nut to 180-250 ft lbs. Now I get to move onto the fun stuff including window net, painting the cage, putting in the rear polycarbonate glass from 914Rubber, figuring out whats still going on with my fog lights and installing the fire system. |
|
|
|
| ThePaintedMan |
Jan 22 2014, 09:18 AM
Post
#295
|
|
Advanced Member Group: Members Posts: 3,887 Joined: 6-September 11 From: St. Petersburg, FL Member No.: 13,527 Region Association: South East States |
Window net in! A bit of a pain finding something that would attach the bottom to the door bars effectively and remain tight, but also be flexible enough to fall completely out of the way to allow ingress/egress. I ended up using a solid 5/16 steel bar with 3/32 vinyl coated cable.
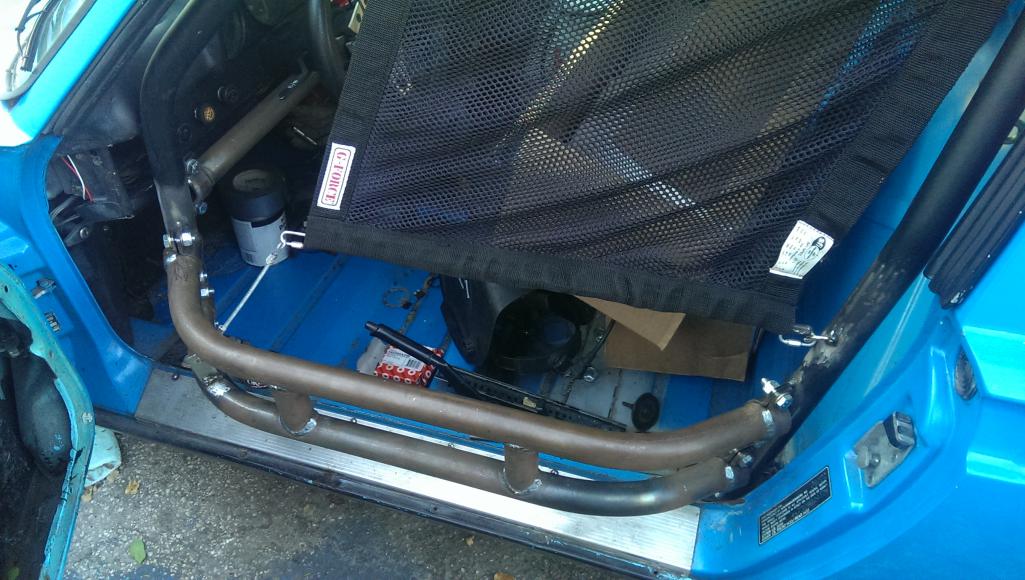 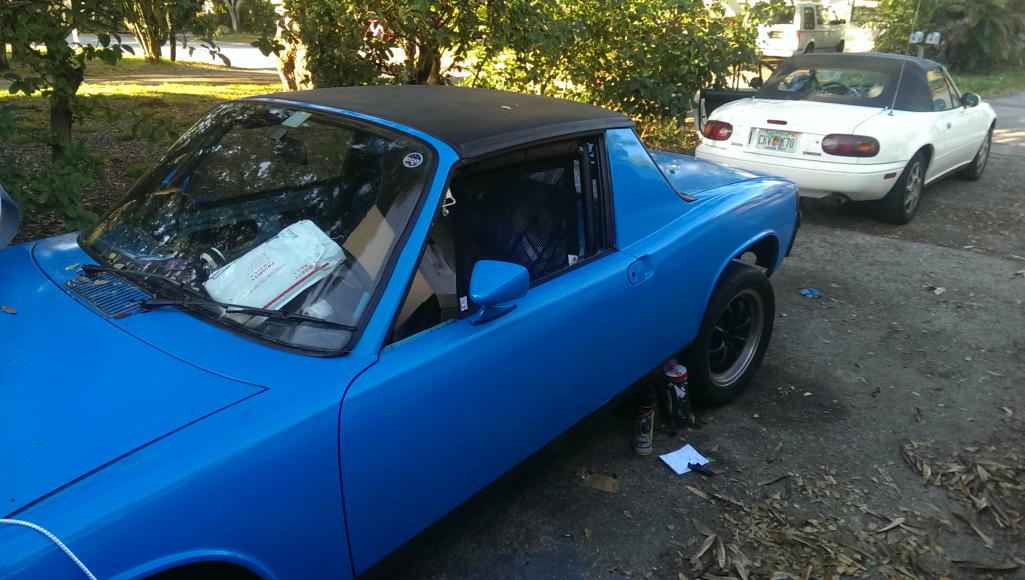 A huge thanks to Perry Kiehl as well. Since the window had to be removed to fit the door bars, I had no way to keep water from getting inside. Perry rushed me out one of his GREAT umbrella covers, which makes rolling up the windows (or even having any) unnecessary now! (IMG:style_emoticons/default/piratenanner.gif) 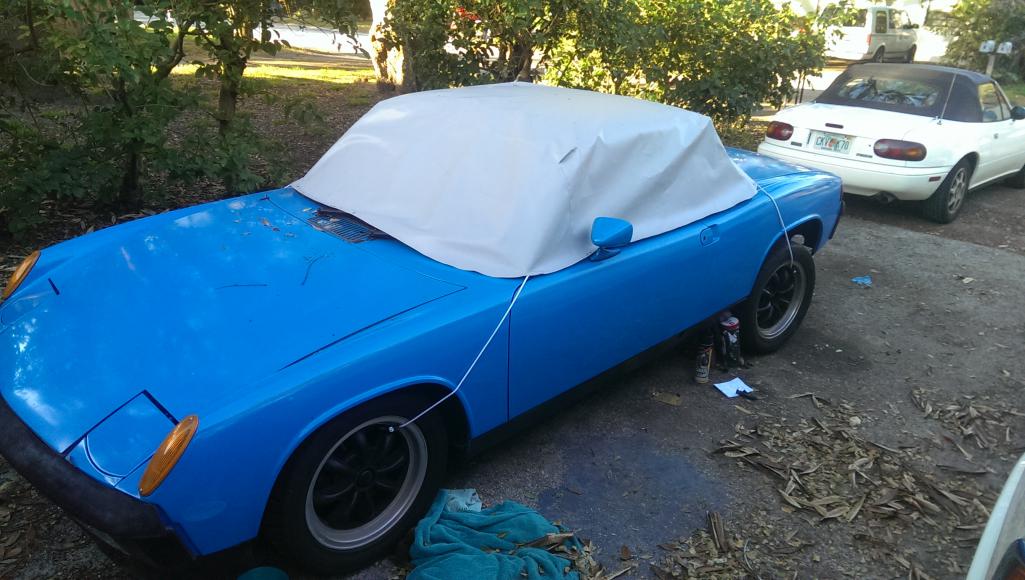 |
|
|
|
| Jetsetsurfshop |
Jan 23 2014, 07:36 AM
Post
#296
|
|
Senior Member Group: Members Posts: 815 Joined: 7-April 11 From: Marco Island Florida Member No.: 12,907 Region Association: South East States |
QUOTE(ThePaintedMan @ Jan 22 2014, 07:18 AM) Window net in! A bit of a pain finding something that would attach the bottom to the door bars effectively and remain tight, but also be flexible enough to fall completely out of the way to allow ingress/egress. I ended up using a solid 5/16 steel bar with 3/32 vinyl coated cable. A huge thanks to Perry Kiehl as well. Since the window had to be removed to fit the door bars, I had no way to keep water from getting inside. Perry rushed me out one of his GREAT umbrella covers, which makes rolling up the windows (or even having any) unnecessary now! (IMG:style_emoticons/default/piratenanner.gif) Does it also cover the engine bay? |
|
|
|
| ThePaintedMan |
Jan 23 2014, 08:36 AM
Post
#297
|
|
Advanced Member Group: Members Posts: 3,887 Joined: 6-September 11 From: St. Petersburg, FL Member No.: 13,527 Region Association: South East States |
QUOTE(Jetsetsurfshop @ Jan 23 2014, 08:36 AM) Does it also cover the engine bay? It sure does Shane. For anyone with carbs, this is a no brainer, but I think it's pretty much a prerequisite for any 914 anyways. Perry is a great guy and was super helpful. |
|
|
|
| ThePaintedMan |
Mar 25 2014, 06:02 PM
Post
#298
|
|
Advanced Member Group: Members Posts: 3,887 Joined: 6-September 11 From: St. Petersburg, FL Member No.: 13,527 Region Association: South East States |
A couple more things I've been meaning to do for awhile.
First, I emulated Brant's simple, but awesome hood fuel filler door idea. Simple measuring and cutting and a little bit of thin aluminum produced almost exactly what I wanted. I finished it off by adding a little bit of split rubber cord from McMaster. I need to go back and paint the metal where the cutting wheel took the paint off once it stops raining around here. Attached thumbnail(s) 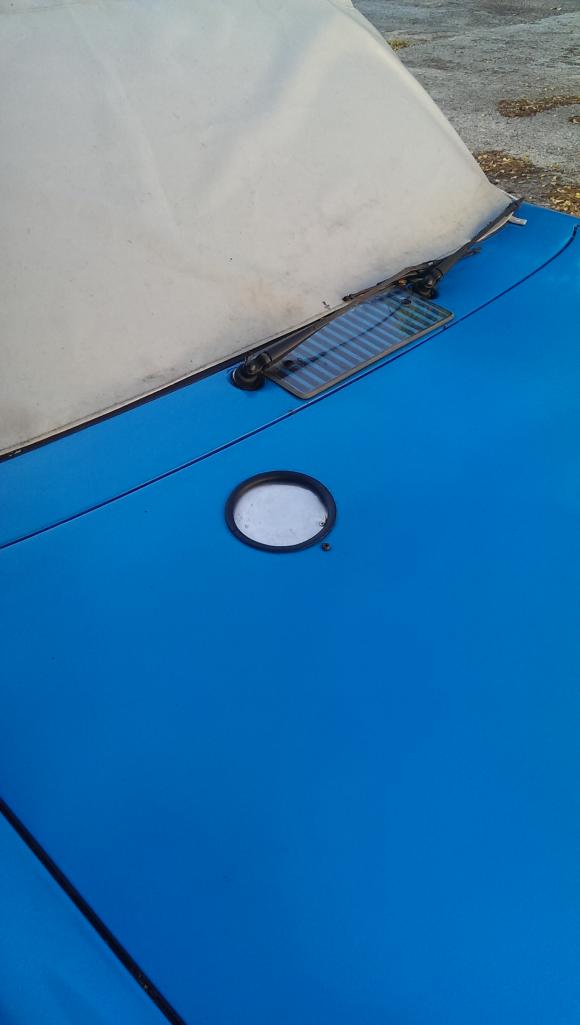 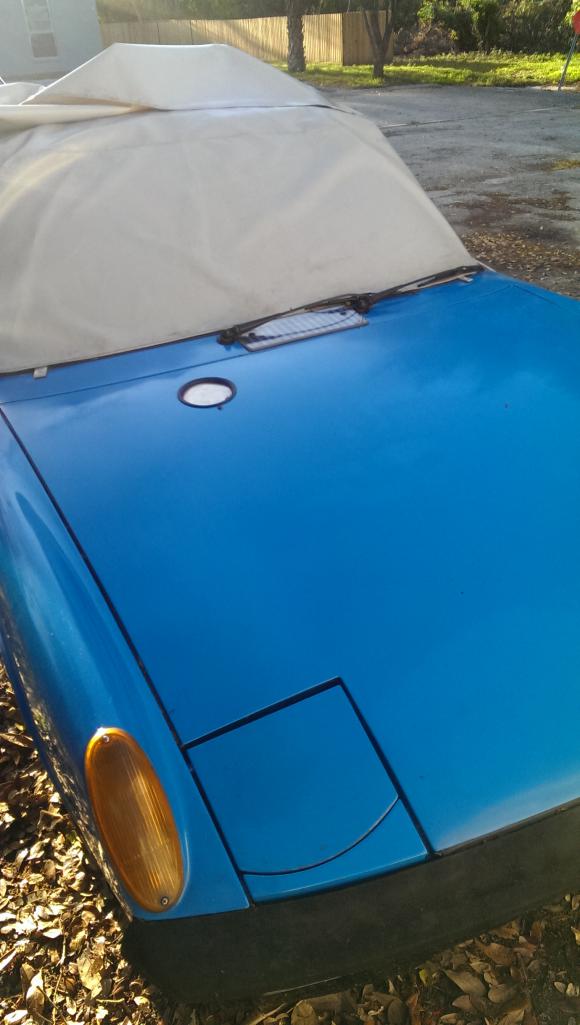
|
|
|
|
| ThePaintedMan |
Mar 25 2014, 06:07 PM
Post
#299
|
|
Advanced Member Group: Members Posts: 3,887 Joined: 6-September 11 From: St. Petersburg, FL Member No.: 13,527 Region Association: South East States |
I also needed a simple and lightweight solution for a defroster. I ended up with a $20 bilge blower from Ebay, some ducting from Home Cheapo and a little bit of time fabbing up an aluminum vent to replace the factory bakelite piece that would have been there. I didn't see the need to connect it to the cowl as all you really need is air at the same temperature as ambient. I would say the whole thing weighs less than 2-3 pounds.
Last night's rain gave me a chance to try it out with the window fully fogged over. In less than a minute it was clear again - those bilge blowers put out a TON of air. Attached thumbnail(s) 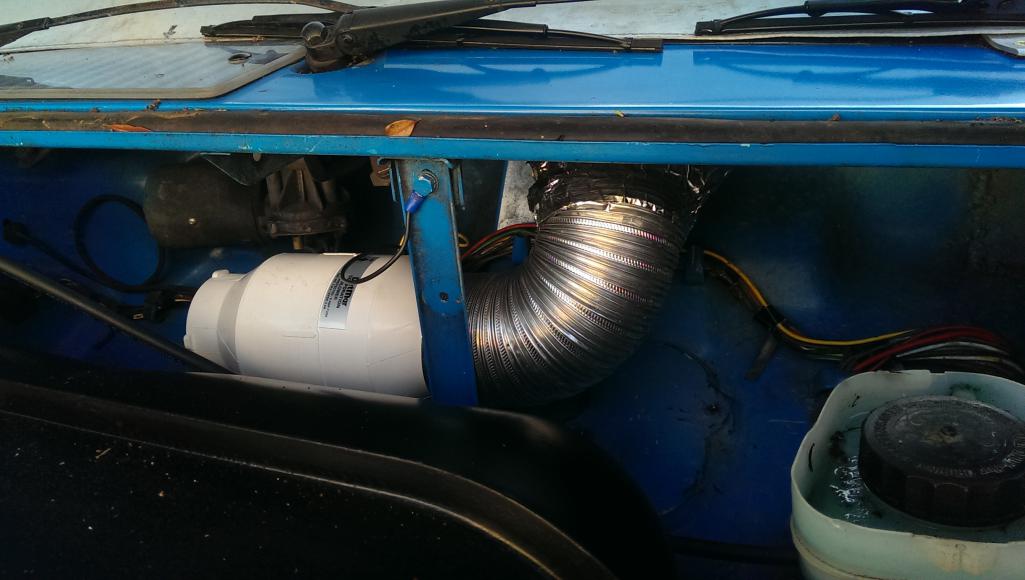 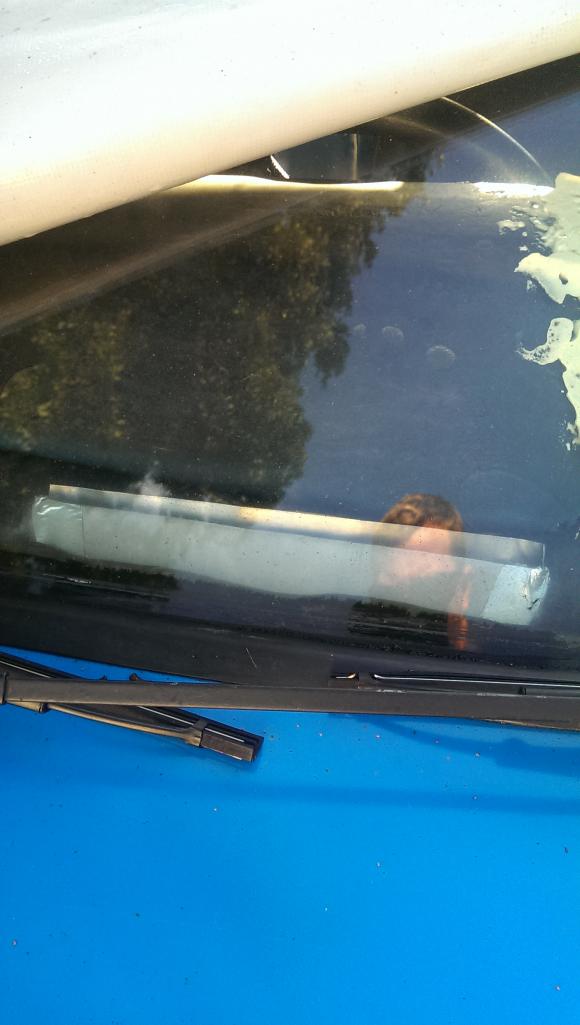
|
|
|
|
| ThePaintedMan |
Mar 25 2014, 06:11 PM
Post
#300
|
|
Advanced Member Group: Members Posts: 3,887 Joined: 6-September 11 From: St. Petersburg, FL Member No.: 13,527 Region Association: South East States |
Finally over the weekend I was able to finish my homemade caliper ducts. I'll concede that this idea was wholeheartedly stolen from Racer Chris' awesome idea for providing vented air to solid rotors. These actually sit directly on top of the caliper, blowing air into them rather than on the rotor.
Unfortunately they're made of thin steel, so they weigh about 1/3 lb each. One day I'll go back and do them in aluminum. Again, thank you to Racer Chris as I definitely wouldn't have come up with the idea on my own. (IMG:style_emoticons/default/pray.gif) Attached thumbnail(s) 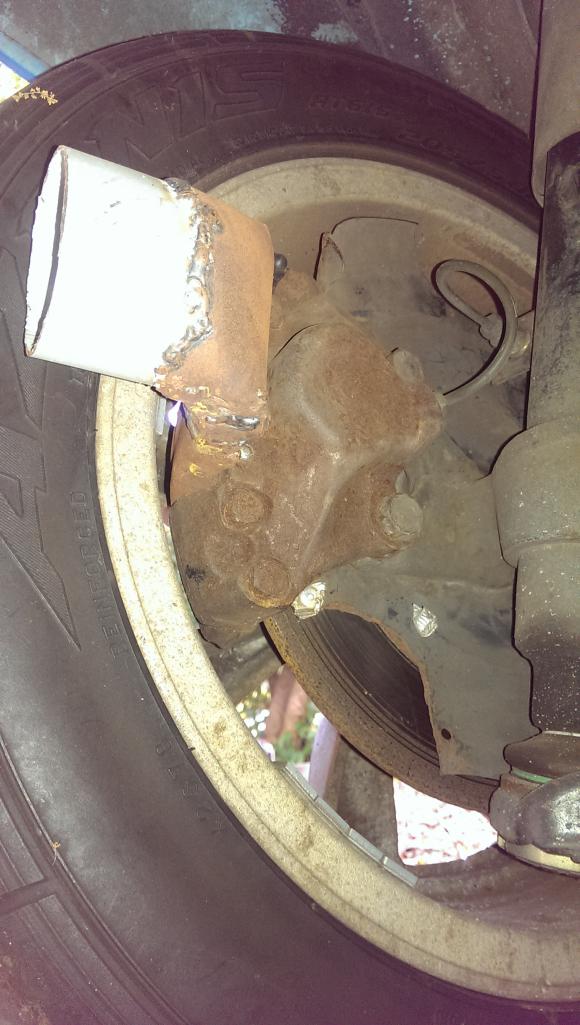
|
|
|
|
|
2 User(s) are reading this topic (2 Guests and 0 Anonymous Users)
0 Members:

|
Lo-Fi Version | Time is now: 29th November 2025 - 02:30 AM |
Invision Power Board
v9.1.4 © 2025 IPS, Inc.