|
|
|
Porsche, and the Porsche crest are registered trademarks of Dr. Ing. h.c. F. Porsche AG.
This site is not affiliated with Porsche in any way. Its only purpose is to provide an online forum for car enthusiasts. All other trademarks are property of their respective owners. |
|
|

  |

| Mike Bellis |
 Oct 28 2012, 09:17 PM Oct 28 2012, 09:17 PM
Post
#101
|
|
Resident Electrician  Group: Members Posts: 8,348 Joined: 22-June 09 From: Midlothian TX Member No.: 10,496 Region Association: None |
(IMG:style_emoticons/default/sawzall-smiley.gif) (IMG:style_emoticons/default/welder.gif) (IMG:style_emoticons/default/smash.gif) (IMG:style_emoticons/default/idea.gif) (IMG:style_emoticons/default/sawzall-smiley.gif) (IMG:style_emoticons/default/welder.gif) (IMG:style_emoticons/default/smash.gif) (IMG:style_emoticons/default/idea.gif) (IMG:style_emoticons/default/headbang.gif) (IMG:style_emoticons/default/sawzall-smiley.gif) (IMG:style_emoticons/default/welder.gif) (IMG:style_emoticons/default/smash.gif)
Pretty much sums it up... Rear firewall is being rebuilt. I curved it so it looks better and the seal will sit correctly. Basic hammer and anvil work. I might be able to put the factory latch back in too. Least of my worries. I welded dutchmen next to the plastic targa top holders. One of each mounting nuts got cut off int the process. Now I need to drill and tap. I cut the bottom out of the trunk too. Just up to the cross member. I'm going to make a dropped removable panel. Dropped so I can fit the methanol tank and because there is 4-5" of space from the original trunk to the tranny. I may have to box in the exhaust a little. I tried 2 exhaust manifolds so far. I'm waiting on a third to arrive for mock up. I "frenched" the coolant tank into the new firewall. The top is hammer rolled over a dolly. The placemant was coordinated with the intercooler... Next post 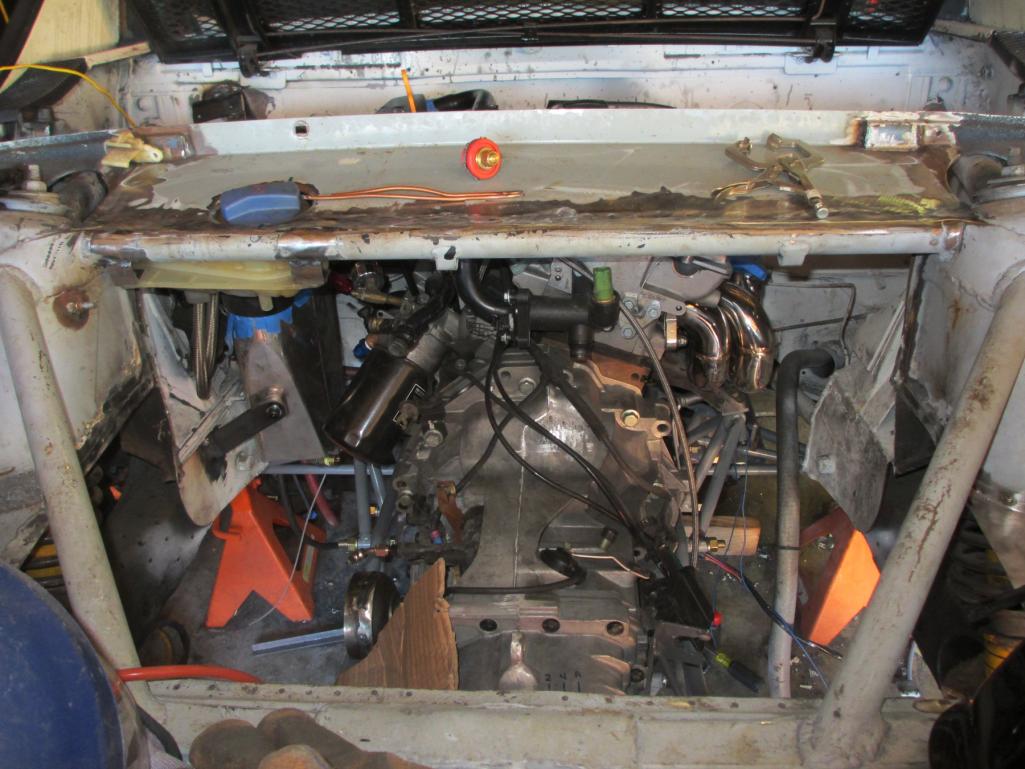 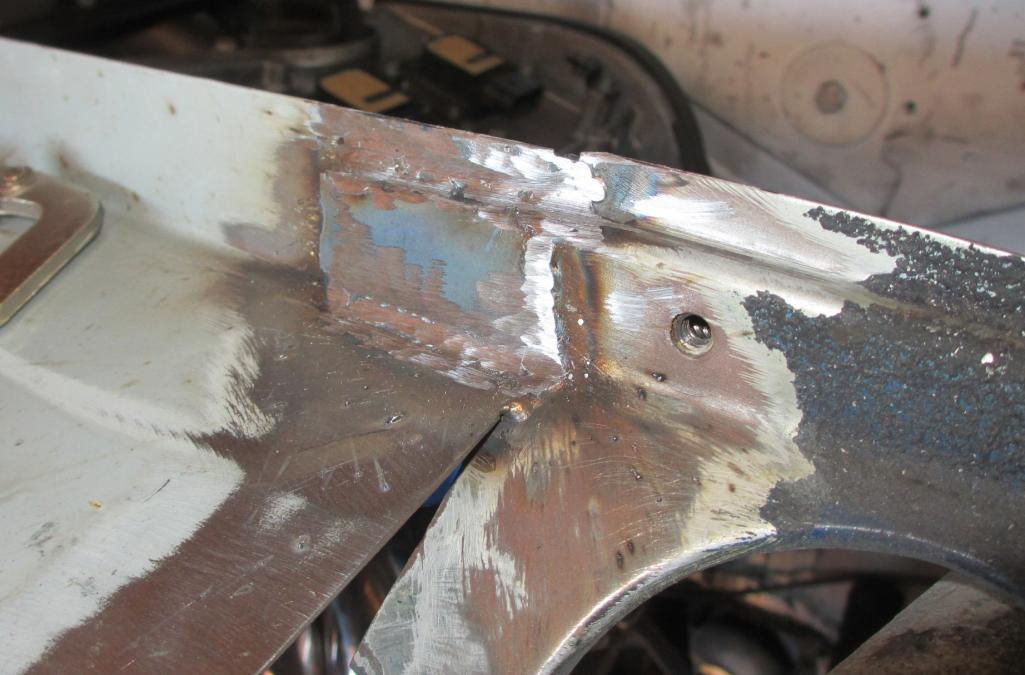 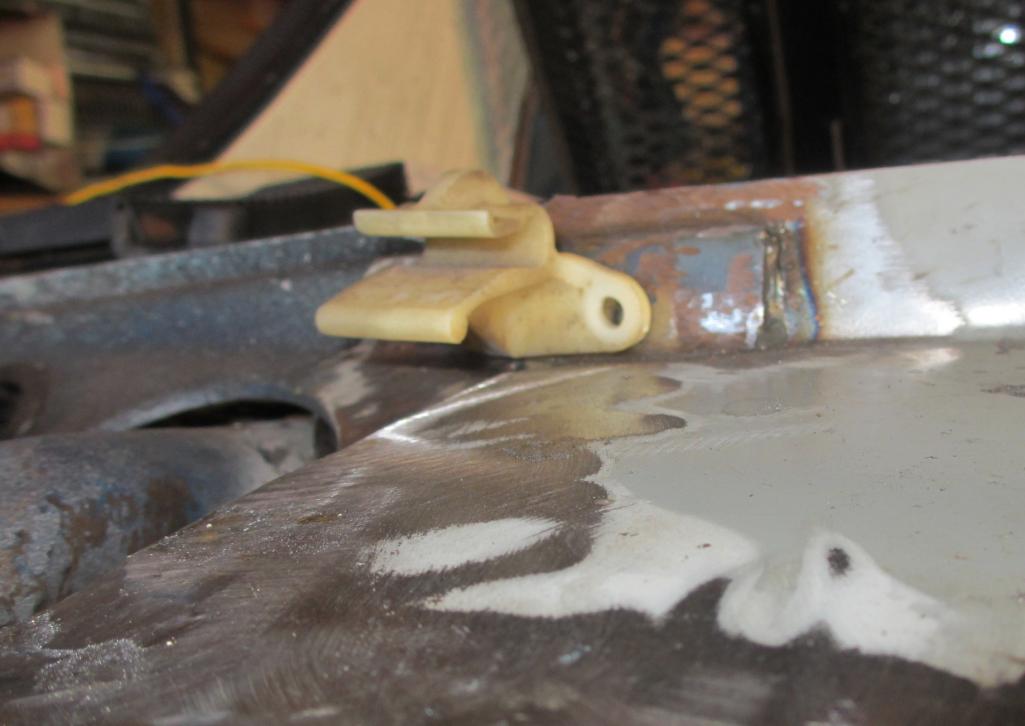 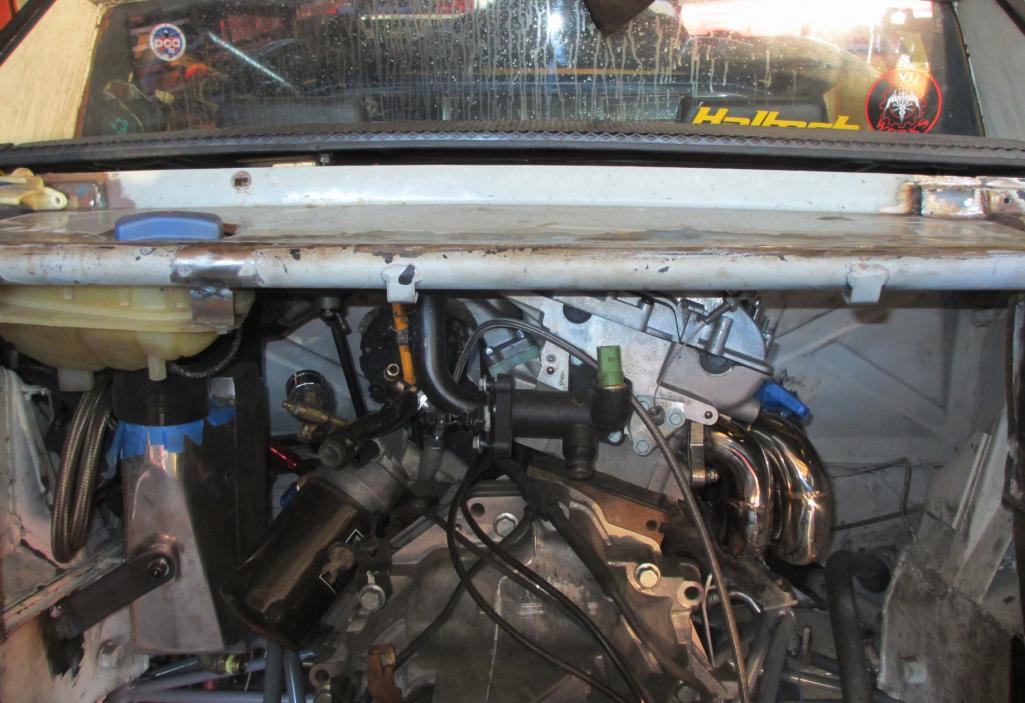 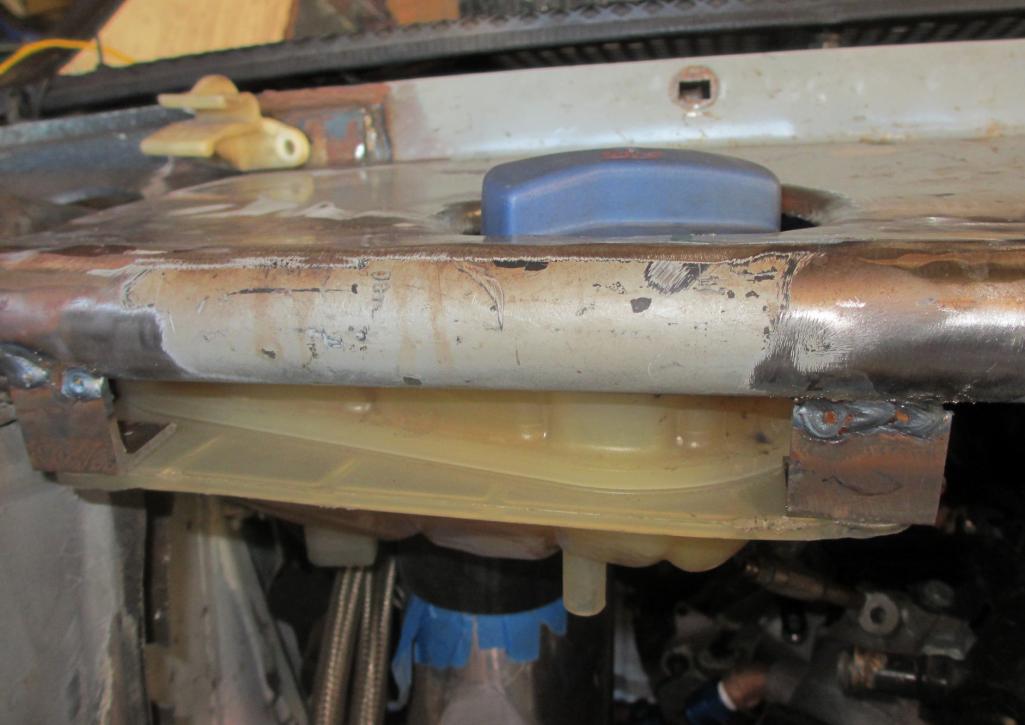 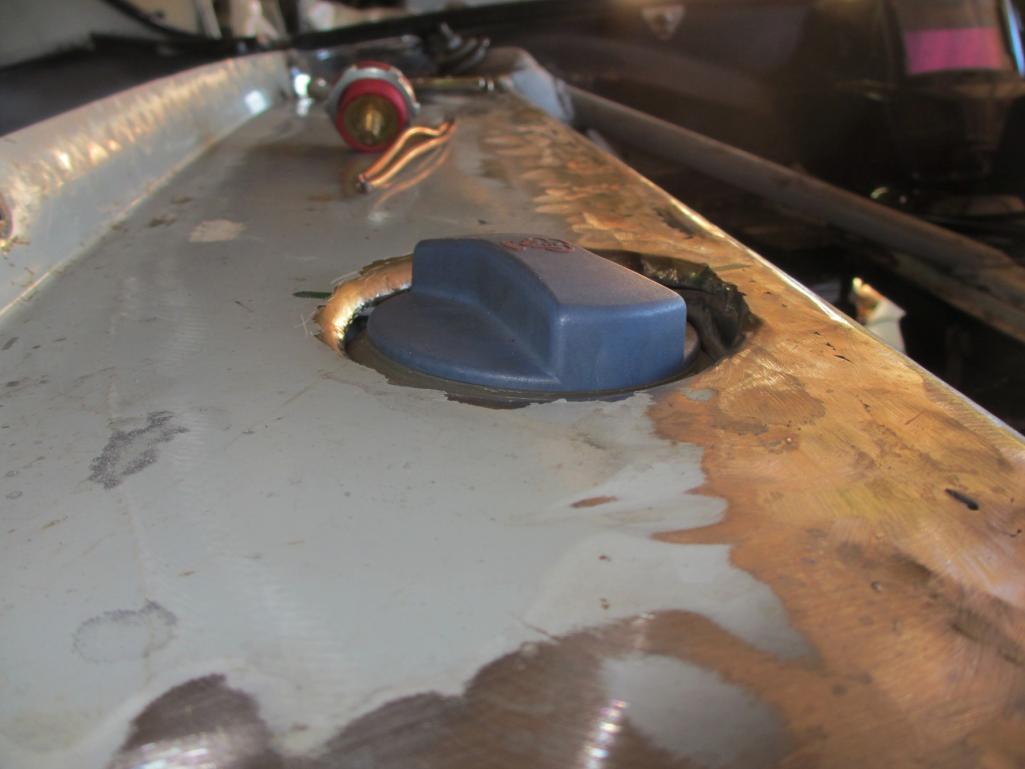 |
   |

 
|
| Mike Bellis |
Oct 28 2012, 09:24 PM
Post
#102
|
|
Resident Electrician Group: Members Posts: 8,348 Joined: 22-June 09 From: Midlothian TX Member No.: 10,496 Region Association: None |
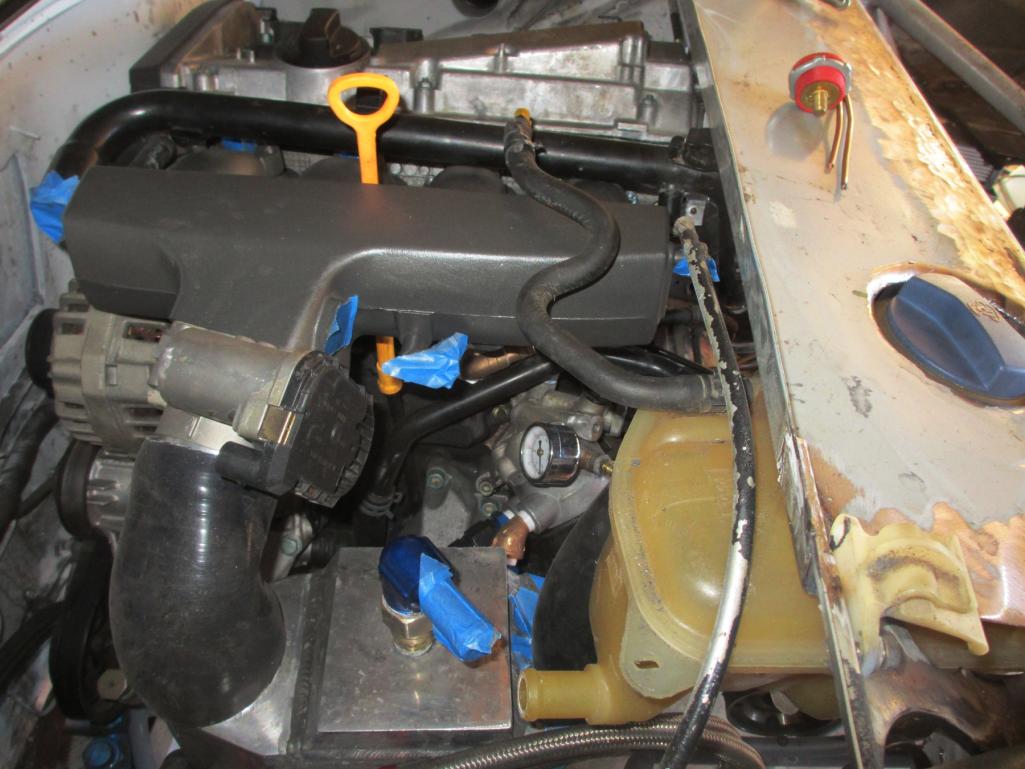
The intercooler was a challenge. I went back to the stock intake manifold and managed to wedge the intercooler into place. I have 1/4" clearance from the engine and from the side wall. I used a reducing 45 from the TB and a reducing 90 that is rotated 45 deg under the coolant tank. It all fits! This will plump to the turbo outlet with the bypass valve.
    |
|
|
|
| Andyrew |
Oct 29 2012, 12:39 AM
Post
#103
|
|
Spooling.... Please wait Group: Members Posts: 13,380 Joined: 20-January 03 From: Riverbank, Ca Member No.: 172 Region Association: Northern California |
Still not exactly sure why you had to raise the firewall so much. Is it because of the exhaust?
Anyways, Lots of work done! Awesome stuff! |
|
|
|
| Mike Bellis |
Oct 29 2012, 04:36 PM
Post
#104
|
|
Resident Electrician Group: Members Posts: 8,348 Joined: 22-June 09 From: Midlothian TX Member No.: 10,496 Region Association: None |
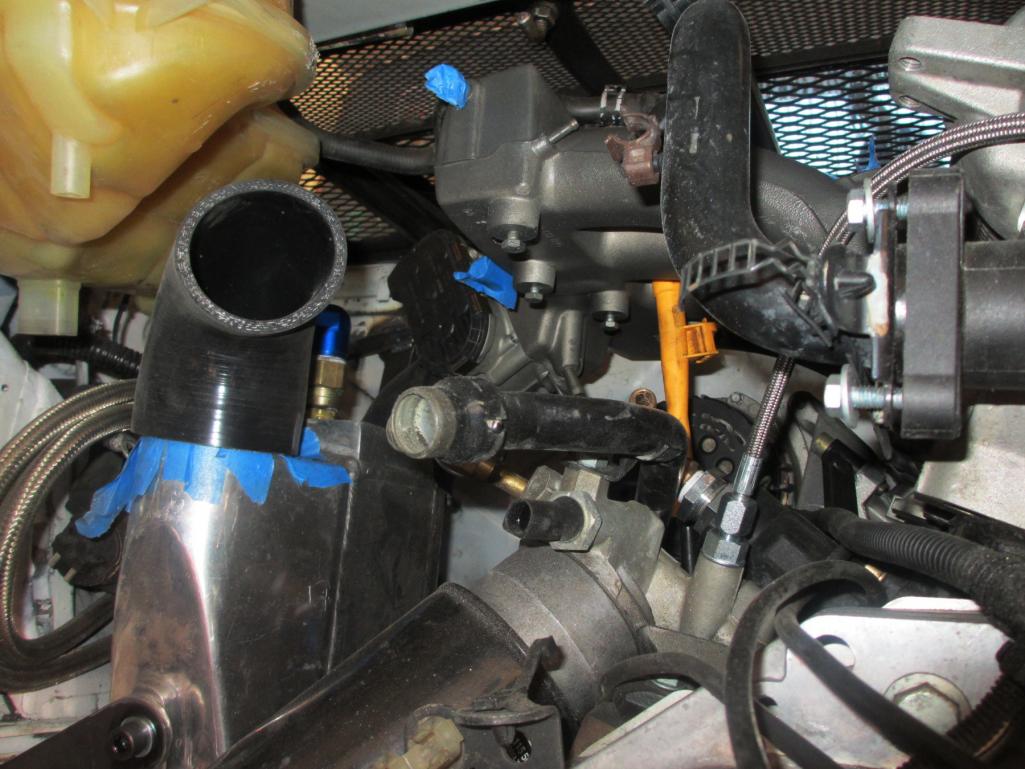
QUOTE(Andyrew @ Oct 28 2012, 11:39 PM)  Still not exactly sure why you had to raise the firewall so much. Is it because of the exhaust? Anyways, Lots of work done! Awesome stuff! Valve cover, Water temp sensor, water outlet manifold, exhaust... Those are the reasons for the firewall movement. I just incorporated the roll cage bracing as the corner. It was the best place to make the transition. It had to come back almost to the bar on the cage. With the extra space, I installed the coolant tank and the remaining space will be: Intercooler piping, Diverter valve, crankcase evacuation system, heater plumbing. I may put more in there if it fits. The crankcase evac system will be done with 5/8" aluminum tubing. The heater piping will be 3/4" aluminum tubing. I also have to squeeze the turbo oil and water lines in this space. It will get crowded! The vertical panel will be removable for access to all the stuff. The Meth tank, pump, filter will go in the recessed area (lower cut out). The meth injector and solenoid will be on the intake manifold somewhere. Overall the engine compartment will be clustered with various things... (IMG:style_emoticons/default/smile.gif) |
|
|
|
| Mike Bellis |
Nov 23 2012, 07:58 PM
Post
#105
|
|
Resident Electrician Group: Members Posts: 8,348 Joined: 22-June 09 From: Midlothian TX Member No.: 10,496 Region Association: None |
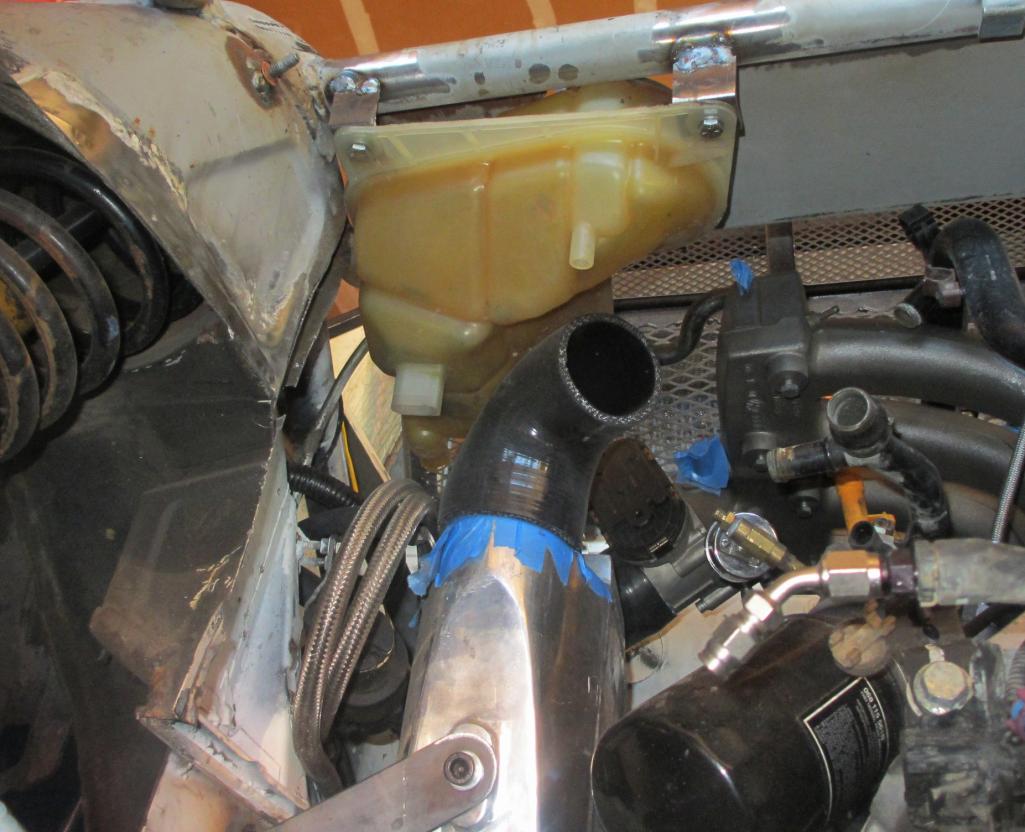
Plumbing, more plumbing... Got most of it licked! The pressure piping is red. I have a recirc valve plumbed into the turbo inlet. The recirc valve can also be a BOV but the ECU likes the missing air back. The cold air intake had to go in the fender. no room for the MAF, air cleaner and bends without hitting the turbo. I am leaving the hold in the side wall open to help draw air through the NACA. I built a inner fender liner out of aluminum to seal the chamber and keep road debris out...
I bought an 18" brake from HF and bent up an aluminum turbo shroud. Added a few knockouts for externals and done! 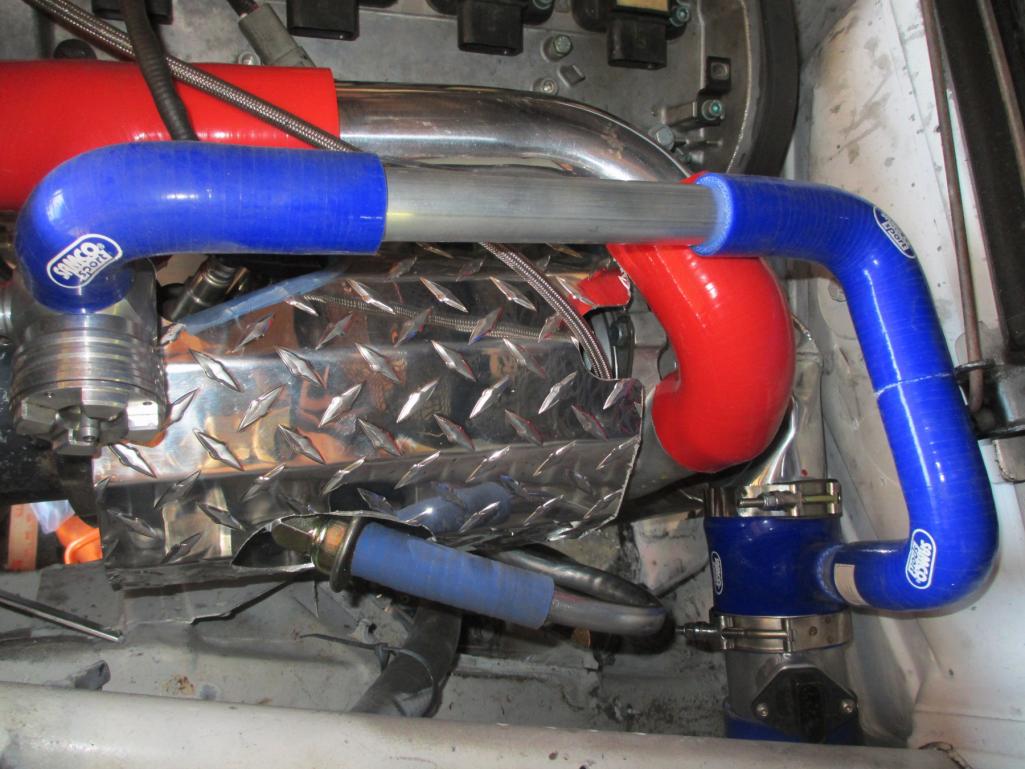 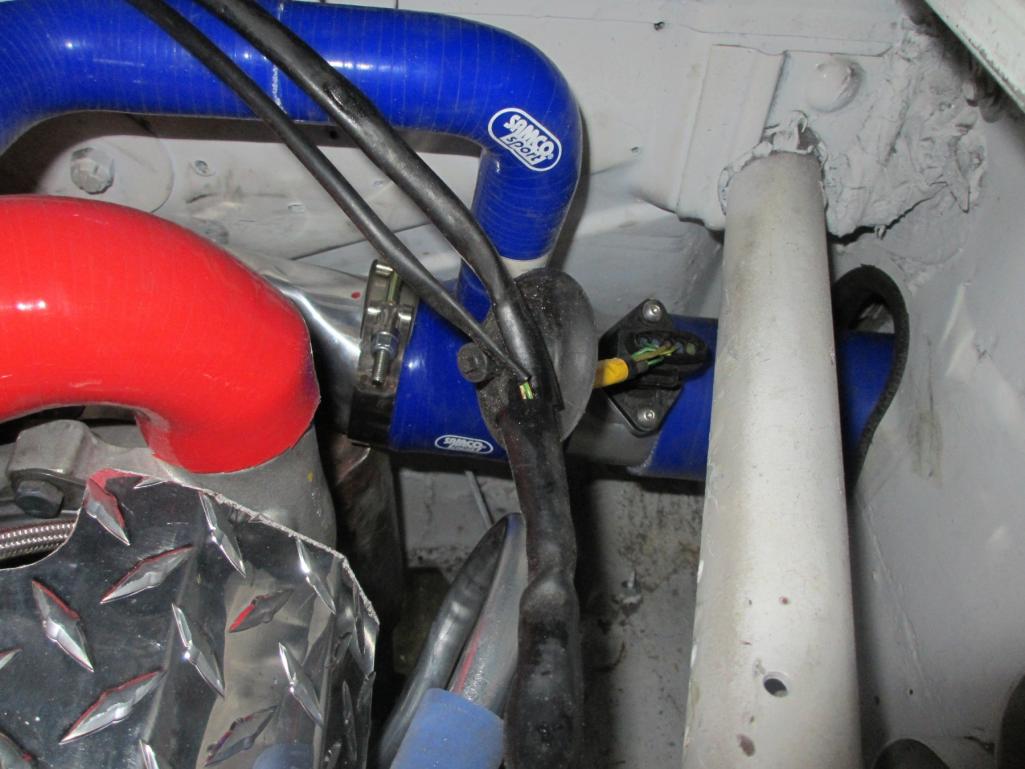 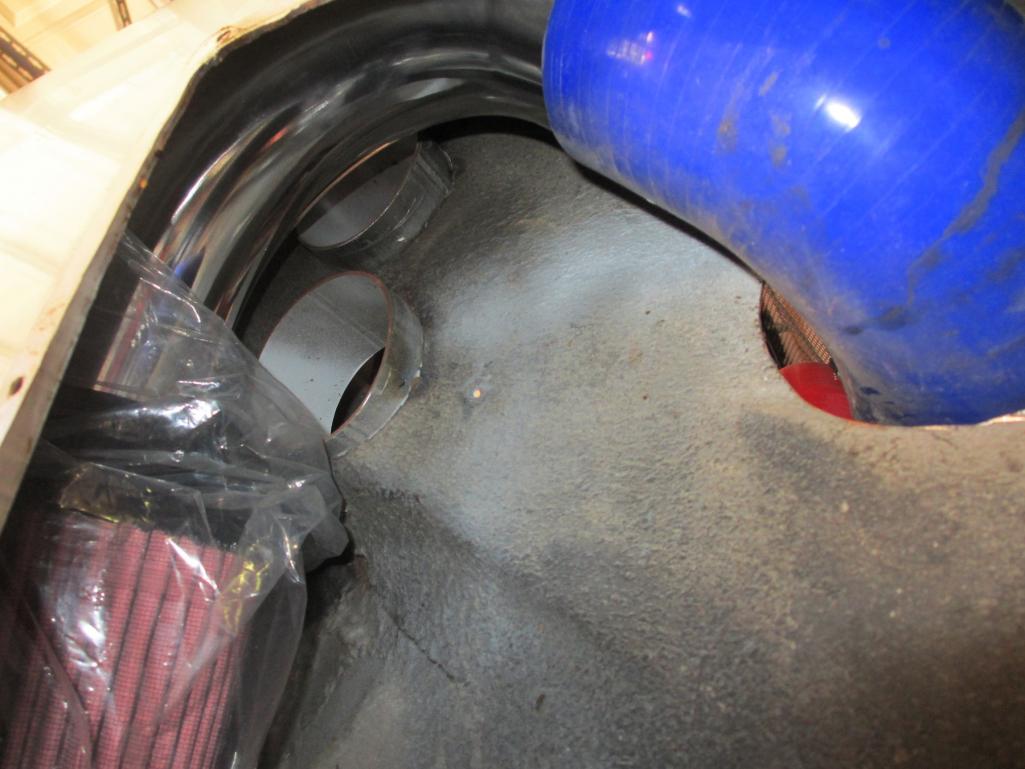 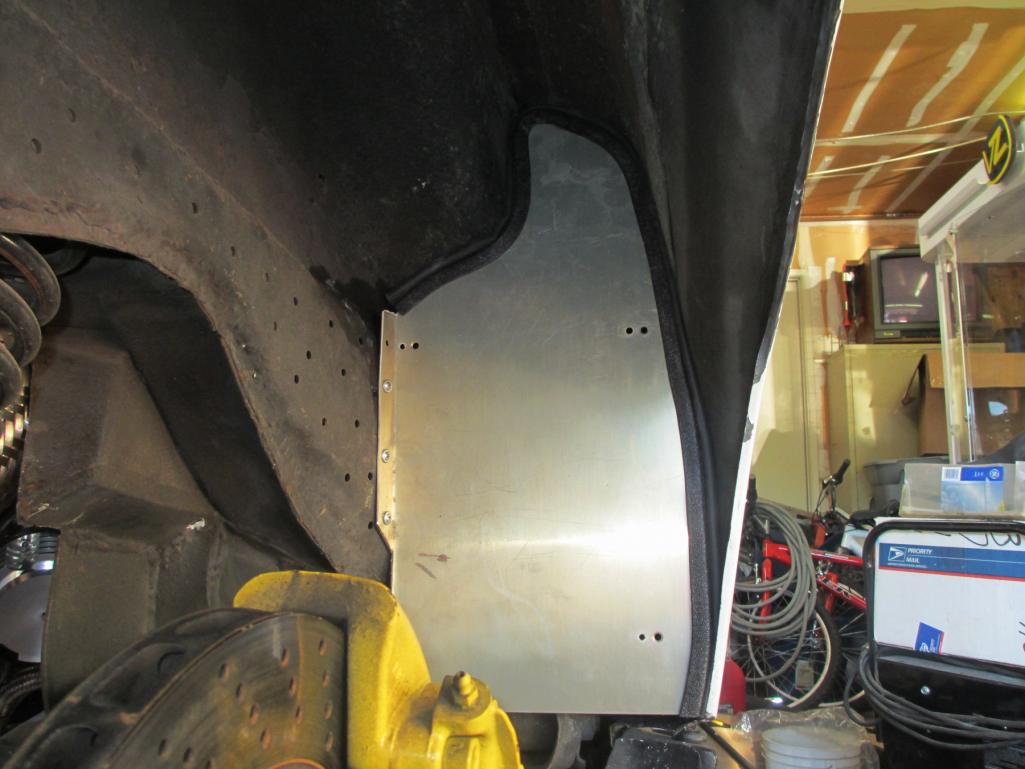 Here you can see some of the misc plumbing behind the engine... Intercooler, 2 heater lines, aluminum crank case vecuum, fuel supply... I dropped the floor 4" too... Attached thumbnail(s) 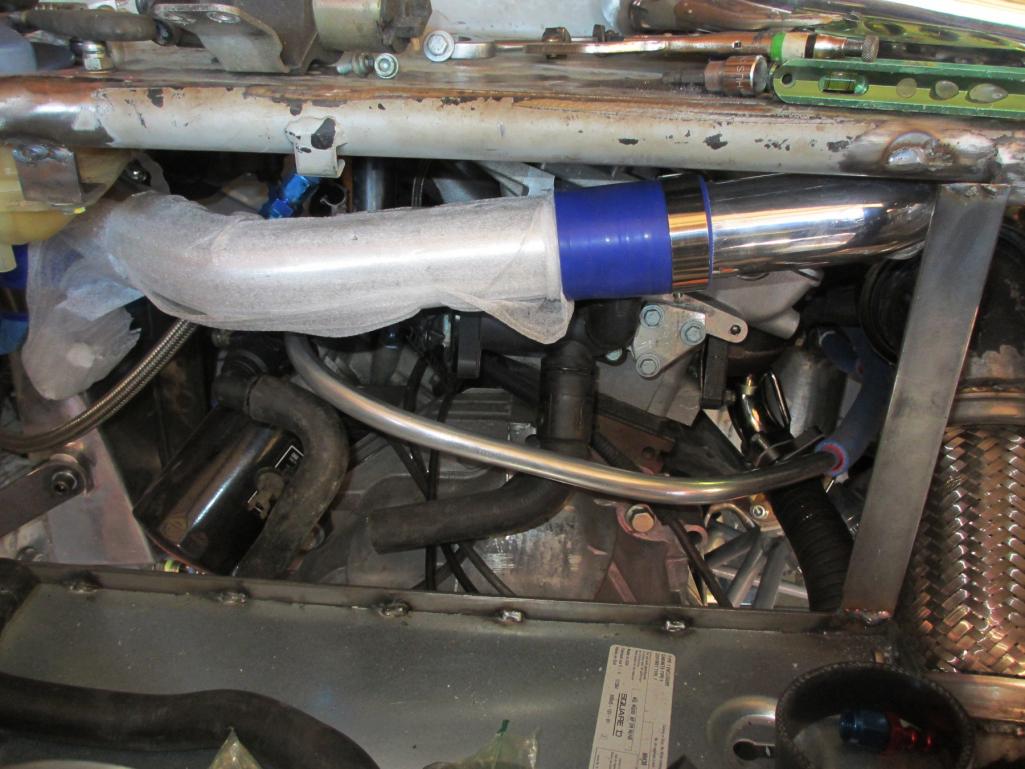
|
|
|
|
| Chris Pincetich |
Nov 24 2012, 10:54 AM
Post
#106
|
|
B-) Group: Members Posts: 2,082 Joined: 3-October 05 From: Point Reyes Station, CA Member No.: 4,907 Region Association: Northern California |
|
|
|
|
| rohar |
Nov 24 2012, 11:24 AM
Post
#107
|
|
Senior Member Group: Members Posts: 924 Joined: 25-October 08 From: spokane Member No.: 9,685 Region Association: None |
OUTSTANDING! I love the intake box in the fender. May have to steal that idea. Twice (one for each fender) on mine (IMG:style_emoticons/default/smile.gif)
|
|
|
|
| Mike Bellis |
Nov 24 2012, 11:41 AM
Post
#108
|
|
Resident Electrician Group: Members Posts: 8,348 Joined: 22-June 09 From: Midlothian TX Member No.: 10,496 Region Association: None |
QUOTE(rohar @ Nov 24 2012, 09:24 AM) OUTSTANDING! I love the intake box in the fender. May have to steal that idea. Twice (one for each fender) on mine (IMG:style_emoticons/default/smile.gif) (1 each) long silicone 90, (1 each) aluminum 120 and (1 each) air cleaner. It took 2-3 weeks of deciding before I cut the hole. If I didn't have the MAF, I think I could have squeezed it into the engine bay. I did not want a short 90 before and after the MAF. Since I already had it cut for the NACA, it seemed like the best solution. When done, you can see the filter through the NACA duct. I used thick copper wire to make a wire frame template of the inner fender. Worked out great! |
|
|
|
| Andyrew |
Nov 24 2012, 11:57 AM
Post
#109
|
|
Spooling.... Please wait Group: Members Posts: 13,380 Joined: 20-January 03 From: Riverbank, Ca Member No.: 172 Region Association: Northern California |
Mike, did you talkto 034 about doing mafless tune? the later ecu like you have can support it..
|
|
|
|
| rohar |
Nov 24 2012, 12:07 PM
Post
#110
|
|
Senior Member Group: Members Posts: 924 Joined: 25-October 08 From: spokane Member No.: 9,685 Region Association: None |
QUOTE(kg6dxn @ Nov 24 2012, 09:41 AM) (1 each) long silicone 90, (1 each) aluminum 120 and (1 each) air cleaner. ROFL. I'm headded to chump with a V8 914, I ain't got budget for all that fancy stuff. Tractor Supply plumbing department here I come! |
|
|
|
| Mike Bellis |
Nov 24 2012, 04:38 PM
Post
#111
|
|
Resident Electrician Group: Members Posts: 8,348 Joined: 22-June 09 From: Midlothian TX Member No.: 10,496 Region Association: None |
QUOTE(Andyrew @ Nov 24 2012, 09:57 AM) Mike, did you talkto 034 about doing mafless tune? the later ecu like you have can support it.. This is tuned for the 3" MAF housing. I wanted to keep the stock sensors (except the 2nd O2). the tune keeps the DBW and eliminates all smog junk. I could have done a stand alone system, maybe cheaper... I wanted the stock driveability the MAF has. The DBW is just because it's cool. After it's driving, I will take it back to 034 for fine tuning. I'm running a WB O2 sensor with a scaled voltage converter to trick the factory ECU input. This should give a WB 0-1V output signal to the NB 0-1V input. |
|
|
|
| Andyrew |
Nov 24 2012, 07:18 PM
Post
#112
|
|
Spooling.... Please wait Group: Members Posts: 13,380 Joined: 20-January 03 From: Riverbank, Ca Member No.: 172 Region Association: Northern California |
If they gave you a standard gt28rs file with 3" maf for an open exhaust I will bet you wont need to retune... The factory sensors will adjust from there. You know Im on a 2x larger turbo than my tune and I just have my boost cut in half. Roughly the same power but the same drivability as before... These modern ecu's are just awesome..
|
|
|
|
| biosurfer1 |
Nov 24 2012, 08:25 PM
Post
#113
|
|
Teener fo Life! Group: Members Posts: 3,020 Joined: 3-August 03 From: Roseville, CA Member No.: 977 Region Association: Northern California |
QUOTE(kg6dxn @ Nov 24 2012, 10:41 AM) It took 2-3 weeks of deciding before I cut the hole. You know what they say, measure 254 times, cut once (IMG:style_emoticons/default/biggrin.gif) Nice work! |
|
|
|
| Mike Bellis |
Nov 24 2012, 09:57 PM
Post
#114
|
|
Resident Electrician Group: Members Posts: 8,348 Joined: 22-June 09 From: Midlothian TX Member No.: 10,496 Region Association: None |
QUOTE(biosurfer1 @ Nov 24 2012, 06:25 PM) QUOTE(kg6dxn @ Nov 24 2012, 10:41 AM) It took 2-3 weeks of deciding before I cut the hole. You know what they say, measure 254 times, cut once (IMG:style_emoticons/default/biggrin.gif) Nice work! I tried every combination of fittings I had before I bit the bullet. It's just too crowded on that side for the air path. I may have to clock the MAF for best results as well... This way I have 6" of straight pipe before and 4" after the MAF. I also wanted the MAF to be close to the turbo. The recirc valve needed to be close too. I got started of some of the ECU wiring today also. I'm sure glad I documented it as well as I did. I still found some connectors without labels. lucky for me, they only plug into sensors and weren't a big deal.n I do need a multi conductor cable to go from the engine to the dash cluster. This will allow all the sensors and stuff to connect to the display. |
|
|
|
| Mike Bellis |
Dec 17 2012, 11:41 PM
Post
#115
|
|
Resident Electrician Group: Members Posts: 8,348 Joined: 22-June 09 From: Midlothian TX Member No.: 10,496 Region Association: None |
Here's a little teaser pic. I mounted the steering column in place. I cut apart a 914 column to get the mounting bracket and welded it in place of the Passat bracket. This column is about 1.5 inches longer at the U joint. I will have to cut and weld the diagonal shaft link and rework the geometry a little but it looks like it will not bind up. By doing this I accomplish a few things...
1) Cruise control 2) Intermittent wipers 3) Functioning immobilizer circuit 4) key that will crank the starter (I had a push button) 5) Tilt and telescoping wheel I have been spending the last couple weeks knitting the electrical system together. I got to hand it to the Germans! Many of the 914 wire colors match the Passat wiring. It looks like they have stuck to their wiring standards after all these years. The exterior light wires match perfectly. This allows for the use of the Passat flasher and hazard relay and switches. The switch contacts match too. Super easy! The cruise control is built into the ECU and pre-wired to the column. The windshield wiper/washer circuit is just as easy. Now I need to source a water bottle and pump. Everything else is a connection from the ECU to the dash cluster. I'm running multi-conductor cable for this. The old ignition switch wiring matches (mostly) to the new one and the wires to the engine bay will be reused. I'm not saying this is/has been easy but it is doable if you take your time and take a lot of notes. On top of that I have photoshoped the schematic into a color drawing. I also have a large color plotter at work to blow up the diagrams. Shown here without the air bag (just in the way) and with only the top trim in place. Note the dual gauge pod on top of the column... 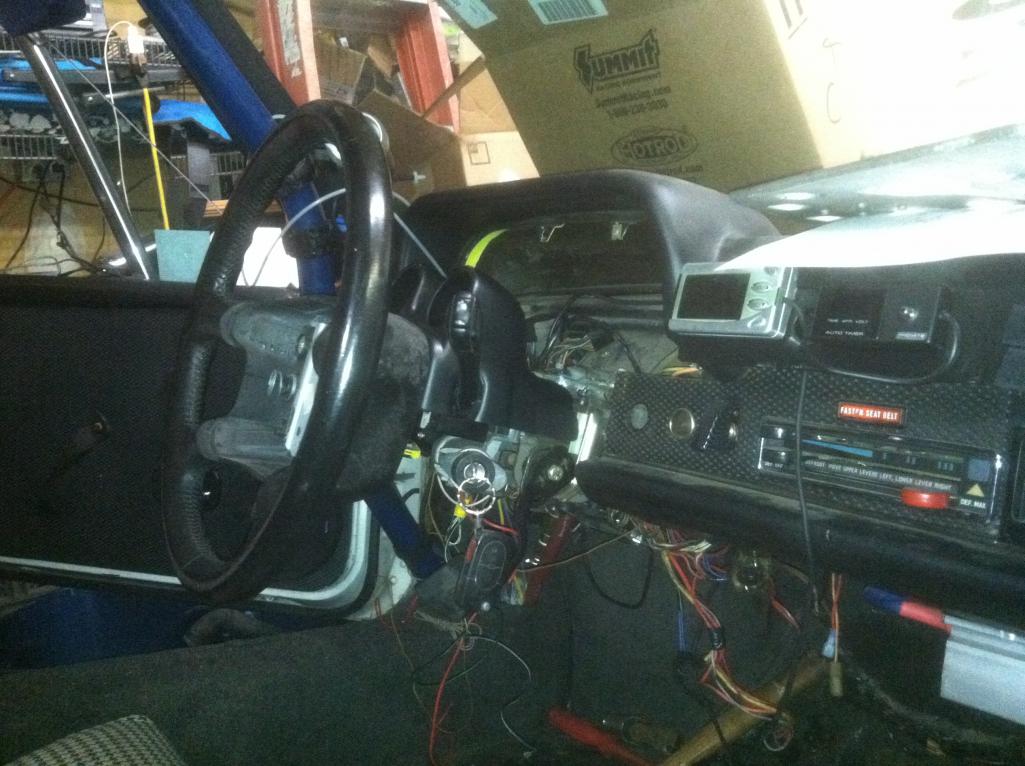 Here is one of my diagrams... 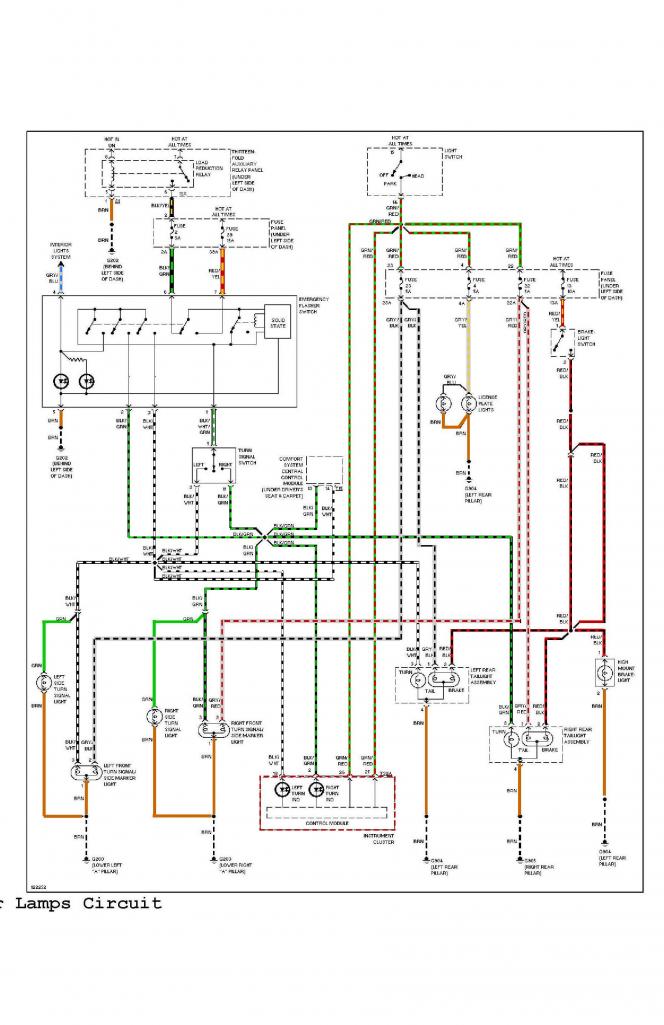 |
|
|
|
| JRust |
Dec 18 2012, 12:40 AM
Post
#116
|
|
914 Guru Group: Members Posts: 6,317 Joined: 10-January 03 From: Albany Oregon Member No.: 129 Region Association: Pacific Northwest |
You make me (IMG:style_emoticons/default/icon8.gif)
But with envy! Mad skills my man (IMG:style_emoticons/default/pray.gif) . That will be one custom teener that will be the envy of many I'm thinkin. Can't wait to see it at WCR |
|
|
|
| Mike Bellis |
Dec 18 2012, 12:50 AM
Post
#117
|
|
Resident Electrician Group: Members Posts: 8,348 Joined: 22-June 09 From: Midlothian TX Member No.: 10,496 Region Association: None |
QUOTE(JRust @ Dec 17 2012, 10:40 PM) You make me (IMG:style_emoticons/default/icon8.gif) But with envy! Mad skills my man (IMG:style_emoticons/default/pray.gif) . That will be one custom teener that will be the envy of many I'm thinkin. Can't wait to see it at WCR It's still going to look like a POS but it should run good. You'll know for sure if I hand you the keys for a joy ride... (IMG:style_emoticons/default/biggrin.gif) |
|
|
|
| matthepcat |
Dec 18 2012, 01:54 AM
Post
#118
|
|
Meat Popsicle Group: Members Posts: 1,462 Joined: 13-December 09 From: Saratoga CA Member No.: 11,125 Region Association: Northern California |
Outstanding! Fearless.
|
|
|
|
| Mike Bellis |
Dec 22 2012, 08:59 PM
Post
#119
|
|
Resident Electrician Group: Members Posts: 8,348 Joined: 22-June 09 From: Midlothian TX Member No.: 10,496 Region Association: None |
Progress... Since the world didn't end...
Grafted in the headlight switch and hazard switch/relay. I am building it into some aluminum diamond plate. Once complete, it will get painted black to match the other diamond plate in the cabin. I have eliminated the 914: headlight switch, hazard switch, flasher relay, fog light switch, Hi/Lo relay and all associated wiring... I still need to install the dimmer rheostat. I ordered 2 different Passat types to see which one looks best. The Passat stuff eliminates some of the 914 complexity in the wiring. Since I'm on a roll, I will finish the wiring before any more major fab. It also helps since it's raining and welding in a closed garage sucks! I scored a broken Passat fuel sender to check the resistance range. 300 Ohms full and 40 ohms empty. I need to find a sender to fit or have the old one modified. Here is a pic. I'm using a clamp to hold in place for now. There is no going back without swapping the entire dash... The switch rotates to turn the headlights on and pulls out (2 notches) for front and rear fogs. It also pushes in while off, not sure what that does yet. I am missing some pins on the harness plugs (Euro Version), so I ordered another pigtail to get parts... 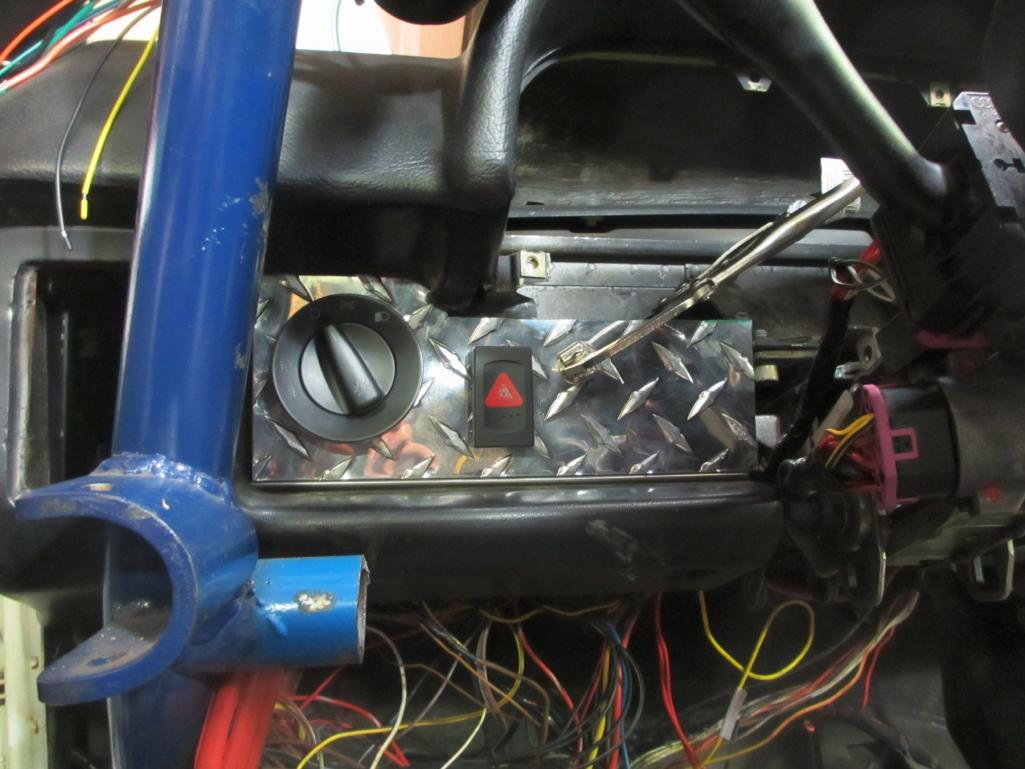 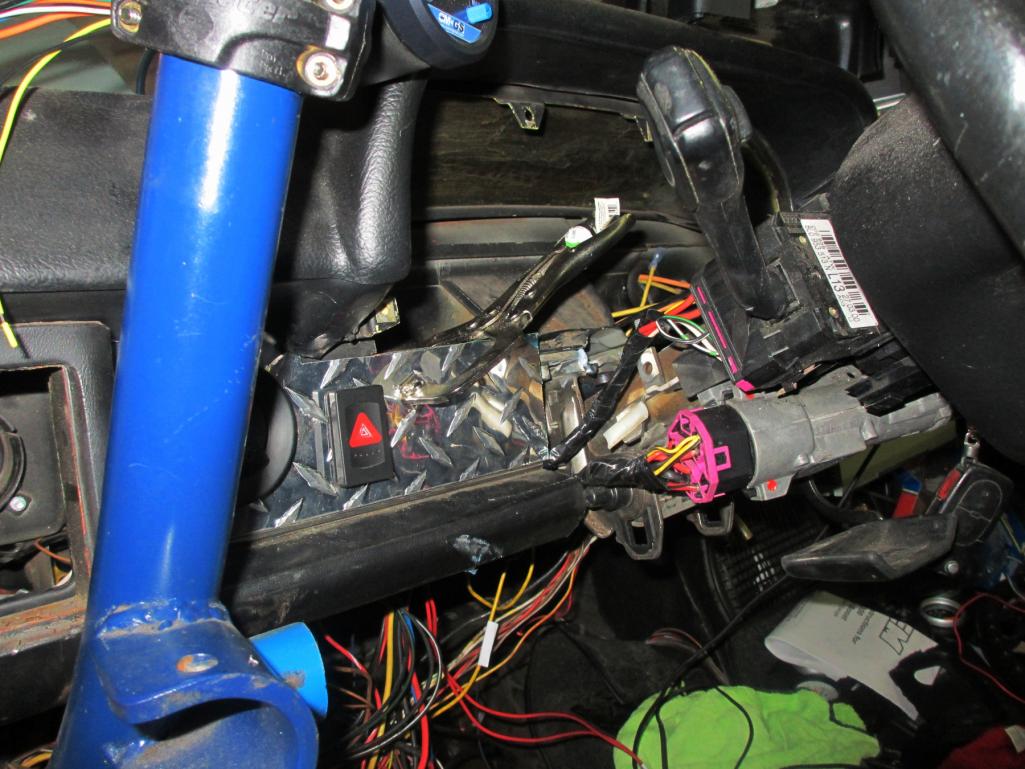 |
|
|
|
| Bob L. |
Dec 22 2012, 10:32 PM
Post
#120
|
|
Senior Member Group: Members Posts: 851 Joined: 7-August 11 From: Austin TX Member No.: 13,411 Region Association: Southwest Region |
That's so sweet! I hope to be able to try something like this soon.
Have you thought about climate controls? Where to mount heater core, a/c evaporator etc. Are you even going to have them? (IMG:style_emoticons/default/popcorn[1].gif) |
|
|
|
|
1 User(s) are reading this topic (1 Guests and 0 Anonymous Users)
0 Members:

|
Lo-Fi Version | Time is now: 17th June 2026 - 07:52 AM |
Invision Power Board
v9.1.4 © 2026 IPS, Inc.