|
|
|
Porsche, and the Porsche crest are registered trademarks of Dr. Ing. h.c. F. Porsche AG.
This site is not affiliated with Porsche in any way. Its only purpose is to provide an online forum for car enthusiasts. All other trademarks are property of their respective owners. |
|
|

  |

| dfelz |
 Jan 31 2013, 11:45 PM Jan 31 2013, 11:45 PM
Post
#101
|
|
beach bum  Group: Members Posts: 419 Joined: 7-June 12 From: San Diego Member No.: 14,538 Region Association: Southern California |
Cool, ya i think thats what my roommate said too.
Just measured the stroke, its 66mm (IMG:style_emoticons/default/dry.gif) Was definitely hoping it was a 71mm... oh well. I still dont feel comfortable blasting those parts, I just went out and bought some oven cleaner and a scotch bright 6pack, so hopefully along with some elbow grease i can get those puppies nice and shinny! |
   |

 
|
| '73-914kid |
Feb 1 2013, 12:48 AM
Post
#102
|
|
Senior Member Group: Members Posts: 1,473 Joined: 1-November 08 From: Vista, CA Member No.: 9,714 Region Association: Southern California |
It's still a 1911, And those are fun Revvy little motors. I think most people would describe them as Peppy... (IMG:style_emoticons/default/beerchug.gif) But I still bet those carbs are over jetted for it. Once you have it all running, weld a bung in the exhaust collector, and We'll throw my AFR on it to see what needs to be done to the jetting.
If the oven cleaner doesn't work, dissasembling the heads if you know someone with a valve spring compressor, and soda blasting them won't provide any issues down the road. Baking soda dissolves completely in water. |
|
|
|
| dfelz |
Feb 1 2013, 02:34 AM
Post
#103
|
|
beach bum Group: Members Posts: 419 Joined: 7-June 12 From: San Diego Member No.: 14,538 Region Association: Southern California |
QUOTE('73-914kid @ Jan 31 2013, 10:48 PM)  It's still a 1911, And those are fun Revvy little motors. I think most people would describe them as Peppy... (IMG:style_emoticons/default/beerchug.gif) But I still bet those carbs are over jetted for it. Once you have it all running, weld a bung in the exhaust collector, and We'll throw my AFR on it to see what needs to be done to the jetting. If the oven cleaner doesn't work, dissasembling the heads if you know someone with a valve spring compressor, and soda blasting them won't provide any issues down the road. Baking soda dissolves completely in water. Ahh ok thats why baking soda is good for this application, good to know. I may be coming to your place then doug if i cant get access to the one on campus in the foundry. I attempted to clean them, got the basic shit off, but they definitely need some serious blasting! Here is the dirtier of the two (IMG:http://www.914world.com/bbs2/uploads_offsite/i1293.photobucket.com-14538-1359707667.1.jpg) Here was the cleaner of the two (IMG:http://www.914world.com/bbs2/uploads_offsite/i1293.photobucket.com-14538-1359707667.2.jpg) so where do i get giant pales of baking soda??? Also anyone have a good source for piston rings, since i may have a busted one, or two... |
|
|
|
| dfelz |
Feb 1 2013, 03:35 AM
Post
#104
|
|
beach bum Group: Members Posts: 419 Joined: 7-June 12 From: San Diego Member No.: 14,538 Region Association: Southern California |
I'm done for the night! my eyes are screaming at me to shut them for a few hours, so i must listen to them. I managed to finally cut and place the new fuel filter and fuel pump up front on the front side of the gas tank firewall. I removed the old plastic fuel lines last night, they slipped right on out. Next i need to get enough wiring for the two FP wires to head through the tunnel to the front of the car. Once i have the wire lengths cut, I can tape them to the SS tunnel line and push it through!
(IMG:http://www.914world.com/bbs2/uploads_offsite/i1293.photobucket.com-14538-1359711326.1.jpg) I like those spots for drilling my holes cause they are at an angle and wont force the lines to make a 90 degree turn to get past the firewall. On my way back from dawn patrol saturday I will get the some spools of wire, HB will be on my way home! |
|
|
|
| '73-914kid |
Feb 1 2013, 11:20 AM
Post
#105
|
|
Senior Member Group: Members Posts: 1,473 Joined: 1-November 08 From: Vista, CA Member No.: 9,714 Region Association: Southern California |
Call these guys AA pistons
They were the ones who made those pistons and cylinders in the first place, so they should be able to sell you a set of Hastings rings |
|
|
|
| dfelz |
Feb 1 2013, 11:53 PM
Post
#106
|
|
beach bum Group: Members Posts: 419 Joined: 7-June 12 From: San Diego Member No.: 14,538 Region Association: Southern California |
Ethan, that helps a lot, thank you. I will call them on monday to order a set of rings.
I have a big exciting day planned for tomorrow. First i am going to bruces (bdstone) place to cut out an engine shelf he said i could have. (IMG:style_emoticons/default/sawzall-smiley.gif) Then i am off to dougs (mrbubblehead) place to soda blast some parts! WOooo, cant wait (IMG:style_emoticons/default/smilie_pokal.gif) |
|
|
|
| mittelmotor |
Feb 2 2013, 12:28 AM
Post
#107
|
|
Member Group: Members Posts: 334 Joined: 21-May 12 From: SoCal Member No.: 14,464 Region Association: None |
David, I have a perfectly good starter that I'll donate to the project if you pick it up (don't want to hassle with shipping). I'm in South OC (Laguna Hills). PM me if you want it.
--Doug |
|
|
|
| dfelz |
Feb 2 2013, 02:40 AM
Post
#108
|
|
beach bum Group: Members Posts: 419 Joined: 7-June 12 From: San Diego Member No.: 14,538 Region Association: Southern California |
Today i also received two packages, one with a pair of front turn signal buckets and the other with one of my front hubs back from Eric.
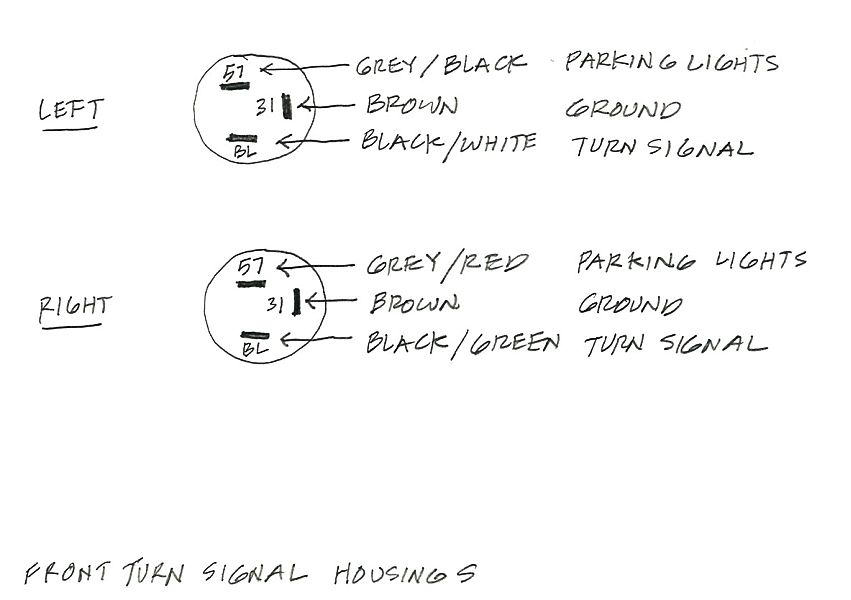
I plugged in the turn signal buckets, hooked up the battery, put in some light bulbs in and tested out the functionality. Anyone got a picture of the wiring to the bucket or can tell me which of the three wires go where???? Because some things were a little off. when headlights were on the DS TS would be on but not blink, and the PS TS would not be on but would blink. With the lights off, both of them would blink when commanded to..... Doug (mittelmotor), I will gladly pick up the starter from you, thank you very much for the offer, i really appreciate it. It will be good assurance for me to know that i have a strong working one. Can you please PM me your cell# so i can text you for your address and a convenient time i can swing by and pick it up. Thanks! |
|
|
|
| dlee6204 |
Feb 2 2013, 05:42 AM
Post
#109
|
|
Howdy Group: Members Posts: 2,162 Joined: 30-April 06 From: Burnsville, NC Member No.: 5,956 |
|
|
|
|
| mittelmotor |
Feb 2 2013, 04:15 PM
Post
#110
|
|
Member Group: Members Posts: 334 Joined: 21-May 12 From: SoCal Member No.: 14,464 Region Association: None |
QUOTE(dfelz @ Feb 2 2013, 12:40 AM) Today i also received two packages, one with a pair of front turn signal buckets and the other with one of my front hubs back from Eric. I plugged in the turn signal buckets, hooked up the battery, put in some light bulbs in and tested out the functionality. Anyone got a picture of the wiring to the bucket or can tell me which of the three wires go where???? Because some things were a little off. when headlights were on the DS TS would be on but not blink, and the PS TS would not be on but would blink. With the lights off, both of them would blink when commanded to..... Doug (mittelmotor), I will gladly pick up the starter from you, thank you very much for the offer, i really appreciate it. It will be good assurance for me to know that i have a strong working one. Can you please PM me your cell# so i can text you for your address and a convenient time i can swing by and pick it up. Thanks! Sure will! |
|
|
|
| dfelz |
Feb 4 2013, 08:46 PM
Post
#111
|
|
beach bum Group: Members Posts: 419 Joined: 7-June 12 From: San Diego Member No.: 14,538 Region Association: Southern California |
Thanks Doug (dlee6204), (man there are a lot of Dougs helping me out on here) for the front turn signal wiring diagram, i had two wires wrong on the DS. Next time i plugin the battery ill test it out to make sure its all bueno.
This past saturday i went over to Dougs (mrbubblehead) place to soda blast my heads, got a lot of it done, but i will have to go back soon to finish up the job, mainly on the valves. But they look good so far! (IMG:http://www.914world.com/bbs2/uploads_offsite/i1293.photobucket.com-14538-1360032378.1.jpg) (IMG:http://www.914world.com/bbs2/uploads_offsite/i1293.photobucket.com-14538-1360032379.2.jpg) (IMG:http://www.914world.com/bbs2/uploads_offsite/i1293.photobucket.com-14538-1360032379.3.jpg) (IMG:http://www.914world.com/bbs2/uploads_offsite/i1293.photobucket.com-14538-1360032379.4.jpg) Also got my front hub back from Eric for some stud adjustment. After a little sanding of the lug holes on one of my rims, it slid on. So i now have a fully rolling 5-lug 914! (IMG:style_emoticons/default/piratenanner.gif) (IMG:http://www.914world.com/bbs2/uploads_offsite/i1293.photobucket.com-14538-1360032619.1.jpg) |
|
|
|
| dfelz |
Feb 7 2013, 03:33 AM
Post
#112
|
|
beach bum Group: Members Posts: 419 Joined: 7-June 12 From: San Diego Member No.: 14,538 Region Association: Southern California |
Yesterday I removed all of the heater controls and blowers, came out a lot easier than i originally anticipated. They wont be going back in the car since i am building for racing/weekend fun car.
I got my horn situation figured out as well. Since the wheel that came with the car had no dash pad and my momo wheel and hub adapter wont work for this car (hub adapter is for 72 or later car that i got when my project involved a 72 and not the current 71.) My roommate brought me a button from his work and i wired to the brown/white wire and grounded to steering column. It worked! yay. first attempt was short circuiting and when the key was turned the horn was on, with no stopping, haha, forgot to put heat shrink around the terminal ends on the button! Tonight I also started the prepping for the installation of the new 911 FG dash. I really do dislike the task of removing the OEM dash, what a pain to get all those damn nuts off on the underside! I unhooked all the gauge wires (took lots of pictures prior to removal) but the only thing i cannot get off is the trip reset cable (the one with the nob on the underside of the dash) I know its supposed to unhook on the nob side and not the gauge side, but i cant get anything to move down there, not even the nob will turn with pliers... suggestions would be appreciated for this task. Picture time! Underside of cowl area with all the heater blowers and air box removed (and then scrubbed with a wire brush) (IMG:http://www.914world.com/bbs2/uploads_offsite/i1293.photobucket.com-14538-1360229615.1.jpg) Horn button wired up (with important heat shrink added) (IMG:http://www.914world.com/bbs2/uploads_offsite/i1293.photobucket.com-14538-1360229615.2.jpg) Button and wheel mounted and tested (IMG:http://www.914world.com/bbs2/uploads_offsite/i1293.photobucket.com-14538-1360229616.3.jpg) |
|
|
|
| dfelz |
Feb 10 2013, 03:08 AM
Post
#113
|
|
beach bum Group: Members Posts: 419 Joined: 7-June 12 From: San Diego Member No.: 14,538 Region Association: Southern California |
I am extremely swamped with school work this weekend, been working on senior project stuff from friday morning till now, basically the entire time! (IMG:style_emoticons/default/headbang.gif) Therefore i cant do any physical work on the teener for a few days... but i can sure surf the forums on my 5 min breaks here and there!
But over these past two days i received two packages in the mail (IMG:style_emoticons/default/piratenanner.gif) First package was from superbrightLEDs.com, ordered my red LED strip for third brake light, after i saw Dougs in person last weekend i was 100% on board with that product. it was $11 for the 50cm strip, cant beat that! While i was making the order from them i also threw in some dielectric grease packets for application to all my connections, again, recommended by Doug. Also ordered a 25' roll of +/- 18 AWG wire, some of which will be used for sure on the wiring of the fuel pump from the stock harness wires through the tunnel to the new front location. Second package was from 70-914nut, i purchased his front turn signal lenses and gaskets from is car part out. I obviously opened that package as well so i could see how they look (IMG:style_emoticons/default/biggrin.gif) Third new item to the garage..... I picked up the starter motor from Doug (mittelmotor), thanks again for that! Your 914 was f**king SWEET!!! that LS1 V8 looked (and sounded) amazing in there, and the sleeper status is off the charts, no one would ever see that coming! (2.0L badge, one of two exhaust pipes hidden, narrow body...) love it. Next topic.... so since i have been stressed with all my school work i did some cleaning of the garage yesterday, i usually resort to cleaning when i need to blow off steam (either garage, room, or one of my fish tanks haha.) This time though i ran across one of the parts that was left in the trunk of my new roller when i got it, when i originally pulled it out i thought it was a rear sway bar, i then put it away for later use. I was moving it and then noticed that it was different than the rear sway bar i already had, and then it hit me, its a front under body sway bar, stoked. i was happy because my 71 doesn't have the holes drilled on the chassis for the thru body type, and the linkages i have for my thru body bar off my 72 are ovaled as sh*T. So since i dont need the adjustability or have the $$ for an aftermarket thru body (for now at least, next few years wont be racing, it isnt necessary at all) the underbody will be perfect! I asked Bruce today if he had any of the brackets/mounting tabs for that style bar, and sure enough he does! so i will pick those up from him this up coming saturday on my way to Dougs for more soda blasting. If only it were this easy to fill up a few paragraphs with words when i was writing my advanced measurements lab report! (IMG:style_emoticons/default/bs.gif) I love pictures, and even though i dont have much to show for this post, i still have some pictures! Talk to you all later (IMG:style_emoticons/default/beerchug.gif) (IMG:http://www.914world.com/bbs2/uploads_offsite/i1293.photobucket.com-14538-1360487318.1.jpg) (IMG:http://www.914world.com/bbs2/uploads_offsite/i1293.photobucket.com-14538-1360487318.2.jpg) |
|
|
|
| GaroldShaffer |
Feb 10 2013, 06:24 AM
Post
#114
|
|
You bought another 914? Group: Benefactors Posts: 7,624 Joined: 27-June 03 From: Portage, IN Member No.: 865 Region Association: None |
QUOTE(dfelz @ Feb 7 2013, 03:33 AM) Tonight I also started the prepping for the installation of the new 911 FG dash. I really do dislike the task of removing the OEM dash, what a pain to get all those damn nuts off on the underside! I unhooked all the gauge wires (took lots of pictures prior to removal) but the only thing i cannot get off is the trip reset cable (the one with the nob on the underside of the dash) I know its supposed to unhook on the nob side and not the gauge side, but i cant get anything to move down there, not even the nob will turn with pliers... suggestions would be appreciated for this task. Were you able to get the trip reset cable off? This is a 71 car, yes? if so then the knob should be a metal nurled (sp?) knob with a small set screw that holds it it on. Remove the set screw, pull knob off if it doesn't fall off then you will see a chrome ring that screws into the dash frame. Unscrew that and the cable will come out. Sometimes that set screw won't come out so I just use a very small drill bit and drill it out. |
|
|
|
| dfelz |
Feb 10 2013, 01:22 PM
Post
#115
|
|
beach bum Group: Members Posts: 419 Joined: 7-June 12 From: San Diego Member No.: 14,538 Region Association: Southern California |
QUOTE(Garold Shaffer @ Feb 10 2013, 04:24 AM) QUOTE(dfelz @ Feb 7 2013, 03:33 AM) Tonight I also started the prepping for the installation of the new 911 FG dash. I really do dislike the task of removing the OEM dash, what a pain to get all those damn nuts off on the underside! I unhooked all the gauge wires (took lots of pictures prior to removal) but the only thing i cannot get off is the trip reset cable (the one with the nob on the underside of the dash) I know its supposed to unhook on the nob side and not the gauge side, but i cant get anything to move down there, not even the nob will turn with pliers... suggestions would be appreciated for this task. Were you able to get the trip reset cable off? This is a 71 car, yes? if so then the knob should be a metal nurled (sp?) knob with a small set screw that holds it it on. Remove the set screw, pull knob off if it doesn't fall off then you will see a chrome ring that screws into the dash frame. Unscrew that and the cable will come out. Sometimes that set screw won't come out so I just use a very small drill bit and drill it out. Correct, its a 71. I was looking at it last night again really quick to see if i saw anything i didnt see before, and did notice that small set screw on the knurled nob. I am pretty sure it will have to be drilled out then, cause the nob wont turn freely at all. I will attempt later, thanks Garold! |
|
|
|
| mrbubblehead |
Feb 10 2013, 04:42 PM
Post
#116
|
|
Twodollardoug Group: Members Posts: 1,155 Joined: 17-December 10 From: calimesa ca. Member No.: 12,492 Region Association: Southern California |
good move on the dielectric grease david. put that shit on every connector you take off. i put it on every single connector in the whole car. i even fill up the turn signal and windshield wiper levers. they operate super smooth afterward.
|
|
|
|
| dfelz |
Feb 11 2013, 12:00 AM
Post
#117
|
|
beach bum Group: Members Posts: 419 Joined: 7-June 12 From: San Diego Member No.: 14,538 Region Association: Southern California |
I like your style Doug!
Well i woke up this morning with a text from Mr. Shea, and he was questioning my decision for the underbody sway bar. After many texts, mainly from his end since he is the knowledgable one, he convinced me to drill the holes for the thru body, and fix the links i have by converting them into 930 style ones, which actually shouldn't be too bad. To sum up his arguments, which are very convincing, the under body bar was designed for a car 1000lb heavier than our 914s, and since i will only be doing around the town shit for the next couple of years, it will be a harsh ride with no adjustability from the sway bar. I trust Eric very much, he has done my entire suspension system for the most p thus far, and when i got a text from him a 8:30am this morning, only 6 hours after my post, with his concerns, i knew i should just listen to what the man has to say! (IMG:style_emoticons/default/drunk.gif) Cause if there is one thing i know, i dont know sh*t about these cars. So i will be going "thru"(play on words, haha) with the modifications shown in the pictures below. First picture is the current condition of my linkages (thanks PO) and second is Erics inspiration picture for this side project. I have the hallow bar stock that be able will get the job done too, just have to do some grinding and welding (IMG:style_emoticons/default/sawzall-smiley.gif) (IMG:style_emoticons/default/smash.gif) I'll be sure to keep you posted! hope everyone had a wonderful weekend! I know i didn't (IMG:style_emoticons/default/stromberg.gif) (IMG:http://www.914world.com/bbs2/uploads_offsite/i1293.photobucket.com-14538-1360562413.1.jpg) (IMG:http://www.914world.com/bbs2/uploads_offsite/i1293.photobucket.com-14538-1360562413.2.jpg) |
|
|
|
| dfelz |
Feb 13 2013, 09:07 PM
Post
#118
|
|
beach bum Group: Members Posts: 419 Joined: 7-June 12 From: San Diego Member No.: 14,538 Region Association: Southern California |
Ok so I have my thru body sway bar modeled up in Solidworks (So wish I had ProE, my last job used it and it was sooooo nice, too bad its a 10K license and my student edition of SW is free.99) I am also going to model the control arms so that i can do a motion simulation and geometry analysis at the different linkage holes. If this was next quarter i could also do a full fledge FEA analysis in Nastran, but since i am not taking finite element analysis until next quarter, the basic knowledge i have of solidworks FEA simulation should give me a good idea of week points in the components and where all the stress concentrations will be.
My design concept was to take the OEM arm, make it adjustable, add the 930 style 90 degree through brackets for more stiffness in part and less chance of rounding the square design, and use spherical bearings on the drop link (top spherical bearing will be right hand thread, bottom will be left hand thread, this will make adjustment super easy by just having to loosen the jam nuts on both sides and then just spinning the drop link tube to adjust the tension/compression.) The clamping method is the same style the stock one uses, i like it more than other methods i have seen on aftermarket ones that have just one bolt on the end. Two bolts with the bar in between distributes the clamping force to ensure all four flats on the bar receive equal forces. I also designed a new bushing bracket so that i could use a a custom oil-impregnated brass bushing. its a simple flange style bushing but it will be pressed in from the wheel side. I will also have some kind of rubber washers in between the back of the bushing bracket and the frame sheet metal. Since the car this will be going on without a stock thru body bar i will be making a backing plate for the gas tank side with the nuts welded on for capture of the 3 M8 bolts. The backing plate, bushing bracket and link arm will all be laser cut 1/8" 1018 cold rolled steel (with the link arm obviously being bent into formation and then tig welded together. Will hopefully have them normalize since all the components will see some welding time, and will then be plated. Please keep in mind this is my first run at this system and would love everyones input and considerations that i may have overlooked. Just for reference, there are 5 holes for adjustment, the middle one is the exact distance the single stock one is at. I worked in the medical device industry for 6 months full time for an internship and i was doing hardware and tooling design (designing components for the manufacturing line and testing systems for pacemakers and implantable defibrillators) so i have some experience doing design work, am also on the SAE electric team. But like i said, i really want your input, so feel free to ask any questions you like and give any commentary. (IMG:http://www.914world.com/bbs2/uploads_offsite/i1293.photobucket.com-14538-1360811229.1.png) (IMG:http://www.914world.com/bbs2/uploads_offsite/i1293.photobucket.com-14538-1360811230.2.png) (IMG:http://www.914world.com/bbs2/uploads_offsite/i1293.photobucket.com-14538-1360811230.3.png) I can get more snap shots too! (IMG:style_emoticons/default/beerchug.gif) |
|
|
|
| sixnotfour |
Feb 13 2013, 09:15 PM
Post
#119
|
|
914 Wizard Group: Members Posts: 10,437 Joined: 12-September 04 From: Life Elevated..planet UT. Member No.: 2,744 Region Association: Rocky Mountains |
Impressive wish drawing , Buy some H&H arms from like 30yrs ago, same but cheep.
Ya Im 52 and own the arm in your pic... 76 Turbo 1yr only |
|
|
|
| mittelmotor |
Feb 13 2013, 11:12 PM
Post
#120
|
|
Member Group: Members Posts: 334 Joined: 21-May 12 From: SoCal Member No.: 14,464 Region Association: None |
Mad computer skillz, David! (IMG:style_emoticons/default/biggrin.gif) (IMG:style_emoticons/default/pray.gif) I still sketch things out on paper.
That U-channel arm looks plenty robust. So nice to have the adjustability. |
|
|
|
|
3 User(s) are reading this topic (3 Guests and 0 Anonymous Users)
0 Members:

|
Lo-Fi Version | Time is now: 13th June 2024 - 11:49 PM |
Invision Power Board
v9.1.4 © 2024 IPS, Inc.