|
|
|
Porsche, and the Porsche crest are registered trademarks of Dr. Ing. h.c. F. Porsche AG.
This site is not affiliated with Porsche in any way. Its only purpose is to provide an online forum for car enthusiasts. All other trademarks are property of their respective owners. |
|
|

  |

| nathansnathan |
 Jun 6 2013, 06:28 AM Jun 6 2013, 06:28 AM
Post
#221
|
|
Senior Member  Group: Members Posts: 1,052 Joined: 31-May 10 From: Laguna Beach, CA Member No.: 11,782 Region Association: None |
QUOTE(dfelz @ Jun 6 2013, 03:13 AM)  Anyone have some good pictures of how this spring is properly mounted to actually be useful??? Here you go (IMG:http://www.914world.com/bbs2/uploads_offsite/www.ratwell.com-11782-1370521711.1.jpg) |
   |

 
|
| monkeyboy |
Jun 6 2013, 07:15 AM
Post
#222
|
|
Senior Member Group: Members Posts: 808 Joined: 8-June 08 From: Los Angeles, Ca Member No.: 9,147 Region Association: None |
I will call you Friday about the engine stand. I have it ready, but I don't think I can get it in the truck by myself. You may need to drive down and help me load it.
|
|
|
|
| dfelz |
Jun 6 2013, 07:25 PM
Post
#223
|
|
beach bum Group: Members Posts: 419 Joined: 7-June 12 From: San Diego Member No.: 14,538 Region Association: Southern California |
QUOTE(nathansnathan @ Jun 6 2013, 05:28 AM) QUOTE(dfelz @ Jun 6 2013, 03:13 AM) Anyone have some good pictures of how this spring is properly mounted to actually be useful??? Here you go Thanks Nathan, any chance you have a pic of were the the hook on the other side is going??? And am i correct in saying that the flap is supposed to be able to go completely flush with the opening in the cold position? |
|
|
|
| nathansnathan |
Jun 6 2013, 09:05 PM
Post
#224
|
|
Senior Member Group: Members Posts: 1,052 Joined: 31-May 10 From: Laguna Beach, CA Member No.: 11,782 Region Association: None |
QUOTE(dfelz @ Jun 6 2013, 06:25 PM) Thanks Nathan, any chance you have a pic of were the the hook on the other side is going??? And am i correct in saying that the flap is supposed to be able to go completely flush with the opening in the cold position? Hopefully this shows the spring. The other was a photo off Ratwell's site. These I took of some parts lying around. Pardon the crustiness. You can see the little hook go under the 'arm' by the white bushing there. 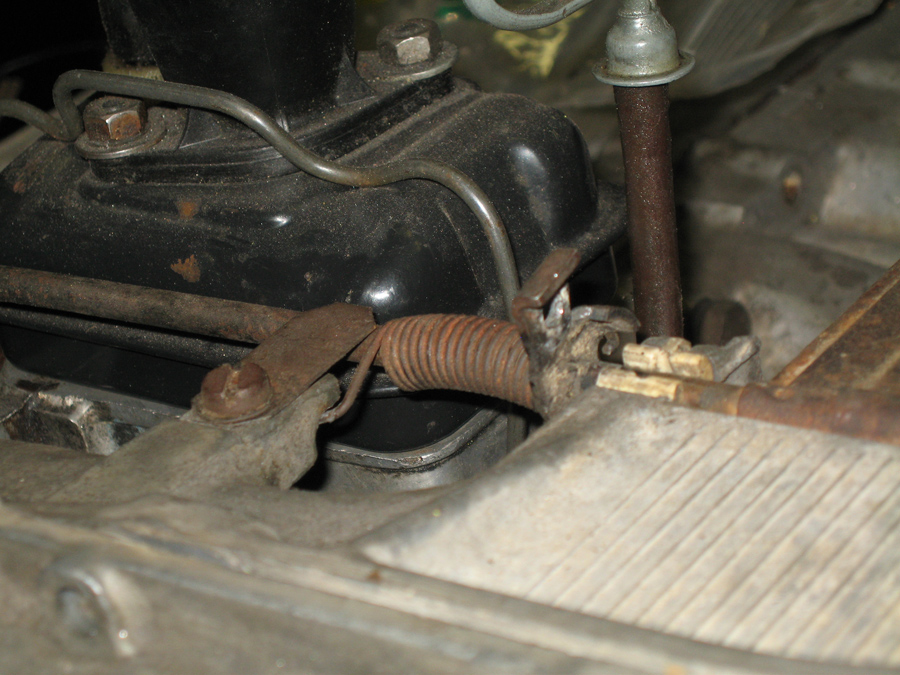 The pivot beam is quite pliable so you can tweak it a bit to close up the gap some. The nub on the fan housing should act as a stopper, rather than the other side pulling the connector piece apart. The fan has to hit that nub because there is a flange on the other side of the pivot beam that the other bushing locates it with. As the pivot beam rotates through its axis, it seems like it should not cock out as it closes, but stay parallel in its axis to the lip of the fan housing. You may have to (un)bend the beam to get it moving freely. The spring pressure is pretty strong, but get the beam smooth, and oil the spring, and may sure the beam is not bent so it binds in the bushings or in the tin. Make it so it moves real easy. -unlike the crusty one I've got mocked up here. The one in my bus doesn't take nearly as much force to hold closed. Seems the smoother it functions, the longer the thermostat will hold up. 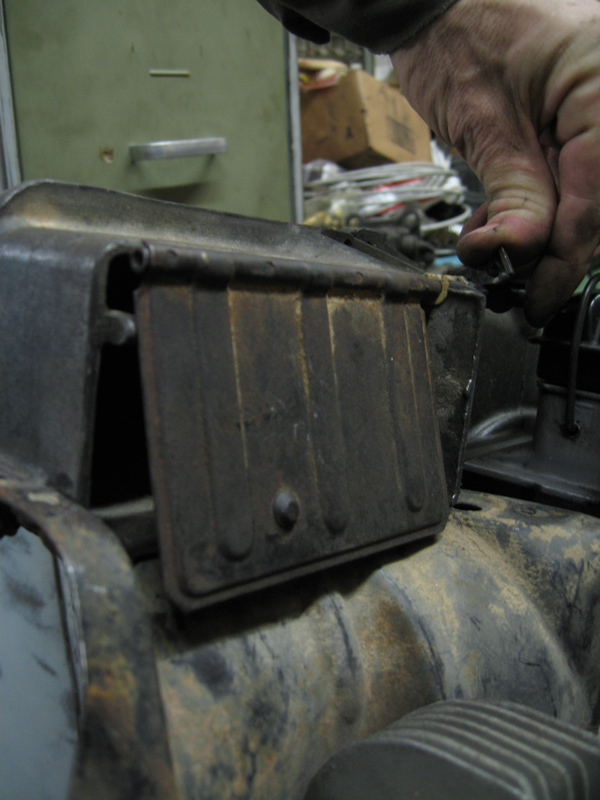 |
|
|
|
| dfelz |
Jun 7 2013, 11:38 AM
Post
#225
|
|
beach bum Group: Members Posts: 419 Joined: 7-June 12 From: San Diego Member No.: 14,538 Region Association: Southern California |
Thank you very much Nathan! Great walk through! Ethan came over last night too and helped me situate it (I didnt see your wonderful tutorial till now,) he fixed the spring positioning and told me the flap was going down to the correct spot. And now that that's taken car of, i started prepping the cylinder/head tins for paint. Also put the flywheel bearing and felt washer on along with the flywheel main oil seal.
Went over to Jims pad (monkeyboy) and grabbed an ATV jack, tranny drain plug tool, and a tranny main shaft to act as a clutch alignment tool. I ordered the clutch alignment tool from pelican, and the bag it was in had the sticker of the right part, but the part said FORD on it???... and it obviously did not fit, so ya gonna contact them about that... Gonna go into the machine shop today and jump on the lathe to fab some battery terminal adapters. I am using an Odyssey ER40 that has M6 studs for terminals, so i need to make something to screw on that with an OD of the battery connect ID, shouldnt take too long, just have to take the correct measurements! I'll post up later today how it goes! (IMG:style_emoticons/default/bye1.gif) |
|
|
|
| dfelz |
Jun 8 2013, 05:45 PM
Post
#226
|
|
beach bum Group: Members Posts: 419 Joined: 7-June 12 From: San Diego Member No.: 14,538 Region Association: Southern California |
I have now almost completed the cleaning and repainting of all the engine tins. Wire brushed by hand to get all the dirt grime build up, mainly off the bottom side, then moved onto the paint striper to finish up the job with a drill wire brush cup. Final stage was hand sanding to get the tough crevasses.
Start (IMG:http://www.914world.com/bbs2/uploads_offsite/i1293.photobucket.com-14538-1370735119.1.jpg) Middle (IMG:http://www.914world.com/bbs2/uploads_offsite/i1293.photobucket.com-14538-1370735119.2.jpg) Finish, still have the 3/4 tin and two others though (IMG:http://www.914world.com/bbs2/uploads_offsite/i1293.photobucket.com-14538-1370735119.3.jpg) Had to weld up this crack before moving on with paint on this guy (IMG:http://www.914world.com/bbs2/uploads_offsite/i1293.photobucket.com-14538-1370735119.4.jpg) All done (IMG:style_emoticons/default/biggrin.gif) (IMG:http://www.914world.com/bbs2/uploads_offsite/i1293.photobucket.com-14538-1370735119.5.jpg) Since i will be sealing in my windshield soon, i had to attend to this small rust spot on the bottom passenger side corner. This was as is (IMG:http://www.914world.com/bbs2/uploads_offsite/i1293.photobucket.com-14538-1370735119.6.jpg) This was after the dermal, prepping for weld, hole grew a little but that was expected, had to remove the cancer (IMG:http://www.914world.com/bbs2/uploads_offsite/i1293.photobucket.com-14538-1370735119.7.jpg) Welded, area was very thin and difficult, had the mig turned all the way down on everything, still burned holes right through, had to do really quick bursts on the edges and worked inwards. (IMG:http://www.914world.com/bbs2/uploads_offsite/i1293.photobucket.com-14538-1370735119.8.jpg) Grounded down to finished contour (IMG:http://www.914world.com/bbs2/uploads_offsite/i1293.photobucket.com-14538-1370735119.9.jpg) Primed with rustoleum (IMG:http://www.914world.com/bbs2/uploads_offsite/i1293.photobucket.com-14538-1370735119.10.jpg) I attached the thermostat cable to the flaps too, no picture though. Progress will slow down heavily until thursday unfortunately, its finals week, my time to shine, no excuses for slacking!! |
|
|
|
| dfelz |
Jun 10 2013, 01:20 PM
Post
#227
|
|
beach bum Group: Members Posts: 419 Joined: 7-June 12 From: San Diego Member No.: 14,538 Region Association: Southern California |
I wasnt supposed to be working on the car this week because of finals, but when i got home last night from studying in the library at 1am, i had just finished my last cup of coffee, so i wasnt about to just go to bed!
First thing i worked on was the alternator mounting, I have the two brackets, the one half square and the curved one. For the square one, it had, as well as the shroud a square hole on one side and the haynes book labeled the bolt going through there as "special bolt," but the bolt i have is just a normal hex head with flange. Is the shank supposed to be square??? Next, how do i properly tension or know if the belt is at an acceptable tension? Also, what screw is used on the hole with the green arrow and what screws into the threaded posts with the red arrows?? (IMG:http://www.914world.com/bbs2/uploads_offsite/i1293.photobucket.com-14538-1370892037.1.jpg) After i did that shit worked on the pressure plate and clutch disk. Cleaned up the pressure plate and roughened up the flat surface that contacts the clutch disk with some sand paper. Then using the alignment tool Jim is lending to me, i bolted the combo to the flywheel with new M8 X 20mm grade 10.9 hex bolts and split lock washers. Dont know if i mention earlier but before mounting the flywheel for good, i hammered in new dowel pins to the flywheel after letting them sit in the freezer. I bought a bag of them from McMaster so i have extras if anyone is in need. (IMG:http://www.914world.com/bbs2/uploads_offsite/i1293.photobucket.com-14538-1370892038.2.jpg) (IMG:http://www.914world.com/bbs2/uploads_offsite/i1293.photobucket.com-14538-1370892038.3.jpg) (IMG:http://www.914world.com/bbs2/uploads_offsite/i1293.photobucket.com-14538-1370892038.4.jpg) (IMG:http://www.914world.com/bbs2/uploads_offsite/i1293.photobucket.com-14538-1370892039.5.jpg) Also did a final check of the adjuster screw clearance to the valve stems using Ethans method, so they are all at .006" and good to go, then the valve covers went on with new cork gaskets from the rebuild kit (did those need to be slightly oiled before assem to the head??) thats all i got for now! (IMG:style_emoticons/default/beerchug.gif) |
|
|
|
| nathansnathan |
Jun 10 2013, 02:57 PM
Post
#228
|
|
Senior Member Group: Members Posts: 1,052 Joined: 31-May 10 From: Laguna Beach, CA Member No.: 11,782 Region Association: None |
QUOTE(dfelz @ Jun 10 2013, 12:20 PM) Is the shank supposed to be square??? It's a special bolt, like a carriage bolt but with part of the head missing so it is a D shaped head. The D part fit's the recess in the tin. the square part goes through the square part of the bracket. It makes it so you can loosen your alternator to put a belt on from underneath instead of needing 2 people. -No clue where you'd get one, part #021903231 QUOTE Next, how do i properly tension or know if the belt is at an acceptable tension? It's supposed to have 5/8" play iirc. QUOTE Also, what screw is used on the hole with the green arrow and what screws into the threaded posts with the red arrows?? Just a m6x30 hex, 10mm head in the one. The others, I don't think 914's use those other holes; they are for the fan screen in a bus. I could be wrong here... QUOTE did those need to be slightly oiled before assem to the head?? I would use a small amount of silicone to hold the gasket to the cover, dry on the head side. |
|
|
|
| dfelz |
Jun 16 2013, 12:14 PM
Post
#230
|
|
beach bum Group: Members Posts: 419 Joined: 7-June 12 From: San Diego Member No.: 14,538 Region Association: Southern California |
Once back in the garage, I sorted out the gas tank. Since I only need one supply line, the other line needed to be plugged. The SS kit that i got from chris had a shank in one of the lines on delivery so it was perfect, clamped that guy into a short 5/16" fuel line that went to the unused nipple. I switched around the original position of the nipples, using the smaller OD one on the outer side, with a new fuel stock filter in there, and the larger OD nipple is the one being plugged. This is so I would not have to step down the fuel hose prior to getting to the fuel filter.
(IMG:http://www.914world.com/bbs2/uploads_offsite/i1293.photobucket.com-14538-1371406469.1.jpg) (IMG:http://www.914world.com/bbs2/uploads_offsite/i1293.photobucket.com-14538-1371406469.2.jpg) (IMG:http://www.914world.com/bbs2/uploads_offsite/i1293.photobucket.com-14538-1371406469.3.jpg) I also came up with a solution for the vibration pads that the tank sit on. Found this rubber adhesive backed pad on McMaster for $3 for two pads. The problem was that it was a bunch of smaller squares, which i knew prior to ordering, but i was hoping they woud stay together better when i removed the backing, that was not the case. Each square had to be individually laid down, hence why it looks like shit, but i dont really care since it is never visible! (IMG:http://www.914world.com/bbs2/uploads_offsite/i1293.photobucket.com-14538-1371406469.4.jpg) (IMG:http://www.914world.com/bbs2/uploads_offsite/i1293.photobucket.com-14538-1371406469.5.jpg) Installed the short carb manifolds i have. Will set up the carbs and dual linkage today, then install the engine/tranny! (IMG:http://www.914world.com/bbs2/uploads_offsite/i1293.photobucket.com-14538-1371406469.6.jpg) |
|
|
|
| dfelz |
Jun 17 2013, 09:09 PM
Post
#231
|
|
beach bum Group: Members Posts: 419 Joined: 7-June 12 From: San Diego Member No.: 14,538 Region Association: Southern California |
Well to start with the good news, this engine is in the car!!!! (IMG:style_emoticons/default/piratenanner.gif) (IMG:style_emoticons/default/piratenanner.gif) (IMG:style_emoticons/default/piratenanner.gif) Was working on the car all of sunday, literally all day before i had to depart for SD to start my new job monday morning. Ill start at the beginning of the day:
As i showed earlier, the bolt/square nut to clamp the thermostar wire had stripped and need replacing. I had to do a makeshift replacement but it worked out well. Used a t-nut and cut a section off to create a flat area, and so it could fit in the tight spot period. (IMG:http://www.914world.com/bbs2/uploads_offsite/i1293.photobucket.com-14538-1371524948.1.jpg) (IMG:http://www.914world.com/bbs2/uploads_offsite/i1293.photobucket.com-14538-1371524948.2.jpg) Next i installed the bdstone rebuilt pedal cluster. As you can see the right floor bolt isnt stock, the original one became rusted to the nut and sheared off upon removal. I drilled it out to just the right size to squeeze an M8 set screw in there; its nuted on the top and bottom. Clutch cable and accelerator cable are hooked up. (IMG:http://www.914world.com/bbs2/uploads_offsite/i1293.photobucket.com-14538-1371524948.3.jpg) (IMG:http://www.914world.com/bbs2/uploads_offsite/i1293.photobucket.com-14538-1371524949.4.jpg) Next moved onto the shift rods. for the bushing shown below, I only had one, but realized i was supposed to have two... so i used an old oil cooler gasket on the other side; it fit nicely and seemed to accomplish the job. If this is a huge no-no, please dont be afraid to tell me. If this should get the job done for a bit, also please let me know! (IMG:http://www.914world.com/bbs2/uploads_offsite/i1293.photobucket.com-14538-1371524949.5.jpg) (IMG:http://www.914world.com/bbs2/uploads_offsite/i1293.photobucket.com-14538-1371524949.6.jpg) (IMG:http://www.914world.com/bbs2/uploads_offsite/i1293.photobucket.com-14538-1371524949.7.jpg) Installed the clutch fork and throwout bearing, new cup bushing on the fork and vibration dampeners on the bearing. (IMG:http://www.914world.com/bbs2/uploads_offsite/i1293.photobucket.com-14538-1371524949.8.jpg) cleaned up the starter motor (IMG:http://www.914world.com/bbs2/uploads_offsite/i1293.photobucket.com-14538-1371524949.9.jpg) mated the tranny to the case, please keep in mind i was by myself the whole day, so this task deemed to be tricky, especially seeing that the case was on wheels and slightly kilter at a downward angle...i had to get inventive. (IMG:style_emoticons/default/smash.gif) (IMG:http://www.914world.com/bbs2/uploads_offsite/i1293.photobucket.com-14538-1371524949.10.jpg) I still cant believe that this replaces all that was removed when using the tail shift components...looks so not upto par (IMG:http://www.914world.com/bbs2/uploads_offsite/i1293.photobucket.com-14538-1371524949.11.jpg) lifted the engine into place, and checked location after every pump of the jack to make adjustments, once again i only had myself to double check everything was lining up (IMG:http://www.914world.com/bbs2/uploads_offsite/i1293.photobucket.com-14538-1371524949.12.jpg) she's all in, the shift rod assemblies are in place and everything (IMG:http://www.914world.com/bbs2/uploads_offsite/i1293.photobucket.com-14538-1371524949.13.jpg) (IMG:http://www.914world.com/bbs2/uploads_offsite/i1293.photobucket.com-14538-1371524949.14.jpg) (IMG:http://www.914world.com/bbs2/uploads_offsite/i1293.photobucket.com-14538-1371524949.15.jpg) (IMG:http://www.914world.com/bbs2/uploads_offsite/i1293.photobucket.com-14538-1371524949.16.jpg) As she sits for the next week until i go back for the weekend to attempt start-up! (IMG:http://www.914world.com/bbs2/uploads_offsite/i1293.photobucket.com-14538-1371524950.17.jpg) I do have a few questions though!.... first, how do i transfer all the parts of the spedo angle drive from the tailshift to the sideshift...i couldnt get that unit out...? (IMG:http://www.914world.com/bbs2/uploads_offsite/i1293.photobucket.com-14538-1371524950.18.jpg) Can someone please provide me with some good pictures of the two connection points of the sidesift rods, right behind the firewall at the rod coupling and at the stock (without that cover there obviously). I have all of it hooked up as of now, but it didnt feel right when trying to move around the shifter, and i think i forgot the friction ring bushing... so i will be redoing all that but would love some quality pics for reference. Thanks everyone for all your help, dont think i would have gotten this far without your aid, but hang in there, i think the biggest challenge is coming up, STARTING it, and then tuning it! (IMG:style_emoticons/default/beerchug.gif) |
|
|
|
| dfelz |
Jun 28 2013, 04:14 AM
Post
#232
|
|
beach bum Group: Members Posts: 419 Joined: 7-June 12 From: San Diego Member No.: 14,538 Region Association: Southern California |
Last weekend on sunday i worked on the car for the entire day with the assistance of Jim (IMG:style_emoticons/default/beerchug.gif) We were hoping to fire it up....but that'll have to wait till this weekend.
Once we found TDC (was actually 180 of TDC, but still worked just had to keep that in mind) we lubed the shit out the distributor driveshaft gear and washer (IMG:style_emoticons/default/sheeplove.gif) and dropped that sucker in there (carefully). Then installed the distributor, but pior to that we checked the gap in the rotor contact. (IMG:http://www.914world.com/bbs2/uploads_offsite/i1293.photobucket.com-14538-1372414455.1.jpg) Before Jim came over I was working on my CFR parts. positioned the breather can where i want it and cut all the hoses to length, then removed the can while the rest of the work was done on the engine, didnt want to scratch it, its so nice looking. Then moved onto the throttle cable pulley linkage. Got some bad news there, my manifolds are apparently to short, so it will be impossible to use with my current set up, the brackets that hold the cables interfere with the tins and dont come close to lining up the the holes they are supposed to bolt to..... (IMG:style_emoticons/default/headbang.gif) So for now, I am using the old swivel type pull bars.... (IMG:http://www.914world.com/bbs2/uploads_offsite/i1293.photobucket.com-14538-1372414455.2.jpg) Before going to grab some in and out for our lunch break, we poured in the brad penn break in oil, came back, and had a leak, i officially own a 914. Leak was coming from between the tuna can and case, was leaking a substantial amount! Going to drain the oil (save it and reuse it), pull the tuna can off and put some RTV gasket stuff on there, should seal it up, hopefully (IMG:style_emoticons/default/idea.gif) (IMG:http://www.914world.com/bbs2/uploads_offsite/i1293.photobucket.com-14538-1372414455.3.jpg) (IMG:http://www.914world.com/bbs2/uploads_offsite/i1293.photobucket.com-14538-1372414455.4.jpg) Will be back up at the house starting tomorrow to work on the car, taking a half day at work to go up early and avoid LA traffic! (IMG:style_emoticons/default/ar15.gif) Will hopefully be uploading a nice video this weekend of the car running, lets pray (IMG:style_emoticons/default/pray.gif) (IMG:style_emoticons/default/pray.gif) (IMG:style_emoticons/default/pray.gif) (IMG:style_emoticons/default/sheeplove.gif) |
|
|
|
| dfelz |
Jul 21 2013, 03:07 PM
Post
#233
|
|
beach bum Group: Members Posts: 419 Joined: 7-June 12 From: San Diego Member No.: 14,538 Region Association: Southern California |
SHE LIVES!!!!
The engine is now alive, cam break in is complete! Will need to finishing the timing with a timing light and then further tune the carbs before a first test drive around the block, but i am super happy right now that i have a running engine! We had some hiccups along the way the to say the least! Previously, both stock starter motors i had on hand weren't powerful enough to turn over the newly rebuilt engine, even with 1600 crank amps connected (had two F-250 diesel truck batteries hooked up in series.) I purchased a new IMI hi-torque starter motor and am supper happy with it! (IMG:http://www.914world.com/bbs2/uploads_offsite/i1293.photobucket.com-14538-1374440866.1.jpg) But even yesterday when we were trying to fire it up, we made many attempts before realizing that the fuel pump had somehow been unhooked, probably my fault, but hey we all make mistakes! So once that was taken care of, and with a little futzing with the distributor to get the timing in line enough to fire, she woke up from her 23 year nap. That was yesterday, and at that point we had no muffler on, just stock headers, was painfully load, and were getting burst of fire out of the carbs during backfires. ran it for just a few minutes, let it sit all night and then this morning checked all the valve clearances, one needed adjusted and the rest were just re-tightened down. Then attached the muffler and after that is what you see in the video! (IMG:style_emoticons/default/w00t.gif) (IMG:style_emoticons/default/popcorn[1].gif) video #1 video #2 If someone could tell me how to get the actual video box to show in the post that would be great! |
|
|
|
| FourBlades |
Jul 21 2013, 04:11 PM
Post
#234
|
|
From Wreck to Rockin Group: Members Posts: 2,056 Joined: 3-December 07 From: Brevard, FL Member No.: 8,414 Region Association: South East States |
Wow, that is super cool! (IMG:style_emoticons/default/first.gif) Great work getting to this point. Soon you can enjoy the best part of these cars, driving them. (IMG:style_emoticons/default/driving.gif) John |
|
|
|
| dfelz |
Jul 23 2013, 09:41 AM
Post
#235
|
|
beach bum Group: Members Posts: 419 Joined: 7-June 12 From: San Diego Member No.: 14,538 Region Association: Southern California |
Thanks John, I appreciate the kind words, I am super excited to be at this point and even more excited to be one step closer to my next objective....DRIVING IT.
I also forgot to mention a funny story from this past weekend. Jim pointed out a "minor discrepancy" in my carb jetting... Both mains on the 1/2 side had a 110, but both mains on the 3/4 side had a 115. Then we also noticed it looked as though the idle jets had been brazed and then re-drilled, most likely to get a smaller hole, but i don't know what size it is now, and the hole wasn't centered... like i said, "minor discrepancies" haha (IMG:style_emoticons/default/blink.gif) (IMG:style_emoticons/default/WTF.gif) So i am working on fixing those in the near future. (IMG:style_emoticons/default/sheeplove.gif) |
|
|
|
| oldschool |
Jul 23 2013, 10:12 AM
Post
#236
|
|
Advanced Member Group: Members Posts: 3,374 Joined: 29-October 08 From: P-town Member No.: 9,705 Region Association: Southern California |
Dude I just went through all your post...very cool, It make's me think I can rebuild the 2 motor I have sitting (IMG:style_emoticons/default/rolleyes.gif)
|
|
|
|
| monkeyboy |
Jul 23 2013, 10:38 AM
Post
#237
|
|
Senior Member Group: Members Posts: 808 Joined: 8-June 08 From: Los Angeles, Ca Member No.: 9,147 Region Association: None |
Lots of progress. It's been fun to help you.
Now lets get her off the jack stands and back on the road! |
|
|
|
| dfelz |
Jul 24 2013, 04:05 AM
Post
#238
|
|
beach bum Group: Members Posts: 419 Joined: 7-June 12 From: San Diego Member No.: 14,538 Region Association: Southern California |
Jamie with some love, your engines could be troopers again too!!
Jim we are on the same page! Ill be at the house working on the car this wed and thurs afternoon this week plus the weekend, so it is doable for sure. I really do appreciate all you help though, thank you!! |
|
|
|
| dfelz |
Aug 20 2013, 09:17 PM
Post
#239
|
|
beach bum Group: Members Posts: 419 Joined: 7-June 12 From: San Diego Member No.: 14,538 Region Association: Southern California |
For the first time ever, I drove my 914 around my neighborhood for a few victory laps! (IMG:style_emoticons/default/piratenanner.gif) (IMG:style_emoticons/default/first.gif) (IMG:style_emoticons/default/driving.gif) It was extremely exhilarating and fun. But there are some "issues" that need attended to and adjusted.
Here are the issues that i noted: -Pops out of second gear. Will engage and drive but within 15 seconds or so it gently pops out of gear. It stays in first just fine. -Brakes have to be pumped like 3 times to feel strong throughout the whole pedal travel, but i have to do it almost every time before i want to actually stop the car. So basically it looses pressure pretty fast is what it seams like to be, does this mean the MC has bad seals and needs replaced? I will bleed the brakes again and see if that helps. -lights on the DS dont work (for the most part). with the headlights turned on: headlight works, brake light works when braking only, fog light does not work, turn signal only works when turn signal is on. Reminder, all lights on PS are working as they should, so is there a fuse or relay that should be checked that operates just the DS? -Both PS tires rub, both DS tires do not?? front rubs on strut dust cover, back rubs on the inside wheel well. both front hubs now have 8mm spacers with 50mm studs, no more rubbing. pass rear now has two 5mm spacers and does not rub. For the rears, does the trailing arm just need some shims? Reminder, i have 944 rims, and the fronts are 911 hubs, so the offset is a bit different, but not much. My main concern is why its only on one side and not the other... (IMG:style_emoticons/default/blink.gif) -Car fires up real quickly when cold, but when its already been on recently it just cranks for awhile (quickly because of my high power starter (IMG:style_emoticons/default/biggrin.gif) ) Thats all i can think of right now, so here are some recent pictures: (IMG:http://www.914world.com/bbs2/uploads_offsite/i1293.photobucket.com-14538-1377055025.1.jpg) (IMG:http://www.914world.com/bbs2/uploads_offsite/i1293.photobucket.com-14538-1377055025.2.jpg) (IMG:http://www.914world.com/bbs2/uploads_offsite/i1293.photobucket.com-14538-1377055025.3.jpg) (IMG:http://www.914world.com/bbs2/uploads_offsite/i1293.photobucket.com-14538-1377055025.4.jpg) (IMG:http://www.914world.com/bbs2/uploads_offsite/i1293.photobucket.com-14538-1377055025.5.jpg) (IMG:http://www.914world.com/bbs2/uploads_offsite/i1293.photobucket.com-14538-1377055025.6.jpg) (front ride hight has been adjusted from where it sat in this pic) (IMG:http://www.914world.com/bbs2/uploads_offsite/i1293.photobucket.com-14538-1377055025.7.jpg) Cheers (IMG:style_emoticons/default/beerchug.gif) |
|
|
|
| '73-914kid |
Aug 20 2013, 11:51 PM
Post
#240
|
|
Senior Member Group: Members Posts: 1,473 Joined: 1-November 08 From: Vista, CA Member No.: 9,714 Region Association: Southern California |
Okay, some answers so most of your questions.. haha
1. The popping out of second gear is due to a bad synchro on second gear. Easy enough to replace with the gearbox in the car and just pull the stack. Hell, I even have a shift fork alignment jig to set it up (IMG:style_emoticons/default/biggrin.gif) 2. Definitely bleed the brakes again. Be methodical about it and do it old school with a buddy. Start at the far corner and move around the car. The low pedal is sometimes caused by the brand new seals in the calipers being stiff and pulling the pistons back immediately. So, bleed them again, and see if it improves. If it doesn't seem to, Stand on the pedal in the driveway. If the pedal slowly falls, then the MC is bad or the you have a leak in the brake lines. More driving will break in the seals, so go drive it. 3. I can't remember if they're fused separately, but check fuses, and check for burned out bulbs, discontinuity in the system due to burned bulbs does weird things in these cars. 4. Check camber. One side may have too much positive camber or negative camber causing rubbing.. 5. When you crank it once it's running, do you get a puff of gray smoke out of the exhaust? Once it's running and warm, shut the car off and look down the throat of the carb to see if the fuel is boiling over into the venturi due to heat soak. |
|
|
|
|
1 User(s) are reading this topic (1 Guests and 0 Anonymous Users)
0 Members:

|
Lo-Fi Version | Time is now: 15th June 2026 - 02:58 AM |
Invision Power Board
v9.1.4 © 2026 IPS, Inc.