|
|

|
Porsche, and the Porsche crest are registered trademarks of Dr. Ing. h.c. F. Porsche AG.
This site is not affiliated with Porsche in any way. Its only purpose is to provide an online forum for car enthusiasts. All other trademarks are property of their respective owners. |
|
|
  |
| euro911 |
 Dec 20 2018, 05:37 PM Dec 20 2018, 05:37 PM
Post
#261
|
|
Retired & living the dream. God help me if I wake up!      Group: Members Posts: 8,846 Joined: 2-December 06 From: So.Cal. & No.AZ (USA) Member No.: 7,300 Region Association: Southern California 
|
|
| dfelz |
 Dec 23 2018, 01:47 PM Dec 23 2018, 01:47 PM
Post
#262
|
|
beach bum   Group: Members Posts: 419 Joined: 7-June 12 From: San Diego Member No.: 14,538 Region Association: Southern California 
|
I wish! I have been organizing my garage and sorting through all my 914 parts though...labeling boxes and such haha. Hopefully will have something to report in the next few months though, we’ll see. Thanks for the motivation though! |
| Mendivil26 |
 Aug 12 2019, 01:01 PM Aug 12 2019, 01:01 PM
Post
#263
|
|
Newbie  Group: Members Posts: 31 Joined: 26-July 18 From: Riverside, Ca. Member No.: 22,344 Region Association: Southern California |
Ok so I have my thru body sway bar modeled up in Solidworks (So wish I had ProE, my last job used it and it was sooooo nice, too bad its a 10K license and my student edition of SW is free.99) I am also going to model the control arms so that i can do a motion simulation and geometry analysis at the different linkage holes. If this was next quarter i could also do a full fledge FEA analysis in Nastran, but since i am not taking finite element analysis until next quarter, the basic knowledge i have of solidworks FEA simulation should give me a good idea of week points in the components and where all the stress concentrations will be. My design concept was to take the OEM arm, make it adjustable, add the 930 style 90 degree through brackets for more stiffness in part and less chance of rounding the square design, and use spherical bearings on the drop link (top spherical bearing will be right hand thread, bottom will be left hand thread, this will make adjustment super easy by just having to loosen the jam nuts on both sides and then just spinning the drop link tube to adjust the tension/compression.) The clamping method is the same style the stock one uses, i like it more than other methods i have seen on aftermarket ones that have just one bolt on the end. Two bolts with the bar in between distributes the clamping force to ensure all four flats on the bar receive equal forces. I also designed a new bushing bracket so that i could use a a custom oil-impregnated brass bushing. its a simple flange style bushing but it will be pressed in from the wheel side. I will also have some kind of rubber washers in between the back of the bushing bracket and the frame sheet metal. Since the car this will be going on without a stock thru body bar i will be making a backing plate for the gas tank side with the nuts welded on for capture of the 3 M8 bolts. The backing plate, bushing bracket and link arm will all be laser cut 1/8" 1018 cold rolled steel (with the link arm obviously being bent into formation and then tig welded together. Will hopefully have them normalize since all the components will see some welding time, and will then be plated. Please keep in mind this is my first run at this system and would love everyones input and considerations that i may have overlooked. Just for reference, there are 5 holes for adjustment, the middle one is the exact distance the single stock one is at. I worked in the medical device industry for 6 months full time for an internship and i was doing hardware and tooling design (designing components for the manufacturing line and testing systems for pacemakers and implantable defibrillators) so i have some experience doing design work, am also on the SAE electric team. But like i said, i really want your input, so feel free to ask any questions you like and give any commentary. (IMG:http://www.914world.com/bbs2/uploads_offsite/i1293.photobucket.com-14538-1360811229.1.png) (IMG:http://www.914world.com/bbs2/uploads_offsite/i1293.photobucket.com-14538-1360811230.2.png) (IMG:http://www.914world.com/bbs2/uploads_offsite/i1293.photobucket.com-14538-1360811230.3.png) I can get more snap shots too! (IMG:style_emoticons/default/beerchug.gif) Sorry about reviving an old thread, but by searching the keyword "Solidworks" rendered this result and I noticed you said you were modeling control arms. Did you ever get to model any other parts of the suspension besides the sway bar? I'm building an off road Baja 914 and would like to design some longer travel control arms, and it would save me a lot of time if someone has the model already. |
| euro911 |
 Aug 12 2019, 01:46 PM Aug 12 2019, 01:46 PM
Post
#264
|
|
Retired & living the dream. God help me if I wake up!      Group: Members Posts: 8,846 Joined: 2-December 06 From: So.Cal. & No.AZ (USA) Member No.: 7,300 Region Association: Southern California 
|
I think David (@dfelz ) finished his engineering courses at Cal Poly, so I'm not sure if he still has access to the cool machines and tools they have there (IMG:style_emoticons/default/confused24.gif)
That reminds me though ... I have a pair of the arms and drop links that he made. I blasted the arms last year, but I still need to have them painted, plated or powder-coated (IMG:style_emoticons/default/idea.gif) |
| dfelz |
 Aug 13 2019, 01:12 AM Aug 13 2019, 01:12 AM
Post
#265
|
|
beach bum   Group: Members Posts: 419 Joined: 7-June 12 From: San Diego Member No.: 14,538 Region Association: Southern California 
|
Hi ( @Mendivil26 ), sorry I don’t have the control arms modeled up unfortunately, and Mark is also correct in the fact I no longer have all the great tools and CAD software that was available when I was at CalPoly. I sure miss that.
Mark I also never got around to installing my sway bar and mounts (IMG:style_emoticons/default/dry.gif) but soon I hope |
| barefoot |
 Aug 13 2019, 05:30 AM Aug 13 2019, 05:30 AM
Post
#266
|
|
Senior Member    Group: Members Posts: 1,269 Joined: 19-March 13 From: Charleston SC Member No.: 15,673 Region Association: South East States 
|
[I also picked up this sexy exhaust this morning. 2.0L straight pipe headers to a 911 muffler. The muffler had its original single side outlet cutoff and welded shut, then a dual tip center outlet weld on. I cant WAIT to mount this puppy!
(IMG:http://www.914world.com/bbs2/uploads_offsite/i1293.photobucket.com-14538-1378794075.7.jpg) Sorry for the long post, hope you enjoyed! Thanks for all the help and support everyone! (IMG:style_emoticons/default/beerchug.gif) [/quote] I think your un-equal length straight headers are going to crack because the different lengths will expand differently creating a fatigue crack cyclic stress condition. With both ends fixed the longer tube wants to expand more than the shorter one will let it. A typical fatigue machine. |
| dfelz |
 Nov 15 2020, 06:18 PM Nov 15 2020, 06:18 PM
Post
#267
|
|
beach bum   Group: Members Posts: 419 Joined: 7-June 12 From: San Diego Member No.: 14,538 Region Association: Southern California 
|
Well Hello 914 Community!! It has been quite sometime now, and I have felt the need to get my 914 back up and running. As an update, I had an engine issue about 5 years back now, and it has been sitting since then... other things in life got in the way, but id really like to get it back up and running again, then finish the job and get bodywork, paint and interior done as well once she is running again.
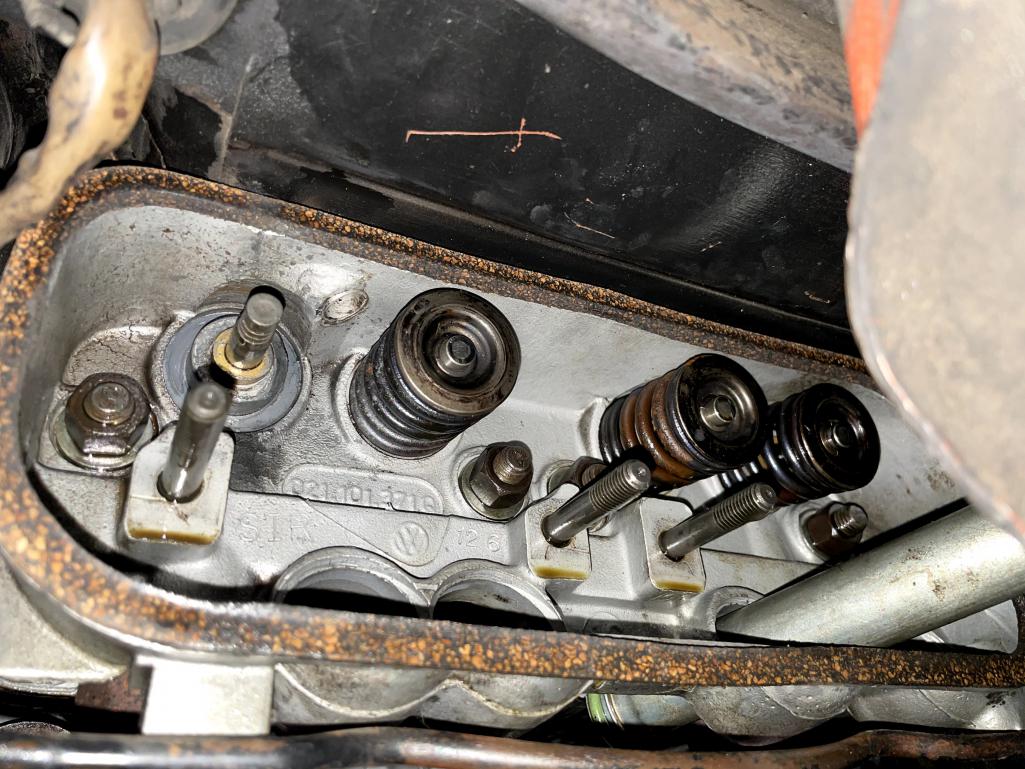
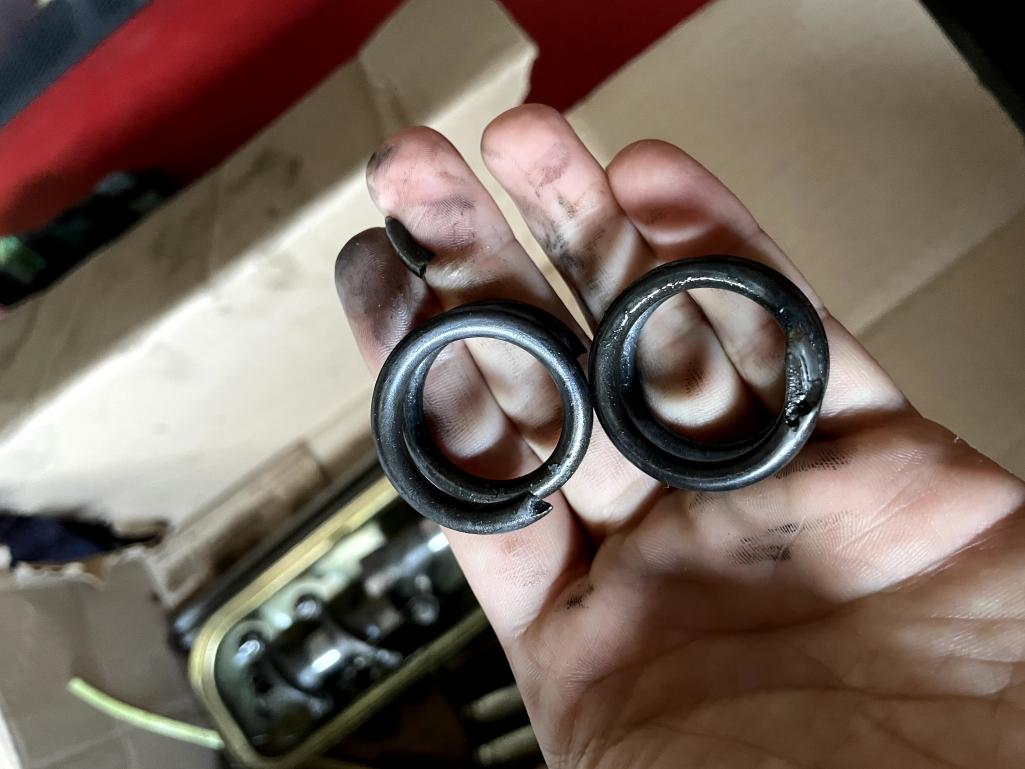
After taking the valve cover off on the driver side, it was very apparent what when wrong years back, had a valve spring failure, on cylinder #2 exhaust valve. This was probably a major oversite on my part when building the engine up, but I didn't replace the valve springs, and looking back now at some old pictures from the rebuild I can see that there is visible rust on the springs, probably from sitting in the engine for years unused before I bought and rebuilt it. So a $100 worth of new parts likely could have saved me form this mess... not sure why I didn't replace them... Lesson learned! So here we are now. My plan is to drop the engine, take the heads off and inspect everything. Feeling the valve as it sits now, the valve guide still feels nice n snug on the valve stem, certainly no wobble or looseness. Hoping (praying) that there isn't bad damage to the piston head. This incident happened while tuning the engine in the garage, so we cut the engine as soon as we heard the large bang sound, but will find out soon what domino affect it had on surrounding parts. Don't see any damage to the rocker arms and that assembly, and all pushrods look to be in great shape, along with pushrod tubes. Problem is that I cant find all the parts of the broken spring and one half of the valve retainer. Looked in the pushrod tubes and noting in there. My gut says that I need to fully crack the case open and clean out the inside to make sure there isn't any remaining pieces of the spring floating in the engine case, does that sound like the smart thing to do to everyone else as well? From the visible damage we can see now, which doesn't look drastic, on the spring seat surrounding the valve guide, does that look like it needs to be machined or repaired, or can that be used as is?? Obviously replacing all the valve springs, retainers, and valve hats. Should I replace all the exhaust valves themselves as well while I'm in there?? I have been reading they have a shorter life anyway? Any and all comments / suggestions welcome.   |
  |
1 User(s) are reading this topic (1 Guests and 0 Anonymous Users)
0 Members:

|
Lo-Fi Version | Time is now: 29th April 2024 - 07:48 PM |
Invision Power Board
v9.1.4 © 2024 IPS, Inc.


