|
|
|
Porsche, and the Porsche crest are registered trademarks of Dr. Ing. h.c. F. Porsche AG.
This site is not affiliated with Porsche in any way. Its only purpose is to provide an online forum for car enthusiasts. All other trademarks are property of their respective owners. |
|
|

  |

| maf914 |
 Dec 24 2014, 07:11 AM Dec 24 2014, 07:11 AM
Post
#61
|
|
Not a Guru!  Group: Members Posts: 3,049 Joined: 30-April 03 From: Central Florida Member No.: 632 Region Association: None |
Yes, great thread, and I missed it as well. Great work, Mats, and best of luck with your car. Merry Christmas!
|
   |

 
|
| falcor75 |
Dec 31 2014, 02:05 PM
Post
#62
|
|
Senior Member Group: Members Posts: 1,579 Joined: 22-November 12 From: Sweden Member No.: 15,176 Region Association: Scandinavia |
 Happy new year! Though I'm six months behind my original schedule it still feels pretty awsome having gotten this far. (IMG:style_emoticons/default/beerchug.gif) |
|
|
|
| thieuster |
Feb 14 2015, 01:32 PM
Post
#63
|
|
Member Group: Members Posts: 447 Joined: 31-January 15 From: 275 mls NW from Stuttgart. Member No.: 18,384 Region Association: Europe |
Just found this thread (coming from the carpet thread). What a great job!
Menno |
|
|
|
| falcor75 |
Feb 14 2015, 02:42 PM
Post
#64
|
|
Senior Member Group: Members Posts: 1,579 Joined: 22-November 12 From: Sweden Member No.: 15,176 Region Association: Scandinavia |
Thanks! (IMG:style_emoticons/default/smile.gif) (IMG:style_emoticons/default/welder.gif)
|
|
|
|
| falcor75 |
Feb 22 2015, 03:36 AM
Post
#65
|
|
Senior Member Group: Members Posts: 1,579 Joined: 22-November 12 From: Sweden Member No.: 15,176 Region Association: Scandinavia |
Watched PMB's video on rear caliper overhaul and proceded to take mine apart, turns out they must have been overhauled at some time during the cars lifespan.
Pistons were like new underneath the torn dust caps. Seal surfaces between the halfs were still nicely gold coloured. I'll replace the piston seals and dustcaps and reassemble and paint them black with some high temp paint. 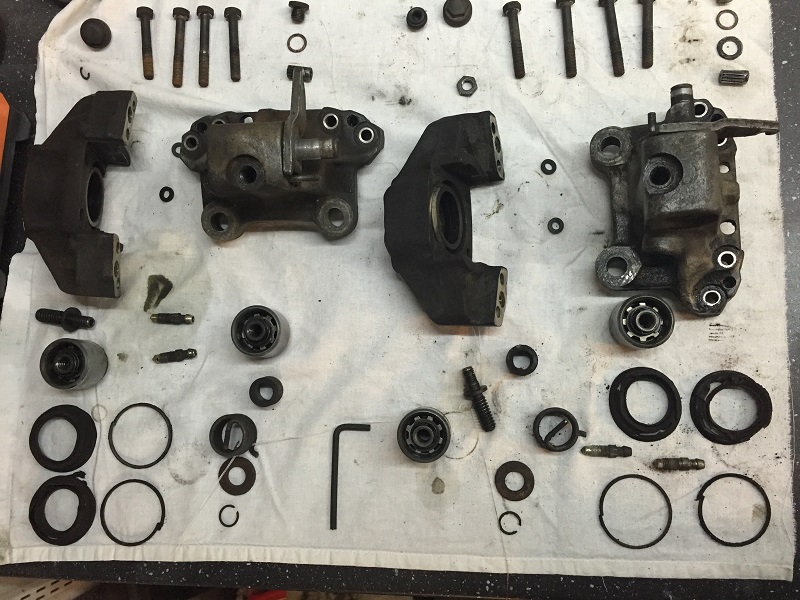 |
|
|
|
| FourBlades |
Feb 22 2015, 09:33 AM
Post
#66
|
|
From Wreck to Rockin Group: Members Posts: 2,056 Joined: 3-December 07 From: Brevard, FL Member No.: 8,414 Region Association: South East States |
|
|
|
|
| falcor75 |
Feb 28 2015, 01:55 PM
Post
#67
|
|
Senior Member Group: Members Posts: 1,579 Joined: 22-November 12 From: Sweden Member No.: 15,176 Region Association: Scandinavia |
(IMG:http://www.914world.com/bbs2/uploads_offsite/matsgarage.com-15176-1425153300.1.jpg)
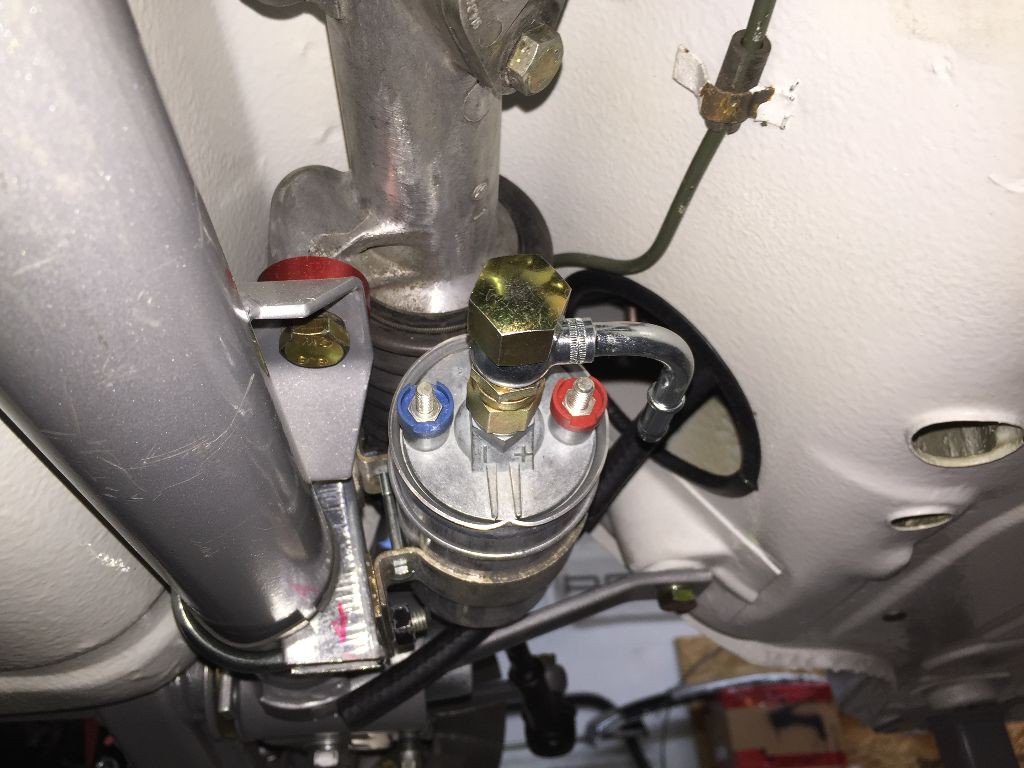
Got the last pieces for the pressure side of the fuel pump. (IMG:http://www.914world.com/bbs2/uploads_offsite/matsgarage.com-15176-1425153301.2.jpg) First piece of carpet installet. I chose to mount them with doublesided foam tape instead of glueing them in place. (IMG:http://www.914world.com/bbs2/uploads_offsite/matsgarage.com-15176-1425153303.3.jpg) Starting to look ok. But the red handle for the rear heater fan will probably need to be replaced for a new one. (IMG:http://www.914world.com/bbs2/uploads_offsite/matsgarage.com-15176-1425153304.4.jpg) OCD means changing bolts that look alittle sad for new ones despite that noone will ever see them. (IMG:http://www.914world.com/bbs2/uploads_offsite/matsgarage.com-15176-1425153305.5.jpg) Spent a few hours today with putting the rear calipers back together. Again, PMB's video made it alot easier. |
|
|
|
| mepstein |
Feb 28 2015, 04:00 PM
Post
#68
|
|
914-6 GT in waiting Group: Members Posts: 20,687 Joined: 19-September 09 From: Landenberg, PA/Wilmington, DE Member No.: 10,825 Region Association: MidAtlantic Region |
You can sand and buff that red knob and make it look like new.
|
|
|
|
| raynekat |
Feb 28 2015, 06:46 PM
Post
#69
|
|
Advanced Member Group: Members Posts: 2,171 Joined: 30-December 14 From: Coeur d'Alene, Idaho Member No.: 18,263 Region Association: Pacific Northwest |
Falcor:
Hey....can you hurry and finish this project? I've got an ivory white 914 that I'm working on as well. Trying to get some ideas from your work. (IMG:style_emoticons/default/smile.gif) Ha....just kidding. Looks great and keep up the good work. And keep warm up there in Sweden during your winter. |
|
|
|
| falcor75 |
Mar 1 2015, 05:59 AM
Post
#70
|
|
Senior Member Group: Members Posts: 1,579 Joined: 22-November 12 From: Sweden Member No.: 15,176 Region Association: Scandinavia |
(IMG:http://www.914world.com/bbs2/uploads_offsite/matsgarage.com-15176-1425211209.1.jpg)
Is it just me or shouldnt the cone on the clutch cable face towards the firewall pipe? |
|
|
|
| BIGKAT_83 |
Mar 1 2015, 07:49 AM
Post
#71
|
|
Senior Member Group: Members Posts: 1,800 Joined: 25-January 03 From: Way down south Bogart,GA Member No.: 194 Region Association: South East States |
Nice job on the fuel pump mount. (IMG:style_emoticons/default/smilie_pokal.gif) (IMG:style_emoticons/default/smilie_pokal.gif)
 |
 |
|
| falcor75 |
Mar 14 2015, 02:47 PM
Post
#72
|
|
Senior Member Group: Members Posts: 1,579 Joined: 22-November 12 From: Sweden Member No.: 15,176 Region Association: Scandinavia |
(IMG:http://www.914world.com/bbs2/uploads_offsite/matsgarage.com-15176-1426366062.1.jpg)
Rear brakes and hardlines mounted (IMG:http://www.914world.com/bbs2/uploads_offsite/matsgarage.com-15176-1426366063.2.jpg) Engine decklid painted (the black pieces) and mesh grille installed with new rubber lining. (IMG:http://www.914world.com/bbs2/uploads_offsite/matsgarage.com-15176-1426366064.3.jpg) Lower and upper front targa seal installed. (IMG:http://www.914world.com/bbs2/uploads_offsite/matsgarage.com-15176-1426366065.4.jpg) Glued the top vinyl in aswell. |
|
|
|
| falcor75 |
Mar 23 2015, 02:01 AM
Post
#73
|
|
Senior Member Group: Members Posts: 1,579 Joined: 22-November 12 From: Sweden Member No.: 15,176 Region Association: Scandinavia |
I'm starting to get close to the point to start dismantling the tins from the engine and fix it up cosmetically. (I will not be splitting the case or removing the heads etc)
I want to hang the engine from my engine stand but I dont have the yoke, I've seen some hang it up anyway while others say not to do it without the yoke.... Paying €300 for a yoke I'll use once isnt in my budget at the moment... What's the wisdom of the forum? |
|
|
|
| mgp4591 |
Mar 23 2015, 05:58 AM
Post
#74
|
|
914 Guru Group: Members Posts: 5,934 Joined: 1-August 12 From: Salt Lake City Ut Member No.: 14,748 Region Association: Intermountain Region |
QUOTE(mepstein @ Feb 28 2015, 04:00 PM)  You can sand and buff that red knob and make it look like new. That's what SHE said... (IMG:style_emoticons/default/w00t.gif) Sorry... it's late in my work day and I'm more than ready to go home (IMG:style_emoticons/default/slap.gif) |
|
|
|
| falcor75 |
Mar 23 2015, 06:12 AM
Post
#75
|
|
Senior Member Group: Members Posts: 1,579 Joined: 22-November 12 From: Sweden Member No.: 15,176 Region Association: Scandinavia |
QUOTE(mgp4591 @ Mar 23 2015, 12:58 PM) QUOTE(mepstein @ Feb 28 2015, 04:00 PM) You can sand and buff that red knob and make it look like new. That's what SHE said... (IMG:style_emoticons/default/w00t.gif) Sorry... it's late in my work day and I'm more than ready to go home (IMG:style_emoticons/default/slap.gif) LOL! Thanks for the laugh... (IMG:style_emoticons/default/lol-2.gif) |
|
|
|
| falcor75 |
Mar 24 2015, 11:29 PM
Post
#76
|
|
Senior Member Group: Members Posts: 1,579 Joined: 22-November 12 From: Sweden Member No.: 15,176 Region Association: Scandinavia |
(IMG:http://www.914world.com/bbs2/uploads_offsite/matsgarage.com-15176-1427261358.1.jpg)
Got my dash back from the upholsterer....sooo smooth! (IMG:http://www.914world.com/bbs2/uploads_offsite/matsgarage.com-15176-1427261360.2.jpg) (IMG:http://www.914world.com/bbs2/uploads_offsite/matsgarage.com-15176-1427261361.3.jpg) Closeup, he had to lay one seam to either side of the bulge and one across the top but it turned out great. He also did the lower piece but I didnt get any pics of that. (IMG:http://www.914world.com/bbs2/uploads_offsite/matsgarage.com-15176-1427261362.4.jpg) Also got my fresh air box back together. Used some 15x5 mm straight foam cell adhesive strips to seal the motor against the housing and the rest of the seals are from 914Rubber's airbox rebuild kit. Not sure why I cant get the box to clean up, annoying with one half looking ok and the other half looking dirty. Now I'm just waiting for my electrical harness to be finished being refurbished by Kroon Wire Harnesses. They have replaced all the crimped on connectors and exchanged some damaged wires. If you need help with your wiring harness I recommend them warmly. Kroon Wire Harnesses |
|
|
|
| 914350 |
Mar 25 2015, 08:39 AM
Post
#77
|
|
Senior Member Group: Members Posts: 548 Joined: 21-April 14 From: Torrance Ca. Member No.: 17,275 Region Association: Southern California |
I love that dash! Nice.
|
|
|
|
| falcor75 |
Apr 20 2015, 10:42 PM
Post
#78
|
|
Senior Member Group: Members Posts: 1,579 Joined: 22-November 12 From: Sweden Member No.: 15,176 Region Association: Scandinavia |
(IMG:http://www.914world.com/bbs2/uploads_offsite/matsgarage.com-15176-1429591311.1.jpg)
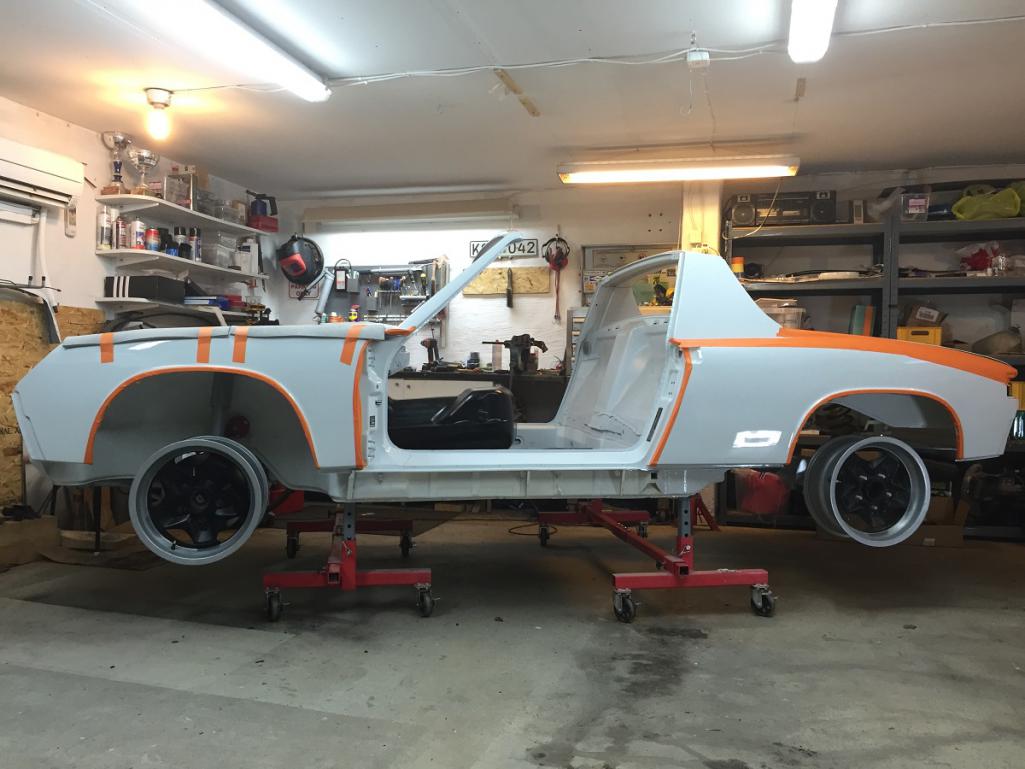
Doors have been added, panel gaps are ok on the passenger side and slightly off on the drivers side, will just have to live with that or get a less molested driver side door. (IMG:http://www.914world.com/bbs2/uploads_offsite/matsgarage.com-15176-1429626472.1.jpg) And I can reveal a bit about how the car will be decorated later on... (IMG:style_emoticons/default/blink.gif) (IMG:http://www.914world.com/bbs2/uploads_offsite/matsgarage.com-15176-1429591312.2.jpg) More parts back from powdercoat, the pile on the right failed pre paint inspection and needs some attention (IMG:http://www.914world.com/bbs2/uploads_offsite/matsgarage.com-15176-1429591313.3.jpg) ...there were cracks.... (IMG:http://www.914world.com/bbs2/uploads_offsite/matsgarage.com-15176-1429591314.4.jpg) Trying to align the hood, the new front bulkhead seal seems to be too tall for the GRP hood as it make the middle of it bulge up out of alignment.... (IMG:style_emoticons/default/sad.gif) (IMG:http://www.914world.com/bbs2/uploads_offsite/matsgarage.com-15176-1429591315.5.jpg) The blackstriped electrical snake... (IMG:http://www.914world.com/bbs2/uploads_offsite/matsgarage.com-15176-1429626646.1.jpg) New fuse panel (yes it was painted black before it was installed) (IMG:http://www.914world.com/bbs2/uploads_offsite/matsgarage.com-15176-1429626709.1.jpg) Airbox went back in after the harness slithered into place. (IMG:http://www.914world.com/bbs2/uploads_offsite/matsgarage.com-15176-1429591317.6.jpg) Along with the flapper valves and hoses. (IMG:http://www.914world.com/bbs2/uploads_offsite/matsgarage.com-15176-1429591318.7.jpg) Cables everywhere... (IMG:http://www.914world.com/bbs2/uploads_offsite/matsgarage.com-15176-1429591319.8.jpg) Slowly coming together, the plastic face on my left gauge has a defect in it, needs to be sorted at a later date. (IMG:http://www.914world.com/bbs2/uploads_offsite/matsgarage.com-15176-1429591320.9.jpg) And on sunday I tried to release the magical smoke, I failed. (IMG:style_emoticons/default/biggrin.gif) Still working on installing all the electrical stuff back into the car but it felt like a major step to have the lights light up again. |
|
|
|
| Cairo94507 |
Apr 21 2015, 07:34 AM
Post
#79
|
|
Michael Group: Members Posts: 10,630 Joined: 1-November 08 From: Auburn, CA Member No.: 9,712 Region Association: Northern California |
Your car is coming along very nicely. Keep posting pictures please. (IMG:style_emoticons/default/first.gif)
|
|
|
|
| CptTripps |
Apr 21 2015, 08:34 AM
Post
#80
|
|
:: Punch and Pie :: Group: Members Posts: 3,586 Joined: 26-December 04 From: Tuscaloosa, AL and Akron, OH Member No.: 3,342 Region Association: Upper MidWest |
Dash and face look amazing. You're going to love that....and hate it when any dust gets on it. Alcantara is a bitch to keep clean.
....but I'm doing the same thing in mine, so who am I to judge! |
|
|
|
|
1 User(s) are reading this topic (1 Guests and 0 Anonymous Users)
0 Members:

|
Lo-Fi Version | Time is now: 13th May 2026 - 02:08 PM |
Invision Power Board
v9.1.4 © 2026 IPS, Inc.