|
|
|
Porsche, and the Porsche crest are registered trademarks of Dr. Ing. h.c. F. Porsche AG.
This site is not affiliated with Porsche in any way. Its only purpose is to provide an online forum for car enthusiasts. All other trademarks are property of their respective owners. |
|
|

  |

| green914 |
 Jul 30 2013, 10:40 AM Jul 30 2013, 10:40 AM
Post
#1
|
|
Senior Member  Group: Members Posts: 1,467 Joined: 29-March 11 From: Sacramento, California Member No.: 12,874 Region Association: Northern California |
Sunday afternoon's autocross ended with what I thought was a broken accelerator cable, (IMG:style_emoticons/default/confused24.gif) but it turned out to be the bushings in the pedal cluster. I guess the loss of the bushing (IMG:style_emoticons/default/WTF.gif) caused a misalignment of the pedal and linkage, so when I went to step on it - it bent this connecting rod. (IMG:style_emoticons/default/idea.gif) I am looking to find some instructions for a DIY overhaul of the pedal cluster.
|
   |

 
|
| green914 |
Jul 30 2013, 10:41 AM
Post
#2
|
|
Senior Member Group: Members Posts: 1,467 Joined: 29-March 11 From: Sacramento, California Member No.: 12,874 Region Association: Northern California |
This is the gas pedal with the connecting rod.
Attached thumbnail(s) 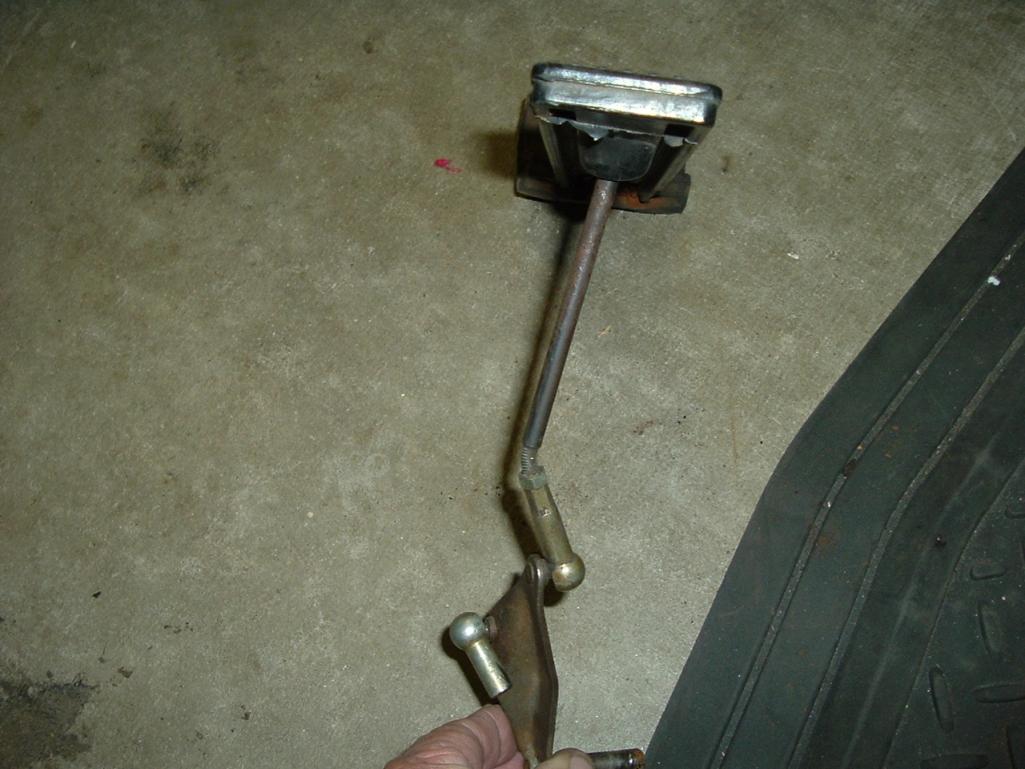
|
|
|
|
| Elliot Cannon |
Jul 30 2013, 11:15 AM
Post
#3
|
|
914 Guru Group: Retired Members Posts: 8,487 Joined: 29-December 06 From: Paso Robles Ca. (Central coast) Member No.: 7,407 Region Association: None |
See Bruce Stone. bdstone.
|
|
|
|
| 76-914 |
Jul 30 2013, 11:27 AM
Post
#4
|
|
Repeat Offender & Resident Subaru Antagonist Group: Members Posts: 13,503 Joined: 23-January 09 From: Temecula, CA Member No.: 9,964 Region Association: Southern California |
You won't need any instructions. It's obvious once you have it on the table. DIY; it's quick, easy and fun.
|
 |
|
| Chris H. |
Jul 30 2013, 11:46 AM
Post
#5
|
|
Senior Member Group: Members Posts: 4,030 Joined: 2-January 03 From: Chicago 'burbs Member No.: 73 Region Association: Upper MidWest |
|
|
|
|
| Eric_Shea |
Jul 30 2013, 12:03 PM
Post
#6
|
|
PMB Performance Group: Admin Posts: 19,275 Joined: 3-September 03 From: Salt Lake City, UT Member No.: 1,110 Region Association: Rocky Mountains |
|
|
|
|
| Cap'n Krusty |
Jul 30 2013, 12:22 PM
Post
#7
|
|
Cap'n Krusty Group: Members Posts: 10,794 Joined: 24-June 04 From: Santa Maria, CA Member No.: 2,246 Region Association: Central California |
QUOTE(Eric_Shea @ Jul 30 2013, 11:03 AM)  The weak point in your nice writeup is the part about the removal of the clutch pedal from the shaft. Over the 40 years I've been doing this job, only a few have actually pressed right off. Hammers, heat, air tools, drifts, and high end penetrants are commonly needed, and that's AFTER you've spent a lot of time getting the roll pin out. Using a drift or punch as shown ion the picture can, and frequently does, mushroom the shaft, making removal even harder. I recommend heat right from the get-go. BTW, I'd replace the gas pedal while I was in there, because a floppy pedal is most often the reason the rod fails. The Cap'n |
|
|
|
| Drums66 |
Jul 30 2013, 12:30 PM
Post
#8
|
|
914 Rudiments Group: Members Posts: 5,321 Joined: 15-January 03 From: Coronado,Cali Member No.: 151 Region Association: Southwest Region |
QUOTE(76-914 @ Jul 30 2013, 10:27 AM) You won't need any instructions. It's obvious once you have it on the table. DIY; it's quick, easy and fun. .....Ya, it's pretty much straight forward (IMG:style_emoticons/default/idea.gif) (IMG:style_emoticons/default/idea.gif) (IMG:style_emoticons/default/popcorn[1].gif)(& there are kit's!) |
|
|
|
| euro911 |
Jul 30 2013, 12:37 PM
Post
#9
|
|
Retired & living the dream. God help me if I wake up! Group: Members Posts: 8,849 Joined: 2-December 06 From: So.Cal. & No.AZ (USA) Member No.: 7,300 Region Association: Southern California |
Removing the roll pin is the easy part. Getting the clutch arm off ... well, that's whole 'nother story (IMG:style_emoticons/default/dry.gif)
|
|
|
|
| Eric_Shea |
Jul 30 2013, 01:15 PM
Post
#10
|
|
PMB Performance Group: Admin Posts: 19,275 Joined: 3-September 03 From: Salt Lake City, UT Member No.: 1,110 Region Association: Rocky Mountains |
QUOTE The weak point in your nice writeup is the part about the removal of the clutch pedal from the shaft. Over the 40 years I've been doing this job, only a few have actually pressed right off. Hammers, heat, air tools, drifts, and high end penetrants are commonly needed, and that's AFTER you've spent a lot of time getting the roll pin out. My "never fail" trick was a pointed bit in an air hammer. Worked every single time to get it started. Then a suitable drift finishes it off but... Mark is correct; Getting the clutch arm off ... well, that's whole 'nother story |
|
|
|
| green914 |
Jul 30 2013, 01:48 PM
Post
#11
|
|
Senior Member Group: Members Posts: 1,467 Joined: 29-March 11 From: Sacramento, California Member No.: 12,874 Region Association: Northern California |
Thanks for all the info (IMG:style_emoticons/default/biggrin.gif) I have been playing with a pedal cluster that I removed from one of my rollers; I got the roll pin out (IMG:style_emoticons/default/smash.gif) fairly easy, but the clutch pedal seems to be frozen in place. (IMG:style_emoticons/default/headbang.gif) It will have to let it soak in penetrating oil for a week (IMG:style_emoticons/default/confused24.gif) maybe longer, and then try it again.
|
|
|
|
| ThePaintedMan |
Jul 30 2013, 03:01 PM
Post
#12
|
|
Advanced Member Group: Members Posts: 3,886 Joined: 6-September 11 From: St. Petersburg, FL Member No.: 13,527 Region Association: South East States |
QUOTE(green914 @ Jul 30 2013, 03:48 PM) Thanks for all the info (IMG:style_emoticons/default/biggrin.gif) I have been playing with a pedal cluster that I removed from one of my rollers; I got the roll pin out (IMG:style_emoticons/default/smash.gif) fairly easy, but the clutch pedal seems to be frozen in place. (IMG:style_emoticons/default/headbang.gif) It will have to let it soak in penetrating oil for a week (IMG:style_emoticons/default/confused24.gif) maybe longer, and then try it again. ....and as the good Cap'n said, START with heat. If you screw it up because you didn't throw everything at it that you could, you'll be sorry later. (IMG:style_emoticons/default/smile.gif) BTDT |
|
|
|
| euro911 |
Jul 30 2013, 03:21 PM
Post
#13
|
|
Retired & living the dream. God help me if I wake up! Group: Members Posts: 8,849 Joined: 2-December 06 From: So.Cal. & No.AZ (USA) Member No.: 7,300 Region Association: Southern California |
Make sure to work in a well ventilated area if you apply a torch after any solvent has been used (especially brake cleaner) ... inhaling the vaporized fumes can kill you (IMG:style_emoticons/default/sad.gif)
|
|
|
|
| ThePaintedMan |
Jul 30 2013, 03:23 PM
Post
#14
|
|
Advanced Member Group: Members Posts: 3,886 Joined: 6-September 11 From: St. Petersburg, FL Member No.: 13,527 Region Association: South East States |
QUOTE(euro911 @ Jul 30 2013, 05:21 PM) Make sure to work in a well ventilated area if you apply a torch after any solvent has been used (especially brake cleaner) ... inhaling the vaporized fumes can kill you (IMG:style_emoticons/default/sad.gif) (IMG:style_emoticons/default/agree.gif) That's also why I NEVER buy chlorinated brake cleaner. I read a bad story about a guy who welded something that had been soaked in the chlorinated kind. Really screwed him up. |
|
|
|
| green914 |
Jul 30 2013, 04:08 PM
Post
#15
|
|
Senior Member Group: Members Posts: 1,467 Joined: 29-March 11 From: Sacramento, California Member No.: 12,874 Region Association: Northern California |
QUOTE(euro911 @ Jul 30 2013, 02:21 PM) Make sure to work in a well ventilated area if you apply a torch after any solvent has been used (especially brake cleaner) ... inhaling the vaporized fumes can kill you (IMG:style_emoticons/default/sad.gif) I have been using an electric-heat-gun, so far I have managed to melt the nylon bushings from both ends of the shaft. (IMG:style_emoticons/default/blink.gif) (IMG:style_emoticons/default/huh.gif) (IMG:style_emoticons/default/wacko.gif) the smoke from the penetrating oil and bushings was quite nasty; I had the garage door in the full up position, window open,, and a fan blasting the work area. (IMG:style_emoticons/default/headbang.gif) still have not moved the clutch pedal. |
|
|
|
| shuie |
Jul 30 2013, 04:12 PM
Post
#16
|
|
Member Group: Members Posts: 352 Joined: 17-May 04 From: baton rouge, la Member No.: 2,075 |
Here's the easiest way to do it:
Step 1.) Put in box Step 2.) Send to fellow forum member bdstone914 |
|
|
|
| green914 |
Jul 30 2013, 04:13 PM
Post
#17
|
|
Senior Member Group: Members Posts: 1,467 Joined: 29-March 11 From: Sacramento, California Member No.: 12,874 Region Association: Northern California |
(IMG:style_emoticons/default/idea.gif) I was thinking maybe a puller of some type might get the pedal off; there is plenty of room for a couple of claws to grab the clutch pedal's lower edge. (IMG:style_emoticons/default/idea.gif) Hmmm...
|
|
|
|
| Cap'n Krusty |
Jul 30 2013, 04:14 PM
Post
#18
|
|
Cap'n Krusty Group: Members Posts: 10,794 Joined: 24-June 04 From: Santa Maria, CA Member No.: 2,246 Region Association: Central California |
I said "heat", not "high performance hair dryer". A propane torch is the minimum leveh heat source, a MAPP torch would be better. IME, soaking doesn't make it any easier.
The Cap'n |
|
|
|
| reharvey |
Jul 30 2013, 04:19 PM
Post
#19
|
|
Senior Member Group: Members Posts: 573 Joined: 16-July 08 From: N. E. Ohio Member No.: 9,308 Region Association: North East States |
QUOTE(Cap'n Krusty @ Jul 30 2013, 06:14 PM) I said "heat", not "high performance hair dryer". A propane torch is the minimum leveh heat source, a MAPP torch would be better. IME, soaking doesn't make it any easier. The Cap'n (IMG:style_emoticons/default/agree.gif) HEAT as in red hot! It'll come right off. |
|
|
|
| green914 |
Aug 6 2013, 06:15 PM
Post
#20
|
|
Senior Member Group: Members Posts: 1,467 Joined: 29-March 11 From: Sacramento, California Member No.: 12,874 Region Association: Northern California |
QUOTE(Cap'n Krusty @ Jul 30 2013, 03:14 PM) I said "heat", not "high performance hair dryer". A propane torch is the minimum leveh heat source, a MAPP torch would be better. IME, soaking doesn't make it any easier. The Cap'n QUOTE(reharvey @ Jul 30 2013, 03:19 PM) QUOTE(Cap'n Krusty @ Jul 30 2013, 06:14 PM) I said "heat", not "high performance hair dryer". A propane torch is the minimum leveh heat source, a MAPP torch would be better. IME, soaking doesn't make it any easier. The Cap'n (IMG:style_emoticons/default/agree.gif) HEAT as in red hot! It'll come right off. Big Thanks to the Cap,n and reharvey for being so good at explaining what was needed (IMG:style_emoticons/default/welder.gif) extreme heat as in (IMG:style_emoticons/default/happy11.gif) red hot did the trick. Looks like the rest should go smoothly. Thanks to those who sent in the links to instructions. (IMG:style_emoticons/default/smile.gif) (IMG:style_emoticons/default/biggrin.gif) (IMG:style_emoticons/default/bye1.gif) |
|
|
|
|
2 User(s) are reading this topic (2 Guests and 0 Anonymous Users)
0 Members:

|
Lo-Fi Version | Time is now: 19th May 2024 - 12:03 PM |
Invision Power Board
v9.1.4 © 2024 IPS, Inc.