|
|
|
Porsche, and the Porsche crest are registered trademarks of Dr. Ing. h.c. F. Porsche AG.
This site is not affiliated with Porsche in any way. Its only purpose is to provide an online forum for car enthusiasts. All other trademarks are property of their respective owners. |
|
|

  |

| cdmcse |
 Apr 21 2005, 11:50 PM Apr 21 2005, 11:50 PM
Post
#101
|
|
Member  Group: Members Posts: 340 Joined: 17-December 04 From: Georgetown, Ky Member No.: 3,305 |
Mount welded on...
Attached image(s) 
|
   |

 
|
| cdmcse |
Apr 21 2005, 11:51 PM
Post
#102
|
|
Member Group: Members Posts: 340 Joined: 17-December 04 From: Georgetown, Ky Member No.: 3,305 |
Engine Bay completely done and POR-15'ed.
Attached image(s) 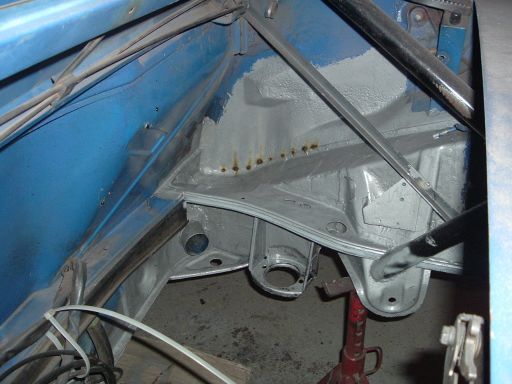
|
|
|
|
| cdmcse |
Apr 21 2005, 11:52 PM
Post
#103
|
|
Member Group: Members Posts: 340 Joined: 17-December 04 From: Georgetown, Ky Member No.: 3,305 |
My hell hole is no longer a hell hole...
Attached image(s) 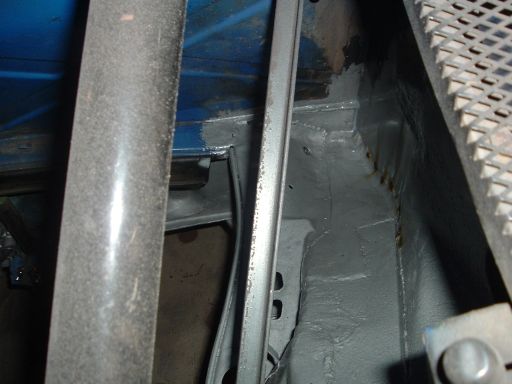
|
|
|
|
| cdmcse |
Apr 21 2005, 11:53 PM
Post
#104
|
|
Member Group: Members Posts: 340 Joined: 17-December 04 From: Georgetown, Ky Member No.: 3,305 |
Right side RD rocker re-enforcement installed...
Attached image(s) 
|
|
|
|
| cdmcse |
Apr 21 2005, 11:55 PM
Post
#105
|
|
Member Group: Members Posts: 340 Joined: 17-December 04 From: Georgetown, Ky Member No.: 3,305 |
Last one for now. Left Side Rocker re-enforcement. Note the Jackpost Delete. Now for a (IMG:http://www.914world.com/bbs2/html/emoticons/beer.gif)
Attached image(s) 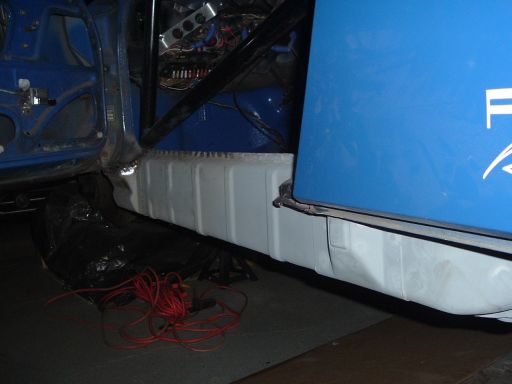
|
|
|
|
| cdmcse |
Apr 29 2005, 07:14 PM
Post
#106
|
|
Member Group: Members Posts: 340 Joined: 17-December 04 From: Georgetown, Ky Member No.: 3,305 |
A little more work done, First panel of the chassis stiffening kit installed...
Attached image(s) 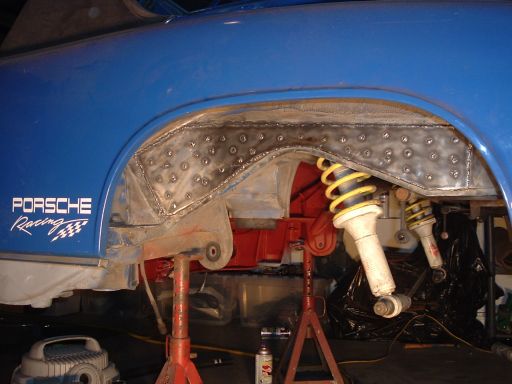
|
|
|
|
| cdmcse |
Apr 29 2005, 07:15 PM
Post
#107
|
|
Member Group: Members Posts: 340 Joined: 17-December 04 From: Georgetown, Ky Member No.: 3,305 |
Got my rear arms cleaned up and new bearings installed...
Attached image(s) 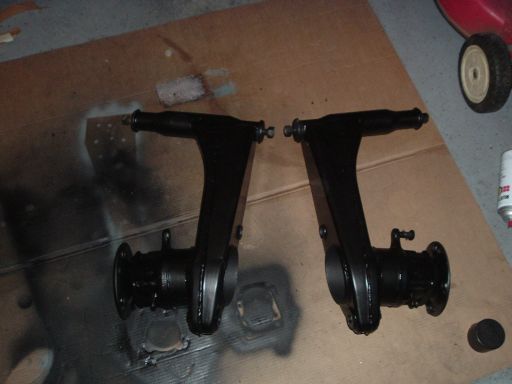
|
|
|
|
| Brad Roberts |
Apr 29 2005, 07:34 PM
Post
#108
|
|
914 Freak! Group: Members Posts: 19,148 Joined: 23-December 02 Member No.: 8 Region Association: None |
I havent been following along.. but where is the down tube going that comes from the top of the main hoop ??
Surprised you are installing the GT kit with a caged car. B |
|
|
|
| cdmcse |
Apr 29 2005, 09:07 PM
Post
#109
|
||
|
Member Group: Members Posts: 340 Joined: 17-December 04 From: Georgetown, Ky Member No.: 3,305 |
The down tube goes to the shock towers, then another fork from that goes to the inside suspension ear. What I was getting during hard corning is a twisting effect on the down tube to the suspension ear (The right rear was actually barely rubbing in the fender occasionally). I think this was mainly due to where the chassis was weakend due to rust. I replaced the severely rusted areas, but I think the whole structure is probably slightly weaker due to the rust. I decided to lock it all in together with the stiffening kit. I think I will only use the piece pictured above and the small piece that ties that to the outer mount. I am still considering if I should use the one that goes on the bottom side of the mount. |
||
|
|
|
||
| Brad Roberts |
Apr 29 2005, 09:13 PM
Post
#110
|
|
914 Freak! Group: Members Posts: 19,148 Joined: 23-December 02 Member No.: 8 Region Association: None |
It looks good. I really like that color of blue.
I would use the other piece you are referencing. The side piece you installed isnt really needed when you run a tube to the front of the shock tower. What we used to see in GT caged cars (with no down tubes) they would crack right in front of the shock tower as we increased spring rate over 300lbs. The stiff kit didnt help this. Only the tubing to the front side of the shock tower helped (or to the top of the frame rail just in front of the shock tower) This car looks familiar. Was this the one that the "dealer" in KY had for sale ? Had multiple pics on a website they run for a small used car dealership ? B |
|
|
|
| cdmcse |
Apr 29 2005, 09:46 PM
Post
#111
|
||
|
Member Group: Members Posts: 340 Joined: 17-December 04 From: Georgetown, Ky Member No.: 3,305 |
Yep same car. It ended up having more rust in it than I thought when I bought it, but That is all behind me now. (IMG:http://www.914world.com/bbs2/html/emoticons/rolleyes.gif) |
||
|
|
|
||
| Brad Roberts |
Apr 29 2005, 09:55 PM
Post
#112
|
|
914 Freak! Group: Members Posts: 19,148 Joined: 23-December 02 Member No.: 8 Region Association: None |
I was asked last April to have someone take a look at the car for us (Resident German Female) She wanted to know if I could go buy it for her and bring it back here. She wanted a track/AutoX car. I told her we would locate something closer to us... we did... The rest is history. It appears you have sorted out all the issues. Get it back together so you can enjoy it.
B |
|
|
|
| cdmcse |
May 9 2005, 11:25 PM
Post
#113
|
|
Member Group: Members Posts: 340 Joined: 17-December 04 From: Georgetown, Ky Member No.: 3,305 |
OK, now since we are having a KY 914 meet on the 22nd, I am going to finish this thing. Left side stiffening kit installed...
Attached image(s) 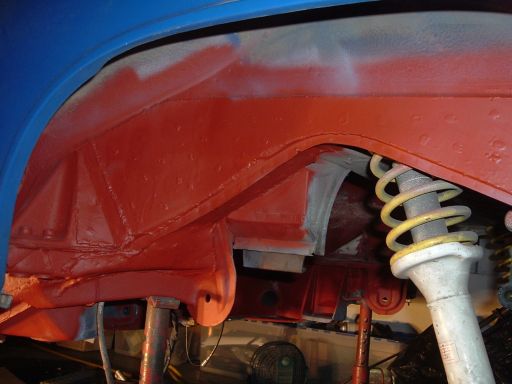
|
|
|
|
| cdmcse |
May 9 2005, 11:25 PM
Post
#114
|
|
Member Group: Members Posts: 340 Joined: 17-December 04 From: Georgetown, Ky Member No.: 3,305 |
Right Side...
Attached image(s) 
|
|
|
|
| cdmcse |
May 9 2005, 11:27 PM
Post
#115
|
|
Member Group: Members Posts: 340 Joined: 17-December 04 From: Georgetown, Ky Member No.: 3,305 |
Left door sill, I had to take the doors off to finish it right.
Attached image(s) 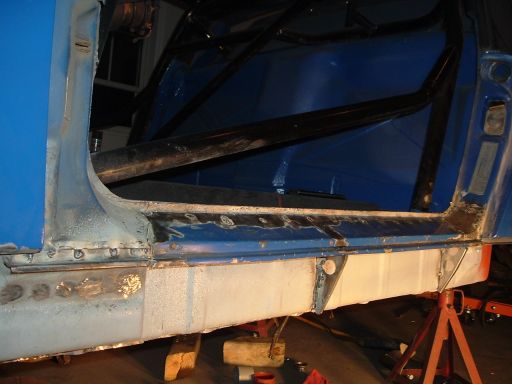
|
|
|
|
| cdmcse |
May 9 2005, 11:29 PM
Post
#116
|
|
Member Group: Members Posts: 340 Joined: 17-December 04 From: Georgetown, Ky Member No.: 3,305 |
This is my patch I made for the door sill. There was a rust repair done there in the past that was bascally hammer a big dent in all the rust, then fill with 1" of bondo. (IMG:http://www.914world.com/bbs2/html/emoticons/dry.gif)
Attached image(s) 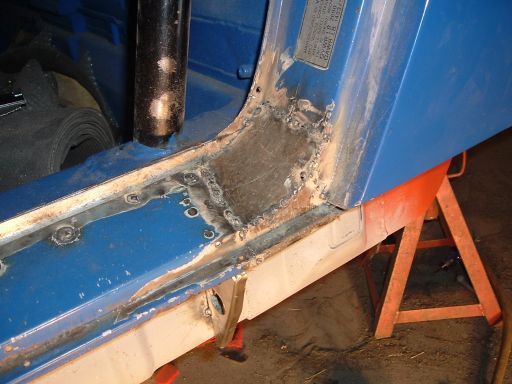
|
|
|
|
| cdmcse |
May 9 2005, 11:31 PM
Post
#117
|
|
Member Group: Members Posts: 340 Joined: 17-December 04 From: Georgetown, Ky Member No.: 3,305 |
Last one for now. The Right door sill. Now I just have to patch a couple of small holes in the driver wheel well, then I am 100% done with the welding!!!!!! (IMG:http://www.914world.com/bbs2/html/emoticons/boldblue.gif)
Attached image(s) 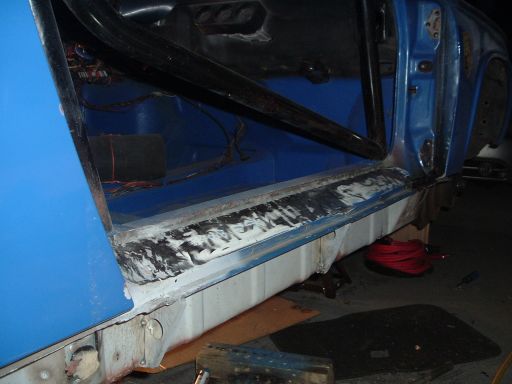
|
|
|
|
| 914fire |
May 10 2005, 12:16 AM
Post
#118
|
|
Captain Dave E7 Group: Members Posts: 200 Joined: 7-April 05 From: MO Member No.: 3,886 |
thats looking good keep it up.. (IMG:http://www.914world.com/bbs2/html/emoticons/clap.gif)
|
|
|
|
| cdmcse |
May 11 2005, 11:29 PM
Post
#119
|
|
Member Group: Members Posts: 340 Joined: 17-December 04 From: Georgetown, Ky Member No.: 3,305 |
Woo Hoo, all the welding is done. (IMG:http://www.914world.com/bbs2/html/emoticons/smile.gif) Prime and Paint tomorrow and friday, re-assemble this weekend.
|
|
|
|
| Michael J |
May 14 2005, 10:30 AM
Post
#120
|
|
Welcome to 2007 Group: Members Posts: 268 Joined: 23-November 04 From: Olympia, WA Member No.: 3,166 |
Wow, I just ran across your repair thread. That series of pictures is a good story for those who think that a bunch of rust means the junk yard. Good work and good luck. I was worried about just replacing my battery tray and claening up surface rust. I am inspired.
|
|
|
|
|
1 User(s) are reading this topic (1 Guests and 0 Anonymous Users)
0 Members:

|
Lo-Fi Version | Time is now: 11th November 2025 - 12:14 AM |
Invision Power Board
v9.1.4 © 2025 IPS, Inc.