|
|
|
Porsche, and the Porsche crest are registered trademarks of Dr. Ing. h.c. F. Porsche AG.
This site is not affiliated with Porsche in any way. Its only purpose is to provide an online forum for car enthusiasts. All other trademarks are property of their respective owners. |
|
|

  |

| DBCooper |
 Sep 11 2015, 09:00 PM Sep 11 2015, 09:00 PM
Post
#42
|
|
14's in the 13's with ATTITUDE  Group: Members Posts: 3,079 Joined: 25-August 04 From: Dazed and Confused Member No.: 2,618 Region Association: Northern California |
You're doing great work. That's a really lucky car.
|
   |

 
|
| zambezi |
Sep 12 2015, 09:10 AM
Post
#43
|
|
Senior Member Group: Members Posts: 711 Joined: 14-April 08 From: Lafayette, LA Member No.: 8,920 Region Association: South East States |
should have fixed the rust on the inside wheel well on the pass. side before the outer panel got welded on.
|
|
|
|
| R_u_dd |
Sep 26 2015, 11:41 AM
Post
#44
|
|
Member Group: Members Posts: 154 Joined: 3-March 14 From: Grants Pass, Oregon Member No.: 17,072 Region Association: Pacific Northwest |
Engine Mount
The inspiration for the engine mount design comes from Amenson's Thread. I am using the Smallcar engine mount which is designed to mount a Subaru engine into a Vanagan. I am also using their oil pan which is designed together with the mount. This is a nice oil pan, aluminum, increases oil capacity to 5 Qt and yet is shorter in profile. It also provides a jack point or flat place to set your engine on the ground or a work bench. The front part of the mount has to be cut off in order to move the engine forward in the engine bay. I flipped my Porsche engine bracket upside down to lower the engine about an inch. I am using the Subaru Transmission which is different then Amenson's thread. He has a side shifting Porsche transmission which is really desirable. With that setup he has to put the engine in the right place to also utilize the transmission mounts and thus four mounting points for the setup. My bracket is for my 1971 with a tail shifter where the shift rods go around the bar rather than through the engine bracket bar. Which allows me to flip the bar. Since I will be using the Subaru transmission it is important to get the transmission bracket the right height so the transmission is level to properly lube the fourth and fifth gear. Trying to get the engine in the right place to: -avoid cutting the trunk, -level the transmission, -give enough clearance in front of the engine, and behind, -align the axles properly (they need some angle, but not too much. -measure for custom fit axles. It's a lot easier to use the Porsche tranny). (IMG:http://www.914world.com/bbs2/uploads_offsite/i1301.photobucket.com-17072-1443289264.1.jpg) In this picture, the Porsche bracket bar is not flipped yet and you can just see the curl of the Smallcar mount touching it. The engine is still too far back. The final mount will be 2" more forward and 1" lower. (IMG:http://www.914world.com/bbs2/uploads_offsite/i1301.photobucket.com-17072-1443289264.2.jpg) Lower side view showing the Porsche bracket and better view of the Smallcar mount. The engine is not level in this shot, or in its final position. Still assessing the position. That curved tube is for the dipstick. Once the mount is welded together, the oil pan comes with it when it is removed. You will see this in later pictures. (IMG:http://www.914world.com/bbs2/uploads_offsite/i1301.photobucket.com-17072-1443289264.3.jpg) Welded angle iron across the mount first while the mount is still on the engine, to insure that there's no movement. Now to finish the mount, I had to remove the mount and oil pan from the engine. At this point the oil pan stays with the mount. (IMG:http://www.914world.com/bbs2/uploads_offsite/i1301.photobucket.com-17072-1443289264.4.jpg) Notice the waterpump tube to the left. The bracket bar will need to clear that by 1/4" to get the hose on. Also, the bracket bar needs to clear the oil filter with enough room to change the filter. This required some careful fitting. (IMG:http://www.914world.com/bbs2/uploads_offsite/i1301.photobucket.com-17072-1443289264.5.jpg) Fitting the bracket bar onto the engine mount. The waterpump tube on the left does not have the clearance yet by the blue tape. The oil filter is on the opposite side barely visible and needs as much space as possible. (IMG:http://www.914world.com/bbs2/uploads_offsite/i1301.photobucket.com-17072-1443289265.6.jpg) Here, the mount has been removed with the oil pan. I cut the front of the mount off and welded a piece of flat steel on the front which will provide a lip for the bracket bar. I welded another piece of angle iron for the back lip, greater strength across the bottom, and to give the bar more clearance from the water pump tube. (IMG:http://www.914world.com/bbs2/uploads_offsite/i1301.photobucket.com-17072-1443289265.7.jpg) The holes were rosette welded and new holes were drilled for the bracket. I considered welding the bracket bar to the mount, but keeping them separate is a better design as long as it is strong enough. Having the lip on each side should keep it from moving. (IMG:http://www.914world.com/bbs2/uploads_offsite/i1301.photobucket.com-17072-1443289265.8.jpg) I welded the nuts onto the backside of the mount because they will not be accessible to the socket wrench once the mount is back on the engine. Cool design, hah? Hopefully everything fits in the right place, because I don't want to do this all over again! Next up, fit the transmission on the engine and measure for the transmission bracket... |
|
|
|
| mgp4591 |
Sep 26 2015, 01:59 PM
Post
#45
|
|
914 Guru Group: Members Posts: 5,967 Joined: 1-August 12 From: Salt Lake City Ut Member No.: 14,748 Region Association: Intermountain Region |
QUOTE(DBCooper @ Aug 6 2015, 07:45 AM)  QUOTE(mgp4591 @ Aug 5 2015, 10:57 PM) Did you sell your Smallcar engine mount after you decided not to use it or is it for sale? Long shot but I figured it's worth a try... (IMG:style_emoticons/default/idea.gif) I'm pretty sure they're in a bin somewhere. I've moved twice since then and during that last move hurt my back, back's still not good so still have bins stacked everywhere. How patient are you? Turns our I'm pretty patient- your answer came in while I was still in the hospital so it got buried for two months until I was back and dug through stuff. If you've still got your mount I'd be interested in buying it if you think that it would a fit the EG33... |
|
|
|
| shoguneagle |
Sep 27 2015, 04:16 AM
Post
#46
|
|
shoguneagle Group: Members Posts: 1,180 Joined: 3-January 03 From: CA, OR, AZ (CAZOR); New Mexico Member No.: 84 Region Association: Northern California |
HOW DID THIS THREAD ESCAPE ME? I thought I kinda knew of all the 914s generally in the Grants Pass area. This one came out of the "blue" suddenly.
I am going to have to read in more detail later. The information thus far is great and gives great information on the Subie transformation including engine selection and why. The rust/body/paint work is great giving good information on what the builder was doing at different stages. I am going to have to see this "bad boy". Incidentally, I have a 1974 914 converted to 3.2 Sixer which is finally titled and registered in Oregon. My project has been going on for 8-10 years and should be completed ready to start the painting side by the end of 2015/2016. As you can see I am very flexible on my project. I live in Grants Pass and would like to see your project. Can we meet sometime? Great working project and another 914 is surviving. Keep going, Tiger! Steve Hurt shogun (IMG:style_emoticons/default/beerchug.gif) (IMG:style_emoticons/default/chatsmiley.gif) eagle |
|
|
|
| R_u_dd |
Sep 27 2015, 06:12 AM
Post
#47
|
|
Member Group: Members Posts: 154 Joined: 3-March 14 From: Grants Pass, Oregon Member No.: 17,072 Region Association: Pacific Northwest |
QUOTE(shoguneagle @ Sep 27 2015, 03:16 AM) HOW DID THIS THREAD ESCAPE ME? I thought I kinda knew of all the 914s generally in the Grants Pass area. This one came out of the "blue" suddenly. I live in Grants Pass and would like to see your project. Can we meet sometime? Great working project and another 914 is surviving. Keep going, Tiger! Steve Hurt shogun (IMG:style_emoticons/default/beerchug.gif) (IMG:style_emoticons/default/chatsmiley.gif) eagle I sent you a pm .... Thanks for the encouragement. |
|
|
|
| R_u_dd |
Sep 27 2015, 07:20 AM
Post
#48
|
|
Member Group: Members Posts: 154 Joined: 3-March 14 From: Grants Pass, Oregon Member No.: 17,072 Region Association: Pacific Northwest |
Radiator
Some background and research: Radiator Thread Vent Holes What Aluminum Radiator are you running? Scirocco Style Radiator Information on Cooling Systems Will the Scirocco radiator really work It seems there are a lot of ways to put a radiator in the front trunk. Very few people have successfully put the radiator anywhere else. I hate to lose the trunk, but possibly I can limit the damage by putting a smaller radiator between the front lights. This requires a radiator of 11" x 31" or less. Jeep Cherokee makes a radiator that is a double pass and that size. The double pass, I am assuming affectively doubles your cooling surface area. Since my engine is a non-turbo 2.5, it's not a v8 or a turbo, and won't require nearly the same cooling capacity. The original radiator for my car is 13.38" x 27" X 0.63" or approximately 361 square inches of cooling area. Notice that it is very thin. The Scirocco style is 11" x 20" X 1.5" or affectively 440 square inches of cooling area since it is double the thickness. When I got the radiator in the mail it seems very small, which is what I wanted, but now I am second guessing myself as to whether this will really cool the engine. What do people think in this regard. Advice needed. It seems that people are running these Scirocco radiators, so they must work. Here's some pictures of my progress so far. You can see just how small this radiator is. (IMG:http://www.914world.com/bbs2/uploads_offsite/i1301.photobucket.com-17072-1443360005.1.jpg) This is a real simple bracket made of angle steel with two holes for the pegs on the radiator. (IMG:http://www.914world.com/bbs2/uploads_offsite/i1301.photobucket.com-17072-1443360005.2.jpg) Another piece of angle steel (about 18-20 gauge) brackets the top of the radiator. I am intentionally not securing the radiator tightly. It needs to move in the mount because of the flex in the front of the car. If you bolt it in tight, the radiator can crack. (IMG:http://www.914world.com/bbs2/uploads_offsite/i1301.photobucket.com-17072-1443360005.3.jpg) Picture from the back. Lot's of room in there. Hopefully not too much... (IMG:http://www.914world.com/bbs2/uploads_offsite/i1301.photobucket.com-17072-1443360005.4.jpg) Working on the shroud. Kind of a PITA, but getting there... (IMG:http://www.914world.com/bbs2/uploads_offsite/i1301.photobucket.com-17072-1455402913.1.jpg) (IMG:http://www.914world.com/bbs2/uploads_offsite/i1301.photobucket.com-17072-1502074992.1.jpg) (IMG:http://www.914world.com/bbs2/uploads_offsite/i1301.photobucket.com-17072-1455402914.3.jpg) (IMG:http://www.914world.com/bbs2/uploads_offsite/i1301.photobucket.com-17072-1455402914.4.jpg) (IMG:http://www.914world.com/bbs2/uploads_offsite/i1301.photobucket.com-17072-1455402914.5.jpg) This is how I decided to handle the vents. (IMG:http://www.914world.com/bbs2/uploads_offsite/i1301.photobucket.com-17072-1455402914.6.jpg) I am planning on covering the vents with something like this to retain strength. This is one made at 914sgonewild.com (IMG:http://www.914world.com/bbs2/uploads_offsite/i1301.photobucket.com-17072-1455402914.7.jpg) Here it is the final cutout covers. Can you still see the triangles? (IMG:http://www.914world.com/bbs2/uploads_offsite/i1301.photobucket.com-17072-1467095619.1.jpeg) And, a shot of both: (IMG:http://www.914world.com/bbs2/uploads_offsite/i1301.photobucket.com-17072-1467095619.2.jpeg) (IMG:http://www.914world.com/bbs2/uploads_offsite/i1301.photobucket.com-17072-1486251982.1.jpeg) Protected radiator hoses. These are conduit pipes split down the middle. I finished off the radiator with an overflow tank and in-line fill. (IMG:http://www.914world.com/bbs2/uploads_offsite/vgy.me-17072-1502074992.2.jpg) |
|
|
|
| JRust |
Sep 27 2015, 04:58 PM
Post
#49
|
|
914 Guru Group: Members Posts: 6,317 Joined: 10-January 03 From: Albany Oregon Member No.: 129 Region Association: Pacific Northwest |
Wow that radiator does look really small. I've been rethinking the front radiator lately. Saw a guy on FB with a suby conversion. Guy had put the radiator in front where the bumper goes. Had a 916 bumper with the fan in front of the radiator. So you saw the fan. Looked like crap but I didn't have close up pics. Since then it has had me rethinking how to do it up front. Possibly having the radiator come through the bottom of the cutout up front behind the bumper. Literally having the top of the radiator right behind the front trunk latch. It would keep 90% of the front trunk open. Since seeing that weird setup it has had me turning over ideas up front I had never considered before (IMG:style_emoticons/default/idea.gif)
|
|
|
|
| R_u_dd |
Sep 27 2015, 05:03 PM
Post
#50
|
|
Member Group: Members Posts: 154 Joined: 3-March 14 From: Grants Pass, Oregon Member No.: 17,072 Region Association: Pacific Northwest |
QUOTE(JRust @ Sep 27 2015, 03:58 PM) Wow that radiator does look really small. I've been rethinking the front radiator lately. Saw a guy on FB with a suby conversion. Guy had put the radiator in front where the bumper goes. Had a 916 bumper with the fan in front of the radiator. So you saw the fan. Looked like crap but I didn't have close up pics. Since then it has had me rethinking how to do it up front. Possibly having the radiator come through the bottom of the cutout up front behind the bumper. Literally having the top of the radiator right behind the front trunk latch. It would keep 90% of the front trunk open. Since seeing that weird setup it has had me turning over ideas up front I had never considered before (IMG:style_emoticons/default/idea.gif) I was wondering about my math. The radiator has less surface area than the stock radiator, but since it is twice as thick and double pass, you would think that it would work. Does the math work on this? |
|
|
|
| 914forme |
Sep 27 2015, 05:28 PM
Post
#51
|
|
Times a wastin', get wrenchin'! Group: Members Posts: 3,899 Joined: 24-July 04 From: Dayton, Ohio Member No.: 2,388 Region Association: None |
Griffen rates that rad at 600HP with their electric fan, 400HP if your doing your own thing. I am guessing you can do your own thing, and cool 600HP, its just they do not want to take the liability hit, for our stupidity.
|
|
|
|
| Chris H. |
Sep 27 2015, 07:25 PM
Post
#52
|
|
Senior Member Group: Members Posts: 4,090 Joined: 2-January 03 From: Chicago 'burbs Member No.: 73 Region Association: Upper MidWest |
QUOTE(JRust @ Sep 27 2015, 05:58 PM) Wow that radiator does look really small. I've been rethinking the front radiator lately. Saw a guy on FB with a suby conversion. Guy had put the radiator in front where the bumper goes. Had a 916 bumper with the fan in front of the radiator. So you saw the fan. Looked like crap but I didn't have close up pics. Since then it has had me rethinking how to do it up front. Possibly having the radiator come through the bottom of the cutout up front behind the bumper. Literally having the top of the radiator right behind the front trunk latch. It would keep 90% of the front trunk open. Since seeing that weird setup it has had me turning over ideas up front I had never considered before (IMG:style_emoticons/default/idea.gif) I've wanted to figure out a way to build a rad INTO the front bumper (or an aftermarket one) too. Take back the whole front trunk. Not quite enough room... |
|
|
|
| Mike Bellis |
Sep 27 2015, 07:36 PM
Post
#53
|
|
Resident Electrician Group: Members Posts: 8,348 Joined: 22-June 09 From: Midlothian TX Member No.: 10,496 Region Association: None |
I'm worried about your engine mount. My rotary mount was very similar and started to sag after a couple months of driving. My new cradle ties the front to the rear so no sagging is possible.
|
|
|
|
| R_u_dd |
Sep 27 2015, 08:16 PM
Post
#54
|
|
Member Group: Members Posts: 154 Joined: 3-March 14 From: Grants Pass, Oregon Member No.: 17,072 Region Association: Pacific Northwest |
QUOTE(Mike Bellis @ Sep 27 2015, 06:36 PM) I'm worried about your engine mount. My rotary mount was very similar and started to sag after a couple months of driving. My new cradle ties the front to the rear so no sagging is possible. The factory bracket bar is very heavy. Feels pretty stout to me. Did you build yours like I did? What page is it on in your thread? |
|
|
|
| R_u_dd |
Sep 27 2015, 08:17 PM
Post
#55
|
|
Member Group: Members Posts: 154 Joined: 3-March 14 From: Grants Pass, Oregon Member No.: 17,072 Region Association: Pacific Northwest |
QUOTE(914forme @ Sep 27 2015, 04:28 PM) Griffen rates that rad at 600HP with their electric fan, 400HP if your doing your own thing. I am guessing you can do your own thing, and cool 600HP, its just they do not want to take the liability hit, for our stupidity. Only doing 165 HP, so I'm good? |
|
|
|
| Mike Bellis |
Sep 27 2015, 08:33 PM
Post
#56
|
|
Resident Electrician Group: Members Posts: 8,348 Joined: 22-June 09 From: Midlothian TX Member No.: 10,496 Region Association: None |
QUOTE(R_u_dd @ Sep 27 2015, 07:16 PM) QUOTE(Mike Bellis @ Sep 27 2015, 06:36 PM) I'm worried about your engine mount. My rotary mount was very similar and started to sag after a couple months of driving. My new cradle ties the front to the rear so no sagging is possible. The factory bracket bar is very heavy. Feels pretty stout to me. Did you build yours like I did? What page is it on in your thread? Here is my rotary build thread. http://www.914world.com/bbs2/index.php?showtopic=113156 Although not exactly the same, the forces applied to the square bar are the same. My bar is made from 1.5", 0.120 wall square tubing. The rotary engine is also lighter than a Subie. The rear mounts sagged a full inch. Yours may not sag as much but the twist force is similar on the main bar. V8 motors are heavier but the angled motor mount bars lean toward the main bar mounts sending more load to the 914 mounting point and not the center of the main bar. 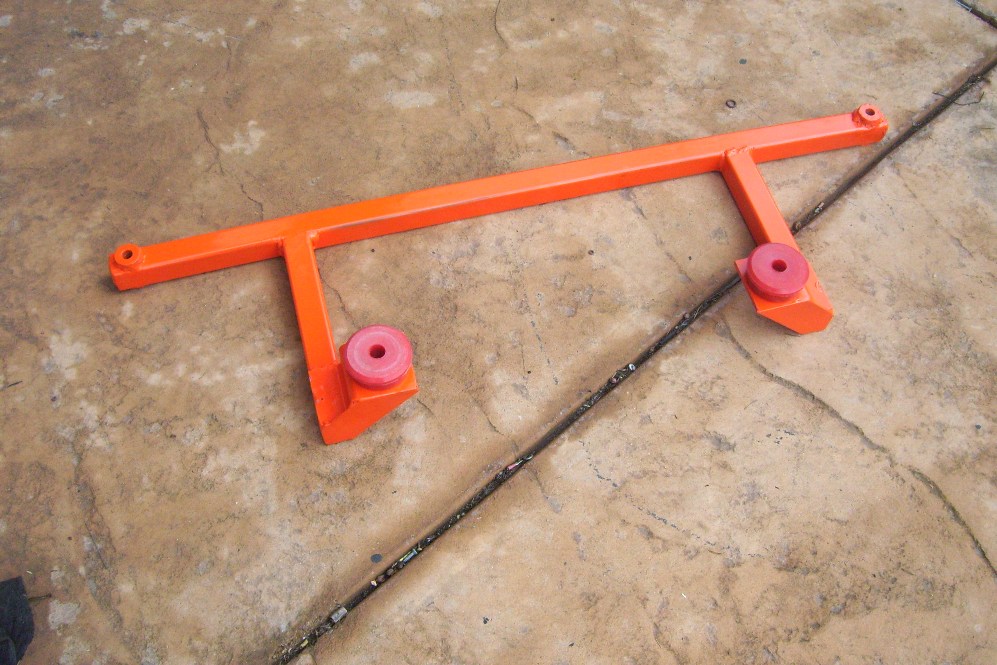 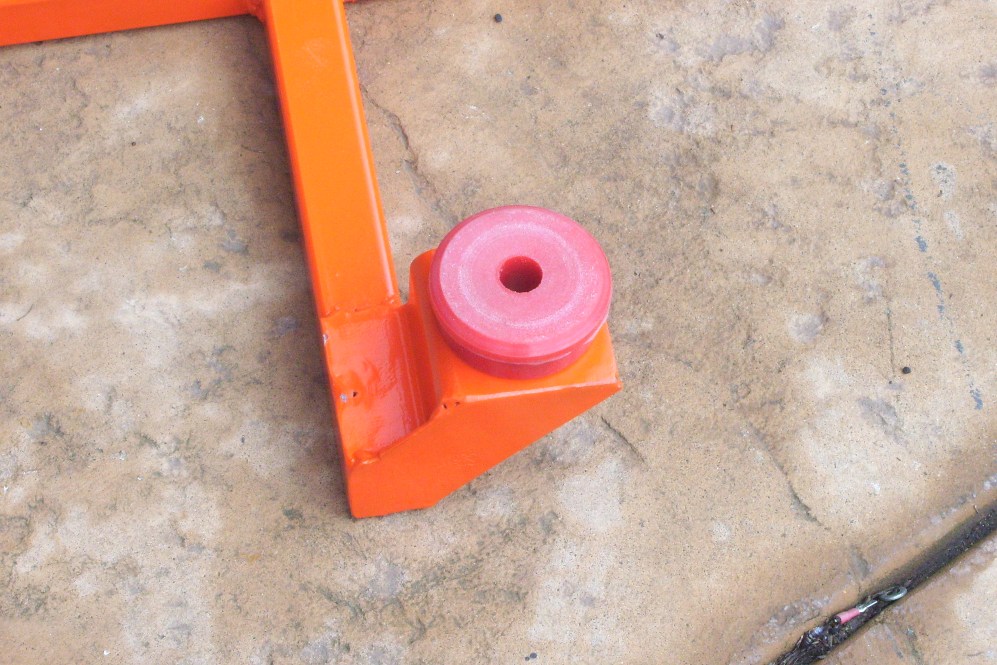  |
|
|
|
| R_u_dd |
Oct 10 2015, 12:48 PM
Post
#57
|
|
Member Group: Members Posts: 154 Joined: 3-March 14 From: Grants Pass, Oregon Member No.: 17,072 Region Association: Pacific Northwest |
Transmission Mount
From the Subaru 5MT Transmission out of a 2002 Impreza TS, I saved the transmission mount and integrated into the design to mount onto the Porsche. The rubber stoppers are stout and will prevent vibration. It was also easier to fabricate than using the circular Porsche mounts. I deliberated whether to use the circular mounts because they seem to provide a full range of motion to the transmission, but I was concerned there might be too much flex. In the end I went with the Subaru mount which also allows some movement front to back and up and down. (IMG:http://www.914world.com/bbs2/uploads_offsite/i1301.photobucket.com-17072-1444502917.1.jpg) (IMG:http://www.914world.com/bbs2/uploads_offsite/i1301.photobucket.com-17072-1444502917.2.jpg) |
|
|
|
| 76-914 |
Oct 10 2015, 06:02 PM
Post
#58
|
|
Repeat Offender & Resident Subaru Antagonist Group: Members Posts: 13,911 Joined: 23-January 09 From: Temecula, CA Member No.: 9,964 Region Association: Southern California |
Smart move. (IMG:style_emoticons/default/biggrin.gif) Your moving right along. Looks like your having fun too! (IMG:style_emoticons/default/beerchug.gif)
|
|
|
|
| R_u_dd |
Nov 14 2015, 05:48 PM
Post
#59
|
|
Member Group: Members Posts: 154 Joined: 3-March 14 From: Grants Pass, Oregon Member No.: 17,072 Region Association: Pacific Northwest |
Axles
(IMG:http://www.914world.com/bbs2/uploads_offsite/i1301.photobucket.com-17072-1447544911.1.jpg) (IMG:http://www.914world.com/bbs2/uploads_offsite/i1301.photobucket.com-17072-1447544911.2.jpg) Subaru on top and 914 on the bottom. The Subaru is a 29 spline and the 914/bug axle is a 33 spline. My axles will need to be shortened because the engine is set forward slightly from the designs of other cradles such as Ian's. I set the engine farther forward to avoid cutting the trunk and flipping the manifold (for now). Note that there is 4 inches of offset from the transmission to the wheel hubs. There should be some bend in the axles and CV's for proper lubrication of the CV's, but how much is too much? According to the Blind Chicken, the maximum angle for the Type 1 CV (bug CV measures the same as the 914) is 12 Degrees. For this reason, I may have to go with the 944 CV's (22 degrees offset capability), on the 914 axles and do a 5 lug conversion while I am at it. (IMG:http://www.914world.com/bbs2/uploads_offsite/i1301.photobucket.com-17072-1447544911.3.jpg) Sawtooth shortened his axles to 18" from 20.25". When I called Dutchman, they suggested doing a mock up by cutting the Subaru axle off and using angle iron to splint the axles together, which would work fine if I had an extra axle to cut up. Anyone? I am going to have to mock up some temporary axles to make sure the CV's will handle the offset and to get the right measurements before I cut the axles down to size. Otherwise, I am concerned about getting the measurements right for the axle length. One positive (with Dutchman) is that you don't need to send all the measurements if you have a sample Subaru axle end to use as an example of what you want, so the only real measurement you need is the axle length- with no other modifications (ie. 911/944 CV's). I would like to keep it simple and use the 914 axles and CV's if possible. This is similar to what I plan to do here: Subaru inner CV- 914 axle- 914 outer CV- 4 lug wheels (for now) Update: The plan is to use 914 stub axles, Renegade conversion plate, 944 CV and axle, resplined on the inside for the Subaru CV to the 5MT transmission. The following discussion is me trying to learn what to do. Axle Info and Threads: Axle Info 101 from Blind Chicken "Things I think I know about CV's and Axles" Dutchman Axles Corkus- Axle questions for a Subaru Tranny, Another Subaru conversion... Axles Shortened in Subi Swap? Angle of Articulation Bus Axles 944 vs 914 5 Lug Axle Conversion: Sir Andy- Convert to real 5-lug using 944 CVs Eric Shea- Easy 5-Lug Conversion - 911 Running Gear, For High Power Applications... I went out and took some measurements with the 914 axles. It looks like I am close to 22 degrees which is the max for a 944 CV. (Update- At 12 degrees) Hmmm. This is a critical decision here. The 914 CV is supposed to max out at 12 degrees. So, I may have to find some 944 CV's but that is fine since it allows me to switch to a 5 lug wheel. Take a look at these pictures. I am curious and need opinions here on this angle. The wheel and CV seem to turn without much friction, but apparently I am past the angle that these CV's can handle. If this angle is too steep (even if I go with the 944 CV), I have to stop here and redesign my cradle and likely cut the trunk. What do you think? More pix- (IMG:http://www.914world.com/bbs2/uploads_offsite/i1301.photobucket.com-17072-1447544912.4.jpg) (IMG:http://www.914world.com/bbs2/uploads_offsite/i1301.photobucket.com-17072-1447544912.5.jpg) (IMG:http://www.914world.com/bbs2/uploads_offsite/i1301.photobucket.com-17072-1447544912.6.jpg) The 944 axles and conversion plates have arrived. I purchased the plates from Renegade Hybrids. They are about a half inch thick and bolt into the 914 stub hub on one side and the 944 cv on the other. This gives a much stronger CV threshold and a larger angle of travel, now up to 22 degrees. This should prevent me from having to redo the engine cradle and flip the manifold. (IMG:http://www.914world.com/bbs2/uploads_offsite/i1301.photobucket.com-17072-1471580651.1.jpg) |
|
|
|
| DBCooper |
Nov 14 2015, 06:24 PM
Post
#60
|
|
14's in the 13's with ATTITUDE Group: Members Posts: 3,079 Joined: 25-August 04 From: Dazed and Confused Member No.: 2,618 Region Association: Northern California |
I'd say you're too far. You say it's 22 degrees now? At ride height? Then what's the angle get to at top and bottom of the suspension travel? That should add a few degrees. Also it's true that not being at zero degrees is preferable for lubrication of the CV's, but I don't think that running at the maximum angle all the time is going to work for very long. That's a LOT of movement inside the CV each revolution.
|
|
|
|
|
1 User(s) are reading this topic (1 Guests and 0 Anonymous Users)
0 Members:

|
Lo-Fi Version | Time is now: 8th July 2026 - 10:31 AM |
Invision Power Board
v9.1.4 © 2026 IPS, Inc.