|
|
|
Porsche, and the Porsche crest are registered trademarks of Dr. Ing. h.c. F. Porsche AG.
This site is not affiliated with Porsche in any way. Its only purpose is to provide an online forum for car enthusiasts. All other trademarks are property of their respective owners. |
|
|

  |

| Olympic 914 |
 Sep 5 2017, 09:41 AM Sep 5 2017, 09:41 AM
Post
#101
|
 Group: Members Posts: 1,780 Joined: 7-July 11 From: Pittsburgh PA Member No.: 13,287 Region Association: North East States |
Installed the hood and bumpers and did some more tuning to the MPS. Then out for state inspection and alignment and we are ready to drive.
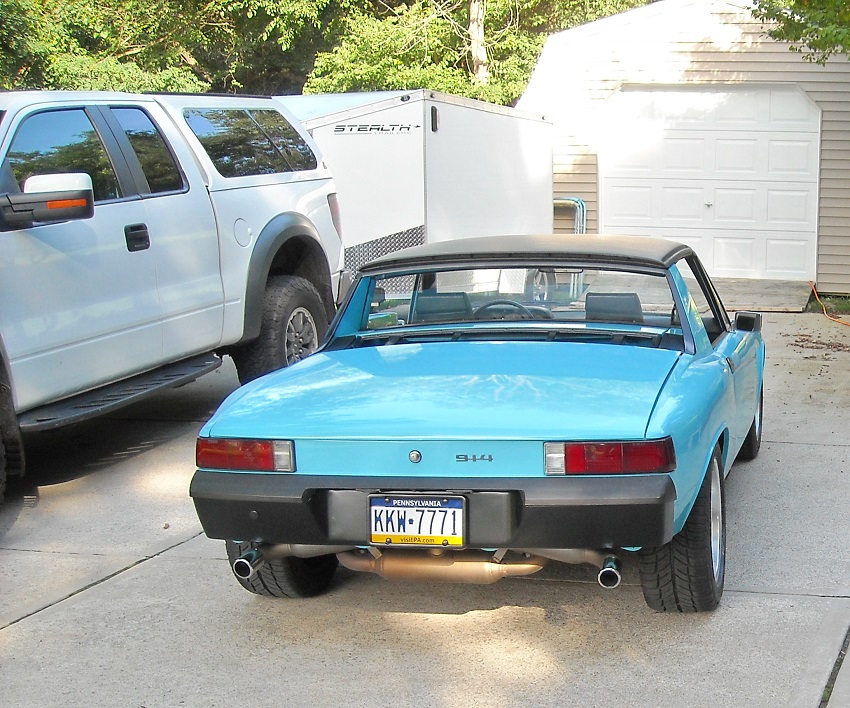
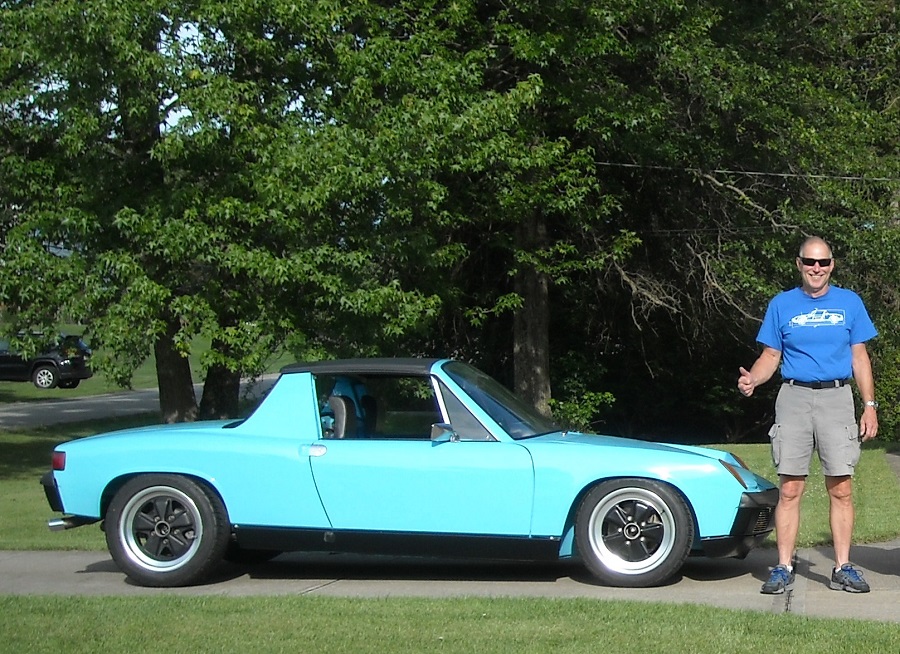 I had set up the MPS using the figures for a 037 MPS on Anders site. This ended up being Waaay too lean for my engine configuration. I was obsessing over getting the readings accurate when I happened to call Chris Foley to ask about another thing and mentioned this. He told me to just back out the inner screw 1 turn or more. Since my previous adjustments were like a few degrees at a time one full turn seemed crazy.. But hey what do I know…. I went 1 ¼ turns for good measure and got a mixture that was too rich. Good, change in the right direction. One more adjustment and I think its PERFECT. I don’t even want to touch it again. Great AFR numbers cruising and the head temps are right where they should be. It’s a little rich on start-up with AFR at around 10.8 – 11.2 and doesn’t idle real smooth, but after about two miles it warms up enough to be in the low 13s. and idles nice then, I’m fine with that. Did my first oil change from the Brad Penn break in oil at 450 mile and put in Brad Penn 20-50. I now have 675 miles on the rebuilt engine and it runs great. Got the new carpet installed and the rest of the interior. Replacing all the door seals and new door panels from 914Rubber. Could not be happier, I am driving it a good bit and had forgotten how much fun it was. The motorcycles will be getting jealous. I still have a couple little things to do, like the rear valence which I will be putting on, and getting a radio hooked up. But for now… I am calling it DONE. !!! It took just over four years to get from something that for most would be a lost cause and just a parts car to something that turns heads anytime I drive it. 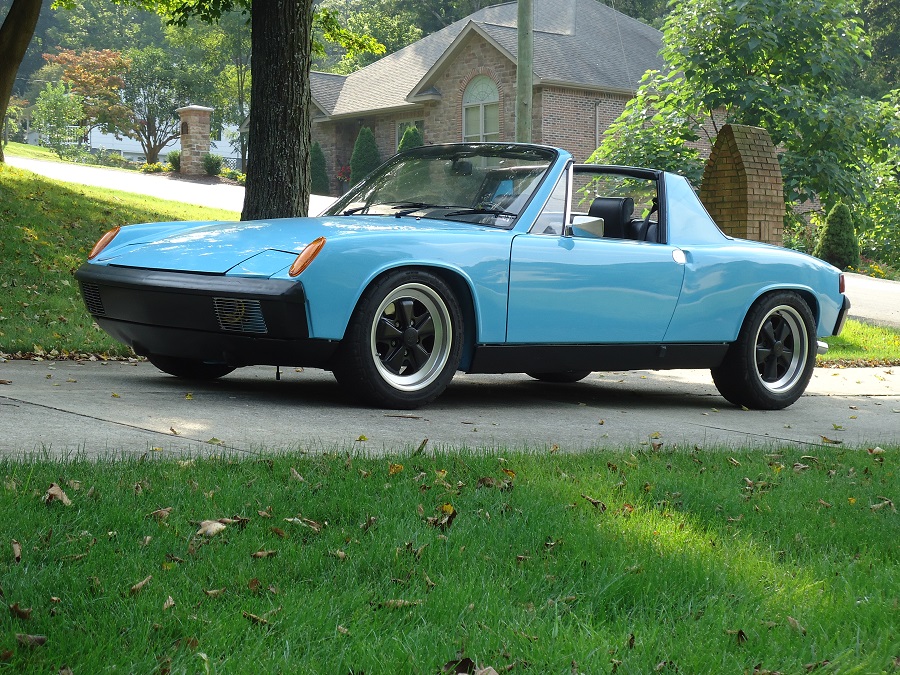 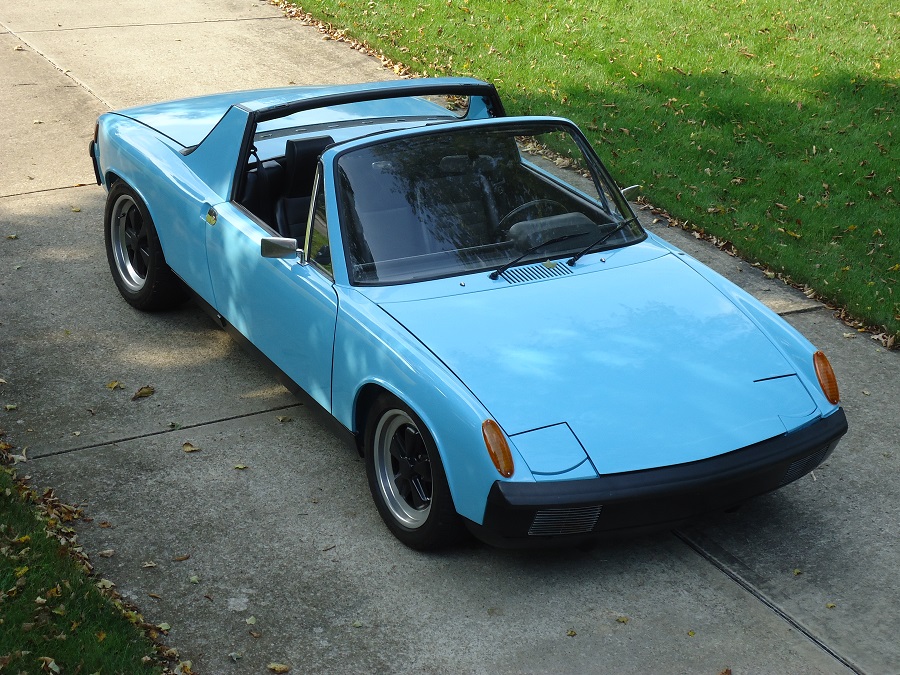  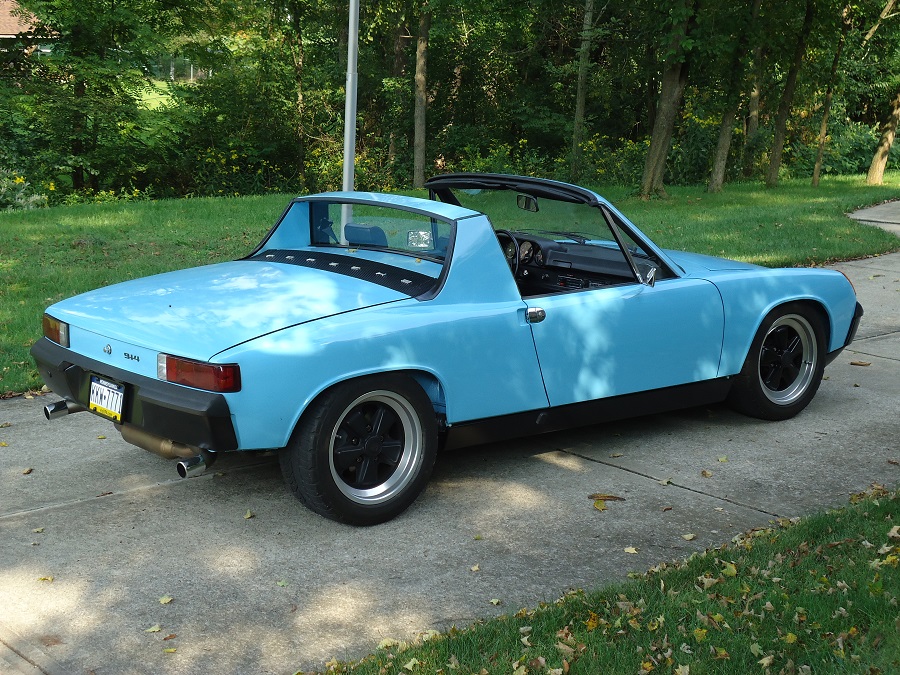 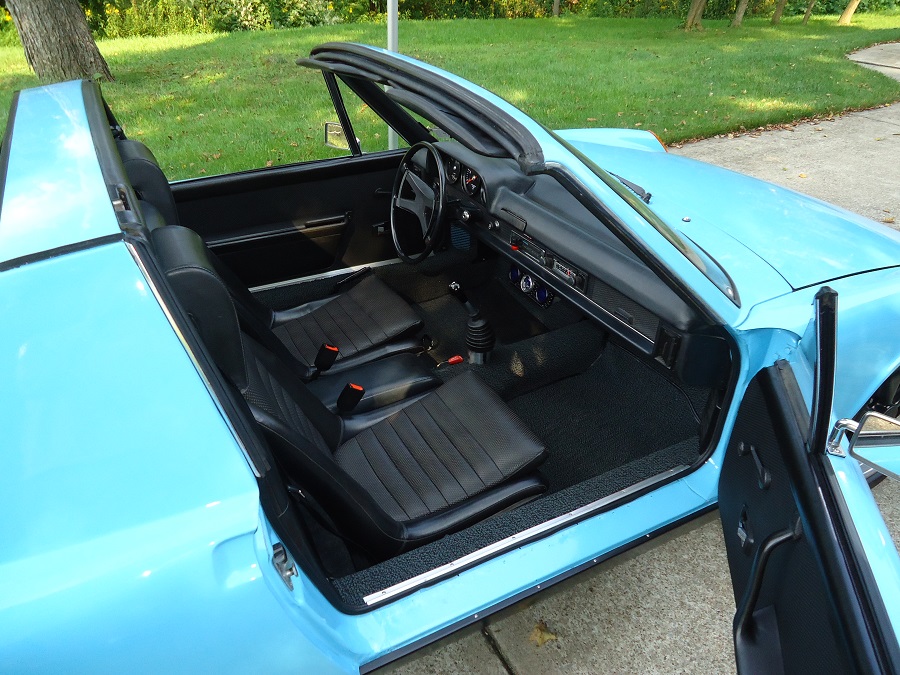 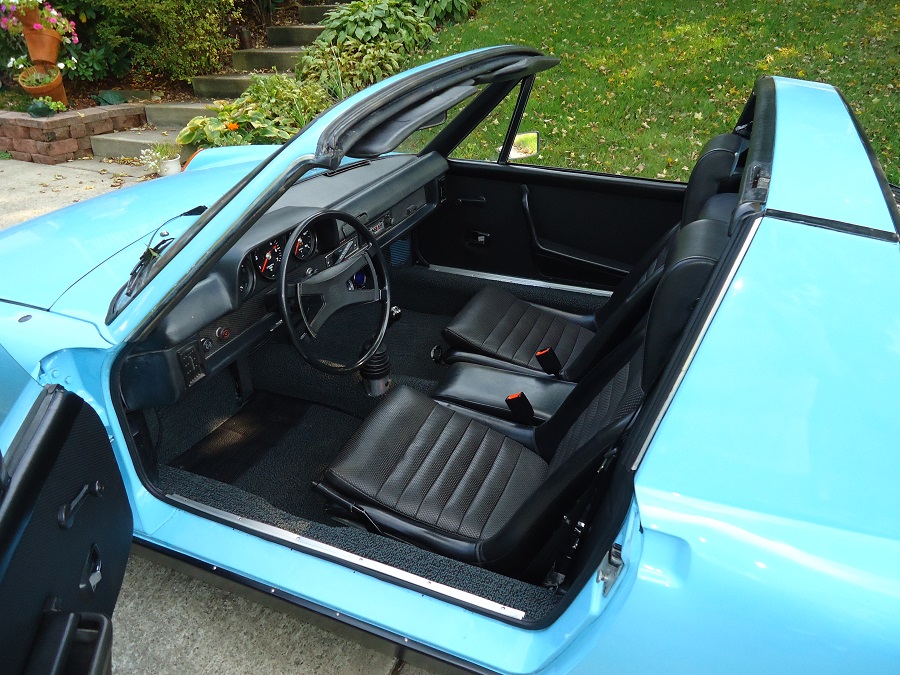 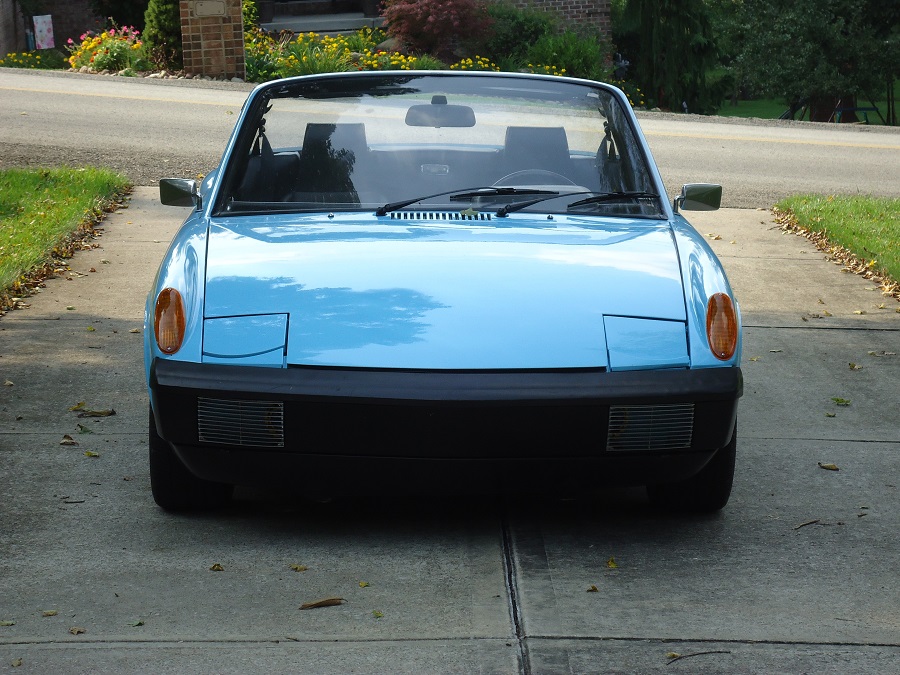 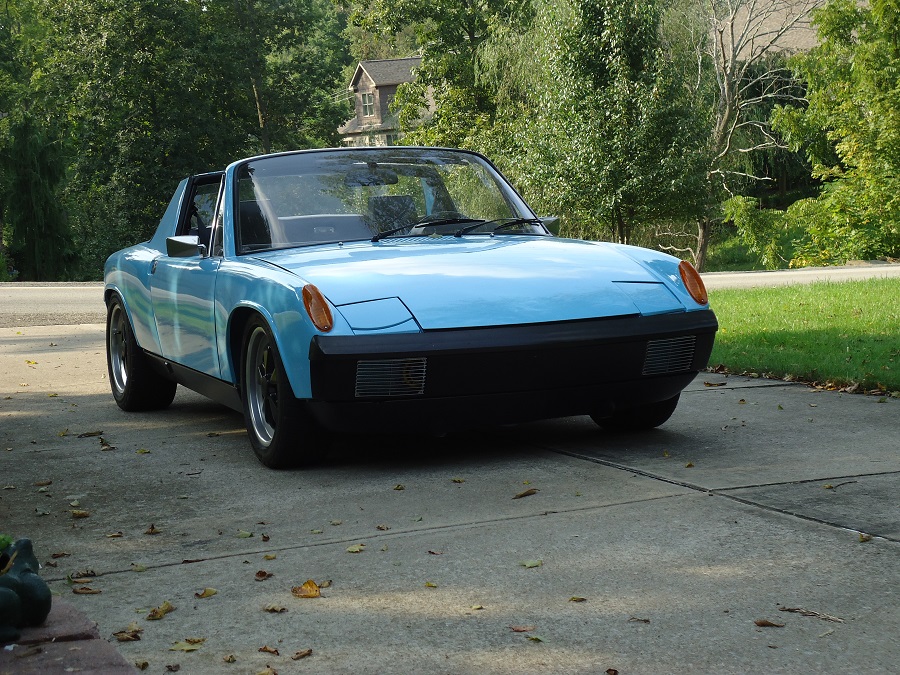 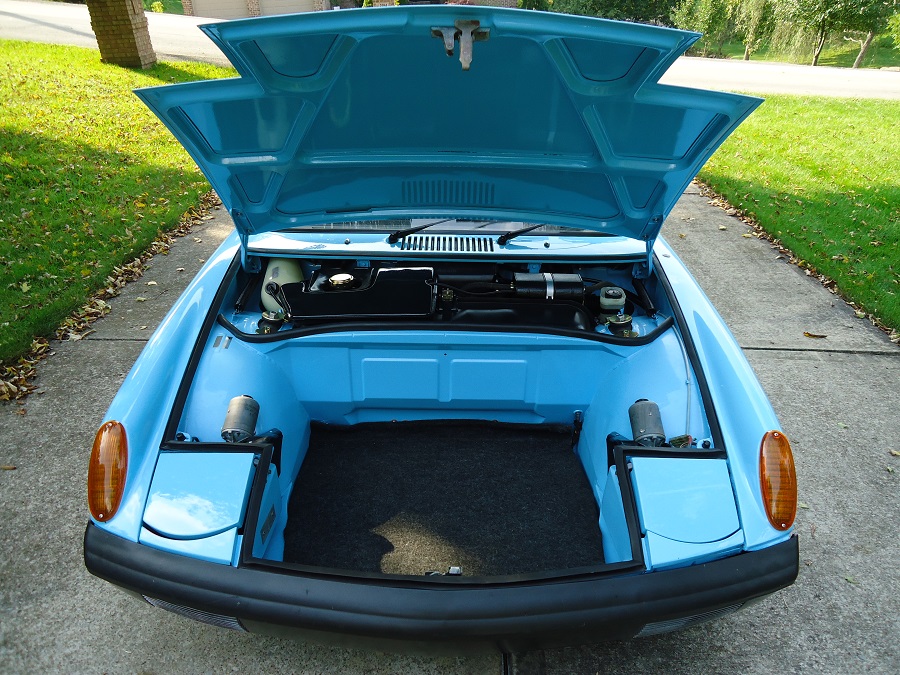 |
   |

 
|
| tygaboy |
Sep 5 2017, 10:20 AM
Post
#102
|
|
914 Guru Group: Members Posts: 5,826 Joined: 6-October 15 From: Petaluma, CA Member No.: 19,241 Region Association: Northern California |
|
 |
|
| Matty900 |
Sep 5 2017, 11:06 AM
Post
#103
|
|
Senior Member Group: Members Posts: 1,305 Joined: 21-February 15 From: Oregon Member No.: 18,454 Region Association: Pacific Northwest |
(IMG:style_emoticons/default/first.gif) (IMG:style_emoticons/default/beerchug.gif) Beautiful car, great job!!
|
|
|
|
| JoeD |
Sep 5 2017, 11:34 AM
Post
#104
|
|
Member Group: Members Posts: 156 Joined: 19-July 15 From: Atlanta, GA Member No.: 18,973 Region Association: South East States |
Congratulations! It's an awesome feeling to get it back out on road. Car looks great!
|
|
|
|
| Rleog |
Sep 5 2017, 12:21 PM
Post
#105
|
|
Senior Member Group: Members Posts: 611 Joined: 12-October 03 From: Middleton, MA Member No.: 1,239 Region Association: North East States |
Fantastic job. Your skills are superb. The paint work is great. I can appreciate how difficult that is to get right.
Well done. Have fun. |
|
|
|
| Andyrew |
Sep 5 2017, 01:46 PM
Post
#106
|
|
Spooling.... Please wait Group: Members Posts: 13,380 Joined: 20-January 03 From: Riverbank, Ca Member No.: 172 Region Association: Northern California |
Congrats!! Looks fantastic!
|
|
|
|
| burton73 |
Sep 5 2017, 01:54 PM
Post
#107
|
|
Senior member, and old dude Group: Members Posts: 4,024 Joined: 2-January 07 From: Los Angeles Member No.: 7,414 Region Association: Southern California |
Very nice job. Love the color and the contrast of the black to the blue.
Enjoy Bob B (IMG:style_emoticons/default/smilie_pokal.gif) |
|
|
|
| Olympic 914 |
Sep 5 2017, 02:48 PM
Post
#108
|
|
Group: Members Posts: 1,780 Joined: 7-July 11 From: Pittsburgh PA Member No.: 13,287 Region Association: North East States |
Thanks for all your kind words. this would have been much harder without the 914World brain trust to help out. and along the way I learned many things that may help others down the road..
During one of my "test drives" we went to Ligonier PA, a friend owns an Ice Cream shop on the Diamond. we were fortunate to get a parking spot on the diamond near the shop, and when I opened the door to get out after parking, there was a guy standing there. He said "Nice car" and all and I was only really half listening to him when I heard him say "I have one" Now I am paying closer attention. I said this was a '73. so was his. So now we start talking a bit more, him telling me it was his fathers car and it was passed down to him. After a bit my GF decides to go into the ice cream shop and about 5 or so minutes later I join her. We were just finishing up our ice cream and headed out to show our friend Dave the car, when the guy walks into the shop. He said "I thought you might want to see it" Well it turns out he only lives a couple minutes away and not only did he go home, get his car to bring it down but somehow also got a parking spot on the diamond RIGHT NEXT TO ME! Unbelivable.. he had introduced himself to me as Russ but turns out his nickname is Rusty. (IMG:style_emoticons/default/av-943.gif) (IMG:style_emoticons/default/lol-2.gif) His car wasn't rusty though. '73 1.7 still had the djet. it was like we had our own little car show going on with all the people walking up admiring the cars and asking questions. Dave the ice cream shop owner was incredulous, what are the chances of someone around even owning another one of these cars let alone bringing it down and parking next to me.... Fun Times. 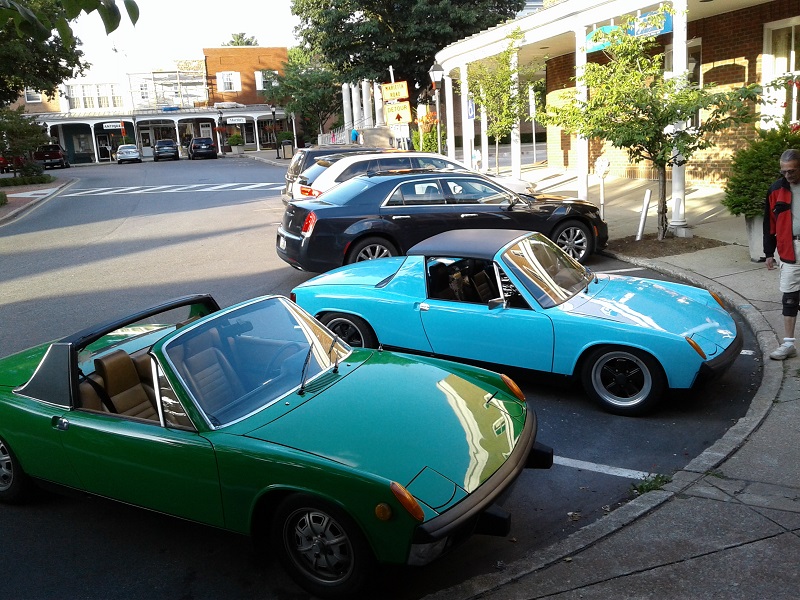 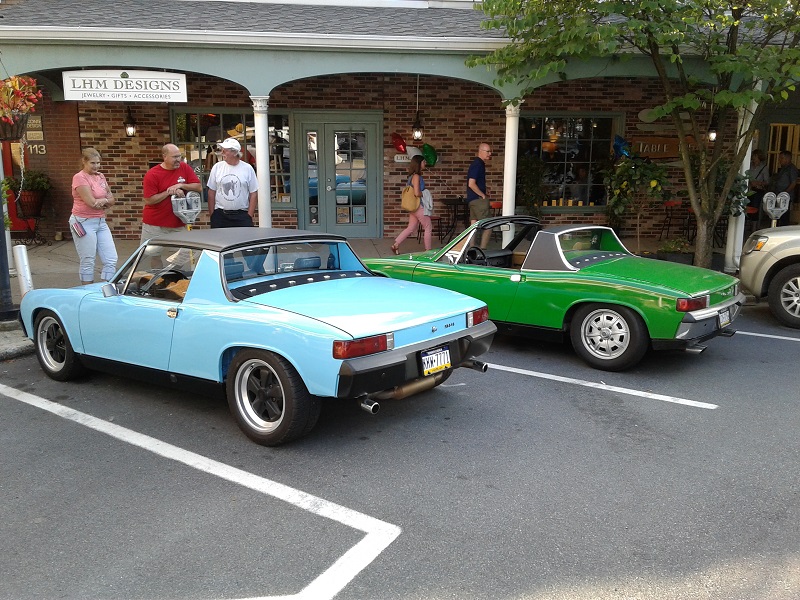 |
|
|
|
| tygaboy |
Sep 5 2017, 03:01 PM
Post
#109
|
|
914 Guru Group: Members Posts: 5,826 Joined: 6-October 15 From: Petaluma, CA Member No.: 19,241 Region Association: Northern California |
Ice cream, 914s and new friends. What could be better? (IMG:style_emoticons/default/first.gif)
|
|
|
|
| Olympic 914 |
Mar 20 2018, 05:00 PM
Post
#110
|
|
Group: Members Posts: 1,780 Joined: 7-July 11 From: Pittsburgh PA Member No.: 13,287 Region Association: North East States |
Since finishing the car I have been taking small trips increasing the mileage each time, I had racked up about 1600 miles on the rebuilt engine and in October 2017 we were heading to Niagara Falls Canada for a little vacation. Well things were running good rolling along at about 70-75 until I heard an unusual ticking noise. So I got off the interstate about a ½ mile later and limped into a little shop with a VW Beetle and a 928 sitting outside. The owner came out smiling and pointed out a 914 sitting on the side. I knew then this was a good place to be. Anyways after poking around and pulling some plug wires we determined that #3 was dead. That explained the CHT gauge reading so low. So onto the flatbed it went. (IMG:style_emoticons/default/sad.gif) 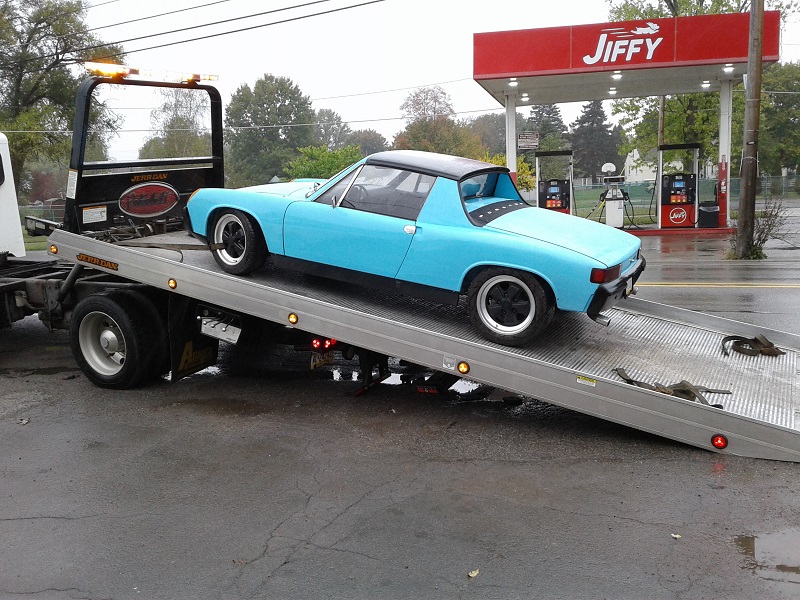 After getting it home and pulling the valve cover off I discovered that one of the rocker arm studs on #3 had busted and the other had come loose. So the engine had to come out to fix it. To pull the head you have to take off most of the cooling tins and I felt like I had really gone backwards. 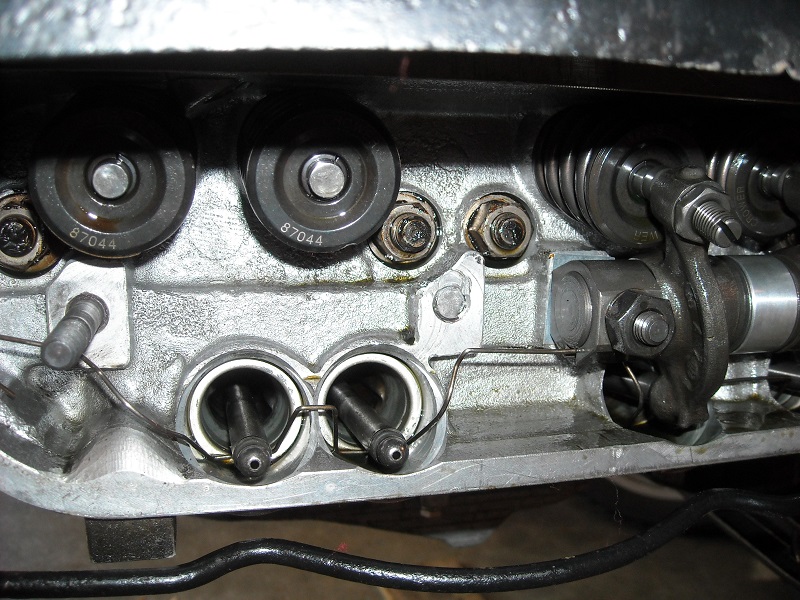 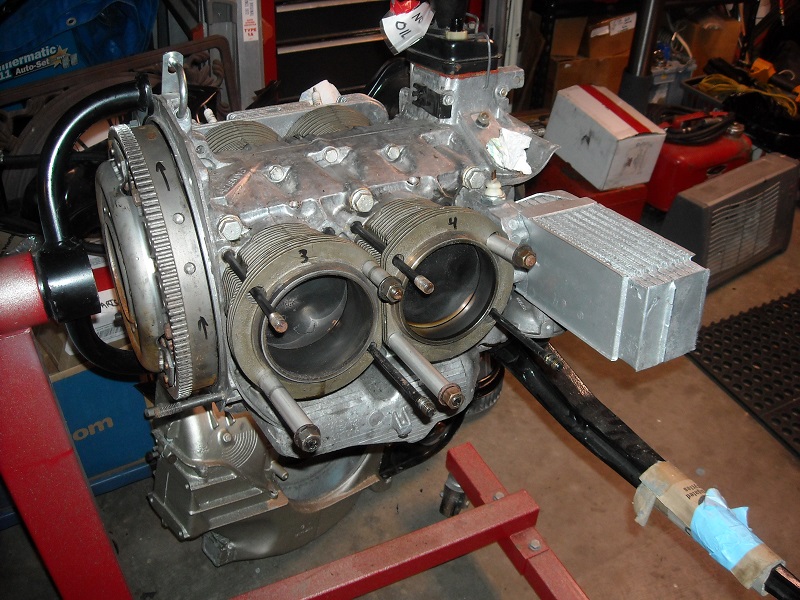 Took the head to a machine shop I use regularly but it didn’t work out so well this time. It’s a one man shop and he had a lot of other things going on, after 7 weeks of “it will be ready next Tuesday or Wednesday” I picked up the head and took it somewhere else for the repair. But now we are into December, and really at the end of the driving season. While the engine was out I bought into the 123 Ignition GB and installed that. Also the CV’s were making some noise and when I disassembled them I discovered that a couple snap rings had come loose and was allowing the axle to walk back and forth and rub on the trans flanges. Since I had seen CuddyK’s video of him unboxing the new axles available from Porsche, I ordered a set of these. Mine looked to be probably still usable but with 137K miles on them I figured new ones should be the last ones I would have to buy. By February I had everything back together and the engine reinstalled. I am now going through the same process of taking small trips and keeping an eye on the head temps, AFR and oil temps. Everything seems to be running smoothly and within recommended ranges. It has about 2000 miles on it so far, but still feels a little tight. Planning to bring it to Hershey this year and let it see some other running 914s Keeping my fingers crossed. |
|
|
|
| raynekat |
Mar 21 2018, 05:17 PM
Post
#111
|
|
Advanced Member Group: Members Posts: 2,171 Joined: 30-December 14 From: Coeur d'Alene, Idaho Member No.: 18,263 Region Association: Pacific Northwest |
Just about my favorite narrow body car on this website....a stud of a car. The color, all the attention to detail, etc. Hope it's a small problem easily fixed. Still jealous as hell with your rear calipers you dog. Best of luck with everything.
|
|
|
|
| Olympic 914 |
Mar 23 2018, 01:26 PM
Post
#112
|
|
Group: Members Posts: 1,780 Joined: 7-July 11 From: Pittsburgh PA Member No.: 13,287 Region Association: North East States |
Right now I am running without a rear valence. I kind of like the Hot-rod look of it. And even though the Triad muffler looks cool, it does seem to be missing something.
 My old valence had cut-outs for the Monza type muffler I used to run. And it was well done. But now of course that will not work. I picked up a nice stock rear valence at Hershey and had planned to modify that to fit the Triad muffler, since the one side already had the correct cut-out. But now I think that I would rather not modify a good stock part. So I dug out the old valence and found it really wasn’t in bad shape. And I was looking for a welding project to help me learn to use the MIG. So I decided to do some welding. 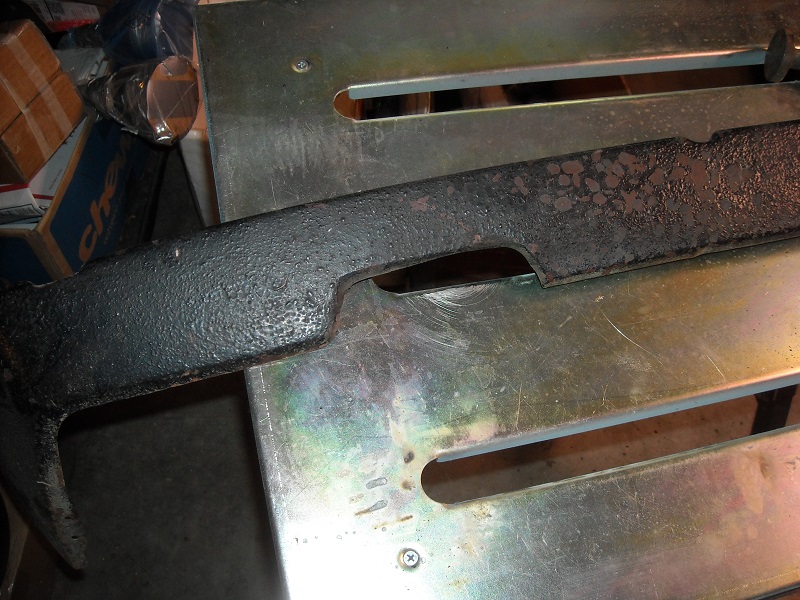 The old cut-out was just covered with a piece of sheet metal and spot welded on so I had to take that off. 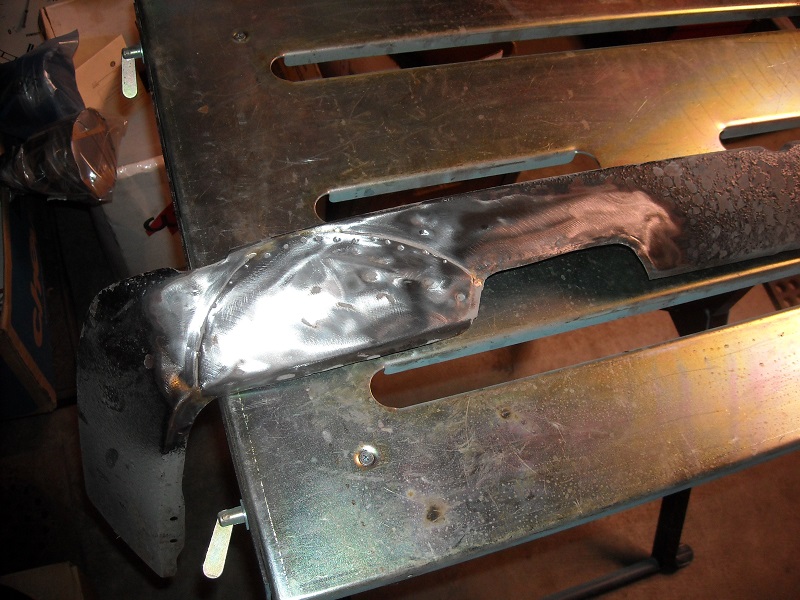 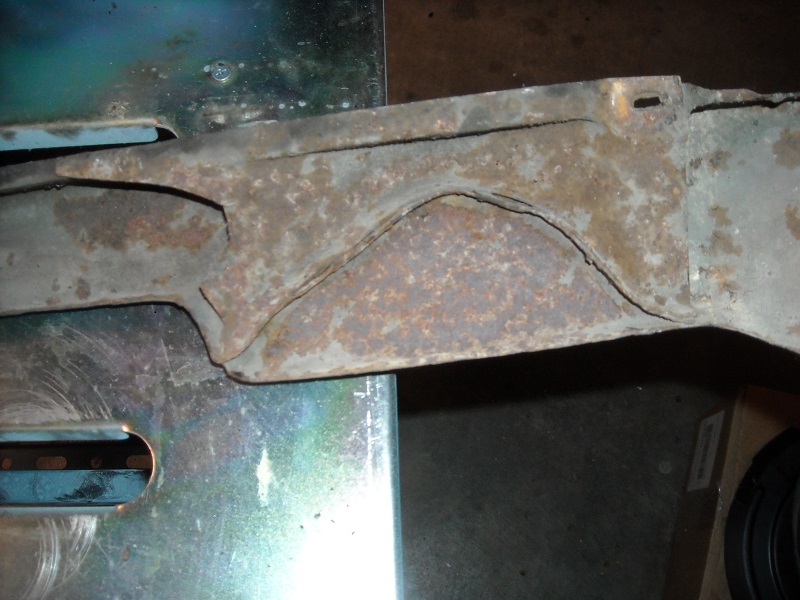 Then I formed a couple pieces to fill in the old notches and used them as a pattern to cut out the valence. 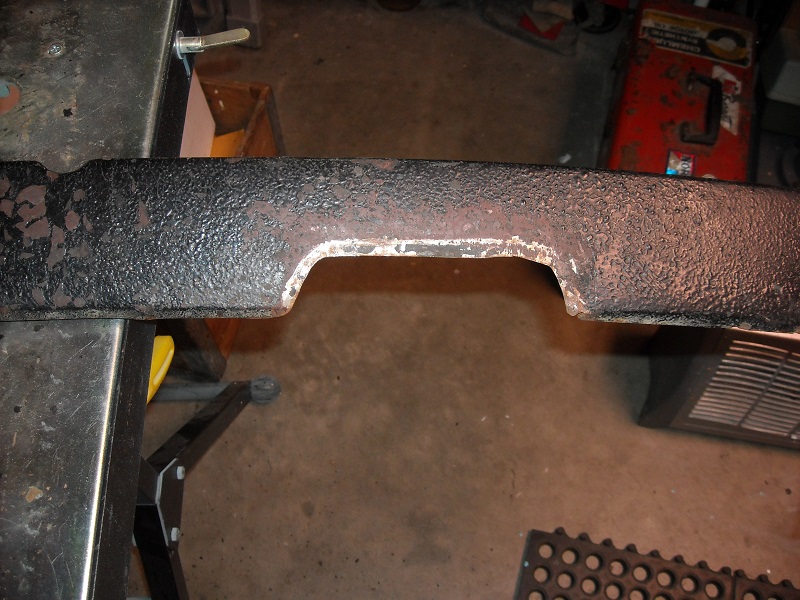 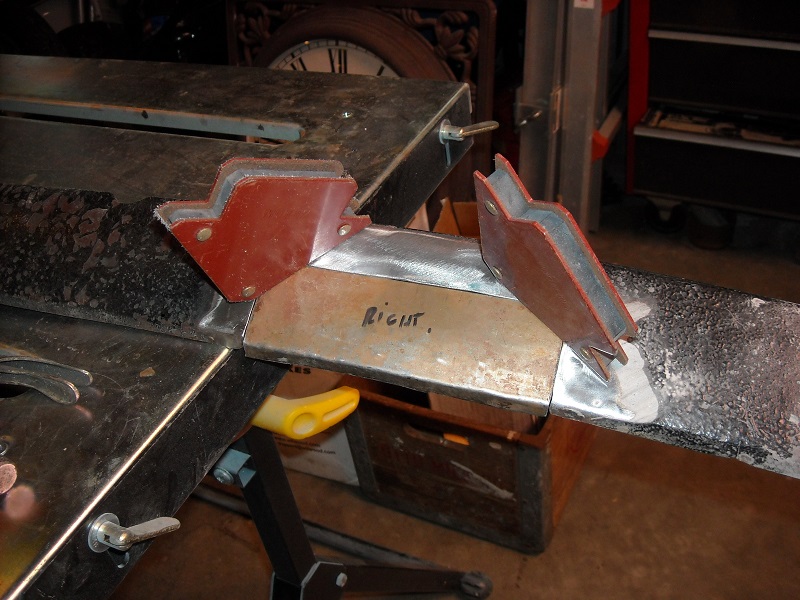 Welding these in was tricky because the only metal I had around that was close was 22 ga . You might as well be trying to weld tinfoil. I used a big hunk of copper for a heat sink to help prevent burn through. And a HF copper welding backer for places I couldn’t get the big piece into. 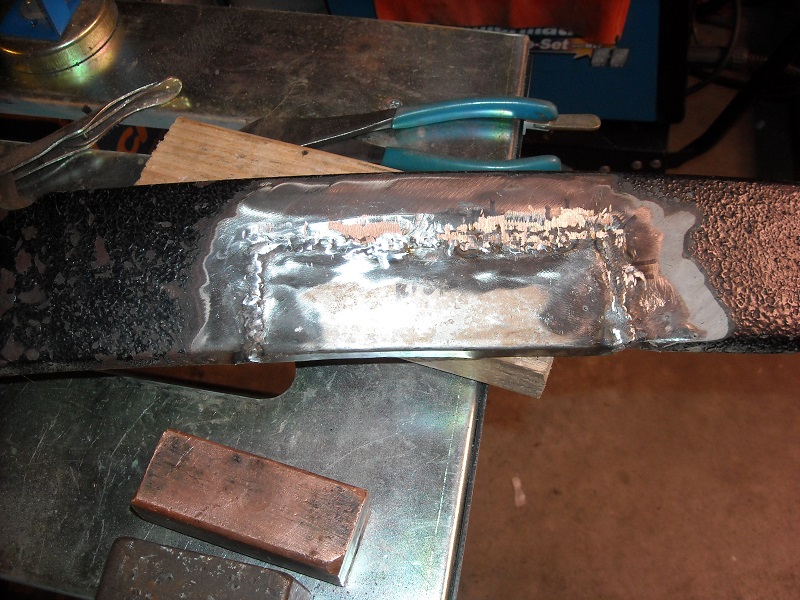 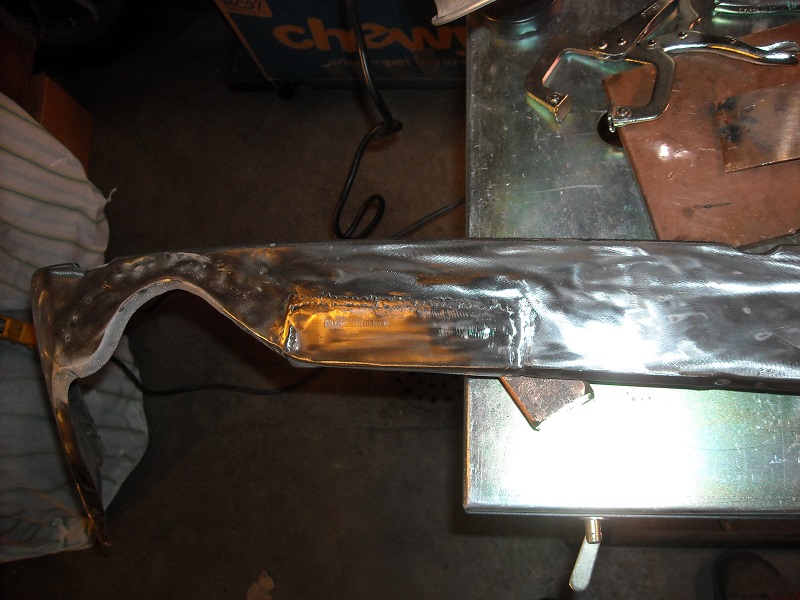 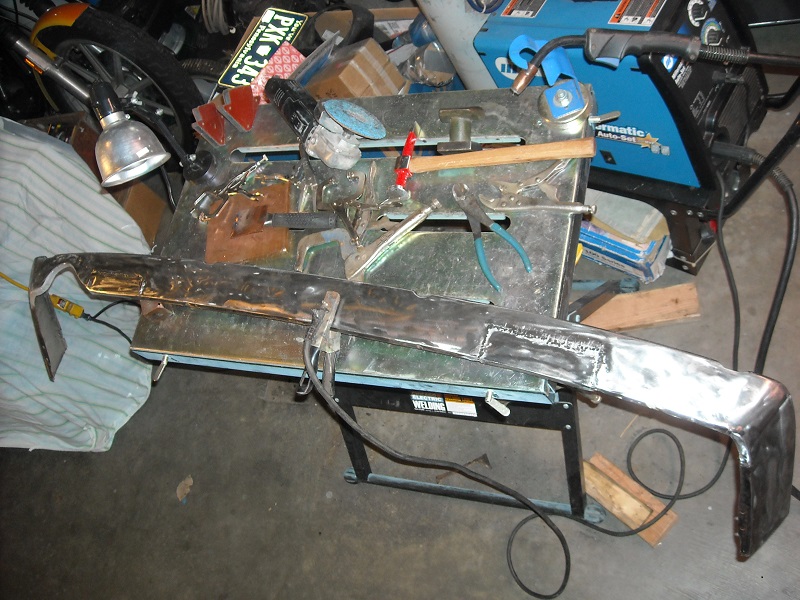 Not a pretty as the Metal Surgeon work but no pin holes, and I don’t care about a little body work on it. When it’s mounted you would have to be on your knees to critique my work anyways. Next I have to make a pattern of the cut-out and transfer it to the other side, leaving enough to fold under. I might have to cut a couple splits to get it to fold under right but time will tell. And I may get to do more practice welding. I am kind of hoping it looks like it was meant to be this way. |
|
|
|
| tygaboy |
Mar 23 2018, 01:42 PM
Post
#113
|
|
914 Guru Group: Members Posts: 5,826 Joined: 6-October 15 From: Petaluma, CA Member No.: 19,241 Region Association: Northern California |
You might have a go at making a hammer form to use when creating the other side opening. It's amazing how much you can get metal to move and what a nice finish you can get. Best of all is no welding/distorting/grinding of the metal (assuming your hammer form is a good fit.)
No matter the method, I'm looking forward to seeing the finished product. And I agree: This is one of the prettiest cars on the World. Great job! |
|
|
|
| Dion |
Oct 3 2018, 05:40 PM
Post
#114
|
|
RN Group: Members Posts: 2,926 Joined: 16-September 04 From: Audubon,PA Member No.: 2,766 Region Association: MidAtlantic Region |
Just bumping this back up to say, I don’t know how I missed this resto Tom.
That’s a beautiful 914. Well done. Hope it’s running well for you & how did the valence turn out? Hope to see ya at Hershey one day or Carlisle! |
|
|
|
| Olympic 914 |
Feb 17 2019, 05:38 PM
Post
#115
|
|
Group: Members Posts: 1,780 Joined: 7-July 11 From: Pittsburgh PA Member No.: 13,287 Region Association: North East States |
QUOTE(tygaboy @ Mar 23 2018, 02:42 PM)  You might have a go at making a hammer form to use when creating the other side opening. It's amazing how much you can get metal to move and what a nice finish you can get. Best of all is no welding/distorting/grinding of the metal (assuming your hammer form is a good fit.) No matter the method, I'm looking forward to seeing the finished product. And I agree: This is one of the prettiest cars on the World. Great job! Did some more work on this, Decided to follow tygaboys suggestion of making a hammer form.  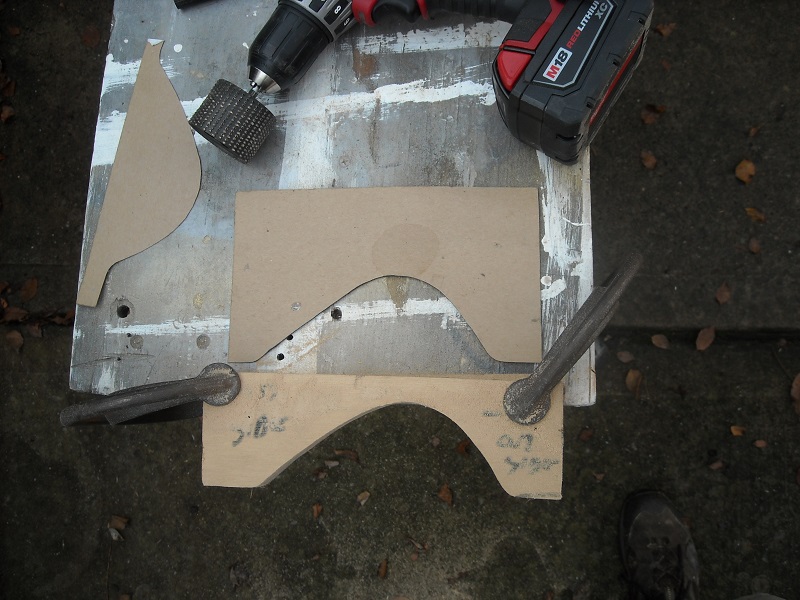 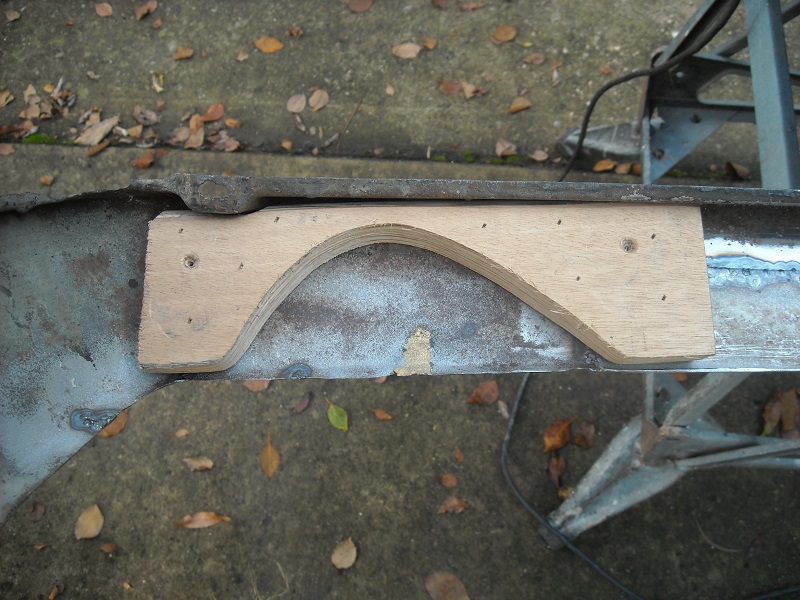 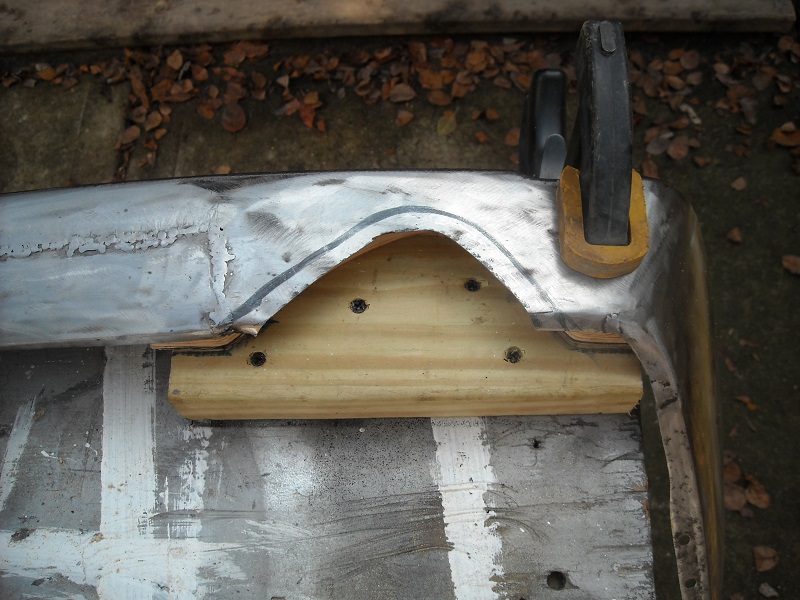 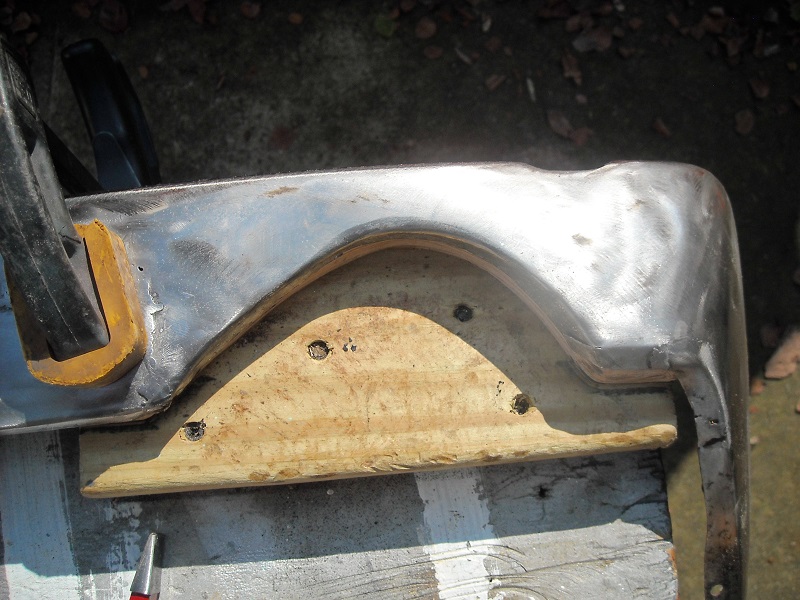 And after some bodywork and paint it is installed. 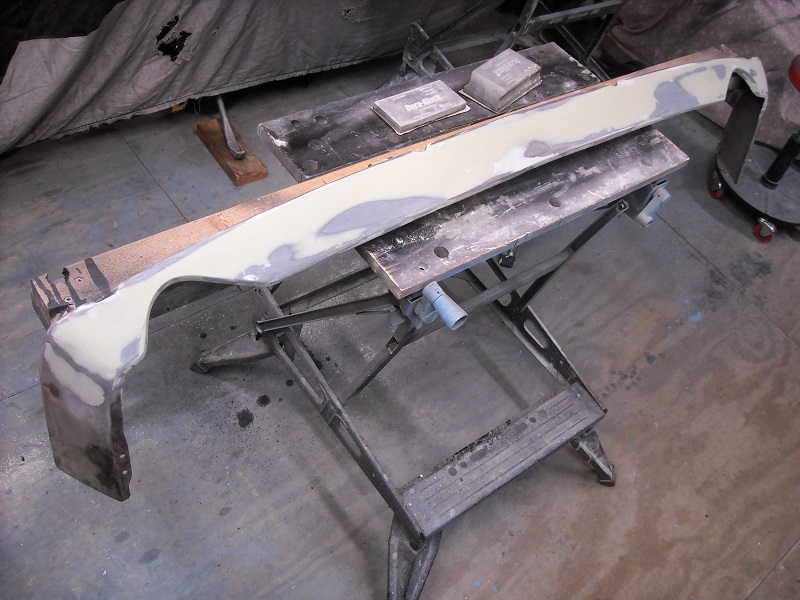 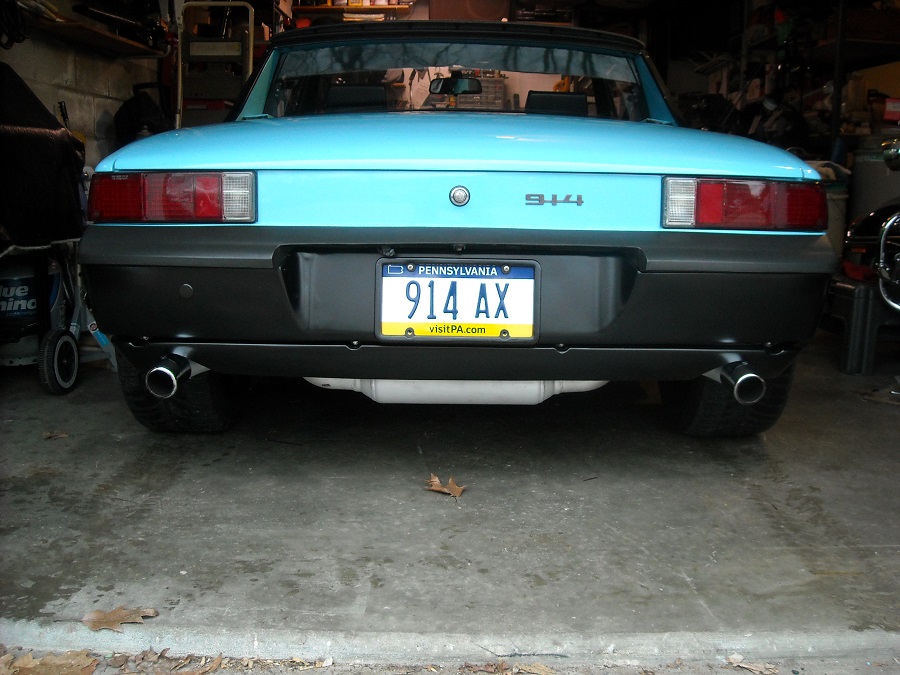 |
|
|
|
| Olympic 914 |
Feb 17 2019, 06:31 PM
Post
#116
|
|
Group: Members Posts: 1,780 Joined: 7-July 11 From: Pittsburgh PA Member No.: 13,287 Region Association: North East States |
So some time had passed before finishing the rear valence because I had other things to deal with like the broken trunk hinge. Decided to pull the engine out to make it easier to repair and using the lathe cut a grease grove in the hinge bolts to prevent it from happening again. (I hope)
Details of that repair are here> http://www.914world.com/bbs2/index.php?sho...=334897&hl= Of course there are always some "while you're in there" things to do. like fixing the leaking oil temp sender taco plate, setting the valves and replacing the throttle cable. The throttle cable had cracked at the ferrule so to help support it I put some heat shrink over the ferrule / cable and dug a spring out of the stash that just fit tight. 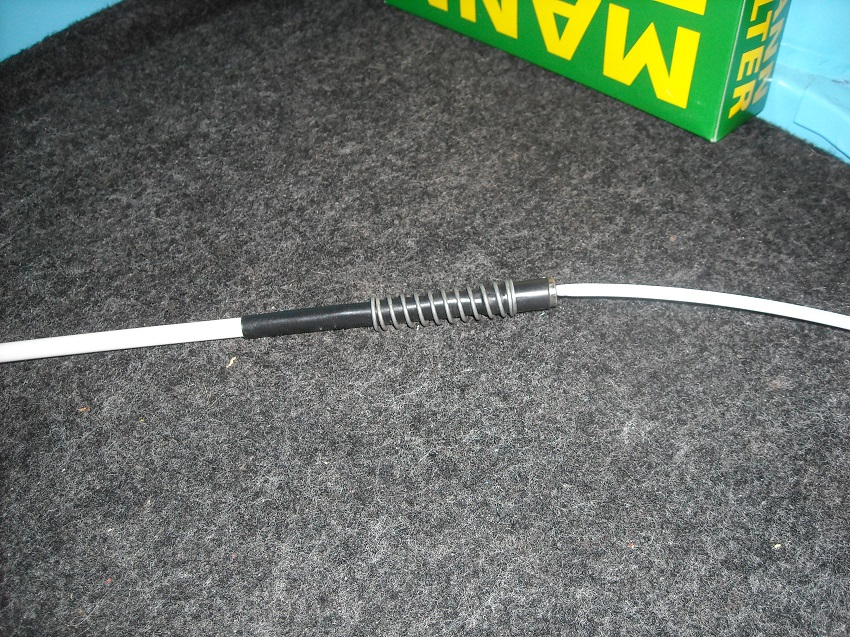 Then I always thought it sat a little too high and the KYB shocks were just a stopgap measure to get me on the road. Time for some proper Koni's Ground Control fixed me up with a package that included the shocks, springs and adjustable sleeves. since this is mainly a street car I decided to go with the 125# springs for the ride, my old springs were 100 or 110# so not much of a change there. If I don't like it.... springs are not too expensive or hard to change. 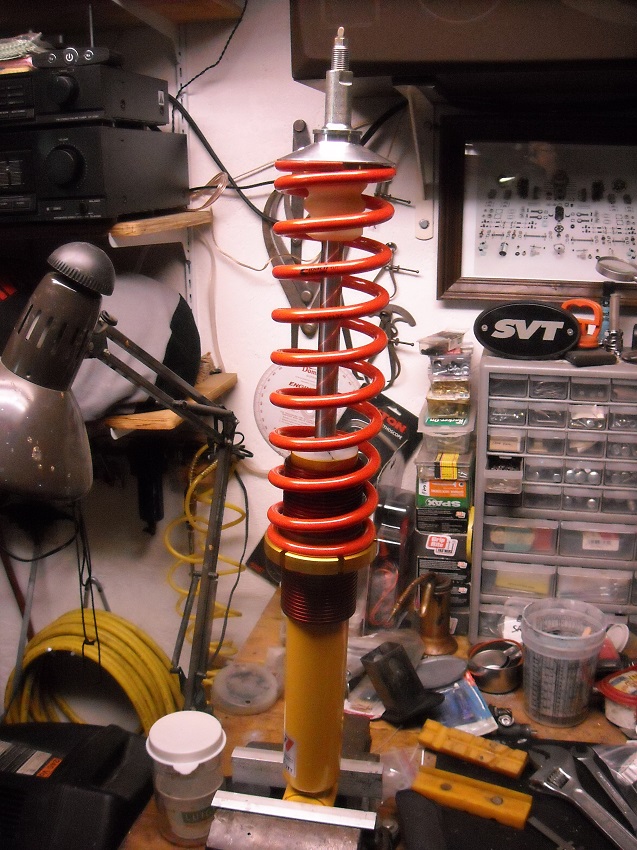 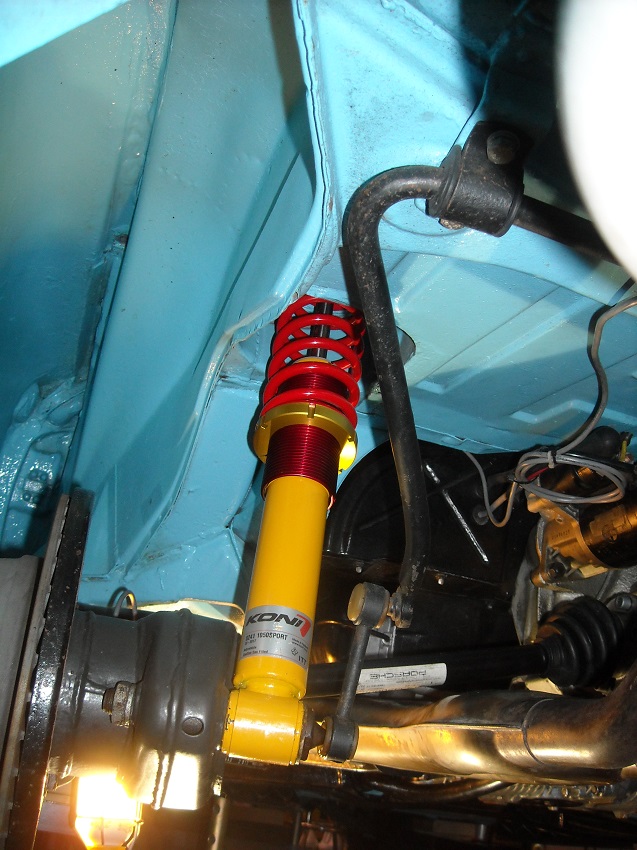 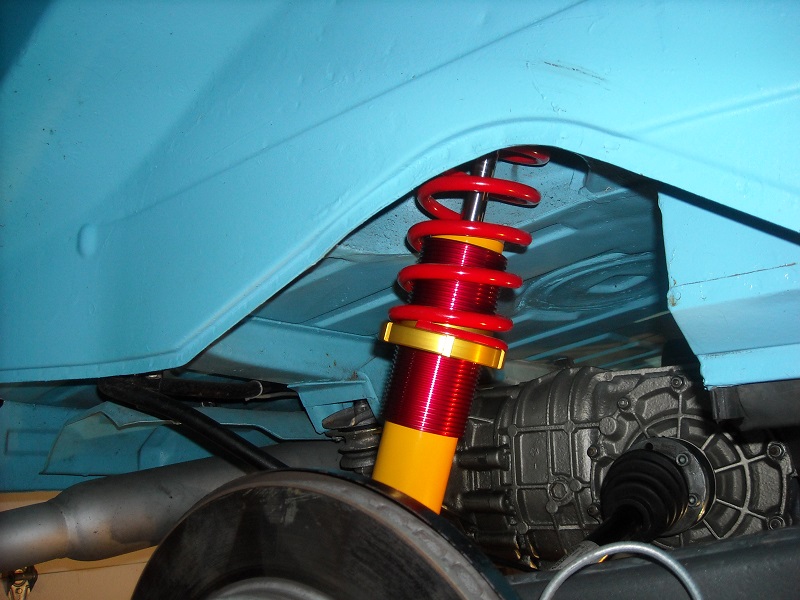 So now its sitting at a much nicer height. AND will probably ride better. I can't wait for better weather to try them out on the local twisties. |
|
|
|
| mepstein |
Feb 17 2019, 07:59 PM
Post
#117
|
|
914-6 GT in waiting Group: Members Posts: 20,735 Joined: 19-September 09 From: Landenberg, PA/Wilmington, DE Member No.: 10,825 Region Association: MidAtlantic Region |
You will be thrilled with the ride.
|
|
|
|
| steuspeed |
Feb 17 2019, 09:29 PM
Post
#118
|
|
Senior Member Group: Members Posts: 1,011 Joined: 12-July 11 From: Portland, Oregon Member No.: 13,308 Region Association: Pacific Northwest |
This looks like a cool set-up with these Koni Ground Control coil over shocks.
|
|
|
|
| Olympic 914 |
Mar 9 2020, 07:18 PM
Post
#119
|
|
Group: Members Posts: 1,780 Joined: 7-July 11 From: Pittsburgh PA Member No.: 13,287 Region Association: North East States |
2019 Winter projects.
During some of my drives I noticed the oil temps getting high, into the 240-250 range on hot days. So adding an aux oil cooler seemed to be a good idea. Guess the 2056 makes a little more heat than the stock 1.7. Mentioned this at Okteenerfest and Danny @Bahnzai sent me a sandwich adapter he wasn’t using, giving me some more incentive. I used a Setrab 119 fanpack cooler and their 180 deg cooler thermostat, I added the 190 deg switch to trigger the fan. Looking through other oil cooler threads I liked the routing of lines above the tins so as not to block the valve cover. Pictures of the brackets, everything fits in there nice. It helps to have a friend with a bandsaw and bending brake. 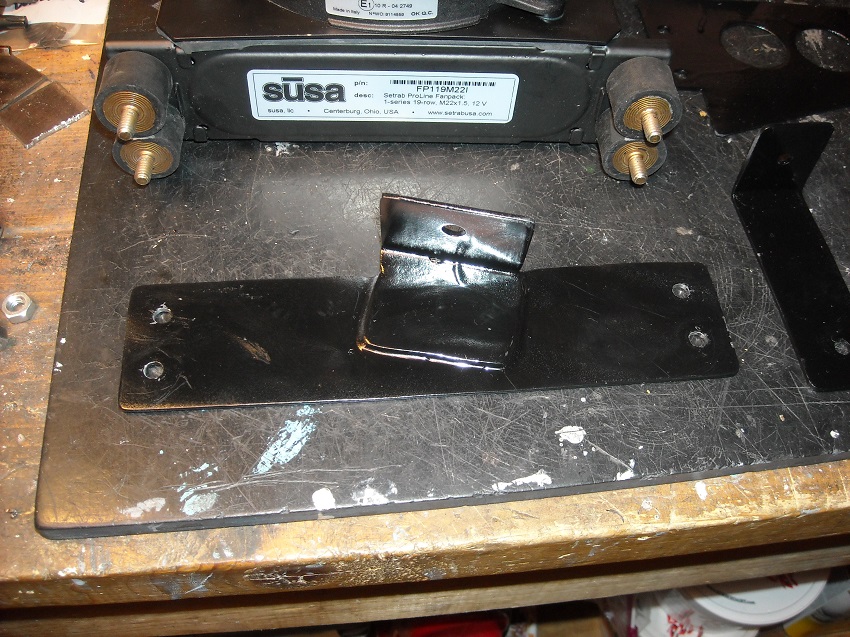 With this short of a run from the adapter to the thermostat the AN10 lines may as well be rigid. So I had to have the lines determine the position of the thermostat. I used the hole that the J tube used to go into. I was getting plenty of heat with just the one hose from the blower anyways. I capped the S pipe. 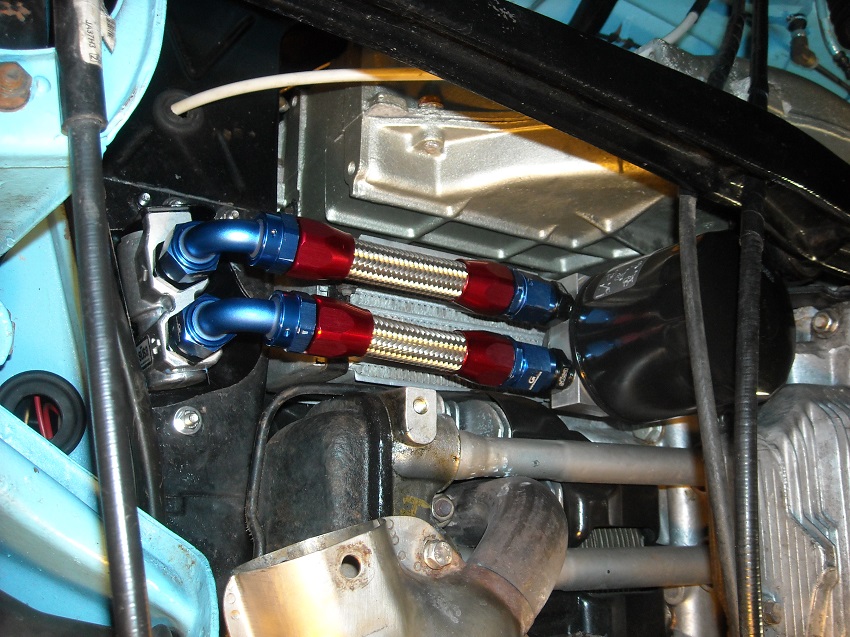 the fan thermostat is mounted in the black piece in this picture It also allowed me to stack the lines vertically on their way to the cooler. 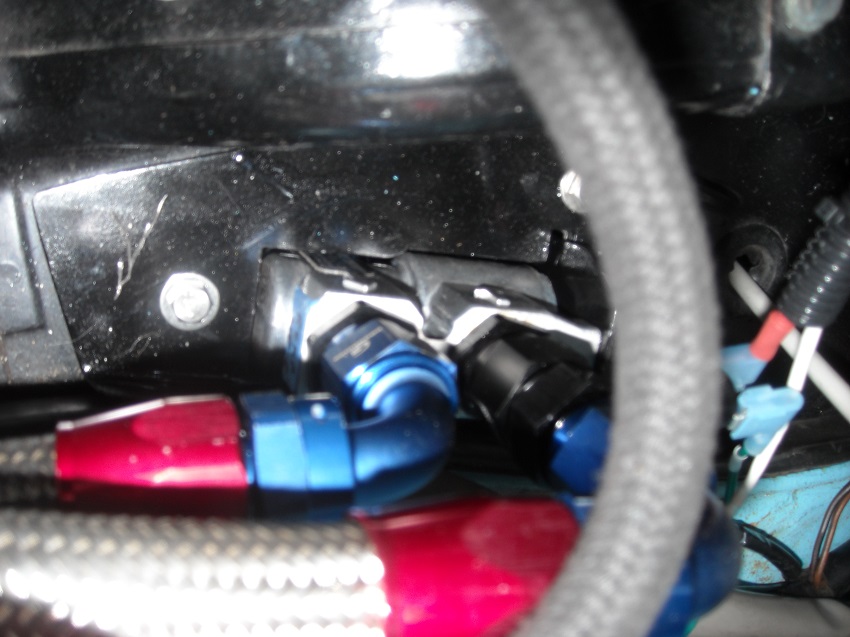 The fan is a pull through type, with shroud. 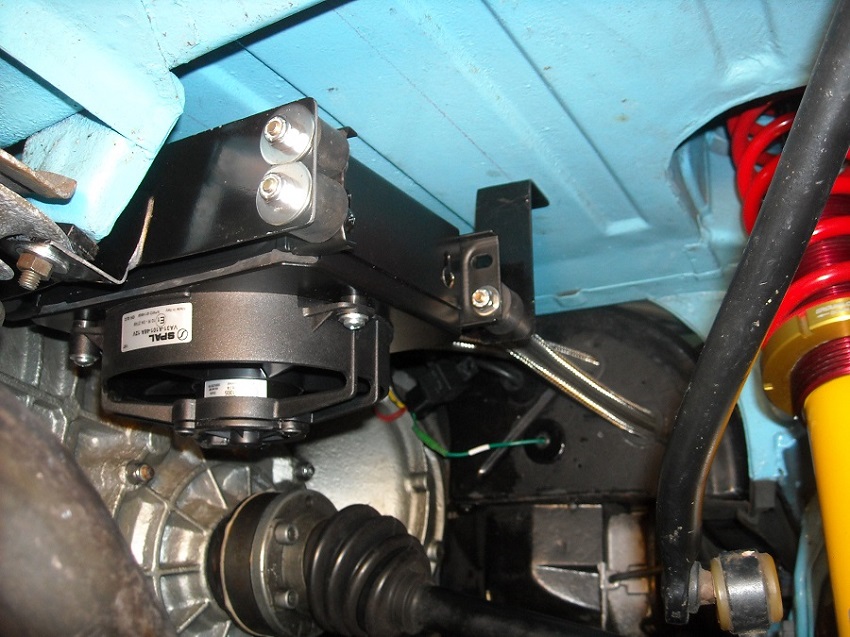 Space is a premium in this area and I had to make a standoff to move the MPS a couple inches so everything would clear. 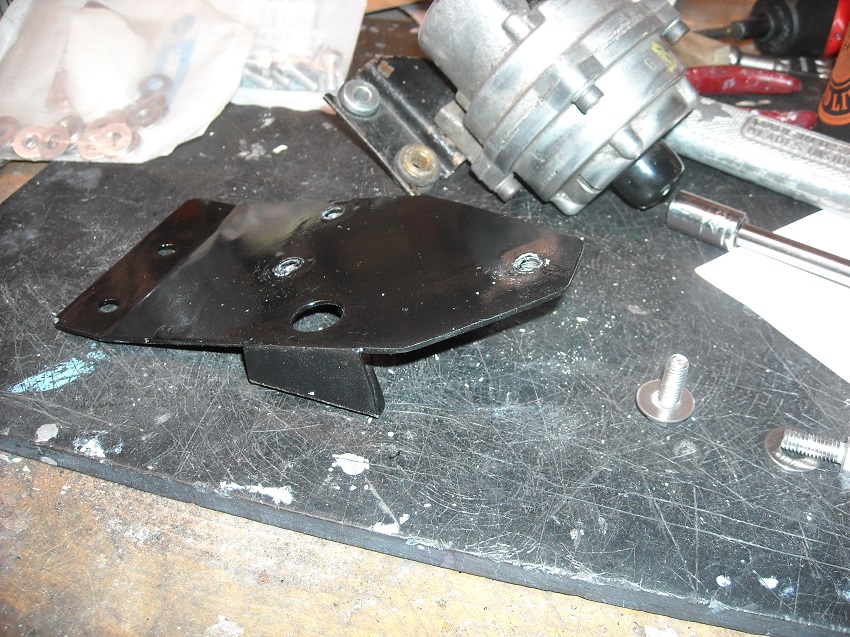 Used AN10 lines to give enough flow. Things are pretty crowded in this area now, I was worried about clearing the injectors. But everything clears. it isn't easy getting your fingers down in there to work though. 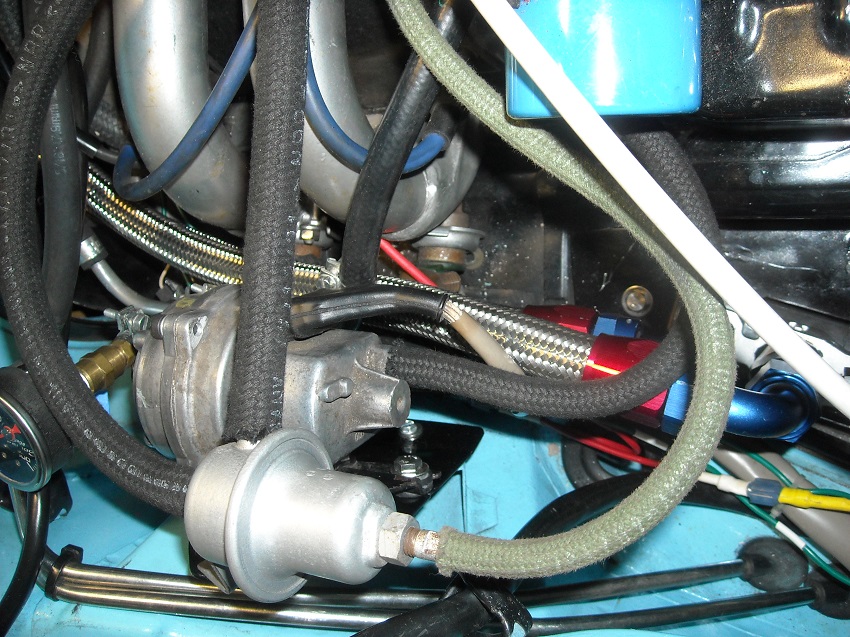 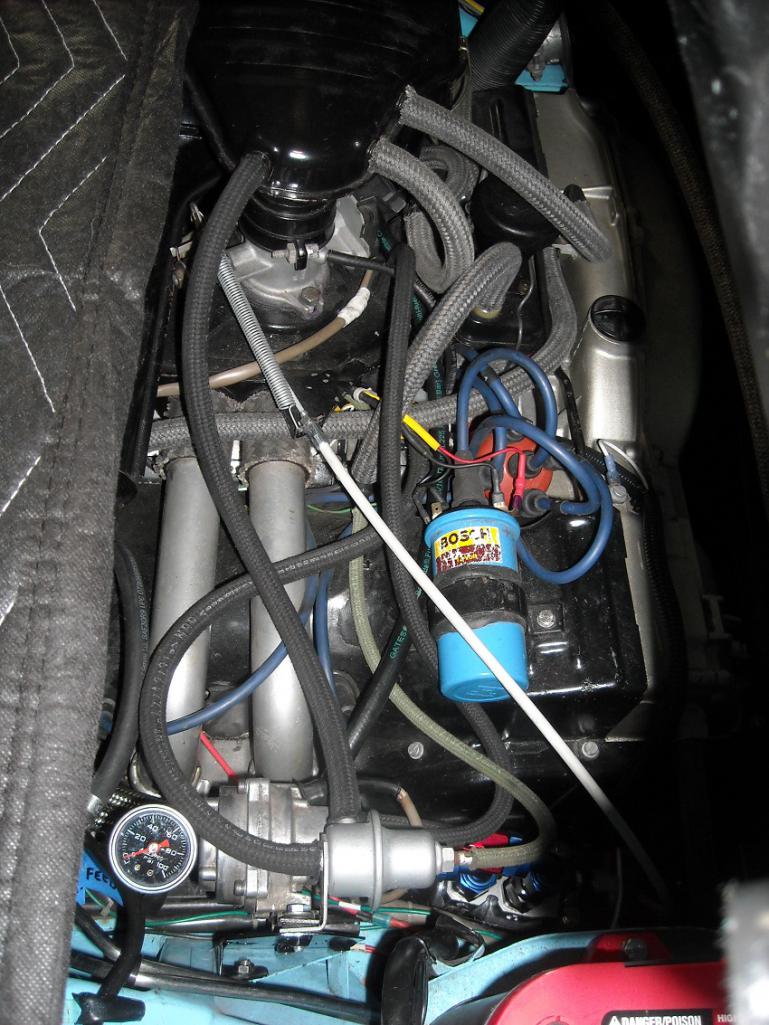 The best part is I didn't have to remove the engine to install everything. Being March, the temps are not yet hot enough for a real test but a speed run down the turnpike today, a 60 deg day, I only saw the oil temps hit 205 and it moves back down much quicker than it used to. |
|
|
|
| bahnzai |
Mar 9 2020, 08:04 PM
Post
#120
|
|
Member Group: Members Posts: 370 Joined: 26-July 06 From: Columbia, SC Member No.: 6,509 Region Association: South East States |
Tom,
What a nice clean job! Congrats. That should give you nice results this summer! |
|
|
|
|
1 User(s) are reading this topic (1 Guests and 0 Anonymous Users)
0 Members:

|
Lo-Fi Version | Time is now: 5th June 2026 - 11:58 AM |
Invision Power Board
v9.1.4 © 2026 IPS, Inc.