|
|
|
Porsche, and the Porsche crest are registered trademarks of Dr. Ing. h.c. F. Porsche AG.
This site is not affiliated with Porsche in any way. Its only purpose is to provide an online forum for car enthusiasts. All other trademarks are property of their respective owners. |
|
|

  |

| keely444 |
 Jun 15 2016, 09:48 PM Jun 15 2016, 09:48 PM
Post
#1
|
|
Member  Group: Members Posts: 103 Joined: 4-May 15 From: santa cruz Member No.: 18,702 Region Association: None |
Any one replace their seat adjuster Handles with any of the aftermarket products out there. How does the removal and install work? Also has anyone powder coated the originals?
|
   |

 
|
| steuspeed |
Jun 15 2016, 09:57 PM
Post
#2
|
|
Senior Member Group: Members Posts: 1,010 Joined: 12-July 11 From: Portland, Oregon Member No.: 13,308 Region Association: Pacific Northwest |
|
|
|
|
| keely444 |
Jun 15 2016, 10:00 PM
Post
#3
|
|
Member Group: Members Posts: 103 Joined: 4-May 15 From: santa cruz Member No.: 18,702 Region Association: None |
QUOTE(steuspeed @ Jun 15 2016, 08:57 PM)  Thanks! Do you know what material they are made of? |
|
|
|
| Mikey914 |
Jun 16 2016, 01:54 AM
Post
#4
|
|
The rubber man Group: Members Posts: 12,772 Joined: 27-December 04 From: Hillsboro, OR Member No.: 3,348 Region Association: None |
Steel powder coated black. They will NEVER break and are designed so that the holes are on center with the existing rivets.
Michael broke one of the "unbreakable" plastic ones on his car. He will be doing this soon too. |
|
|
|
| keely444 |
Jun 16 2016, 06:45 AM
Post
#5
|
|
Member Group: Members Posts: 103 Joined: 4-May 15 From: santa cruz Member No.: 18,702 Region Association: None |
QUOTE(Mikey914 @ Jun 16 2016, 12:54 AM) Steel powder coated black. They will NEVER break and are designed so that the holes are on center with the existing rivets. Michael broke one of the "unbreakable" plastic ones on his car. He will be doing this soon too. That is what I was hoping to hear. I will get some on order. |
|
|
|
| Optimusglen |
Jun 16 2016, 07:31 AM
Post
#6
|
|
Senior Member Group: Members Posts: 923 Joined: 26-February 16 From: Minneapolis Member No.: 19,709 Region Association: Upper MidWest |
I have a steel one from 914Rubber in my car, the thing is seriously really tough, very pleased with it. I have an early car so I only have one though.
|
|
|
|
| 76-914 |
Jun 16 2016, 08:01 AM
Post
#7
|
|
Repeat Offender & Resident Subaru Antagonist Group: Members Posts: 13,734 Joined: 23-January 09 From: Temecula, CA Member No.: 9,964 Region Association: Southern California |
Buy 2 because Mark's is actually nicer than the OEM model. (IMG:style_emoticons/default/beerchug.gif)
|
|
|
|
| Rob-O |
Jun 16 2016, 09:03 PM
Post
#8
|
|
Senior Member Group: Members Posts: 1,272 Joined: 5-December 03 From: Mansfield, TX Member No.: 1,419 Region Association: Southwest Region |
(IMG:style_emoticons/default/agree.gif)
I bought 914Rubber ones. Easy fix and they e been in place for several years. I can't see them ever breaking again. Originals were pot metal. Even if you removed them, painted them and put them back on the car, eventually they're going to fatigue to the point of failing. When? Probably two weeks after you have them powder coated! |
|
|
|
| green914 |
Jun 17 2016, 07:00 AM
Post
#9
|
|
Senior Member Group: Members Posts: 1,467 Joined: 29-March 11 From: Sacramento, California Member No.: 12,874 Region Association: Northern California |
914 Rubber (IMG:style_emoticons/default/agree.gif) have them on mine, easy to install.
|
|
|
|
| billsimmeth |
May 20 2018, 03:15 PM
Post
#10
|
|
Newbie Group: Members Posts: 23 Joined: 3-May 12 From: Virginia's Blue Ridge Member No.: 14,428 Region Association: None |
Question for those that have installed the 914Rubber handle: Do I need to drill the holes in the adjuster to a larger size or do the supplied screws fit in the factory holes?
|
|
|
|
| Rob-O |
May 20 2018, 05:35 PM
Post
#11
|
|
Senior Member Group: Members Posts: 1,272 Joined: 5-December 03 From: Mansfield, TX Member No.: 1,419 Region Association: Southwest Region |
Ya been awhile since I installed them but I want to say I did need to drill a slightly larger hole and then assemble with nut and bolt. I don’t remember if the nut and bolt were provided by 914Rubber or not.
|
|
|
|
| billsimmeth |
May 20 2018, 07:07 PM
Post
#12
|
|
Newbie Group: Members Posts: 23 Joined: 3-May 12 From: Virginia's Blue Ridge Member No.: 14,428 Region Association: None |
Thanks Rob,
Seems hardware is included. Just need to know hole size as car is leaving tomorrow for California and I'll need to install handle in the field. QUOTE(Rob-O @ May 20 2018, 07:35 PM) Ya been awhile since I installed them but I want to say I did need to drill a slightly larger hole and then assemble with nut and bolt. I don’t remember if the nut and bolt were provided by 914Rubber or not. |
|
|
|
| 914-300Hemi |
May 20 2018, 07:23 PM
Post
#13
|
|
Senior Member Group: Members Posts: 1,385 Joined: 7-September 06 From: San Dimas, CA Member No.: 6,794 Region Association: Southern California |
I just installed one. You have to make the hole bigger for the bolts that are provided with the kit. I would suggest replacing both of them.
I did take the eats out to drill the old rivets out which made the job much easier. |
|
|
|
| billsimmeth |
May 21 2018, 04:43 PM
Post
#14
|
|
Newbie Group: Members Posts: 23 Joined: 3-May 12 From: Virginia's Blue Ridge Member No.: 14,428 Region Association: None |
Thanks guys. Anyone know what diameter the bolt that 914Rubber provides is?
|
|
|
|
| Dave_Darling |
May 21 2018, 10:48 PM
Post
#15
|
|
914 Idiot Group: Members Posts: 15,192 Joined: 9-January 03 From: Silicon Valley / Kailua-Kona Member No.: 121 Region Association: Northern California |
Avoid the plastic Weltmeister ones... They break about the second time you use them.
--DD |
|
|
|
| jcd914 |
May 21 2018, 11:07 PM
Post
#16
|
|
Advanced Member Group: Members Posts: 2,096 Joined: 7-February 08 From: Sacramento, CA Member No.: 8,684 Region Association: Northern California |
I did not buy this one, it came with one of the cars I bought but I don't know of anyone else that makes metal ones other than 914rubber.
It has 6mm Allen head bolts with lock washers, so a 1/4 inch drill will work. Jim 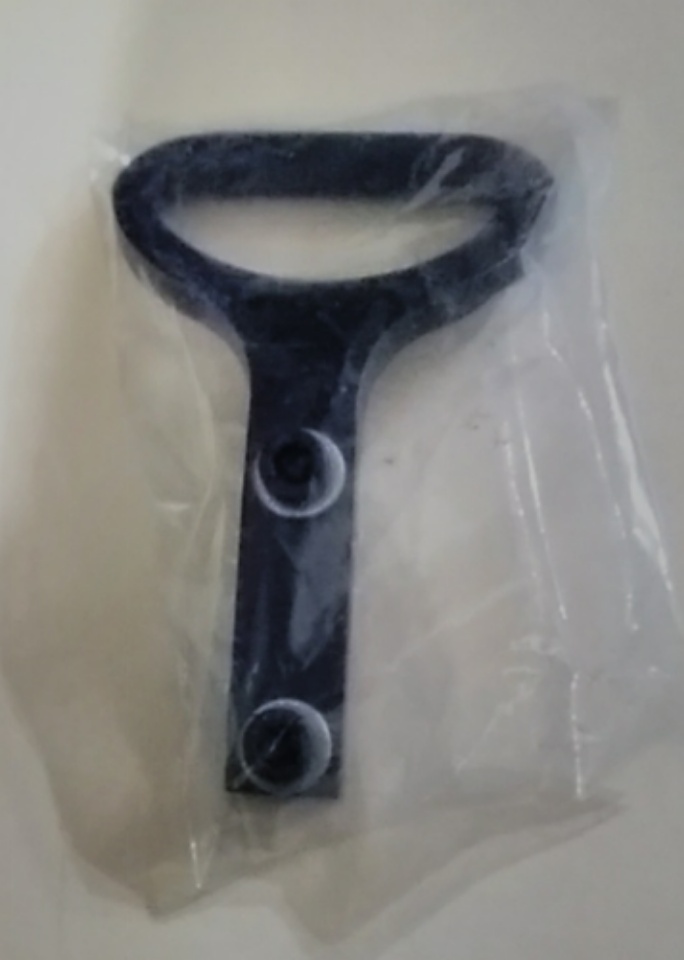 |
|
|
|
| Matty900 |
May 22 2018, 01:44 AM
Post
#17
|
|
Senior Member Group: Members Posts: 1,293 Joined: 21-February 15 From: Oregon Member No.: 18,454 Region Association: Pacific Northwest |
I restored the base while I had it out and also replaced the seat adjuster bushings. https://shop.914rubber.com/Seat-adjuster-re...4?categoryId=-1
Attached thumbnail(s) 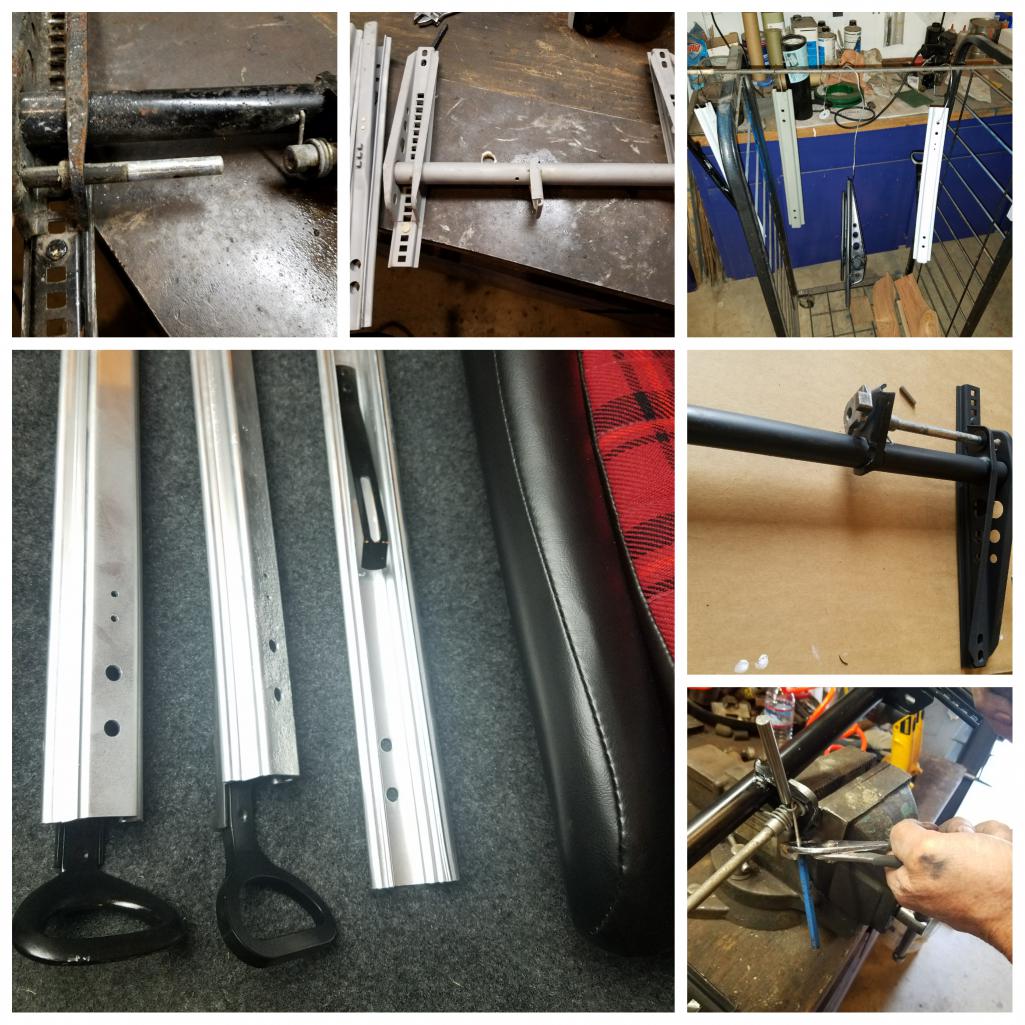
|
|
|
|
| Matty900 |
May 22 2018, 01:46 AM
Post
#18
|
|
Senior Member Group: Members Posts: 1,293 Joined: 21-February 15 From: Oregon Member No.: 18,454 Region Association: Pacific Northwest |
Drill out the broken handle. (I think it was 7/32)
Attached thumbnail(s) 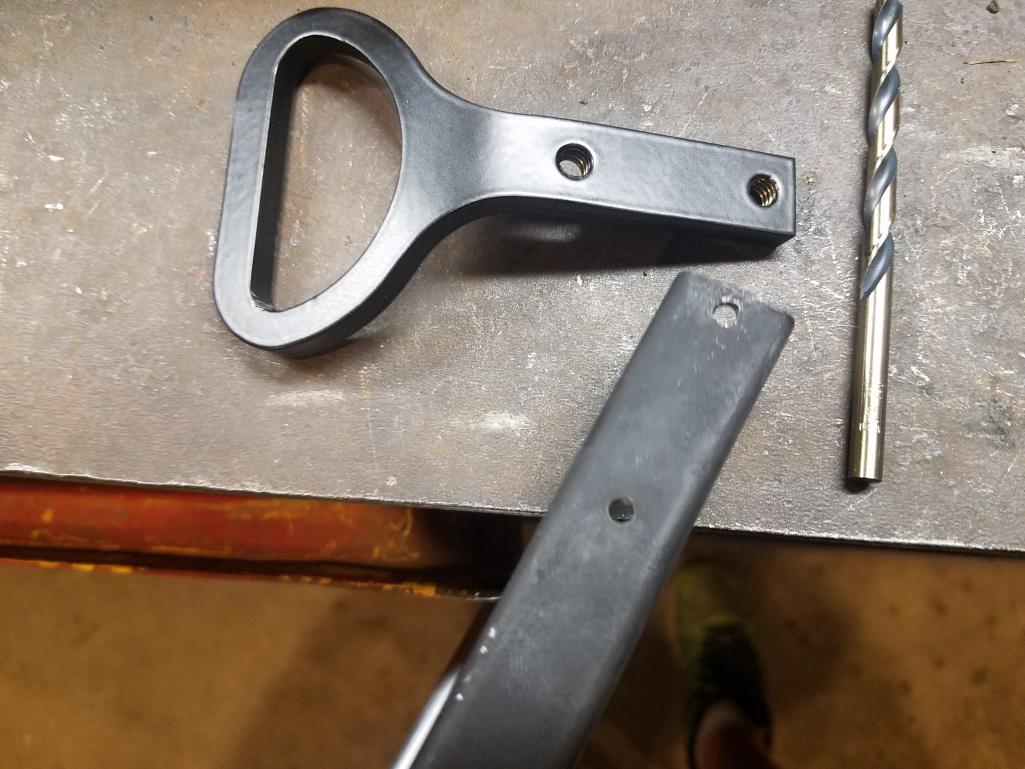
|
|
|
|
| Matty900 |
May 22 2018, 01:49 AM
Post
#19
|
|
Senior Member Group: Members Posts: 1,293 Joined: 21-February 15 From: Oregon Member No.: 18,454 Region Association: Pacific Northwest |
Then screw on the new one.
Attached thumbnail(s) 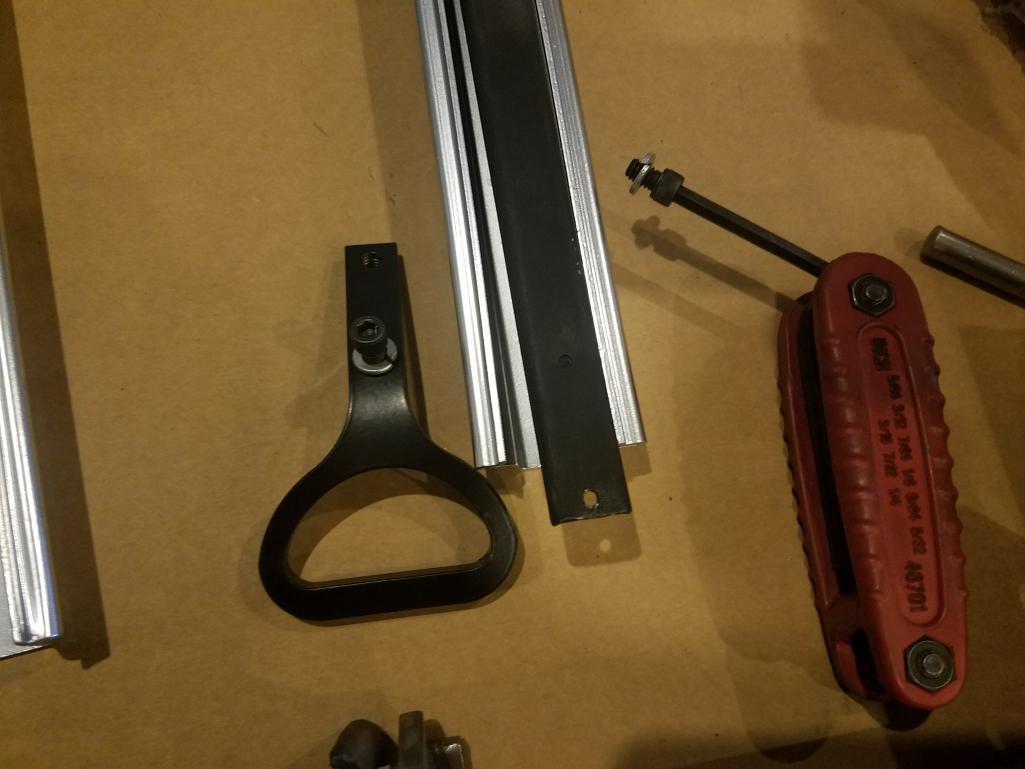
|
|
|
|
| billsimmeth |
May 22 2018, 04:43 AM
Post
#20
|
|
Newbie Group: Members Posts: 23 Joined: 3-May 12 From: Virginia's Blue Ridge Member No.: 14,428 Region Association: None |
Thanks all!
|
|
|
|
|
1 User(s) are reading this topic (1 Guests and 0 Anonymous Users)
0 Members:

|
Lo-Fi Version | Time is now: 1st July 2025 - 01:50 AM |
Invision Power Board
v9.1.4 © 2025 IPS, Inc.