|
|
|
Porsche, and the Porsche crest are registered trademarks of Dr. Ing. h.c. F. Porsche AG.
This site is not affiliated with Porsche in any way. Its only purpose is to provide an online forum for car enthusiasts. All other trademarks are property of their respective owners. |
|
|

  |

| aggiezig |
 May 6 2018, 10:13 PM May 6 2018, 10:13 PM
Post
#141
|
|
Porsche Wannabe  Group: Members Posts: 319 Joined: 13-January 16 From: Los Angeles, CA Member No.: 19,557 Region Association: Southern California |
QUOTE(bbrock @ May 6 2018, 11:10 PM)  Great progress. Thanks for the insight on staging the paint job. As I inch slowly toward painting my car, I've been wondering about how to approach this. I really appreciate you sharing your experience. BTW, do you remember roughly what it cost to have your Raptor bedliner tinted? I'm leaning in that direction but haven't decided. Thanks Brent, you've got a great thread as well. The tint was cheap. I want to say $30-40 for a quart of color at my local Tasco (which is more than enough). I just used PPG shopline for the tint color. Make sure to ask for them to mix it without binders. |
   |

 
|
| aggiezig |
May 14 2018, 01:25 PM
Post
#142
|
|
Porsche Wannabe Group: Members Posts: 319 Joined: 13-January 16 From: Los Angeles, CA Member No.: 19,557 Region Association: Southern California |
Small update for this weekend:
I picked away at a few little things. First up was stripping the gas tank. In the process I found a couple of pin holes at the bottom. I had no idea they were there before, but went ahead and welded them up. Hopefully these are it. I'm going to see if I can rig up some way to pressure test. (IMG:http://www.914world.com/bbs2/uploads_offsite/i.imgur.com-19557-1526325911.1.jpg) (IMG:http://www.914world.com/bbs2/uploads_offsite/i.imgur.com-19557-1526325913.2.jpg) Next was getting the other side of the car (passenger side) in poly primer: (IMG:http://www.914world.com/bbs2/uploads_offsite/i.imgur.com-19557-1526325913.3.jpg) After a day of curing, I reluctantly started block sanding. This evercoat featherfill sands really nicely. It also changes color when sanded (well, lightens up) so that it's really easy to find your highs / lows without needed guide coat. (IMG:http://www.914world.com/bbs2/uploads_offsite/i.imgur.com-19557-1526325914.4.jpg) (IMG:http://www.914world.com/bbs2/uploads_offsite/i.imgur.com-19557-1526325915.5.jpg) (IMG:http://www.914world.com/bbs2/uploads_offsite/i.imgur.com-19557-1526325915.6.jpg) I'm going to keep at it and get all of this poly sanded out to 220 grit and then coat with 2k primer. I'll take the 2k up to 600 grit before a sealer coat and color. I think the game plan is to get the car back on it's own wheels so it can be easily transported for paint. I'd like to rent a booth if possible for spraying color. We'll see! |
|
|
|
| aggiezig |
Jun 1 2018, 09:30 PM
Post
#143
|
|
Porsche Wannabe Group: Members Posts: 319 Joined: 13-January 16 From: Los Angeles, CA Member No.: 19,557 Region Association: Southern California |
Well, it's been a few weeks since my last post. I was traveling both of the last weekends so progress has been slow but hoping to get back at it now. Lots and lots of sanding... I need to finish taking the poly primer up to 220 grit and then I will spray 2k on top of everything and wet sand up to 600 before paint.
In the mean time... I have some parts porn to share with everyone. I sent all of my hardware out to Texas Precision Plating up near Dallas. They did three flat rate USPS boxes for me in two colors for $270 which included rack plating & baking some pieces. Overall, I am very pleased. There are a few parts I should have cleaned up better. The cleaner you get the part, the shinier the coating ends up being. Of all the parts, I am least pleased with the calipers. In retrospect, I should have blasted these with some fine sand or something to get them really clean before plating. They're going to be hidden under the car so I'll be ok, but they could have been better if I did more prep work. (IMG:http://www.914world.com/bbs2/uploads_offsite/i.imgur.com-19557-1527910213.1.jpg) (IMG:http://www.914world.com/bbs2/uploads_offsite/i.imgur.com-19557-1527910216.2.jpg) (IMG:http://www.914world.com/bbs2/uploads_offsite/i.imgur.com-19557-1527910217.3.jpg) (IMG:http://www.914world.com/bbs2/uploads_offsite/i.imgur.com-19557-1527910217.4.jpg) (IMG:http://www.914world.com/bbs2/uploads_offsite/i.imgur.com-19557-1527910218.5.jpg) (IMG:http://www.914world.com/bbs2/uploads_offsite/i.imgur.com-19557-1527910218.6.jpg) (IMG:http://www.914world.com/bbs2/uploads_offsite/i.imgur.com-19557-1527910219.7.jpg) (IMG:http://www.914world.com/bbs2/uploads_offsite/i.imgur.com-19557-1527910219.8.jpg) Only one faux pas. For easy shipping, I slid the stub axles into the hub plates. One set was plated together as a unit and is now stuck together. I talked to TPP and they said they will re-plate after I am able to get them apart. (IMG:http://www.914world.com/bbs2/uploads_offsite/i.imgur.com-19557-1527910220.9.jpg) I went ahead and bought new bolts for some "critical" places but I still re-plated all of my old hardware. This pic is before sorting, which took a good 2-3 hours. (IMG:http://www.914world.com/bbs2/uploads_offsite/i.imgur.com-19557-1527910221.10.jpg) I'm hoping this will be a productive weekend for me so I can keep moving forward with paint / bodywork. Will post more progress soon! |
|
|
|
| aggiezig |
Jun 3 2018, 09:57 PM
Post
#144
|
|
Porsche Wannabe Group: Members Posts: 319 Joined: 13-January 16 From: Los Angeles, CA Member No.: 19,557 Region Association: Southern California |
Well, lots of sorting later and only identified a few missing pieces. Luckily I sent spare parts from the other car I disassembled so I should be OK. Here are some pics:
(IMG:http://www.914world.com/bbs2/uploads_offsite/i.imgur.com-19557-1528084664.1.jpg) (IMG:http://www.914world.com/bbs2/uploads_offsite/i.imgur.com-19557-1528084665.2.jpg) I spent some time on assembly this weekend to (hopefully) have everything ready to go together so I can trailer the car to a booth for painting color. Rebuild rack & turbo tie-rod kit: (IMG:http://www.914world.com/bbs2/uploads_offsite/i.imgur.com-19557-1528084665.3.jpg) Re-plated hardware: (IMG:http://www.914world.com/bbs2/uploads_offsite/i.imgur.com-19557-1528084665.4.jpg) New Koni Shocks front & rear: (IMG:http://www.914world.com/bbs2/uploads_offsite/i.imgur.com-19557-1528084665.5.jpg) I also worked on pressing new front rubber suspension bushings for the A-Arms from 914rubber. I followed Ian Karr's youtube video and got them pressed on. Had a couple of issues with the rears (small tears) & sent Mikey914 a PM to get his thoughts. New bushings pressed into carriers: (IMG:http://www.914world.com/bbs2/uploads_offsite/i.imgur.com-19557-1528084666.6.jpg) Made sure to sand smooth carriers & arms: (IMG:http://www.914world.com/bbs2/uploads_offsite/i.imgur.com-19557-1528084666.7.jpg) Heated in boiling water: (IMG:http://www.914world.com/bbs2/uploads_offsite/i.imgur.com-19557-1528084666.8.jpg) Pulled on using all-thread & LOTS of soap: (IMG:http://www.914world.com/bbs2/uploads_offsite/i.imgur.com-19557-1528084666.9.jpg) Also spent some time doing body work. I finished sanding the poly primer on the rear of the car up to 220. I used spot putty in a few places to fix a couple remaining lows. I was happy with everything and went ahead and sprayed 2k primer on top. I did a couple of wet coats but had real issues with the 100+ TX heat flashing the primer instantly out of the gun. The finish isn't quite as smooth as I was hoping for but a lot of it will be sanded off anyways. Before w/ self-etch over bare metal: (IMG:http://www.914world.com/bbs2/uploads_offsite/i.imgur.com-19557-1528084666.10.jpg) After: (IMG:http://www.914world.com/bbs2/uploads_offsite/i.imgur.com-19557-1528084667.11.jpg) (IMG:http://www.914world.com/bbs2/uploads_offsite/i.imgur.com-19557-1528084667.12.jpg) Going to try to pick up some slower reducer and get the front half in 2K soon as well. After that, I will probably get the trunk & engine bay in blue and allow some time for the 2k to fully cure and shrink up. More to come! |
|
|
|
| Tdskip |
Jun 4 2018, 08:26 AM
Post
#145
|
|
Advanced Member Group: Members Posts: 3,737 Joined: 1-December 17 From: soCal Member No.: 21,666 Region Association: None |
Great thread!
A bit late to the party but subscribing. Thanks for keeping it going. |
|
|
|
| aggiezig |
Jun 5 2018, 10:56 AM
Post
#146
|
|
Porsche Wannabe Group: Members Posts: 319 Joined: 13-January 16 From: Los Angeles, CA Member No.: 19,557 Region Association: Southern California |
Thanks, tdskip.
Small update, I put the pedal assembly back together last night with new bronze bushings from Pelican. Overall, not too hard of a job and I consulted the write-up from Eric Shea. (IMG:http://www.914world.com/bbs2/uploads_offsite/i.imgur.com-19557-1528217785.1.jpg) (IMG:http://www.914world.com/bbs2/uploads_offsite/i.imgur.com-19557-1528217785.2.jpg) (IMG:http://www.914world.com/bbs2/uploads_offsite/i.imgur.com-19557-1528217786.3.jpg) (IMG:http://www.914world.com/bbs2/uploads_offsite/i.imgur.com-19557-1528217786.4.jpg) Obviously still needs accelerator arm installed, rubber pedal covers, brake pushrod & switch. But, the "hard" part is done now. I may tackle the CV joints, boots & axles tonight. Reassembling components is a nice break away from sanding. |
|
|
|
| xperu |
Jun 5 2018, 03:39 PM
Post
#147
|
|
TEXAS Group: Members Posts: 597 Joined: 13-June 06 From: League City Texas Member No.: 6,213 Region Association: None |
QUOTE(aggiezig @ Jun 5 2018, 11:56 AM) Thanks, tdskip. Small update, I put the pedal assembly back together last night with new bronze bushings from Pelican. Overall, not too hard of a job and I consulted the write-up from Eric Shea. (IMG:http://www.914world.com/bbs2/uploads_offsite/i.imgur.com-19557-1528217785.1.jpg) (IMG:http://www.914world.com/bbs2/uploads_offsite/i.imgur.com-19557-1528217785.2.jpg) (IMG:http://www.914world.com/bbs2/uploads_offsite/i.imgur.com-19557-1528217786.3.jpg) (IMG:http://www.914world.com/bbs2/uploads_offsite/i.imgur.com-19557-1528217786.4.jpg) Obviously still needs accelerator arm installed, rubber pedal covers, brake pushrod & switch. But, the "hard" part is done now. I may tackle the CV joints, boots & axles tonight. Reassembling components is a nice break away from sanding. Hi, I sent you a PM. Mike |
|
|
|
| aggiezig |
Jun 6 2018, 10:09 PM
Post
#148
|
|
Porsche Wannabe Group: Members Posts: 319 Joined: 13-January 16 From: Los Angeles, CA Member No.: 19,557 Region Association: Southern California |
Tiny update, still pecking away at reassembly jobs to avoid sanding. Rear axles are reassembled and just need grease. The axle shafts were powdercoated and the original CV joints were just cleaned and reassembled with new boots.
(IMG:http://www.914world.com/bbs2/uploads_offsite/i.imgur.com-19557-1528344551.1.jpg) (IMG:http://www.914world.com/bbs2/uploads_offsite/i.imgur.com-19557-1528344552.2.jpg) It feels great to have clean parts ready to go back on the car. Next up is getting the calipers rebuilt and ready to roll. |
|
|
|
| 914Sixer |
Jun 7 2018, 01:22 PM
Post
#149
|
|
914 Guru Group: Members Posts: 9,191 Joined: 17-January 05 From: San Angelo Texas Member No.: 3,457 Region Association: Southwest Region |
Was your plating done at Del's Plating in west Houston?
|
|
|
|
| aggiezig |
Jun 7 2018, 02:22 PM
Post
#150
|
|
Porsche Wannabe Group: Members Posts: 319 Joined: 13-January 16 From: Los Angeles, CA Member No.: 19,557 Region Association: Southern California |
QUOTE(914Sixer @ Jun 7 2018, 02:22 PM) Was your plating done at Del's Plating in west Houston? No, I ended up using Texas Precision Plating in Garland. I tried contacting Del's a couple times via their website and never got a reply. I spoke with another shop in Houston called Delta Specialty Coatings prior to choosing TPP. I think they would have done a good job, but they would not plate my latches and mechanisms as complete units without disassembling first and that was a deal breaker for me as I'd never get them back together right. |
|
|
|
| aggiezig |
Jun 10 2018, 09:45 PM
Post
#151
|
|
Porsche Wannabe Group: Members Posts: 319 Joined: 13-January 16 From: Los Angeles, CA Member No.: 19,557 Region Association: Southern California |
Busy weekend for me knocking out some loose ends. I'm doing everything I can to avoid sanding primer right now (IMG:style_emoticons/default/biggrin.gif). So, I decided to tackle a few different pieces laying around the garage to get the finished and put them up out of the way.
Before I get into that, I got some goodies in the mail. New rotors & pads. The rotors I found on ebay at a really sweet price. One set was NOS and the others were just priced well. The pads are from PMB. I also have a new brake hardline kit (not pictured). (IMG:http://www.914world.com/bbs2/uploads_offsite/i.imgur.com-19557-1528688734.1.jpg) Went ahead and seam sealed my door jambs too: (IMG:http://www.914world.com/bbs2/uploads_offsite/i.imgur.com-19557-1528688734.2.jpg) (IMG:http://www.914world.com/bbs2/uploads_offsite/i.imgur.com-19557-1528688734.3.jpg) Then I went about finishing up with the dashboard. I welded the two halves back together in an earlier post but I still needed to fix where the radio hole was enlarged. I also threw some body filler over the welds to try to smooth it. I didn't go crazy with the dash as it will all be covered up anyways. Here's the dash & fuel tank getting ready for some master series primer: (IMG:http://www.914world.com/bbs2/uploads_offsite/i.imgur.com-19557-1528688734.4.jpg) I can't read German, but found a secret message on the dash: (IMG:http://www.914world.com/bbs2/uploads_offsite/i.imgur.com-19557-1528688735.5.jpg) I had a quart of single stage black paint mixed up for these pieces. I went with shopline (JAU) and it ran about $40 a quart. I asked the shop to flatten the paint down to satin for me, but somehow ended up with a pretty glossy finish. Oh well... Not worth doing over. (IMG:http://www.914world.com/bbs2/uploads_offsite/i.imgur.com-19557-1528688735.6.jpg) (IMG:http://www.914world.com/bbs2/uploads_offsite/i.imgur.com-19557-1528688735.7.jpg) (IMG:http://www.914world.com/bbs2/uploads_offsite/i.imgur.com-19557-1528688735.8.jpg) Next up was finishing up the rocker covers, bumper valences and exhaust heat shield. These pieces were all pretty mangled and I spent a good bit of time beating them straight and making sure they fit the car well. They are not perfect, but I think for their purpose they'll do just fine. Unfortunately, the front valence was really mangled and while I have it straightened out, it's still pretty ugly. Not sure if I'm going to be able to salvage it with my skills. I wanted to coat these pieces in something more durable than the factory black so I opted for UPOL raptor liner in black as I have experience shooting this product. It mixes 3:1 and I thinned it out 3:1:1. This is a little thinner than they recommend, but I shot it out of my HVLP with no issues and I'm very, very pleased with the texture. Just what I was looking for. (IMG:http://www.914world.com/bbs2/uploads_offsite/i.imgur.com-19557-1528688735.9.jpg) (IMG:http://www.914world.com/bbs2/uploads_offsite/i.imgur.com-19557-1528688736.10.jpg) (IMG:http://www.914world.com/bbs2/uploads_offsite/i.imgur.com-19557-1528688736.11.jpg) Lastly, I riveted the exhaust shield back in place using 3/16" aluminum rivets. I'm glad to have this piece back on the car and off the garage floor. (IMG:http://www.914world.com/bbs2/uploads_offsite/i.imgur.com-19557-1528688736.12.jpg) (IMG:http://www.914world.com/bbs2/uploads_offsite/i.imgur.com-19557-1528688736.13.jpg) (IMG:http://www.914world.com/bbs2/uploads_offsite/i.imgur.com-19557-1528688737.14.jpg) Unfortunately, I'm going to have to get back to sanding soon and finish up the front end so I can get 2K on it. Still need to spray the engine bay and trunk in color, too. One of these days... |
|
|
|
| aggiezig |
Jun 14 2018, 09:16 PM
Post
#152
|
|
Porsche Wannabe Group: Members Posts: 319 Joined: 13-January 16 From: Los Angeles, CA Member No.: 19,557 Region Association: Southern California |
It's been a few days and time to update this thread. First up, small item but took a bit of effort. New rear bearings are in the trailing arms and the bearing caps are installed. Still have to press in the hubs.
(IMG:http://www.914world.com/bbs2/uploads_offsite/i.imgur.com-19557-1529032567.1.jpg) Next up, the big update. The whole car is officially in 2K primer. Except the rear trunk lid, I still haven't gotten around to fixing the tin-canning. I finished sanding the poly primer up to 220 grit and sprayed everything that was still in white epoxy. Here are some shots during primer and afterwords. I put on two wet coats and will sand this up to 600 before sealer & color. (IMG:http://www.914world.com/bbs2/uploads_offsite/i.imgur.com-19557-1529032568.2.jpg) (IMG:http://www.914world.com/bbs2/uploads_offsite/i.imgur.com-19557-1529032569.3.jpg) (IMG:http://www.914world.com/bbs2/uploads_offsite/i.imgur.com-19557-1529032569.4.jpg) Stowed back away: (IMG:http://www.914world.com/bbs2/uploads_offsite/i.imgur.com-19557-1529032570.5.jpg) I'm going to try and get the engine bay and trunk sprayed in blue this weekend if the weather co-operates. That would be a big push forward for me and inch me closer to my goal of spraying the car at the end of July. |
|
|
|
| bbrock |
Jun 14 2018, 09:51 PM
Post
#153
|
|
914 Guru Group: Members Posts: 5,269 Joined: 17-February 17 From: Montana Member No.: 20,845 Region Association: Rocky Mountains |
Loving the progress. This looks fantastic! (IMG:style_emoticons/default/cheer.gif)
|
|
|
|
| aggiezig |
Jun 16 2018, 09:52 PM
Post
#154
|
|
Porsche Wannabe Group: Members Posts: 319 Joined: 13-January 16 From: Los Angeles, CA Member No.: 19,557 Region Association: Southern California |
Today, I am a happy camper. I finished spraying Mexico Blue "inside" the car. Just the engine bay and trunk were left, but those felt like huge obstacles for a while now. When I was prepping, I wasn't sure how everything was going to turn out. In fact, I bought some more tint-able raptor liner to spray the engine bay and trunk floor with after seeing how rough the primer was in some places.
(IMG:http://www.914world.com/bbs2/uploads_offsite/i.imgur.com-19557-1529207537.1.jpg) After spraying color, I decided that despite the flaws, it still looks pretty good. I think I'm going to hold off on the raptor liner and live with the paint for now. I sprayed two medium wet coats. I still can't get over how nicely this PPG DCC lays down. Really, really great paint. (IMG:http://www.914world.com/bbs2/uploads_offsite/i.imgur.com-19557-1529207537.2.jpg) (IMG:http://www.914world.com/bbs2/uploads_offsite/i.imgur.com-19557-1529207537.3.jpg) (IMG:http://www.914world.com/bbs2/uploads_offsite/i.imgur.com-19557-1529207538.4.jpg) (IMG:http://www.914world.com/bbs2/uploads_offsite/i.imgur.com-19557-1529207538.5.jpg) (IMG:http://www.914world.com/bbs2/uploads_offsite/i.imgur.com-19557-1529207538.6.jpg) I did only shoot myself in the foot once today. Before spraying color in the engine bay, I wanted to lay down some epoxy primer to promote adhesion. Obviously, I thinned the epoxy too much and ended up with a few runs that now show through under the blue paint. I was pretty pissed at myself about it, but I have to keep reminding myself that it's just the engine bay and a lot of things will be covered up. You can see one of the runs in the upper left corner: (IMG:http://www.914world.com/bbs2/uploads_offsite/i.imgur.com-19557-1529207538.7.jpg) After I finished spraying the paint, I decided it was time to take all of the old masking off and admire my work for a few minutes. I think I needed to see how much I've done so far to really believe it. It's easy to forget what all has been accomplished when it gets covered right back up with masking plastic. (IMG:http://www.914world.com/bbs2/uploads_offsite/i.imgur.com-19557-1529207539.8.jpg) (IMG:http://www.914world.com/bbs2/uploads_offsite/i.imgur.com-19557-1529207539.9.jpg) Here are a couple of reflection shots to show just how great this DCC is laying down. I am not a painter and have no real experience other than reading forums and watching YouTube videos. I've had really great luck with this stuff and my Devilbiss StartingLine gun. Would highly recommend. (IMG:http://www.914world.com/bbs2/uploads_offsite/i.imgur.com-19557-1529207539.10.jpg) (IMG:http://www.914world.com/bbs2/uploads_offsite/i.imgur.com-19557-1529207539.11.jpg) Minimal orange peel: (IMG:http://www.914world.com/bbs2/uploads_offsite/i.imgur.com-19557-1529207540.12.jpg) Also, while I was out I had to play with my dash and make sure everything still fit right after joining the two halves back together. (IMG:http://www.914world.com/bbs2/uploads_offsite/i.imgur.com-19557-1529207540.13.jpg) I'm going to focus on some reassembly for the next couple of days before I start sanding on the 2K. I may also play with polishing up my 2L fuchs. Stay tuned, more to come. |
|
|
|
| TravisNeff |
Jun 16 2018, 10:20 PM
Post
#155
|
|
914 Guru Group: Members Posts: 5,082 Joined: 20-March 03 From: Mesa, AZ Member No.: 447 Region Association: Southwest Region |
The trunk and engine bay turned out great! Great job.
|
|
|
|
| Cairo94507 |
Jun 17 2018, 06:30 AM
Post
#156
|
|
Michael Group: Members Posts: 10,383 Joined: 1-November 08 From: Auburn, CA Member No.: 9,712 Region Association: Northern California |
Terrific build thread and very nice work. I love the Mexico Blue. You definitely deserve a beer for that. (IMG:style_emoticons/default/beerchug.gif)
|
|
|
|
| aggiezig |
Jun 17 2018, 11:35 AM
Post
#157
|
|
Porsche Wannabe Group: Members Posts: 319 Joined: 13-January 16 From: Los Angeles, CA Member No.: 19,557 Region Association: Southern California |
Thanks, gents. It feels good to have all of the interior paint finally knocked out. Big step forward in the right direction.
|
|
|
|
| aggiezig |
Jul 30 2018, 10:13 AM
Post
#158
|
|
Porsche Wannabe Group: Members Posts: 319 Joined: 13-January 16 From: Los Angeles, CA Member No.: 19,557 Region Association: Southern California |
Wow - it's been a minute since my last update. Life has definitely gotten in the way of my project but I can't complain. A month ago I proposed to my now-fiance. We've also been preparing for our move to L.A. in September. So, all of the distractions that come with engagements and cross-country moves have taken over my life for the last six weeks or so. Needless to say, the 914 has been a little neglected.
Any free time I've found has been spent sanding, sanding and doing more sanding to get this thing ready for color before we move. I don't want to have to deal with the hassles of VOC paint compliance in CA. I decided to focus on getting as many panels as I could prepped and painted before working on the body itself. One thing I definitely under-estimated was just how many coats of primer & sanding it takes to get a perfectly flat & smooth surface. I think I ended up shooting between 6-8 coats on the doors and hoods, sanding every 2-3 coats. I've used Eastwood's 2K primer this whole time and I have to say it's pretty good stuff. It mixes and sprays well as long as you thin it 5-10%. It sands super easy and acts as its own guide coat. After 2K, I worked my way from 240 grit (dry) up to 320 (wet) and then 400 (wet). I used soft sander blocks and a meguiars foam sanding pad for the final sand. I also gave everything a once-over with a light gray "finish" scotch-brite pad before spraying color. I would recommend spending the extra $$ and getting good quality 3M sandpaper. I used wax & grease removed to occasionally wet the panel and check for any issues. Here are some shots of various panels in process: (IMG:http://www.914world.com/bbs2/uploads_offsite/i.imgur.com-19557-1532967222.1.jpg) (IMG:http://www.914world.com/bbs2/uploads_offsite/i.imgur.com-19557-1532967222.2.jpg) Before spraying the hood, I wanted to go ahead and spray the underside and have it done so that I could lay the hood flat and spray how it will sit on the car. I seam sealed some of the ribbing to the skin to help with support / flutter. I put two coats on all of the ribbing and just lightly blew color on the inside panels. I am planning on cutting matching carpet and adhering it to the cut out sections on the bottom side of the hood. (IMG:http://www.914world.com/bbs2/uploads_offsite/i.imgur.com-19557-1532967223.3.jpg) When everything was ready for color, I took the pieces out to my uncle's shop about 30 minutes away from me. He has built a make shift paint booth in his shop for his Willys truck project. He's offered to let me use the space to spray my project as well. (IMG:http://www.914world.com/bbs2/uploads_offsite/i.imgur.com-19557-1532967223.4.jpg) (IMG:http://www.914world.com/bbs2/uploads_offsite/i.imgur.com-19557-1532967223.5.jpg) I followed the advice of my local paint shop and sprayed a coat of PPG Urethane Sealer in white immediately before spraying color. Frankly, I wish I would have not done this. The PPG product was tough to lay down flat and I ended up having to come back and sand before color. In the future, I think I will just spray some thinned epoxy primer immediately before color. I've had pretty good luck getting my Eastwood epoxy primer to lay down flat. As a reminder, I am using PPG DCC concept single stage acrylic urethane paint. I am mixing 4:2:1 with DT reducer and DCX hardener. I am spraying out of a Devilbiss starting line gun with a 1.3 tip. I have no prior paint experience, so this is a big learning curve for me and fun to watch for you. Worth mentioning, after this weekend, I have gone through almost an entire gallon of color. It's covered two coats in the front trunk, cabin, engine bay, rear trunk and three coats on these panels below. I think I will need another two or three quarts to finish the car, and a gallon is about as expensive as three quarts anyways. OK, let the color pics begin... (IMG:http://www.914world.com/bbs2/uploads_offsite/i.imgur.com-19557-1532967223.6.jpg) (IMG:http://www.914world.com/bbs2/uploads_offsite/i.imgur.com-19557-1532967223.7.jpg) (IMG:http://www.914world.com/bbs2/uploads_offsite/i.imgur.com-19557-1532967224.8.jpg) (IMG:http://www.914world.com/bbs2/uploads_offsite/i.imgur.com-19557-1532967224.9.jpg) (IMG:http://www.914world.com/bbs2/uploads_offsite/i.imgur.com-19557-1532967224.10.jpg) And here is a close up of the orange peel. It's a little worse in person than this pic shows, but nothing that shouldn't sand and buff out. (IMG:http://www.914world.com/bbs2/uploads_offsite/i.imgur.com-19557-1532967224.11.jpg) Of course, what would a weekend of work be without a screw up... I sprayed the hood a few hours after the doors and wanted to keep down the overspray. So, I laid some .7 mil thin plastic sheeting over my painted pieces to avoid overspray. I *thought* the panels were dry enough (they were to the touch...). Turns out they were still pretty soft. Most of the marks I made will buff out but I think the decklid is going to be a re-spray: (IMG:http://www.914world.com/bbs2/uploads_offsite/i.imgur.com-19557-1532967225.12.jpg) Don't touch drying paint (IMG:style_emoticons/default/chair.gif) More to come, stay tuned! |
|
|
|
| simonjb |
Jul 30 2018, 11:20 AM
Post
#159
|
|
KiwiMan Group: Members Posts: 568 Joined: 18-October 16 From: Stamford, Connecticut Member No.: 20,505 Region Association: North East States |
Looks Fantastic !
|
|
|
|
| 914fahrer |
Jul 30 2018, 11:26 AM
Post
#160
|
|
Member Group: Members Posts: 103 Joined: 12-November 14 From: Berlin/Germany Member No.: 18,115 Region Association: Germany |
really great work.
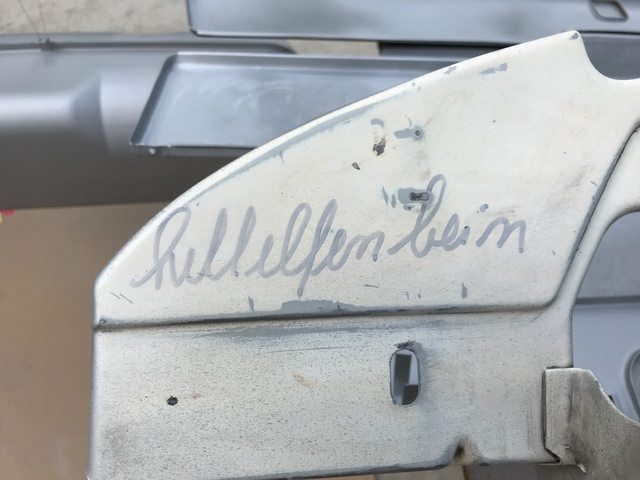 This is the german word for the color " Hellelfenbein " I think in english "light ivory" grettings Ralf |
|
|
|
|
1 User(s) are reading this topic (1 Guests and 0 Anonymous Users)
0 Members:

|
Lo-Fi Version | Time is now: 12th July 2025 - 09:44 AM |
Invision Power Board
v9.1.4 © 2025 IPS, Inc.