|
|
|
Porsche, and the Porsche crest are registered trademarks of Dr. Ing. h.c. F. Porsche AG.
This site is not affiliated with Porsche in any way. Its only purpose is to provide an online forum for car enthusiasts. All other trademarks are property of their respective owners. |
|
|

  |

| seanpaulmc |
 Oct 5 2024, 07:58 PM Oct 5 2024, 07:58 PM
Post
#121
|
|
Member  Group: Members Posts: 458 Joined: 6-December 16 From: Orlando, FL Member No.: 20,649 Region Association: South East States |
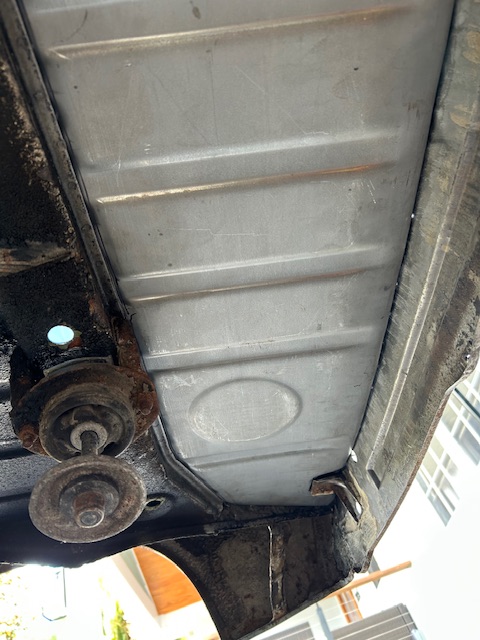
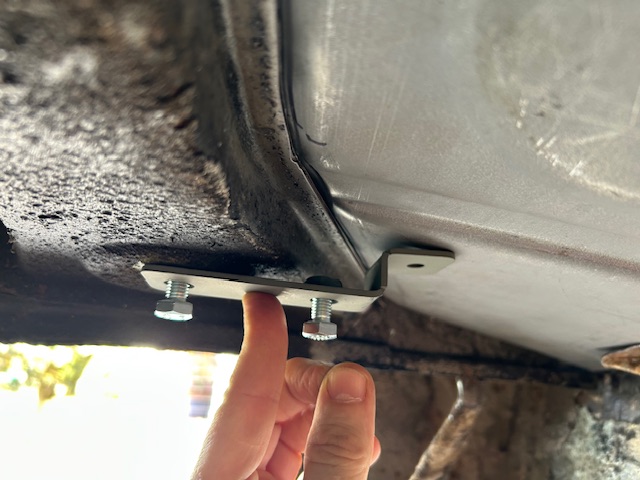
Going with a bolt in battery tray.
And on some level feels wrong to put holes in the metal I just replaced. 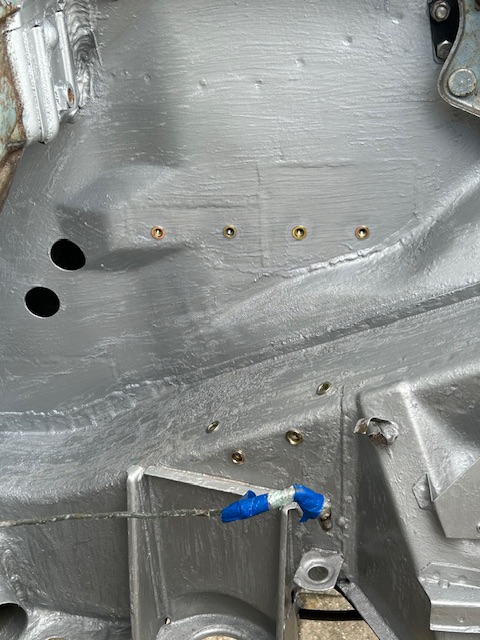  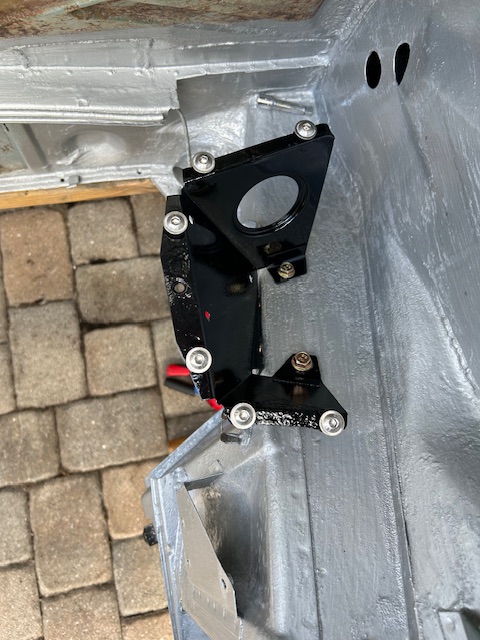 Using stainless flange head screws on the battery tray and gold zinc flange bolts on the tray support. |
   |

 
|
| seanpaulmc |
Oct 5 2024, 08:08 PM
Post
#122
|
|
Member Group: Members Posts: 458 Joined: 6-December 16 From: Orlando, FL Member No.: 20,649 Region Association: South East States |
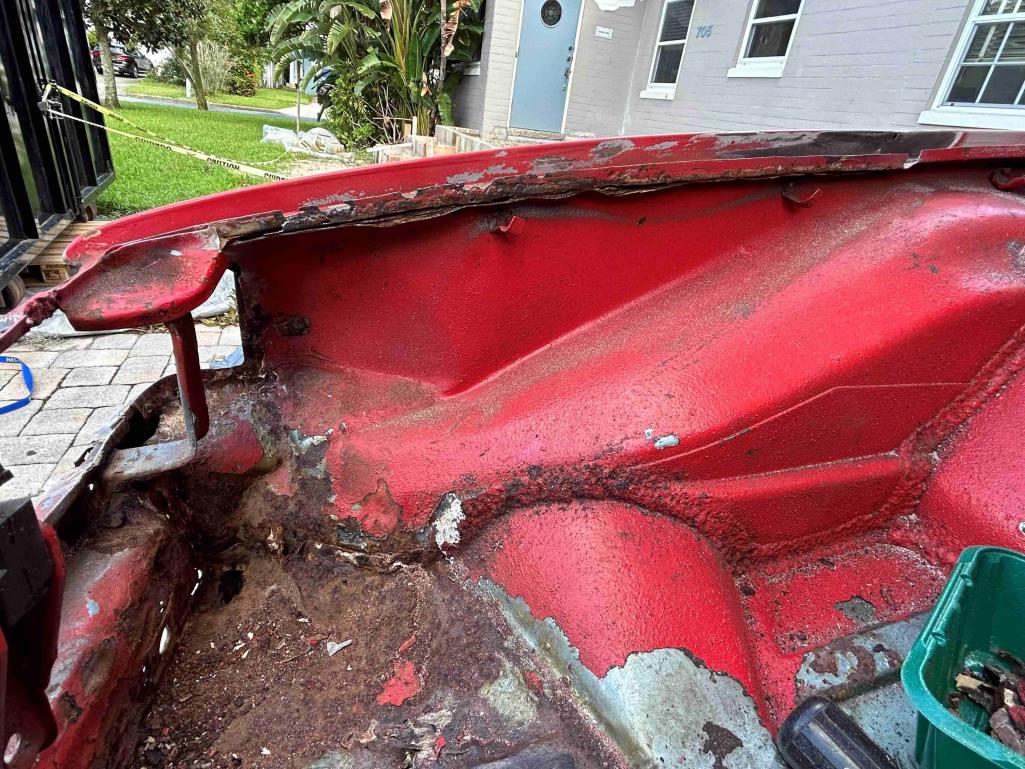
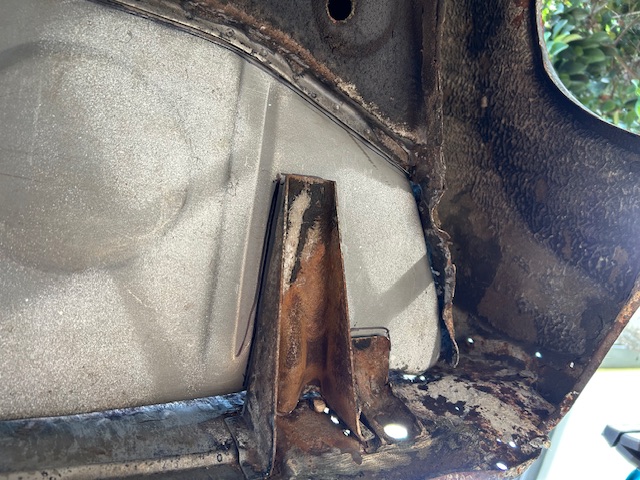
Peeled up the cross brace in the trunk.
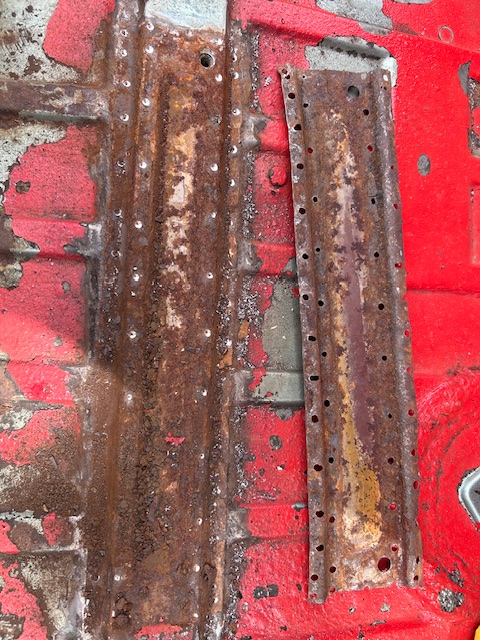 Some perforations found on the right. 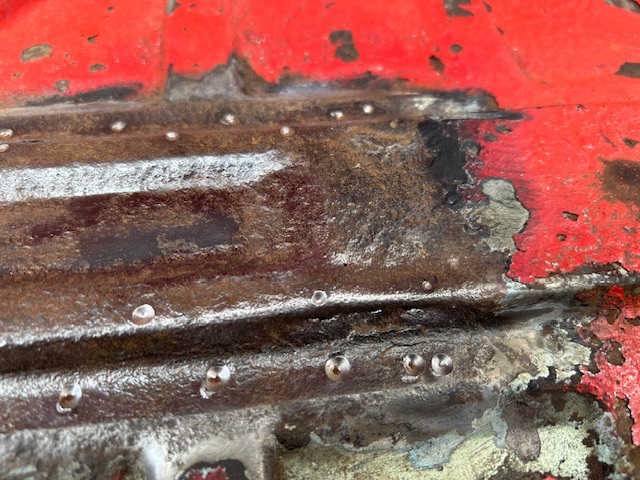 Lots of flaky rust along the top seam. 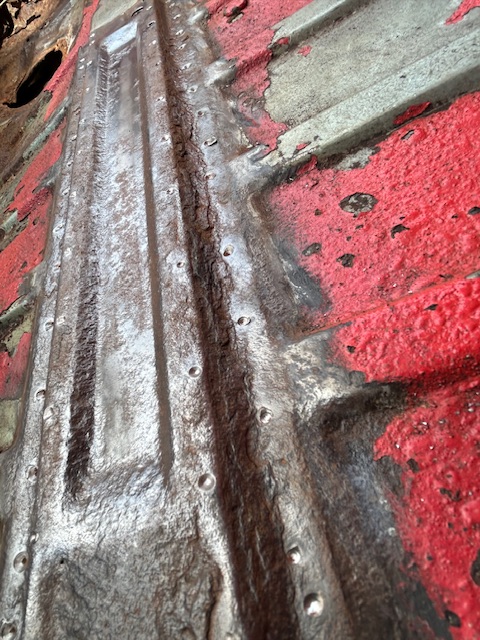 Gonna need more metal. |
|
|
|
| Montreal914 |
Oct 5 2024, 09:23 PM
Post
#123
|
|
Advanced Member Group: Members Posts: 2,179 Joined: 8-August 10 From: Claremont, CA Member No.: 12,023 Region Association: Southern California |
Sean, that metal is coming your way! (IMG:style_emoticons/default/smile.gif)
|
|
|
|
| seanpaulmc |
Oct 14 2024, 05:31 PM
Post
#124
|
|
Member Group: Members Posts: 458 Joined: 6-December 16 From: Orlando, FL Member No.: 20,649 Region Association: South East States |
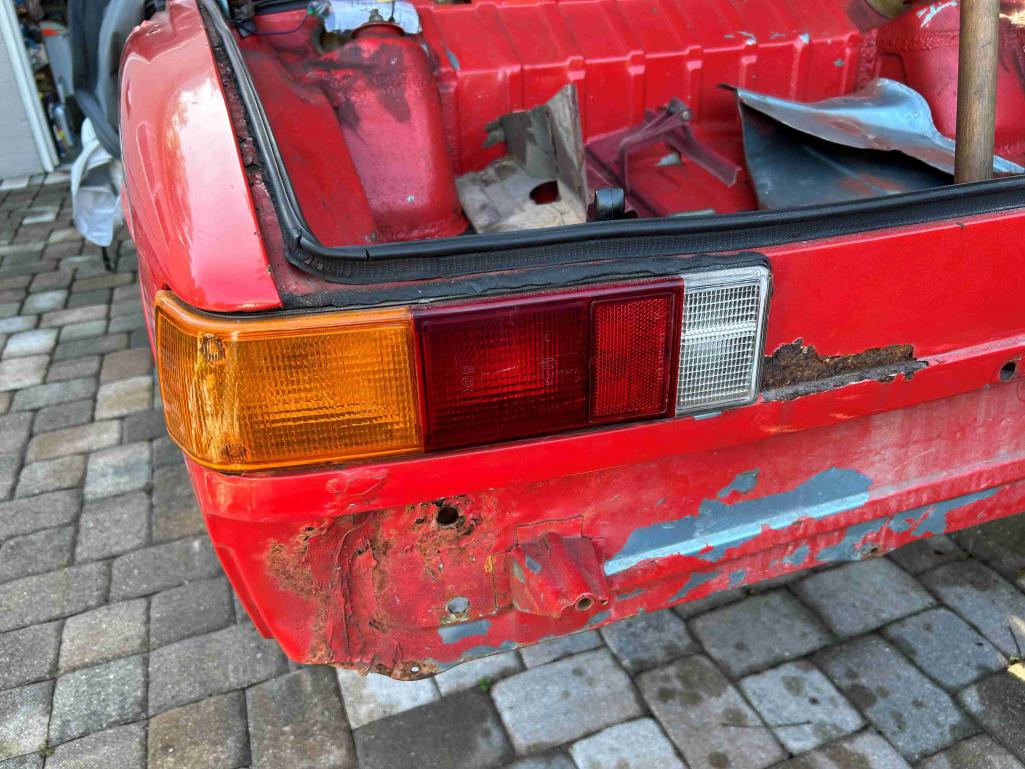
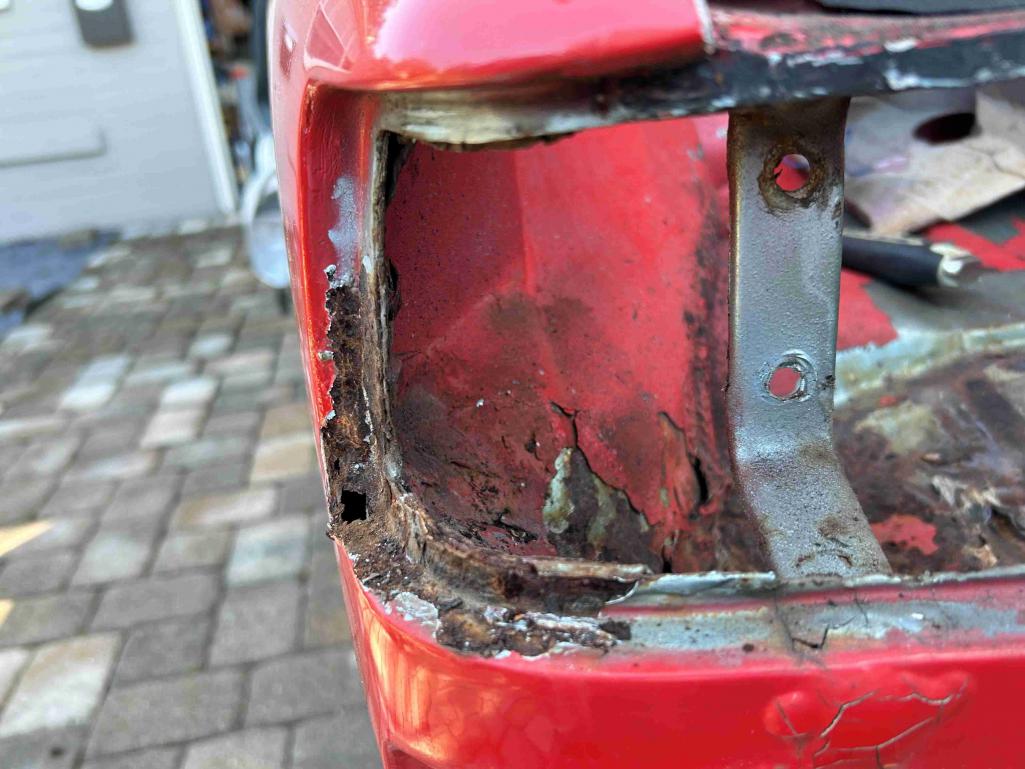
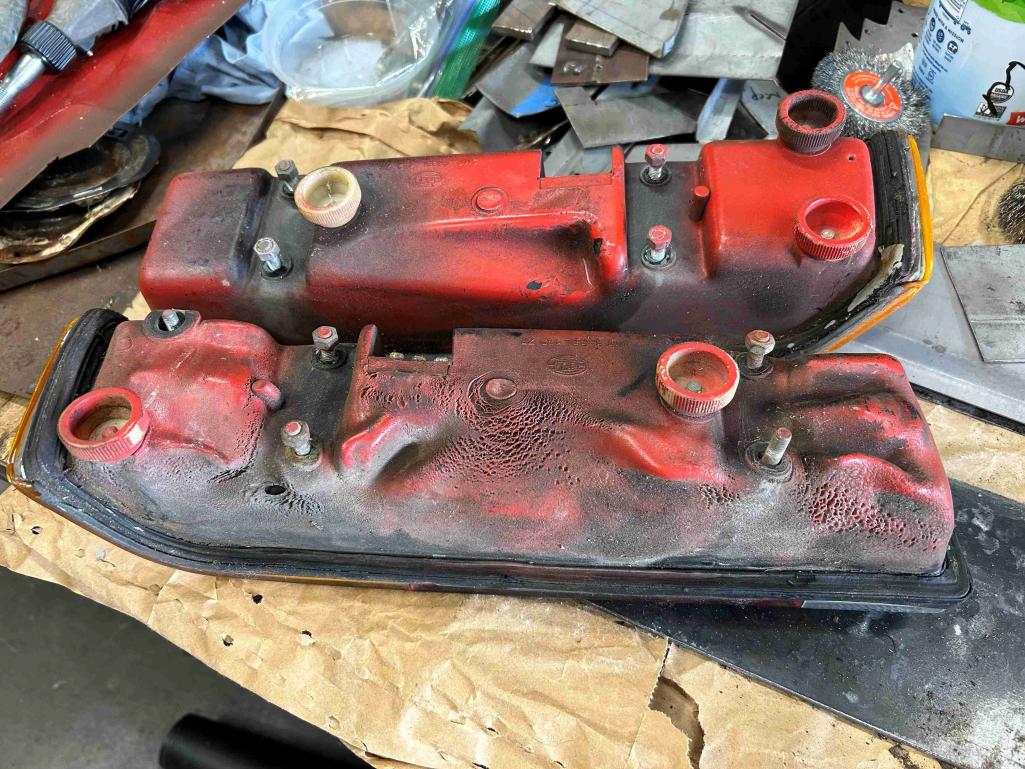
Tail lights look good. Sort of.
      |
|
|
|
| seanpaulmc |
Oct 14 2024, 05:37 PM
Post
#125
|
|
Member Group: Members Posts: 458 Joined: 6-December 16 From: Orlando, FL Member No.: 20,649 Region Association: South East States |
|
|
|
|

| seanpaulmc |
Oct 15 2024, 05:37 PM
Post
#126
|
|
Member Group: Members Posts: 458 Joined: 6-December 16 From: Orlando, FL Member No.: 20,649 Region Association: South East States |
Since I think this repair is beyond my current skill set, I'm starting a separate thread to solicit help and focus on this fender repair. Here - http://www.914world.com/bbs2/index.php?showtopic=372158
I am looking to take chassis measurements on it this weekend to get a sense of the existing dimension versus the book dimensions. I appreciate the help! |
|
|
|
| 930cabman |
Oct 16 2024, 04:56 AM
Post
#127
|
|
Advanced Member Group: Members Posts: 4,773 Joined: 12-November 20 From: Buffalo Member No.: 24,877 Region Association: North East States |
QUOTE(seanpaulmc @ Oct 15 2024, 05:37 PM)  Since I think this repair is beyond my current skill set, I'm starting a separate thread to solicit help and focus on this fender repair. Here - http://www.914world.com/bbs2/index.php?showtopic=372158 I am looking to take chassis measurements on it this weekend to get a sense of the existing dimension versus the book dimensions. I appreciate the help! These repairs can get extensive quick. was this a running/driving car recently? Hopefully the structure is intact or mostly intact. |
|
|
|
| seanpaulmc |
Oct 19 2024, 03:14 PM
Post
#128
|
|
Member Group: Members Posts: 458 Joined: 6-December 16 From: Orlando, FL Member No.: 20,649 Region Association: South East States |
Needing to find some positive momentum after uncovering the very bad rear corner, I was able to tack in the passenger side engine shelf thereby completing the hell hole and engine bay metal repairs (till I find something else). (IMG:style_emoticons/default/piratenanner.gif)
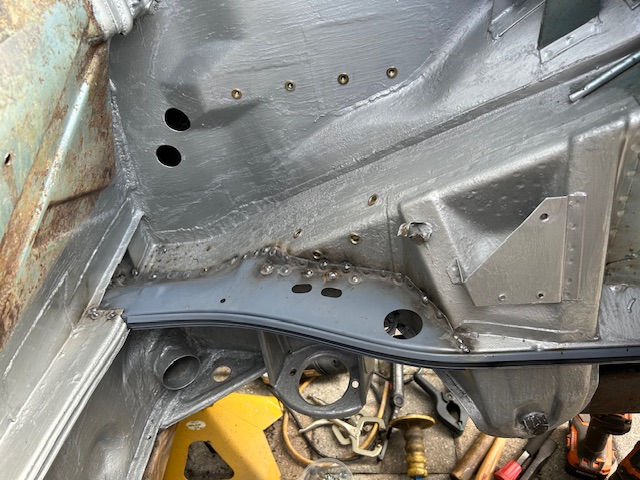 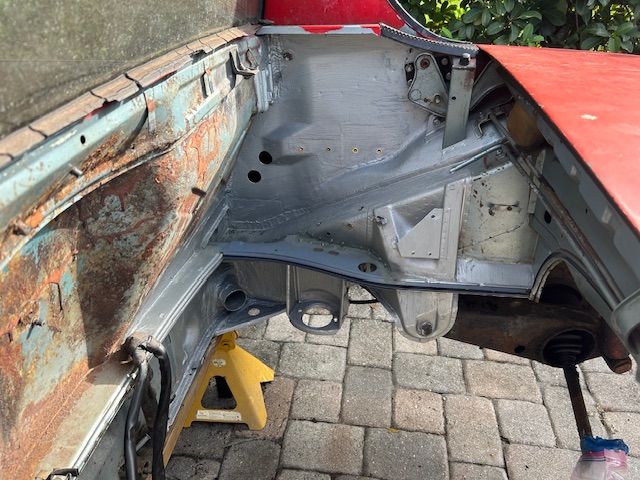 Having been at this area for a long time, you can imagine how satisfying it is to see all the metal bits back where they’re supposed to be. I’m leaving the grinding and clean up to another day. |
|
|
|
| seanpaulmc |
Apr 14 2025, 06:17 PM
Post
#129
|
|
Member Group: Members Posts: 458 Joined: 6-December 16 From: Orlando, FL Member No.: 20,649 Region Association: South East States |
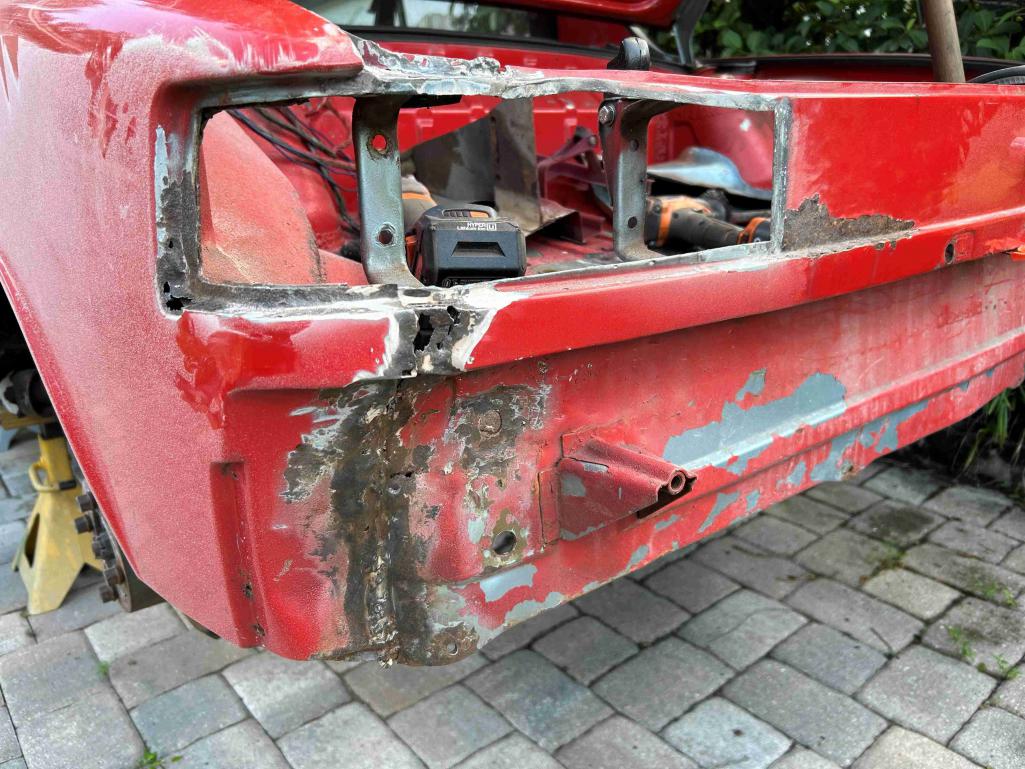
PITA removal
Rear Tow Hook Bracket My recommendation is to sacrifice it and cut it apart rather than trying removal in one piece. 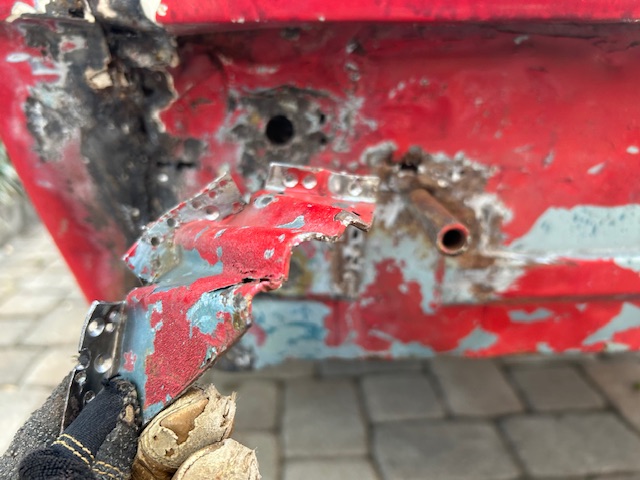 These next photos show the damage in the tail panel right to left where the left side has been bent down. This is even after some judicious whacks with the sledge and 2x4. Note the gap on the top edge between the body and the square. 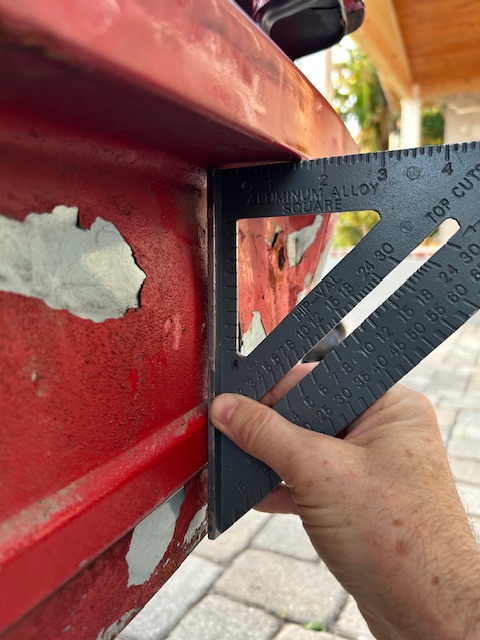 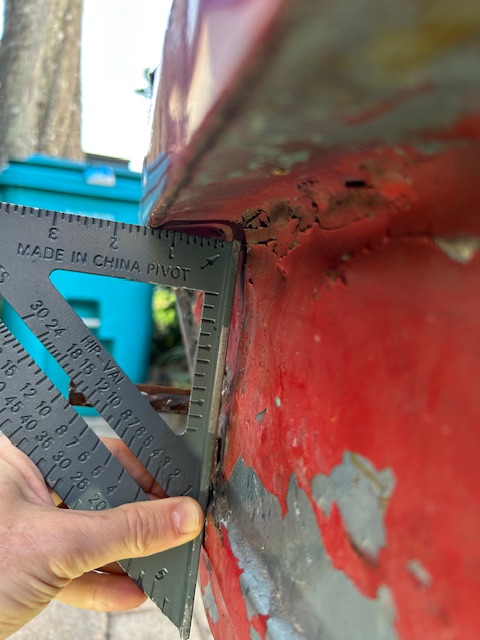 This area is going to need a lot of attention. (IMG:style_emoticons/default/smash.gif) (IMG:style_emoticons/default/smash.gif) (IMG:style_emoticons/default/smash.gif) |
|
|
|
| 930cabman |
Apr 16 2025, 05:56 AM
Post
#130
|
|
Advanced Member Group: Members Posts: 4,773 Joined: 12-November 20 From: Buffalo Member No.: 24,877 Region Association: North East States |
It's an option to cut out all the damaged stuff and replace it with new metal
|
|
|
|
| seanpaulmc |
Oct 19 2025, 11:54 AM
Post
#131
|
|
Member Group: Members Posts: 458 Joined: 6-December 16 From: Orlando, FL Member No.: 20,649 Region Association: South East States |
Some new metal in the trunk with some more still to come.
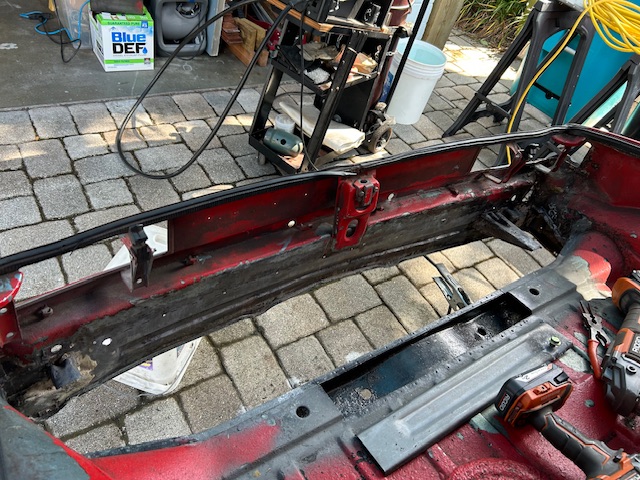  Parts from Eric (Montreal914). Welds not fully dressed but there is still much to do. |
|
|
|
| seanpaulmc |
Oct 19 2025, 12:01 PM
Post
#132
|
|
Member Group: Members Posts: 458 Joined: 6-December 16 From: Orlando, FL Member No.: 20,649 Region Association: South East States |
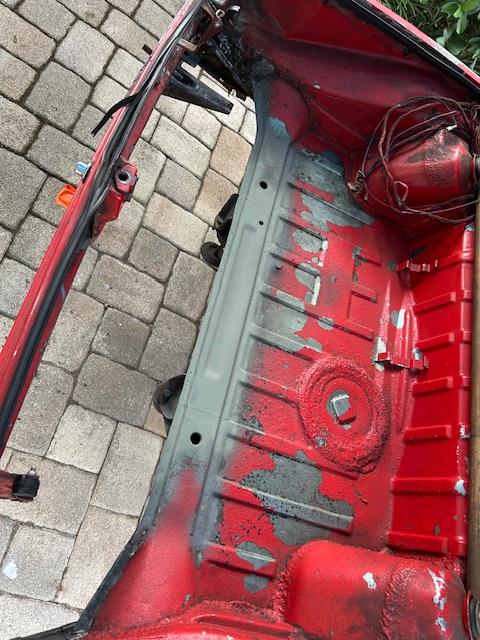
Been working on fitting the trunk pan.
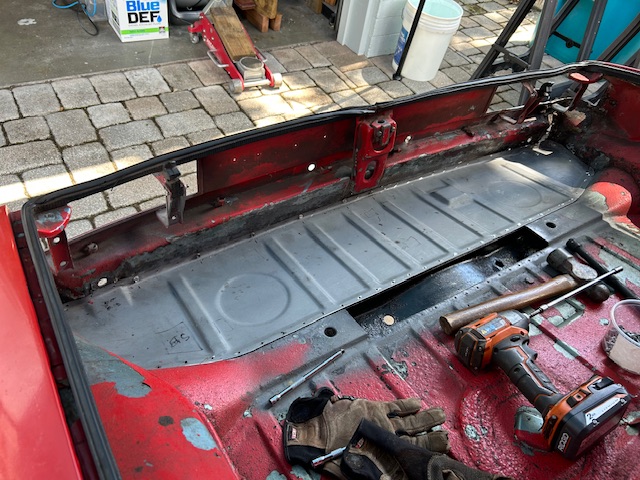     Planning for rear sway bar mounts while I’m in here. |
|
|
|
| Montreal914 |
Oct 19 2025, 12:13 PM
Post
#133
|
|
Advanced Member Group: Members Posts: 2,179 Joined: 8-August 10 From: Claremont, CA Member No.: 12,023 Region Association: Southern California |
Good progress! Always extremely satisfying to do forward work with fresh metal in what seems to be a never ending cutting away and grinding old rusty steel... (IMG:style_emoticons/default/smilie_pokal.gif)
|
|
|
|
| seanpaulmc |
Oct 19 2025, 03:18 PM
Post
#134
|
|
Member Group: Members Posts: 458 Joined: 6-December 16 From: Orlando, FL Member No.: 20,649 Region Association: South East States |
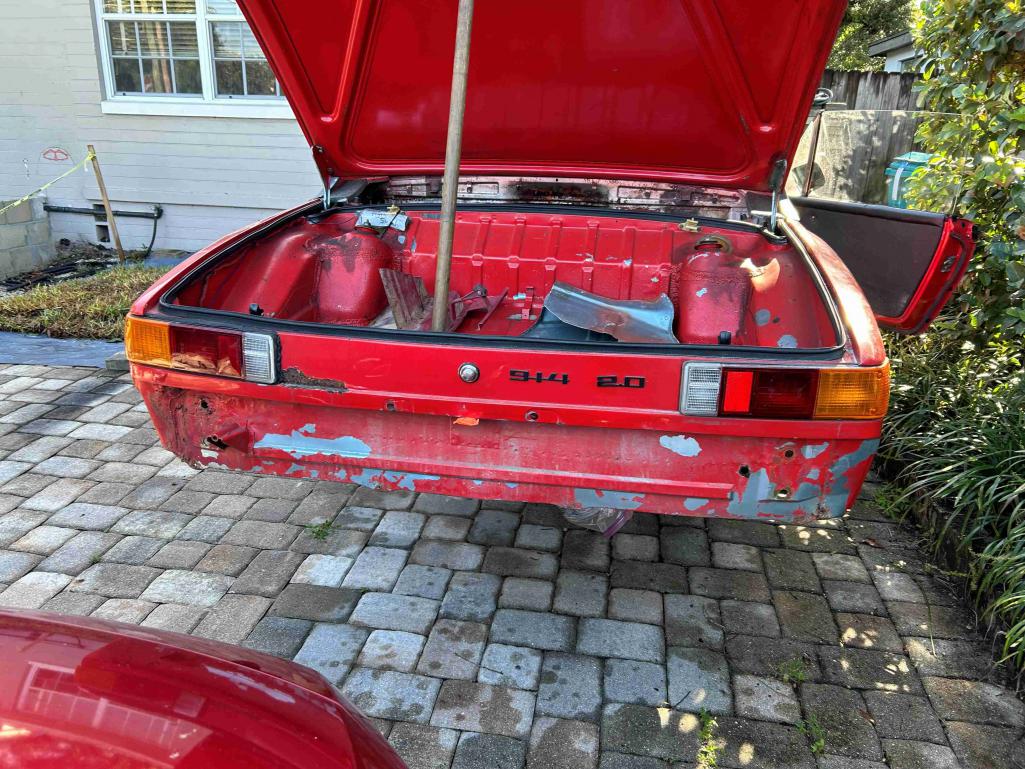
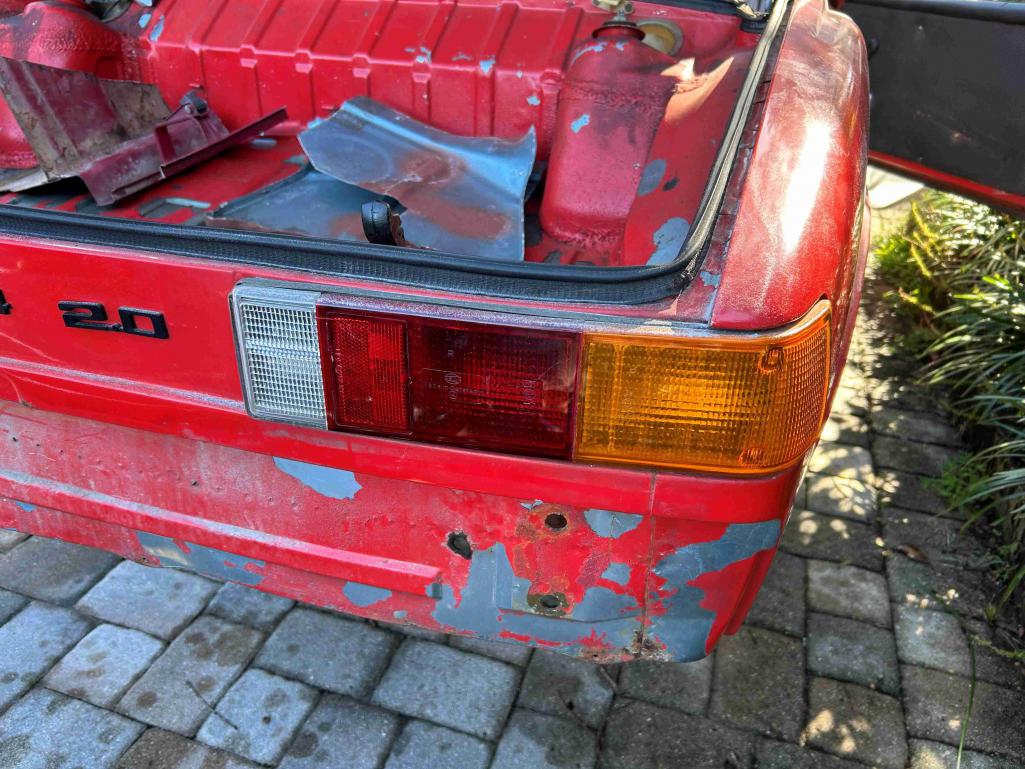
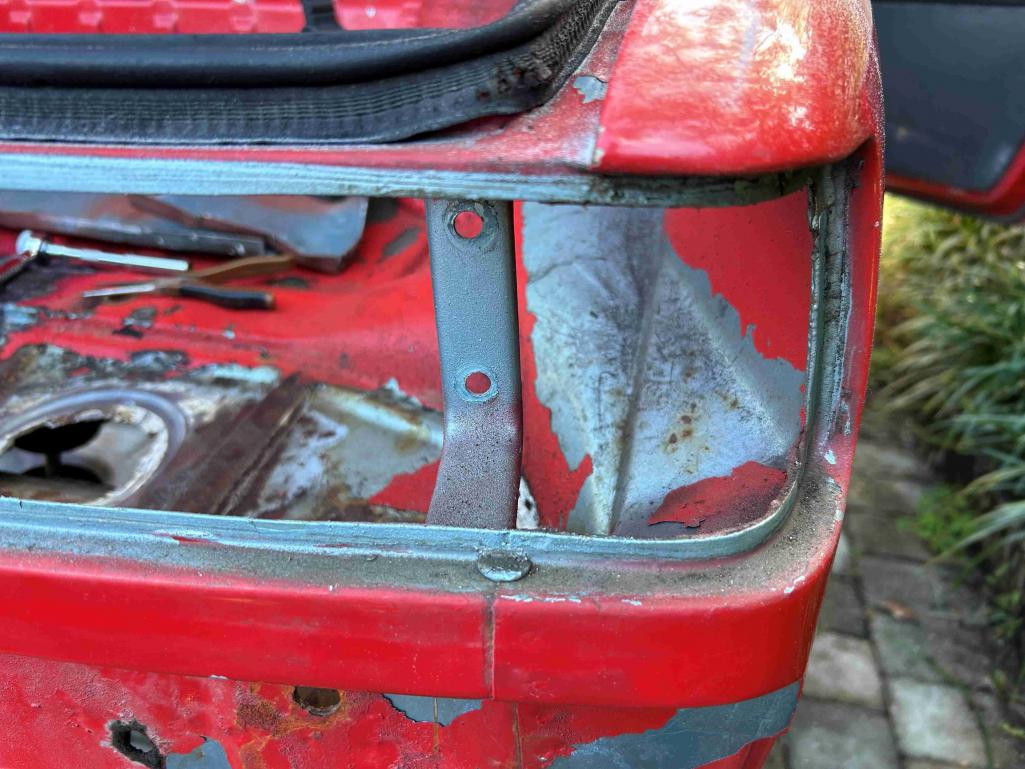
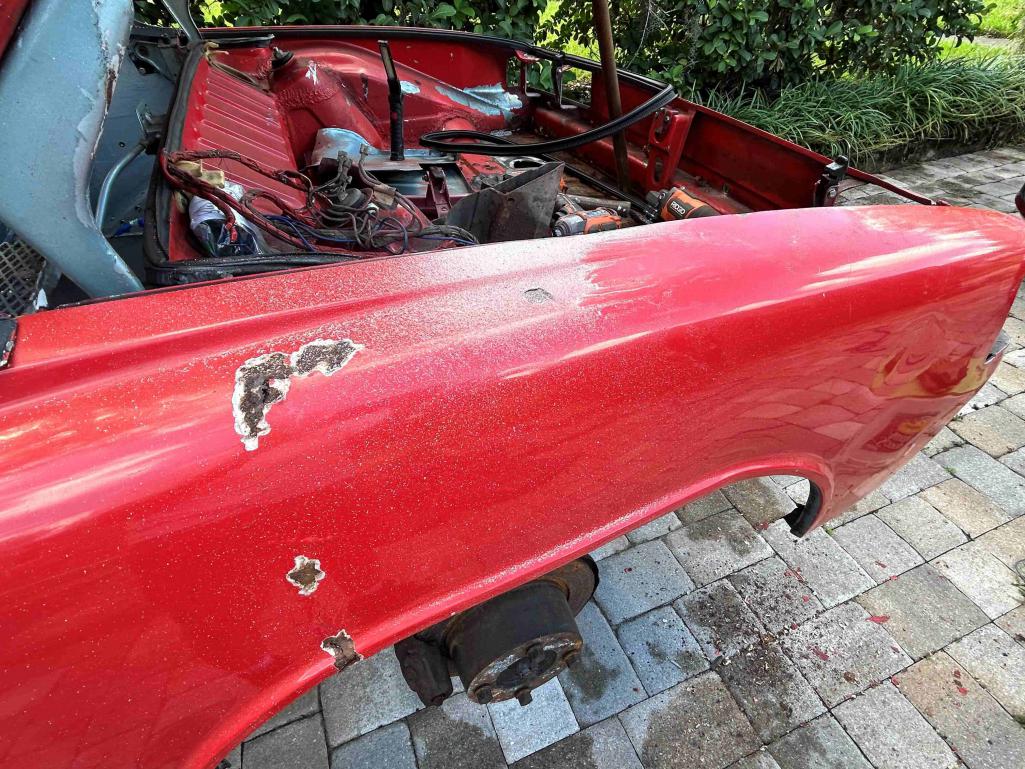
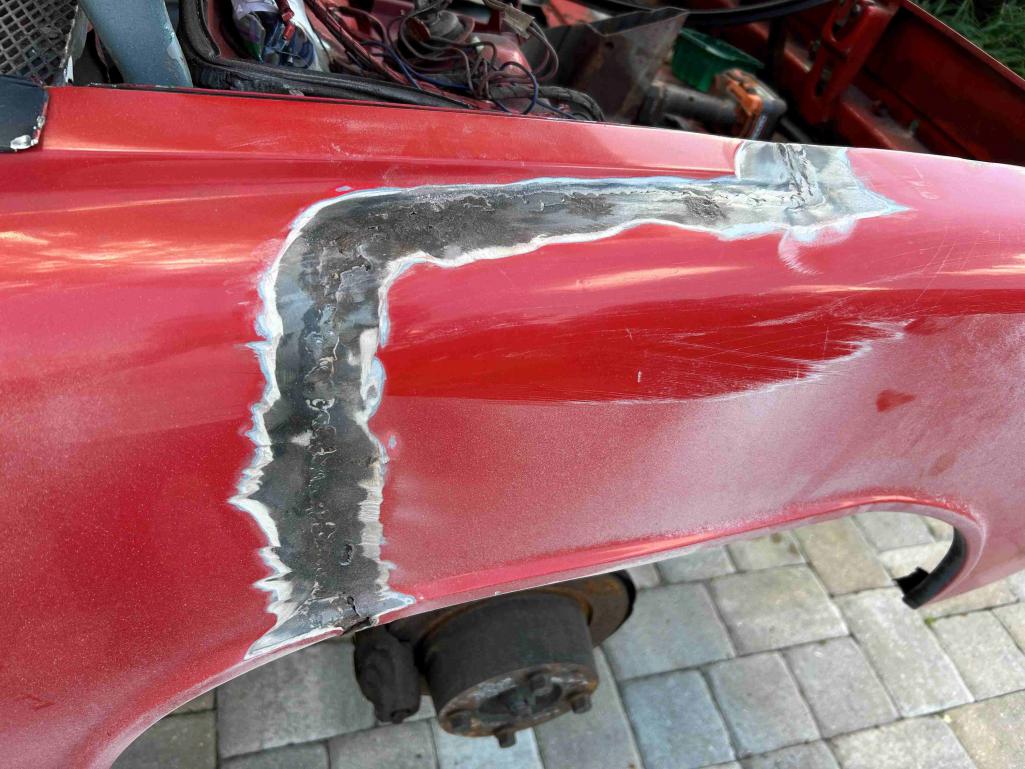
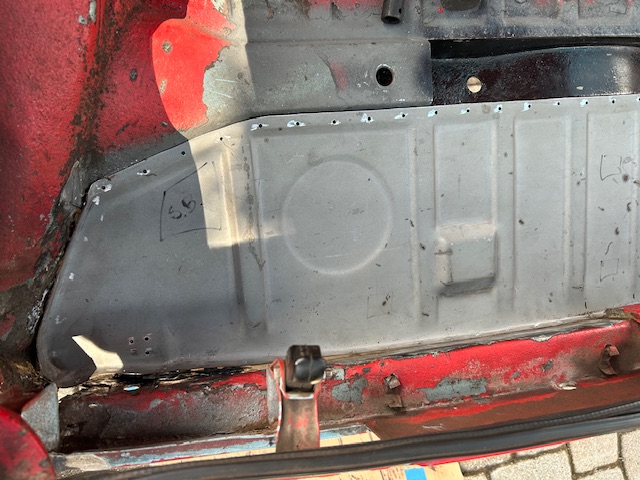
Talking about old rusty steel, it turns out this rear tail panel is worse than anticipated.
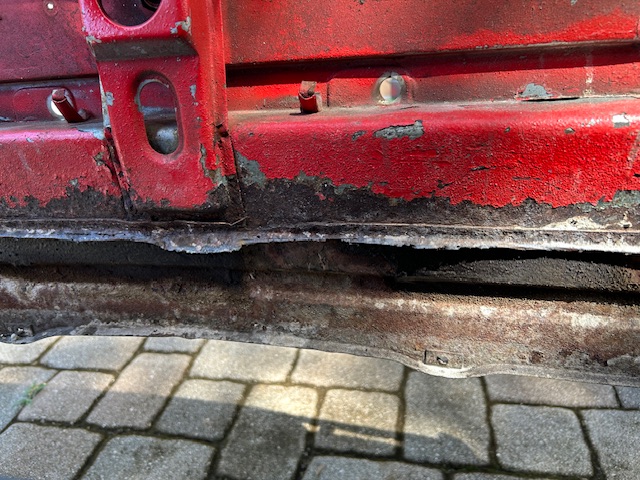 I was careful to remove all the old floor bits without damaging the rear panel but the years and exposure have just thinned it out too much. 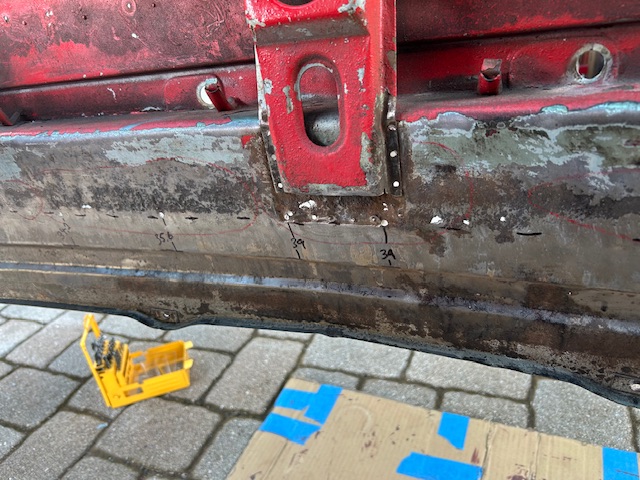 You can see here that the last 1-1/2 inch of this trunk latch bracket is gone. 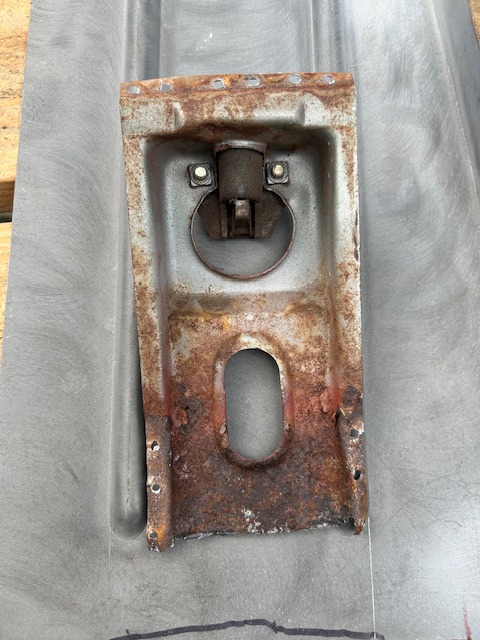 So I decided to try out Fitzee’s ol’ cut-n-butt with an eye on the practice I’ll need for the driver’s rear quarter panel repair still ahead. 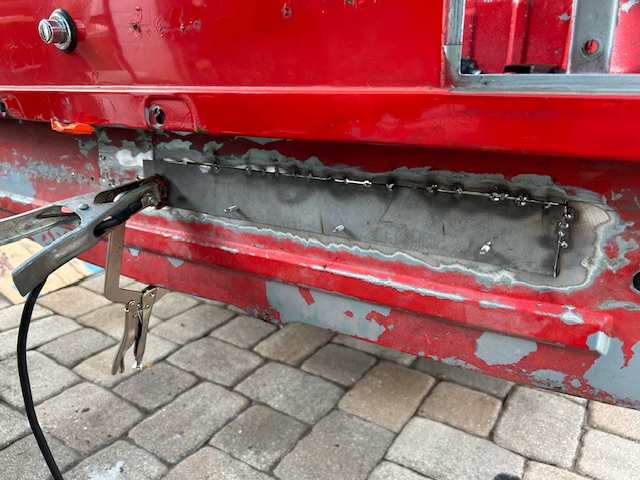 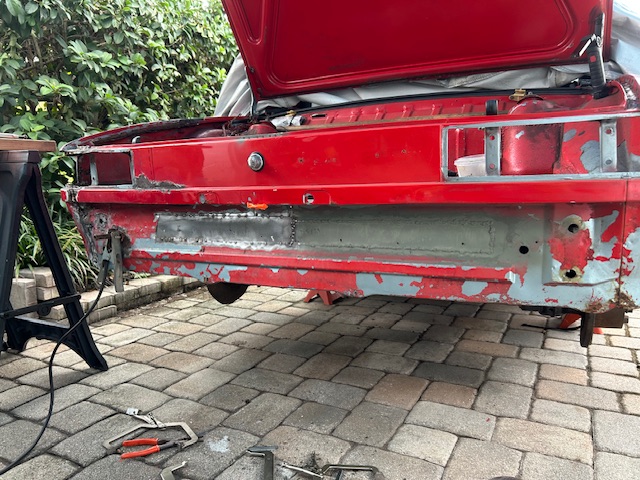 Good thing this is practice because this did not work out so well. I’ve got a lot of videos to go back over. My gaps were too large. I think the tail panel metal was originally closer to a 20 gauge than the 18 I was using for patching. It’ll clean up but a good thing this repair will be hidden by the bumper. |
|
|
|
| didenpx |
Oct 19 2025, 04:44 PM
Post
#135
|
|
Member Group: Members Posts: 127 Joined: 1-September 23 From: Usa Member No.: 27,556 Region Association: North East States |
Sean,
You might be better off setting aside the trunk floor repair until you get the rear panel sorted out and understand where metal might need to move on that LH inner quarter. I think the RD rear panel is still under $300 and it gives a good basis for piecing together the rear end. Stripping the paint on that entire LH quarter would also help understand what is going on. Paul |
|
|
|
| didenpx |
Oct 19 2025, 05:09 PM
Post
#136
|
|
Member Group: Members Posts: 127 Joined: 1-September 23 From: Usa Member No.: 27,556 Region Association: North East States |
Duplicate…
|
|
|
|
| L-Jet914 |
Oct 19 2025, 07:09 PM
Post
#137
|
|
Member Group: Members Posts: 416 Joined: 24-October 12 From: Davis, CA Member No.: 15,080 Region Association: Northern California |
QUOTE(seanpaulmc @ Oct 19 2024, 02:14 PM) Needing to find some positive momentum after uncovering the very bad rear corner, I was able to tack in the passenger side engine shelf thereby completing the hell hole and engine bay metal repairs (till I find something else). (IMG:style_emoticons/default/piratenanner.gif) Having been at this area for a long time, you can imagine how satisfying it is to see all the metal bits back where they’re supposed to be. I’m leaving the grinding and clean up to another day. I like how you've decided to go with a bolt in battery tray it's not concours but in my opinion very practical repair wise. I think that is how they should have done from the beginning as it's a sacrificial part especially in the era of lead acid batteries and the location of it. Some manufacturers today have a battery tray piece that bolts to the body and is replaceable if it becomes rusted from corrosion etc. I have since went to a AGM battery as I got tired of seeing vehicles with lead acid batteries cause so much damage. |
|
|
|
| seanpaulmc |
Oct 20 2025, 04:59 PM
Post
#138
|
|
Member Group: Members Posts: 458 Joined: 6-December 16 From: Orlando, FL Member No.: 20,649 Region Association: South East States |
I can’t take credit for the bolt in battery tray. Definitely stole that from others that have gone before.
|
|
|
|
| seanpaulmc |
Oct 20 2025, 06:00 PM
Post
#139
|
|
Member Group: Members Posts: 458 Joined: 6-December 16 From: Orlando, FL Member No.: 20,649 Region Association: South East States |
QUOTE(didenpx @ Oct 19 2025, 06:44 PM) Sean, You might be better off setting aside the trunk floor repair until you get the rear panel sorted out and understand where metal might need to move on that LH inner quarter. I think the RD rear panel is still under $300 and it gives a good basis for piecing together the rear end. Stripping the paint on that entire LH quarter would also help understand what is going on. Paul My concern with this corner repair has been the thought of losing all reference points if the trunk floor, rear panel, and quarter are all removed simultaneously. I was thinking if the trunk floor is replaced and fixed on the good side, not fully welded all around, it helps locate the rear panel and inner quarter on the bad side, to some degree. You are right, the paint and bondo need to be fully stripped from the bad quarter panel to get a better assessment, and part of the reason why I was trying to understand how that top corner came together. Seeing what folks like you and Fred are doing provides a lot of inspiration. |
|
|
|
| didenpx |
Oct 20 2025, 07:17 PM
Post
#140
|
|
Member Group: Members Posts: 127 Joined: 1-September 23 From: Usa Member No.: 27,556 Region Association: North East States |
Fred is an entirely different league. What he’s doing is heroic.
|
|
|
|
|
36 User(s) are reading this topic (36 Guests and 0 Anonymous Users)
0 Members:

|
Lo-Fi Version | Time is now: 31st July 2026 - 09:51 PM |
Invision Power Board
v9.1.4 © 2026 IPS, Inc.