|
|
|
Porsche, and the Porsche crest are registered trademarks of Dr. Ing. h.c. F. Porsche AG.
This site is not affiliated with Porsche in any way. Its only purpose is to provide an online forum for car enthusiasts. All other trademarks are property of their respective owners. |
|
|

  |

| seanpaulmc |
 Apr 26 2023, 04:14 PM Apr 26 2023, 04:14 PM
Post
#61
|
|
Member  Group: Members Posts: 458 Joined: 6-December 16 From: Orlando, FL Member No.: 20,649 Region Association: South East States |
Mmmmmm parts!
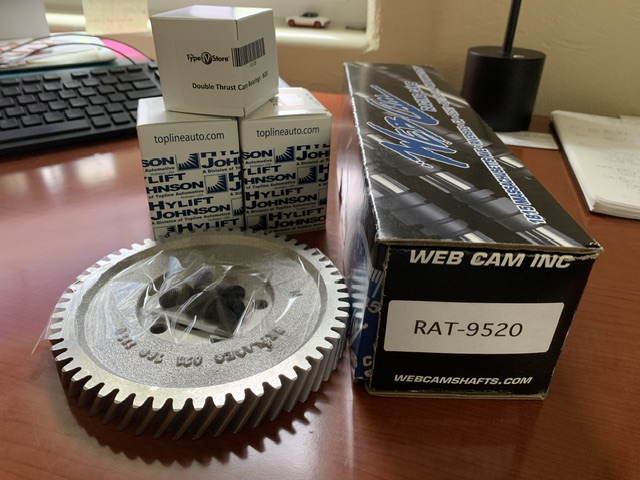 Had to share my excitement. |
   |

 
|
| East coaster |
Apr 26 2023, 08:01 PM
Post
#62
|
|
Senior Member Group: Members Posts: 1,959 Joined: 28-March 03 From: Millville, NJ Member No.: 487 Region Association: None |
Good metal work. I just did some of those same spots myself, not much fun but it’s nice to see the car become solid again.
|
|
|
|
| seanpaulmc |
May 27 2023, 05:20 PM
Post
#63
|
|
Member Group: Members Posts: 458 Joined: 6-December 16 From: Orlando, FL Member No.: 20,649 Region Association: South East States |
Been a while for an update… floors are done. At least the inside of the floors. Brushed on three layers of rust bullet. Two coats then seam sealed and then the final third coat. I’m impressed with its durability.
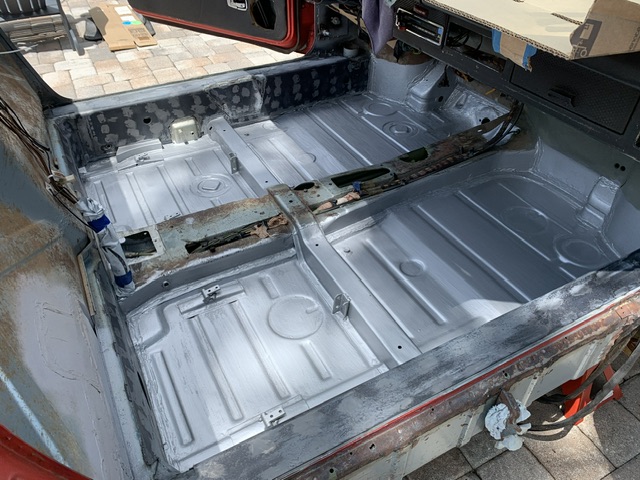 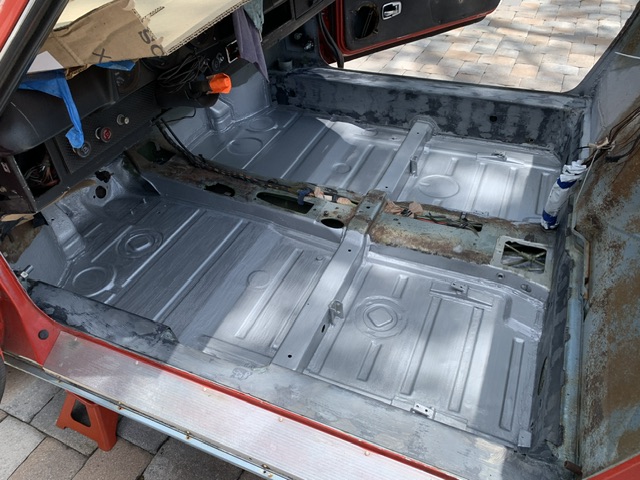 Had to treat the longs with ospho for some surface rust that developed during the very rainy week we had here. Will get them cleaned off and coat with rust bullet to finish off the longs and interior floors. Then I will need to clean and treat the underneath outside of the floors. Followed by Raptor? Herculiner? Anyone want to share their experiences with either? Thanks for looking. |
|
|
|
| Dave_Darling |
May 27 2023, 05:41 PM
Post
#64
|
|
914 Idiot Group: Members Posts: 15,356 Joined: 9-January 03 From: Silicon Valley / Kailua-Kona Member No.: 121 Region Association: Northern California |
Herculiner? Make sure you don't get it on your hootus.
(Dammit, the Exploder Forum won't let you see that thread any more without logging in.) --DD |
|
|
|
| mgarrison |
May 27 2023, 07:20 PM
Post
#65
|
|
Member Group: Members Posts: 419 Joined: 14-February 20 From: Chandler, AZ Member No.: 23,922 Region Association: Southwest Region |
QUOTE(seanpaulmc @ May 27 2023, 04:20 PM)  Been a while for an update… floors are done. At least the inside of the floors. Brushed on three layers of rust bullet. Two coats then seam sealed and then the final third coat. I’m impressed with its durability. Had to treat the longs with ospho for some surface rust that developed during the very rainy week we had here. Will get them cleaned off and coat with rust bullet to finish off the longs and interior floors. Then I will need to clean and treat the underneath outside of the floors. Followed by Raptor? Herculiner? Anyone want to share their experiences with either? Thanks for looking. Here's my Raptor liner experience/results for reference: http://www.914world.com/bbs2/index.php?s=&...t&p=2923677 |
|
|
|
| East coaster |
May 28 2023, 05:18 AM
Post
#66
|
|
Senior Member Group: Members Posts: 1,959 Joined: 28-March 03 From: Millville, NJ Member No.: 487 Region Association: None |
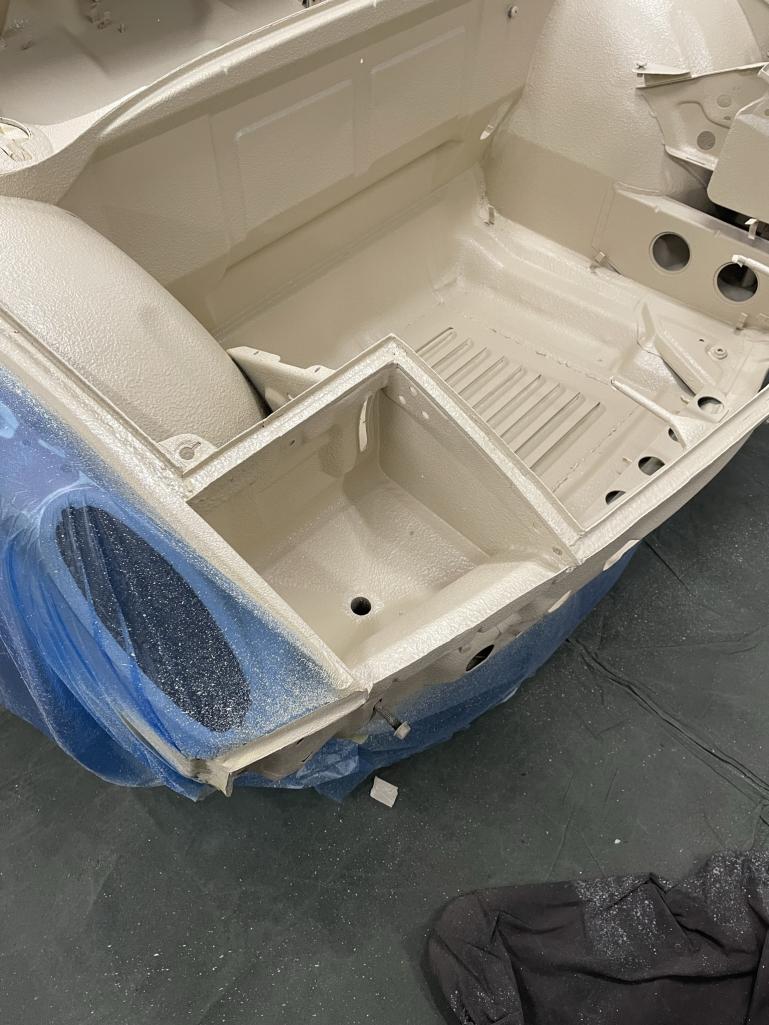
Just sprayed my tub with Custom Coat bedliner (from TCP Global). I did black on the underside of the car and tinted (to match my exterior paint color) in the trunks, engine compartment, and interior. I used Raptor on my last project and this was the same to work with and results seem the same. Just another option……I got mine from Amazon.
   |
|
|
|
| seanpaulmc |
May 28 2023, 09:12 AM
Post
#67
|
|
Member Group: Members Posts: 458 Joined: 6-December 16 From: Orlando, FL Member No.: 20,649 Region Association: South East States |
Thanks for the references on the bed / raptor liner. Results on both your cars looks amazing. Nice work, Gents!
|
|
|
|
| bajafreaks |
May 29 2023, 08:06 AM
Post
#68
|
|
Member Group: Members Posts: 145 Joined: 7-February 14 From: Gardnerville, Nevada Member No.: 16,969 Region Association: Northern California |
QUOTE(seanpaulmc @ Feb 21 2023, 05:57 PM) Well it’s been a while. Where was I? Right, a life on jack stands… The passenger floor - front to back - is in with a new cross brace. This photo is from before the welding. Inner firewall patched (hellhole). Outer firewall patched (hellhole). Corner triangle replaced (hellhole). Looks a little better now than when I got it. And, surely a lot stronger. Now it needs a new engine shelf and some decisions need to be made about where to relocate the battery. I’m fairly certain I won’t put it back in the original location with this now being a Florida. But there’s more to do before I get to that - front of the floor board at the bulkhead, replacement of the door sill, and all the layers to the A-pillar support. Hope you all enjoy the progress report. Thanks for looking! Did the replacement passenger floor pan come with the seat rails and brackets already attached/welded in place? If so where did you get the pan? I need to do the same repair including the center support cross brace. Thanks |
|
|
|
| seanpaulmc |
May 29 2023, 01:45 PM
Post
#69
|
|
Member Group: Members Posts: 458 Joined: 6-December 16 From: Orlando, FL Member No.: 20,649 Region Association: South East States |
@bajafreaks
The passenger floor pan I bought from the classifieds here on World from another member. With shipping it still cost me the price as a new one but I got to help another member out with the purchase. The pan was likely originally from Stoddard since it was the full passenger side. Yes, this pan came with the seat rail underside reinforcement and the seat hinge brackets/risers installed. I only had to weld on the hinges themselves which I was able to salvage from the old floor. Depending on what you need various configurations of floor replacement pans can be obtained from Restoration Design, AA, Stoddard and maybe others. These same vendors will also have the cross brace. You could start with a WTB ad to see what others might have to offer up before going straight to retail. Good luck! |
|
|
|
| bajafreaks |
May 29 2023, 06:09 PM
Post
#70
|
|
Member Group: Members Posts: 145 Joined: 7-February 14 From: Gardnerville, Nevada Member No.: 16,969 Region Association: Northern California |
[quote name='seanpaulmc' date='May 29 2023, 12:45 PM' post='3080330']
@bajafreaks The passenger floor pan I bought from the classifieds here on World from another member. With shipping it still cost me the price as a new one but I got to help another member out with the purchase. The pan was likely originally from Stoddard since it was the full passenger side. Yes, this pan came with the seat rail underside reinforcement and the seat hinge brackets/risers installed. I only had to weld on the hinges themselves which I was able to salvage from the old floor. Depending on what you need various configurations of floor replacement pans can be obtained from Restoration Design, AA, Stoddard and maybe others. These same vendors will also have the cross brace. You could start with a WTB ad to see what others might have to offer up before going straight to retail. Good luck! [/quote Thanks for getting back to me. Res. Design and Stoddard look to have the best sheet metal. Working on cars for 40+years Ive been able to do just about anything mechanically including body work and paint, but welding has never been my thing, oh well time to dive in... |
|
|
|
| seanpaulmc |
Jul 6 2023, 01:27 PM
Post
#71
|
|
Member Group: Members Posts: 458 Joined: 6-December 16 From: Orlando, FL Member No.: 20,649 Region Association: South East States |
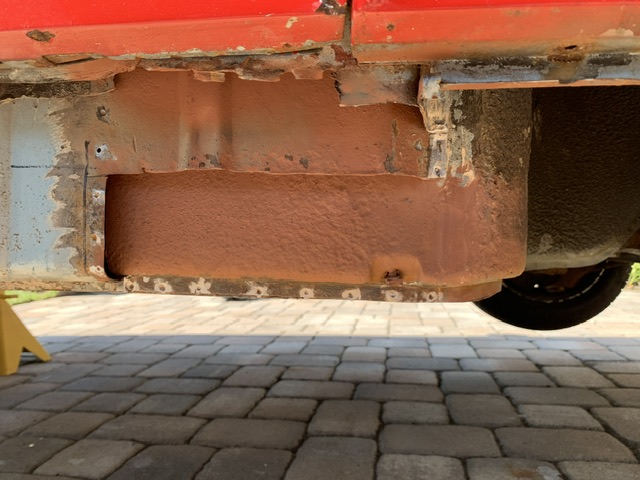
For review, we last left off with completion of the inner stiffening kit installation and a liberal coating of Rust Bullet. 3 coats brushed on.
With the holiday weekend and cool, dry weather (upper 90s and feels like in the 100s) time to get back to the floor weld repairs. So, I opened up the shop for the weekend.  Of course it’s bigger on the inside. 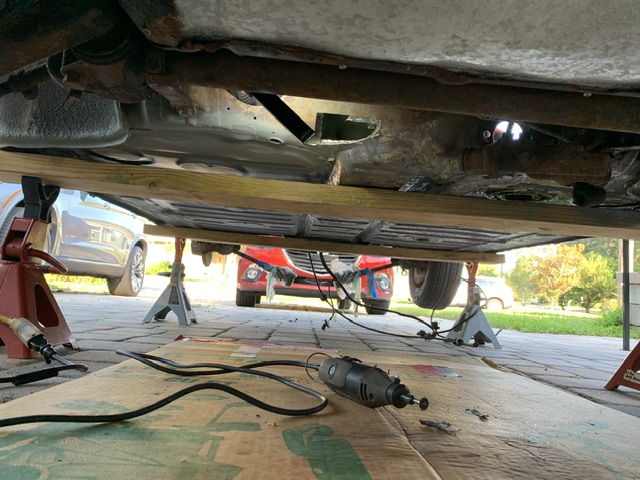 Remaining areas needing repair before I can move on to applying an underside protective coating of the floorpan are the A-pillar door support and this little spot at the bulkhead in the forward section of the tunnel underneath the fuel tank.  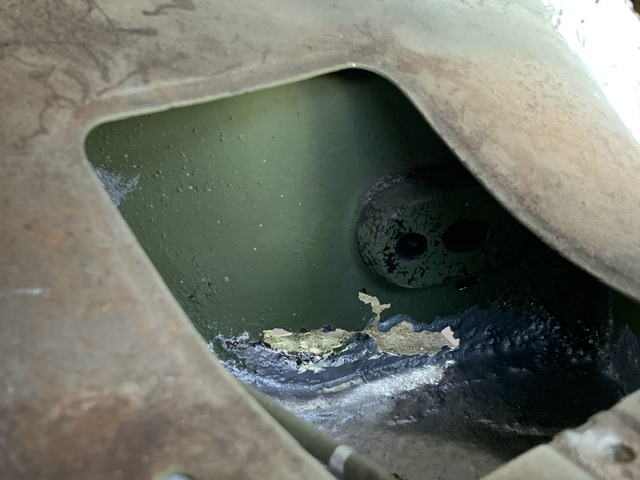 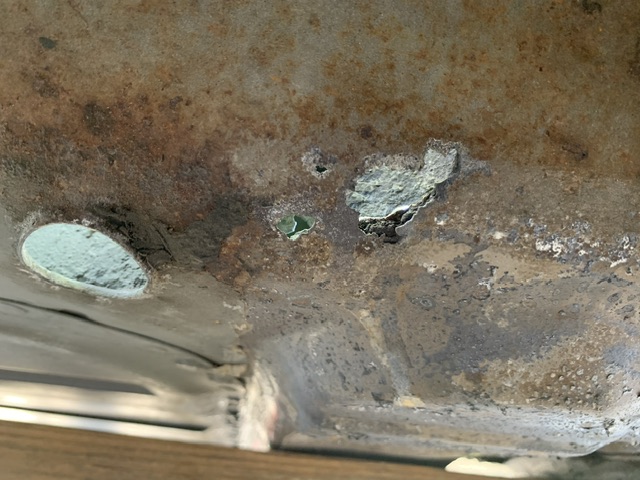 I posted separately about removal of the bulkhead fuel line grommet. Light heat and liberal amounts of soapy water and we can see what we’re working with behind there. Thanks for the removal tips, Zach. 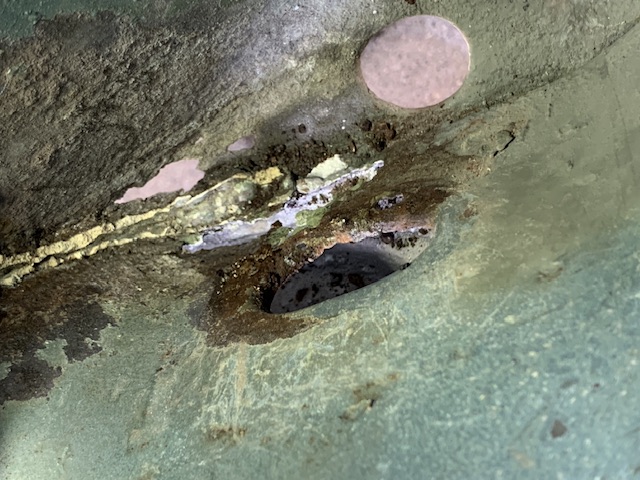 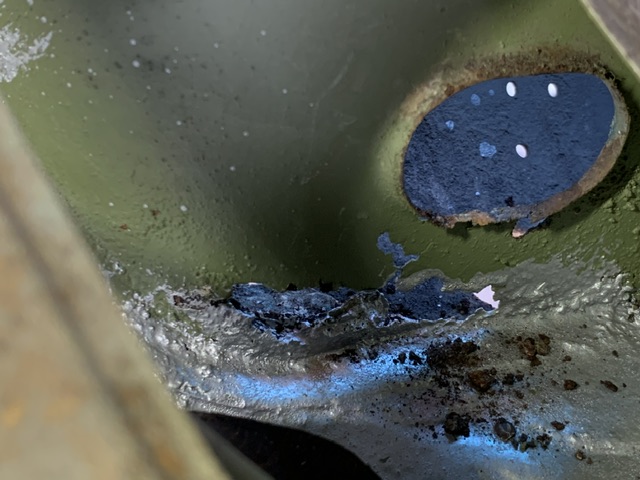 After 3 days of acrobatics, hot yoga, and inventing new swear words my attempt at making an acceptable weld repair yielded what I am calling a passable repair. Much better than the as found rotten metal but I had to acquiesce and use a small lap panel because one edge kept blowing through. I also had to use a little epoxy at edges as well since I could not get the mig nozzle positioned correctly. This patch piece has quite the geometry. 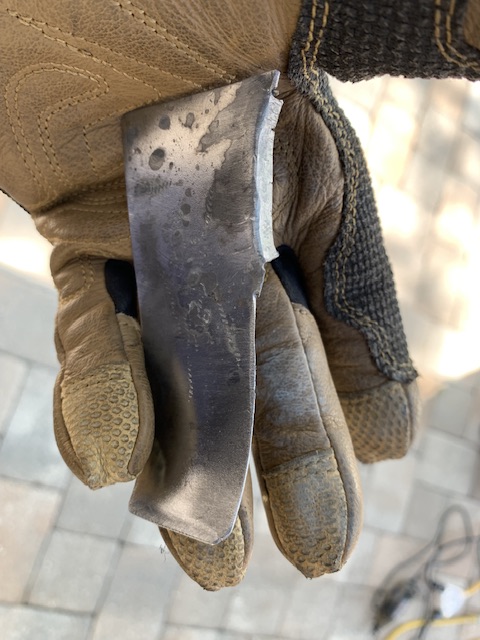 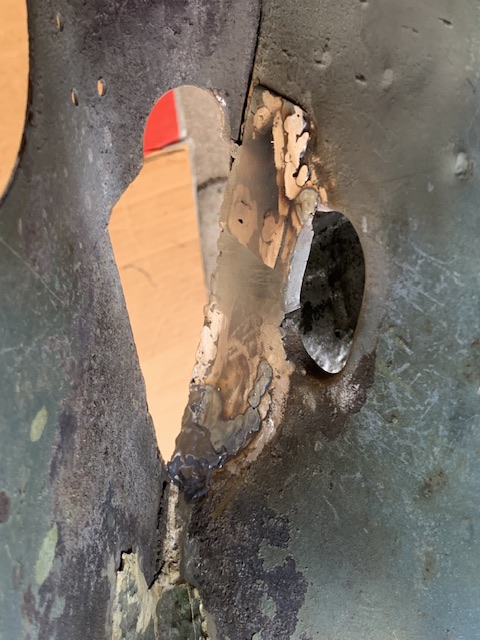   I’ll fiddle with it some more before I’m done with it of course. I need to confirm the shape of the hole and flange lip. Then add some seam sealer and a good coat of rust bullet and reinstall the fuel line grommet. I miss our shade tree.  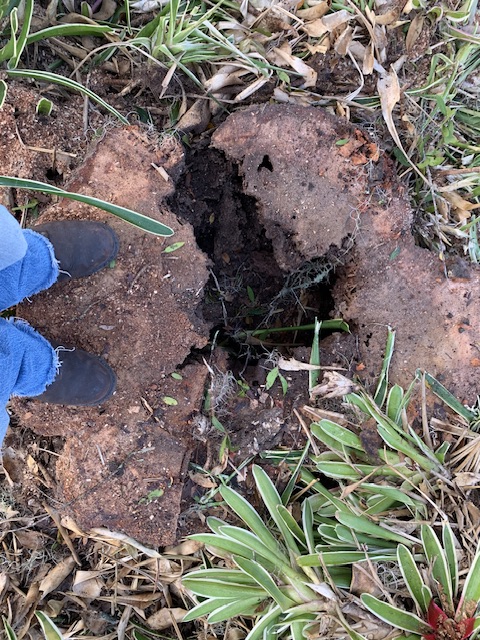 I really could have used an extra set of hands and of course there’s always that neighbor looking over your shoulder never offering to help.  No further mention of the A-pillar support repair should speak for itself. That repair will have to wait for the next heat wave. |
|
|
|
| 930cabman |
Jul 6 2023, 02:23 PM
Post
#72
|
|
Advanced Member Group: Members Posts: 4,773 Joined: 12-November 20 From: Buffalo Member No.: 24,877 Region Association: North East States |
Great progress, currently I am repairing some minor rusting issues, completing a good prep job with the entire area and coating with oil based brush on paint from my local True Value hardware store. I can't really see all the hype with such high performance coatings when our cars have made it 1/2 century with minimal protection from the factory and in many cases very little maintenance. In 50 years I will be 120 years of age
Getting most of the rust out is key |
|
|
|
| seanpaulmc |
Aug 27 2023, 03:29 PM
Post
#73
|
|
Member Group: Members Posts: 458 Joined: 6-December 16 From: Orlando, FL Member No.: 20,649 Region Association: South East States |
Back at it.
 I made up my own replacement corner out of some other cut offs rather than cutting out a tiny section from a brand new RD piece which seemed wasteful to me. Used the RD piece as a template. 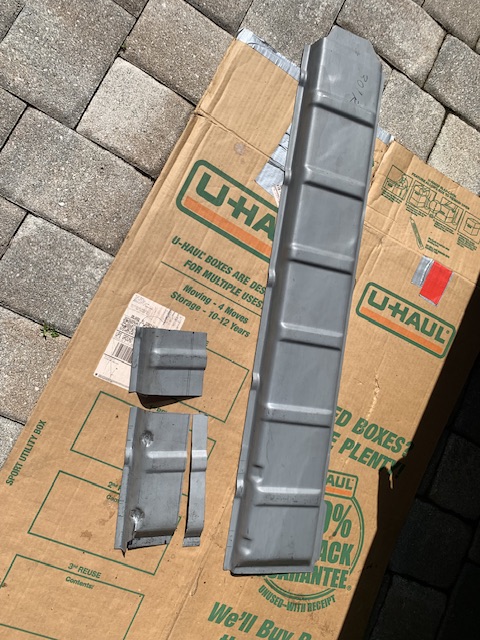 Turned out rather nice. But it is just going to get covered up by the outer reinforcement piece that goes here. 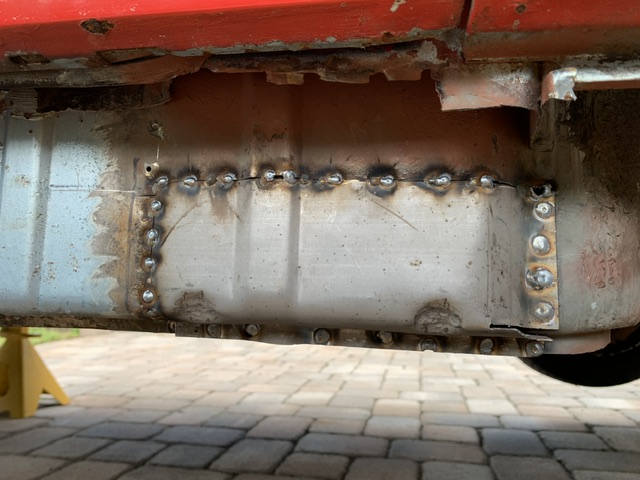 Question for you experts. Any tips for getting the door on and off alone? To install the outer reinforcement piece I have to get the door out of the way. It’ll probably take a couple on and offs I’m sure so looking for some practiced advise. Thanks for looking. |
|
|
|
| DennisV |
Aug 27 2023, 04:15 PM
Post
#74
|
|
Senior Member Group: Members Posts: 987 Joined: 8-August 20 From: Santa Rosa, CA Member No.: 24,575 Region Association: Northern California |
QUOTE(seanpaulmc @ Feb 1 2017, 03:49 PM) About that welder, is there advice for a recommended welder for a novice on here? Likewise, on what to stay away from? I started down the path of welding just over a year ago. If you plan to do any body panels, you may benefit from learning TIG. Plenty of people are successful with MIG, but I think you'll find it offers less control and introduces more heat distortion on body panels. I ended up buying the Lincoln POWER MIG 140 Multi-Process. I’ve been very happy with it so far. You can do TIG, MIG, or stick. Runs off 110 which is convenient. It is pretty compact. I put it on a cheap Harbor Freight cart and it has been fine. I have only used it for TIG of 18-20 gauge sheet metal so far. There are two key drawbacks, but neither would stop me from buying this one again: 1. Volt / Amp control doesn’t allow you to select a value. It’s a letter system that take a little trial and error. But once you know, you know. You will spend at least another $500 to get a Lincoln model that offers precise readout. 2. It is lift start. You get used to it. High Frequency start would be ideal. Again more $$$. I did online classes first. Tom Perazzo who is pretty well known for his Garage Time YouTube channel has a very good TIG video class. Also, master metal shaper Ron Covell has MIG and TIG videos. Beyond being good teachers, they are swell people. And don't rule out YouTube. Ray Schelin has a wealth of knowledge he shares for free from ProShaper. Then took three hands on classes. Starting with a MIG class at my local maker space. You may also be able to find classes at a junior college too. (IMG:style_emoticons/default/welder.gif) Ultimately, practice, practices, practice. |
|
|
|
| seanpaulmc |
Sep 2 2023, 07:29 PM
Post
#75
|
|
Member Group: Members Posts: 458 Joined: 6-December 16 From: Orlando, FL Member No.: 20,649 Region Association: South East States |
With a little help from you guys I was able to figure out how this piece should look and fit on the bottom. (IMG:style_emoticons/default/sawzall-smiley.gif)
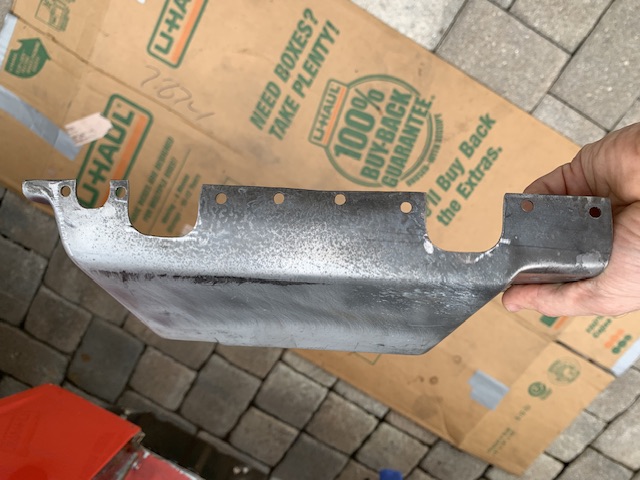  Some (IMG:style_emoticons/default/welder.gif) 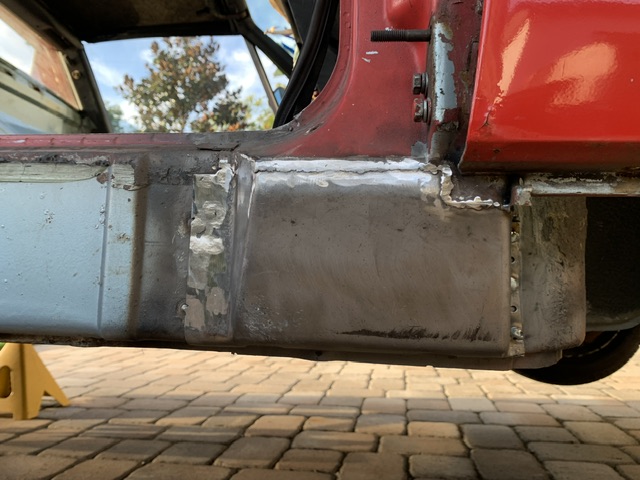 Mostly done. |
|
|
|
| 930cabman |
Sep 3 2023, 05:51 AM
Post
#76
|
|
Advanced Member Group: Members Posts: 4,773 Joined: 12-November 20 From: Buffalo Member No.: 24,877 Region Association: North East States |
+1 with your progress, all the while working outdoors in the hurricane season. (IMG:style_emoticons/default/piratenanner.gif) (IMG:style_emoticons/default/piratenanner.gif)
Keep up your efforts and soon you will be cruising |
|
|
|
| seanpaulmc |
Sep 9 2023, 06:14 PM
Post
#77
|
|
Member Group: Members Posts: 458 Joined: 6-December 16 From: Orlando, FL Member No.: 20,649 Region Association: South East States |
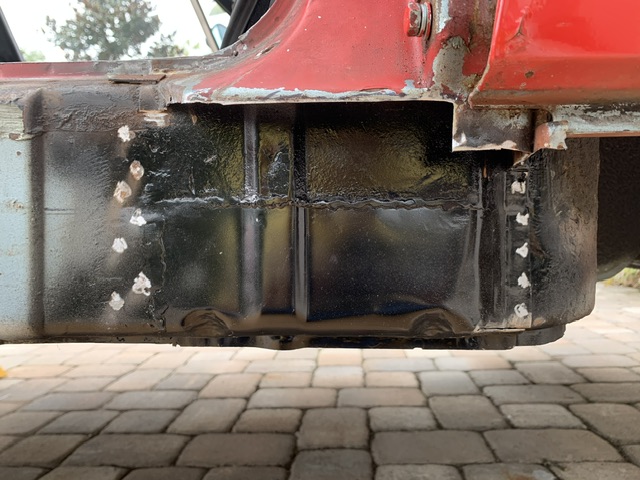
Put back the old door sill.
Mostly. Almost done but still some finishing to do. 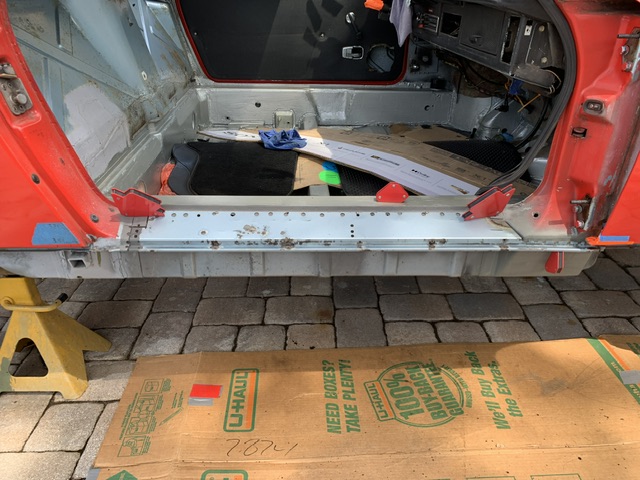 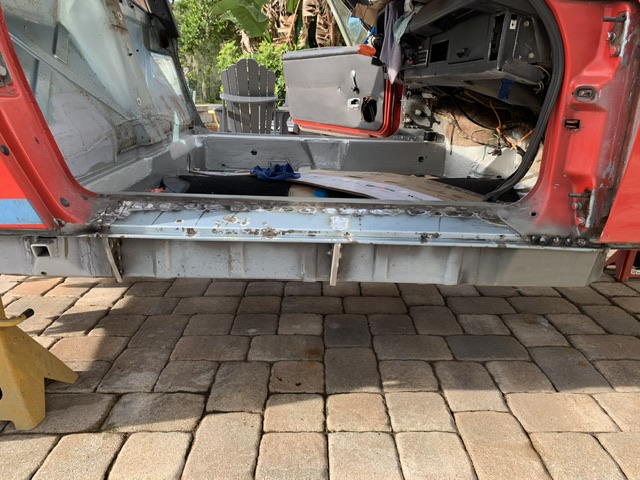 Advice on painting anyone? At my rate of metal repair it will be a while before this chassis gets repainted. Till then I’ll need to keep the rust off the new and repaired metal. What should I be doing? Advice? Thanks |
|
|
|
| seanpaulmc |
Jul 7 2024, 07:17 PM
Post
#78
|
|
Member Group: Members Posts: 458 Joined: 6-December 16 From: Orlando, FL Member No.: 20,649 Region Association: South East States |
Sometimes a project reaches a tipping point…
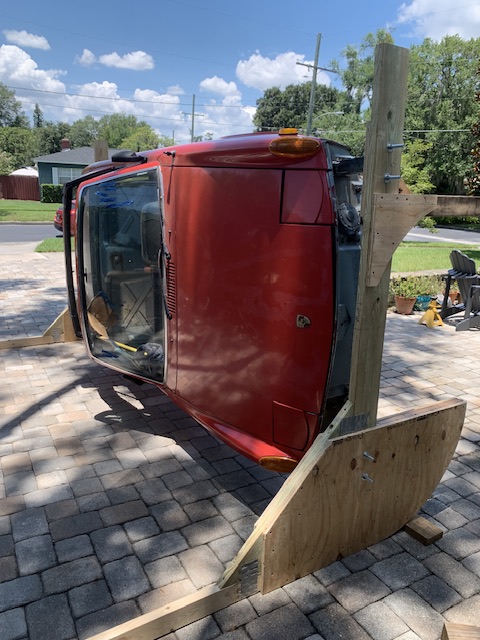  Started the day off on all fours (Jackstands of course) 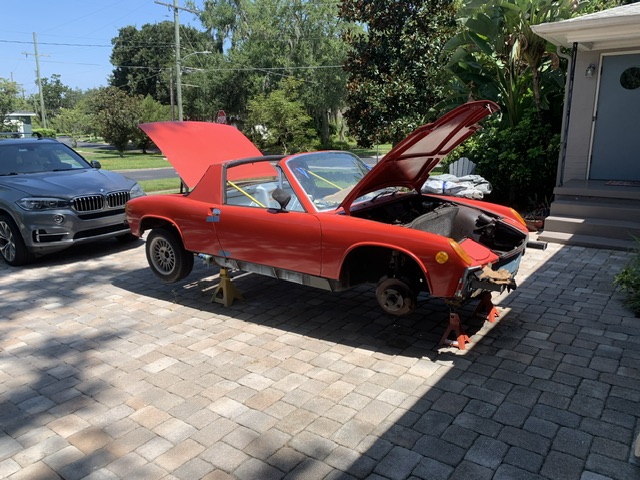 A BIG THANKS to Peter and Wesley for their helping hands today! I’m very grateful. |
|
|
|
| Artfrombama |
Jul 8 2024, 09:24 PM
Post
#79
|
|
Artfrombama Group: Members Posts: 470 Joined: 21-January 24 From: One of the chosen few Member No.: 27,870 Region Association: South East States |
Impressed with your work and tenacity.
Keep up the good work (and postings)! |
 |
|
| seanpaulmc |
Jul 17 2024, 08:04 AM
Post
#80
|
|
Member Group: Members Posts: 458 Joined: 6-December 16 From: Orlando, FL Member No.: 20,649 Region Association: South East States |
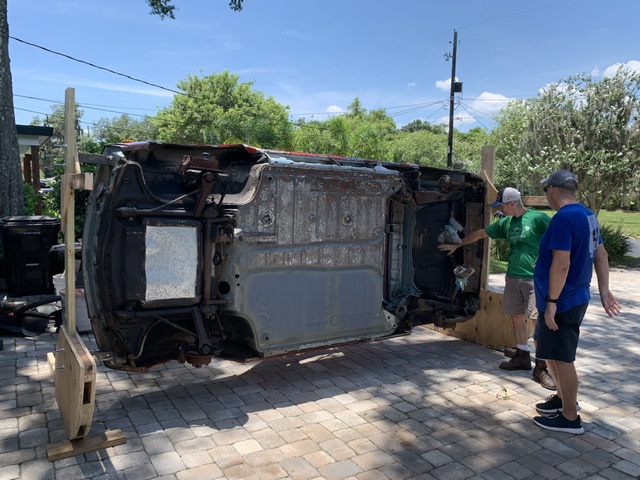
Between the rain (daily), family life, and regular job duties, I’ve been able to put in some work on the Teener. Having it on her side with full access to the floor has been incredibly productive even with dodging the daily rains.
Since I’ve already done the passenger floor (the hard way), I still needed to repair some rust spots on the driver side. 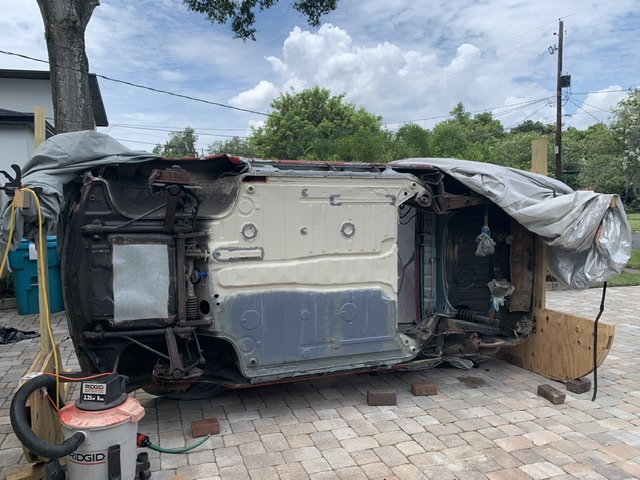 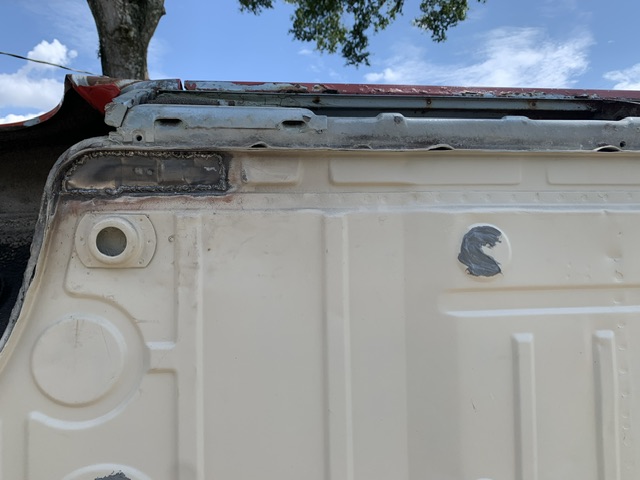 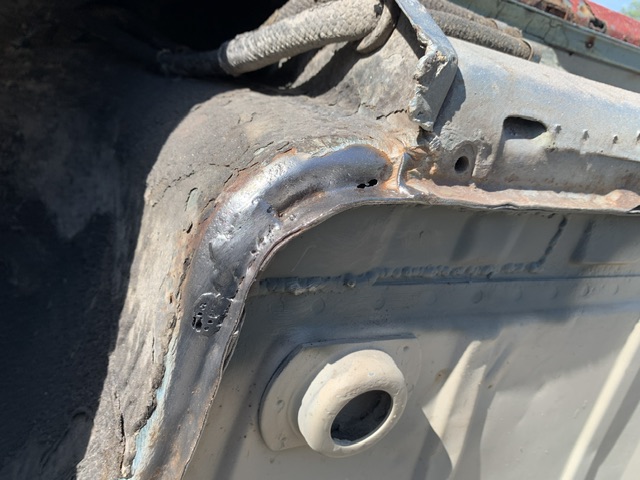 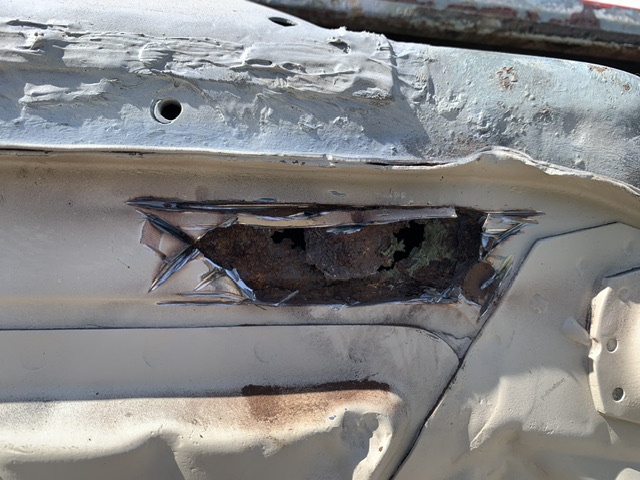 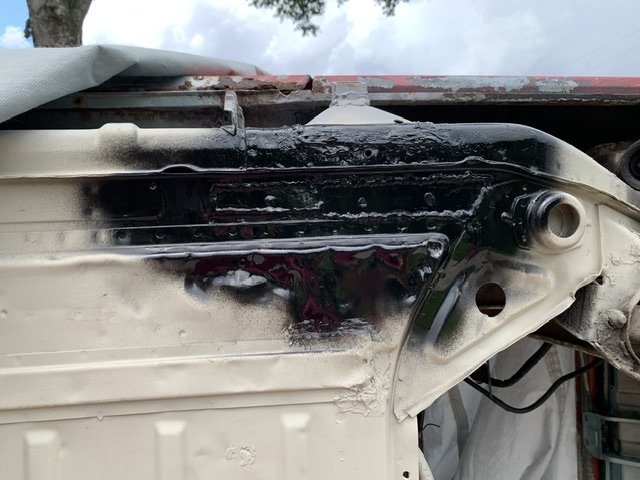 Patches are in. The floor and longs are nearing completion. Still need some seam sealer and an undercoating. The roll over jig has really helped my motivation getting back into these repairs. |
|
|
|
|
34 User(s) are reading this topic (34 Guests and 0 Anonymous Users)
0 Members:

|
Lo-Fi Version | Time is now: 31st July 2026 - 08:50 PM |
Invision Power Board
v9.1.4 © 2026 IPS, Inc.