|
|
|
Porsche, and the Porsche crest are registered trademarks of Dr. Ing. h.c. F. Porsche AG.
This site is not affiliated with Porsche in any way. Its only purpose is to provide an online forum for car enthusiasts. All other trademarks are property of their respective owners. |
|
|

  |

| 914forme |
 Mar 31 2018, 07:32 AM Mar 31 2018, 07:32 AM
Post
#81
|
|
Times a wastin', get wrenchin'!  Group: Members Posts: 3,899 Joined: 24-July 04 From: Dayton, Ohio Member No.: 2,388 Region Association: None |
A bit more progress:
Worked on getting the old rotor off the passenger side rear. Like everything on this car, it rusted solid. Sitting is a real bitch on cars. First up get the rotor off the hub. I used a couple of cap head screws I had around. Could not get the rotor keeper screw out. So I drilled it out. Remnants still need to be removed. Letting it soak in some penetrant. 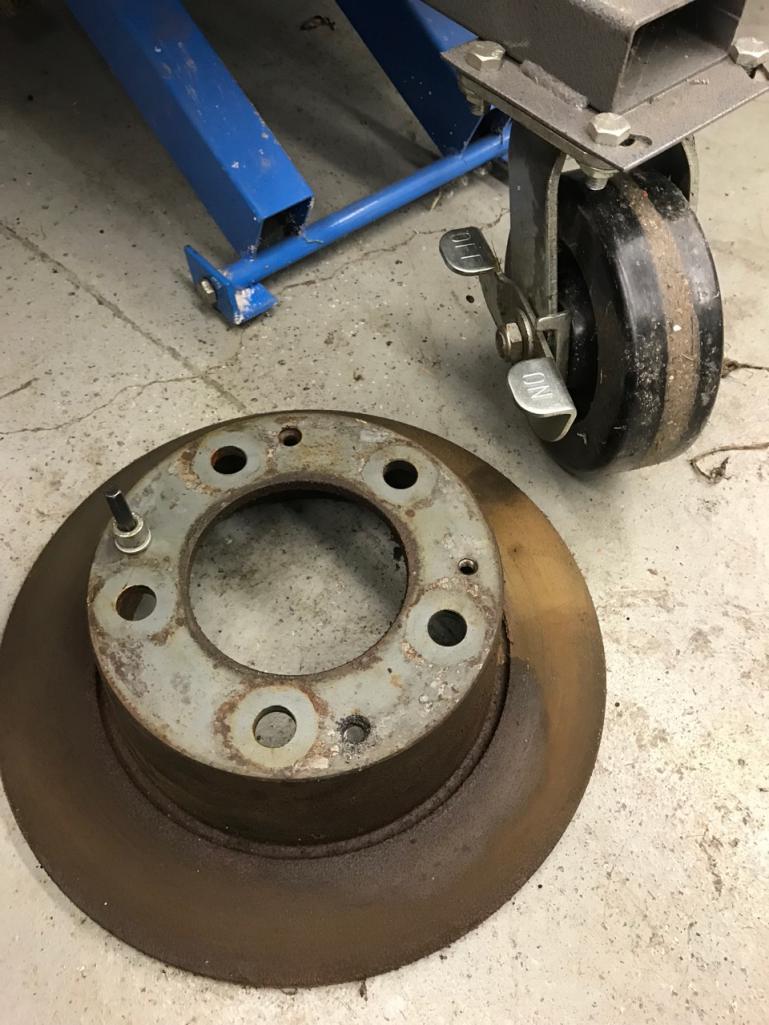 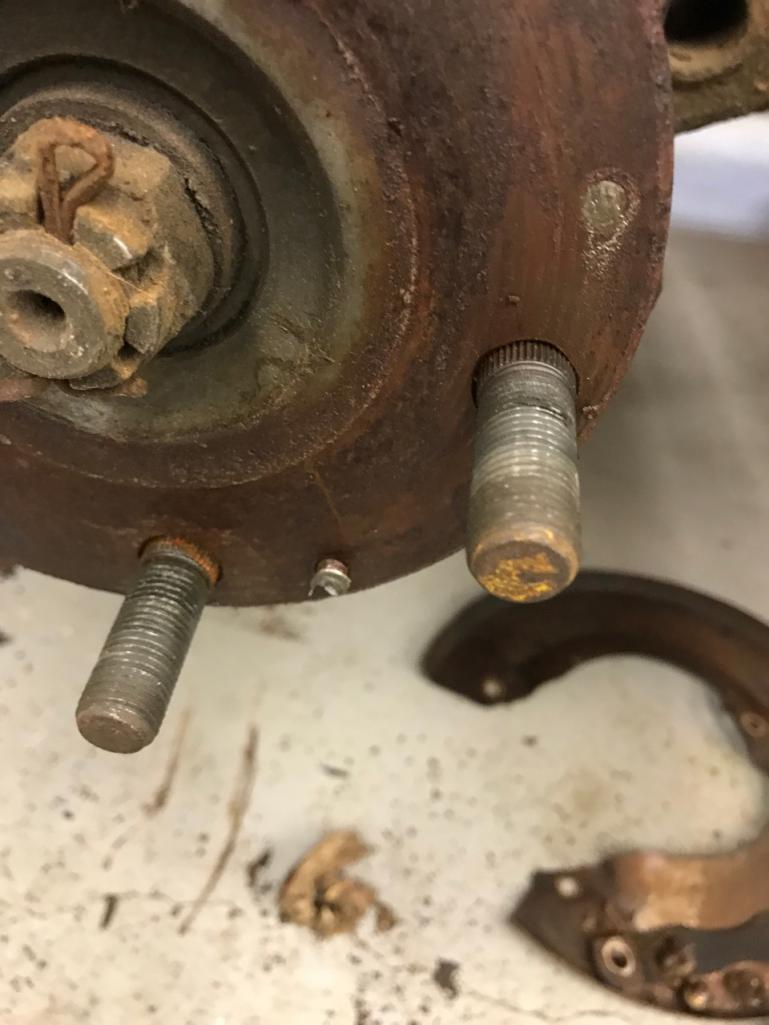 Backing plates need to be cleaned up. 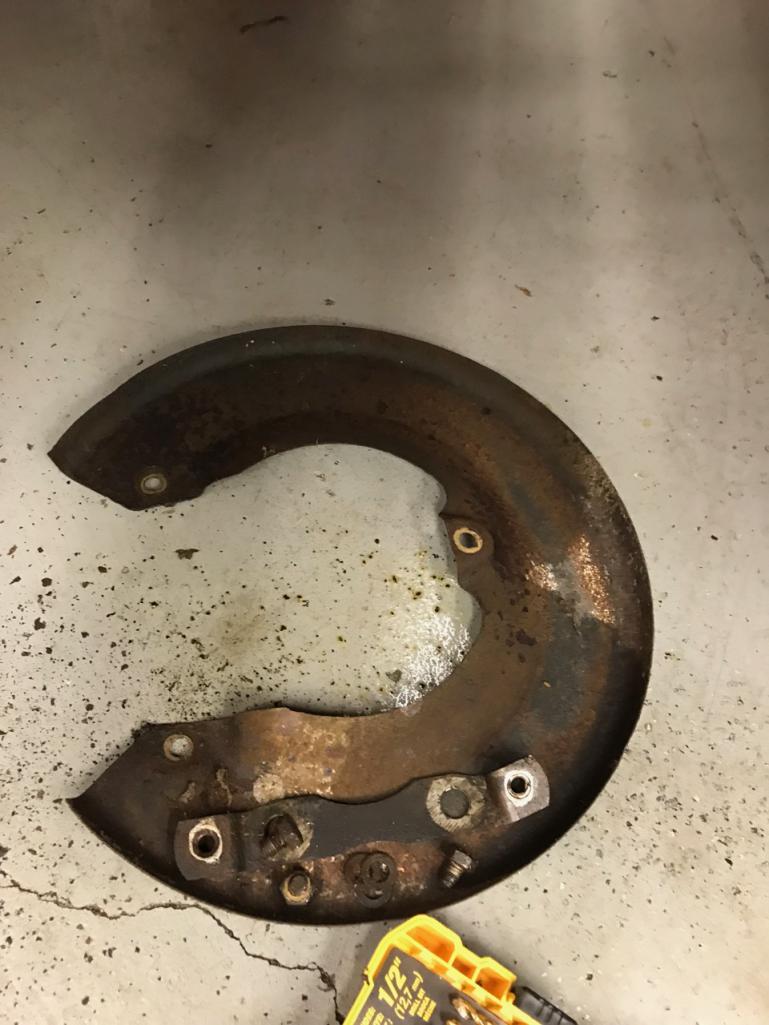 Old Shocks off and replaced with these Bilsiens. Custom valved, adjustable colors, 140lbs springs, monoball shock tops. 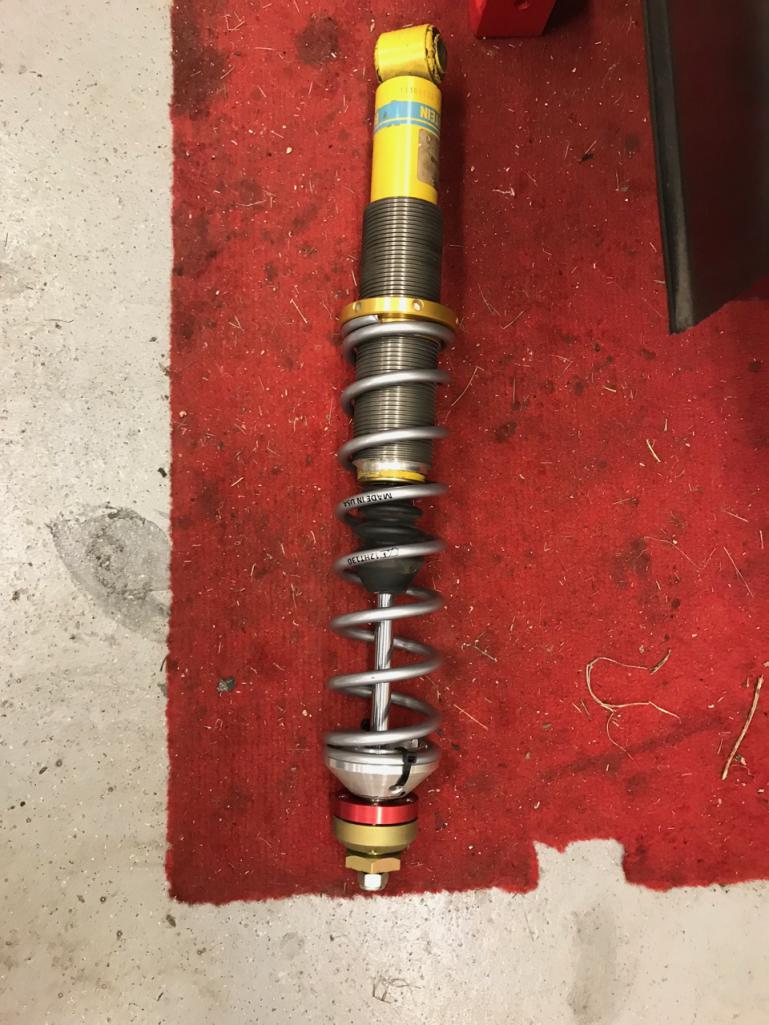 Installed - required a 38mm socket. Good thing I work on large machinery otherwise I would not have a 38mm around. Yes it is a 3/4" drive, bit over kill for a shock top nut. Never thought I would be using 3/4" stuff on a 914 (IMG:style_emoticons/default/huh.gif) 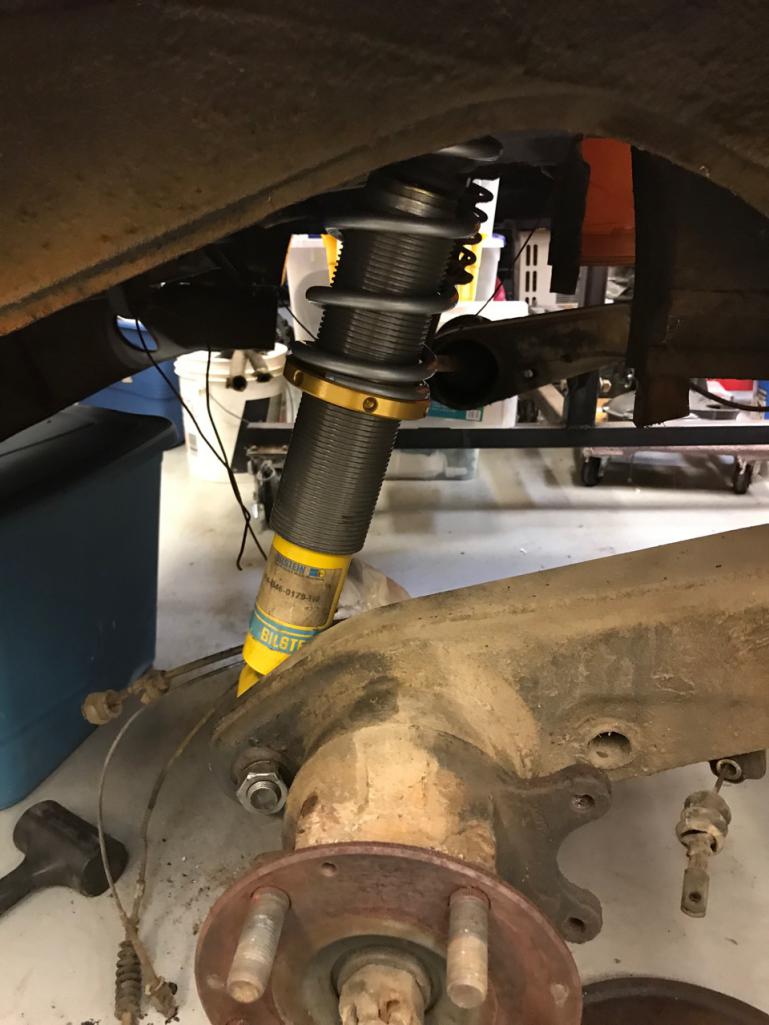 Rear Arm still has to come off get cleaned up, have the pivot arm bushings installed, and new bearings installed. Onto the passenger front Hub and parts all laid out. 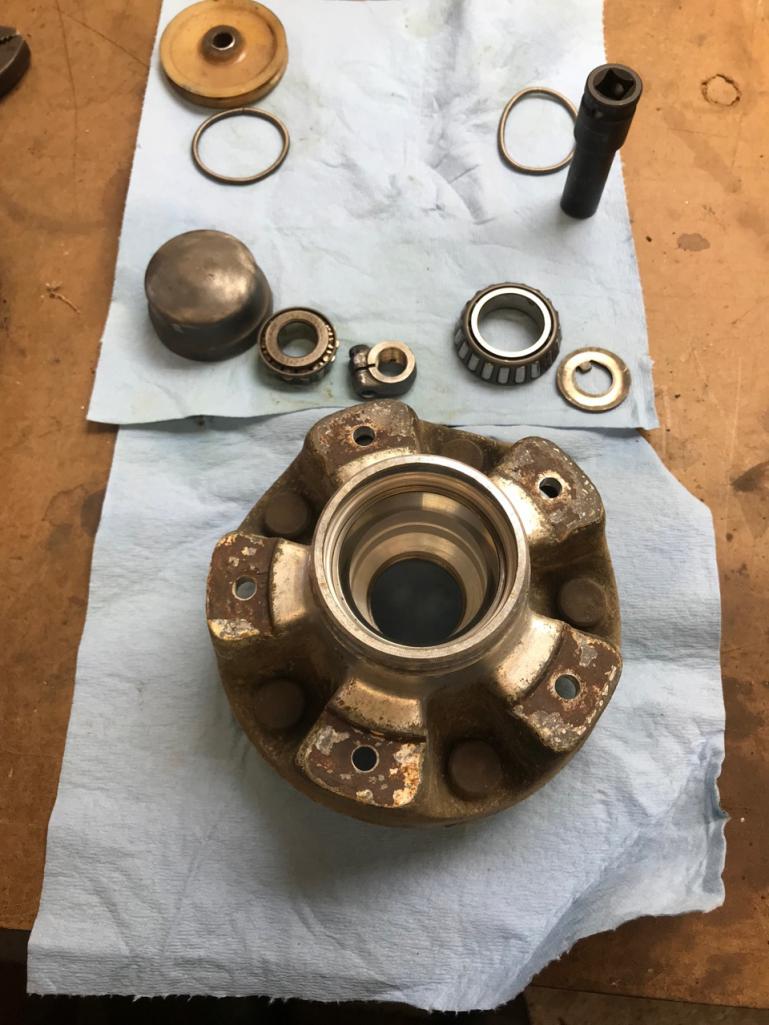 All assembled 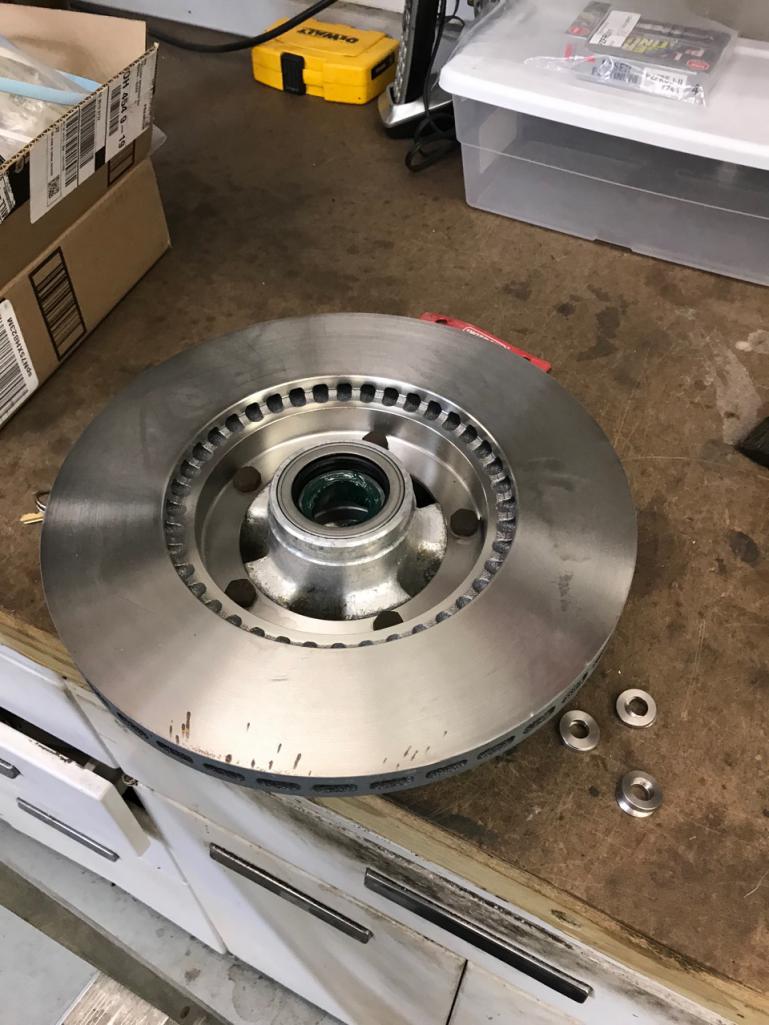 Struts and Arm in place and mocking up the brake calipers 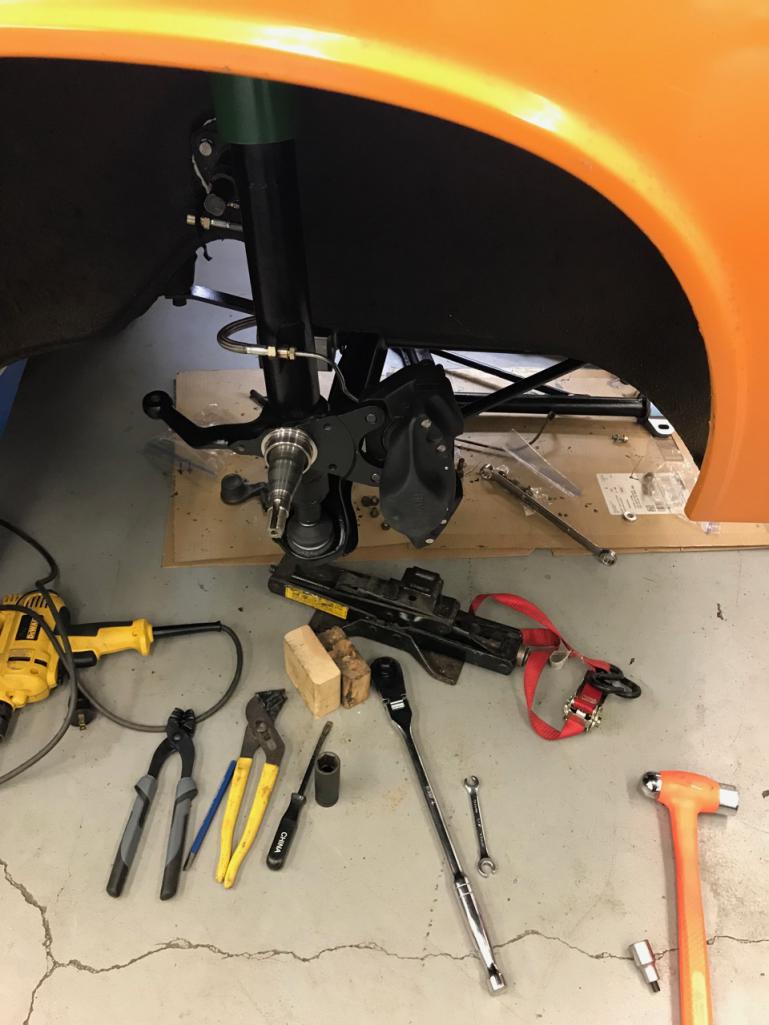 Alfa GT Brake Caliper, why you might ask. 3" caliper bolt spacing, larger pads, lighter calipers. think of them as a 911S Alloy caliper for the 3" strut. 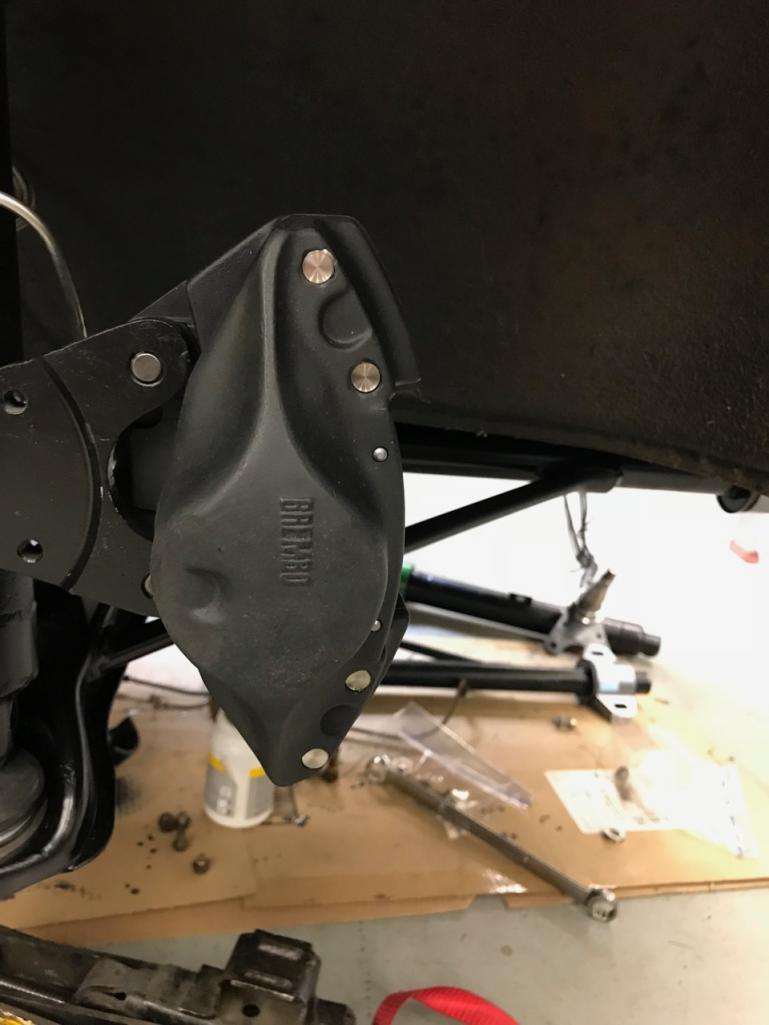 Had to remake the caliper hard line 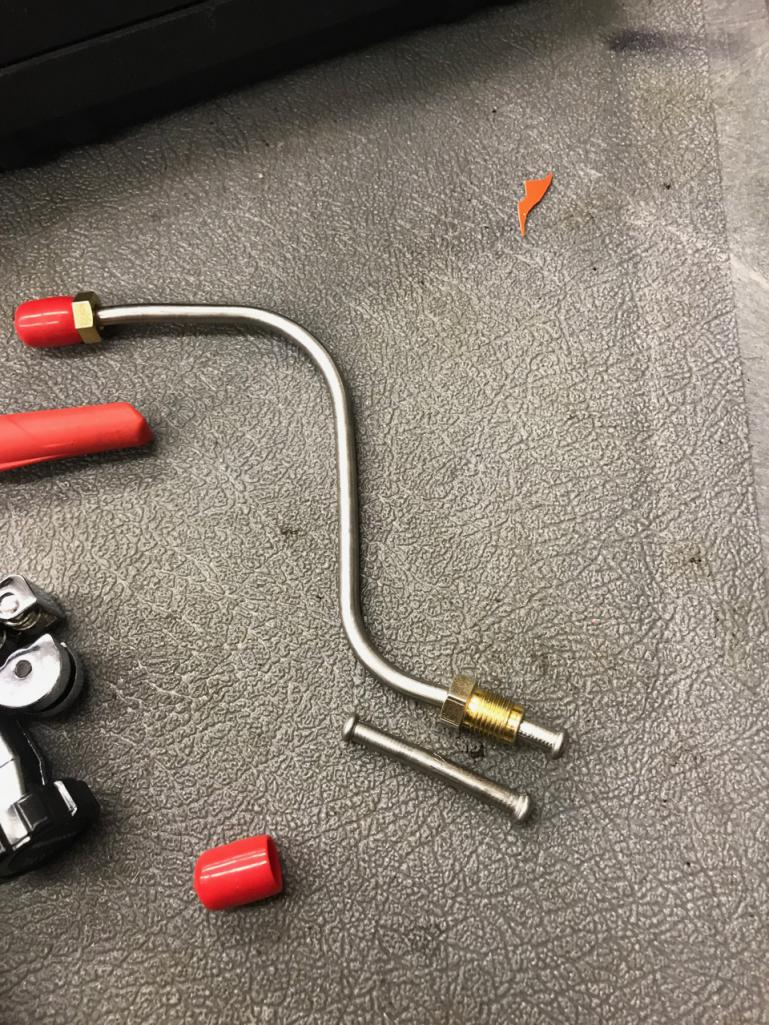 The small piece is the part I cut from the PMB original line. These SS lines are hard. Also tested the flare on the SS line using the scrap piece. Screw it up first before doing the real line. I will take a picture of the original and the modified line. Before I duplicate it for the drivers side. Luckly I have the proper tools to form them and remake the flare. But man SS is hard to work with. 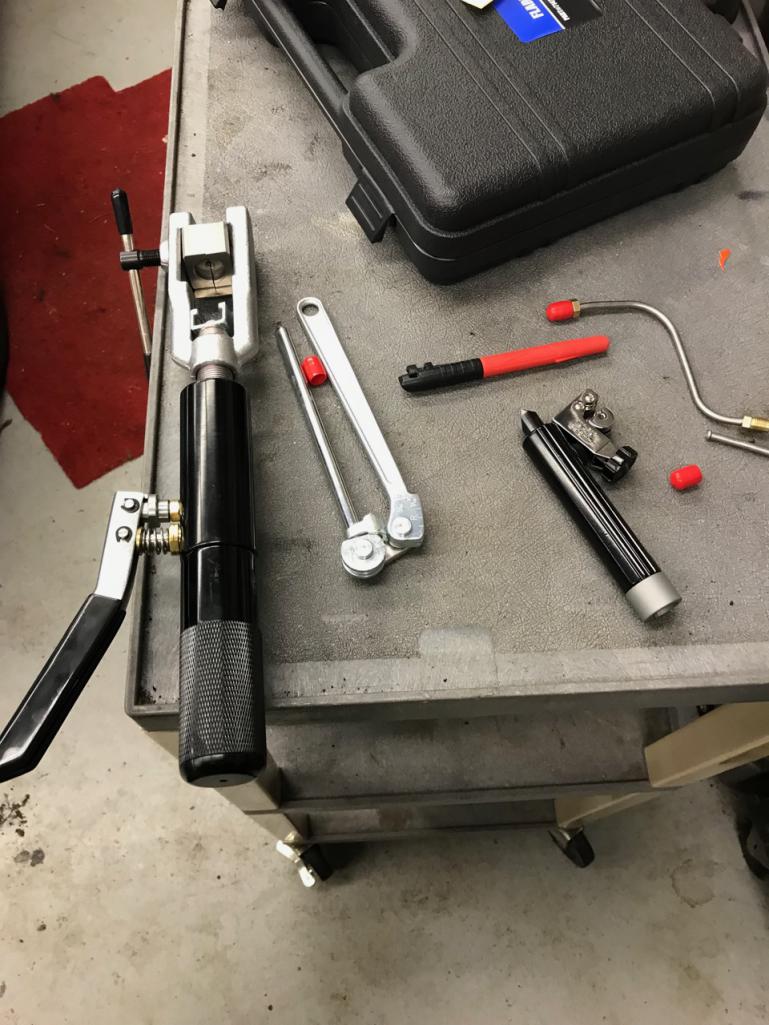 That is where I stoped late last night All of this to get this car off the lift so I can do a timing belt on the wife's EOS, and all the other odd spring jobs that come up. I really need a couple of lifts. a 4 poster to store stuff in a vertical fashion. A couple of mid rises, as I like to move my stuff around to fit the need of the work. Bolted down 2 posts just don't work for me. I have some stuff that is over 30 feet long. Everything in the shop is on wheels, so when I need to get the big stuff in, smaller stuff just moves around. (IMG:style_emoticons/default/poke.gif) "Times a wasting time to get wrenching" |
   |

 
|
| Lucky9146 |
Mar 31 2018, 07:46 AM
Post
#82
|
|
Always Wanted A Bigger Go Cart Group: Members Posts: 1,711 Joined: 22-September 14 From: Poway California Member No.: 17,942 Region Association: Southern California |
Looking really good, love the detail (IMG:style_emoticons/default/first.gif)
(IMG:style_emoticons/default/white914.jpg)  |
|
|
|
| 914forme |
Mar 31 2018, 06:39 PM
Post
#83
|
|
Times a wastin', get wrenchin'! Group: Members Posts: 3,899 Joined: 24-July 04 From: Dayton, Ohio Member No.: 2,388 Region Association: None |
I made two steps forward and the two steps back to move three steps forward in the end.
(IMG:style_emoticons/default/headbang.gif) So the short of the long I got al the suspension in place on the front, and looked over to see the steering rack under the bench (IMG:style_emoticons/default/headbang.gif) Take everything back out, instal the steering rack, and put it al back in. So where I was today when I stopped to eat at 3pm is where I once again am when I stopped tonight. (IMG:style_emoticons/default/headbang.gif) Frustrating to say the least. Not sure how I forgot that piece. First thing this morning I made the second brake line for the drivers side. And fitted it up on the bench. 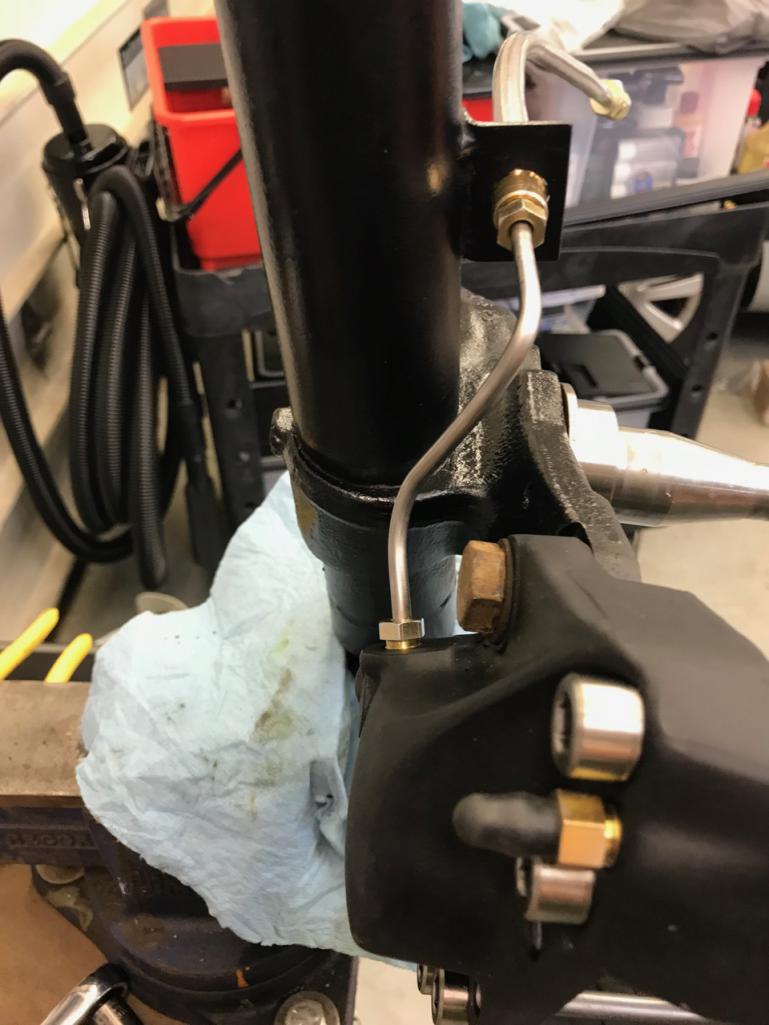 The Alfa calipers are a bit big, so the stock rain shields have to modified just a bit to make them fit.  Trim a straight line from point A to B then debur.  Passenger side is done, well almost I need to get a 803 615 715, not sure where that got to (IMG:style_emoticons/default/confused24.gif)    And need to build the swayer drop links, some semi joints and tube, easy enough. Attached thumbnail(s) 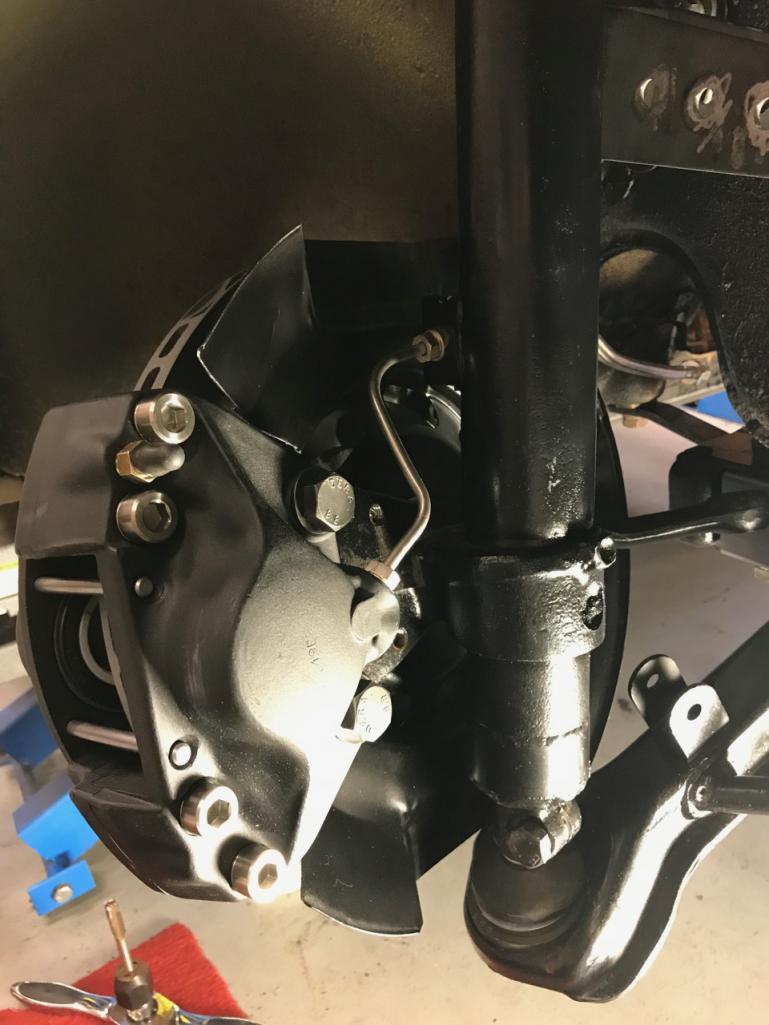
|
|
|
|
| 914forme |
Apr 3 2018, 08:00 AM
Post
#84
|
|
Times a wastin', get wrenchin'! Group: Members Posts: 3,899 Joined: 24-July 04 From: Dayton, Ohio Member No.: 2,388 Region Association: None |
Sunday:
Got some time over Easter after all the festivities and people started taking naps. My wife and I went off and let the sleeping beauties sleep. She went off to work in the years, one of her favorite things to do. I went off to work in the shop, one of my favorite things to do. Did not take any pictures so, sorry it was a productive afternoon. Got drivers side (left) front suspension done. Installed the turbo tie rods, no issues. Moved to the back, installed the other rear shock. Dropped the left side rear arm for cleanup. Removed all the brake lines, started installing the PMB Stainless lines. Pretty close match, I like them, a tad bit of tweaking to get them just right. Pulled the Rear Brake Prop valve. Check PMB for rebuild if they do the -6 valve. Pulled all the 9-14-6 shifter stuff out of the tunnel. Installed Tangerine's racings conversion spherical ball linkage bushing on the firewall. As always (IMG:style_emoticons/default/drooley.gif) stuff. Pushed the 914-6 back over to one side of the shop. I did not drop the Passenger (right) side arm as I can get to it where it sits. Monday: Got my invoice from PMB for the prop valve, very reasonable. Paid for that one. They do rebuild them, (IMG:style_emoticons/default/piratenanner.gif) Got my shipping label printed off, and ready to make the shipment. Searched for a supplier that has the parts I need. Spent lots of time in the PET (IMG:style_emoticons/default/wacko.gif) QTY 2 - 900-013-037-02 counter sunk screws to retain the rear brake rotors. QTY 1 - 803-611-715 retainer spring for the brake lines on the strut, or rear arm. I lost one HTF does that happen, everything was bagged and tagged. Swaybar drop links, I built the for my EG Build / Auto-X car, and can't find where I got them from. (IMG:style_emoticons/default/headbang.gif) SS nuts and washers for the transmission case, as I am there might as well finish it up with hardware. Today's goals Get the box packed with the prop valve, and ready to ship, my post office closes at 4pm (IMG:style_emoticons/default/bs.gif) small town living at its finest right there. (IMG:style_emoticons/default/huh.gif) Clean up the driver (right) rear arm, prep for paint. I also prep to change out the bushings with the Rebel Racing parts I have. Trying to keep the project creep from kicking in. Tangerine racing makes some real nice stuff for trailing arms. Order the parts I need from the above list. Drop the left side trailing arm Install suspension cross brace on the farm truck. - if it shows up today Install windshield wipers on wife's EOS if they show up today, Amazon (IMG:style_emoticons/default/sheeplove.gif) me on these. (IMG:style_emoticons/default/chowtime.gif) Eating the Elephant (IMG:style_emoticons/default/chowtime.gif) |
|
|
|
| Amenson |
Apr 3 2018, 08:10 AM
Post
#85
|
|
That's opposite lock!! Group: Members Posts: 645 Joined: 27-May 05 From: Dublin, OH Member No.: 4,154 Region Association: None |
Great progress (IMG:style_emoticons/default/chowtime.gif)
Those front calipers are my favorite part of the build! Will be interesting to see how many people notice that they are Brembo's when it is on the ground. |
|
|
|
| 914forme |
Apr 10 2018, 01:20 PM
Post
#86
|
|
Times a wastin', get wrenchin'! Group: Members Posts: 3,899 Joined: 24-July 04 From: Dayton, Ohio Member No.: 2,388 Region Association: None |
New Tool Tuesday (IMG:style_emoticons/default/piratenanner.gif)
Okay so if you can't find the tool you need you make one. 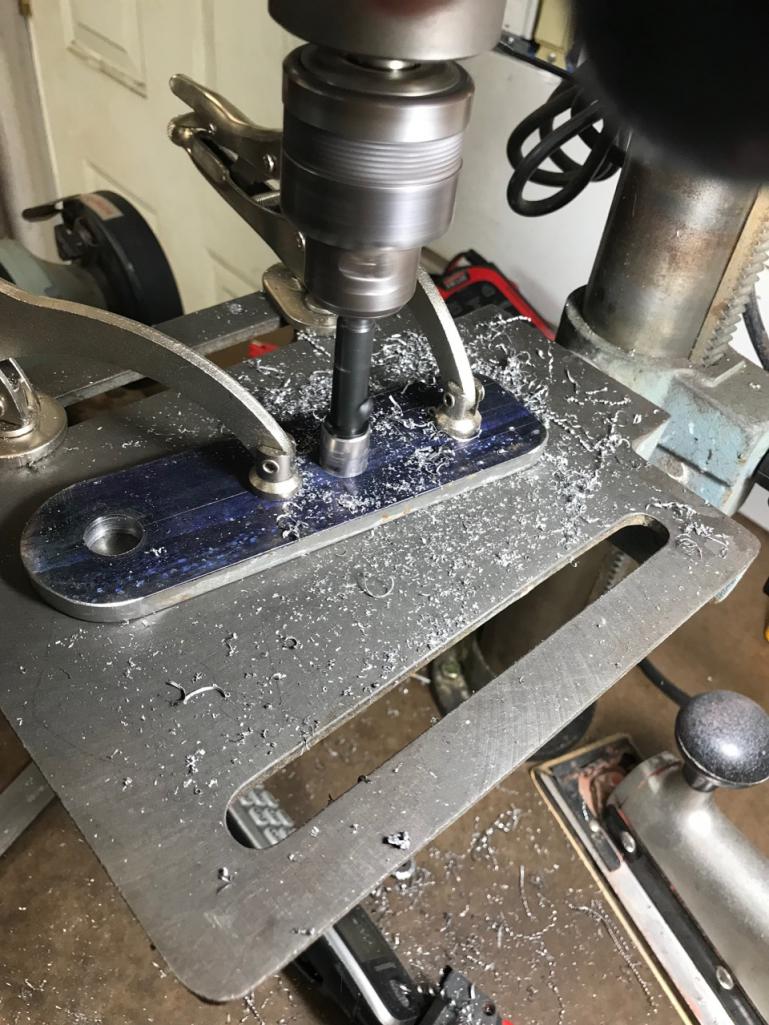 (IMG:style_emoticons/default/wub.gif) Rotabores 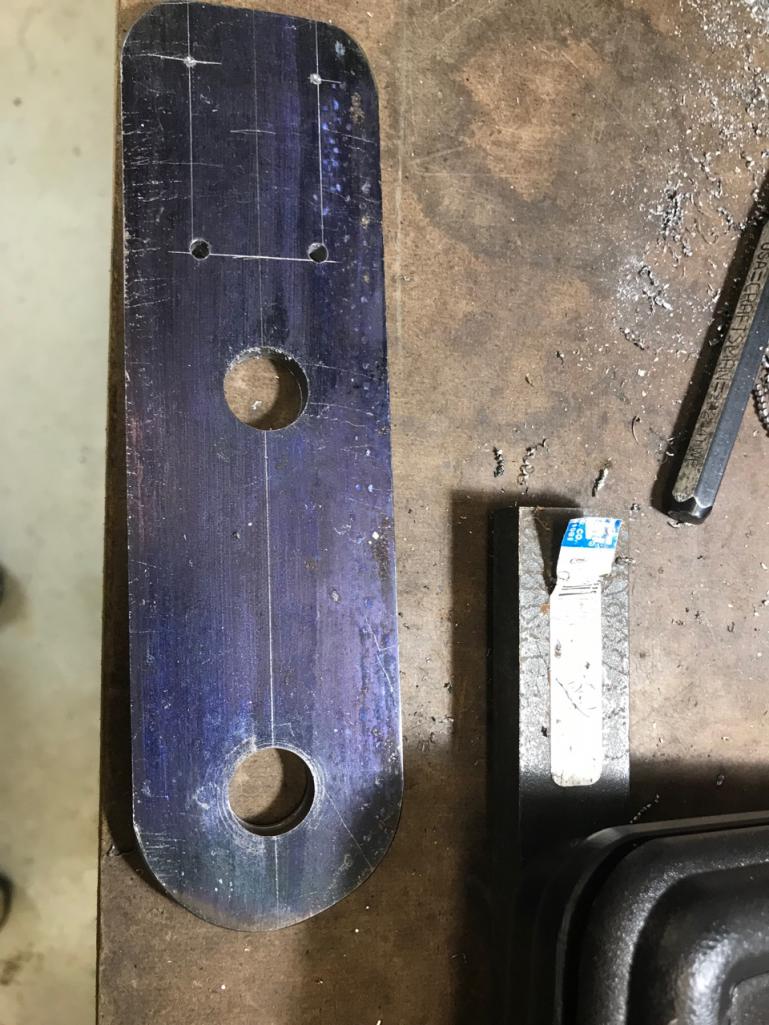 Now it becomes a bit clearer what I am doing 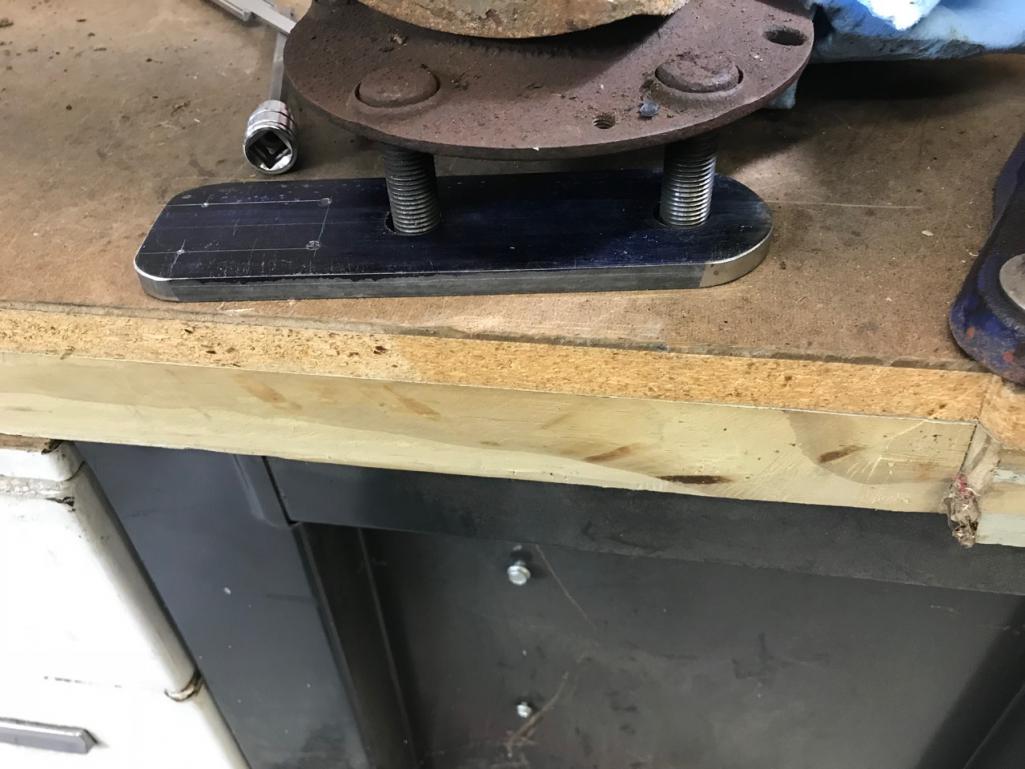 big stick driven into the flange (IMG:style_emoticons/default/smash.gif) 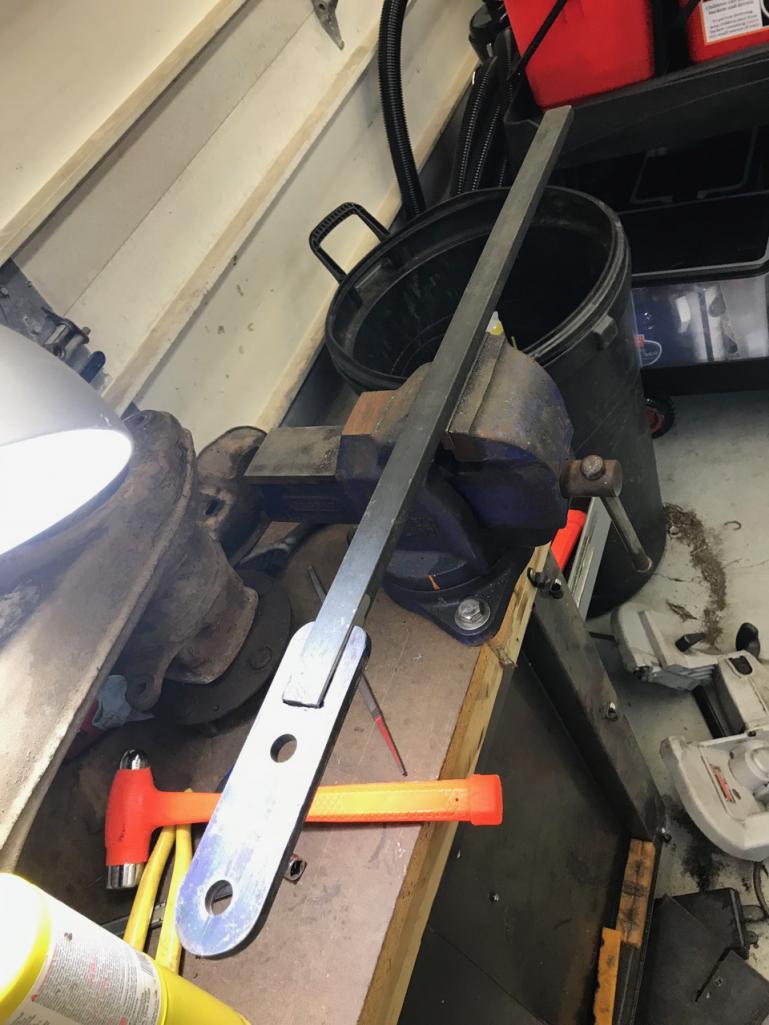 All welded up (IMG:style_emoticons/default/welder.gif) 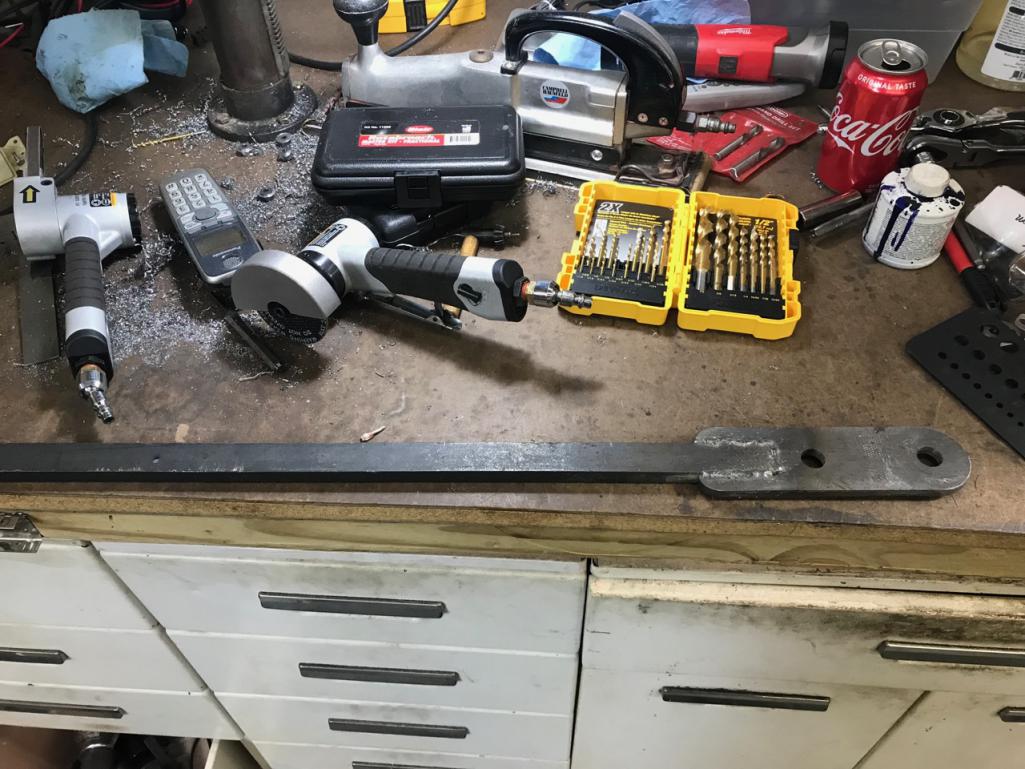 Big long handle allows it to mount in my vice, or used on the car. For now it is being used in the vice.  This is very handy for taking that nut off to remove the stub axle. 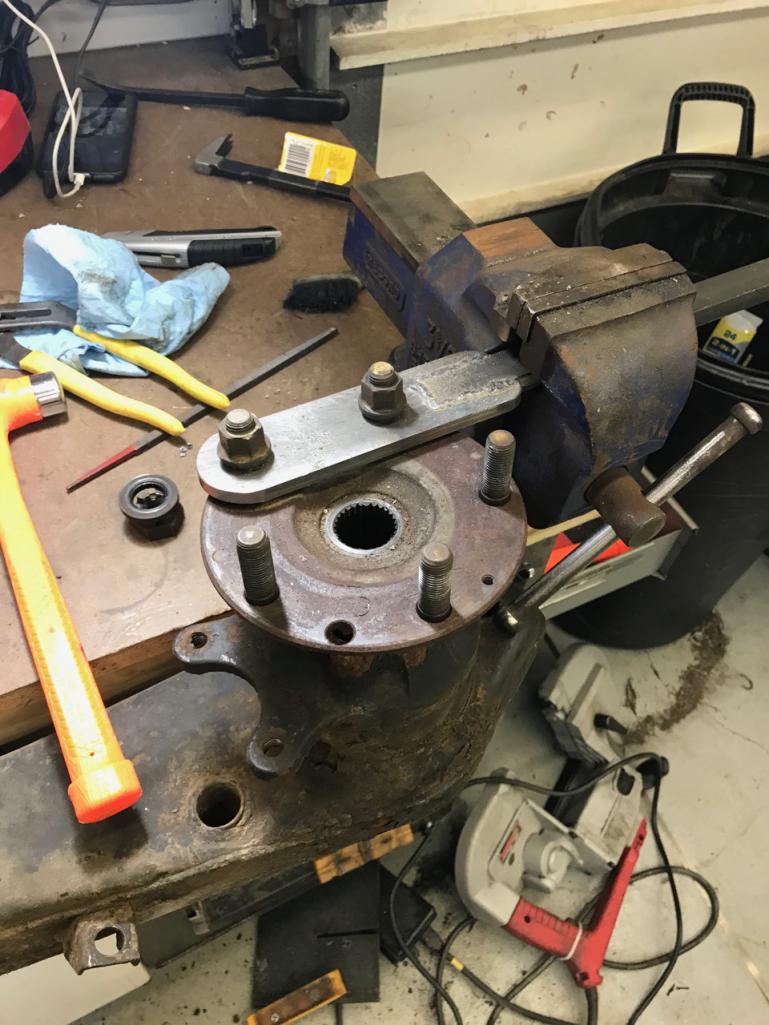 More work to come latter tonight. On a sad note you see my Portaband on the floor. Using it and it slipped out of the vice and hit the floor. Carnage ensued! I need to make a mount for it to better support it while working with it. Or I need to pickup a larger floor standing band saw. Work has a couple 26" units coming up for auction (IMG:style_emoticons/default/idea.gif) Need to do 3 phase in the shop oh that opens a whole new can of worms. (IMG:style_emoticons/default/w00t.gif) Will also need to add a machine room to the side of the shop. Another 40 x 60 should do the trick. |
|
|
|
| tom.esh |
Apr 10 2018, 04:32 PM
Post
#87
|
|
Member Group: Members Posts: 63 Joined: 6-March 14 From: Canton Ohio Member No.: 17,083 Region Association: North East States |
A converter for three phase may be worth looking into. Made one years ago with a few parts. My friend still runs a mill and a lathe with it. Found the plans online.
|
|
|
|
| raynekat |
Apr 10 2018, 04:51 PM
Post
#88
|
|
Advanced Member Group: Members Posts: 2,171 Joined: 30-December 14 From: Coeur d'Alene, Idaho Member No.: 18,263 Region Association: Pacific Northwest |
Your Alfa brakes look great. Lots of work, frustration but you'll be happy in the end.
|
|
|
|
| 914forme |
Apr 14 2018, 07:36 PM
Post
#89
|
|
Times a wastin', get wrenchin'! Group: Members Posts: 3,899 Joined: 24-July 04 From: Dayton, Ohio Member No.: 2,388 Region Association: None |
Active Day working on many projects from Dad's -6 to keeping my old iPhone off the workbench.
First up working on rebuilding the rear trailing arms. Pressed out the rear pivot bushing and tube. Upgrading them to Rebel Racing parts. But as everything with this project, it did not go as planned. One of the rubber bushings got stuck in the arm. I finally got it moved to one of the ends, and drove it in so it did not moved. Grabbed a drywall saw and cut one side of the bushing. Grabbed some long needle nose pliers. And twisted the end and finally got it out. (IMG:style_emoticons/default/headbang.gif)  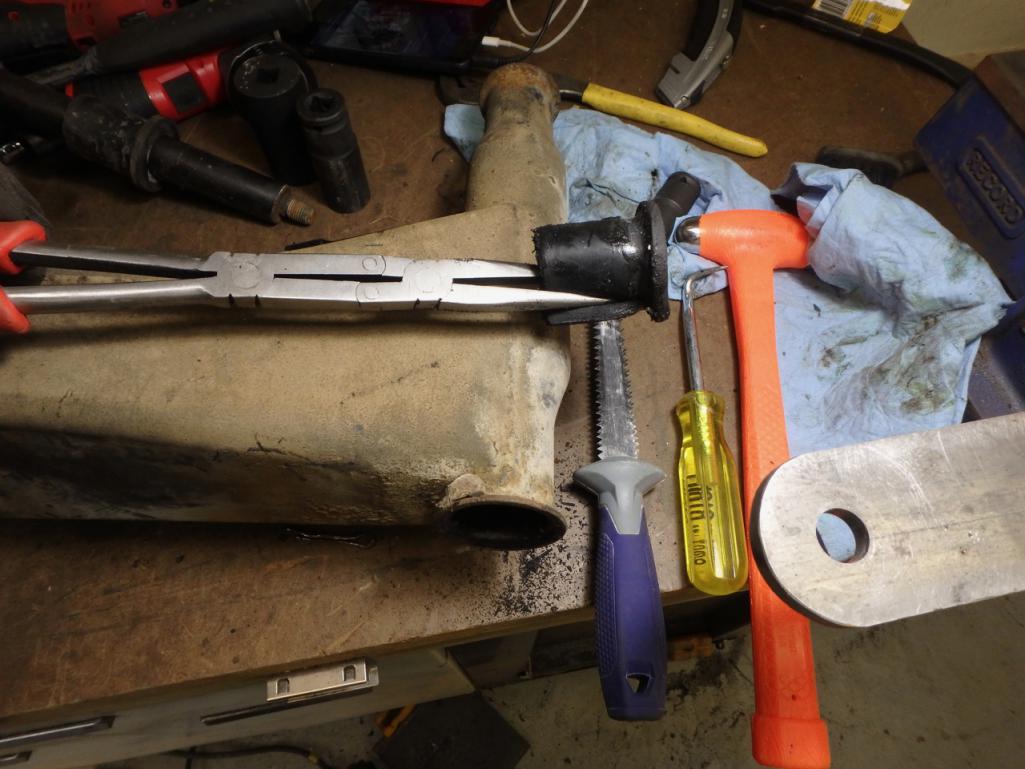 Seam welded the rear pivot cup, do this to all my 914s. Just makes me feel better. And yes it allowed me to get my (IMG:style_emoticons/default/welder.gif) on. 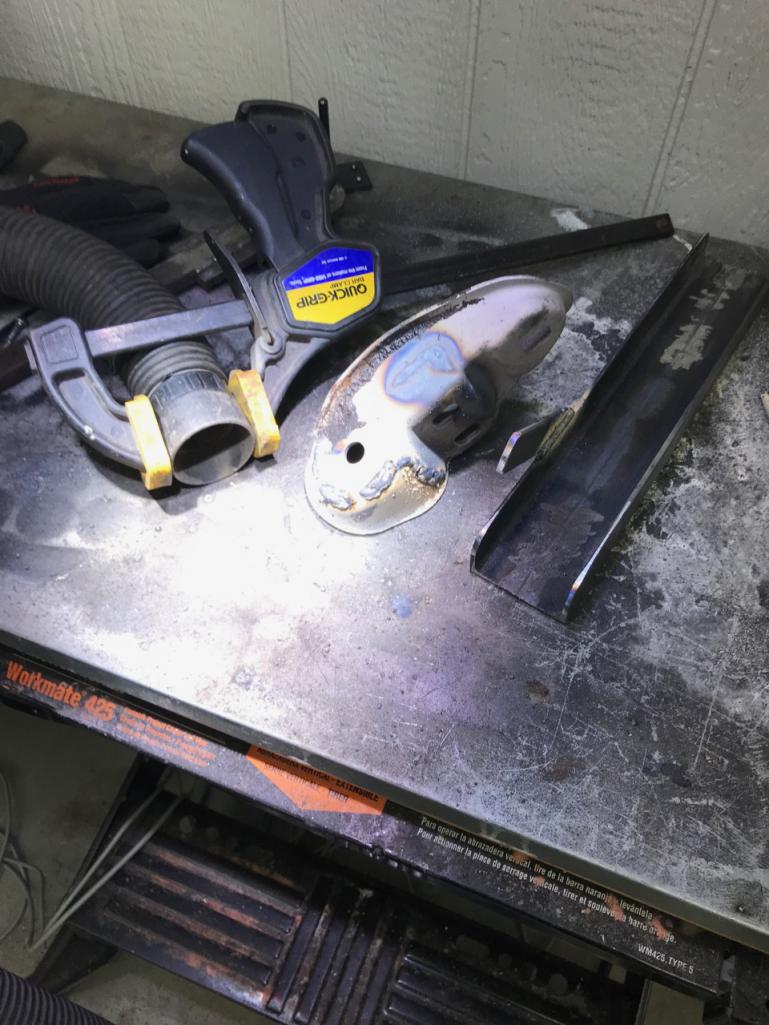 the item beside the outer cup, is a mount for my portaband. Don't want to see it fall on the floor again. You can pull one pin and use the portaband as a handheld saw. It is handy to have a portable bandsaw.  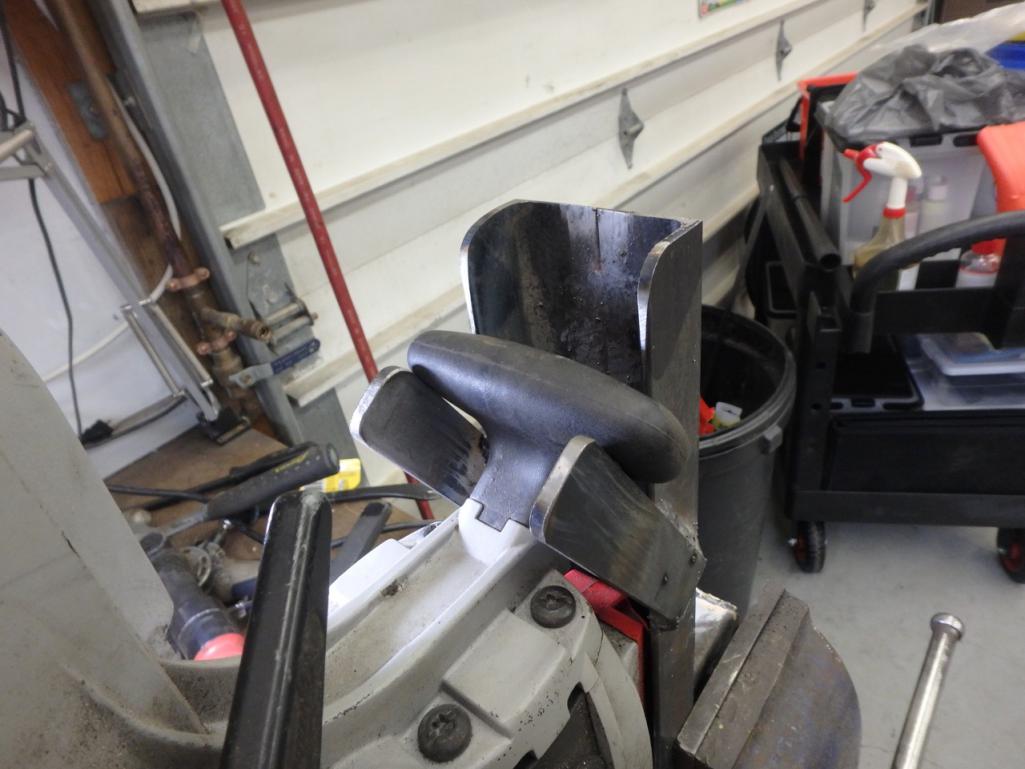 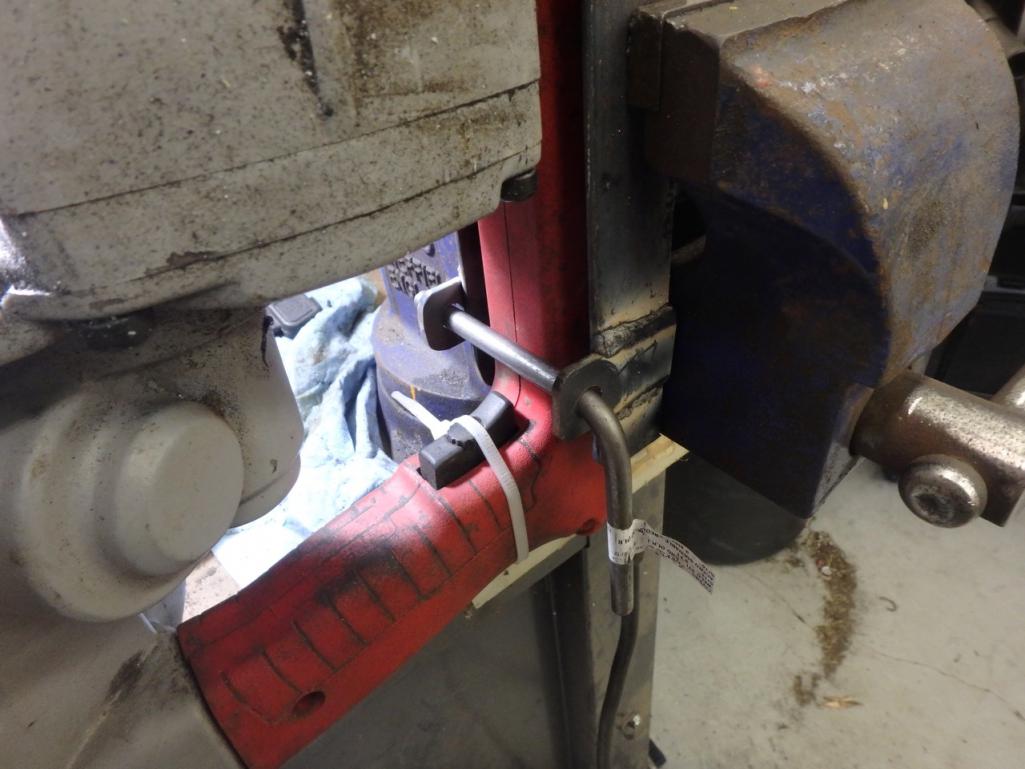 I use a foot switch to control the on off. Allows two hands on the project. Mounts into my older Record Vice. YES I love this vice it has been with me for years. I need a few more vices in the shop. I had to test my new stand out with the Portaband. So I mounted my old iPhone on the door of one of my cabinets. Built a a simple mount that holds the case to the door. Easy, keep it out of the dirt and grime of the work bench. 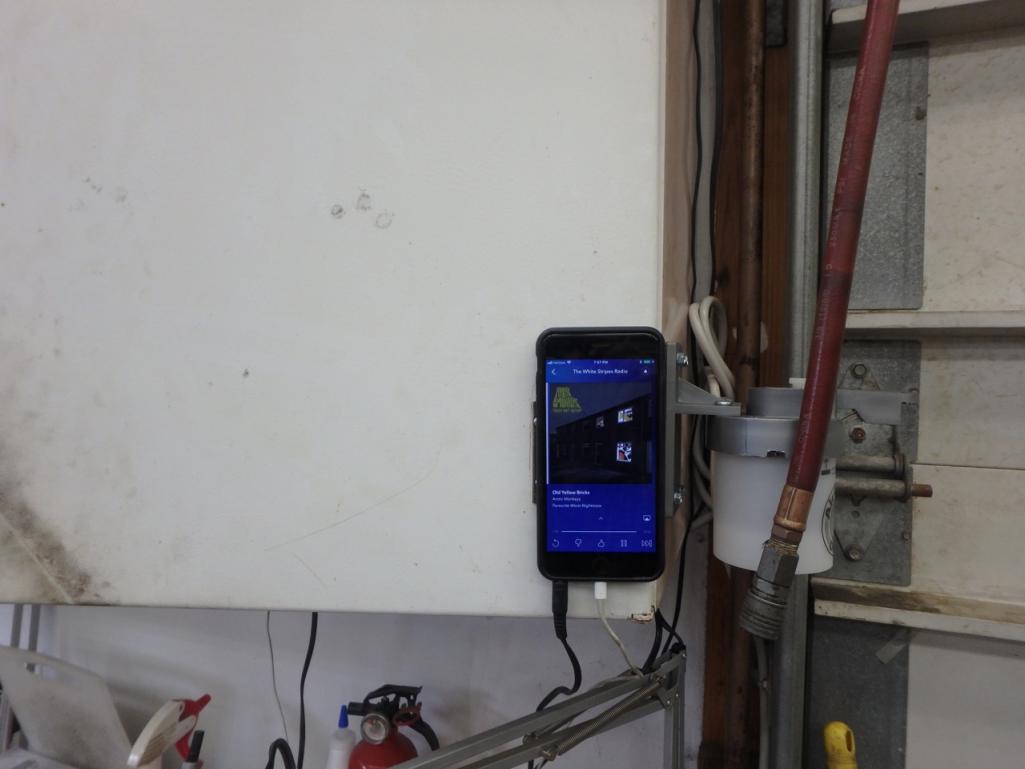 That is it for tonight, off to work on some gauges. Attached thumbnail(s) 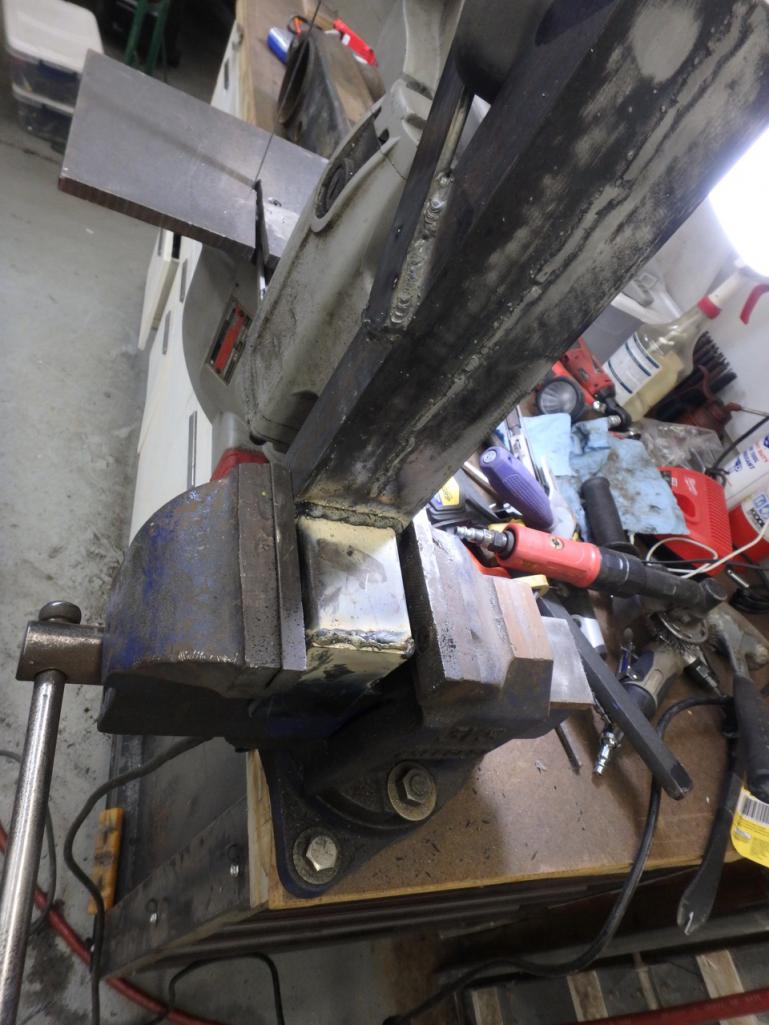
|
|
|
|
| 76-914 |
Apr 15 2018, 09:28 AM
Post
#90
|
|
Repeat Offender & Resident Subaru Antagonist Group: Members Posts: 13,912 Joined: 23-January 09 From: Temecula, CA Member No.: 9,964 Region Association: Southern California |
I've been thinking about buying a portable band saw just for metal cutting. Any tips on building a jig w/ table? (IMG:style_emoticons/default/beerchug.gif)
|
|
|
|
| 914forme |
Apr 15 2018, 11:28 AM
Post
#91
|
|
Times a wastin', get wrenchin'! Group: Members Posts: 3,899 Joined: 24-July 04 From: Dayton, Ohio Member No.: 2,388 Region Association: None |
QUOTE(76-914 @ Apr 15 2018, 11:28 AM)  I've been thinking about buying a portable band saw just for metal cutting. Any tips on building a jig w/ table? (IMG:style_emoticons/default/beerchug.gif) I need to redo my table. I bought this one used from a pawn shop. Great deal, as cheap as Harbor freights better quality. The Dewalt version the top handle unscrews making it easier to bolt to a stand. I am going to make a new blade guide to use when using it I mounted. It was broken when I picked this one up. So the blade guide will be a tad bigger than the original. But it will allow me to bolt the top plate to the saw. Will most likely make a frame out of steel. And then screw a piece of melamine to it for the top. Nice and flat, yet easily replaceable when needed. It works well for what I do, but every time I’m in Scott’s shop I see his big band saw and I think man I need one of those. It’s eats up shop space, and I have ways of cutting bigger stuff. I’ll detail out what I come up with. The stand was made out of flat steel and angle . Easy enough, and cost a few bucks. Steel was out of Lowe’s clearance. Stuff was so cheap, I drove from store to store buying all the had. Idiots it was cheaper than what the scrapers where paying for used unclean steel. I bought every stick I could buy. And been using it up for years. Love getting bargins on raw materials I can use to build. Welding wire is a Blue Demin product designed for galvanized steel. Burns a bit hotter, and sparks a bit more. I like the penatration and puddle cleaning I’m getting with it. Oh and the slag comes off in sections great product for heavier welded items. I also used I to seem weld the cups. Worked great I stand blasted the cups before. Welded them up, nice and clean puddle, containers burn off. Bit more smoke, but that hose leads to a lLicoln fume extractor. That thing is the best. Need to build an adjustable arm for the extractor.. shop stays nice and clean. (IMG:style_emoticons/default/smile.gif) |
|
|
|
| 914forme |
Apr 23 2018, 06:50 AM
Post
#92
|
|
Times a wastin', get wrenchin'! Group: Members Posts: 3,899 Joined: 24-July 04 From: Dayton, Ohio Member No.: 2,388 Region Association: None |
Got the rear suspension off the passenger side. Used the fixture from Chris' raised rear suspension pickup point. And now it is up on jack stands.
 Needed it to get some work done on another car. Brother in-Law came by and needed some heat shield repair on his car. Lift made this very easy.  Just want to make it clear, life gets in the way. Work, Family, other people dropping stuff off for you to fix because your a mechanic, welder, machinist, nice person. Just go with it, carve out a bit of time to do what you want. You always have the right to say NO! The above car, came in for one thing, change spark plugs. Left with attempting to find an oil leak, fixing a heat shield issue. That stuff is like tin foil. And cleaning up the plastic headlamps. I put so dye in the oil to see if I can locate the leak at a latter date. (IMG:style_emoticons/default/confused24.gif) What really bugged me was when I took it for the test drive before I did any work, I noticed a clunking every time I hit a bump. Most likely the strut top bushings or shock bushings. He did not want me to dig deeper into that. This to me is more important than the minor drip drip oil leak. Each their own. After that it was working on Dad's mower, he is getting older as the reason for this thread, and well installing this muffler seemed to take for ever. When I jumped in I found out why. Threads where all buggered up. Drilled out and nut served them. Mount Bracket was screwed up also. Drilled up one size, and bolted it on. Then the it cuts an odd pattern. Started looking at it, and found a lift cable broke. Found the reviews that these cables are a notorious issue. Found some one making replacement steel lift arms, I could fabricate them myself, but at $7.50 per pair, why? |
|
|
|
| 914forme |
Jul 2 2018, 02:57 PM
Post
#93
|
|
Times a wastin', get wrenchin'! Group: Members Posts: 3,899 Joined: 24-July 04 From: Dayton, Ohio Member No.: 2,388 Region Association: None |
Let the parts gathering continue.
Some times a box full of peanuts and brown paper brings you more than drugs wrapped in coffee. Today they brought me a different form of addiction. 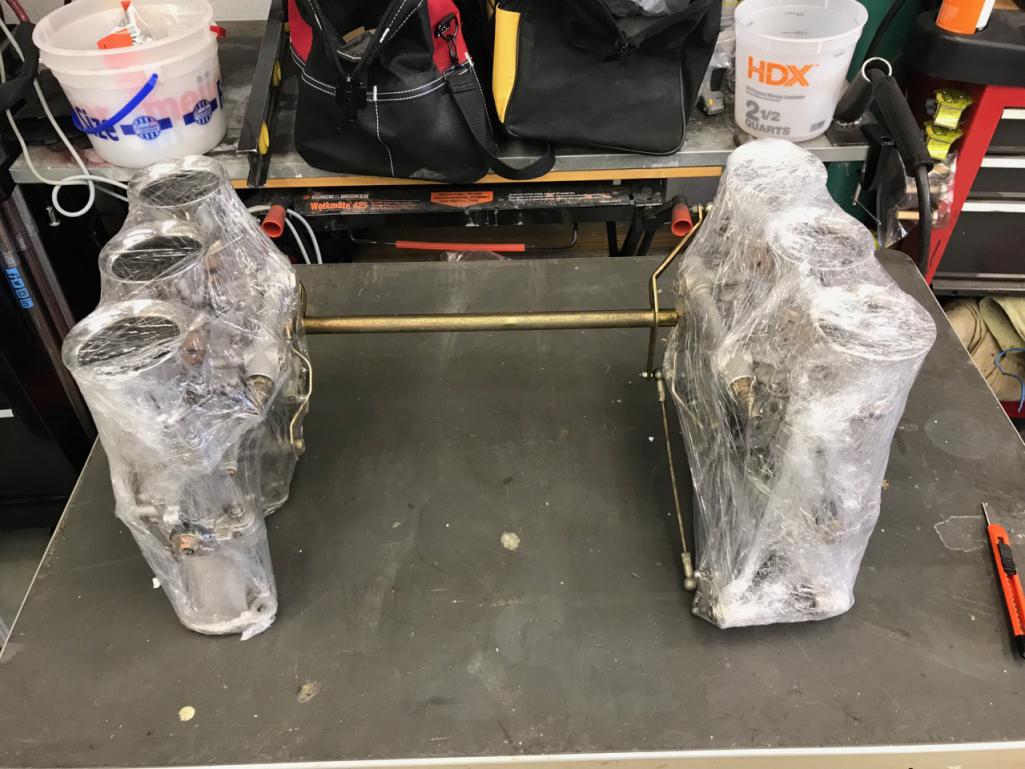 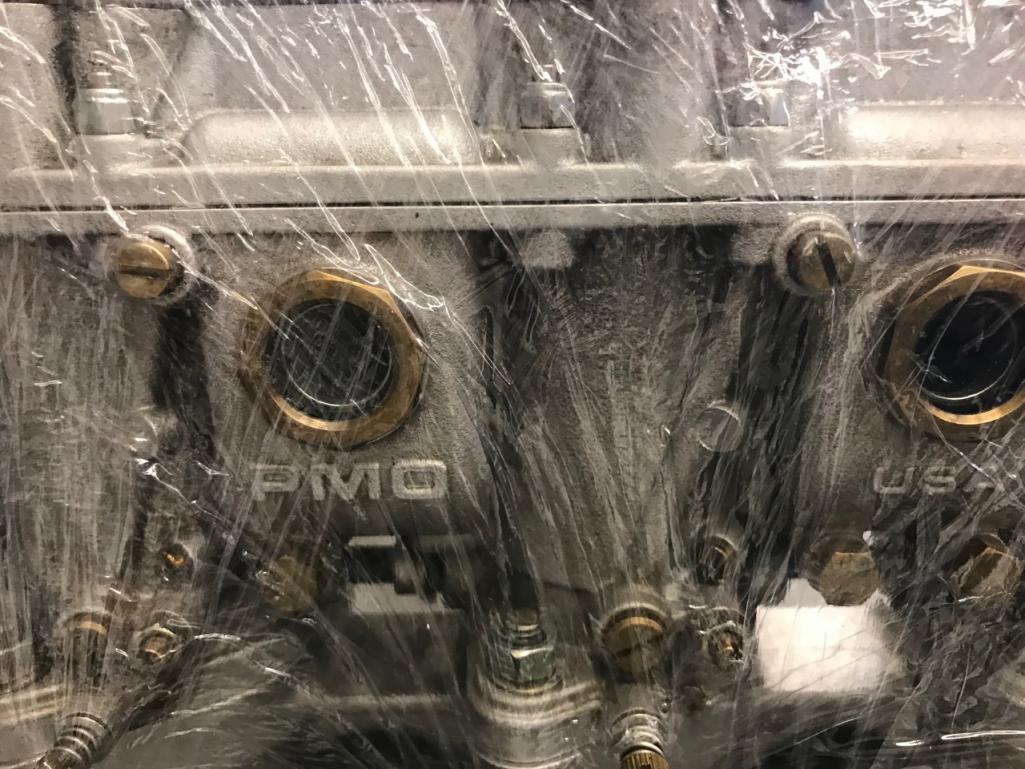 Yes PMO Carburetors, will at least make the 914-6 go. Need to check the specifications of everything and get parts on order to make them right for the engine, car and altitude. Did not unwrap them as I was putting them into storage, along with the digital ignition system. 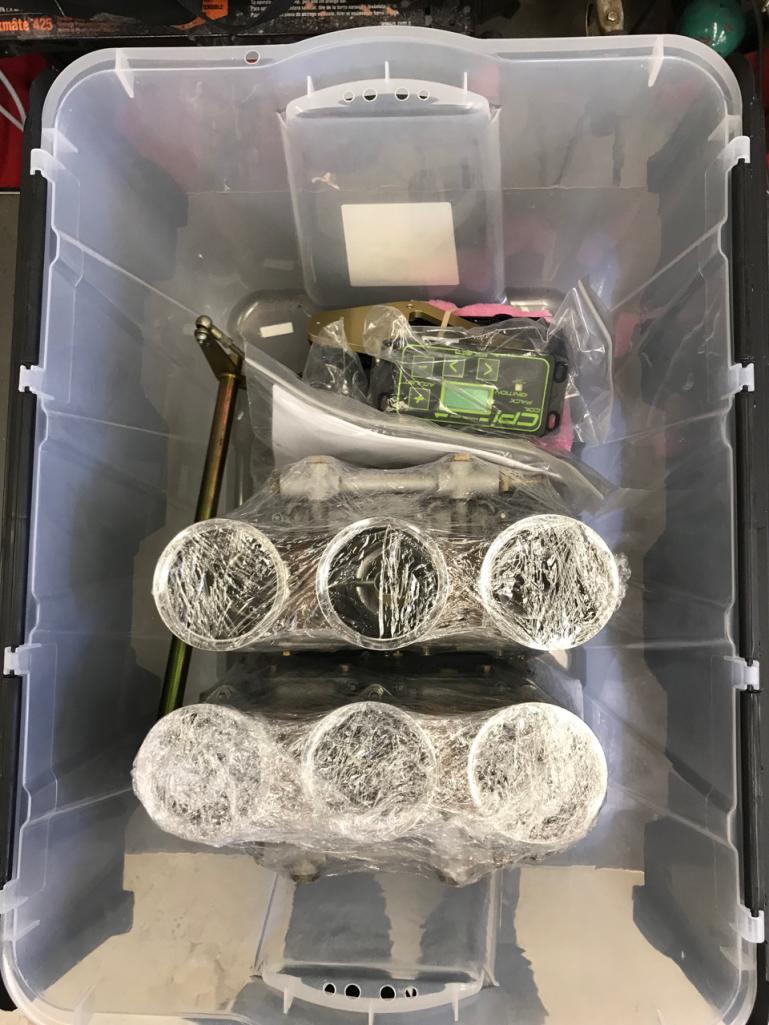 EFI will be down the road, right now I need to get this car running. Everything else can happen as smaller projects to make the car better. |
|
|
|
| tygaboy |
Jul 2 2018, 03:31 PM
Post
#94
|
|
914 Guru Group: Members Posts: 5,844 Joined: 6-October 15 From: Petaluma, CA Member No.: 19,241 Region Association: Northern California |
|
|
|
|
| TravisNeff |
Jul 2 2018, 04:11 PM
Post
#95
|
|
914 Guru Group: Members Posts: 5,082 Joined: 20-March 03 From: Mesa, AZ Member No.: 447 Region Association: Southwest Region |
Can I ask where you sourced your rear shock top monoballs?
|
|
|
|
| 914forme |
Jul 2 2018, 06:26 PM
Post
#96
|
|
Times a wastin', get wrenchin'! Group: Members Posts: 3,899 Joined: 24-July 04 From: Dayton, Ohio Member No.: 2,388 Region Association: None |
QUOTE(Travis Neff @ Jul 2 2018, 06:11 PM) Can I ask where you sourced your rear shock top monoballs? They are from Tarret and man the price went up. (IMG:style_emoticons/default/huh.gif) |
|
|
|
| 914forme |
Jul 15 2018, 09:17 AM
Post
#97
|
|
Times a wastin', get wrenchin'! Group: Members Posts: 3,899 Joined: 24-July 04 From: Dayton, Ohio Member No.: 2,388 Region Association: None |
I have been doing a lot of gauge building for a few people, while I am waiting for a process to complete, I got back on Dad's -6 today doing a lot of the stuff that needs to be done. Prepping parts for cleaning, rust removal and paint. I am onto the rear suspension of the car.
(IMG:style_emoticons/default/piratenanner.gif) Love getting in the shop Up frist pulling hubs out of the arm and bearings off the backs of stubs. I mount the hub in the arm. Use my SirTools bearing puller to pull the hub out. Then go after the bearing race that always stays on the back side. These can be a bugger to get off. Mounted in my handy hub tool. I could take a cold chisel and give it a couple (IMG:style_emoticons/default/smash.gif) on each side 180 degrees apart. That made enough space to get my bearing puller onto the back side. 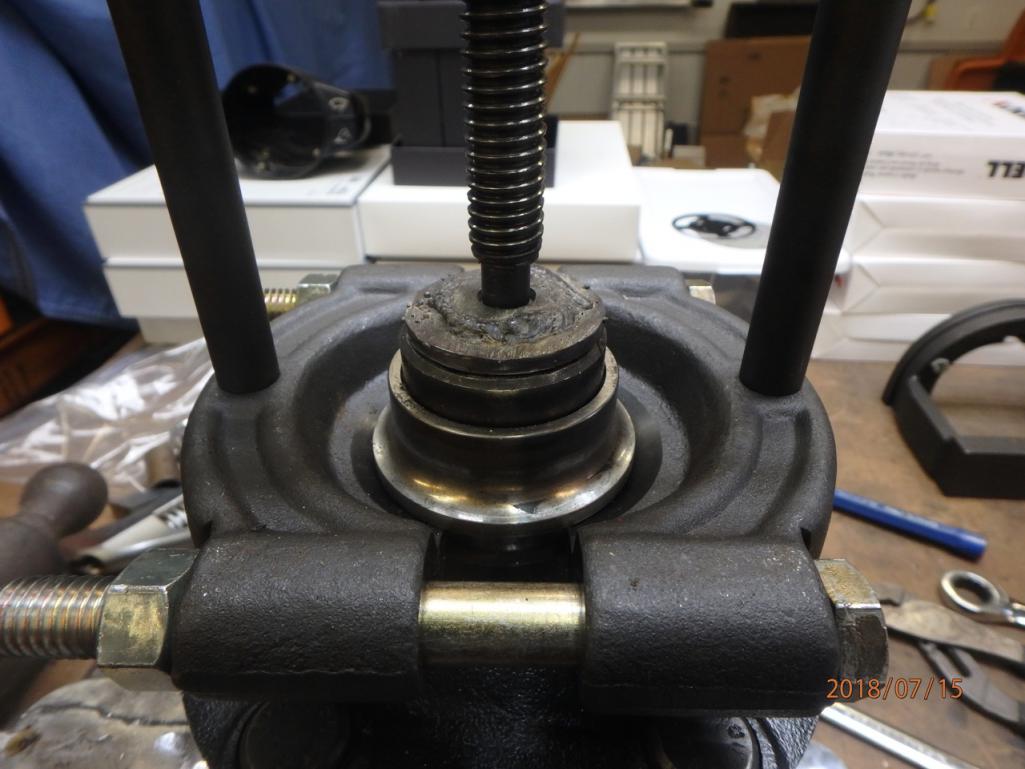 Note th homemade centering and surface the bearing puller goes against. It is designed to center in the hub, and then hold the bearing puller screw in the center also. Makes for an easy pull. Simple to make a 3/8 wash on the top of 1/4 Steel from the scrap bin and a 3/4" nut on the back side with the points rounded off. Not pretty, does a great job. (IMG:style_emoticons/default/aktion035.gif) 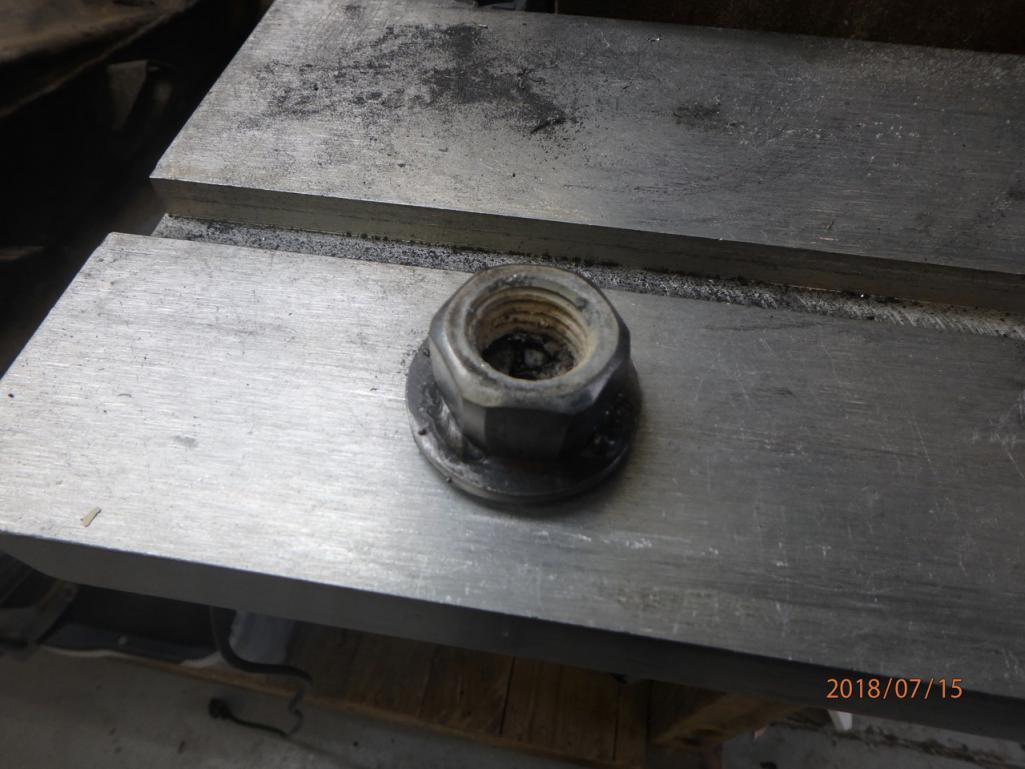 I took apart both arms, and did 6 sets of hubs off bearings. Carnage as follows documentation makes me feel like I got something done today. 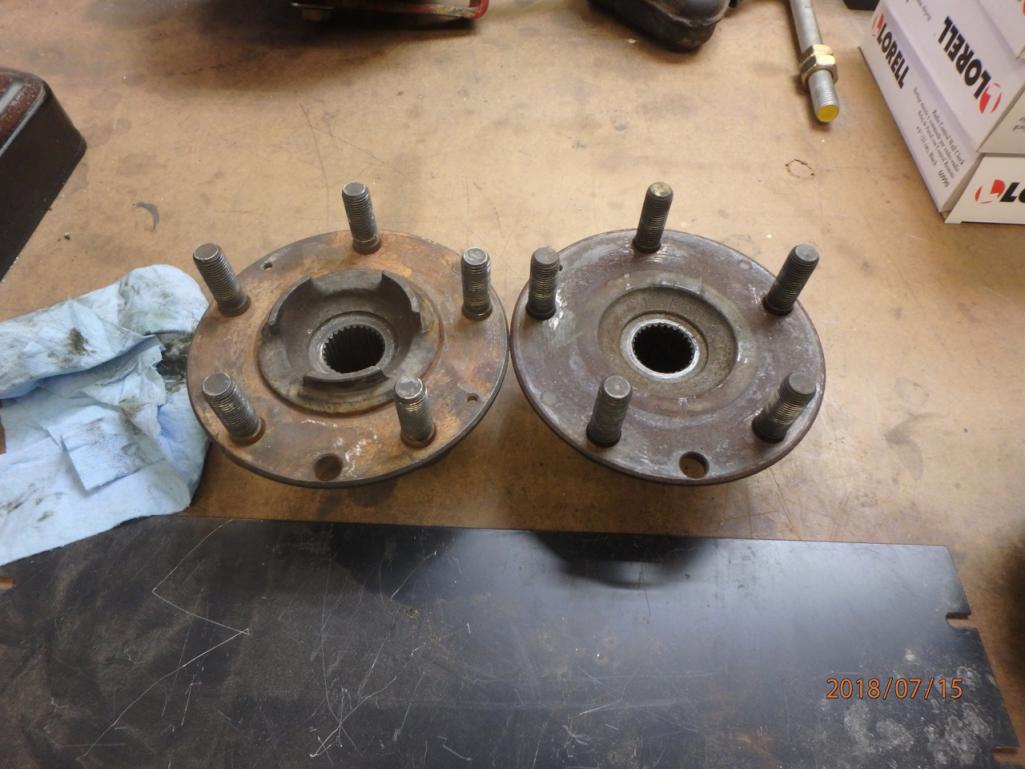 Late model 911 hub centric hubs on the left, original 914-6 hub on the right. Going hub centric - will need to machine the bearing spacer for the hub. 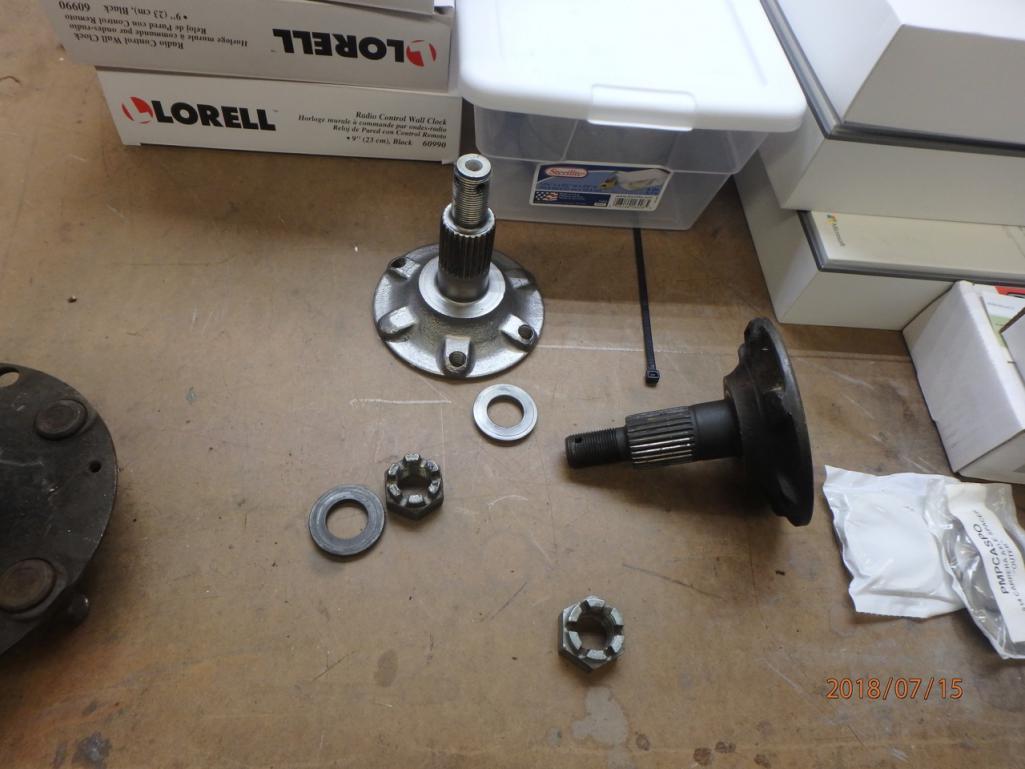 108mm stubs - 930 CVs here we come, no worries about CV joints. 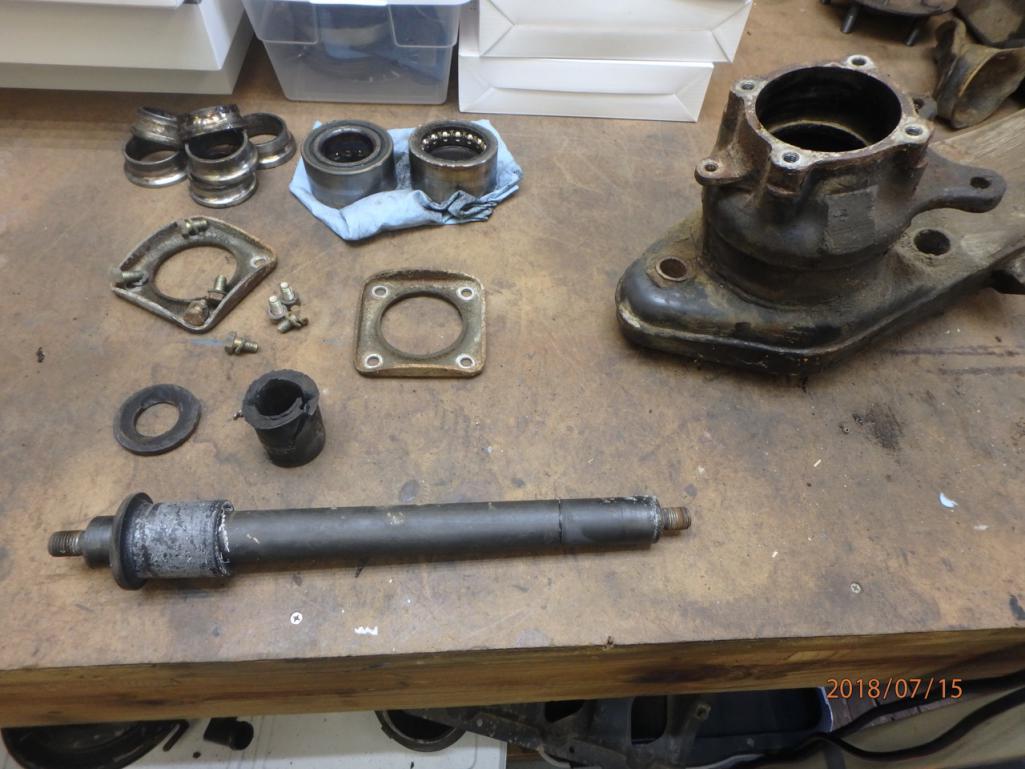 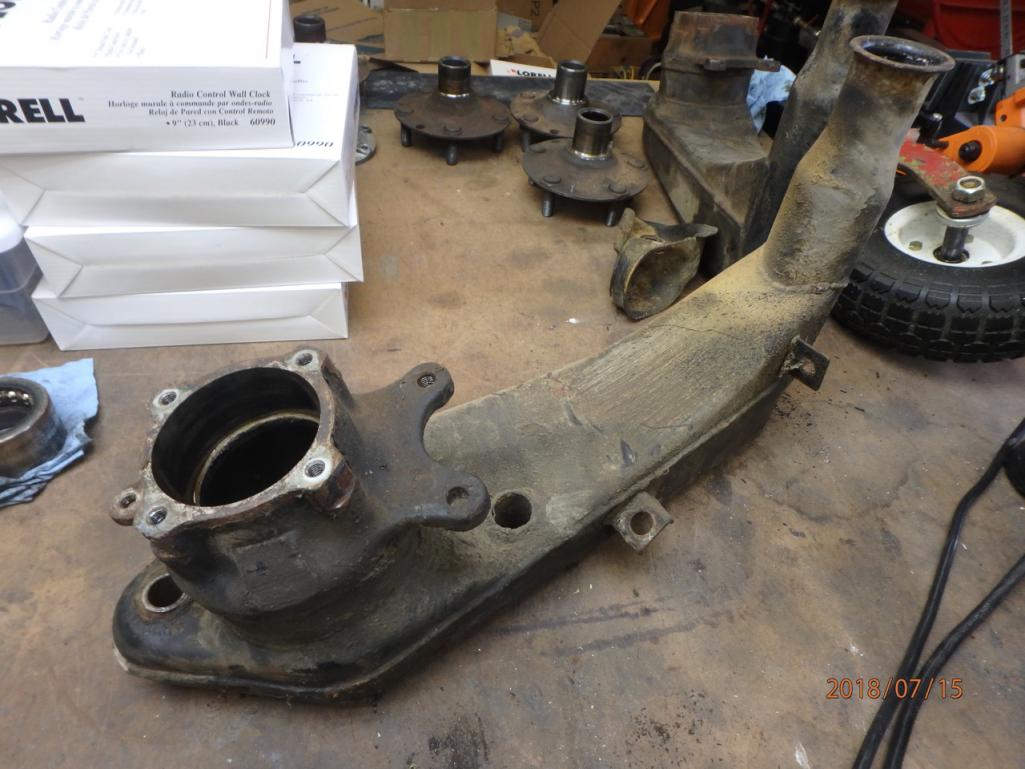 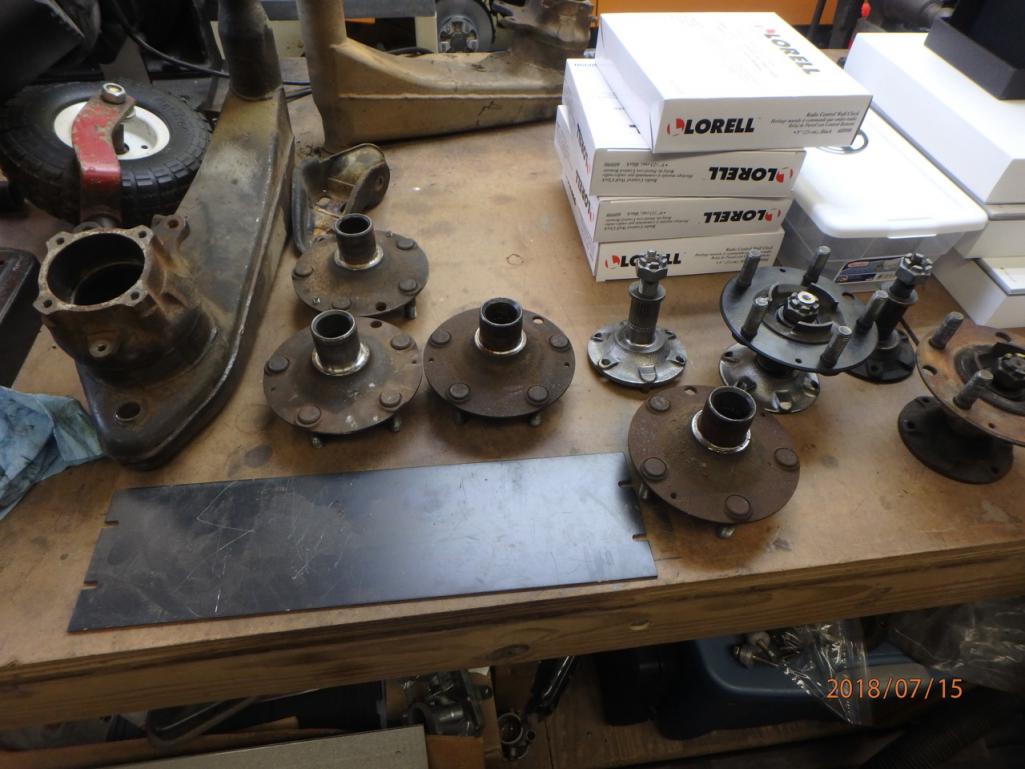 Parts broken down. And a wheel that fell of the mower deck of one of the big tractors. Solid wheel because the area it mows has Locus trees, and the thrones eat deck tires for breakfast, lunch, and dinner, with a snack in-between. I need to get that one done, have not ordered the tire yet. (IMG:style_emoticons/default/dry.gif) Now to spend days cleaning all this up in prep for paint. And get parts ordered that are need to finish this up. |
|
|
|
| simonjb |
Jul 15 2018, 10:27 AM
Post
#98
|
|
KiwiMan Group: Members Posts: 574 Joined: 18-October 16 From: Stamford, Connecticut Member No.: 20,505 Region Association: North East States |
QUOTE(914forme @ Oct 22 2017, 05:39 PM) Now to keep me off the slacker list (IMG:style_emoticons/default/poke.gif) Did a few things 914-6 related (IMG:style_emoticons/default/piratenanner.gif) First up Passenger side sway bar mount. At least Prep. For refresher I am using Brad's mount on the 914-6 (IMG:style_emoticons/default/aktion035.gif) So I signed up the backside with the notch in the wheel well and used a transfer punch to set my first screw location. Drilled it, opened it ou for the bolt, and bolted it together. Moved the transfer punch to the next hole, and got a center mark, and drilled it out. I then bolted the sway bar mount in place to give me the location of the lower hole. I marked the center, and then drilled a pilot and then used a step drill to punch it out to clear the not on he back side of the Brad's outer plate. That all done it looks like this. ' So then I need to mark the center one the swatbar location. Since I was missing time on my metal lathe, I turned a spacer down. Fits like a precision glove, well because it is a precision fit. Transfer punch inserted in the last picture , give it a few hits with the hammer, and disassemble the pieces one last time. Probably not (IMG:style_emoticons/default/dry.gif) Drill a pilot hole and then drill the hole. Tools of the trade to fit these, in a pile on the floor. Small Ball Peen hammer Socke wrench, extension and socket Transfer Punches Close Quarters drill - pilot holes 1/2 inch drill - step drill Rotabroach to drill the big hole Final Big hole drilled And in place, well I', holding it in place, did not feel like bolting it all together to take it apart again. Next up for this side is clean the undercoating. Scuff up the paint, and JB weld it to the car. Yes normally I would weld, but since I don't want to repaint, where the weld would burn off paint, it will be JB Weld. Brad says it will work, and I see no reason it would not work. I tend to measure project success and the amount of fun I have had by the number of chips, pile of metal shavings, and metal abound. Successful and fun day (IMG:style_emoticons/default/piratenanner.gif) Oh the not fun part of my day, I have been working on one of the sets of MiniLites I have. Prepping for paint, as they where in good condition. But lots of small paint chips, and different colors. So following the instructions off a wheel restore that works on Ferrari Mag wheels I got to this point. That one was sitting on my stool that turns, hate the stool, but it does a great job for painting wheels And the last one, all where baking in the afternoon sun Hope to get a bit more done on the wheels over the week, but maybe I will focus on the sway bar mounts and install. Would like to start having the car go back together. And well my plan is to put it together, as McMark says a running driving 914 beats any of them that are on jack stands any day. Stephen, what was the step drill used for vs the Rotabroach? - and what sizes were they? Thanks ! 1/2 inch drill - step drill Rotabroach to drill the big hole |
|
|
|
| 914forme |
Jul 15 2018, 07:36 PM
Post
#99
|
|
Times a wastin', get wrenchin'! Group: Members Posts: 3,899 Joined: 24-July 04 From: Dayton, Ohio Member No.: 2,388 Region Association: None |
The Rotabroach was the size of the swayer reinforcement, can't remember the exact size. The Step drill I used to drill the bolt holes, I like using step drill because they debut the hole at the same time. The Rota's are great for drilling big in sheet metals, leave a nice clean hole. Love them.
Hope that answered the question and made it clearer. |
|
|
|
| ctc911ctc |
Jul 16 2018, 09:46 PM
Post
#100
|
|
Senior Member Group: Members Posts: 1,341 Joined: 9-June 18 From: boston Member No.: 22,206 Region Association: North East States |
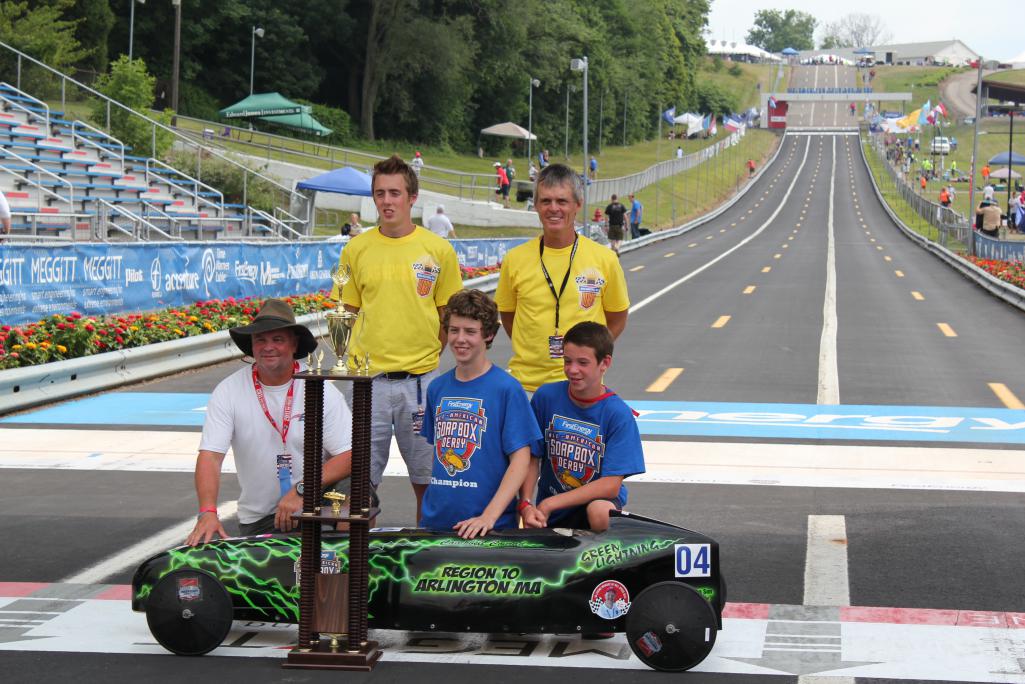
Since you mentioned Derby and it is Derby week I thought I would post this:
 |
|
|
|
|
2 User(s) are reading this topic (2 Guests and 0 Anonymous Users)
0 Members:

|
Lo-Fi Version | Time is now: 16th July 2026 - 03:52 AM |
Invision Power Board
v9.1.4 © 2026 IPS, Inc.