|
|
|
Porsche, and the Porsche crest are registered trademarks of Dr. Ing. h.c. F. Porsche AG.
This site is not affiliated with Porsche in any way. Its only purpose is to provide an online forum for car enthusiasts. All other trademarks are property of their respective owners. |
|
|

  |

| mgarrison |
 Dec 16 2022, 08:40 PM Dec 16 2022, 08:40 PM
Post
#221
|
|
Member  Group: Members Posts: 416 Joined: 14-February 20 From: Chandler, AZ Member No.: 23,922 Region Association: Southwest Region |
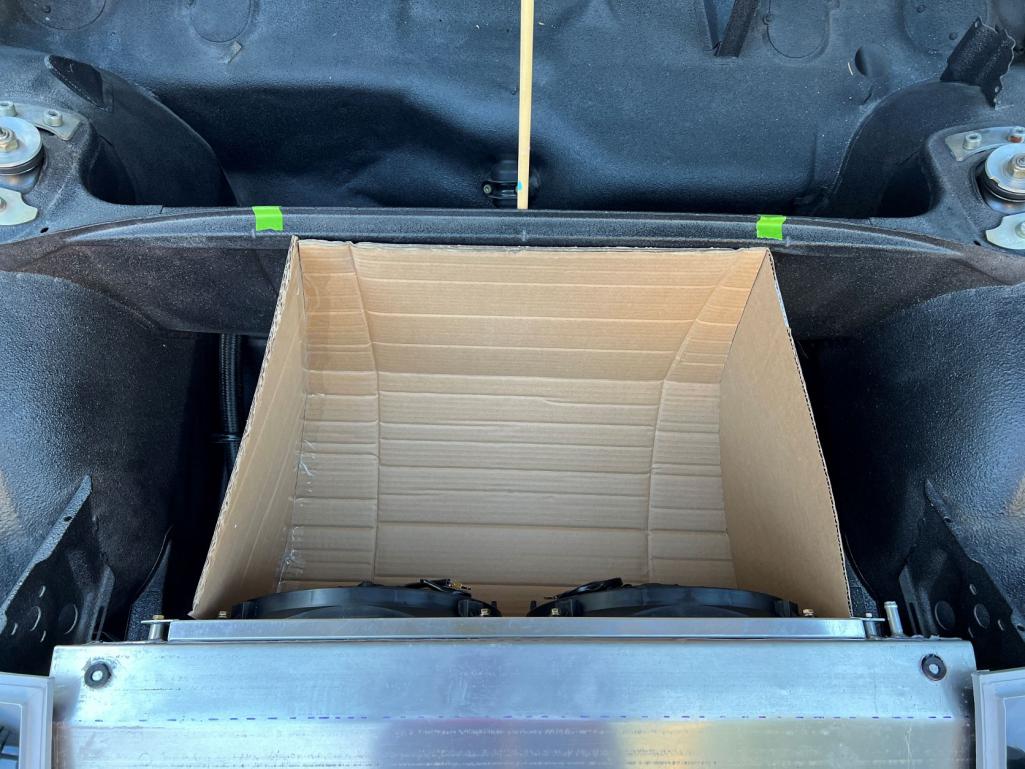
I've been working on my radiator mount/frame. But I had to replace my phone and the pics I took are in the new iPhone format and basically unusable. And, I got the whole thing welded together only to discover it was about 1/8" too tall/high. Had to cut off the bottom mounts, move them down, then re-do the upper braces (why there's 4 Rivnuts instead of 2 on each upper brace. (IMG:style_emoticons/default/headbang.gif)
So, I gave up and deleted what I'd taken, but took some new ones this afternoon while testing to see with my rather sophisticated CAD system if I can mount the aluminum shrouding before installing the radiator mount...State of the art CAD system! Even my scissors suck... 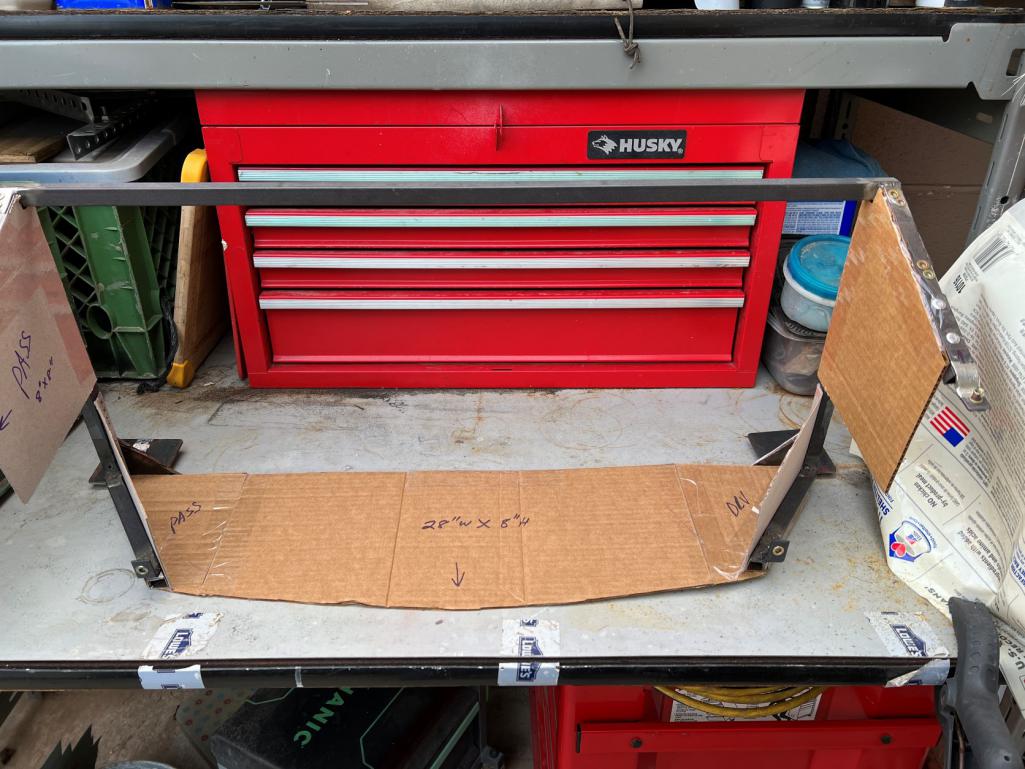 Survey says...Nope! Can't mount the lower sides before it's installed in the car.  Once it's in the car I believe things will fit ok. 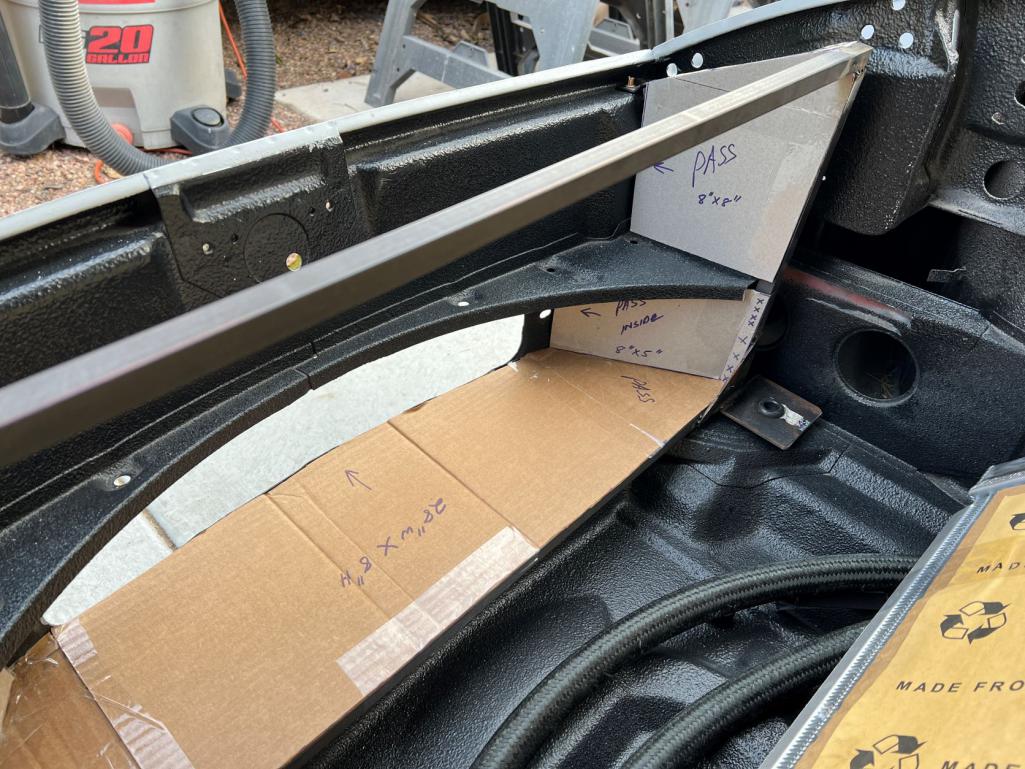 Need an extra 1/2" or so on the back of the bottom shroud to close up this gap though! 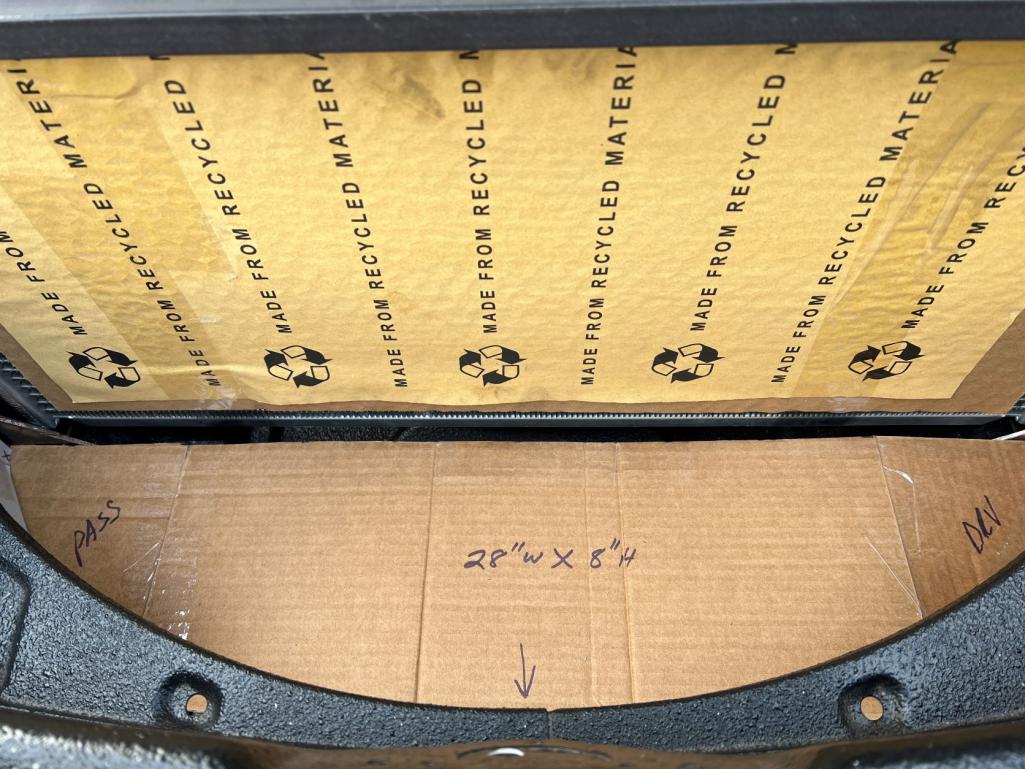 Arguing with myself (IMG:style_emoticons/default/screwy.gif) over how to shroud the portion above the curved bracing. Not sure if I should go angled like this, and then a cosmetic cover over the top, or... 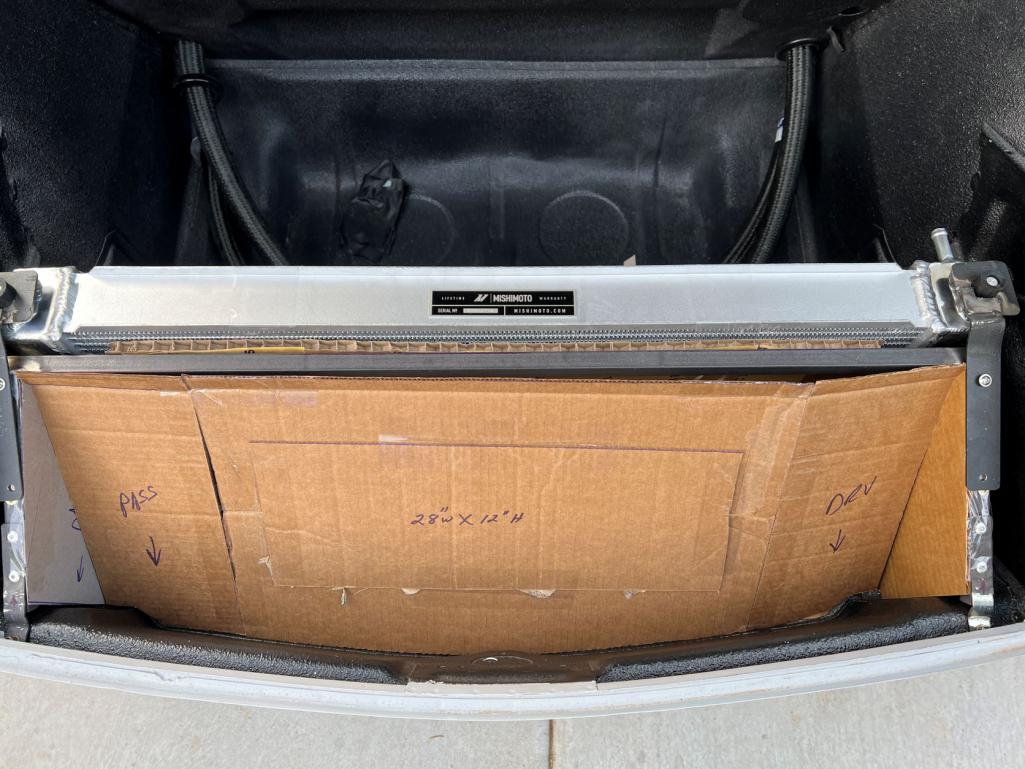 |
   |

 
|
| slowrodent |
Dec 17 2022, 09:11 AM
Post
#222
|
|
Member Group: Members Posts: 235 Joined: 29-February 20 From: Tucson/Oro Valley Member No.: 23,981 Region Association: Southwest Region |
Looks great Mike... Your CAD system is primo and a notch better than my own (IMG:style_emoticons/default/rolleyes.gif) .. My only regret (thus far) with my rad mount is that I didn't leave sufficient room for rubber isolaters. I squeezed in some lame thin pads, but I wish I'd have planned for a real buffer of some sorts.... Just FYI...
|
|
|
|
| Lilchopshop |
Dec 17 2022, 12:41 PM
Post
#223
|
|
Member Group: Members Posts: 115 Joined: 17-February 20 From: New York Member No.: 23,932 Region Association: North East States |
QUOTE(mgarrison @ Dec 16 2022, 09:40 PM)  I've been working on my radiator mount/frame. But I had to replace my phone and the pics I took are in the new iPhone format and basically unusable. And, I got the whole thing welded together only to discover it was about 1/8" too tall/high. Had to cut off the bottom mounts, move them down, then re-do the upper braces (why there's 4 Rivnuts instead of 2 on each upper brace. (IMG:style_emoticons/default/headbang.gif) So, I gave up and deleted what I'd taken, but took some new ones this afternoon while testing to see with my rather sophisticated CAD system if I can mount the aluminum shrouding before installing the radiator mount...State of the art CAD system! Even my scissors suck... Survey says...Nope! Can't mount the lower sides before it's installed in the car. Once it's in the car I believe things will fit ok. Need an extra 1/2" or so on the back of the bottom shroud to close up this gap though! Arguing with myself (IMG:style_emoticons/default/screwy.gif) over how to shroud the portion above the curved bracing. Not sure if I should go angled like this, and then a cosmetic cover over the top, or... Looks really good! I’m following build closely since I’m planning to do something very similar. Couple of questions…. 1. When you ran the coolant hoses in the longs, did you run them right inside of the existing insulated ducts? 2. Is the part number of the radiator “MMRAD-CEL-00”? 3. What radiator fans are you using? Thanks, Aaron |
|
|
|
| Chris914n6 |
Dec 17 2022, 02:17 PM
Post
#224
|
|
Jackstands are my life. Group: Members Posts: 3,536 Joined: 14-March 03 From: Las Vegas, NV Member No.: 431 Region Association: Southwest Region |
“MMRAD-CEL-00”
Would make sense. MishiMoto Radiator Celica 2000-2004. There are cheaper copies of the 'racing' radiator for the Celica/MR-S than Mishimoto. Using the Celica radiator is well documented here. I used the factory Celica fans as the generic Chinese fans are questionable. I also used the MR-S version of this radiator as the hose inlets are in a better place. |
|
|
|
| mgarrison |
Dec 18 2022, 07:57 PM
Post
#225
|
|
Member Group: Members Posts: 416 Joined: 14-February 20 From: Chandler, AZ Member No.: 23,922 Region Association: Southwest Region |
QUOTE(Lilchopshop @ Dec 17 2022, 11:41 AM) QUOTE(mgarrison @ Dec 16 2022, 09:40 PM) I've been working on my radiator mount/frame. But I had to replace my phone and the pics I took are in the new iPhone format and basically unusable. And, I got the whole thing welded together only to discover it was about 1/8" too tall/high. Had to cut off the bottom mounts, move them down, then re-do the upper braces (why there's 4 Rivnuts instead of 2 on each upper brace. (IMG:style_emoticons/default/headbang.gif) So, I gave up and deleted what I'd taken, but took some new ones this afternoon while testing to see with my rather sophisticated CAD system if I can mount the aluminum shrouding before installing the radiator mount...State of the art CAD system! Even my scissors suck... Survey says...Nope! Can't mount the lower sides before it's installed in the car. Once it's in the car I believe things will fit ok. Need an extra 1/2" or so on the back of the bottom shroud to close up this gap though! Arguing with myself (IMG:style_emoticons/default/screwy.gif) over how to shroud the portion above the curved bracing. Not sure if I should go angled like this, and then a cosmetic cover over the top, or... Looks really good! I’m following build closely since I’m planning to do something very similar. Couple of questions…. 1. When you ran the coolant hoses in the longs, did you run them right inside of the existing insulated ducts? 2. Is the part number of the radiator “MMRAD-CEL-00”? 3. What radiator fans are you using? Thanks, Aaron No ducts in my longs. Completely open/empty longs. Couple pics here: http://www.914world.com/bbs2/index.php?s=&...t&p=2800284 It's a 2000-2005 Toyota Celica radiator. Mishimoto makes nice things. Didn't want to buy a Chinese knock off radiator, so I waited till they had it on sale around black Friday for about $215. I have not purchased fans or shroud yet. Debating what fans to go with, etc. |
|
|
|
| mgarrison |
Dec 28 2022, 02:08 PM
Post
#226
|
|
Member Group: Members Posts: 416 Joined: 14-February 20 From: Chandler, AZ Member No.: 23,922 Region Association: Southwest Region |
Waiting on some aluminum sheet to get here for the shroud/ducting for the radiator. Meanwhile, my toolbox and stuff kept getting wet when it rained despite my temporary cover. With more rain due soon I decided to build a more permanent cover to try and keep things dry & protected.
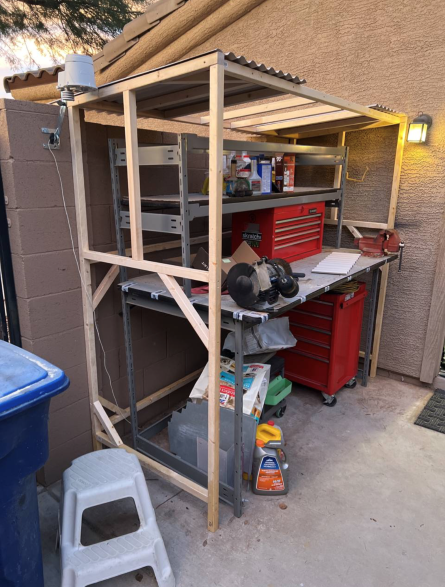 Simple and hopefully effective... (IMG:style_emoticons/default/popcorn[1].gif) This should keep things dry. 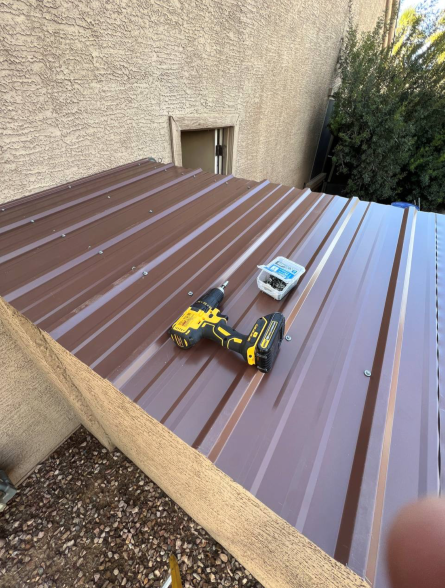 |
|
|
|
| mgarrison |
Jan 15 2023, 03:00 PM
Post
#227
|
|
Member Group: Members Posts: 416 Joined: 14-February 20 From: Chandler, AZ Member No.: 23,922 Region Association: Southwest Region |
One sheet of aluminum showed up, so I tried to do what I could with it! Still waiting on the second sheet to make it here... (IMG:style_emoticons/default/confused24.gif)
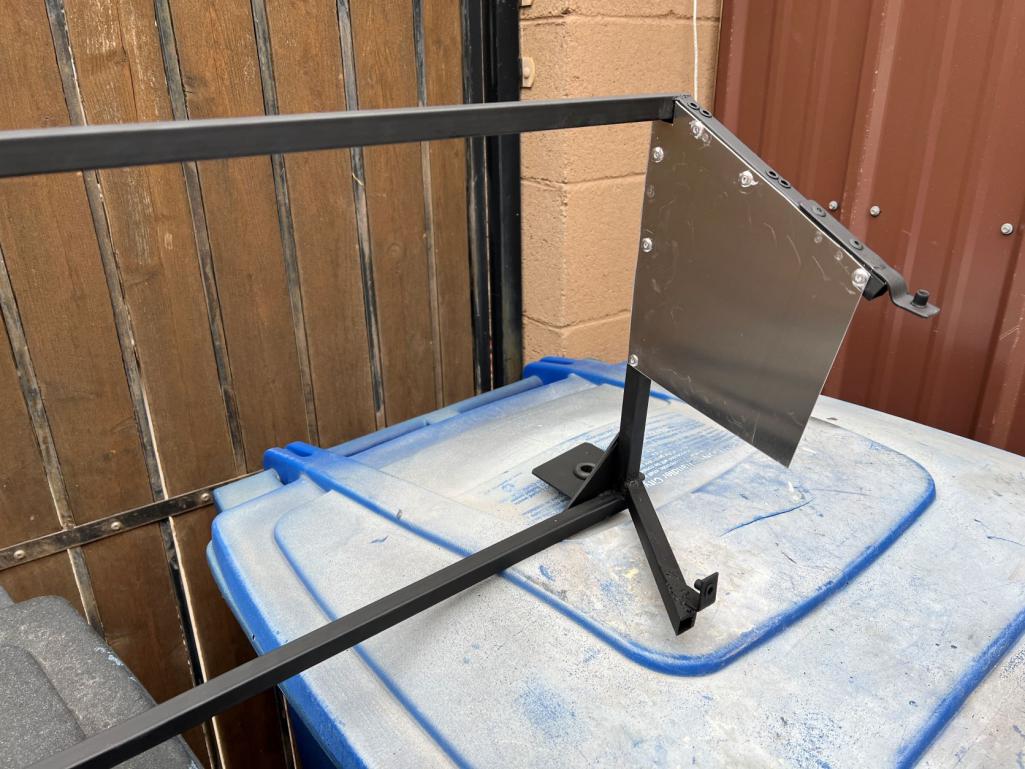 I had a gift card for HF so I picked up this cheap "metal bender". As usual for HF, required a bit of modification to work half decent... (IMG:style_emoticons/default/smash.gif) 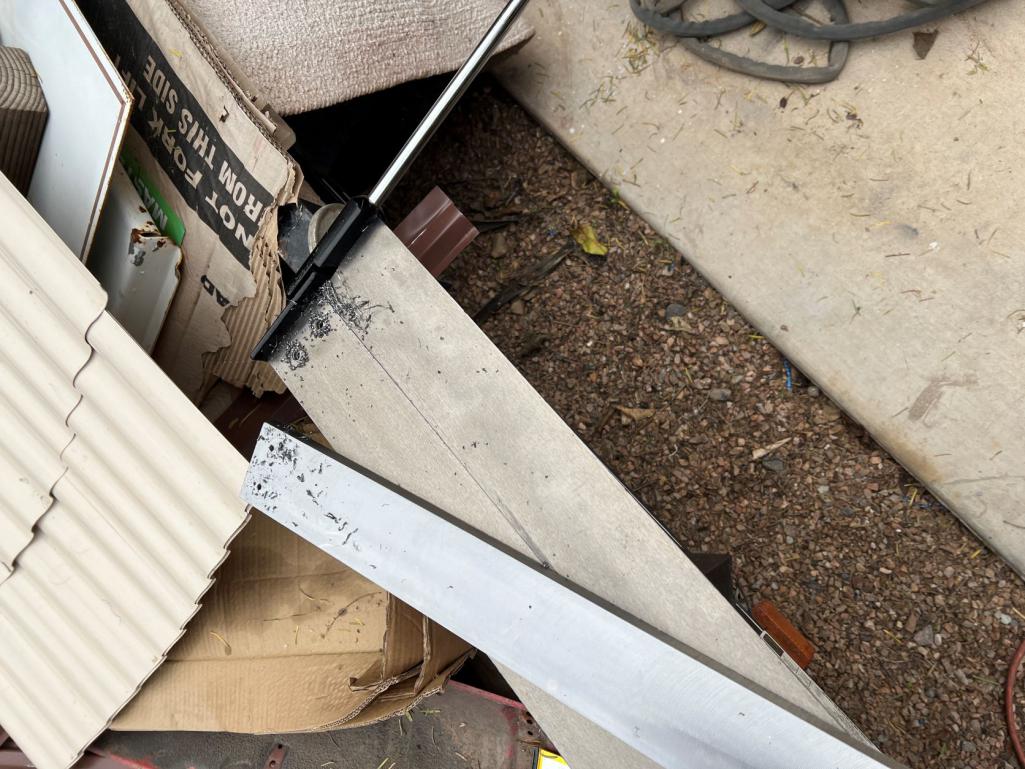 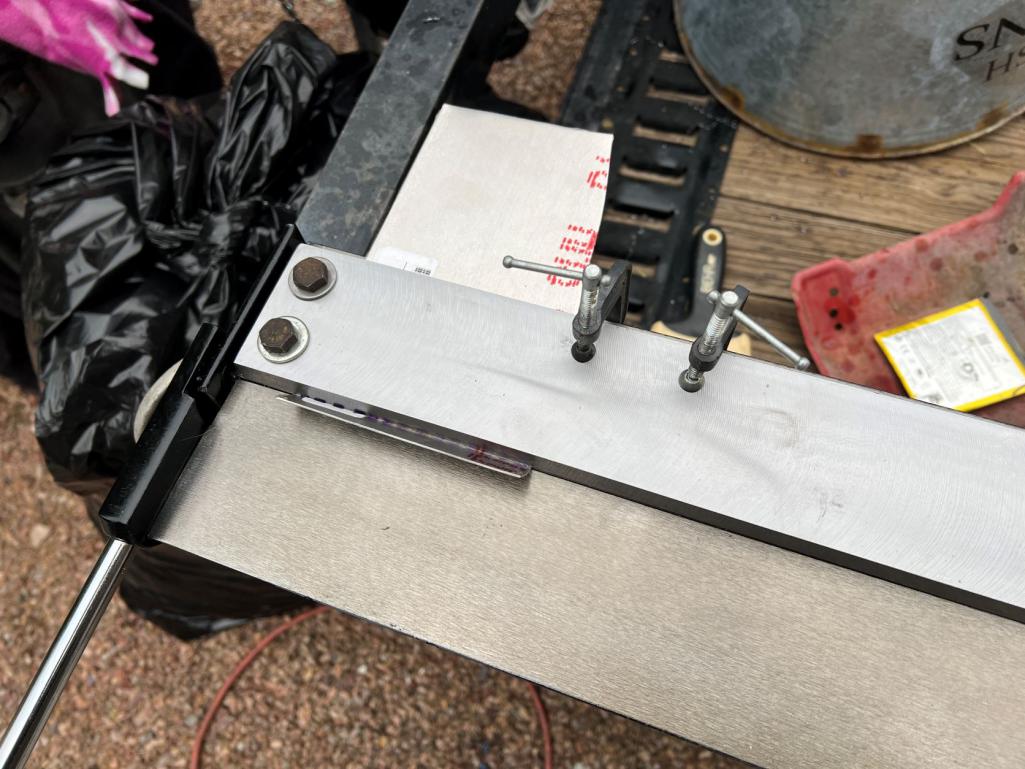 I lost a bit of width, but the top piece cant move around anymore! I thought about drilling a couple more sets of holes across it at maybe 8" & 12", but I think just getting a couple more larger C clamps would be quicker/easier (IMG:style_emoticons/default/idea.gif) I can't mount the lower sides until the radiator frame is bolted in, so I'm back to waiting on the rest of my aluminum to show up! (IMG:style_emoticons/default/headbang.gif) 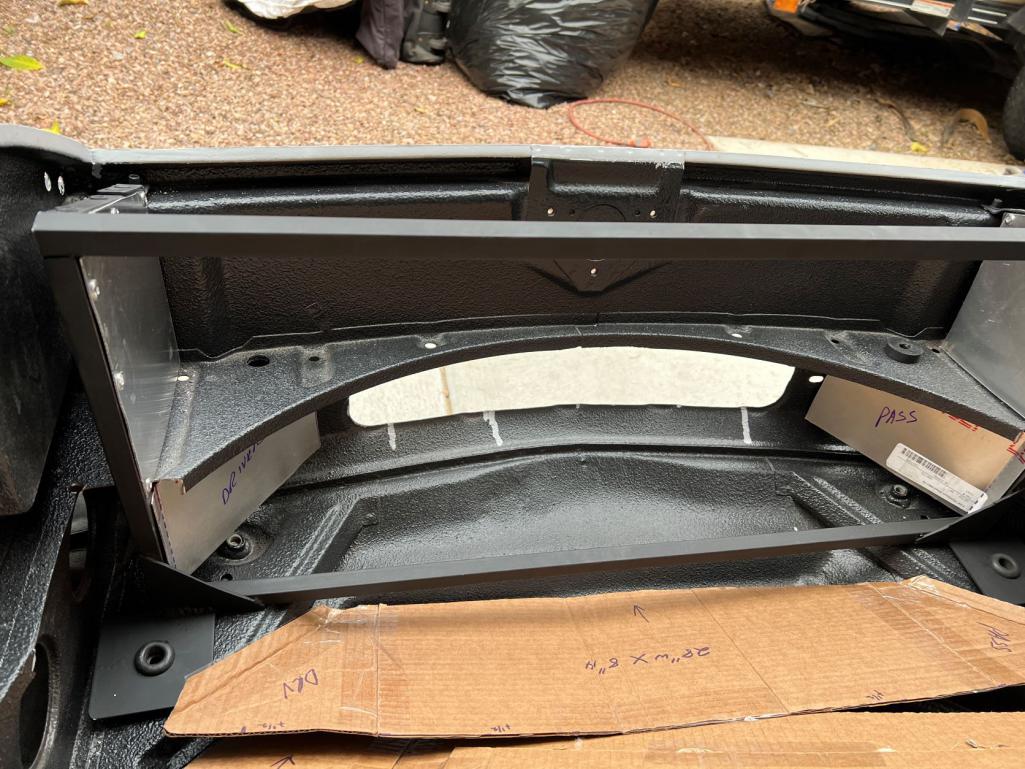 |
|
|
|
| mgarrison |
Feb 5 2023, 08:17 PM
Post
#228
|
|
Member Group: Members Posts: 416 Joined: 14-February 20 From: Chandler, AZ Member No.: 23,922 Region Association: Southwest Region |
While I was waiting on more aluminum I decided to redo my workbench top. The old top had gotten wet an swelled up and was coming apart. While I was at it, I figured I'd try a "proof of concept" for the concrete countertop videos I've seen. (IMG:style_emoticons/default/idea.gif)
My first attempt did not go well, and cracked. So I decided to pour half at a time - made it much easier to move into place as well. I welded in some extra support across the middle, and a couple 45s to keep things square. This Snap-On light my son got me for Christmas is the cat's pajamas!  Here's a slab in the form 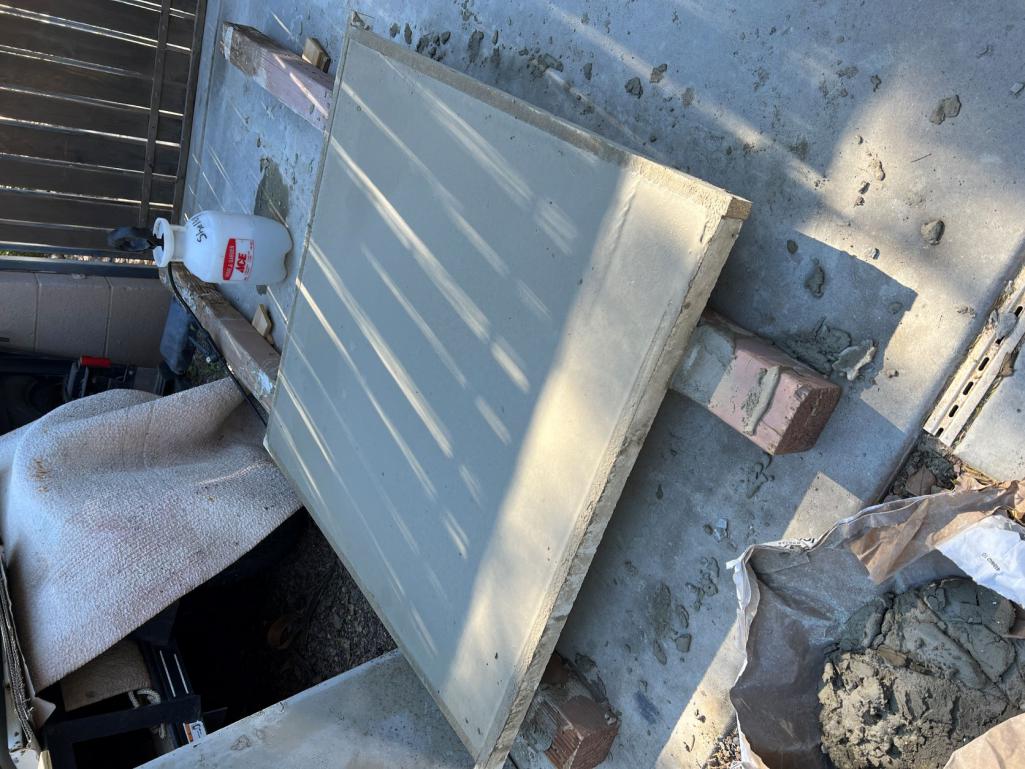 Getting them into place was interesting, but not terrible. 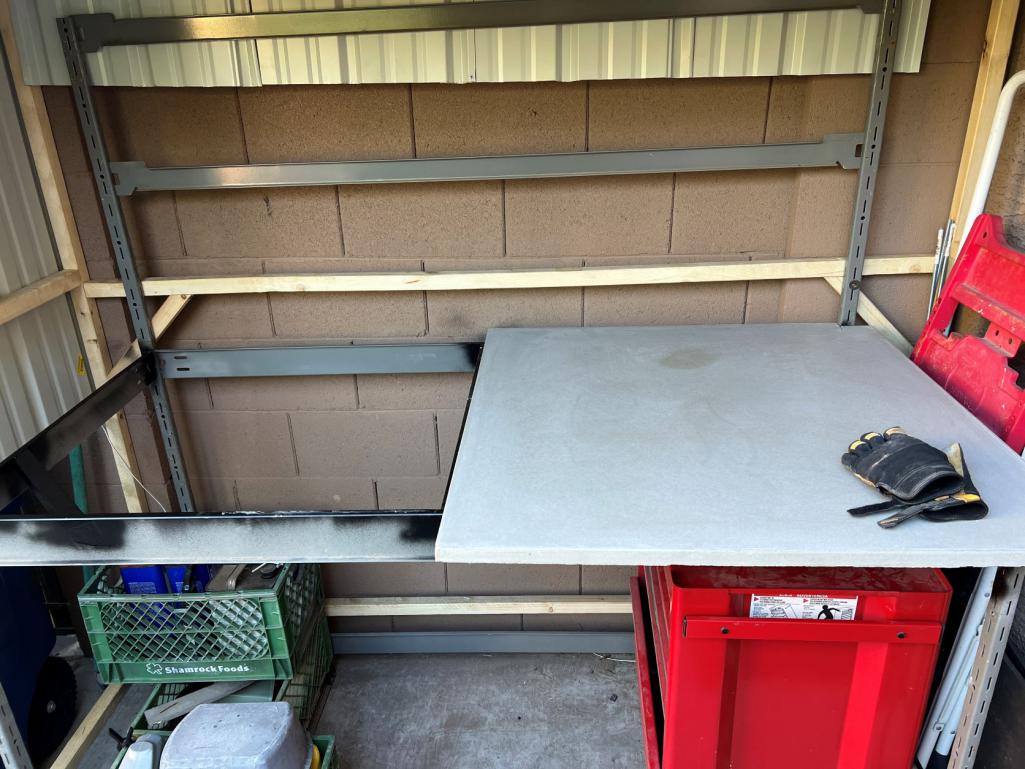 Came out pretty good. 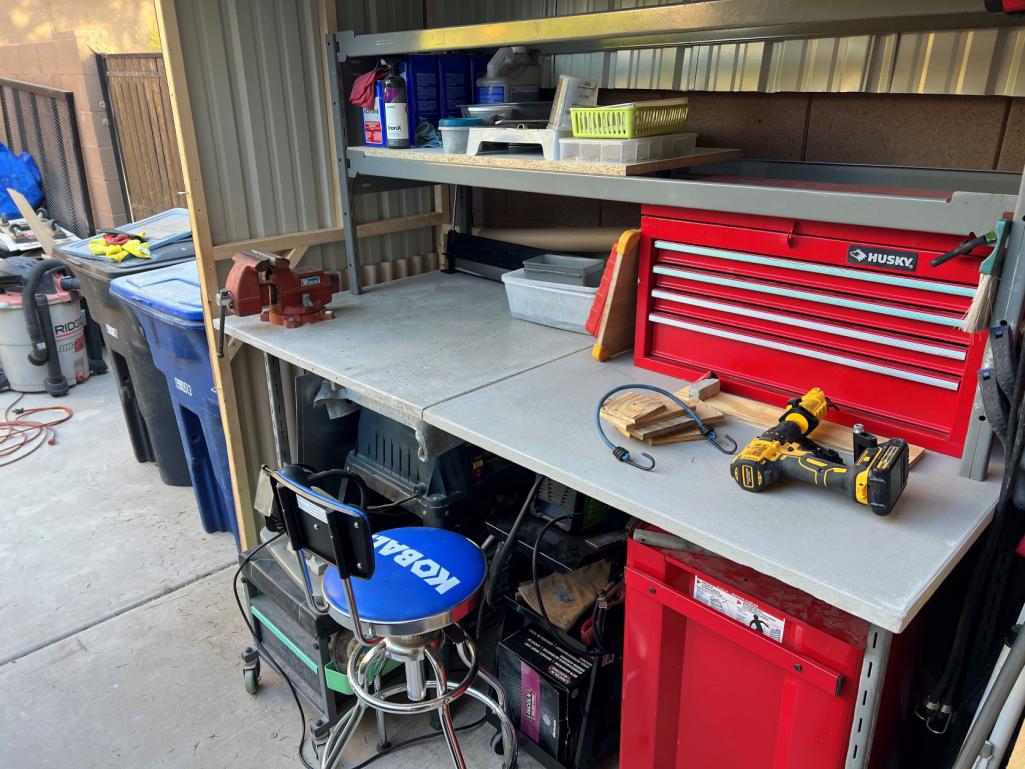 After hearing my aluminum was backordered until late February, I found an alternative source and got back to work. 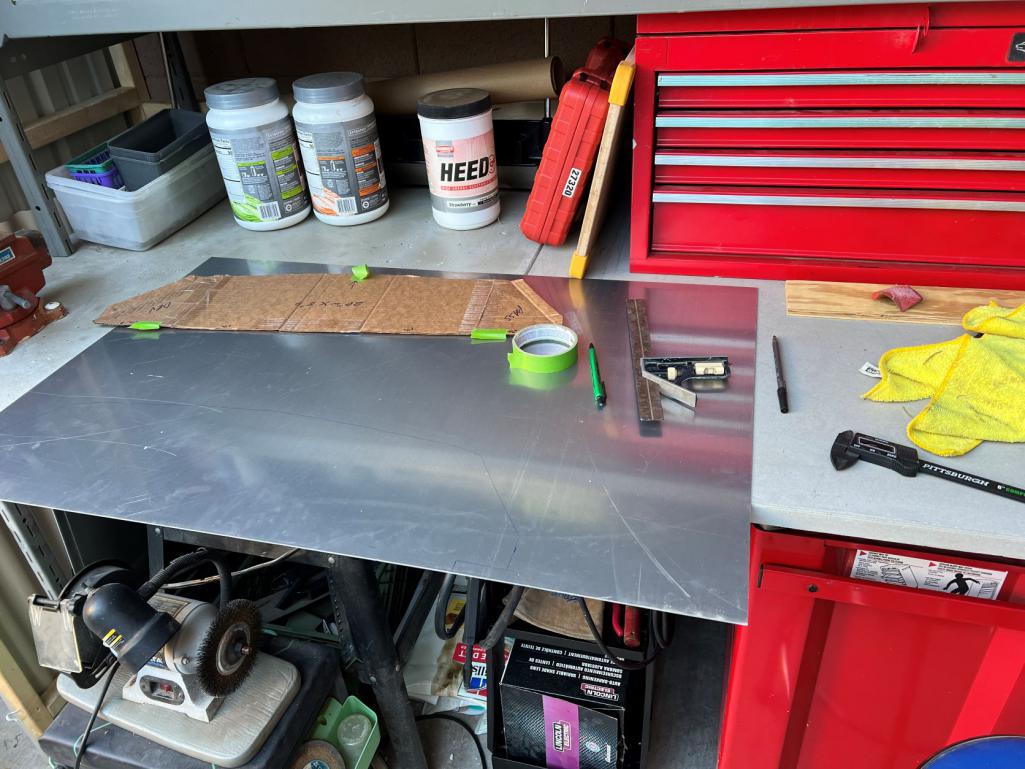 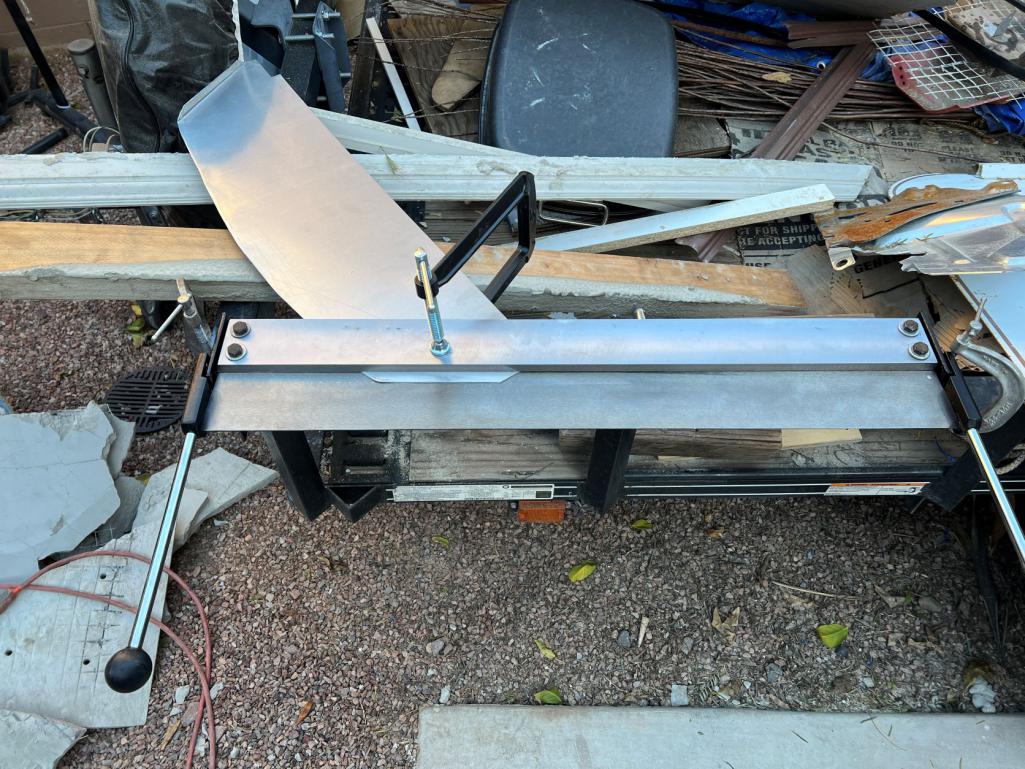 Things are starting to come together a bit. 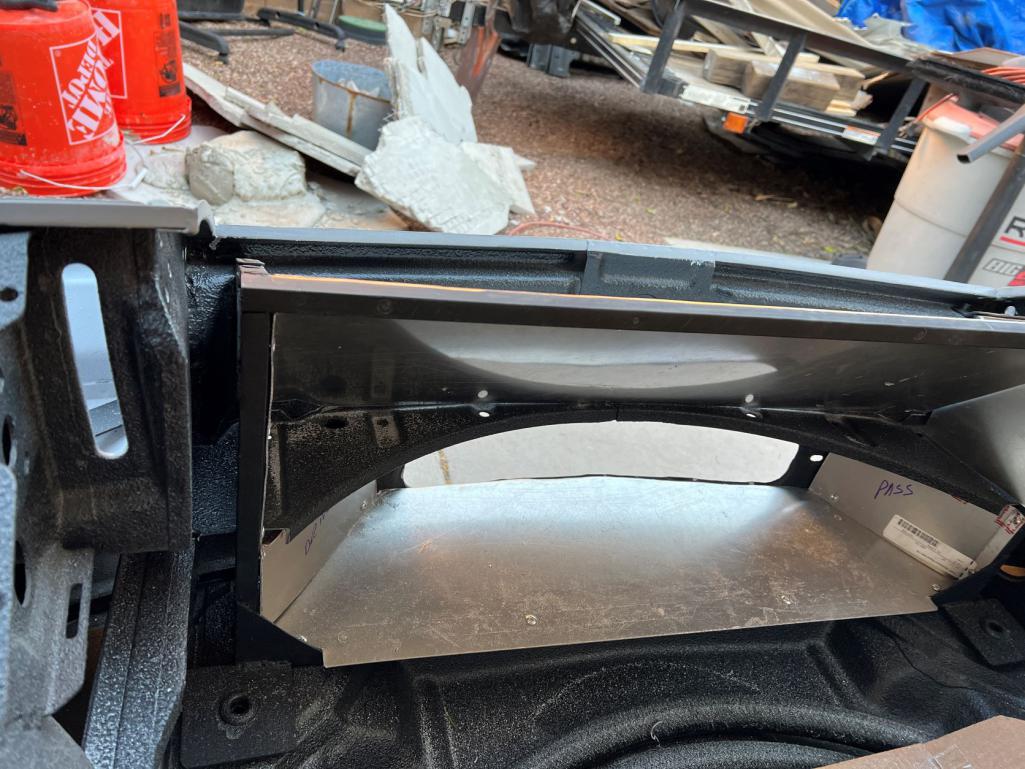 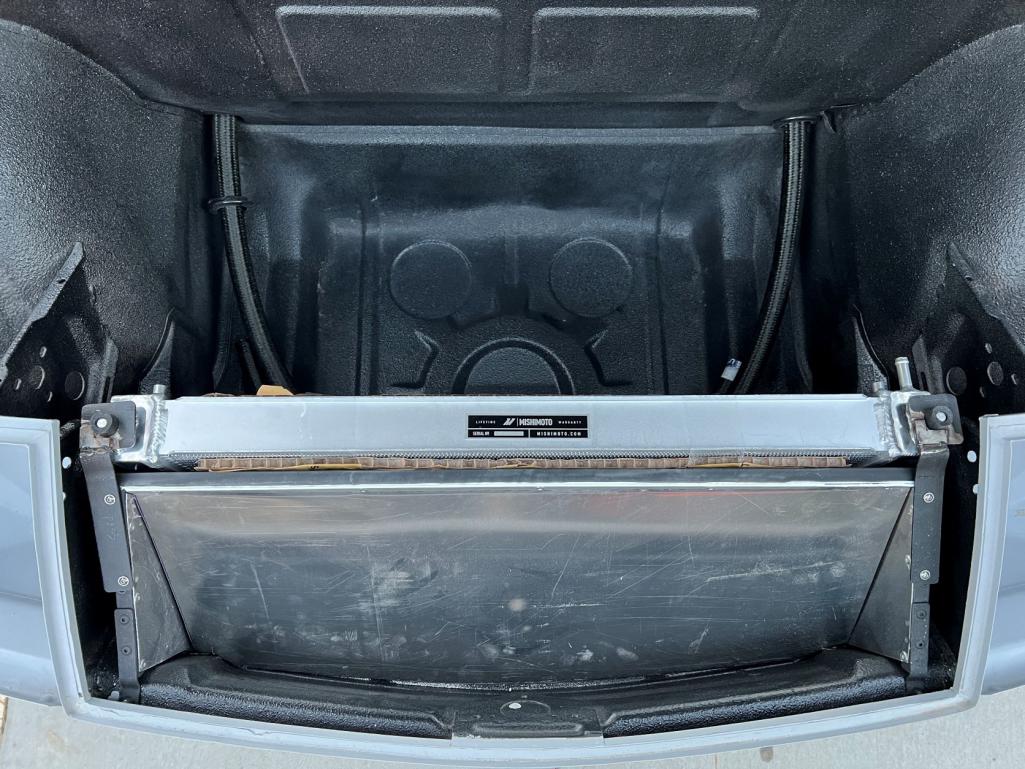 More of that cutting edge CAD work...  This piece was about 2-3" too long for my little bender, so had to employ some serious "Southern Engineering", but it came out ok. 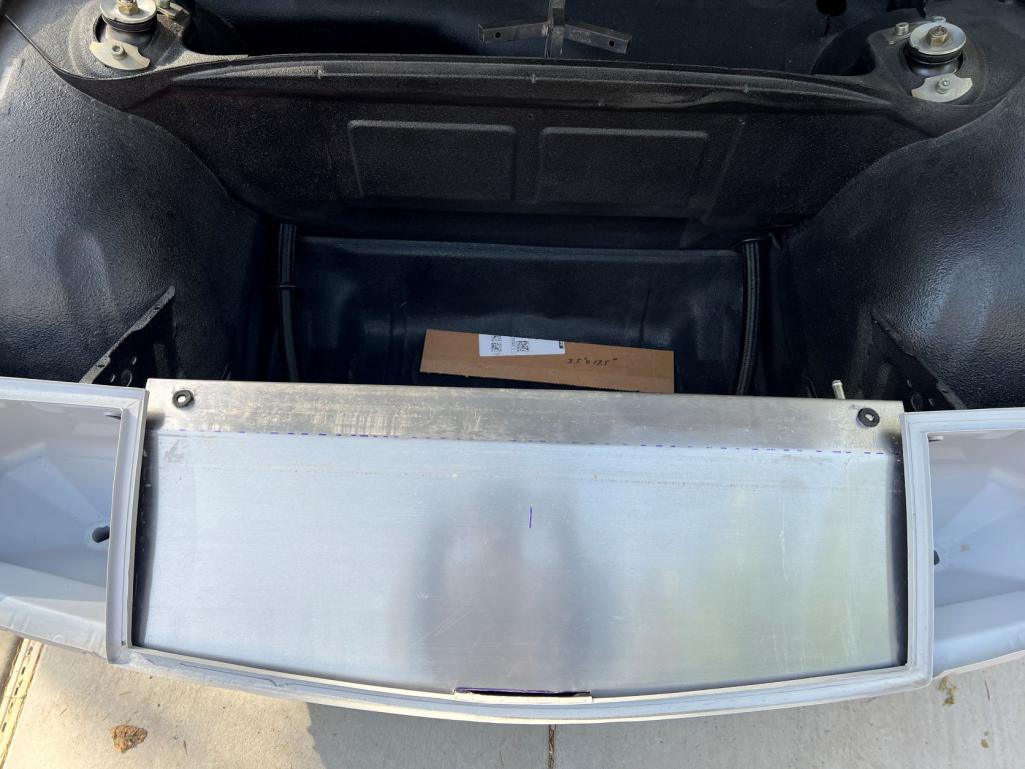 |
|
|
|
| mgarrison |
Feb 14 2023, 10:15 AM
Post
#229
|
|
Member Group: Members Posts: 416 Joined: 14-February 20 From: Chandler, AZ Member No.: 23,922 Region Association: Southwest Region |
Some more terribly sophisticated CAD...
 Just need to dream up a way to fold & rivet these pieces together in aluminum. Taking a long look at what Andy did for his oil cooler. But don't think I'll be able to fit a toolbox behind mine (IMG:style_emoticons/default/idea.gif) This is what my life has come to; "Paper Dolls" for old guys with classic cars! (IMG:style_emoticons/default/lol-2.gif) 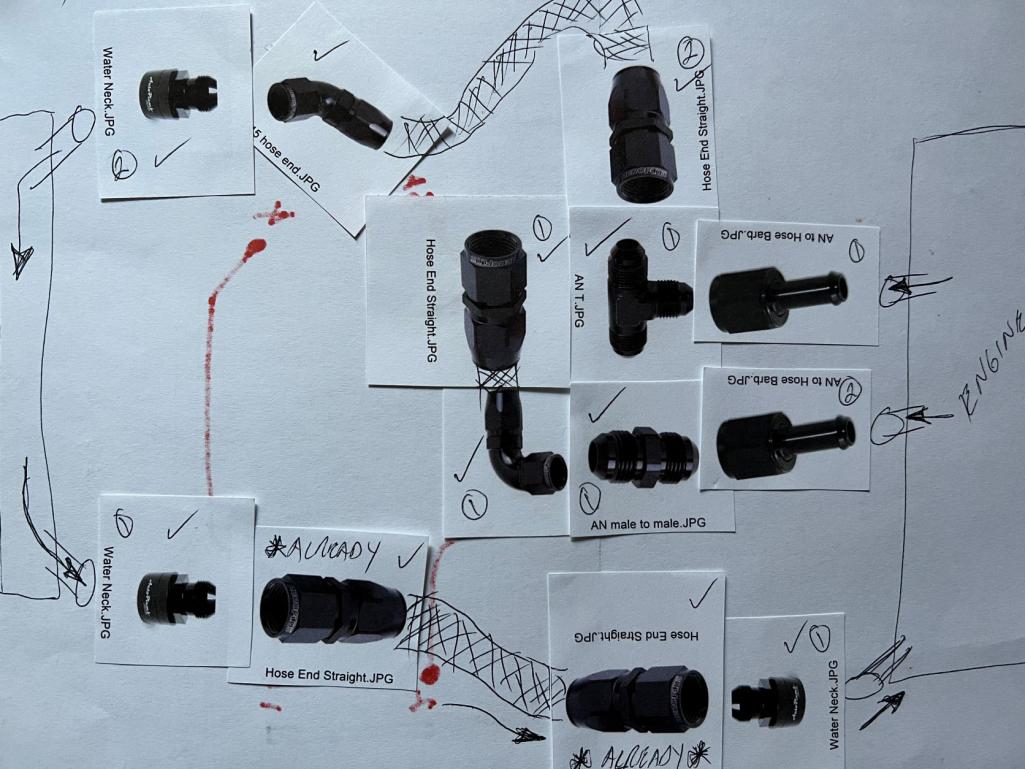 I was struggling so with keeping track of which fitting was male vs female, and if any one company had all the fittings I needed in one place...nope! Still need to confirm a couple of bends/angles are going to be workable. I was able to confirm with Mishimoto the Celica radiator can flow either direction, so no need to cross my coolant lines at the front/rear to make sure it flows driver to passenger side... (IMG:style_emoticons/default/wacko.gif) |
|
|
|
| tygaboy |
Feb 14 2023, 11:35 AM
Post
#230
|
|
914 Guru Group: Members Posts: 5,827 Joined: 6-October 15 From: Petaluma, CA Member No.: 19,241 Region Association: Northern California |
OMG... hose end fitting planning is (IMG:style_emoticons/default/blink.gif) (IMG:style_emoticons/default/blink.gif)
Your radiator shrouding looks great! (IMG:style_emoticons/default/aktion035.gif) |
|
|
|
| mgarrison |
Feb 14 2023, 11:46 AM
Post
#231
|
|
Member Group: Members Posts: 416 Joined: 14-February 20 From: Chandler, AZ Member No.: 23,922 Region Association: Southwest Region |
QUOTE(tygaboy @ Feb 14 2023, 10:35 AM) OMG... hose end fitting planning is (IMG:style_emoticons/default/blink.gif) (IMG:style_emoticons/default/blink.gif) Your radiator shrouding looks great! (IMG:style_emoticons/default/aktion035.gif) Thanks Chris! (IMG:style_emoticons/default/pray.gif) Just trying to balance my OCD against limited skillset/tools...I can picture how I want it in my head, but making come out that way is (IMG:style_emoticons/default/hissyfit.gif) |
|
|
|
| mgarrison |
Feb 21 2023, 05:33 PM
Post
#232
|
|
Member Group: Members Posts: 416 Joined: 14-February 20 From: Chandler, AZ Member No.: 23,922 Region Association: Southwest Region |
Look Ma, I made SOMETHING! (IMG:style_emoticons/default/screwy.gif)
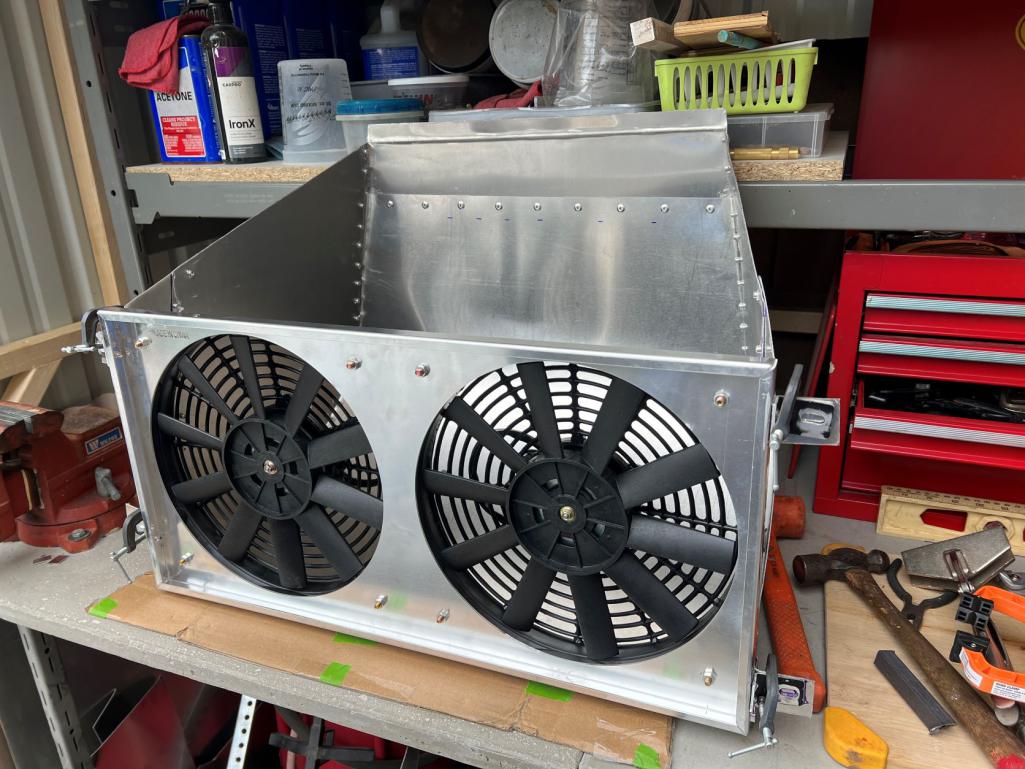 I put the hoses in the headlight buckets and then started chuckling because it reminded me of flux capacitor plumbing in Doc's DeLorean! (IMG:style_emoticons/default/lol-2.gif) 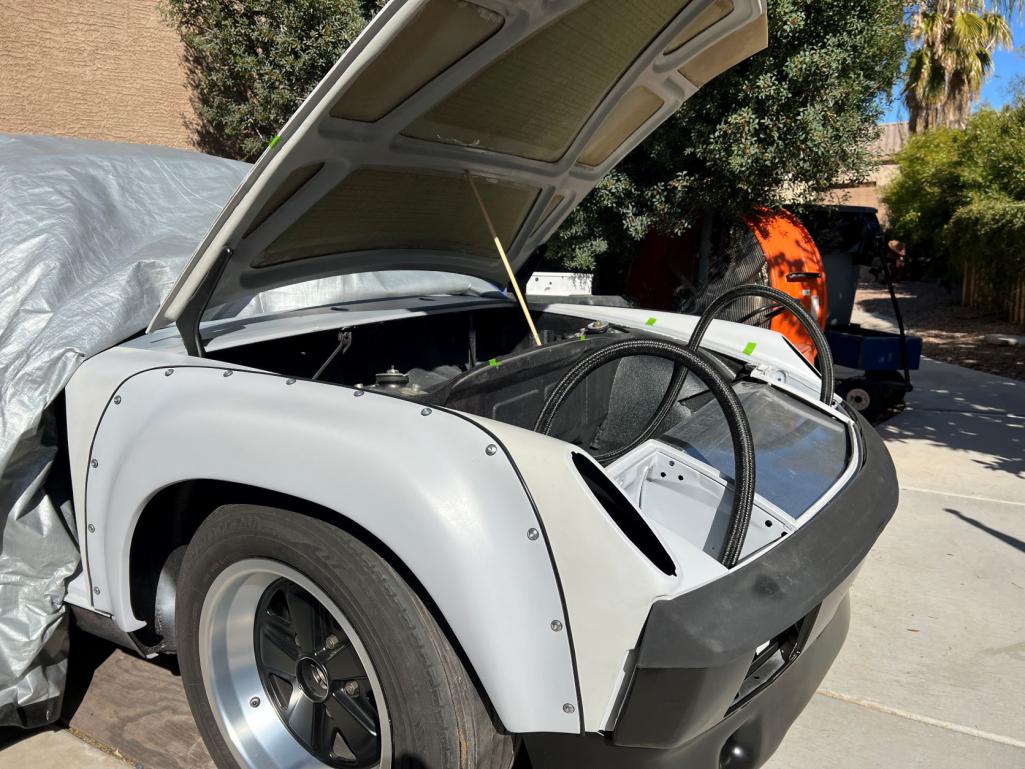 Got my "creation" to mostly fit, and clamped into place. 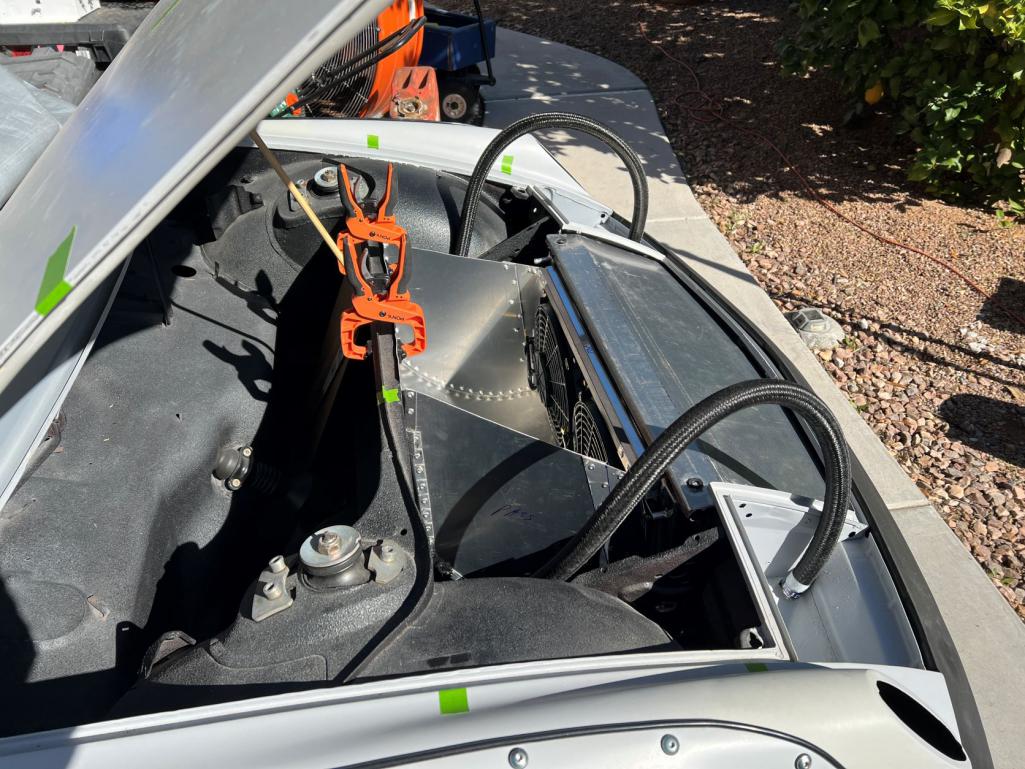 Used rivnuts to mount it up for easy removal. 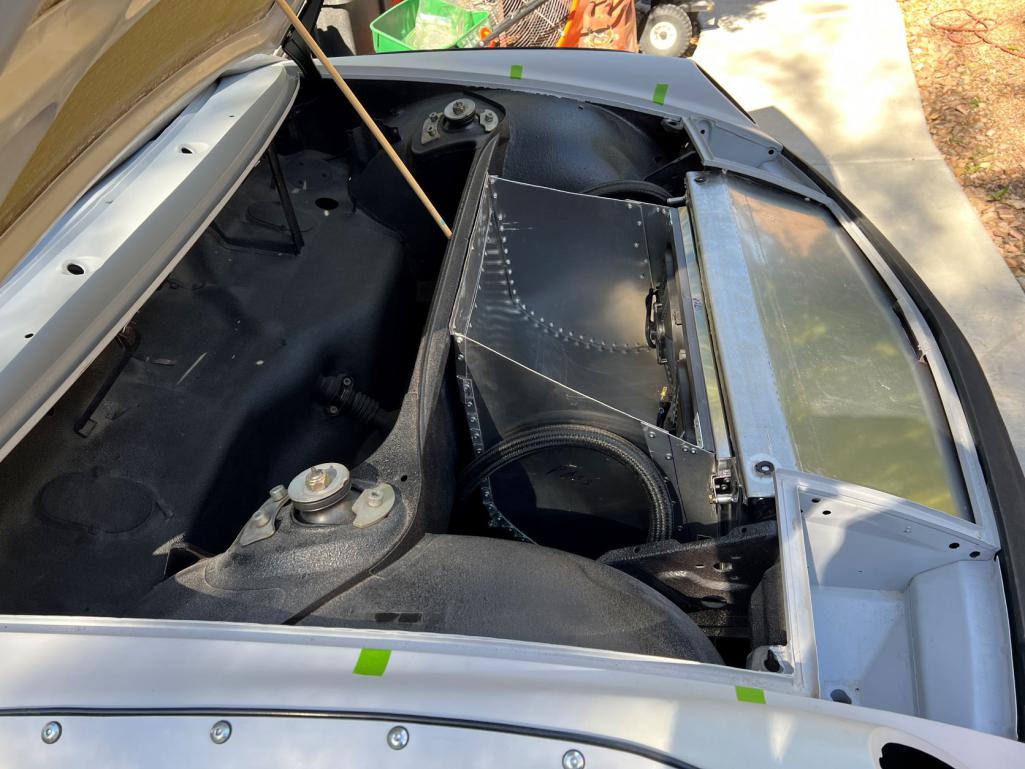 I measured 6-8 times, and still needed a stiff drink before I drilled those holes! Started with a 1/8" bit just in case I needed to fill it. (IMG:style_emoticons/default/icon8.gif)  Got it in the correct spot, and it came out ok! (IMG:style_emoticons/default/beerchug.gif)  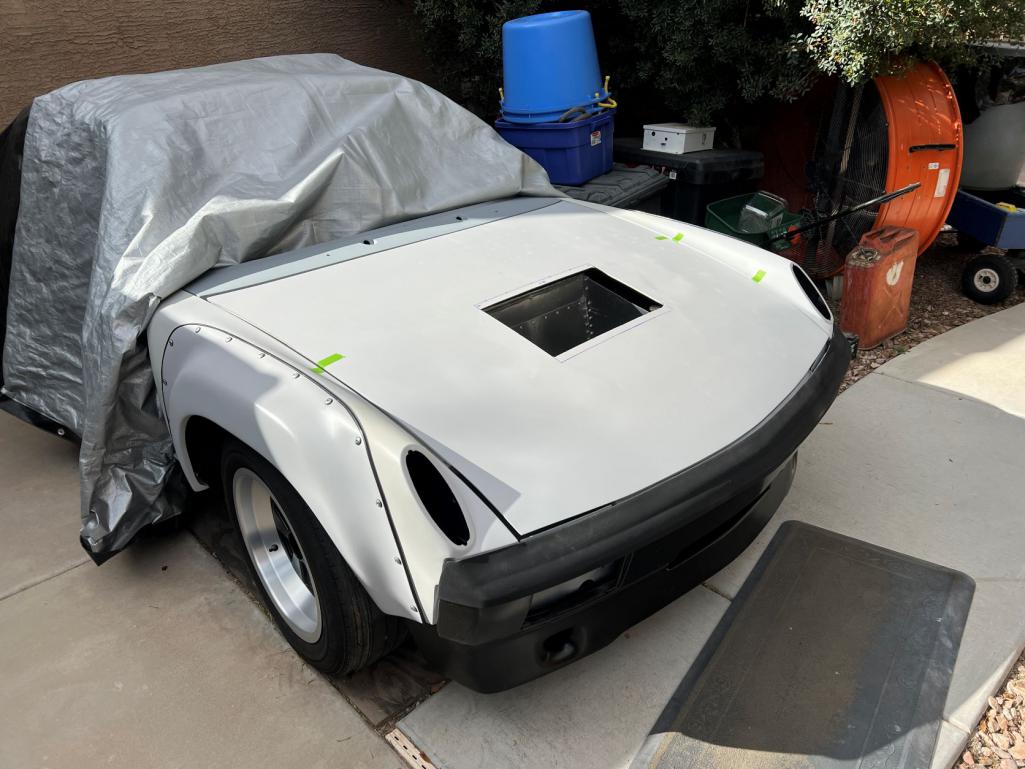 Looks like I'll need to revisit it in the future to extend the overall height for aesthetics, but looks like it will get the hot air out well enough for now! 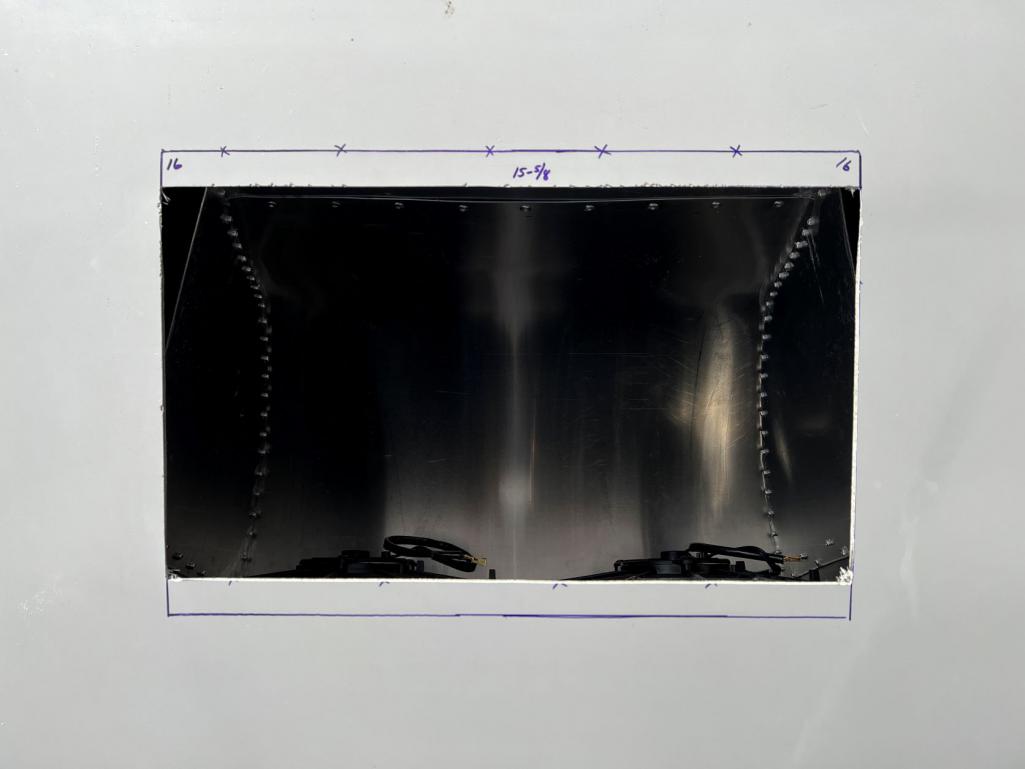 AND I learned the Boys Ranch right across the road has a plasma cutter nobody ever uses. Barn connections...you just never know what you'll learn/find! (IMG:style_emoticons/default/idea.gif) |
|
|
|
| slowrodent |
Feb 21 2023, 05:56 PM
Post
#233
|
|
Member Group: Members Posts: 235 Joined: 29-February 20 From: Tucson/Oro Valley Member No.: 23,981 Region Association: Southwest Region |
Beautiful Mike..... It's really taking shape very nicely.. As I've said before, your detail work is great and will certainly pay off in a high-quality end product.
|
|
|
|
| mgarrison |
Feb 22 2023, 09:22 AM
Post
#234
|
|
Member Group: Members Posts: 416 Joined: 14-February 20 From: Chandler, AZ Member No.: 23,922 Region Association: Southwest Region |
QUOTE(slowrodent @ Feb 21 2023, 04:56 PM) Beautiful Mike..... It's really taking shape very nicely.. As I've said before, your detail work is great and will certainly pay off in a high-quality end product. Thanks Kevin! Feeling my way like a blind guy in a room full of rakes with their tines up! (IMG:style_emoticons/default/unsure.gif) Fingers crossed that the passenger side outlet on the radiator has enough clearance for the AN adapter and fitting (IMG:style_emoticons/default/icon8.gif) That one's gonna be snug. If it won't clear, I'll be reworking the radiator fit/placement for a third time. Seems like every step takes 4x as long as expected, and costs 2x as much as expected. Quite the journey...I keep joking that our son may have to finish the car after I'm dead and gone! (IMG:style_emoticons/default/wacko.gif) |
|
|
|
| tygaboy |
Feb 22 2023, 09:28 AM
Post
#235
|
|
914 Guru Group: Members Posts: 5,827 Joined: 6-October 15 From: Petaluma, CA Member No.: 19,241 Region Association: Northern California |
Built, not bought.
...for the win, everytime! (IMG:style_emoticons/default/aktion035.gif) (IMG:style_emoticons/default/smilie_pokal.gif) |
|
|
|
| mgarrison |
Feb 22 2023, 09:57 AM
Post
#236
|
|
Member Group: Members Posts: 416 Joined: 14-February 20 From: Chandler, AZ Member No.: 23,922 Region Association: Southwest Region |
QUOTE(tygaboy @ Feb 22 2023, 08:28 AM) Built, not bought. ...for the win, everytime! (IMG:style_emoticons/default/aktion035.gif) (IMG:style_emoticons/default/smilie_pokal.gif) Thanks Chris! I keep reminding myself I want to do as much of this build myself as I can manage. May not look as perfect, or might take multiple iterations, but I figured it out, and I did it! (IMG:style_emoticons/default/smash.gif) |
|
|
|
| ClayPerrine |
Feb 22 2023, 11:23 AM
Post
#237
|
|
Life's been good to me so far..... Group: Admin Posts: 16,545 Joined: 11-September 03 From: Hurst, TX. Member No.: 1,143 Region Association: NineFourteenerVille |
QUOTE(tygaboy @ Feb 22 2023, 09:28 AM) Built, not bought. ...for the win, everytime! (IMG:style_emoticons/default/aktion035.gif) (IMG:style_emoticons/default/smilie_pokal.gif) (IMG:style_emoticons/default/agree.gif) Every time someone with a new 911 GT3 makes disparaging comments about my Six conversion, I just look at him and say "Anyone can write a check and buy a car. But not everyone can engineer and build one." And then I blow his doors off.......... |
|
|
|
| 76-914 |
Feb 22 2023, 11:52 AM
Post
#238
|
|
Repeat Offender & Resident Subaru Antagonist Group: Members Posts: 13,896 Joined: 23-January 09 From: Temecula, CA Member No.: 9,964 Region Association: Southern California |
QUOTE(mgarrison @ Feb 21 2023, 03:33 PM) Look Ma, I made SOMETHING! (IMG:style_emoticons/default/screwy.gif) I put the hoses in the headlight buckets and then started chuckling because it reminded me of flux capacitor plumbing in Doc's DeLorean! (IMG:style_emoticons/default/lol-2.gif) Got my "creation" to mostly fit, and clamped into place. Used rivnuts to mount it up for easy removal. I measured 6-8 times, and still needed a stiff drink before I drilled those holes! Started with a 1/8" bit just in case I needed to fill it. (IMG:style_emoticons/default/icon8.gif) Got it in the correct spot, and it came out ok! (IMG:style_emoticons/default/beerchug.gif) Looks like I'll need to revisit it in the future to extend the overall height for aesthetics, but looks like it will get the hot air out well enough for now! AND I learned the Boys Ranch right across the road has a plasma cutter nobody ever uses. Barn connections...you just never know what you'll learn/find! (IMG:style_emoticons/default/idea.gif) Use this to seal your baffle to the hood. All non-radial piston powered planes use it to seal the baffles to the cowling. Question: is the concrete slab reinforced or plasticized? You're making good progress. Stay after it. (IMG:style_emoticons/default/beerchug.gif) |
|
|
|
| Costa05 |
Feb 22 2023, 01:25 PM
Post
#239
|
|
Member Group: Members Posts: 320 Joined: 27-October 16 From: Phoenix, Arizona Member No.: 20,535 Region Association: Southwest Region |
Coming along real well Mike!
|
|
|
|
| mgarrison |
Feb 22 2023, 02:12 PM
Post
#240
|
|
Member Group: Members Posts: 416 Joined: 14-February 20 From: Chandler, AZ Member No.: 23,922 Region Association: Southwest Region |
[/quote]
Use this to seal your baffle to the hood. All non-radial piston powered planes use it to seal the baffles to the cowling. Question: is the concrete slab reinforced or plasticized? You're making good progress. Stay after it. (IMG:style_emoticons/default/beerchug.gif) [/quote] Did I miss your link? Maybe it didn't paste... Assuming your referring to the concrete "countertop/workbench"; It's actually quickset mortar with no rocks in it since I only could do a 1" thickness. I put metal lath in the middle to reinforce it. It's basically a POC to see if I could pull off doing our bathroom counters. I did add flow control to make it flow a bit better, and tried to use the least amount of water I could get away with (meets DOT requirements, whatever that means!). I cast the bolt holes for the vise in it using dowels. So far so good. I've hammered out some aluminum on the vise, and I've been clamping and bending the aluminum duct on it too. I kind of expected some cracks by now... (IMG:style_emoticons/default/popcorn[1].gif) Here's where I got the idea: https://youtu.be/T7mYB6x68DY |
|
|
|
|
2 User(s) are reading this topic (2 Guests and 0 Anonymous Users)
0 Members:

|
Lo-Fi Version | Time is now: 11th June 2026 - 10:37 PM |
Invision Power Board
v9.1.4 © 2026 IPS, Inc.