|
|
|
Porsche, and the Porsche crest are registered trademarks of Dr. Ing. h.c. F. Porsche AG.
This site is not affiliated with Porsche in any way. Its only purpose is to provide an online forum for car enthusiasts. All other trademarks are property of their respective owners. |
|
|

  |

| Mayne |
 Mar 20 2023, 12:07 PM Mar 20 2023, 12:07 PM
Post
#261
|
|
Member  Group: Members Posts: 254 Joined: 28-February 17 From: NM Member No.: 20,880 Region Association: None |
Looking good, and that’s a proud little spot for the teener!
|
   |

 
|
| mgarrison |
Mar 24 2023, 10:24 AM
Post
#262
|
|
Member Group: Members Posts: 416 Joined: 14-February 20 From: Chandler, AZ Member No.: 23,922 Region Association: Southwest Region |
I managed to get the hose ends on the front lines about 95% of the way on - waiting on another -16 wrench to finish tightening them down. Typically you use a vise with aluminum jaw pads to install the hose ends, but I don't have that option with the hoses running through the chassis. I guess I could have pulled the hoses out, then installed ends on one end. Run the hoses back through the chassis, and then installed the other ends. Seemed like too much work for not much return! (IMG:style_emoticons/default/confused24.gif)
I decided to cross the lines at the front so that the return (passenger side) goes to the "upper" (really middle inlet on the Celica radiator), and the feed (drivers side) goes to the lower inlet/outlet. Mishimoto said flow direction did not matter, and the radiator would flow fine either direction but... 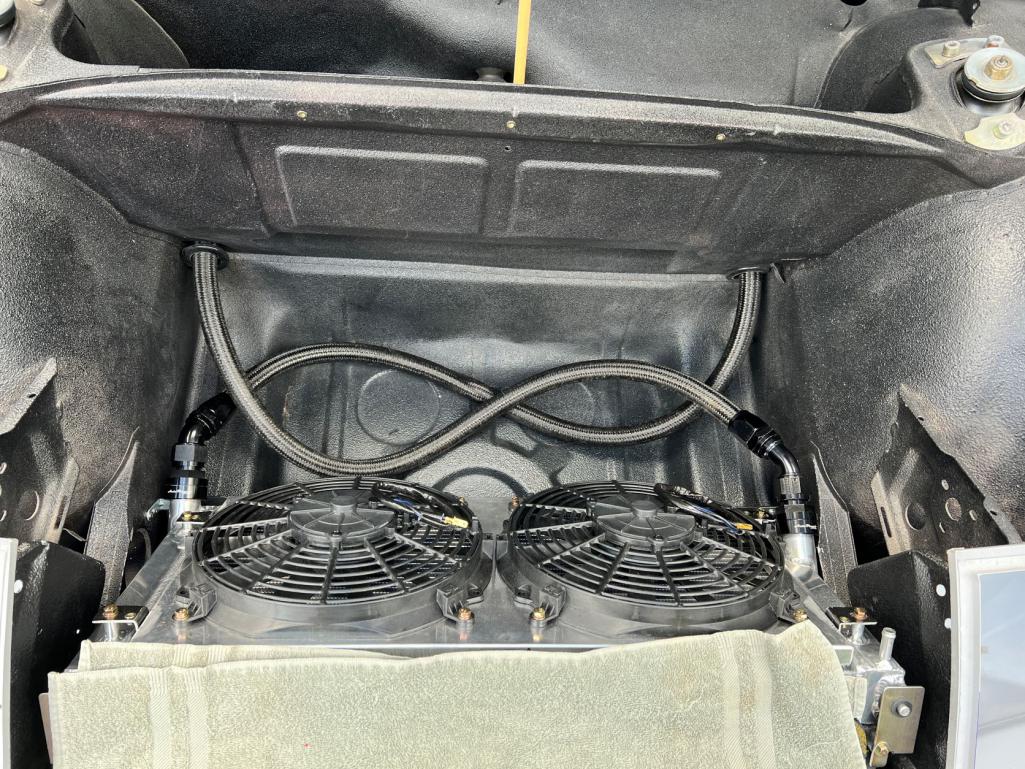 I got the thermostat housing adapter installed. In case anyone's interested in the AutoPlumb adapters (instead of having a bung welded in), here's the basic process: Put the grip tape around the threaded collar and slip the collar and split ring over inlet. 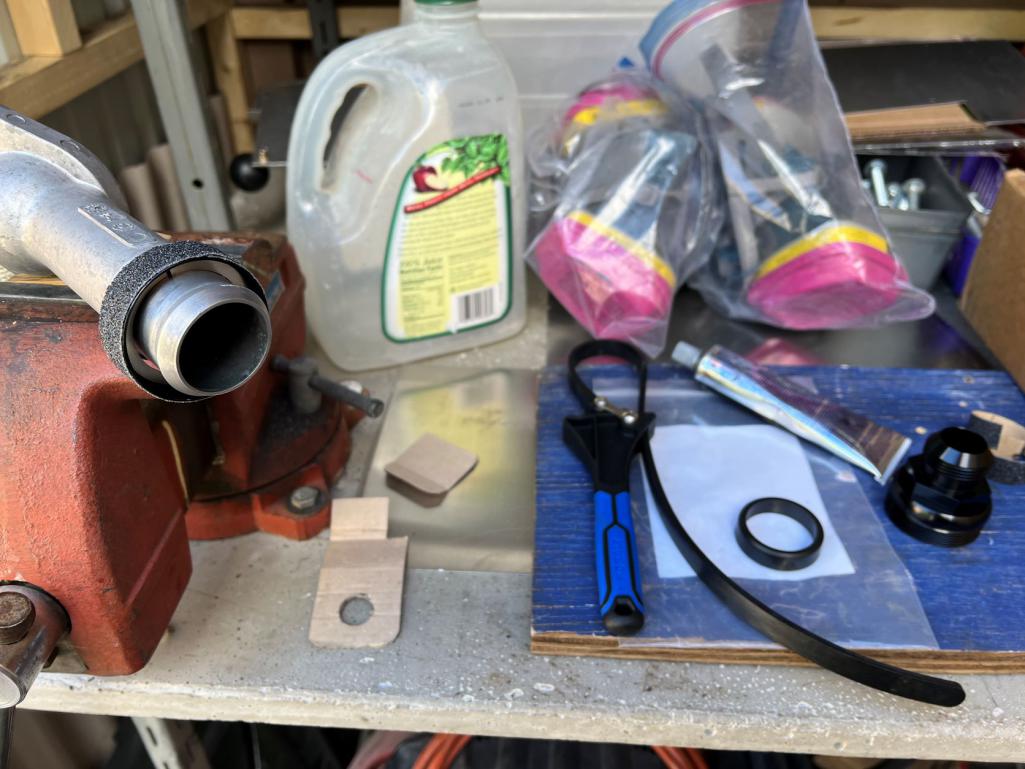 Coat the rubber bushing with black RTV and slip over the inlet with the chamfer to the outside. 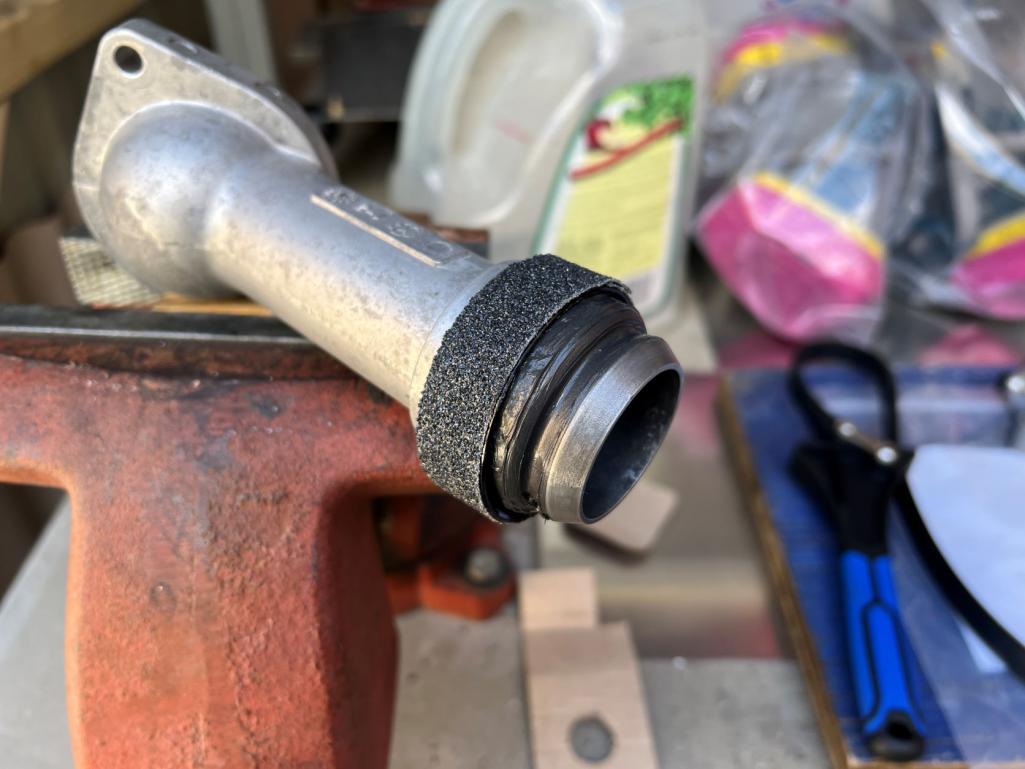 Thread the collar on by hand as tight as you can get it making sure it stays square to the end of the inlet. Tighten the rest of the way using the strap wrench and AN wrench.  Clean the outside up with lacquer thinner. 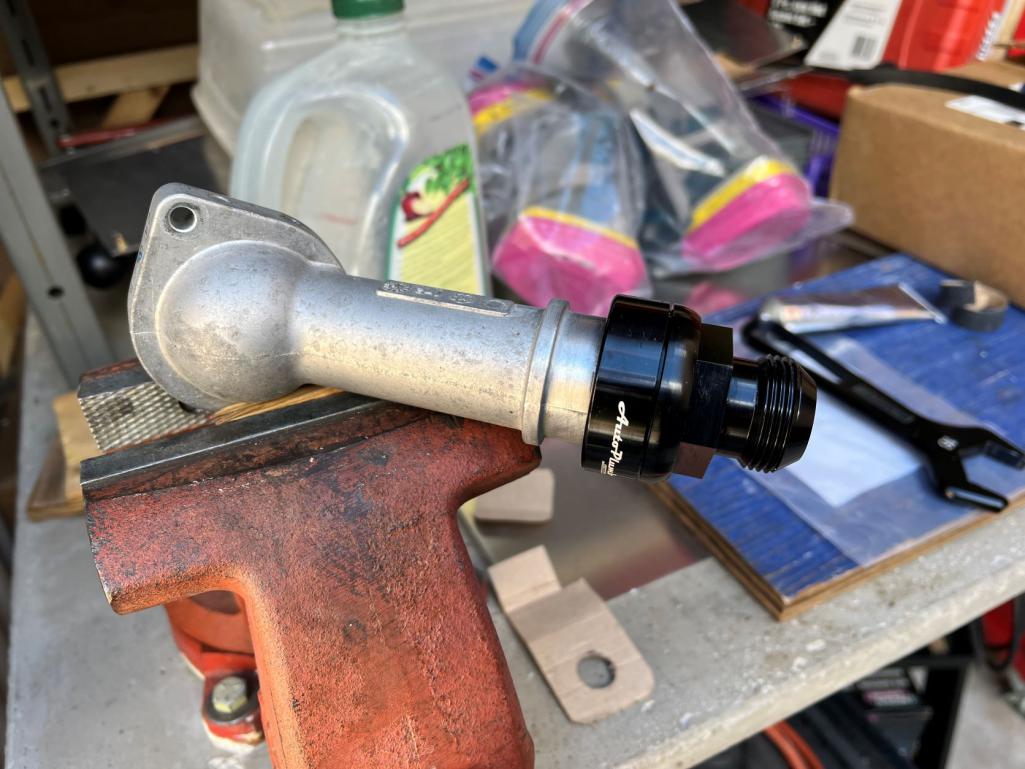 Works pretty well, IMHO... Subaru puts the thermostat housing in the craziest place; bottom of the motor, on the driver's side! (IMG:style_emoticons/default/wacko.gif) 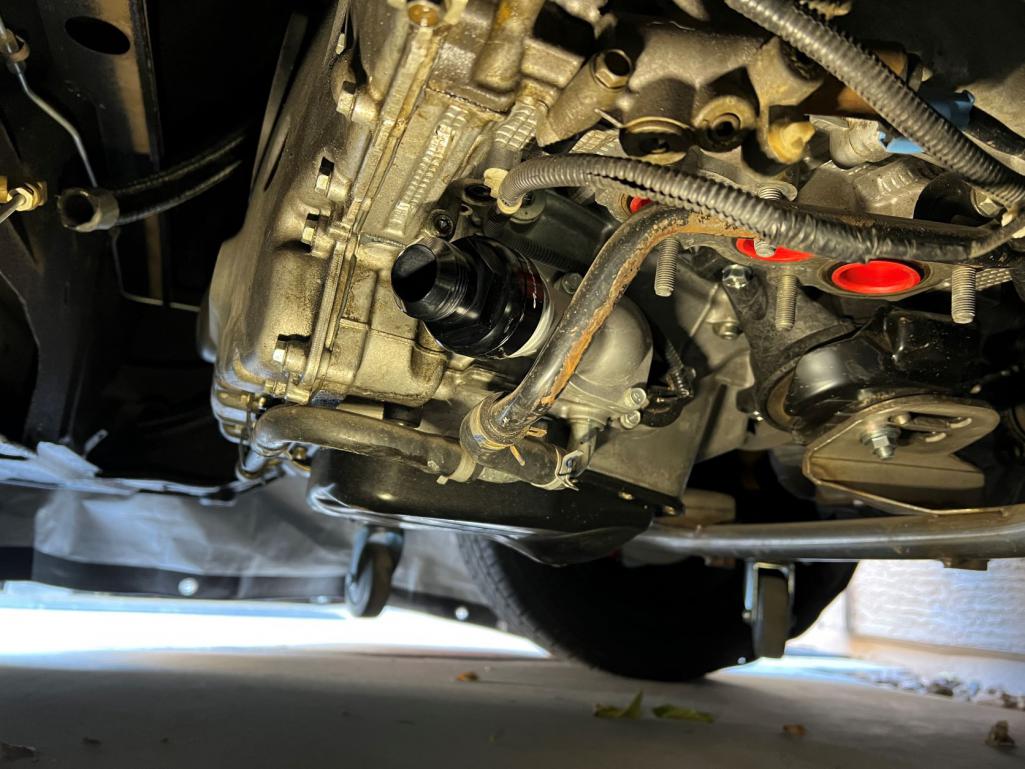 Now I'm waiting on another 45 degree hose end - I used the one that was for the thermostat housing on the radiator due to the change in the radiator mounting angle needed to make everything fit (IMG:style_emoticons/default/headbang.gif) Using my time to try and work out the exit ducting...again! Trying to reuse what I can, but going to need more aluminum sheet, of course! (IMG:style_emoticons/default/popcorn[1].gif) 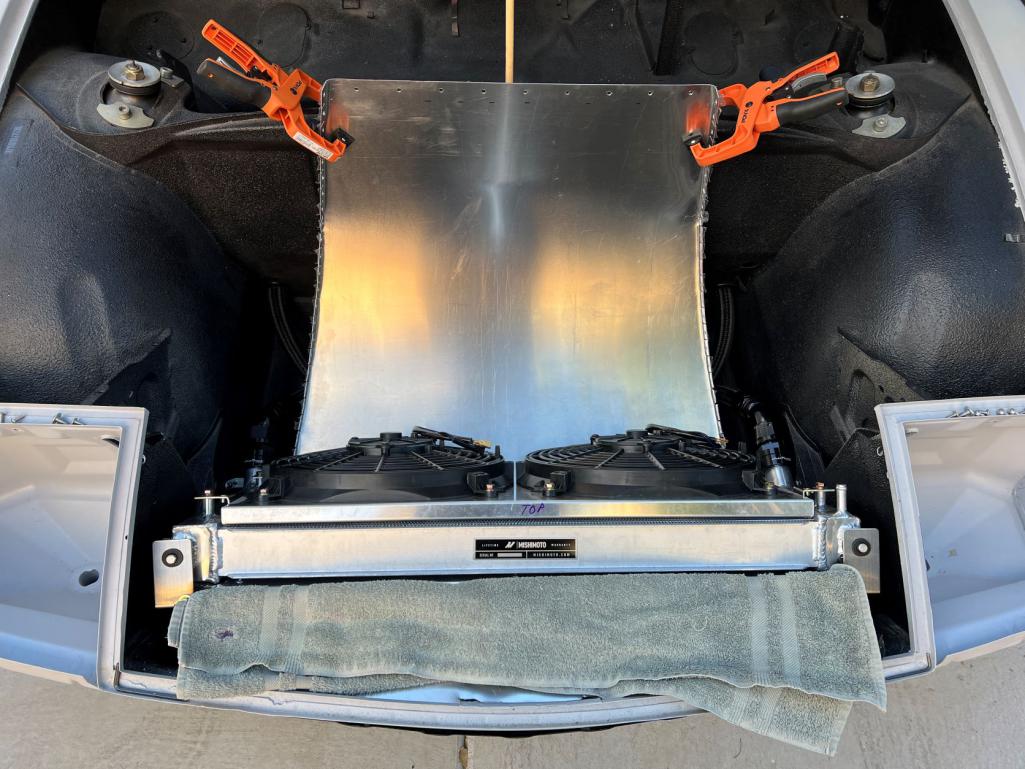 |
|
|
|
| slowrodent |
Mar 24 2023, 03:34 PM
Post
#263
|
|
Member Group: Members Posts: 235 Joined: 29-February 20 From: Tucson/Oro Valley Member No.: 23,981 Region Association: Southwest Region |
Keep up the great work Mike.. As always, looking very good! (IMG:style_emoticons/default/beer.gif)
|
|
|
|
| 76-914 |
Mar 26 2023, 08:42 AM
Post
#264
|
|
Repeat Offender & Resident Subaru Antagonist Group: Members Posts: 13,896 Joined: 23-January 09 From: Temecula, CA Member No.: 9,964 Region Association: Southern California |
Do they not use rebar for reinforcement in your neck of the woods? The finish looks good. Did you slope it to keep the rainwater away from the siding? That thermostat location will work out very well and lines up nicely with the nipple coming off the long. Mixing that concrete by hand will give you a good work out!. (IMG:style_emoticons/default/beerchug.gif)
|
|
|
|
| mgarrison |
Mar 26 2023, 08:51 PM
Post
#265
|
|
Member Group: Members Posts: 416 Joined: 14-February 20 From: Chandler, AZ Member No.: 23,922 Region Association: Southwest Region |
QUOTE(76-914 @ Mar 26 2023, 07:42 AM)  Do they not use rebar for reinforcement in your neck of the woods? The finish looks good. Did you slope it to keep the rainwater away from the siding? That thermostat location will work out very well and lines up nicely with the nipple coming off the long. Mixing that concrete by hand will give you a good work out!. (IMG:style_emoticons/default/beerchug.gif) No...They dont even use rebar on driveways out here! Probably because they used to make adobe bricks out of the dang dirt! I tried to match the slope of the existing pad that was added off the garage years ago - it slopes away from the house so should be ok. I wasn't as sore as I thought I'd be... (IMG:style_emoticons/default/aktion035.gif) |
|
|
|
| mgarrison |
Mar 26 2023, 09:04 PM
Post
#266
|
|
Member Group: Members Posts: 416 Joined: 14-February 20 From: Chandler, AZ Member No.: 23,922 Region Association: Southwest Region |
Made a bit more progress this weekend. Starting to question my life's choices trying to put the AN fittings on the braided hose. Not sure what I'm doing wrong, or if it's just the fact that they are -16 and a crazy challenge! (IMG:style_emoticons/default/headbang.gif)
Anyhow, I have the exit ducting about 95% squared away. I think it would function fine, just an odd gap towards the front of the opening... Started with the CAD again.  I was able to reuse the main piece, but not the sides. 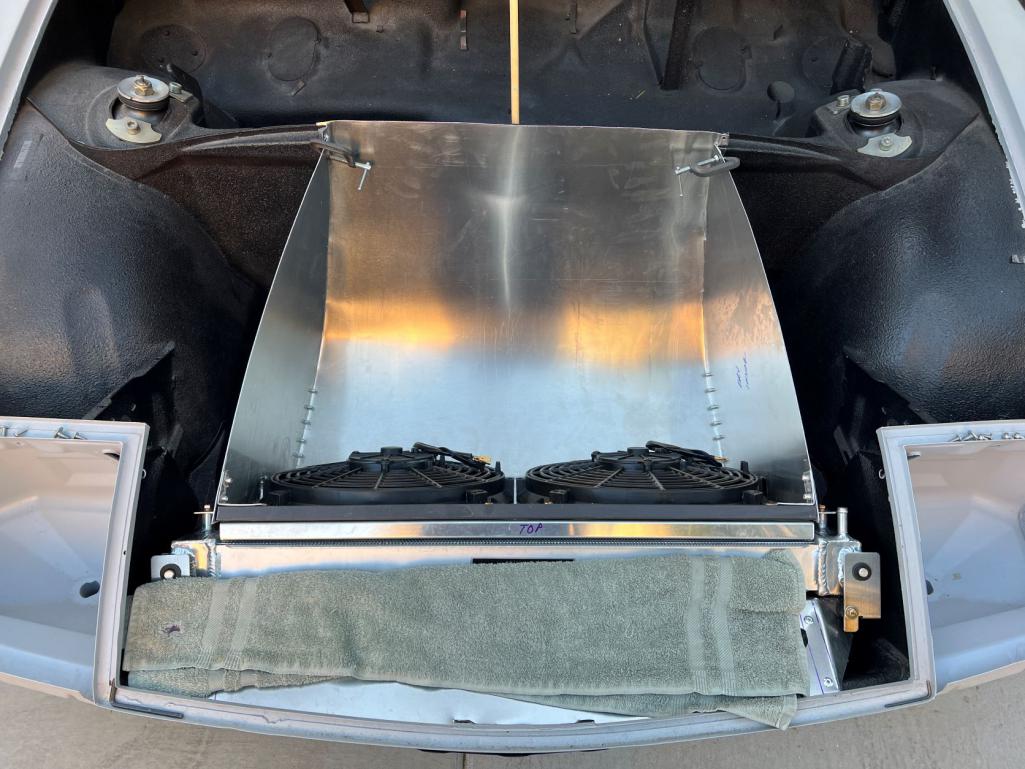 With the angle change on the radiator mount the top of the radiator is farther forward of the opening. Needed to add a covered section, but that added some structure for the sides. 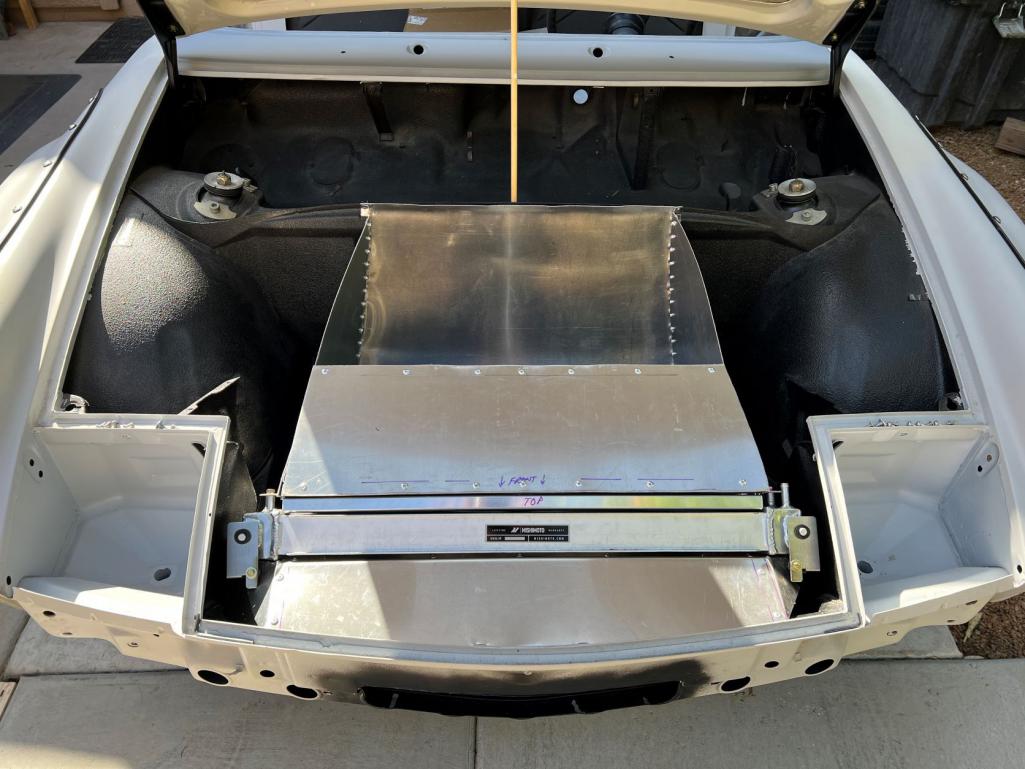 Everything clears good, and there's a bit of room under there for toolbox, or maybe even the battery... (IMG:style_emoticons/default/idea.gif) 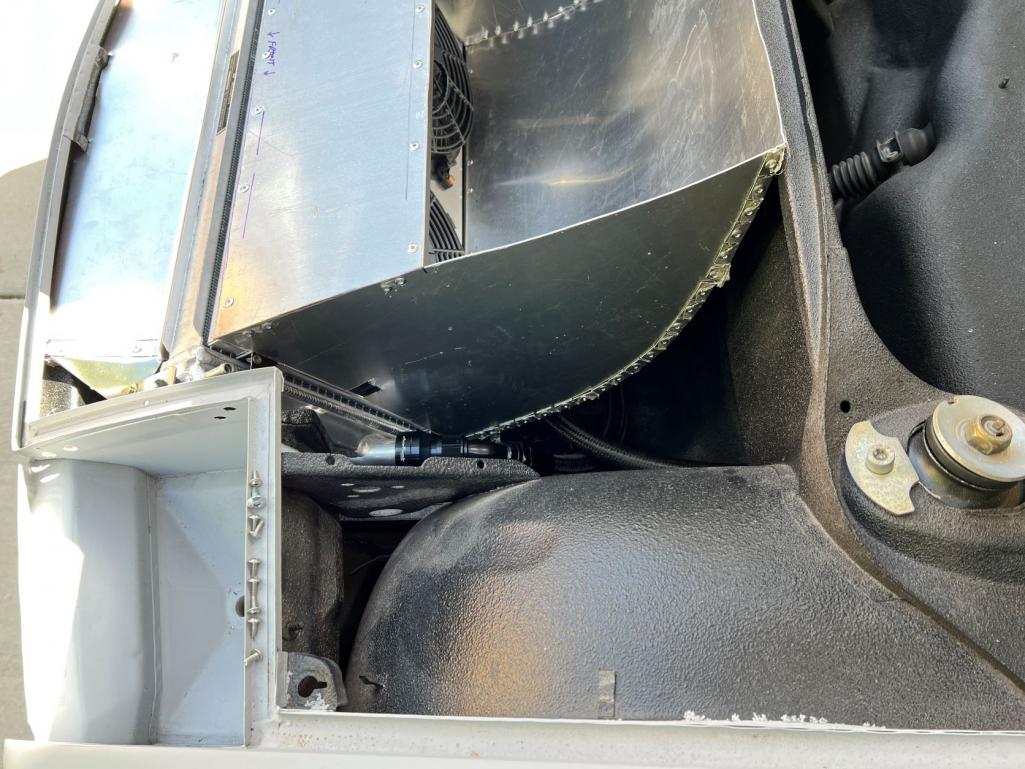 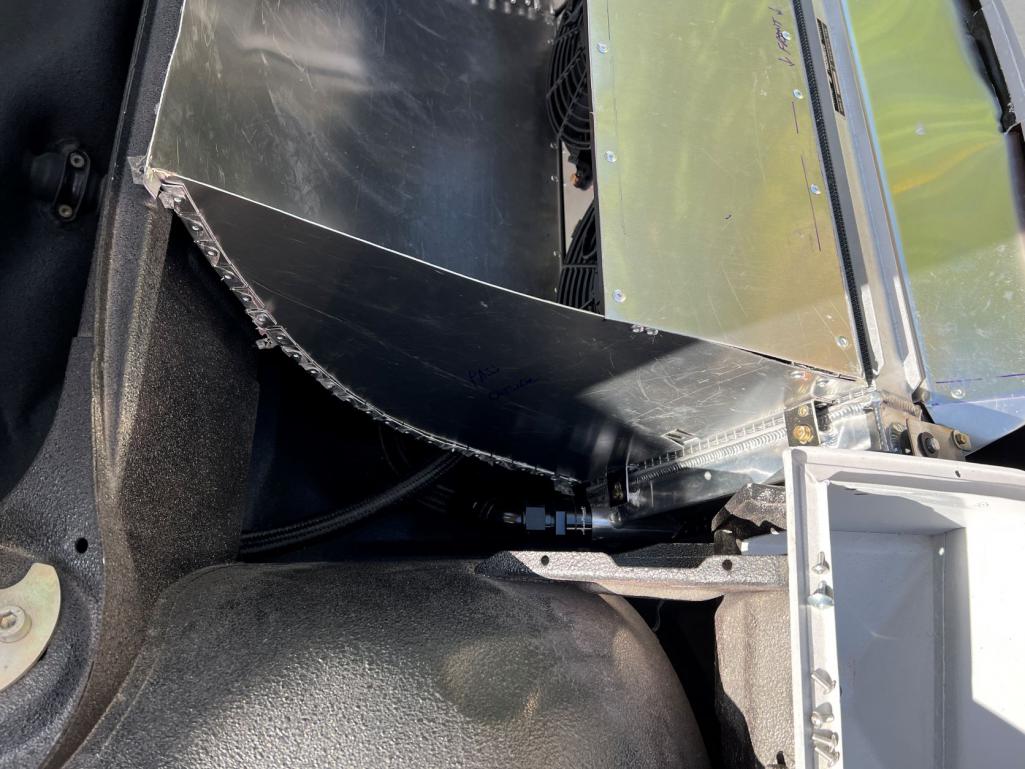 Made sure it was fairly simple to remove. 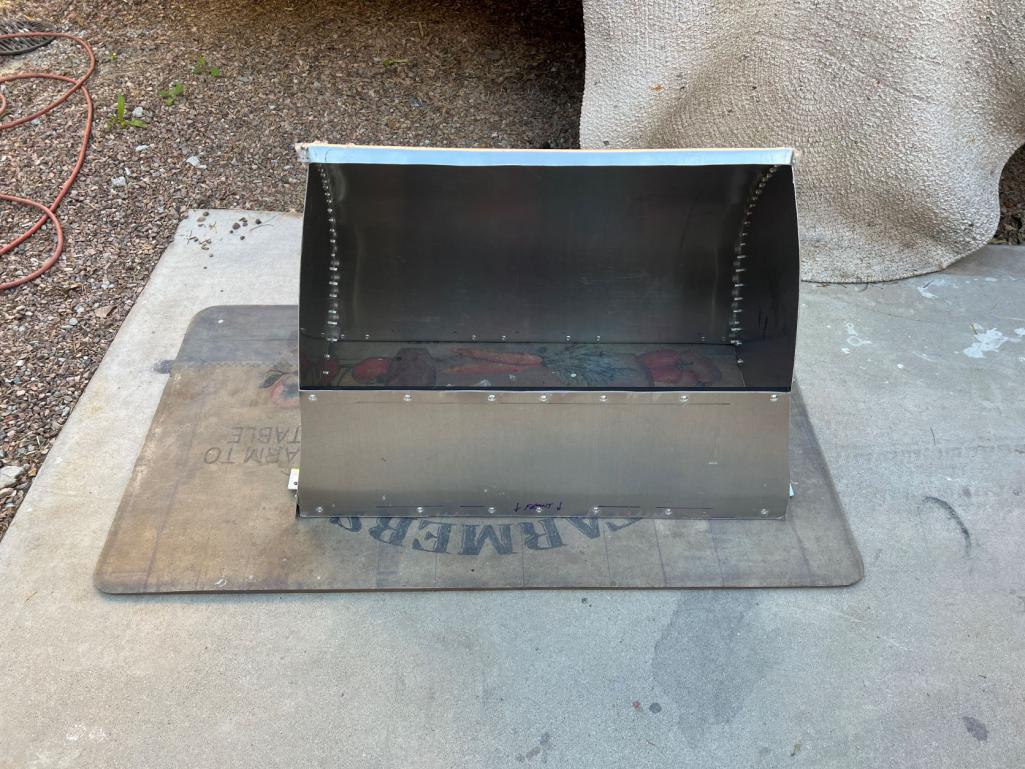 Here's the hose and fittings for the returns coming off the top of the heads. Not as much space as I thought I'd have, but I think I can make it work. 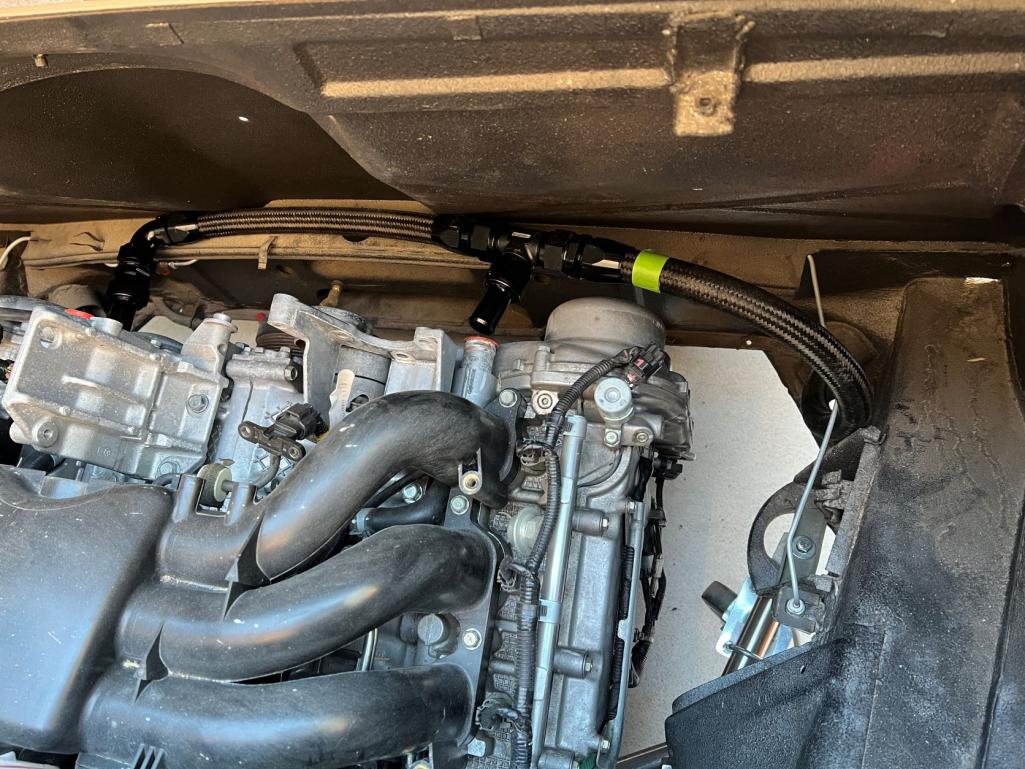 Now just waiting on the 45 degree end for the thermostat housing...Debating on doing fuel tank and lines next, or wiring harness (IMG:style_emoticons/default/confused24.gif) |
|
|
|
| mgarrison |
Mar 27 2023, 08:52 PM
Post
#267
|
|
Member Group: Members Posts: 416 Joined: 14-February 20 From: Chandler, AZ Member No.: 23,922 Region Association: Southwest Region |
I wasn't happy with the gap that showed above my exit duct when looking forward in the car, so I started trying to come up with a solution. That section of the hood also does not have any bracing underneath it, so if it could provide support that would be a bonus.
Here's the gap. 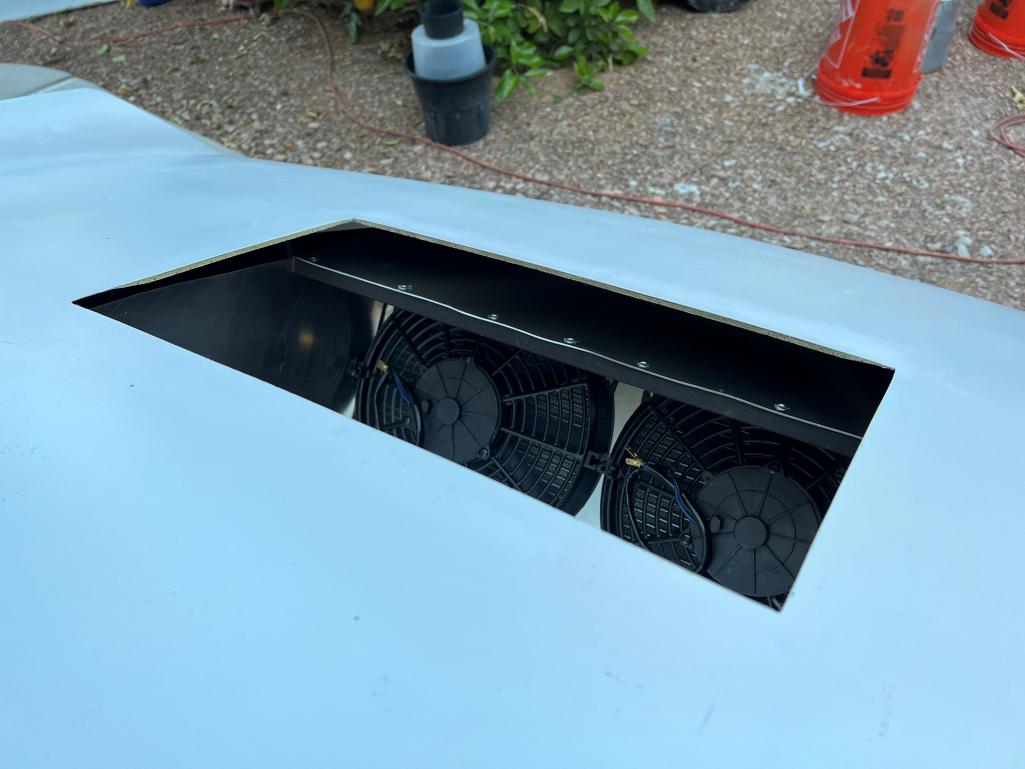 Here's a first try at covering the gap and providing some support for that section of the hood opening. 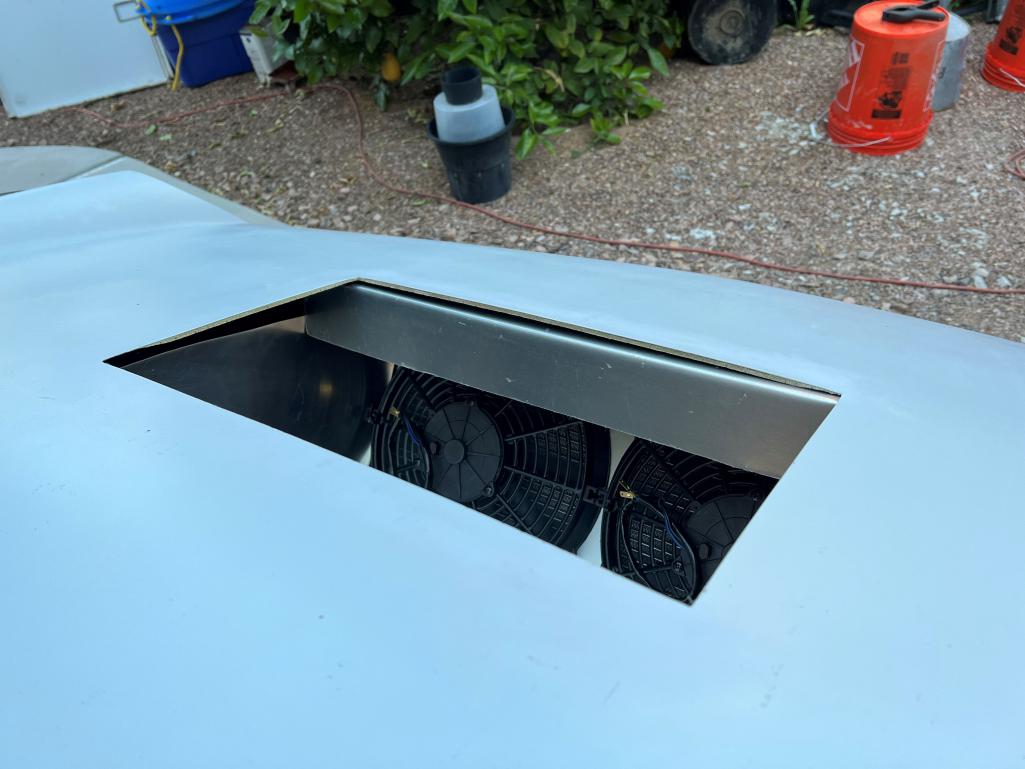 I'm thinking riveted to the cross support, and maybe a piece of foam across the top to protect the underside of the hood... (IMG:style_emoticons/default/idea.gif) Trying to stay in the KISS zone. |
|
|
|
| slowrodent |
Mar 28 2023, 09:07 AM
Post
#268
|
|
Member Group: Members Posts: 235 Joined: 29-February 20 From: Tucson/Oro Valley Member No.: 23,981 Region Association: Southwest Region |
A 3d-printed grate/grill would be awesome...
|
|
|
|
| Lilchopshop |
Mar 28 2023, 11:28 AM
Post
#269
|
|
Member Group: Members Posts: 115 Joined: 17-February 20 From: New York Member No.: 23,932 Region Association: North East States |
@mgarrison , I'm curious if you're worried about airflow getting under the hood and causing it to lift at high speeds? Are you planning on putting any sort of louvers on the big opening?
I'm also wondering about water getting into your duct or getting past the duct and ending up in what's left of your frunk. It feels like there should be some sort of gutter/diverter around the big opening in the hood that directs the water into the duct and then a drain hole/hose in the bottom of the duct to carry the water out the bottom of the car. These are the crazy things that those of us who don't live in sunny Arizona have to contemplate. (IMG:style_emoticons/default/blink.gif) |
|
|
|
| mgarrison |
Mar 28 2023, 11:51 AM
Post
#270
|
|
Member Group: Members Posts: 416 Joined: 14-February 20 From: Chandler, AZ Member No.: 23,922 Region Association: Southwest Region |
QUOTE(Lilchopshop @ Mar 28 2023, 10:28 AM) @mgarrison , I'm curious if you're worried about airflow getting under the hood and causing it to lift at high speeds? Are you planning on putting any sort of louvers on the big opening? I'm also wondering about water getting into your duct or getting past the duct and ending up in what's left of your frunk. It feels like there should be some sort of gutter/diverter around the big opening in the hood that directs the water into the duct and then a drain hole/hose in the bottom of the duct to carry the water out the bottom of the car. These are the crazy things that those of us who don't live in sunny Arizona have to contemplate. (IMG:style_emoticons/default/blink.gif) Not really concerned about air lifting the hood. Too many race examples that travel at much greater speeds without issues...Some examples from around these parts:  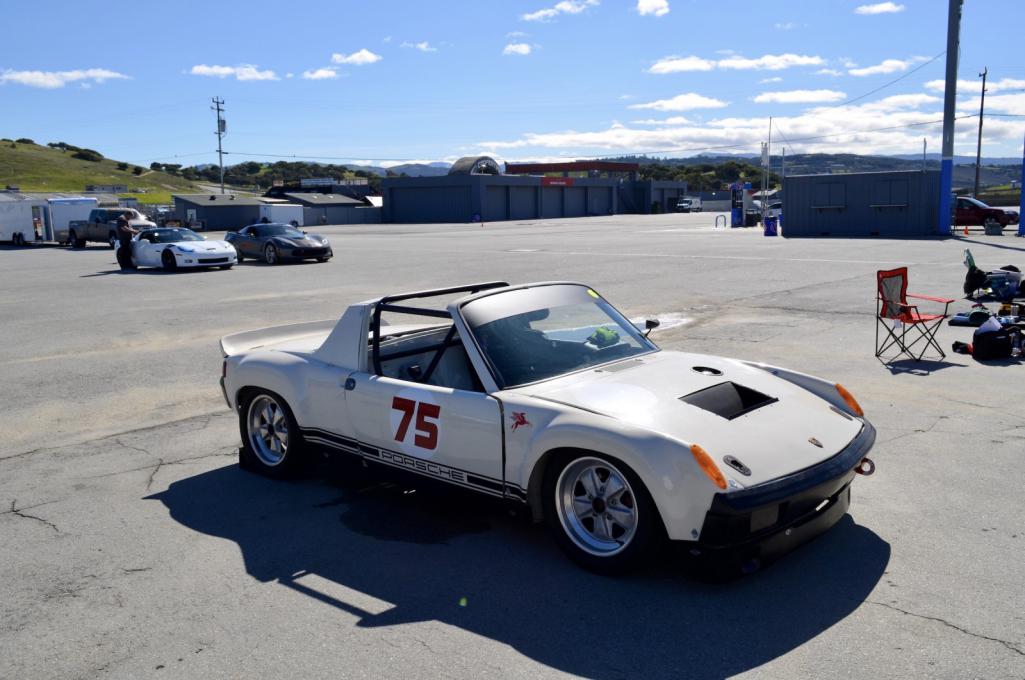 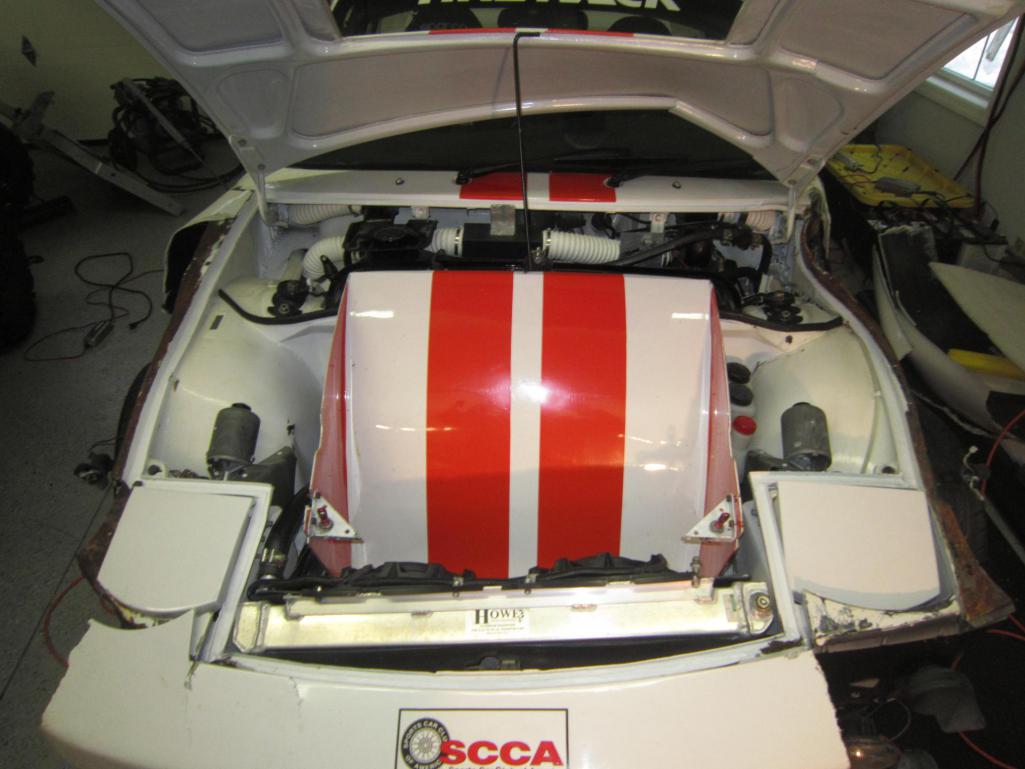  Also, my '03 EVO VIII had a similar vent on the aluminum hood, but with a louvered insert, and even my '19 Ford Raptor has a vented hood with a plastic louvered insert. Water drainage is definitely more of a thought - mostly from washing the car here in AZ! I plan to put a couple of drains in the bottom of the frunk in the lowest areas. I believe that's what these were designed for: https://914rubber.com/front-trunk-drain-tube-1 Mostly making it up as I go though! (IMG:style_emoticons/default/popcorn[1].gif) |
|
|
|
| Lilchopshop |
Mar 28 2023, 12:36 PM
Post
#271
|
|
Member Group: Members Posts: 115 Joined: 17-February 20 From: New York Member No.: 23,932 Region Association: North East States |
Sweet pictures! (IMG:style_emoticons/default/aktion035.gif) Dammit, now I want a hole in my hood! (IMG:style_emoticons/default/idea.gif)
|
|
|
|
| Chris914n6 |
Mar 28 2023, 12:57 PM
Post
#272
|
|
Jackstands are my life. Group: Members Posts: 3,536 Joined: 14-March 03 From: Las Vegas, NV Member No.: 431 Region Association: Southwest Region |
Normally a radiator fills from the top and sucks from the bottom. Idea is that it won't run out of water for the pump/motor until it's really low.
The Celica/MRS is an abnormal design. |
|
|
|
| mgarrison |
Mar 28 2023, 03:00 PM
Post
#273
|
|
Member Group: Members Posts: 416 Joined: 14-February 20 From: Chandler, AZ Member No.: 23,922 Region Association: Southwest Region |
QUOTE(Chris914n6 @ Mar 28 2023, 11:57 AM) Normally a radiator fills from the top and sucks from the bottom. Idea is that it won't run out of water for the pump/motor until it's really low. The Celica/MRS is an abnormal design. Yea, the Celica radiator is odd - why I called Mishimoto to see what their take was on the direction of flow in their version. Also why I crossed the lines in the frunk. Was easier to line up the hoses/connectors anyway. It will draw from the lower outlet and fill via the upper/higher inlet. I figured that was the most efficient flow direction... (IMG:style_emoticons/default/popcorn[1].gif) |
|
|
|
| mgarrison |
Mar 29 2023, 08:55 PM
Post
#274
|
|
Member Group: Members Posts: 416 Joined: 14-February 20 From: Chandler, AZ Member No.: 23,922 Region Association: Southwest Region |
Had some time this evening to spend on the 914. Still waiting on a couple of hose ends, but trying to keep moving forward...
Cut some steel mesh for the inlet. Still need to square away mounting it a bit more secure and get it painted black, but not too bad for the moment. 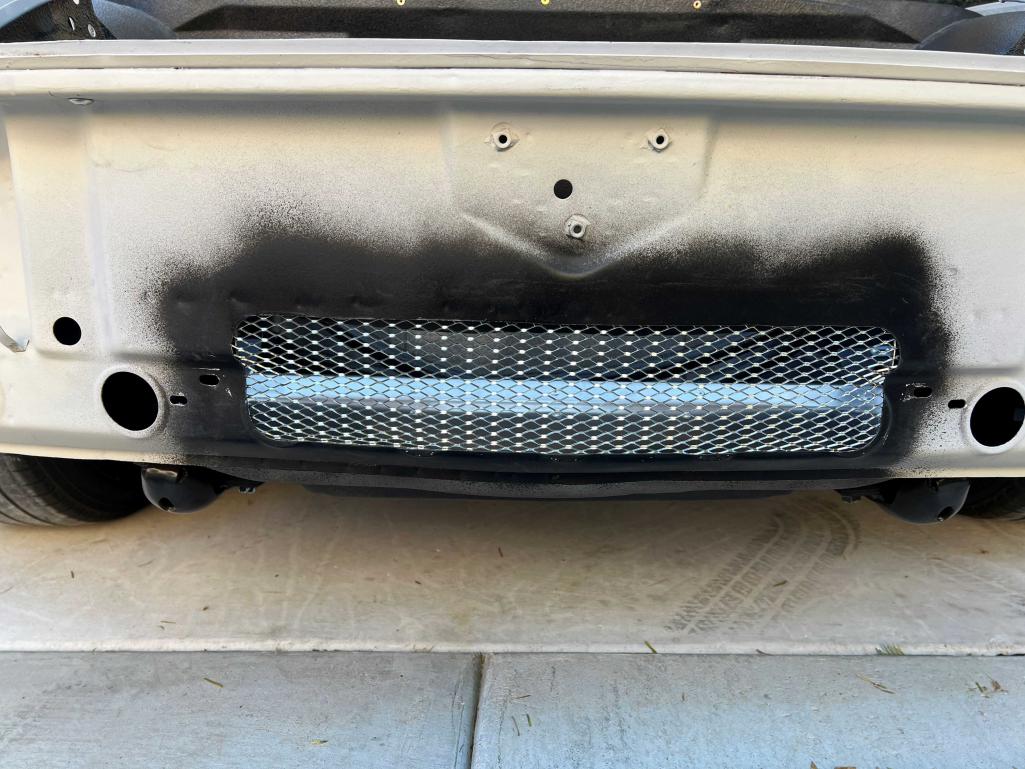 I got my block off plate and "Gurney flap" cut and mounted. Far, far, FAR from perfect/how I picture it in my teenie, tiny mind, but it's ok. I get the feeling I will never be "done", but that's ok in a lot of ways! *The plastic jug is the same dimensions as a 2.5qt round expansion tank...trying to work out where I have room to fit things. (IMG:style_emoticons/default/idea.gif) 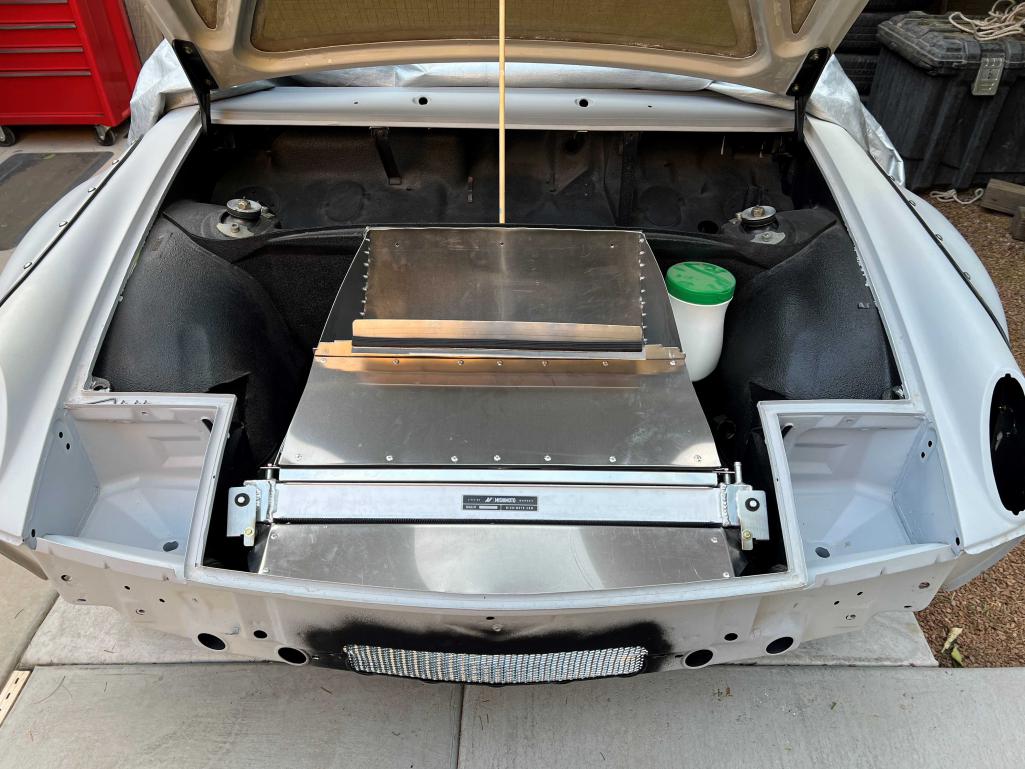 Seems to support the hood pretty well... 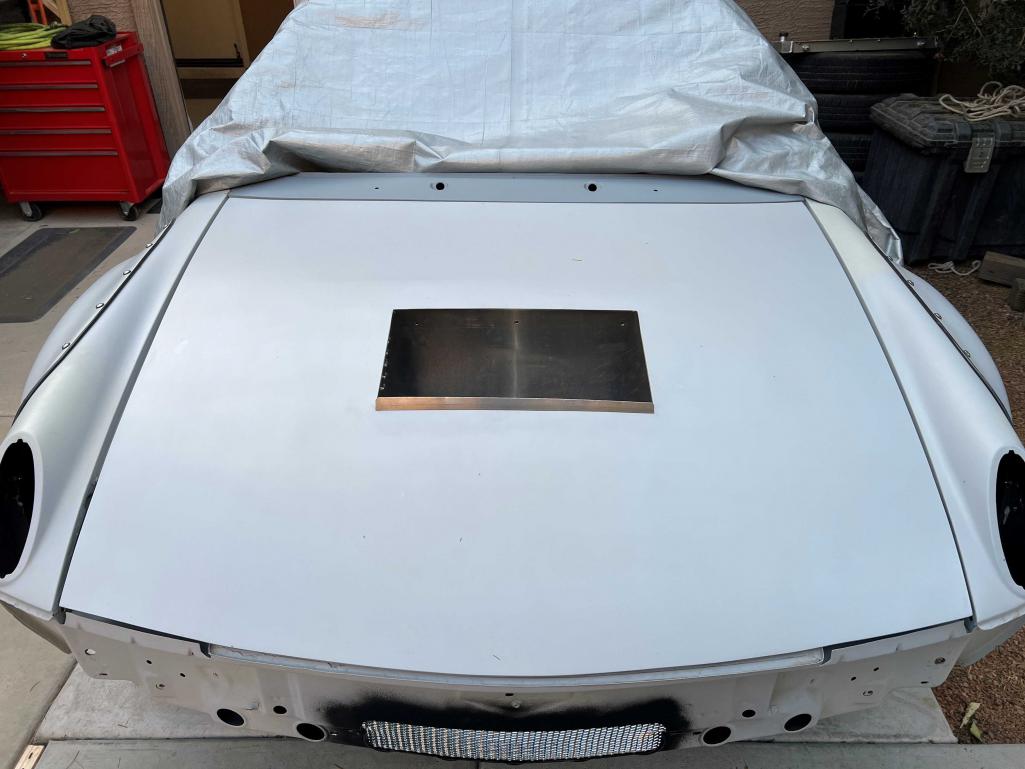 View from the inside is much improved.  |
|
|
|
| mgarrison |
Apr 3 2023, 10:43 AM
Post
#275
|
|
Member Group: Members Posts: 416 Joined: 14-February 20 From: Chandler, AZ Member No.: 23,922 Region Association: Southwest Region |
My expansion tank arrived. Time to figure out where it fits best and get it mounted. I originally planned on the driver's side so it was closest to the outlet on the radiator.
 That side proved a little too tight with the second outlet I'm not using is in exactly the wrong spot. So, over to the passenger's side we go.  A little bit more room on that side, and the plug for the extra port has room too. Confirmed it sits 3-4" higher than the outlets coming off the cylinder heads, and that it will clear the hood bracing, then mounted it with a couple of rivnuts.  Still room for a recovery/overflow tank on the driver's side, if its needed. Ordered the plug, and a 90 degree elbow for the outlet on the expansion tank. Still need to pickup some 3/8" hose, clamps, etc. at the local auto parts store (IMG:style_emoticons/default/smash.gif) |
|
|
|
| tygaboy |
Apr 3 2023, 11:56 AM
Post
#276
|
|
914 Guru Group: Members Posts: 5,827 Joined: 6-October 15 From: Petaluma, CA Member No.: 19,241 Region Association: Northern California |
It's so cool watching you work through all the things that come up as you custom fabricate your way to your one-of-a kind build. You're doing a splendid job of solving each challenge. Makes me want to steal some of your solutions...
Keep up the great work and keep the pics coming! (IMG:style_emoticons/default/popcorn[1].gif) |
|
|
|
| mgarrison |
Apr 3 2023, 02:39 PM
Post
#277
|
|
Member Group: Members Posts: 416 Joined: 14-February 20 From: Chandler, AZ Member No.: 23,922 Region Association: Southwest Region |
QUOTE(tygaboy @ Apr 3 2023, 10:56 AM) It's so cool watching you work through all the things that come up as you custom fabricate your way to your one-of-a kind build. You're doing a splendid job of solving each challenge. Makes me want to steal some of your solutions... Keep up the great work and keep the pics coming! (IMG:style_emoticons/default/popcorn[1].gif) Steal away - Lord knows I've stolen any and every idea I can from your builds! (IMG:style_emoticons/default/pray.gif) |
|
|
|
| Mayne |
Apr 3 2023, 08:22 PM
Post
#278
|
|
Member Group: Members Posts: 254 Joined: 28-February 17 From: NM Member No.: 20,880 Region Association: None |
Looks great. I can’t quite read the brand. Canton?
|
|
|
|
| mgarrison |
Apr 4 2023, 10:00 AM
Post
#279
|
|
Member Group: Members Posts: 416 Joined: 14-February 20 From: Chandler, AZ Member No.: 23,922 Region Association: Southwest Region |
QUOTE(Mayne @ Apr 3 2023, 07:22 PM) Looks great. I can’t quite read the brand. Canton? Yes, Canton 2.5qt 5" diameter expansion tank... |
|
|
|
| mgarrison |
Apr 10 2023, 12:45 PM
Post
#280
|
|
Member Group: Members Posts: 416 Joined: 14-February 20 From: Chandler, AZ Member No.: 23,922 Region Association: Southwest Region |
Had to be "Barn Dad" the last two Saturdays, but got a couple things done on the 914. With the concrete poured, I can at least use the Quick Jack without having to roll the 914 around to the garage.
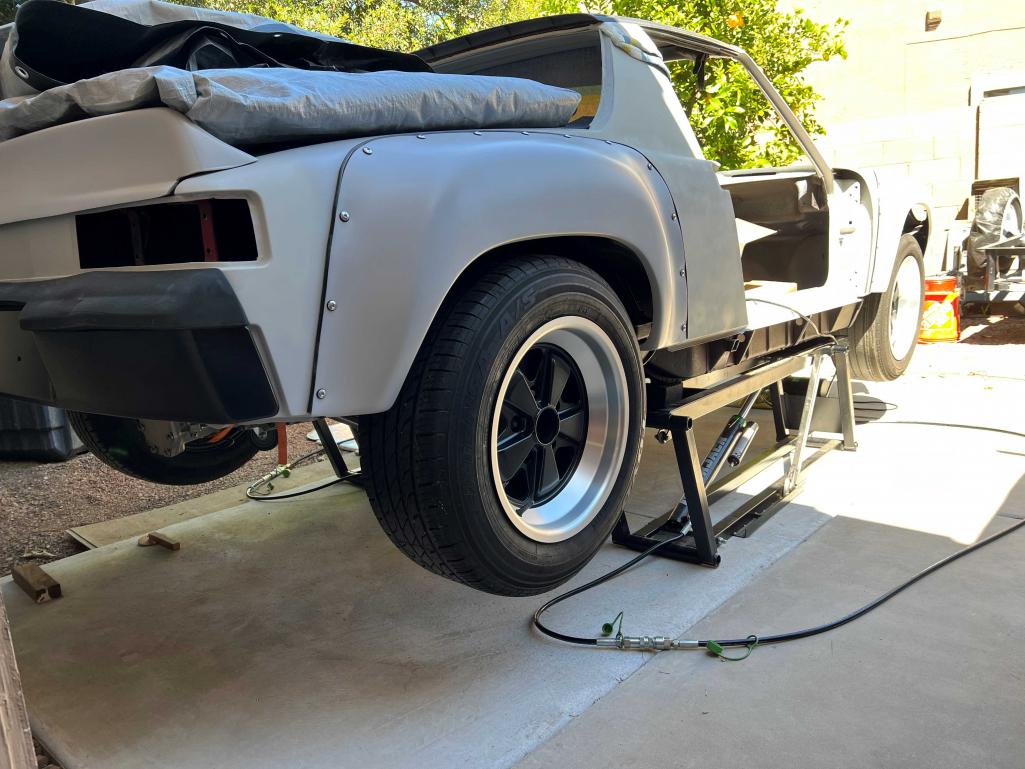 I managed to get the last -16AN hose end on. Had to do this one under the car as it was not long enough to pull out beside the car to install. -16 fittings are a real bear...hoping to not do those again this lifetime! But, they look cool and I like the idea they just unscrew.  My new fuel tank showed up only for me to discover I had an early style tank in my '74. Expansion tank mounts are not correct for the metal expansion tank I have. No charcoal canister in any of the parts that came off the car. We'll see if I need to correct the expansion tank mounts, or... (IMG:style_emoticons/default/confused24.gif) |
|
|
|
|
1 User(s) are reading this topic (1 Guests and 0 Anonymous Users)
0 Members:

|
Lo-Fi Version | Time is now: 11th June 2026 - 09:07 PM |
Invision Power Board
v9.1.4 © 2026 IPS, Inc.