|
|
|
Porsche, and the Porsche crest are registered trademarks of Dr. Ing. h.c. F. Porsche AG.
This site is not affiliated with Porsche in any way. Its only purpose is to provide an online forum for car enthusiasts. All other trademarks are property of their respective owners. |
|
|


| Morph914 |
 Mar 12 2020, 07:07 PM Mar 12 2020, 07:07 PM
Post
#21
|
|
Member  Group: Members Posts: 435 Joined: 22-August 16 From: St Augustine, FL Member No.: 20,326 Region Association: South East States |
I am more than a couple of years into my restoration of my ‘73 1.7 (now 2.0) but did not want to bore everyone with the same old stuff you have seen before. However, I am very thankful that many members here, take the time to post there work in detail. I have followed Brent’s (bbrock) post and have used many of his examples. In fact, I have adopted his idea of painting the trunks, cabin, underside first and now am doing the exterior panels. However, I do not have the cojones to paint mine myself.
I am getting close to having the car ready for paint. Once I finish this I will get the car back to a roller so I can flatbed to the paint shop. I want to use my old 4 lug Fuchs to sent to the paint shop and not my nice 5 lug Fuchs. This is where I need advice, I sent my 4 lug hubs to PMB to be converted to 5 lug and also purchased the kit. Since I no longer have the 4 lug hubs, what would be the easiest way to accomplish this. I know Ivan purchase a pair of 4 lug hubs, just wanted to make sure I am not missing something easier. Also, I want to know if I can install the stub axles without the axles just to get it to the paint shop. There will be no engine in the car. 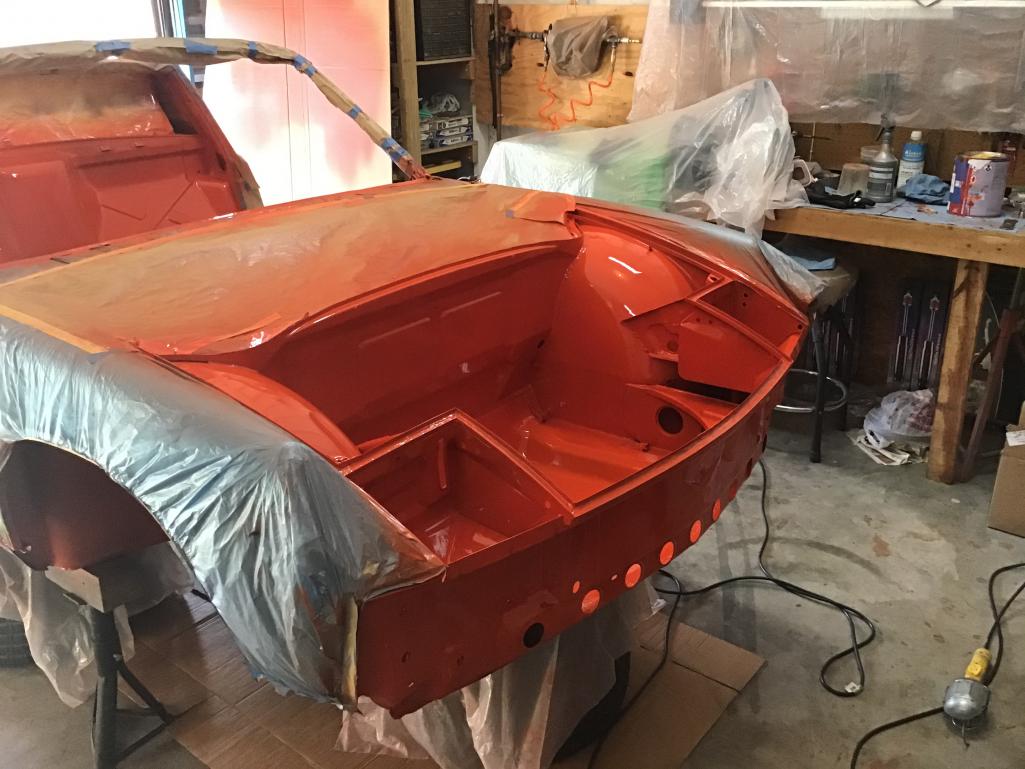 I want to use these wheels to take to the paint shop 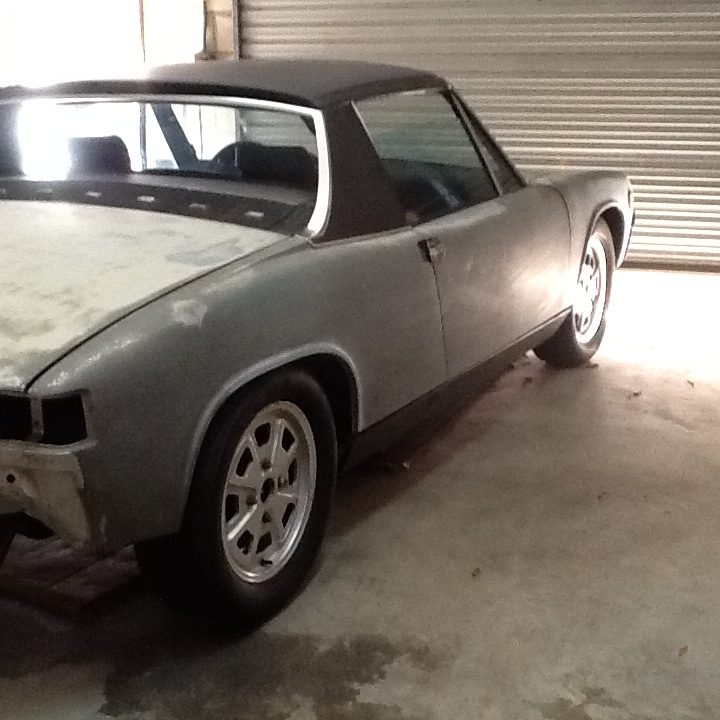 And not these 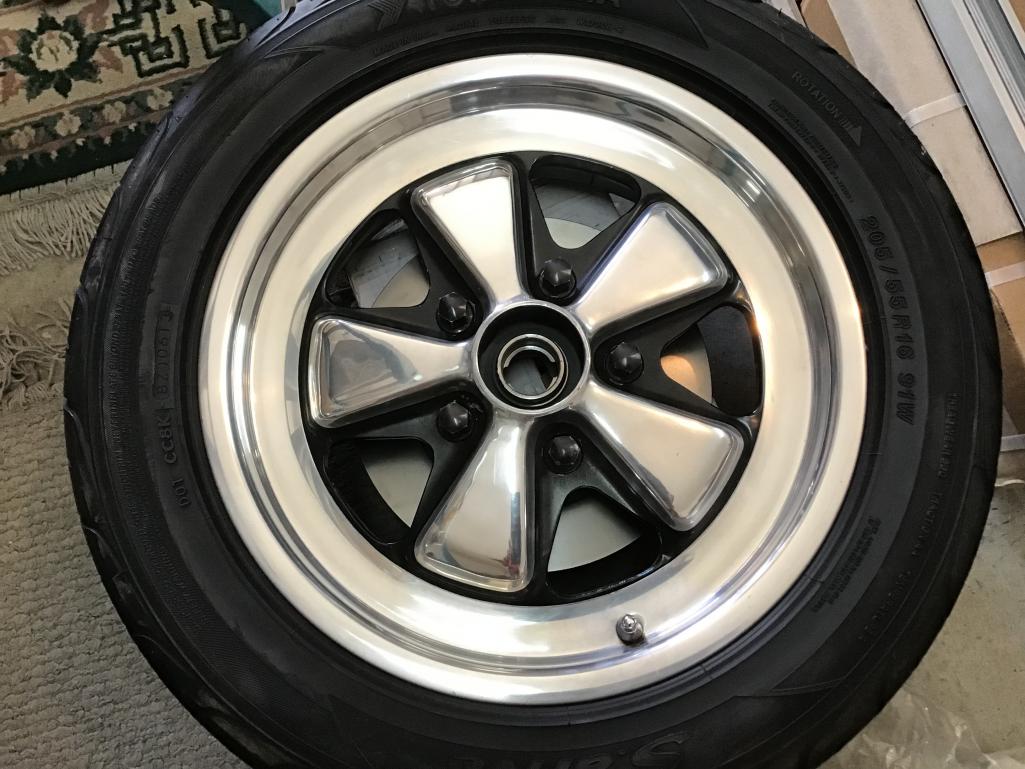 Cheers, John |
   |

 
|
Posts in this topic
 Morph914 John’s ‘73 Restoration Mar 12 2020, 07:07 PM
 mepstein If you haven't installed your five lug setup y... Mar 12 2020, 10:22 PM billh1963 I agree....don't use those 4 lug Fuchs for pai... Mar 13 2020, 04:17 AM Morph914 Thank you, maybe some out there has some 4 lug hub... Mar 13 2020, 04:45 AM Morph914 I guess I will continue the build postings here in... Sep 29 2020, 07:13 AM porsche914rick :driving: Sep 29 2020, 07:32 AM JOEPROPER Very nice progress. Inspiration for the reset of ... Sep 29 2020, 07:33 AM mepstein Looks amazing. :beer2: Sep 29 2020, 07:37 AM 76-914 To locate your thread or comments you've made ... Sep 29 2020, 08:17 AM Cairo94507 Very nice to see it all coming together. You are ... Sep 29 2020, 08:22 AM PanelBilly Everything looks so nice at this stage. Assembly i... Sep 29 2020, 10:18 AM Morph914 Thank you all for your comments.
I just received t... Sep 29 2020, 02:48 PM mepstein Keep the yoke all the way in. I would drill holes ... Sep 29 2020, 02:54 PM
mepstein If you haven't installed your five lug setup y... Mar 12 2020, 10:22 PM billh1963 I agree....don't use those 4 lug Fuchs for pai... Mar 13 2020, 04:17 AM Morph914 Thank you, maybe some out there has some 4 lug hub... Mar 13 2020, 04:45 AM Morph914 I guess I will continue the build postings here in... Sep 29 2020, 07:13 AM porsche914rick :driving: Sep 29 2020, 07:32 AM JOEPROPER Very nice progress. Inspiration for the reset of ... Sep 29 2020, 07:33 AM mepstein Looks amazing. :beer2: Sep 29 2020, 07:37 AM 76-914 To locate your thread or comments you've made ... Sep 29 2020, 08:17 AM Cairo94507 Very nice to see it all coming together. You are ... Sep 29 2020, 08:22 AM PanelBilly Everything looks so nice at this stage. Assembly i... Sep 29 2020, 10:18 AM Morph914 Thank you all for your comments.
I just received t... Sep 29 2020, 02:48 PM mepstein Keep the yoke all the way in. I would drill holes ... Sep 29 2020, 02:54 PM
 Morph914
Keep the yoke all the way in. I would drill holes... Sep 29 2020, 04:24 PM nditiz1 I have the same yoke and that's what I did. A... Sep 29 2020, 05:40 PM Morph914 Anyone know what the zip tied sleeve/ bushing is?
... Sep 30 2020, 05:29 AM VaccaRabite
Anyone know what the zip tied sleeve/ bushing is?... Sep 30 2020, 06:05 AM Morph914
Anyone know what the zip tied sleeve/ bushing is... Sep 30 2020, 09:07 AM Morph914 Since the weather is fantastic here today, I am wo... Sep 30 2020, 09:18 AM Morph914 I decided not to use this piece of vinyl due to th... Sep 30 2020, 08:40 PM Tdskip Keep the updates coming please. Sep 30 2020, 09:50 PM Morph914 Continuing to work on the dash, I received the 2 w... Oct 4 2020, 03:11 PM Morph914 These are the rear license plate lights. As you ca... Oct 5 2020, 08:28 PM Gint Nice work! Oct 6 2020, 06:23 PM Morph914 She is in! After shedding a few tears due to t... Oct 8 2020, 08:23 AM iankarr nice to see the rubber bands ;) Oct 8 2020, 08:51 AM Morph914
nice to see the rubber bands ;)
Thanks to you a... Oct 8 2020, 06:02 PM Morph914 I was able to finish with all the ducting today.
Oct 8 2020, 06:06 PM Morph914 I was able to get the dash top installed today. I�... Oct 16 2020, 01:54 PM turk22 Progress is great, the workmanship looks top notch... Oct 17 2020, 07:55 PM Mitox Great work; love the attention to detail Oct 17 2020, 08:03 PM Cairo94507 If you have it apart, I would do the bearing. Mig... Oct 18 2020, 06:10 AM Jett
If you have it apart, I would do the bearing. Mi... Oct 18 2020, 08:35 AM Morph914 Thank you all for the kind words of encouragement.... Oct 18 2020, 09:23 AM Morph914 Today I took apart the steering column
I have o... Oct 20 2020, 06:09 PM tygaboy John - You're doing a GREAT job on your car... Oct 20 2020, 06:34 PM Morph914
John - You're doing a GREAT job on your car... Oct 20 2020, 07:37 PM DRPHIL914
John - You're doing a GREAT job on your car... Oct 21 2020, 06:11 AM Morph914
[quote name='Morph914' post='2860499' date='Oct 2... Oct 23 2020, 07:31 PM Morph914 I received my carmagic switch for the windshield w... Oct 23 2020, 08:14 PM DRPHIL914 :popcorn:
i will be doing this soon as well and j... Oct 24 2020, 11:57 AM Morph914
:popcorn:
i will be doing this soon as well and ... Oct 25 2020, 05:25 PM FlacaProductions @Morph914 - are you running that switch straight ... Oct 25 2020, 08:53 AM Morph914
[b]@[url=http://www.914world.com/bbs2/index.php?s... Oct 25 2020, 05:32 PM zfisher6164
[quote name='FlacaProductions' post='2861651' dat... Oct 28 2020, 08:42 AM DRPHIL914
[quote name='FlacaProductions' post='2861651' dat... Dec 2 2020, 10:34 PM Morph914
[quote name='FlacaProductions' post='2861651' da... Dec 3 2020, 08:33 AM bbrock
[quote name='DRPHIL914' post='2871534' date='Dec ... Dec 3 2020, 08:43 AM Morph914 Finally received the upper bearing for the steerin... Nov 1 2020, 08:42 PM Morph914 I purchased this kit to clean and seal my gas tank... Nov 4 2020, 06:43 PM djway I don't think that is the proper routing for t... Nov 5 2020, 01:27 AM Morph914
I don't think that is the proper routing for ... Nov 5 2020, 12:16 PM Morph914 I discovered this today, after installing the dash... Nov 5 2020, 01:26 PM Gint I discovered this today, after installing the dash... Nov 7 2020, 03:15 PM Morph914 Figured it out, it has to go on the outside to tig... Nov 11 2020, 03:58 PM Morph914 Has anyone had any issues with the 914 Rubber dash... Nov 11 2020, 04:26 PM bbrock
Has anyone had any issues with the 914 Rubber das... Dec 2 2020, 09:10 PM Morph914
Has anyone had any issues with the 914 Rubber da... Dec 3 2020, 08:26 AM Morph914 I am getting ready to install the fuel pump on the... Dec 2 2020, 08:09 PM Morph914 So I already have the intermittent relay on my car... Dec 17 2020, 08:31 PM raynekat It's great that we have 914 Rubber.
Unfortunat... Dec 17 2020, 09:39 PM Morph914
It's great that we have 914 Rubber.
Unfortuna... Dec 18 2020, 11:24 AM Morph914 Starting to get some tidbits ready for the engine.... Dec 23 2020, 07:22 PM Morph914 After replacing some of the seals on my side shift... Jan 6 2021, 08:35 PM Morph914 Time to get the fan shroud cleaned up
Decid... Jan 24 2021, 05:16 PM Morph914 The pulley after fresh paint
I can’t remem... Jan 24 2021, 05:33 PM krazykonrad It looks like you're just a couple of steps ah... Jan 25 2021, 11:31 AM Morph914
It looks like you're just a couple of steps a... Jan 25 2021, 01:41 PM krazykonrad Your photos make sense now. Thanks for the info. t... Jan 25 2021, 03:23 PM Morph914 Trying to figure out if I have all my heater parts... Feb 14 2021, 02:13 PM Morph914 Time to clean and inspect the seat belt bits and p... Feb 25 2021, 08:05 PM DC_neun_vierzehn
Time to clean and inspect the seat belt bits and ... Mar 13 2021, 09:44 PM Morph914
Time to clean and inspect the seat belt bits and... Mar 14 2021, 08:16 AM Morph914 I was making fairly good progress today until my f... Mar 2 2021, 08:36 PM barefoot Is there any benefit to mounting the coil here ver... Mar 3 2021, 07:11 AM anderssj
Is there any benefit to mounting the coil here v... Mar 3 2021, 09:50 AM Morph914
Is there any benefit to mounting the coil here ... Mar 3 2021, 07:45 PM Morph914 Started on the vinyl last week, the weather has be... Mar 13 2021, 08:02 PM Morph914 Also worked on installing the vinyl on the floor
... Mar 13 2021, 08:21 PM bkrantz Looks great! We were in sync on targa vinyl, ... Mar 13 2021, 08:32 PM 930cabman This is great, thanks for posting and sharing all ... Mar 14 2021, 09:12 AM Morph914
This is great, thanks for posting and sharing all... Mar 15 2021, 11:58 AM Morph914 I pulled the targa top out to check the condition.... Mar 18 2021, 07:04 PM Morph914 Time for some window seal replacements. The new se... Mar 22 2021, 10:28 AM Morph914 Today I’m continuing with the refresh on my targ... Apr 6 2021, 12:32 PM 930cabman +1, looks great, check another item from the list Apr 6 2021, 12:51 PM Morph914 Time to get the engine off the stand so I can marr... Apr 17 2021, 08:34 PM bbrock Looking good! You made the right call install... Apr 17 2021, 08:48 PM Morph914
Looking good! You made the right call instal... Apr 18 2021, 01:39 PM bbrock
Looking good! You made the right call insta... Apr 18 2021, 02:17 PM 930cabman Looking good, keep the progress reports coming, in... Apr 18 2021, 01:50 PM 930cabman If it was easy, our kids would do it.
Lucky is t... Apr 18 2021, 02:30 PM Morph914 I’ve been working on the engine last couple of d... Apr 28 2021, 07:18 PM bbrock Looks like you have the green hose plugged into th... Apr 28 2021, 09:25 PM Dion Car is looking fantastic! Great work. I apprec... Apr 29 2021, 04:46 AM Morph914
Car is looking fantastic! Great work. I appre... Apr 29 2021, 10:28 AM bbrock BTW, where did you get the green vacuum hose? Apr 29 2021, 07:31 AM Morph914
BTW, where did you get the green vacuum hose?
... Apr 29 2021, 10:21 AM Root_Werks Looks clean and detailed, nice! Apr 29 2021, 10:43 AM 930cabman Lookin good and thanks for posting your progress. ... Apr 29 2021, 12:05 PM
Morph914
Keep the yoke all the way in. I would drill holes... Sep 29 2020, 04:24 PM nditiz1 I have the same yoke and that's what I did. A... Sep 29 2020, 05:40 PM Morph914 Anyone know what the zip tied sleeve/ bushing is?
... Sep 30 2020, 05:29 AM VaccaRabite
Anyone know what the zip tied sleeve/ bushing is?... Sep 30 2020, 06:05 AM Morph914
Anyone know what the zip tied sleeve/ bushing is... Sep 30 2020, 09:07 AM Morph914 Since the weather is fantastic here today, I am wo... Sep 30 2020, 09:18 AM Morph914 I decided not to use this piece of vinyl due to th... Sep 30 2020, 08:40 PM Tdskip Keep the updates coming please. Sep 30 2020, 09:50 PM Morph914 Continuing to work on the dash, I received the 2 w... Oct 4 2020, 03:11 PM Morph914 These are the rear license plate lights. As you ca... Oct 5 2020, 08:28 PM Gint Nice work! Oct 6 2020, 06:23 PM Morph914 She is in! After shedding a few tears due to t... Oct 8 2020, 08:23 AM iankarr nice to see the rubber bands ;) Oct 8 2020, 08:51 AM Morph914
nice to see the rubber bands ;)
Thanks to you a... Oct 8 2020, 06:02 PM Morph914 I was able to finish with all the ducting today.
Oct 8 2020, 06:06 PM Morph914 I was able to get the dash top installed today. I�... Oct 16 2020, 01:54 PM turk22 Progress is great, the workmanship looks top notch... Oct 17 2020, 07:55 PM Mitox Great work; love the attention to detail Oct 17 2020, 08:03 PM Cairo94507 If you have it apart, I would do the bearing. Mig... Oct 18 2020, 06:10 AM Jett
If you have it apart, I would do the bearing. Mi... Oct 18 2020, 08:35 AM Morph914 Thank you all for the kind words of encouragement.... Oct 18 2020, 09:23 AM Morph914 Today I took apart the steering column
I have o... Oct 20 2020, 06:09 PM tygaboy John - You're doing a GREAT job on your car... Oct 20 2020, 06:34 PM Morph914
John - You're doing a GREAT job on your car... Oct 20 2020, 07:37 PM DRPHIL914
John - You're doing a GREAT job on your car... Oct 21 2020, 06:11 AM Morph914
[quote name='Morph914' post='2860499' date='Oct 2... Oct 23 2020, 07:31 PM Morph914 I received my carmagic switch for the windshield w... Oct 23 2020, 08:14 PM DRPHIL914 :popcorn:
i will be doing this soon as well and j... Oct 24 2020, 11:57 AM Morph914
:popcorn:
i will be doing this soon as well and ... Oct 25 2020, 05:25 PM FlacaProductions @Morph914 - are you running that switch straight ... Oct 25 2020, 08:53 AM Morph914
[b]@[url=http://www.914world.com/bbs2/index.php?s... Oct 25 2020, 05:32 PM zfisher6164
[quote name='FlacaProductions' post='2861651' dat... Oct 28 2020, 08:42 AM DRPHIL914
[quote name='FlacaProductions' post='2861651' dat... Dec 2 2020, 10:34 PM Morph914
[quote name='FlacaProductions' post='2861651' da... Dec 3 2020, 08:33 AM bbrock
[quote name='DRPHIL914' post='2871534' date='Dec ... Dec 3 2020, 08:43 AM Morph914 Finally received the upper bearing for the steerin... Nov 1 2020, 08:42 PM Morph914 I purchased this kit to clean and seal my gas tank... Nov 4 2020, 06:43 PM djway I don't think that is the proper routing for t... Nov 5 2020, 01:27 AM Morph914
I don't think that is the proper routing for ... Nov 5 2020, 12:16 PM Morph914 I discovered this today, after installing the dash... Nov 5 2020, 01:26 PM Gint I discovered this today, after installing the dash... Nov 7 2020, 03:15 PM Morph914 Figured it out, it has to go on the outside to tig... Nov 11 2020, 03:58 PM Morph914 Has anyone had any issues with the 914 Rubber dash... Nov 11 2020, 04:26 PM bbrock
Has anyone had any issues with the 914 Rubber das... Dec 2 2020, 09:10 PM Morph914
Has anyone had any issues with the 914 Rubber da... Dec 3 2020, 08:26 AM Morph914 I am getting ready to install the fuel pump on the... Dec 2 2020, 08:09 PM Morph914 So I already have the intermittent relay on my car... Dec 17 2020, 08:31 PM raynekat It's great that we have 914 Rubber.
Unfortunat... Dec 17 2020, 09:39 PM Morph914
It's great that we have 914 Rubber.
Unfortuna... Dec 18 2020, 11:24 AM Morph914 Starting to get some tidbits ready for the engine.... Dec 23 2020, 07:22 PM Morph914 After replacing some of the seals on my side shift... Jan 6 2021, 08:35 PM Morph914 Time to get the fan shroud cleaned up
Decid... Jan 24 2021, 05:16 PM Morph914 The pulley after fresh paint
I can’t remem... Jan 24 2021, 05:33 PM krazykonrad It looks like you're just a couple of steps ah... Jan 25 2021, 11:31 AM Morph914
It looks like you're just a couple of steps a... Jan 25 2021, 01:41 PM krazykonrad Your photos make sense now. Thanks for the info. t... Jan 25 2021, 03:23 PM Morph914 Trying to figure out if I have all my heater parts... Feb 14 2021, 02:13 PM Morph914 Time to clean and inspect the seat belt bits and p... Feb 25 2021, 08:05 PM DC_neun_vierzehn
Time to clean and inspect the seat belt bits and ... Mar 13 2021, 09:44 PM Morph914
Time to clean and inspect the seat belt bits and... Mar 14 2021, 08:16 AM Morph914 I was making fairly good progress today until my f... Mar 2 2021, 08:36 PM barefoot Is there any benefit to mounting the coil here ver... Mar 3 2021, 07:11 AM anderssj
Is there any benefit to mounting the coil here v... Mar 3 2021, 09:50 AM Morph914
Is there any benefit to mounting the coil here ... Mar 3 2021, 07:45 PM Morph914 Started on the vinyl last week, the weather has be... Mar 13 2021, 08:02 PM Morph914 Also worked on installing the vinyl on the floor
... Mar 13 2021, 08:21 PM bkrantz Looks great! We were in sync on targa vinyl, ... Mar 13 2021, 08:32 PM 930cabman This is great, thanks for posting and sharing all ... Mar 14 2021, 09:12 AM Morph914
This is great, thanks for posting and sharing all... Mar 15 2021, 11:58 AM Morph914 I pulled the targa top out to check the condition.... Mar 18 2021, 07:04 PM Morph914 Time for some window seal replacements. The new se... Mar 22 2021, 10:28 AM Morph914 Today I’m continuing with the refresh on my targ... Apr 6 2021, 12:32 PM 930cabman +1, looks great, check another item from the list Apr 6 2021, 12:51 PM Morph914 Time to get the engine off the stand so I can marr... Apr 17 2021, 08:34 PM bbrock Looking good! You made the right call install... Apr 17 2021, 08:48 PM Morph914
Looking good! You made the right call instal... Apr 18 2021, 01:39 PM bbrock
Looking good! You made the right call insta... Apr 18 2021, 02:17 PM 930cabman Looking good, keep the progress reports coming, in... Apr 18 2021, 01:50 PM 930cabman If it was easy, our kids would do it.
Lucky is t... Apr 18 2021, 02:30 PM Morph914 I’ve been working on the engine last couple of d... Apr 28 2021, 07:18 PM bbrock Looks like you have the green hose plugged into th... Apr 28 2021, 09:25 PM Dion Car is looking fantastic! Great work. I apprec... Apr 29 2021, 04:46 AM Morph914
Car is looking fantastic! Great work. I appre... Apr 29 2021, 10:28 AM bbrock BTW, where did you get the green vacuum hose? Apr 29 2021, 07:31 AM Morph914
BTW, where did you get the green vacuum hose?
... Apr 29 2021, 10:21 AM Root_Werks Looks clean and detailed, nice! Apr 29 2021, 10:43 AM 930cabman Lookin good and thanks for posting your progress. ... Apr 29 2021, 12:05 PM  |
1 User(s) are reading this topic (1 Guests and 0 Anonymous Users)
0 Members:

|
Lo-Fi Version | Time is now: 8th May 2026 - 02:35 PM |
Invision Power Board
v9.1.4 © 2026 IPS, Inc.