|
|
|
Porsche, and the Porsche crest are registered trademarks of Dr. Ing. h.c. F. Porsche AG.
This site is not affiliated with Porsche in any way. Its only purpose is to provide an online forum for car enthusiasts. All other trademarks are property of their respective owners. |
|
|


| Root_Werks |
 Mar 25 2020, 11:22 AM Mar 25 2020, 11:22 AM
Post
#181
|
|
Village Idiot  Group: Members Posts: 9,031 Joined: 25-May 04 From: About 15NM from Canada Member No.: 2,105 Region Association: Pacific Northwest |
Michelle and I picked up our new to us 914-6 over the weekend. We practiced social distancing and kept safe. Two days home, 920 miles, the 914 never missed a beat.
Here's a picture at a rest stop about 30% of the way home. Attached thumbnail(s) 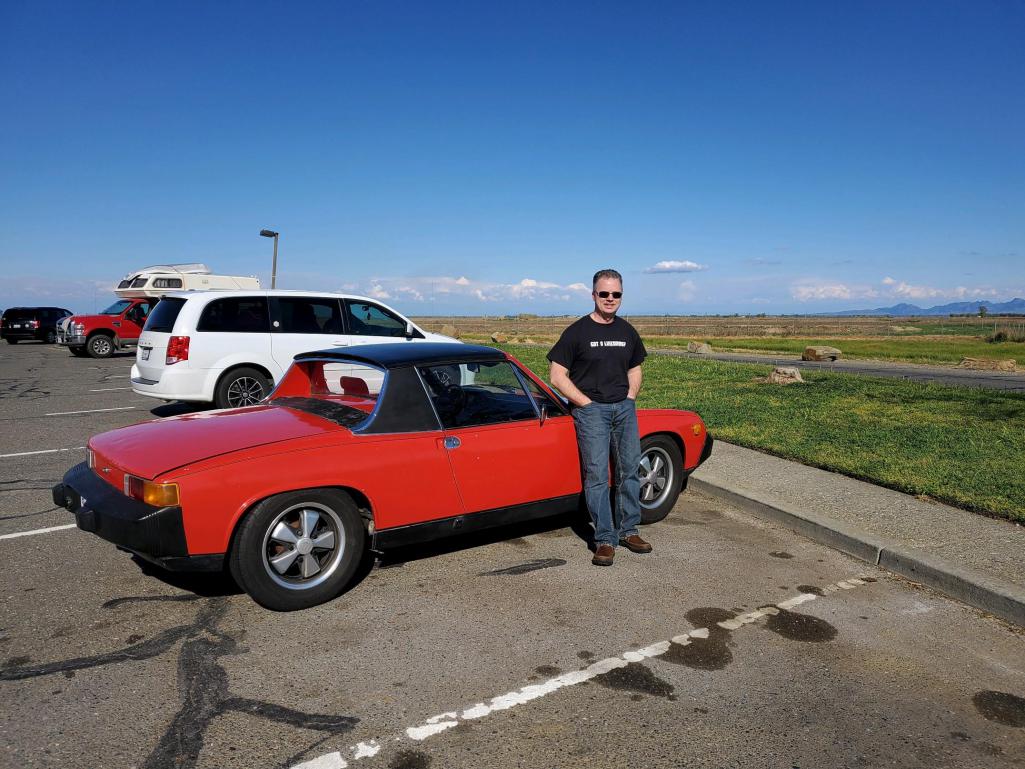
|
   |

 
|
Posts in this topic
 Root_Werks Freshening up an older 914-6 conversion: Mar 25 2020, 11:22 AM
 Root_Werks The engine is a 2.7 with CIS, Aluminum case, 993 c... Mar 25 2020, 11:26 AM Tom Dan,
Good to hear you are back in 914's. N... Mar 25 2020, 11:37 AM
Root_Werks The engine is a 2.7 with CIS, Aluminum case, 993 c... Mar 25 2020, 11:26 AM Tom Dan,
Good to hear you are back in 914's. N... Mar 25 2020, 11:37 AM
 Root_Werks
Dan,
Good to hear you are back in 914's. ... Mar 25 2020, 12:59 PM ValcoOscar Nice score....
Need more details and pictures PLE... Mar 25 2020, 11:39 AM PanelBilly I’d like to see how they used the 993 heat excha... Mar 25 2020, 11:42 AM Cairo94507 Congrats on your new car and a successful, safe tr... Mar 25 2020, 11:47 AM Root_Werks Picture of the 993 heater boxes.
The heater works... Mar 25 2020, 12:09 PM TravisNeff I like it! congrats Mar 25 2020, 01:23 PM 914werke :first: Mar 25 2020, 01:27 PM Jett Nice car! Mar 25 2020, 01:35 PM Root_Werks With building a house as my first priority, I... Apr 8 2020, 09:10 AM Root_Werks And this is why the paint/color change will happen... Apr 8 2020, 09:24 AM bigkensteele
And this is why the paint/color change will happe... Apr 8 2020, 06:00 PM Sprout Congratulations! Sounds like it was a great, l... Apr 8 2020, 09:38 AM IronHillRestorations :Qarl: Nice find! Sounds like a fun car with t... Apr 8 2020, 10:42 AM Mark Henry Is the case aluminum? There's $10k right ... Apr 8 2020, 02:51 PM mb911 993 heat exchangers work great.. They are not equa... Apr 8 2020, 03:28 PM Root_Werks
993 heat exchangers work great.. They are not equ... Apr 8 2020, 03:56 PM mb911
[quote name='mb911' post='2802159' date='Apr 8 20... Apr 8 2020, 03:58 PM windforfun Congrats. You're a lucky guy! Apr 8 2020, 03:40 PM mb911 Maddog is the producer of engine mounts and that i... Apr 8 2020, 03:59 PM Root_Werks
Maddog is the producer of engine mounts and that ... Apr 8 2020, 04:46 PM mb911
Maddog is the producer of engine mounts and that... Apr 8 2020, 04:52 PM jim_hoyland Nice Dan,HAVE FUN :)
Remember this beauty.... Apr 8 2020, 04:52 PM Root_Werks
Nice Dan,HAVE FUN :)
Remember this beauty....
... Apr 9 2020, 08:36 AM Tdskip Belated congratulations @Root_Werks ! Apr 8 2020, 06:37 PM eric9144 Awesome!! Congratulations @Root_Werks :... Apr 8 2020, 08:46 PM davehg Congrats and nice to see another 2.7 conversion in... Apr 9 2020, 12:53 AM sixnotfour Dan, the last I heard it was at a body shop ..agai... Apr 9 2020, 11:21 AM Root_Werks
Dan, the last I heard it was at a body shop ..aga... Apr 10 2020, 11:23 AM Bleyseng a pic from awhile ago Apr 22 2020, 12:05 PM Root_Werks If memory serves, I believe I was picking up a sol... Apr 22 2020, 12:23 PM sixnotfour HaHa, I bought a 914-6 and parts from Craig, That ... Apr 22 2020, 02:55 PM Root_Werks Tinkered on the 914 today, swapped bumpers and rea... Nov 27 2020, 04:10 PM Root_Werks Found these tucked away Nov 27 2020, 05:11 PM mb911 Score. Nov 27 2020, 05:15 PM Root_Werks
Score.
Totally unexpected one at that. Bought... Nov 27 2020, 10:20 PM KELTY360
Score.
Totally unexpected one at that. Bough... Nov 27 2020, 11:43 PM Root_Werks
[quote name='Root_Werks' post='2870092' date='Nov... Nov 30 2020, 09:40 AM KELTY360
[quote name='Root_Werks' post='2870092' date='No... Nov 30 2020, 02:04 PM mb911
Score.
Totally unexpected one at that. Bough... Nov 28 2020, 06:30 AM Root_Werks
[quote name='Root_Werks' post='2870092' date='Nov... Nov 28 2020, 06:57 PM infraredcalvin Nice to see the 993 HEs on a 6, I’d like to see ... Nov 28 2020, 01:06 AM Rand Does us all good seeing this! Nov 28 2020, 07:26 PM pete-stevers Hey Dan!!It is great to see you back into ... Dec 13 2020, 04:14 PM Root_Werks
Hey Dan!!It is great to see you back into... Dec 14 2020, 11:32 AM pete-stevers
Hey Dan!!It is great to see you back int... Dec 18 2020, 11:56 PM Root_Werks Little update on this yet to be started project:
... Dec 14 2020, 11:36 AM Root_Werks Sourced a nicer hood as the original hood would ha... Feb 1 2021, 10:43 AM Root_Werks Another picture showing all the colors. :) Feb 1 2021, 10:51 AM Root_Werks Still trying to get the 914 prepped for body work ... Mar 8 2021, 11:20 AM Root_Werks After almost exactly one year after driving the 98... Mar 19 2021, 04:59 PM Root_Werks Forgot:
Swapped out the plastic 3-pod gauge face ... Mar 19 2021, 05:01 PM Cairo94507 I like the work you are doing to that car. :beer... Mar 19 2021, 06:00 PM Root_Werks Got around to welding in the trunk floor to patch ... Mar 22 2021, 07:57 PM Root_Werks Little nervous about pulling off the passenger sid... Mar 22 2021, 08:01 PM Cairo94507 That's amazingly clean, even for a CA car. Th... Mar 23 2021, 07:56 AM Root_Werks
That's amazingly clean, even for a CA car. T... Mar 23 2021, 08:49 AM rhodyguy Have you nailed down a paint guy or doing it at ho... Mar 23 2021, 08:54 AM Root_Werks
Have you nailed down a paint guy or doing it at h... Mar 23 2021, 09:22 AM Root_Werks Bad pic, but better now. 944 steering wheel, wires... Mar 24 2021, 09:57 PM Root_Werks Hard to explain what it takes to undo an AC instal... Mar 24 2021, 10:01 PM Root_Werks Two new eyebrows, drivers side was welded on. Ugh.... Apr 3 2021, 03:35 PM Root_Werks The welded brow that had to be cut out.
Note the ... Apr 3 2021, 03:36 PM Root_Werks Almost ready for the body/paint shop. Side marker... Apr 9 2021, 12:40 PM Root_Werks Pulled the fresh airbox out along with wiper assem... Apr 9 2021, 12:42 PM Root_Werks Here's another bad picture of the interior wit... Apr 9 2021, 12:45 PM 914werke So you've found/decided on a paint shop? Apr 9 2021, 01:19 PM Root_Werks
So you've found/decided on a paint shop?
St... Apr 9 2021, 02:17 PM Root_Werks Going to correct this with a proper welded 90 turn... Apr 27 2021, 09:27 PM flyer86d I see you have a Luscombe. Very nice!
Charlie Apr 28 2021, 03:32 AM Root_Werks
I see you have a Luscombe. Very nice!
Charli... Apr 28 2021, 09:49 AM AZBanks
I see you have a Luscombe. Very nice!
Charl... Apr 28 2021, 01:21 PM Root_Werks Well, the "Good Cooler" is going bye-bye... Apr 28 2021, 09:51 AM mb911 I might have missed it but are you going to chrome... Apr 28 2021, 10:01 AM Root_Werks
I might have missed it but are you going to chrom... Apr 28 2021, 10:50 AM Root_Werks Still have a couple of weeks until I tow my 914 to... May 6 2021, 03:36 PM horizontally-opposed
Still have a couple of weeks until I tow my 914 t... May 11 2021, 09:12 AM Root_Werks
Still have a couple of weeks until I tow my 914 ... May 11 2021, 09:17 AM Root_Werks Removed the rear window, it was silly-coned in fro... May 7 2021, 09:37 AM Root_Werks I was pretty certain I'd have to replace the b... May 7 2021, 09:39 AM boxstr Dan, good evening. Glad to see that you are still ... May 7 2021, 09:03 PM Root_Werks
Dan, good evening. Glad to see that you are still... May 11 2021, 08:59 AM Root_Werks Pulled the engine to redo some things and replace ... May 13 2021, 10:02 AM Root_Werks Inside the engine bay, you can see the mount plate... May 13 2021, 10:03 AM Root_Werks Had to Dremel, cold chisel and grind for a bit of ... May 13 2021, 10:06 AM Root_Werks The pieces from the constructed mount: May 13 2021, 10:07 AM Root_Werks Maddogs mount welded in place, sorry for the fuzzy... May 13 2021, 10:08 AM Root_Werks Another fuzzy picture, dang, gotta figure out what... May 19 2021, 03:49 PM Root_Werks Done enough with the engine bay. Lots and lots of... May 20 2021, 03:06 PM Root_Werks Found a color in spray can that was sort of close ... May 20 2021, 03:10 PM Root_Werks Moved the Brake Pressure Regulator, new lines from... May 26 2021, 08:43 AM Root_Werks Started installing MD's inner long stiffening ... Jun 9 2021, 10:00 PM Root_Werks Hardest part is keeping metal tight against long. ... Jun 9 2021, 10:04 PM nditiz1 Can you provide more pics of your regulator reloca... Jun 10 2021, 05:29 AM Root_Werks
Can you provide more pics of your regulator reloc... Jun 10 2021, 08:46 AM Root_Werks Finished up the inner longitudinal stiffening kit ... Jun 11 2021, 09:44 AM Root_Werks Quick shot of the new Hi-Torque starter, ground ca... Jun 11 2021, 12:01 PM rjames Nice progress, Dan. Looking forward to seeing the ... Jun 11 2021, 03:05 PM
Root_Werks
Dan,
Good to hear you are back in 914's. ... Mar 25 2020, 12:59 PM ValcoOscar Nice score....
Need more details and pictures PLE... Mar 25 2020, 11:39 AM PanelBilly I’d like to see how they used the 993 heat excha... Mar 25 2020, 11:42 AM Cairo94507 Congrats on your new car and a successful, safe tr... Mar 25 2020, 11:47 AM Root_Werks Picture of the 993 heater boxes.
The heater works... Mar 25 2020, 12:09 PM TravisNeff I like it! congrats Mar 25 2020, 01:23 PM 914werke :first: Mar 25 2020, 01:27 PM Jett Nice car! Mar 25 2020, 01:35 PM Root_Werks With building a house as my first priority, I... Apr 8 2020, 09:10 AM Root_Werks And this is why the paint/color change will happen... Apr 8 2020, 09:24 AM bigkensteele
And this is why the paint/color change will happe... Apr 8 2020, 06:00 PM Sprout Congratulations! Sounds like it was a great, l... Apr 8 2020, 09:38 AM IronHillRestorations :Qarl: Nice find! Sounds like a fun car with t... Apr 8 2020, 10:42 AM Mark Henry Is the case aluminum? There's $10k right ... Apr 8 2020, 02:51 PM mb911 993 heat exchangers work great.. They are not equa... Apr 8 2020, 03:28 PM Root_Werks
993 heat exchangers work great.. They are not equ... Apr 8 2020, 03:56 PM mb911
[quote name='mb911' post='2802159' date='Apr 8 20... Apr 8 2020, 03:58 PM windforfun Congrats. You're a lucky guy! Apr 8 2020, 03:40 PM mb911 Maddog is the producer of engine mounts and that i... Apr 8 2020, 03:59 PM Root_Werks
Maddog is the producer of engine mounts and that ... Apr 8 2020, 04:46 PM mb911
Maddog is the producer of engine mounts and that... Apr 8 2020, 04:52 PM jim_hoyland Nice Dan,HAVE FUN :)
Remember this beauty.... Apr 8 2020, 04:52 PM Root_Werks
Nice Dan,HAVE FUN :)
Remember this beauty....
... Apr 9 2020, 08:36 AM Tdskip Belated congratulations @Root_Werks ! Apr 8 2020, 06:37 PM eric9144 Awesome!! Congratulations @Root_Werks :... Apr 8 2020, 08:46 PM davehg Congrats and nice to see another 2.7 conversion in... Apr 9 2020, 12:53 AM sixnotfour Dan, the last I heard it was at a body shop ..agai... Apr 9 2020, 11:21 AM Root_Werks
Dan, the last I heard it was at a body shop ..aga... Apr 10 2020, 11:23 AM Bleyseng a pic from awhile ago Apr 22 2020, 12:05 PM Root_Werks If memory serves, I believe I was picking up a sol... Apr 22 2020, 12:23 PM sixnotfour HaHa, I bought a 914-6 and parts from Craig, That ... Apr 22 2020, 02:55 PM Root_Werks Tinkered on the 914 today, swapped bumpers and rea... Nov 27 2020, 04:10 PM Root_Werks Found these tucked away Nov 27 2020, 05:11 PM mb911 Score. Nov 27 2020, 05:15 PM Root_Werks
Score.
Totally unexpected one at that. Bought... Nov 27 2020, 10:20 PM KELTY360
Score.
Totally unexpected one at that. Bough... Nov 27 2020, 11:43 PM Root_Werks
[quote name='Root_Werks' post='2870092' date='Nov... Nov 30 2020, 09:40 AM KELTY360
[quote name='Root_Werks' post='2870092' date='No... Nov 30 2020, 02:04 PM mb911
Score.
Totally unexpected one at that. Bough... Nov 28 2020, 06:30 AM Root_Werks
[quote name='Root_Werks' post='2870092' date='Nov... Nov 28 2020, 06:57 PM infraredcalvin Nice to see the 993 HEs on a 6, I’d like to see ... Nov 28 2020, 01:06 AM Rand Does us all good seeing this! Nov 28 2020, 07:26 PM pete-stevers Hey Dan!!It is great to see you back into ... Dec 13 2020, 04:14 PM Root_Werks
Hey Dan!!It is great to see you back into... Dec 14 2020, 11:32 AM pete-stevers
Hey Dan!!It is great to see you back int... Dec 18 2020, 11:56 PM Root_Werks Little update on this yet to be started project:
... Dec 14 2020, 11:36 AM Root_Werks Sourced a nicer hood as the original hood would ha... Feb 1 2021, 10:43 AM Root_Werks Another picture showing all the colors. :) Feb 1 2021, 10:51 AM Root_Werks Still trying to get the 914 prepped for body work ... Mar 8 2021, 11:20 AM Root_Werks After almost exactly one year after driving the 98... Mar 19 2021, 04:59 PM Root_Werks Forgot:
Swapped out the plastic 3-pod gauge face ... Mar 19 2021, 05:01 PM Cairo94507 I like the work you are doing to that car. :beer... Mar 19 2021, 06:00 PM Root_Werks Got around to welding in the trunk floor to patch ... Mar 22 2021, 07:57 PM Root_Werks Little nervous about pulling off the passenger sid... Mar 22 2021, 08:01 PM Cairo94507 That's amazingly clean, even for a CA car. Th... Mar 23 2021, 07:56 AM Root_Werks
That's amazingly clean, even for a CA car. T... Mar 23 2021, 08:49 AM rhodyguy Have you nailed down a paint guy or doing it at ho... Mar 23 2021, 08:54 AM Root_Werks
Have you nailed down a paint guy or doing it at h... Mar 23 2021, 09:22 AM Root_Werks Bad pic, but better now. 944 steering wheel, wires... Mar 24 2021, 09:57 PM Root_Werks Hard to explain what it takes to undo an AC instal... Mar 24 2021, 10:01 PM Root_Werks Two new eyebrows, drivers side was welded on. Ugh.... Apr 3 2021, 03:35 PM Root_Werks The welded brow that had to be cut out.
Note the ... Apr 3 2021, 03:36 PM Root_Werks Almost ready for the body/paint shop. Side marker... Apr 9 2021, 12:40 PM Root_Werks Pulled the fresh airbox out along with wiper assem... Apr 9 2021, 12:42 PM Root_Werks Here's another bad picture of the interior wit... Apr 9 2021, 12:45 PM 914werke So you've found/decided on a paint shop? Apr 9 2021, 01:19 PM Root_Werks
So you've found/decided on a paint shop?
St... Apr 9 2021, 02:17 PM Root_Werks Going to correct this with a proper welded 90 turn... Apr 27 2021, 09:27 PM flyer86d I see you have a Luscombe. Very nice!
Charlie Apr 28 2021, 03:32 AM Root_Werks
I see you have a Luscombe. Very nice!
Charli... Apr 28 2021, 09:49 AM AZBanks
I see you have a Luscombe. Very nice!
Charl... Apr 28 2021, 01:21 PM Root_Werks Well, the "Good Cooler" is going bye-bye... Apr 28 2021, 09:51 AM mb911 I might have missed it but are you going to chrome... Apr 28 2021, 10:01 AM Root_Werks
I might have missed it but are you going to chrom... Apr 28 2021, 10:50 AM Root_Werks Still have a couple of weeks until I tow my 914 to... May 6 2021, 03:36 PM horizontally-opposed
Still have a couple of weeks until I tow my 914 t... May 11 2021, 09:12 AM Root_Werks
Still have a couple of weeks until I tow my 914 ... May 11 2021, 09:17 AM Root_Werks Removed the rear window, it was silly-coned in fro... May 7 2021, 09:37 AM Root_Werks I was pretty certain I'd have to replace the b... May 7 2021, 09:39 AM boxstr Dan, good evening. Glad to see that you are still ... May 7 2021, 09:03 PM Root_Werks
Dan, good evening. Glad to see that you are still... May 11 2021, 08:59 AM Root_Werks Pulled the engine to redo some things and replace ... May 13 2021, 10:02 AM Root_Werks Inside the engine bay, you can see the mount plate... May 13 2021, 10:03 AM Root_Werks Had to Dremel, cold chisel and grind for a bit of ... May 13 2021, 10:06 AM Root_Werks The pieces from the constructed mount: May 13 2021, 10:07 AM Root_Werks Maddogs mount welded in place, sorry for the fuzzy... May 13 2021, 10:08 AM Root_Werks Another fuzzy picture, dang, gotta figure out what... May 19 2021, 03:49 PM Root_Werks Done enough with the engine bay. Lots and lots of... May 20 2021, 03:06 PM Root_Werks Found a color in spray can that was sort of close ... May 20 2021, 03:10 PM Root_Werks Moved the Brake Pressure Regulator, new lines from... May 26 2021, 08:43 AM Root_Werks Started installing MD's inner long stiffening ... Jun 9 2021, 10:00 PM Root_Werks Hardest part is keeping metal tight against long. ... Jun 9 2021, 10:04 PM nditiz1 Can you provide more pics of your regulator reloca... Jun 10 2021, 05:29 AM Root_Werks
Can you provide more pics of your regulator reloc... Jun 10 2021, 08:46 AM Root_Werks Finished up the inner longitudinal stiffening kit ... Jun 11 2021, 09:44 AM Root_Werks Quick shot of the new Hi-Torque starter, ground ca... Jun 11 2021, 12:01 PM rjames Nice progress, Dan. Looking forward to seeing the ... Jun 11 2021, 03:05 PM  |
1 User(s) are reading this topic (1 Guests and 0 Anonymous Users)
0 Members:

|
Lo-Fi Version | Time is now: 26th July 2026 - 05:07 PM |
Invision Power Board
v9.1.4 © 2026 IPS, Inc.