|
|
|
Porsche, and the Porsche crest are registered trademarks of Dr. Ing. h.c. F. Porsche AG.
This site is not affiliated with Porsche in any way. Its only purpose is to provide an online forum for car enthusiasts. All other trademarks are property of their respective owners. |
|
|

  |

| technicalninja |
 Mar 21 2023, 10:17 AM Mar 21 2023, 10:17 AM
Post
#61
|
|
Advanced Member  Group: Members Posts: 2,531 Joined: 31-January 23 From: Granbury Texas Member No.: 27,135 Region Association: Southwest Region |
QUOTE(nditiz1 @ Mar 21 2023, 10:29 AM)  Timing could be off, but I believe you ran it up to 3500 and set the timing to 27/ the mark on the pulley. If you did, then the timing is correct, no need to touch the timing And here is where my 914 lack of knowledge might be hurting me... If it really has a timing mark of 27 degrees, then that is a mechanical advance fully in mark and it SHOULD be set at high RPM. If this is the case my previous post is hogwash... I was not aware of a high speed mark and I apologize if this is the case... |
   |

 
|
| nditiz1 |
Mar 21 2023, 10:18 AM
Post
#62
|
|
Senior Member Group: Members Posts: 1,272 Joined: 26-May 15 From: Mount Airy, Maryland Member No.: 18,763 Region Association: MidAtlantic Region |
Yes please retract your post (IMG:style_emoticons/default/biggrin.gif)
Just so we are clear, there are at least 2 ways to set the full advance timing with a timing light at 3500rpm. As the OP did it with the gun having no digital advance OR set to 0 you should see the mark of 27 degrees on the wheel or one you have placed on the wheel (follow the guide on how to create). The second way is to set your gun to 27 and line it up to the 0 mark on the pulley, both ways will get you the full advance. He is working with a 009 which has no vac cannister on it. It is crude but works. Be sure to plug any open vac ports on the carbs that could introduce additional unwanted air. The SVDA is one of the best cheap distros you can have with your dual carb setup. |
|
|
|
| technicalninja |
Mar 21 2023, 10:39 AM
Post
#63
|
|
Advanced Member Group: Members Posts: 2,531 Joined: 31-January 23 From: Granbury Texas Member No.: 27,135 Region Association: Southwest Region |
Yep, I'm sorry I may have added to the confusion.
I'll never retract something I post in error. I'll allow my lack of knowledge to be in full view of all. I will apologize and re-post if I'm wrong, however. You should notice that I was damn close to what the timing should be at that RPM. I posted 25+degrees at 3500 rpm. I was 2 degrees off! I just pulled that number out of my knowledge base in my memory. Red mark is 27 and 0 mark is TDC. How did Porsche expect technicians to be able to set timing to 7.5 advance at 850 rpm as my timing sticker states? I wasn't aware of any timing lights that could do advance back then... I started doing this stuff professionally (all this means is being paid) in 1982. |
|
|
|
| ClayPerrine |
Mar 21 2023, 10:48 AM
Post
#64
|
|
Life's been good to me so far..... Group: Admin Posts: 16,567 Joined: 11-September 03 From: Hurst, TX. Member No.: 1,143 Region Association: NineFourteenerVille |
Just so you know, the 009 is a terrible distributor for a VW Type IV engine. The advance curve is completely wrong for it. IIRC, I don't think you can actually get 27 degrees at 3500 RPM with an 009 without having the base timing really off.
There are 4 things needed to make an internal combustion engine run, and they can be remembered with the acronym "FAST" Fuel Air Spark Timing Fuel - you have that and you can adjust the carbs after it is running Air - the engine is making compression Spark - you verified that already Timing - Start with that. How I do it. Take out the #1 spark plug. Put in the hose from a compression tester. Using a remote starter button, crank the engine over while keeping your thumb over the end of the compression tester hose. When it blows your thumb off the hose, you are on the compression stroke. Now turn the engine until the 0 mark is in the timing marks in the fan housing. Make the rotor in the distributor point to the left front of the car. Reinstall the cap and put the wires on. The two plug wires on the right side of the motor connect to the two distributor towers on the right side. The two plug wires on the left side of the motor are crossed, i.e. the front spark plug connects to the rear distributor tower, and the rear spark plug connects to the front distributor tower. Turn the motor until you have about 8 degrees advance on the timing marks. Then hook a test light to the points wire and hook the other end to the positive battery post. Turn the distributor back and forth until the light just goes out. That sets the static timing. Hook the points lead back up to the coil and the car should start. You will need to make sure the carbs are properly synced at idle. Once you do that, you can then take the engine to 3500 RPM and check the timing is a 27 degrees. I hope this helps. |
|
|
|
| Superhawk996 |
Mar 21 2023, 11:16 AM
Post
#65
|
|
914 Guru Group: Members Posts: 7,960 Joined: 25-August 18 From: Woods of N. Idaho Member No.: 22,428 Region Association: Galt's Gulch |
QUOTE(technicalninja @ Mar 21 2023, 11:39 AM) How did Porsche expect technicians to be able to set timing to 7.5 advance at 850 rpm as my timing sticker states? 1.8L engine has a 7.5 degree timing mark on the impeller. At this point with so many parts having been swapped mix and match on 914s you’re liable to find a 7.5 degree mark on others including those that may have been added at a rebuild. As a rough approximation 7 degrees is about 3/4 of the distance between impeller blades. 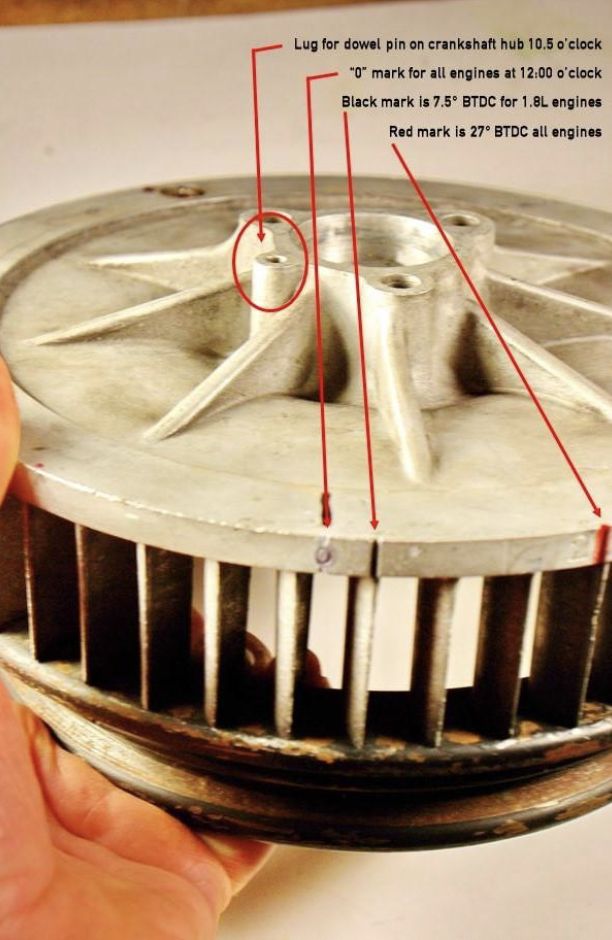 |
|
|
|
| nditiz1 |
Mar 21 2023, 11:28 AM
Post
#66
|
|
Senior Member Group: Members Posts: 1,272 Joined: 26-May 15 From: Mount Airy, Maryland Member No.: 18,763 Region Association: MidAtlantic Region |
009 should have no problem getting to the base. Its curve closely resembles the 034 SVDA. Reason why the SVDA is better is because it eliminates the "flat spot" on acceleration and makes it so you dont need to run super rich to over come it.
|
|
|
|
| technicalninja |
Mar 21 2023, 12:08 PM
Post
#67
|
|
Advanced Member Group: Members Posts: 2,531 Joined: 31-January 23 From: Granbury Texas Member No.: 27,135 Region Association: Southwest Region |
QUOTE(Superhawk996 @ Mar 21 2023, 12:16 PM) QUOTE(technicalninja @ Mar 21 2023, 11:39 AM) How did Porsche expect technicians to be able to set timing to 7.5 advance at 850 rpm as my timing sticker states? 1.8L engine has a 7.5 degree timing mark on the impeller. At this point with so many parts having been swapped mix and match on 914s you’re liable to find a 7.5 degree mark on others including those that may have been added at a rebuild. As a rough approximation 7 degrees is about 3/4 of the distance between impeller blades. Thanks again SH... My 75 1.8 blower is still in the car. I have a 73 2.0l core I got from Mark Heard completely apart and it does not have the 7.5 indicator etched on it. I did post that I was not a 914 timing Guru yet... Guess what, I was RIGHT! And now I'm a little bit smarter because of this thread. |
|
|
|
| cgnj |
Mar 21 2023, 01:29 PM
Post
#68
|
|
Senior Member Group: Members Posts: 735 Joined: 6-March 03 From: Medford, NJ Member No.: 403 Region Association: None |
Hi,
You never said what fixed your no start problem. Something did. Care to share? Carb setup - I have limited Webber experience. I prefer Dellortto. In either case I never open more than one air bypass screw per side. I generally follow this procedure aircooled.net Carb sync |
|
|
|
| Type 47 |
Mar 21 2023, 01:53 PM
Post
#69
|
|
Senior Member Group: Members Posts: 800 Joined: 1-June 10 From: St. Louis, MO Member No.: 11,790 Region Association: None |
QUOTE(cgnj @ Mar 21 2023, 11:29 AM) Hi, You never said what fixed your no start problem. Something did. Care to share? Carb setup - I have limited Webber experience. I prefer Dellortto. In either case I never open more than one air bypass screw per side. I generally follow this procedure aircooled.net Carb sync Carlos, while we did get the engine fired it's far from fixed. I will be reading your carb instructions next, thanks for posting the link. |
|
|
|
| Type 47 |
Mar 21 2023, 02:11 PM
Post
#70
|
|
Senior Member Group: Members Posts: 800 Joined: 1-June 10 From: St. Louis, MO Member No.: 11,790 Region Association: None |
QUOTE(Superhawk996 @ Mar 21 2023, 09:16 AM) QUOTE(technicalninja @ Mar 21 2023, 11:39 AM) How did Porsche expect technicians to be able to set timing to 7.5 advance at 850 rpm as my timing sticker states? 1.8L engine has a 7.5 degree timing mark on the impeller. At this point with so many parts having been swapped mix and match on 914s you’re liable to find a 7.5 degree mark on others including those that may have been added at a rebuild. As a rough approximation 7 degrees is about 3/4 of the distance between impeller blades. thanks for posting this. Is there any difference between the 1.8 and 2.0? the pic below is the actual impeller from this engine. It had some broken fins so we swapped it with another one from a spare 2.0. Nothing but the 27 line, no 0, no 7.5 mark. The impeller we put on it was from GA006291 a late 73' 2.0 I believe. It has the 0 and the 27 mark. I will have to look closely at it, now I know where to look for the black line. I hear what your saying about "at this point" I do believe this engine is original to this car; both have low production #'s 00696 for the car and GC000243 for the engine. Then again it had a degree plate on the front of the engine like a bus would have. 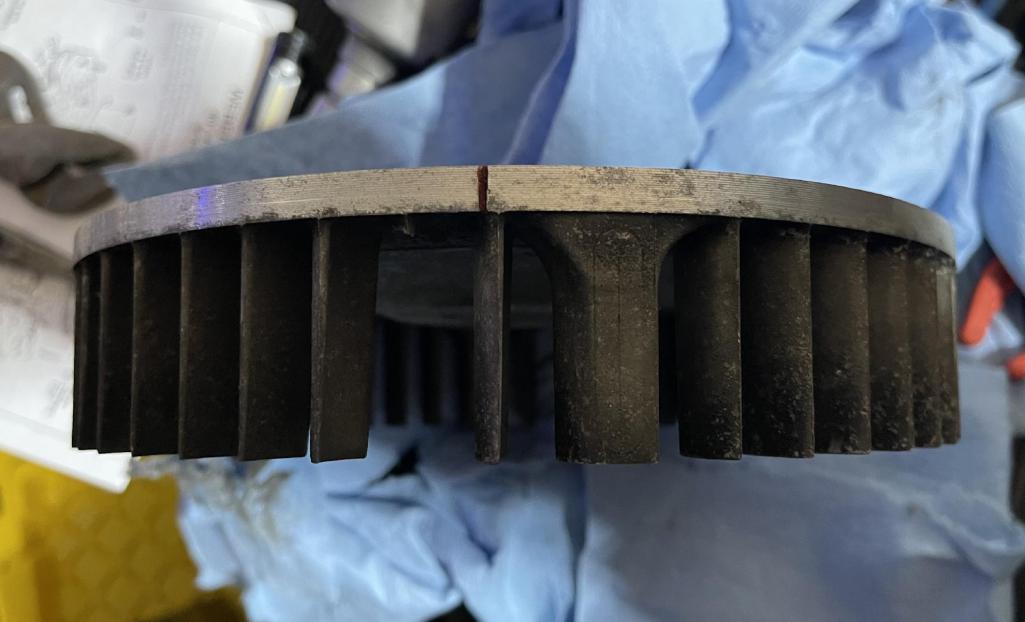 |
|
|
|
| technicalninja |
Mar 21 2023, 02:26 PM
Post
#71
|
|
Advanced Member Group: Members Posts: 2,531 Joined: 31-January 23 From: Granbury Texas Member No.: 27,135 Region Association: Southwest Region |
Just looked at the link provided for syncing carbs.
Very good into. I have both tools and far. far prefer the snail gauge. One thing that link didn't provide was what I do now FIRST. I'll set the throttle stops on the carbs (commonly I was doing 3 two bl side drafts) to have the same openings when you look through the carb when off the car. I'd back the throttle stops out until the blades actually seated and then chose one carb to be my standard. I'd open the throttle stop approx 1/2 turn from blade closed and then set the others in much the same way. I'd then hold the carbs and look through the bores with a light source behind the carb, I'd adjust # 2-3 to have the same width crescent of light coming that will be visible from the light source. On an IDF which has a adjustment between the two bores I'd set this adjustment next. I'd bolt them on and hook up linkage and adjust the linkage to make all three carbs open at the same time. Really important to set any mechanical throttle for WFO right from the start. Have someone bury the accelerator hard into the floorboard and verify the carbs can just hit wide open without any undue stress happening in the linkage. All throttle cables should be adjusted for wide open first! Most designs will then have the extra play at the beginning of the throttle stroke and you will not be able to damage. bend, or knock your adjustments out by flooring it. After you have this together make sure the throttles all open at the same time VIA the accelerator pedal. Adjust individual linkages accordingly. I found adjusting this crap, by eyeball, when the car is not running got 90% of the sync job done and the use of the snail tool was for minor finish up adjusting only. The above mentioned procedure decreased the time involved for me by 75%. Sometimes just eyeballing it was dead nut on. It turned what can be a frustrating job into gravy... |
|
|
|
| Type 47 |
Mar 21 2023, 02:56 PM
Post
#72
|
|
Senior Member Group: Members Posts: 800 Joined: 1-June 10 From: St. Louis, MO Member No.: 11,790 Region Association: None |
QUOTE(nditiz1 @ Mar 21 2023, 07:29 AM) Idle circuit is dirty - are the carbs clean? Have they been cleaned? Mixture screws are set too lean - richen them up to see if the popping goes away. The carbs where taken apart and cleaned enough to install what was in a rebuild kit. They were not completely taken every single piece apart. by richen them I'm assuming you mean backing the screws out |
|
|
|
| Type 47 |
Mar 21 2023, 03:00 PM
Post
#73
|
|
Senior Member Group: Members Posts: 800 Joined: 1-June 10 From: St. Louis, MO Member No.: 11,790 Region Association: None |
QUOTE(ClayPerrine @ Mar 21 2023, 08:48 AM) Just so you know, the 009 is a terrible distributor for a VW Type IV engine. The advance curve is completely wrong for it. IIRC, I don't think you can actually get 27 degrees at 3500 RPM with an 009 without having the base timing really off. There are 4 things needed to make an internal combustion engine run, and they can be remembered with the acronym "FAST" Fuel Air Spark Timing Fuel - you have that and you can adjust the carbs after it is running Air - the engine is making compression Spark - you verified that already Timing - Start with that. How I do it. Take out the #1 spark plug. Put in the hose from a compression tester. Using a remote starter button, crank the engine over while keeping your thumb over the end of the compression tester hose. When it blows your thumb off the hose, you are on the compression stroke. Now turn the engine until the 0 mark is in the timing marks in the fan housing. Make the rotor in the distributor point to the left front of the car. Reinstall the cap and put the wires on. The two plug wires on the right side of the motor connect to the two distributor towers on the right side. The two plug wires on the left side of the motor are crossed, i.e. the front spark plug connects to the rear distributor tower, and the rear spark plug connects to the front distributor tower. Turn the motor until you have about 8 degrees advance on the timing marks. Then hook a test light to the points wire and hook the other end to the positive battery post. Turn the distributor back and forth until the light just goes out. That sets the static timing. Hook the points lead back up to the coil and the car should start. You will need to make sure the carbs are properly synced at idle. Once you do that, you can then take the engine to 3500 RPM and check the timing is a 27 degrees. I hope this helps. Yes, all of this helps. Thank you. |
|
|
|
| nditiz1 |
Mar 21 2023, 06:37 PM
Post
#74
|
|
Senior Member Group: Members Posts: 1,272 Joined: 26-May 15 From: Mount Airy, Maryland Member No.: 18,763 Region Association: MidAtlantic Region |
There are definitely different levels of cleaning. Even to go as far as dipping them in Chem dip. The rebuild kit will break the carb down enough to get most areas clean. You need to pay attention to the passages and shoot brake cleaner and compressed air through them.
Did you perform the float adjustment procedure. Very key to setting carbs up? Ensure you have proper fuel pressure to the carbs (3psi) Dialing in carbs is not difficult, but it can be time consuming. You also need to make sure the the engine is warm. Since it will at least idle you already have a base. Pop off the linkage on side so it does not interfere with getting them to idle smoothly. Use the snail gauge to ensure the vac on both L and R are the same. Also ensure the the throats on the same carb are also in sync. The bypass screws should start all the way closed. These screws will be opened to increase the vac on that throat. In the perfect world all throats will be the same as the pull on each cylinder is perfectly matched, but I have yet to encounter this so minor adjustment is always needed. Now that all 4 carbs are in sync you can use the Idle speed screw to bring the idle to around 1000. When you do this your sync will be off so readjust L and R. Now you should be running ~1000 and the Land R are in sync. Start turning the mixture screws out from all the way in about 3 turns. Slowly screw it in until the engine starts to stumble. If the idle never drops you could have an issue (dirt) with that throat. The point at which the engine starts to stumble means it is going lean. I usually back the screw out a half turn or quarter depending on the jet size. This will get you close to best lean idle. If the engine is worn the same all 4 mixture screws should be within a quarter to half turn of each other. It is a good practice to perform this step a few times as it could increase you idle. This will make you move the speed screws out to lower idle which will change the mixture. It is a cycle to get everything into a harmonious balance. If you have made it this far the engine should be pretty smooth. If not you could have any number of issues, dirty carbs, intake leak, exhaust leak. The last step is to sync the carbs under throttle from linkage. You use the sync gauge again holding different RPM to ensure the L and R are the same. If one side is pulling more then adjust the linkage. You never need to touch mixture, idle speed, or bypass screws. The last step involves driving, getting a feel, and using a AFR meter to possibly rejet. |
|
|
|
| Rand |
Mar 21 2023, 07:04 PM
Post
#75
|
|
Cross Member Group: Members Posts: 7,415 Joined: 8-February 05 From: OR Member No.: 3,573 Region Association: None |
QUOTE(Aerostatwv @ Mar 15 2023, 03:21 PM) Sounds like a bad condenser to me. I'd be interested in your explanation of why and how a condenser would cause this. I'm also curious to know what color the spark is?? (like yellow, or bright blue?) |
|
|
|
| Type 47 |
Mar 21 2023, 08:13 PM
Post
#76
|
|
Senior Member Group: Members Posts: 800 Joined: 1-June 10 From: St. Louis, MO Member No.: 11,790 Region Association: None |
QUOTE(nditiz1 @ Mar 21 2023, 04:37 PM) There are definitely different levels of cleaning. Even to go as far as dipping them in Chem dip. The rebuild kit will break the carb down enough to get most areas clean. You need to pay attention to the passages and shoot brake cleaner and compressed air through them. not chem dipped but carb cleaner and air (son thinks BC is to caustic) Did you perform the float adjustment procedure. Very key to setting carbs up? probably not, son's tech school taught nothing about carbs, we probably assumed carbs taken off properly running car was good for a baseline Ensure you have proper fuel pressure to the carbs (3psi) That's where the FPR is set will follow your tuning advise. I'm hoping this experience is teaching someone some patience and understanding. BTW, didn't work on the car today. Want to soak all this info in and move forward tomorrow. |
|
|
|
| ChrisFoley |
Mar 22 2023, 05:23 AM
Post
#77
|
|
I am Tangerine Racing Group: Members Posts: 8,031 Joined: 29-January 03 From: Bolton, CT Member No.: 209 Region Association: None |
That red line on your impeller is the 27 degree mark, which is what you want to see with the timing light at 3000-3500 rpm. Actually, a little past that mark, so you are at 28 deg. is even better.
|
|
|
|
| bossboy302 |
Mar 22 2023, 11:40 AM
Post
#78
|
|
Member Group: Members Posts: 88 Joined: 13-December 21 From: NorCal Member No.: 26,158 Region Association: None |
TYPE 47: you never have explained how you got from "what happened-not running" to "Got it to run".
Even if it still runs poorly, you solved something.........what? |
|
|
|
| Type 47 |
Mar 22 2023, 02:48 PM
Post
#79
|
|
Senior Member Group: Members Posts: 800 Joined: 1-June 10 From: St. Louis, MO Member No.: 11,790 Region Association: None |
QUOTE(bossboy302 @ Mar 22 2023, 09:40 AM) TYPE 47: you never have explained how you got from "what happened-not running" to "Got it to run". Even if it still runs poorly, you solved something.........what? we set the static timing and then cranked it until it fired. We have to keep a hand on the linkage to keep it running. it doesn't idle on it's own yet. We ran out of time and haven't been able to work on it further. will update on the progress. when we work on it next, maybe tomorrow or Friday. |
|
|
|
|
1 User(s) are reading this topic (1 Guests and 0 Anonymous Users)
0 Members:

|
Lo-Fi Version | Time is now: 22nd July 2026 - 05:36 PM |
Invision Power Board
v9.1.4 © 2026 IPS, Inc.