|
|
|
Porsche, and the Porsche crest are registered trademarks of Dr. Ing. h.c. F. Porsche AG.
This site is not affiliated with Porsche in any way. Its only purpose is to provide an online forum for car enthusiasts. All other trademarks are property of their respective owners. |
|
|


| DennisV |
 Aug 19 2023, 10:15 AM Aug 19 2023, 10:15 AM
Post
#1
|
|
Senior Member  Group: Members Posts: 867 Joined: 8-August 20 From: Santa Rosa, CA Member No.: 24,575 Region Association: Northern California |
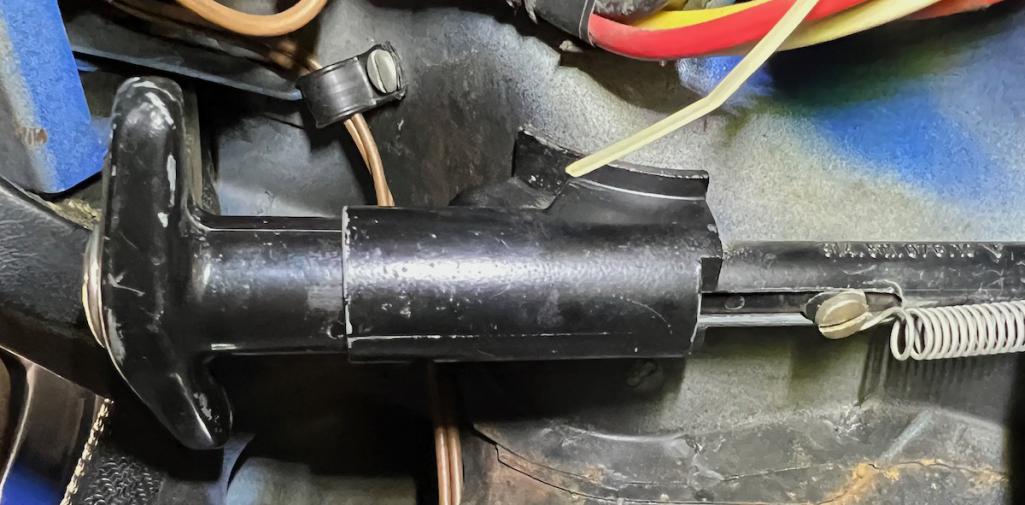
Is this the correct attachment point for the frunk handle spring? It doesn't look right to me, but I can't see where else it would go. (IMG:style_emoticons/default/confused24.gif)
 Thanks. |
   |

 
|
  |
Replies(1 - 13)
| tygaboy |
Aug 19 2023, 10:37 AM
Post
#2
|
|
914 Guru Group: Members Posts: 5,787 Joined: 6-October 15 From: Petaluma, CA Member No.: 19,241 Region Association: Northern California |
That's not it. There is no spring related to the handle. The spring action is handed within the latch itself. If yours isn't returning, you've got an issue with the latch and/or the cable routing and housing getting from the handle to the latch.
You're welcome to come by and check out my car. I also have a couple latches and handles, in the event you need a replacement(s). |
 |
|
| DennisV |
Aug 19 2023, 11:55 AM
Post
#3
|
|
Senior Member Group: Members Posts: 867 Joined: 8-August 20 From: Santa Rosa, CA Member No.: 24,575 Region Association: Northern California |
QUOTE(tygaboy @ Aug 19 2023, 09:37 AM)  That's not it. There is no spring related to the handle. Thanks for the info and offer to visit. (IMG:style_emoticons/default/huh.gif) I wonder what that spring is for then. Wish I had taken a better photo when I was still with the car. |
|
|
|
| Superhawk996 |
Aug 19 2023, 12:34 PM
Post
#4
|
|
914 Guru Group: Members Posts: 7,741 Joined: 25-August 18 From: Woods of N. Idaho Member No.: 22,428 Region Association: Galt's Gulch |
QUOTE(DennisV @ Aug 19 2023, 01:55 PM) (IMG:style_emoticons/default/huh.gif) I wonder what that spring is for then. Wish I had taken a better photo when I was still with the car. Tygaboy nailed it, Just another typical DAPO “improvement” to band-aid a sticky cable or latch mechanism rather than addressing root cause. Put it in the bin! |
|
|
|
| NARP74 |
Aug 19 2023, 02:45 PM
Post
#5
|
|
Senior Member Group: Members Posts: 1,448 Joined: 29-July 20 From: Colorado, USA, Earth Member No.: 24,549 Region Association: Rocky Mountains |
Just went though this mess. Here are 2 links that have more info.
http://www.914world.com/bbs2/index.php?showtopic=366163 http://www.914world.com/specs/rekey.php Scroll way down |
|
|
|
| Mikey914 |
Aug 19 2023, 05:34 PM
Post
#6
|
|
The rubber man Group: Members Posts: 12,772 Joined: 27-December 04 From: Hillsboro, OR Member No.: 3,348 Region Association: None |
Try lubricating the latch mechanism. It really makes a lot of difference.
|
|
|
|
| Seattle_914 |
Aug 19 2023, 09:10 PM
Post
#7
|
|
Newbie Group: Members Posts: 11 Joined: 15-August 21 From: Seattle Member No.: 25,806 Region Association: Pacific Northwest |
QUOTE(DennisV @ Aug 19 2023, 11:15 AM) Is this the correct attachment point for the frunk handle spring? It doesn't look right to me, but I can't see where else it would go. (IMG:style_emoticons/default/confused24.gif) Thanks. How do you lubricate the frunk handle, I really have to pull hard on the handle to get it open? Worried the cable is going to break off. |
|
|
|
| tygaboy |
Aug 19 2023, 10:07 PM
Post
#8
|
|
914 Guru Group: Members Posts: 5,787 Joined: 6-October 15 From: Petaluma, CA Member No.: 19,241 Region Association: Northern California |
QUOTE(Seattle_914 @ Aug 19 2023, 08:10 PM) QUOTE(DennisV @ Aug 19 2023, 11:15 AM) Is this the correct attachment point for the frunk handle spring? It doesn't look right to me, but I can't see where else it would go. (IMG:style_emoticons/default/confused24.gif) Thanks. How do you lubricate the frunk handle, I really have to pull hard on the handle to get it open? Worried the cable is going to break off. @Seattle_914 It's almost always that the latch is super sticky and a good cleaning/lube takes care of it. I did have one latch that was worn to the point that the movement of the components was compromised and no amount of cleaning would have fixed it - so it was replacement time. |
|
|
|
| Mikey914 |
Aug 20 2023, 02:13 PM
Post
#9
|
|
The rubber man Group: Members Posts: 12,772 Joined: 27-December 04 From: Hillsboro, OR Member No.: 3,348 Region Association: None |
The handle shouldnt be binding. If it is determine if its the cable. The factory routing will keep it from binding, so check that.
I was advocating lubricating the latch only. I used lithium grease. Only took a small dab. Cycle it a few time usung something to push the latch mechanism down(not by closing trunk). I few cycles of opening and closing the latch mechanism should do it. |
|
|
|
| NARP74 |
Aug 20 2023, 03:53 PM
Post
#10
|
|
Senior Member Group: Members Posts: 1,448 Joined: 29-July 20 From: Colorado, USA, Earth Member No.: 24,549 Region Association: Rocky Mountains |
Having just gone through this, there is nothing in the handle that binds things up. The cable routing, the sleeve being broken, old ones are brittle and break or the latch are the areas to look at.
I found these instructions here I think and tweaked them a bit. Long but worth it if you are going through it. 914 FRONT TRUNK RELEASE CABLE REPLACEMENT When it was time to replace a defective hood release cable in my 914, I was unsuccessful at doing a search to find the procedure to do the work. As a consequence, I struggled with quite a few missteps before I was able to complete the replacement of the cable (with a lot of help from my 914World friends). So, here is a DIY for this item, with some comments on the issues that you can run into. Though you can replace the cable by itself, it is advised that you replace both the cable and the sheathe in which it is installed. Total install time should be 1-2 hours. 1. Though the cable can be installed with the latch assembly attached to the front bulkhead, it is easier if you remove the latch assembly. Mark its alignment with a Sharpie before removing so that you can put it back exactly as it was. 2. Remove the (3) 5mm socket head cap screws that attach the latch assembly to the bulkhead. 3. Straighten the pull wire which you will find bent at its clamp. 4. Loosen the two screws to separate the latch assembly from the wire pull and the clamp that holds the cable sheathe in place. 5. While the latch assembly is out of the car, carefully clean and inspect it for damage and affect repairs as appropriate. Confirm that the (2) springs installed on the latch are in good condition. Apply grease to the moving parts of the latch. Set aside. 6. Locate and carefully open the (4) hold downs for the cable sheathe. There is one hold down on the front bulkhead and (3) spaced over the wheel well. They should be bent just enough to free the cable assembly. Pull the cable assembly out of the car. 7. With the cable assembly free, you can slip it out of the ferrule (located at the firewall) and slide the cable sheathe off the pull wire. 8. To remove the pull wire, the locking handle located below the dashboard must be removed from the car. The handle is held in place with a small bracket that is attached to the firewall under the dashboard. There are two 4 mm socket head cap screws that secure the bracket under the dash. Please note that these two cap screws are accessed from the frunk. They are located behind the brake fluid reservoir. If there is any light corrosion on these screws, spray them with penetrating oil for several hours to make their removal easy. Remove the (2) cap screws. The locking pull handle will now drop down below the dash. 9. From inside the car, slide the handle and the attached pull wire through the firewall ferrule out of the car. 10. Remove the single slotted stop screw, 4-.7mm x 4.5 mm that locks the handle into its bracket. Slide the bracket off the pull wire. 11. Using pliers, unscrew the pull wire from the pull handle. Install the new pull wire in a reverse fashion. Slide the bracket over the new pull wire and install the lock screw into the pull handle which locks the bracket in place. Please note that the screw allows the pull handle to slide within its bracket freely. 12. Reinstall the new pull wire and handle assembly. Simply feed the wire through the firewall via the ferrule installed. Push the pull cable all the way through the firewall until the bracket that holds the pull handle aligns with the two holes in the firewall. 13. Standing outside of the car, at the front of the door (and with the door opened fully), you can reach into the car with your right hand to position and hold the bracket in place while installing the first screw inside the trunk (behind the brake fluid reservoir). There is enough room to do this, even though you may be operating a little blindly, not being able to view the installation of the cap screws. Take your time.....it's easier than it sounds! Snug both screws up with your fingers and use an allen wrench to tighten them lightly. No need to really torque these screws down very tight. They are lightly loaded and really not subject to vibration. Over tighten them, and they will be really tough to break loose the next time you replace the pull wire! 14. With the pull wire extended out into the trunk area, slide on the new cable sheathe and be certain that it is fully seated in the firewall ferrule. Before installing the new sheathe, spray some light grease (such as lithium) into the new sheathe. Ideally, you should fill the sheathe over about 3/4 of its length. Wipe off an excess grease. 15. Route the cable assembly along the same route from which it was removed. Do not bend down the retention tabs at this time. Feed the cable down the front side of the wheel well. If you are lucky, you should be able to move the cable around and get it to go through the side wall in the hole installed at the point where the front bulkhead meets the sidewall. You are aiming for the hole at the very bottom. If this proves difficult, you will find it easier to take a two foot length of bendable wire and back feed the wire from the trunk through the hole in the sidewall and up along the wheel well. Stuff this wire into the cable assembly and tape the wire in place with some masking tape. then push the cable sheathe while guiding the wire back out of the sidewall hole. Once the cable is through the sidewall and is daylighting into the trunk, you can remove the guide wire and tape. You have now done the toughest part of this job! 16. Install the cable assembly into the latch assembly. To do this, slide the cable assembly into the pull wire clamp. Position the sheathe of the cable into its retaining clamp on the latch as you install the pull wire in its clamp. Do not tighten the sheathe clamp until the pull wire is threaded through its clamp. 17. Before locking down the pull wire and the sheathe, make certain that the sheathe is fully pushed into place at the firewall, and that the pull handle under the dash is seated fully forward into its attachment bracket. Though each latch assembly is slightly different, you should have approximately one inch of pull wire protruding through the clamp. This should result in the sheathe protruding approximately a half inch through its clamp. At this time, tighten first the clamp that holds the sheathe in place. Then use pliers to pull the pull wire firmly through its clamp before tightening the clamp screw tightly. 18. Make certain that the cable assembly is positioned under the (4) cable retaining hold downs and then re-attach the latch assembly to the bulkhead with the three cap screws removed earlier. Once installed, but before tightening the screws align the latch using the Sharpie marks you made for that purpose earlier. Once the latch is in its original position, tighten all three cap screws. Then bend over the (4) retaining clips along the front bulkhead and on the wheel well. 19. IMPORTANT! Test the latching system BEFORE you close the trunk lid. You do this by getting the latch to lock down with the trunk lid remaining open. Do this by pressing with a finger on the pivot latch until it snaps down with the assistance of one of the springs in the latch assembly. This is a dramatic and audible snap. Observe that the latch is in the locked position. Then go to the cockpit and pull the trunk handle. If the latch does not snap open, you will need to re-adjust the pull wire so that more of the wire passes through the wire clamp. I found it easier to do this by unbolting the latch assembly from the bulkhead. 20. Once you are satisfied that the latch can be opened from inside the cockpit, make certain that the wire clamp screw is screwed down tightly and that the clamp holding the cable in place on the latch is also screwed down tightly. Lastly, when satisfied, using pliers, bend over the pull wire that protrudes through its clamp. Ideally, the wire should be bent back on itself. This provides extra assurance against the pull wire slipping out of its clamp. 21. Close the trunk lid and latch it in place. If you encounter any difficulty, some re-alignment of the latch assembly may be required. 22. In the event that the hood is latched, and some malfunction occurs preventing the trunk hood from operating, you can gain access to the locking mechanism by removing the front bumper from the car. This is relatively easy. The bumper is attached with two 13mm bolts on each side. These bolts are located in each wheel well. You'll find it easier to access them by turning the tires left or right with the steering wheel. Once the bumper has been removed, a flat bladed screw driver can be inserted through the hole accessing the latch. Use the screwdriver to pry against the latch and it will pop open. Don't ask me how I know this! Like I said, Murphy's Law was in full force when I did this job the first time. |
|
|
|
| DennisV |
Sep 2 2023, 07:33 PM
Post
#11
|
|
Senior Member Group: Members Posts: 867 Joined: 8-August 20 From: Santa Rosa, CA Member No.: 24,575 Region Association: Northern California |
QUOTE(NARP74 @ Aug 20 2023, 02:53 PM) I found these instructions here I think and tweaked them a bit. Long but worth it if you are going through it. These were very helpful. Thanks. One thing I ran into that may save others some headaches. Check that the white sheath can actually be inserted to the metal tube that leads to the passenger compartment. The white sheath I got was at least .5mm too large in diameter. After getting the wire run, handle installed, and sheath in place I had to undo it all. (IMG:style_emoticons/default/mad.gif) My dad had the idea of taking a die and running it around the end of the sheath a few times to get some relief in it to permit insertion without melting it. QUOTE(NARP74 @ Aug 20 2023, 02:53 PM) 5. While the latch assembly is out of the car, carefully clean and inspect it for damage and affect repairs as appropriate. Confirm that the (2) springs installed on the latch are in good condition. Apply grease to the moving parts of the latch. Set aside. You mention there being two springs. Ours only has one. Is that a model year difference, or is something missing from ours? 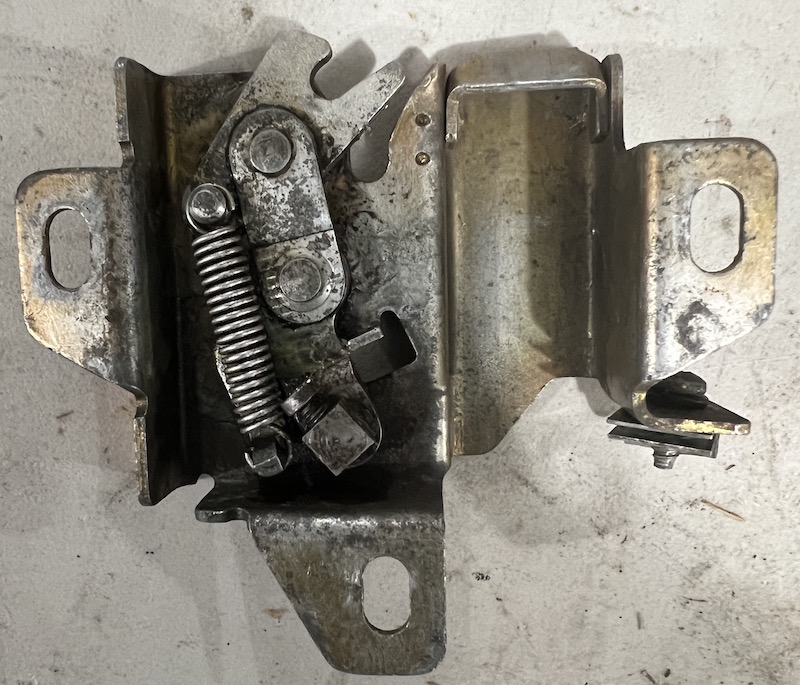 |
|
|
|
| Shivers |
Sep 3 2023, 09:46 AM
Post
#12
|
|
Senior Member Group: Members Posts: 3,324 Joined: 19-October 20 From: La Quinta, CA Member No.: 24,781 Region Association: Southern California |
QUOTE(DennisV @ Sep 2 2023, 06:33 PM) QUOTE(NARP74 @ Aug 20 2023, 02:53 PM) I found these instructions here I think and tweaked them a bit. Long but worth it if you are going through it. These were very helpful. Thanks. One thing I ran into that may save others some headaches. Check that the white sheath can actually be inserted to the metal tube that leads to the passenger compartment. The white sheath I got was at least .5mm too large in diameter. After getting the wire run, handle installed, and sheath in place I had to undo it all. (IMG:style_emoticons/default/mad.gif) My dad had the idea of taking a die and running it around the end of the sheath a few times to get some relief in it to permit insertion without melting it. QUOTE(NARP74 @ Aug 20 2023, 02:53 PM) 5. While the latch assembly is out of the car, carefully clean and inspect it for damage and affect repairs as appropriate. Confirm that the (2) springs installed on the latch are in good condition. Apply grease to the moving parts of the latch. Set aside. You mention there being two springs. Ours only has one. Is that a model year difference, or is something missing from ours? 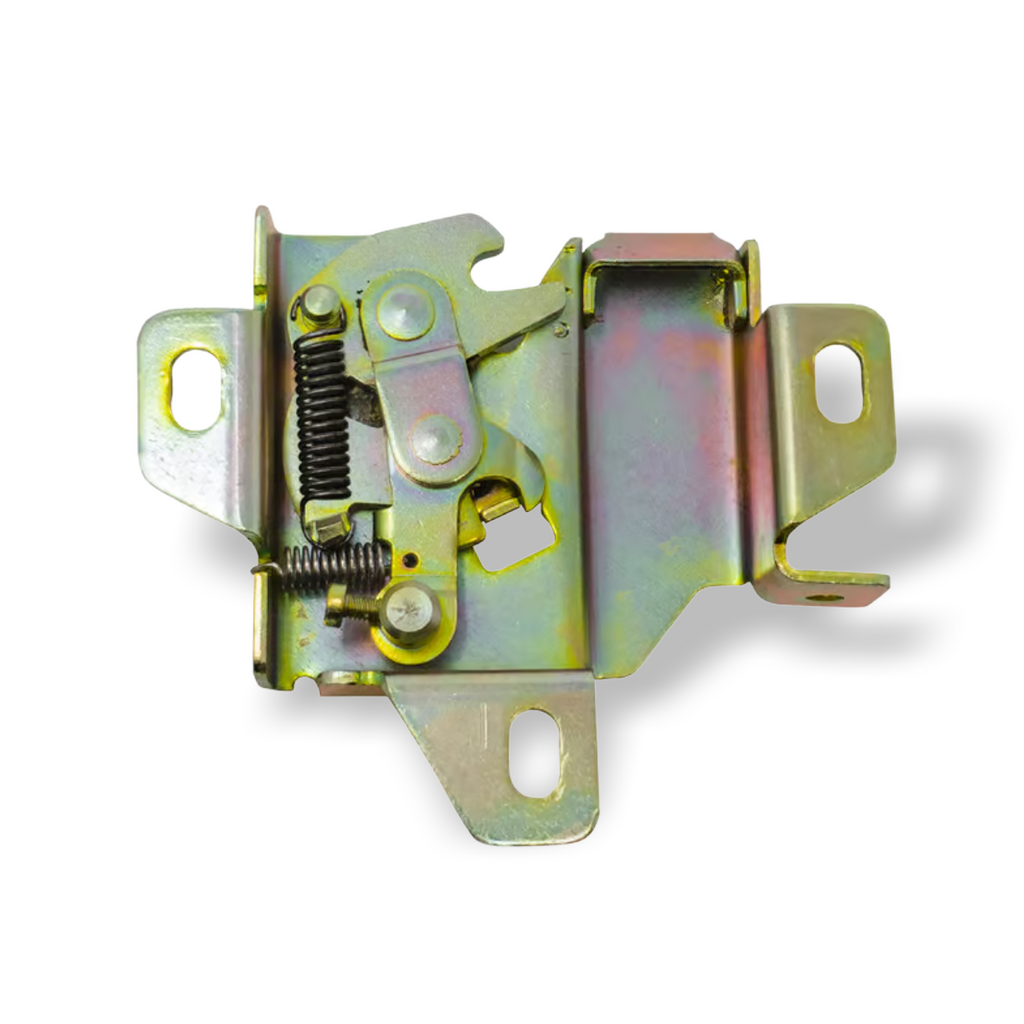 |
|
|
|
| NARP74 |
Sep 3 2023, 04:37 PM
Post
#13
|
|
Senior Member Group: Members Posts: 1,448 Joined: 29-July 20 From: Colorado, USA, Earth Member No.: 24,549 Region Association: Rocky Mountains |
I also had trouble inserting the sheath into the metal tube. I lubed the crap out of it and measured how far I could reasonably insert it, then cut of the rest and used a pencil sharpener to put a taper on the end like it came with. Inserted it all the way to the stop and was on my way. Suggestion from 914Rubber.
|
|
|
|
| DennisV |
Sep 3 2023, 07:34 PM
Post
#14
|
|
Senior Member Group: Members Posts: 867 Joined: 8-August 20 From: Santa Rosa, CA Member No.: 24,575 Region Association: Northern California |
QUOTE(Shivers @ Sep 3 2023, 08:46 AM) Thanks for that comparison photo. I fiddled with ours to position it the same as your example. I wonder if there are some design evolutions. There are some subtle distinctions to the metal pieces, beyond the spring. Or maybe one is aftermarket?  |
|
|
|
|
1 User(s) are reading this topic (1 Guests and 0 Anonymous Users)
0 Members:

|
Lo-Fi Version | Time is now: 16th March 2026 - 05:23 PM |
Invision Power Board
v9.1.4 © 2026 IPS, Inc.