|
|
|
Porsche, and the Porsche crest are registered trademarks of Dr. Ing. h.c. F. Porsche AG.
This site is not affiliated with Porsche in any way. Its only purpose is to provide an online forum for car enthusiasts. All other trademarks are property of their respective owners. |
|
|

  |

| Series9 |
 Sep 20 2006, 01:42 PM Sep 20 2006, 01:42 PM
Post
#1
|
|
Lesbians taste like chicken.  Group: Members Posts: 5,444 Joined: 22-August 04 From: DeLand, FL Member No.: 2,602 Region Association: South East States |
I just started installing the decal on my top.
No matter how careful I am, each piece comes out full of bubbles. I'm pretty sure I just trashed a $100 decal. (IMG:style_emoticons/default/headbang.gif) |
   |

 
|
| brant |
Sep 20 2006, 01:49 PM
Post
#2
|
|
914 Wizard Group: Members Posts: 11,625 Joined: 30-December 02 From: Colorado Member No.: 47 Region Association: Rocky Mountains |
don't pop them with a sewing pin.
it seems like the quick and easy solution but actually causes tears a couple of months later. you need to sit the car out in the hot sun and get it really hot. you need a squeege and to keep working them once its good and hot. you can usually get 80% of them out that way... don't pop them. brant |
|
|
|
| SGB |
Sep 20 2006, 01:59 PM
Post
#3
|
|
just visiting Group: Members Posts: 4,086 Joined: 8-March 03 From: Huntsville, AL Member No.: 404 Region Association: South East States |
would one want to keep the surface wet while working out the bubbles? I used to work in a shop where we screened big decals, and the material used was pretty porous- water soaked through easily. We put a little dish soap in the water too. I remember the whole sheets would slide around pretty easily. I was always surprised that the "trapped" liquid dried out, but it did.
|
|
|
|
| Trekkor |
Sep 20 2006, 02:02 PM
Post
#4
|
|
I do things... Group: Members Posts: 7,809 Joined: 2-December 03 From: Napa, Ca Member No.: 1,413 Region Association: Northern California |
QUOTE out in the hot sun and get it really hot. I heard just the opposite from the vinyl installer at Racer's Group. (IMG:style_emoticons/default/confused24.gif) They do ALL their installs in the cool shop, out of the sunlight (IMG:style_emoticons/default/unsure.gif) For me, the key is lots of water. Spray the surfaces that get it and the back of the stickers. Once you have it positioned, spray the release paper and get it fully saturated. Start to squeegee from the inside-out. After you lift the realease paper, use a soft object ( felt block ) to push the trapped air and water out from under the vinyl without scratching the design. Works for me... KT |
|
|
|
| 736conver |
Sep 20 2006, 02:02 PM
Post
#5
|
|
Advanced Member Group: Members Posts: 2,117 Joined: 25-May 03 From: SE Wisconsin Member No.: 736 Region Association: None |
Have you tried the wet method or are you just sticking it on dry.
Usually does a pretty good job. |
|
|
|
| Engman |
Sep 20 2006, 02:03 PM
Post
#6
|
|
Zoisite Group: Benefactors Posts: 1,349 Joined: 25-March 03 From: New Albany, IN Member No.: 475 |
|
|
|
|
| rick 918-S |
Sep 20 2006, 02:03 PM
Post
#7
|
|
Hey nice rack! -Celette Group: Members Posts: 20,464 Joined: 30-December 02 From: Now in Superior WI Member No.: 43 Region Association: Northstar Region |
About a 1/2 tsp. of dish soap in a windex bottle of water. Carefully stir the water don't shake it. Wet the surface and the decal. slide it in place, start in the middle with a plastic squeege and lock the decal down, carefully move the water/soap mixture out from under the decal from the center out. Don't go too fast. I also us a heat gun as I go. (very carfully or you'll shrink the edges and have to start over)
Good luck Joe. Also be sure the surface is clean and lint free or you'll trap the stuff under the decal and it will read through. Biggest one I ever applied was a Smokey and the Bandit stlye Eagle on a Trans Am! It was the size of the hood, and yes it sucked. |
|
|
|
| McMark |
Sep 20 2006, 02:03 PM
Post
#8
|
|
914 Freak! Group: Retired Admin Posts: 20,179 Joined: 13-March 03 From: Grand Rapids, MI Member No.: 419 Region Association: None |
I also disagree with 'popping' the bubbles. You can usually see the pin pricks regardless. You can work them out the sides (yes even the ones in the middle), but it take LOTS of time and patience. Beyond that, I too am a bit baffled by the application of large vinyl.
|
|
|
|
| 736conver |
Sep 20 2006, 02:04 PM
Post
#9
|
|
Advanced Member Group: Members Posts: 2,117 Joined: 25-May 03 From: SE Wisconsin Member No.: 736 Region Association: None |
|
|
|
|
| Eric_Shea |
Sep 20 2006, 02:08 PM
Post
#10
|
|
PMB Performance Group: Admin Posts: 19,275 Joined: 3-September 03 From: Salt Lake City, UT Member No.: 1,110 Region Association: Rocky Mountains |
We did my Carrera graphics the way Scott recommends. Go to a garden supply store and get a spray/mister bottle. Use a little dish detergent in the mix. Apply in a cool location and use a squeege to work the bubbles out.
|
|
|
|
| Eric_Shea |
Sep 20 2006, 02:10 PM
Post
#11
|
|
PMB Performance Group: Admin Posts: 19,275 Joined: 3-September 03 From: Salt Lake City, UT Member No.: 1,110 Region Association: Rocky Mountains |
LOL 3 replies since I hit the send. I guess he has his info.
|
|
|
|
| Trekkor |
Sep 20 2006, 02:15 PM
Post
#12
|
|
I do things... Group: Members Posts: 7,809 Joined: 2-December 03 From: Napa, Ca Member No.: 1,413 Region Association: Northern California |
Also heard a freshly washed and WAXED car takes 'em better, too.
KT |
|
|
|
| brant |
Sep 20 2006, 02:18 PM
Post
#13
|
|
914 Wizard Group: Members Posts: 11,625 Joined: 30-December 02 From: Colorado Member No.: 47 Region Association: Rocky Mountains |
maybe the bubbles directions were specific the vinyl that my decals are made from?
I know for a fact I met with my guy who does the HUGE decals on the sides of semi-tractor rigs. He showed me ones that had been pin-popped and large tears that would later occur as the decal stretched and shrunk from heat. he told me that the pin pop hole gets pulled by very large decals and the material streches by tearing the pin-hole. On an unpopped decal the stretching is sharred equally in all directions. but on a pin-popped decal the hole becomes the path of least resistance. Remember this is a large decal and not a 6inch type thing. So perhaps its material specific... I just know that I follow this advice out of my desire not to replace my expensive decals on the race car. brant |
|
|
|
| jasons |
Sep 20 2006, 02:38 PM
Post
#14
|
|
Jackstand Extraordinaire Group: Members Posts: 2,002 Joined: 19-August 04 From: Scottsdale, AZ Member No.: 2,573 Region Association: None |
QUOTE(Eric_Shea @ Sep 20 2006, 01:08 PM)  We did my Carrera graphics the way Scott recommends. Go to a garden supply store and get a spray/mister bottle. Use a little dish detergent in the mix. Apply in a cool location and use a squeege to work the bubbles out. (IMG:style_emoticons/default/agree.gif) X2 or X3 or whatever. Don't be afraid to use too much of the solution. I actually use a 50/50 mix of water and rubbing alcohol. Used a bondo spreader to work the decal down. |
|
|
|
| Jenny |
Sep 20 2006, 02:51 PM
Post
#15
|
|
Advanced Member Group: Members Posts: 4,060 Joined: 6-January 03 Member No.: 96 Region Association: None |
What everyone else said. Wash the surface, squeegee clean, spray with soapy water mixture. Lay decal on table sticky side up. Spray soapy water on sticky side (adhesive exposed). Slap that sucker on the surface of the car and position to where ever your heart's content. Hold down the center with your left hand (for right handed peeps), and use a rubber scraper/squeegee and squeegee from the middle out. The lube (soapy water) will let you work out all the air bubbles. The moisture will bake itself out in the sun. Once you've squeegeed out as much moisture as possible, start peeling off the paper backing. You want to peel the paper back parallel to the decal, not perpendicular. If you pull up on the paper, you risk lifting the decal. Gosh I hope that makes sense.
Jen |
|
|
|
| Series9 |
Sep 20 2006, 05:22 PM
Post
#16
|
|
Lesbians taste like chicken. Group: Members Posts: 5,444 Joined: 22-August 04 From: DeLand, FL Member No.: 2,602 Region Association: South East States |
Well, live and learn.
I would have never thought to WET an adhesive decal. I trashed my $100 top decal. I'll leave it on for Moab, but It'll have to be redone. |
|
|
|
| Series9 |
Sep 20 2006, 05:26 PM
Post
#17
|
|
Lesbians taste like chicken. Group: Members Posts: 5,444 Joined: 22-August 04 From: DeLand, FL Member No.: 2,602 Region Association: South East States |
There's also a circle that goes around the number, but there was absolutely no way it would center in the correct space.
I ended up having to apply what you see as individual pieces, because I didn't know the water trick. I've pissed away more than $100 on the RS... Attached image(s) 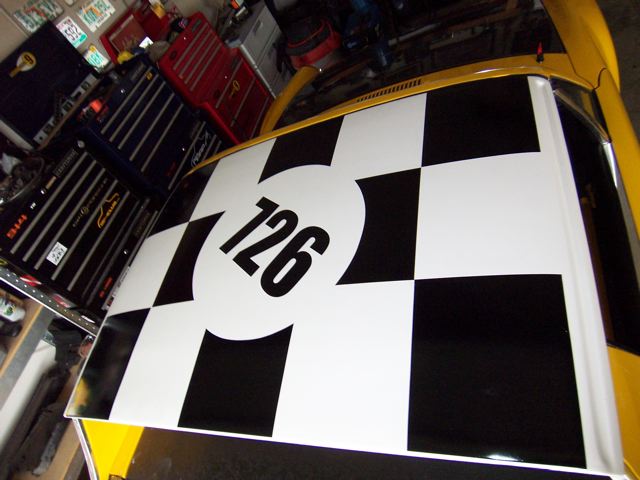
|
|
|
|
| MoveQik |
Sep 20 2006, 05:27 PM
Post
#18
|
|
What size wheels can I fit? Group: Members Posts: 4,645 Joined: 5-April 05 From: Scottsdale, AZ Member No.: 3,881 Region Association: Southwest Region |
QUOTE(Series9 @ Sep 20 2006, 04:22 PM) Well, live and learn. I would have never thought to WET an adhesive decal. Glad you said it. I just sat quietly on the sidelines here thinking I must not be understanding what they were talking about. "water & sticker" seems a bit odd. |
|
|
|
| TravisNeff |
Sep 20 2006, 05:31 PM
Post
#19
|
|
914 Guru Group: Members Posts: 5,082 Joined: 20-March 03 From: Mesa, AZ Member No.: 447 Region Association: Southwest Region |
Bubbles or not, that design is cool!
|
|
|
|
| Series9 |
Sep 20 2006, 05:34 PM
Post
#20
|
|
Lesbians taste like chicken. Group: Members Posts: 5,444 Joined: 22-August 04 From: DeLand, FL Member No.: 2,602 Region Association: South East States |
QUOTE(Travis Neff @ Sep 20 2006, 05:31 PM) Bubbles or not, that design is cool! The picture looks great, but not so much in person. It'll be redone correctly. Also, this decal came in four pieces, which made it very difficult to align. I'm going to look for a cutter that can take the full size as one piece. I'll have a better chance at success next time. |
|
|
|
|
1 User(s) are reading this topic (1 Guests and 0 Anonymous Users)
0 Members:

|
Lo-Fi Version | Time is now: 22nd May 2024 - 03:59 AM |
Invision Power Board
v9.1.4 © 2024 IPS, Inc.