|
|
|
Porsche, and the Porsche crest are registered trademarks of Dr. Ing. h.c. F. Porsche AG.
This site is not affiliated with Porsche in any way. Its only purpose is to provide an online forum for car enthusiasts. All other trademarks are property of their respective owners. |
|
|

  |

| ilike914 |
 Sep 26 2006, 12:36 AM Sep 26 2006, 12:36 AM
Post
#1
|
|
Newbie  Group: Members Posts: 12 Joined: 26-September 06 From: Canada Member No.: 6,921 |
Hi, all,
I just get my 914. The tachometer is not running. How can I fix it? 1) It runs with a carb., does this made the tachometer not working. If so, how can reconnected the wiring to make the tach. works again. 2) Attached please find the diagram of the wiring of the tach. (back view), what is the following wires connected to: 2.1) No. 3 red / white wiring (as stated as # 31 from the Haynes manual Page 136 Fig 9.47 2.2) No. 5 black wiring (as stated as # 15 from the Haynes manual Page 136 Fig 9.47 Thanks for your advices Attached image(s) 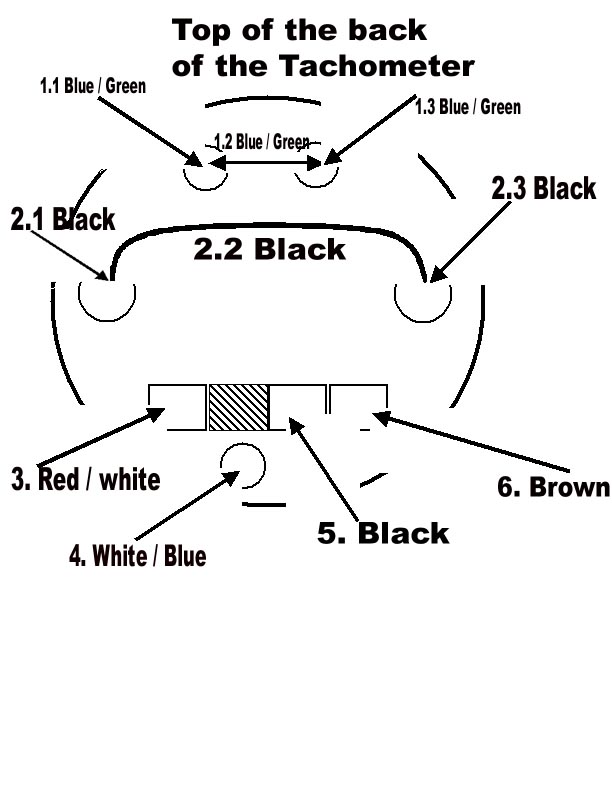
|
   |

 
|
| So.Cal.914 |
Sep 26 2006, 12:52 AM
Post
#2
|
|
"...And it has a front trunk too." Group: Members Posts: 6,588 Joined: 15-February 04 From: Low Desert, CA./ Hills of N.J. Member No.: 1,658 Region Association: None |
If the tach wires are hooked up on the tach itself check the easy stuff first. The
tach takes a pulse from the coil, look and see if there is a loose or detached wire at the coil. Can't remember the color/colors of the wire but if is disconnected you will see it. |
|
|
|
| ilike914 |
Sep 26 2006, 01:02 AM
Post
#3
|
|
Newbie Group: Members Posts: 12 Joined: 26-September 06 From: Canada Member No.: 6,921 |
QUOTE(So.Cal.914 @ Sep 25 2006, 11:52 PM)  If the tach wires are hooked up on the tach itself check the easy stuff first. The tach takes a pulse from the coil, look and see if there is a loose or detached wire at the coil. Can't remember the color/colors of the wire but if is disconnected you will see it. I had check the wiring, all are connected without free play (shown in the drawing of the attachement), just do not know the functions of the wires I stated: No. 3 & No.5 in the drawing. "tach takes a pulse from the coil"----1) Where is the coil? the one at the engine to send out electric puluse to the spark plugs? -----2) Which wire should I check at the tach. No. 3 or No. 5? And How? use a multimeter to check for current? thanks |
|
|
|
| So.Cal.914 |
Sep 26 2006, 01:29 AM
Post
#4
|
|
"...And it has a front trunk too." Group: Members Posts: 6,588 Joined: 15-February 04 From: Low Desert, CA./ Hills of N.J. Member No.: 1,658 Region Association: None |
Yes the very same coil that feeds your dizzy and in turn feeds your spark plugs.
I wish I could remember the color, it could be wht/rd or brn. Oh hell I am sure that someone tomarrow will read this and remember off the top of their head. (IMG:style_emoticons/default/confused24.gif) |
|
|
|
| dlo914 |
Sep 26 2006, 01:40 AM
Post
#5
|
|
Whatchu' lookin' at?!?! Group: Members Posts: 3,432 Joined: 6-September 04 From: San Gabriel, CA Member No.: 2,697 |
my tach also doesnt work...could someone take a picture of the wiring on the back of the tach? i might have mix n'matched the wires.
|
|
|
|
| So.Cal.914 |
Sep 26 2006, 01:49 AM
Post
#6
|
|
"...And it has a front trunk too." Group: Members Posts: 6,588 Joined: 15-February 04 From: Low Desert, CA./ Hills of N.J. Member No.: 1,658 Region Association: None |
You have the color codes right on the dia. that you posted. Each wire will have a
color or two a main color and a band of color on it. match them up to your drawing. |
|
|
|
| McMark |
Sep 26 2006, 02:04 AM
Post
#7
|
|
914 Freak! Group: Retired Admin Posts: 20,179 Joined: 13-March 03 From: Grand Rapids, MI Member No.: 419 Region Association: None |
Tach is black/purple at both ends. Make sure your coil (mounted on the engine) has a black/purple wire connected to the coil negative side. At the gauge black/purple goes on the G terminal, and switched 12v to the + and a good ground to the -.
|
|
|
|
| Twystd1 |
Sep 26 2006, 02:14 AM
Post
#8
|
|
You don't want to know... really..... Group: Members Posts: 2,514 Joined: 12-September 04 From: Newport Beach, California Member No.: 2,743 |
Ilike914,
If ya don't mind me asking. Where do you live? ya might have some help close to you that can be of assistance. Hell.... it might even be me.... (oh crap) Clayton |
|
|
|
| dlo914 |
Sep 26 2006, 02:39 AM
Post
#9
|
|
Whatchu' lookin' at?!?! Group: Members Posts: 3,432 Joined: 6-September 04 From: San Gabriel, CA Member No.: 2,697 |
cool i'll go print out the diagram and compare it to my tach tomorrow.
|
|
|
|
| Dave_Darling |
Sep 26 2006, 09:46 AM
Post
#10
|
|
914 Idiot Group: Members Posts: 14,990 Joined: 9-January 03 From: Silicon Valley / Kailua-Kona Member No.: 121 Region Association: Northern California |
The "black" wire in the pic at the top should have a purple stripe on it. The purple fades over the years, so it can be a little tough to see... As Burgerboy McMark said, check for that black/purple wire on the (-) connection of the ignition coil as well.
The red/white wire carries "switched" power to the tach. This means the wire has +12V when the ignition is on, and none when the ignition is off. This comes from the ignition switch. The brown wire is, of course, the ground. The other wires should not have any effect on whether the tach works or not. The stock tach should work with carbs or EFI. If you have a single-carb setup, do yourself a favor and switch to dual carbs. --DD |
 |
|
| ilike914 |
Sep 26 2006, 10:46 AM
Post
#11
|
|
Newbie Group: Members Posts: 12 Joined: 26-September 06 From: Canada Member No.: 6,921 |
QUOTE(Dave_Darling @ Sep 26 2006, 08:46 AM) The "black" wire in the pic at the top should have a purple stripe on it. The purple fades over the years, so it can be a little tough to see... As Burgerboy McMark said, check for that black/purple wire on the (-) connection of the ignition coil as well. The red/white wire carries "switched" power to the tach. This means the wire has +12V when the ignition is on, and none when the ignition is off. This comes from the ignition switch. The brown wire is, of course, the ground. The other wires should not have any effect on whether the tach works or not. The stock tach should work with carbs or EFI. If you have a single-carb setup, do yourself a favor and switch to dual carbs. --DD Hi, all, Thanks for all you input. I will check that out. Hi, DD, Just want to make sure that: 1) “The "black" wire in the pic at the top should have a purple stripe on it.” -------Do you mean the #2.1, #2.2 & #2.3 wires in the diagram? 2) “The red/white wire carries "switched" power to the tach.” -------Do you mean # 3 in the diagram. 3) “The brown wire is, of course, the ground.” ------- Do you mean #6 in the diagram. Besides 4) Can you tell me what is the wire # No. 5 black wiring in the diagram (as stated as # 15 in the Haynes manual Page 136 Fig 9.47) for? The Haynes does not mention that. Thank you. |
|
|
|
| ilike914 |
Oct 11 2006, 08:13 PM
Post
#12
|
|
Newbie Group: Members Posts: 12 Joined: 26-September 06 From: Canada Member No.: 6,921 |
Hi All,
Thanks for the advise last posted. Finally have time to work on this: 1) I could not find the black/purple wire at the “—“ of the coil. 2) So, I un-pluged the original black/purple wire at back of the tachometer (# 5 of diagram in the top post), I run a separate line from the “—“ at the coil to the back of the tachometer directly. 3) The tachometer runs. Good news. It works properly. So, I have a question about the reconnection: Can I find the original line that was used to connect to the “—“ of the coil in the engine compartment and reconnect that: 1) There was a bundle of wire connected to the “+” of the coil and one was not connecting but with a long plastic plug. (Can not distinguise the colour of the wires) Is it the original one? How can I test this out . Diagram 1 2) Can I find this in the Relay plate box? AS state in Haynes P161, the Relay plate diagram: Is it # 7 of X or #5 of Y which show the colour is BK/PU (Black / purple) wiring in the diagram 2. Can I run a line from this #5 of Y or #7 of X to the “—“ at the coil so as to reconnect the line to the tachometer assuming the original line is not broken and direct to the relay box. Diagram 2 Which one should I use to connect to the “—“ at the coil? Thanks a lot. Attached File(s)  Tachometer_line_in_engine_compartment_.pdf ( 155.12k )
Number of downloads: 85
Tachometer_line_in_engine_compartment_.pdf ( 155.12k )
Number of downloads: 85 |
|
|
|
| ilike914 |
Oct 11 2006, 08:20 PM
Post
#13
|
|
Newbie Group: Members Posts: 12 Joined: 26-September 06 From: Canada Member No.: 6,921 |
Hi All,
(Sorry that the last post is attached with pdf that does notr shown the diagrams). Thanks for the advise last posted. Finally have time to work on this: 1) I could not find the black/purple wire at the “—“ of the coil. 2) So, I un-pluged the original black/purple wire at back of the tachometer, I run a separate line from the “—“ at the coil to the back of the tachometer directly. 3) The tachometer runs. Good news. It works properly. So, I have a question about the reconnection: Can I find the orginal line that was used to connect to the “—“ of the coil in the engine compartment and reconnect that: 1) There was a bundle of wire connected to the “+” of the coil and one was not connecting but with a long plastic plug. (Can not distinguise the colour of the wires) Is it the original one? How can I test this out . Diagram 1 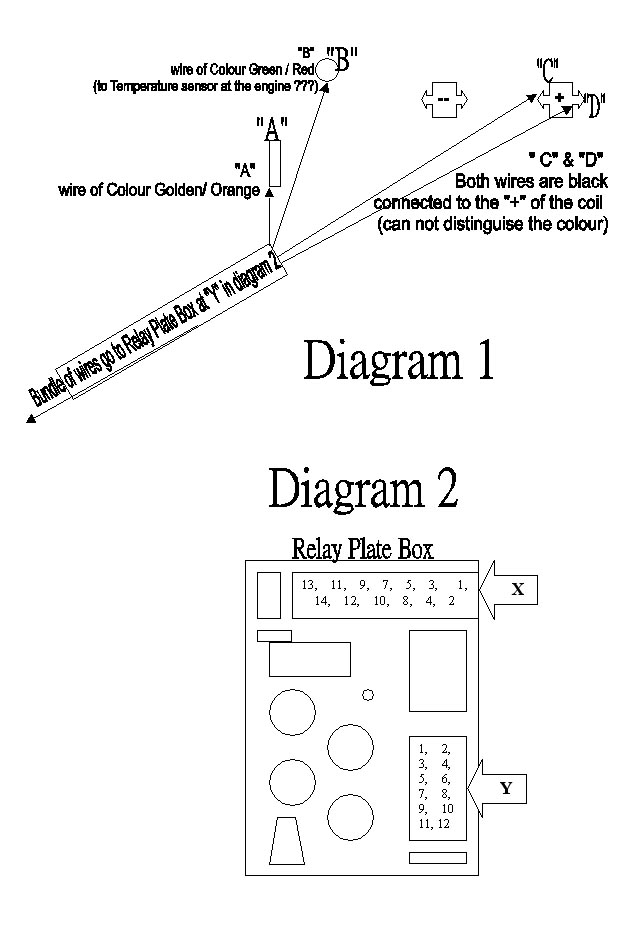 2) Can I find this in the Relay plate box? AS state in Haynes P161, the Relay plate diagram: Is it # 7 of X or #5 of Y which show the colour is BK/PU (Black / purple) wiring in the diagram 2. Can I run a line from this #5 of Y or #7 of X to the “—“ at the coil so as to reconnect the line to the tachometer assuming the original line is not broken and direct to the relay box. Which one should I use to connect to the “—“ at the coil? Diagram 2 Thanks a lot. |
|
|
|
| Spoke |
Oct 12 2006, 07:19 AM
Post
#14
|
|
Jerry Group: Members Posts: 6,983 Joined: 29-October 04 From: Allentown, PA Member No.: 3,031 Region Association: None |
Do you have a voltmeter handy? If not, go buy one; you'll need it eventually. Also if you don't have a repair manual for your car with a schematic, go buy one; you'll need it eventually.
With the voltmeter set for ohms, try to find which wire on or around the coil is the one going to the tach. Do this with the extra wire you connected directly from the tach to the coil and the car OFF. Check each wire on the tach (if you're not sure which one goes to the coil) with each wire on the coil. Car must be off to do this. One of the wire combinations should give zero ohms. If you find a zero ohm (or close to zero) combination, chances are this is the tach wire. Connect it to the tach and the "-" of the coil. My schematic shows 1 wire on the "+" of the coil and 2 wires on the "-". One wire on the "-" goes to the points in the dizzy and the other is the tach wire. The one on the "+" is +12V when the car is on. If you can't find the tach wire with the end-to-end measurement, try measuring wire to wire from the coil to the tach. First, find the tach wire from coil to relay board. This wire is #5 on the connector from relay board to engine wire bundle. Measure zero ohms to make sure this wire is ok. Wire #7 on this connector is the +12V wire to the coil. You can measure ohms on this wire for sanity. Wire #5 on the connector to engine crosses over the relay board to #7 on the connector to the passenger compartment. Measure from #7 on this connector to the coil tach wire. Should still read about zero ohms. The wire on #7 to the passenger compartment is BK/PU (Black/Purple). Measure ohms on the connector #7 wire to tach wire and find zero ohms. This should complete the circuit. If any of these tests fail, then you're closer to the issue. Could even be the connector causing the issue. Dirty or green contacts must be cleaned up with contact cleaner or like solvent. I had an opposite issue with my tach wire. When I hit a bump, my tach would momentarily go to zero RPM, and the engine would hiccup. Turns out the tach wire that crosses over the engine would short out to ground inside the wire bundle and inhibit spark firing. I ran a new wire from the tach to the relay board and the bump hiccups stopped. Good luck, Spoke |
|
|
|
| ilike914 |
Oct 13 2006, 12:10 AM
Post
#15
|
|
Newbie Group: Members Posts: 12 Joined: 26-September 06 From: Canada Member No.: 6,921 |
Hi, Spoke,
Thanks. I will try this out. ilike914 |
|
|
|
| ilike914 |
Oct 13 2006, 08:03 PM
Post
#16
|
|
Newbie Group: Members Posts: 12 Joined: 26-September 06 From: Canada Member No.: 6,921 |
HI, Spoke & everyone,
THanks for everyone helping. Spoke: I use your method and find out that the line C of diagram one should be connected to the tachometer black / purple wire (zero OHM tested). I switch it from the "+" to the negative (Do not beleived that the PO had done that). Within one minutes, the tachometer is running. Really thanks to everyone who had contributed their adsvise. THanks. Talk to you all later. ilike914 |
|
|
|
|
1 User(s) are reading this topic (1 Guests and 0 Anonymous Users)
0 Members:

|
Lo-Fi Version | Time is now: 20th May 2024 - 07:00 PM |
Invision Power Board
v9.1.4 © 2024 IPS, Inc.