|
|
|
Porsche, and the Porsche crest are registered trademarks of Dr. Ing. h.c. F. Porsche AG.
This site is not affiliated with Porsche in any way. Its only purpose is to provide an online forum for car enthusiasts. All other trademarks are property of their respective owners. |
|
|

  |

| shaggy |
 Oct 2 2006, 09:45 PM Oct 2 2006, 09:45 PM
Post
#1
|
|
mechanic/welder/fabricator  Group: Members Posts: 702 Joined: 26-September 05 From: Gilbert, AZ Member No.: 4,869 Region Association: None |
ive searched here and at Shop talk and havent been able to turn up anythign that i can understand.
so what is it?(simply) and how do i determine it? thanks -shaggy |
   |

 
|
| Aaron Cox |
Oct 2 2006, 09:49 PM
Post
#2
|
|
Professional Lawn Dart Group: Retired Admin Posts: 24,541 Joined: 1-February 03 From: OC Member No.: 219 Region Association: Southern California |
at HALF lift...
you want the rocker adjuster to be PARRALLEL to the Valve stem. (laymans) there were some bitchin pics on STF |
|
|
|
| Mark Henry |
Oct 2 2006, 10:30 PM
Post
#3
|
|
that's what I do! Group: Members Posts: 20,065 Joined: 27-December 02 From: Port Hope, Ontario Member No.: 26 Region Association: Canada |
QUOTE(shaggy @ Oct 2 2006, 11:45 PM)  ....so what is it?(simply) and how do i determine it? thanks -shaggy It is not a "simple" task! Stock or Hi-Po? It takes time, an adjustable pushrod, shims, maybe a lathe to cut the pushrods, etc. You need to know you lift. Aaron is right about the half lift bit...stock is not that bad, hi-po is more work. |
|
|
|
| Aaron Cox |
Oct 2 2006, 11:20 PM
Post
#4
|
|
Professional Lawn Dart Group: Retired Admin Posts: 24,541 Joined: 1-February 03 From: OC Member No.: 219 Region Association: Southern California |
QUOTE(Mark Henry @ Oct 2 2006, 09:30 PM) QUOTE(shaggy @ Oct 2 2006, 11:45 PM) ....so what is it?(simply) and how do i determine it? thanks -shaggy It is not a "simple" task! Stock or Hi-Po? It takes time, an adjustable pushrod, shims, maybe a lathe to cut the pushrods, etc. You need to know you lift. Aaron is right about the half lift bit...stock is not that bad, hi-po is more work. mark - care to elaborate on the differences between hipo and stock for jimbo? my setup - manton cromo CTL pushrods... 1.7 rockers with oem 911 swivels. rockers were decked .060, and i think to get it dead nuts i had .060 rocker shims.... mark can explain it better than i (IMG:style_emoticons/default/smile.gif) |
|
|
|
| anthony |
Oct 2 2006, 11:36 PM
Post
#5
|
|
2270 club Group: Benefactors Posts: 3,107 Joined: 1-February 03 From: SF Bay Area, CA Member No.: 218 |
Jake's next radio show is all about the valvetrain.
|
|
|
|
| eeyore |
Oct 3 2006, 09:20 AM
Post
#6
|
|
Senior Member Group: Members Posts: 889 Joined: 8-January 04 From: meridian, id Member No.: 1,533 Region Association: None |
After being slightly flummoxed by trying to find half-lift at the valve because I had no idea what a good starting pushrod length would be, I opted for mildly cheesy way to figure half-lift – at the base of the pushrod.
There is a boss-thingy on the case right next to a lifter bore (#4 cylinder?). Put a piece of tape on the adjustable pushrod next to this boss. Make sure the short end of the adjuster is on the head side.* Turn the crank until full lift. Use the boss as a reference point to scribe a line on the tape (orange). Turn the crank to zero lift and scribe another line (red). Using trusty calculator and calipers, determine half-lift and scribe a third line between those (magenta). ** Turn the crank until that center line is even with the boss reference point. The cam is at half-lift. Twiddle with the adjustable end of the pushrod and the valve adjuster until the valve adjuster shaft is parallel with the valve. Raise or lower rocker blocks if necessary. Fortunately for me, this point coincided with half-lift at the valve. * It helps to use those lightweight test-only valve springs. ** Lift at the pushrod is not the same as the lift value given on the cam card. Attached image(s) 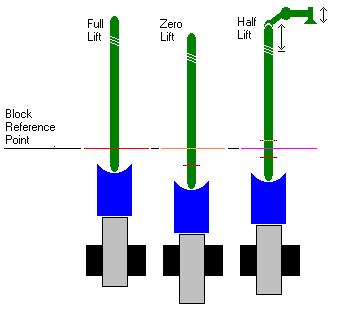
|
|
|
|
| Aaron Cox |
Oct 3 2006, 10:08 AM
Post
#7
|
|
Professional Lawn Dart Group: Retired Admin Posts: 24,541 Joined: 1-February 03 From: OC Member No.: 219 Region Association: Southern California |
easier to use the flywheel... mark when it opens...mark when it closes.. cut that distance in 2
|
|
|
|
| Jake Raby |
Oct 3 2006, 10:30 AM
Post
#8
|
|
Engine Surgeon Group: Members Posts: 9,394 Joined: 31-August 03 From: Lost Member No.: 1,095 Region Association: South East States |
QUOTE(anthony @ Oct 2 2006, 10:36 PM) Jake's next radio show is all about the valvetrain. Yep, Make sure to listen in on Friday! |
|
|
|
| Mark Henry |
Oct 3 2006, 11:56 AM
Post
#9
|
|
that's what I do! Group: Members Posts: 20,065 Joined: 27-December 02 From: Port Hope, Ontario Member No.: 26 Region Association: Canada |
That pic is pretty good.
Everyone has their own method, for a rough baseline I have about a dozen+ pushrods of different lengths, I find one that is about right, and then I use a dial indicator to figure out the lift. Then I use an adjustable pushrod at 0 lift. Once I've figured my shim and I'm happy I cut to size a lathe. Then you use 2 old lifters to hammer on the end. I do this for each and every push rod. |
|
|
|
| Mid_Engine_914 |
Oct 3 2006, 01:59 PM
Post
#10
|
|
Member Group: Members Posts: 195 Joined: 22-September 06 From: Left Coast Member No.: 6,888 |
Did Jake cover this in his recent series of Hot VWs articles? I was thinking about buying those issues and was curious as to just what was covered.
|
|
|
|
| Twystd1 |
Oct 3 2006, 02:11 PM
Post
#11
|
|
You don't want to know... really..... Group: Members Posts: 2,514 Joined: 12-September 04 From: Newport Beach, California Member No.: 2,743 |
I am going to see if we can Richard, or McMark, or me or SOMEONE to make a definitive post on this for a permanent sticky.
Somebody must be doing this in the next month or so. All we need are great pictures to show how to do it. It is dam near impossible to write it up without pictures. This will show what tools to use and exactly what it looks like when done correctly and show what it looks like when done wrong. There used to b good thread at the STF. It was for a type 1 setup done by 500Lb Gorilla. Problem is that setup is the reverse of our Type IV. Lets see who steps up.!!!!! If I was at that point. I would post it now.... I am just not there yet. Pictures tell a thousand words. C |
|
|
|
| Aaron Cox |
Oct 3 2006, 02:14 PM
Post
#12
|
|
Professional Lawn Dart Group: Retired Admin Posts: 24,541 Joined: 1-February 03 From: OC Member No.: 219 Region Association: Southern California |
QUOTE(Twystd1 @ Oct 3 2006, 01:11 PM) I am going to see if we can Richard, or McMark, or me or SOMEONE to make a definitive post on this for a permanent sticky. Somebody must be doing this in the next month or so. All we need are great pictures to show how to do it. It is dam near impossible to write it up without pictures. This will show what tools to use and exactly what it looks like when done correctly and show what it looks like when done wrong. There used to b good thread at the STF. It was for a type 1 setup done by 500Lb Gorilla. Problem is that setup is the reverse of our Type IV. Lets see who steps up.!!!!! If I was at that point. I would post it now.... I am just not there yet. Pictures tell a thousand words. C there is a bitchin writeup with pics over at STF... our own Yeahmag did alot of it i recall.... |
|
|
|
| blitZ |
Oct 4 2006, 05:32 AM
Post
#13
|
|
Beer please... Group: Members Posts: 2,223 Joined: 31-August 05 From: Lawrenceville, GA Member No.: 4,719 Region Association: South East States |
I believe this is the STF thread, it contains some good images. It's long but a lot of good info here.
STF Valvetrain Geometry |
|
|
|
|
1 User(s) are reading this topic (1 Guests and 0 Anonymous Users)
0 Members:

|
Lo-Fi Version | Time is now: 19th May 2024 - 02:54 AM |
Invision Power Board
v9.1.4 © 2024 IPS, Inc.