|
|
|
Porsche, and the Porsche crest are registered trademarks of Dr. Ing. h.c. F. Porsche AG.
This site is not affiliated with Porsche in any way. Its only purpose is to provide an online forum for car enthusiasts. All other trademarks are property of their respective owners. |
|
|

  |

| DNHunt |
 Dec 11 2003, 09:56 PM Dec 11 2003, 09:56 PM
Post
#1
|
|
914 Wizard? No way. I got too much to learn.  Group: Members Posts: 4,099 Joined: 21-April 03 From: Gig Harbor, WA Member No.: 598 |
Got the rear suspension cleaned up and ready to install. New shocks, springs, wheel bearings, suspension bushings and 2 new inboard CV joints.
Ready to hoist Dave Attached image(s) 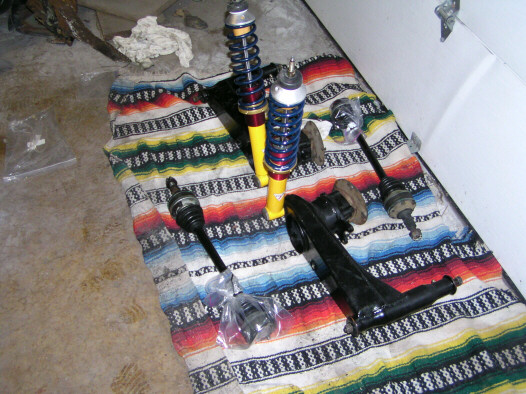
|
   |

 
|
| DNHunt |
Dec 11 2003, 09:58 PM
Post
#2
|
|
914 Wizard? No way. I got too much to learn. Group: Members Posts: 4,099 Joined: 21-April 03 From: Gig Harbor, WA Member No.: 598 |
Driver's side up and in. All snugged down still need to torque
Attached image(s) 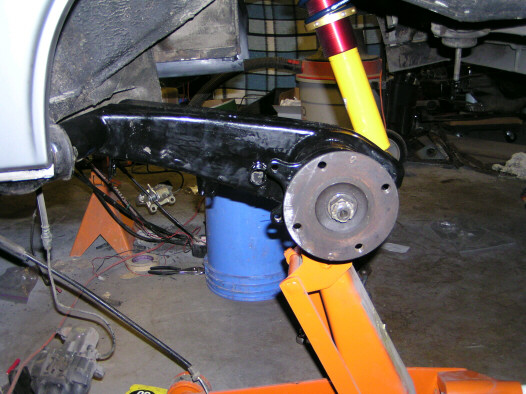
|
|
|
|
| Gint |
Dec 11 2003, 10:25 PM
Post
#3
|
|
Mike Ginter Group: Admin Posts: 16,106 Joined: 26-December 02 From: Denver CO. Member No.: 20 Region Association: Rocky Mountains |
Gotta love progress. (IMG:style_emoticons/default/beerchug.gif)
|
|
|
|
| DNHunt |
Dec 13 2003, 08:54 AM
Post
#4
|
|
914 Wizard? No way. I got too much to learn. Group: Members Posts: 4,099 Joined: 21-April 03 From: Gig Harbor, WA Member No.: 598 |
Rear suspension done! (IMG:style_emoticons/default/smilie_pokal.gif)
I had to solve one problem. Got it all together, put the calipers on and the rotors wouldn't turn, they were frozen solid. I got a light and shined it up from below. I could see a trace of light between the inboard pad and the rotor but nothing between the outboard pad and rotor. The calipers were positioned too far inboard. Took it all apart and I had painted the caliper flanges on the bearing carrier portion of the control arm. DOH! Got rid of the paint and the problem. Dave Attached image(s) 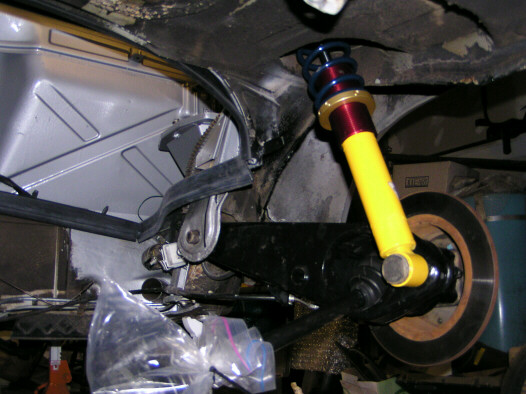
|
|
|
|
| rhodyguy |
Dec 13 2003, 09:29 AM
Post
#5
|
|
Chimp Sanctuary NW. Check it out. Group: Members Posts: 22,252 Joined: 2-March 03 From: Orion's Bell. The BELL! Member No.: 378 Region Association: Galt's Gulch |
you gotta love the fire wall (IMG:style_emoticons/default/smilie_pokal.gif) . you do fine work dave. i smell an engine install. i'll give you a call in a bit. the weather is way to crappy for my plans.
kevin |
|
|
|
| maf914 |
Dec 13 2003, 09:39 AM
Post
#6
|
|
Not a Guru! Group: Members Posts: 3,049 Joined: 30-April 03 From: Central Florida Member No.: 632 Region Association: None |
Looking good, Dave! (IMG:style_emoticons/default/smilie_pokal.gif)
Where did you get your adjustable spring set-up? Paragon? Thanks, Mike |
|
|
|
| watsonrx13 |
Dec 13 2003, 12:03 PM
Post
#7
|
|
Advanced Member Group: Members Posts: 2,735 Joined: 18-February 03 From: Plant City, FL Member No.: 312 Region Association: South East States |
Dave, how long have you been working on the project?
Great job (IMG:style_emoticons/default/smilie_pokal.gif) (IMG:style_emoticons/default/smilie_pokal.gif) (IMG:style_emoticons/default/smilie_pokal.gif) |
|
|
|
| rhodyguy |
Dec 13 2003, 12:58 PM
Post
#8
|
|
Chimp Sanctuary NW. Check it out. Group: Members Posts: 22,252 Joined: 2-March 03 From: Orion's Bell. The BELL! Member No.: 378 Region Association: Galt's Gulch |
you should have done the lower firewall too.
kevin |
|
|
|
| Doug Leggins |
Dec 13 2003, 03:19 PM
Post
#9
|
|
Senior Member Group: Benefactors Posts: 1,358 Joined: 6-February 03 From: Nashville, Indiana Member No.: 261 Region Association: None |
Looks great Dave!
I'll be painting POR15 on the rear trailing arms soon. Thanks for the the tip on not painting the caliper flanges. |
|
|
|
| Brad Roberts |
Dec 13 2003, 04:09 PM
Post
#10
|
|
914 Freak! Group: Members Posts: 19,148 Joined: 23-December 02 Member No.: 8 Region Association: None |
Dave,
Did you reinstall the spacer for the calipers ? The one that holds the dust shield on ? I cant tell from your pics. If you didnt... you should. It centers the caliper properly on the rotor. It un bolts from the dust shield. B |
|
|
|
| Gint |
Dec 13 2003, 05:11 PM
Post
#11
|
|
Mike Ginter Group: Admin Posts: 16,106 Joined: 26-December 02 From: Denver CO. Member No.: 20 Region Association: Rocky Mountains |
And the small circular ScotchBrite type disks on a die grinder will zip paint (and powder coat) right off of those mating surfaces in a heartbeat.
|
|
|
|
| seanery |
Dec 13 2003, 05:14 PM
Post
#12
|
|
waiting to rebuild whitey! Group: Retired Admin Posts: 15,857 Joined: 7-January 03 From: Indy Member No.: 100 Region Association: None |
scotchbrite will take off powdercoat? (IMG:style_emoticons/default/confused24.gif)
|
|
|
|
| Gint |
Dec 13 2003, 05:19 PM
Post
#13
|
|
Mike Ginter Group: Admin Posts: 16,106 Joined: 26-December 02 From: Denver CO. Member No.: 20 Region Association: Rocky Mountains |
The coarse discs like these (lower right in the package) in a die grinder will. Takes a little more effort than removing paint, but it will take it off.
Attached image(s) 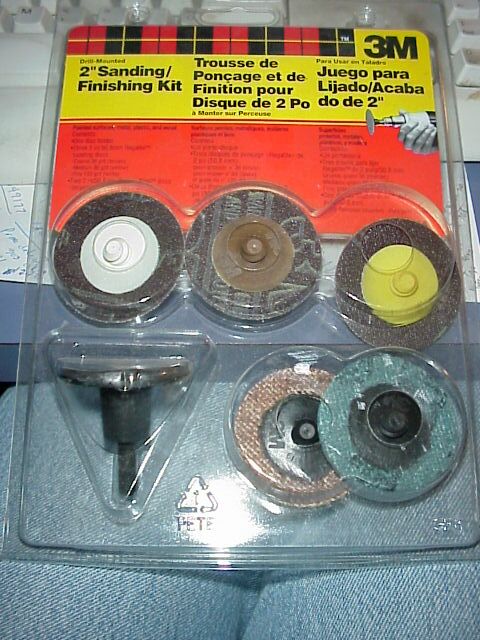
|
|
|
|
| DNHunt |
Dec 13 2003, 07:10 PM
Post
#14
|
|
914 Wizard? No way. I got too much to learn. Group: Members Posts: 4,099 Joined: 21-April 03 From: Gig Harbor, WA Member No.: 598 |
Brad
Sure did, I took them off of thedust covers. Scotchbrite products are great. Kind of expensive but they last longer than you would think they would. Great product Dave |
|
|
|
| RustyWa |
Dec 13 2003, 11:07 PM
Post
#15
|
|
Working Member Group: Members Posts: 610 Joined: 2-January 03 From: Kent, WA Member No.: 72 |
That looks like new lower engine tin rubber, by the powder looking stuff on them. If they are, did you get the expensive ones or the reproduction ones people were talking about a while back?
|
|
|
|
| Brad Roberts |
Dec 13 2003, 11:32 PM
Post
#16
|
|
914 Freak! Group: Members Posts: 19,148 Joined: 23-December 02 Member No.: 8 Region Association: None |
Cool Dave. Just watch'n ya back bro.
yes.. I use 3m pads exclusively. They also work GREAT at removing old gasket material from intake manifolds and the such. B |
|
|
|
| DNHunt |
Dec 14 2003, 05:34 AM
Post
#17
|
|
914 Wizard? No way. I got too much to learn. Group: Members Posts: 4,099 Joined: 21-April 03 From: Gig Harbor, WA Member No.: 598 |
Eric
It is new rubber. I don't know about original or repro. Kevin tipped me off to them on Ebay. Got a sweet deal. They fit fine so I'm satisfied Dave |
|
|
|
|
1 User(s) are reading this topic (1 Guests and 0 Anonymous Users)
0 Members:

|
Lo-Fi Version | Time is now: 4th March 2026 - 05:53 PM |
Invision Power Board
v9.1.4 © 2026 IPS, Inc.