|
|
|
Porsche, and the Porsche crest are registered trademarks of Dr. Ing. h.c. F. Porsche AG.
This site is not affiliated with Porsche in any way. Its only purpose is to provide an online forum for car enthusiasts. All other trademarks are property of their respective owners. |
|
|

  |

| Jeff Hail |
 Nov 24 2007, 11:00 PM Nov 24 2007, 11:00 PM
Post
#121
|
|
Senior Member  Group: Members Posts: 1,141 Joined: 3-May 07 From: LA/ CA Member No.: 7,712 |
QUOTE(Eric_Shea @ Nov 24 2007, 08:55 PM)  QUOTE Jeff, I have been reading your thread as you go along and I only have one question. Can I have your car when you are done??? QUOTE No! How about me? Can I have it? (IMG:style_emoticons/default/confused24.gif) (IMG:style_emoticons/default/biggrin.gif) Eric will have the pleasure of rebuilding my calipers soon. At least you get a piece of the car! (IMG:style_emoticons/default/biggrin.gif) |
   |

 
|
| Eric_Shea |
Nov 24 2007, 11:03 PM
Post
#122
|
|
PMB Performance Group: Admin Posts: 19,275 Joined: 3-September 03 From: Salt Lake City, UT Member No.: 1,110 Region Association: Rocky Mountains |
Yeah but... I have to give them back! (IMG:style_emoticons/default/biggrin.gif)
Keep up the good work bud. (IMG:style_emoticons/default/smilie_pokal.gif) Do you like to ski (and weld)? (IMG:style_emoticons/default/biggrin.gif) |
|
|
|
| Jeff Hail |
Nov 24 2007, 11:19 PM
Post
#123
|
|
Senior Member Group: Members Posts: 1,141 Joined: 3-May 07 From: LA/ CA Member No.: 7,712 |
QUOTE(Eric_Shea @ Nov 24 2007, 09:03 PM) Yeah but... I have to give them back! (IMG:style_emoticons/default/biggrin.gif) Keep up the good work bud. (IMG:style_emoticons/default/smilie_pokal.gif) Do you like to ski (and weld)? (IMG:style_emoticons/default/biggrin.gif) I used to ski and race giant slalom 20 years ago as a young man. I became bored with skiing. Snowboarders slowed everyone down. (IMG:style_emoticons/default/dead horse.gif) Last time I raced was at Ajax/ Aspen a long time ago. Welding is fun. I get to burn things on purpose. (IMG:style_emoticons/default/welder.gif) |
|
|
|
| Jeff Hail |
Nov 25 2007, 08:24 PM
Post
#124
|
|
Senior Member Group: Members Posts: 1,141 Joined: 3-May 07 From: LA/ CA Member No.: 7,712 |
Spent about 3 hours today fitting the new rear rail. I had a bit of re-work to get the dimensions right. It's not bad, just takes some time to fit.
Anyway the part whether new of aftermarket has to be fit and trimmed. Any sheetmetal part that is not bolt on and is supplied as cut to fit is going to take some work. The trick on the rear rail (AA Part) is to fit it to the front inner long first. From there you will get the correct pitch (angle) leading to the trunk bulkhead. This took some fiddling and trimming. I cut off about 1/4 inch at the rear and obtained the correct angle for a flush fit. I then had to fishmouth the front inner long to get some "play" in the adjustment. ( I hate bending a newly installed inner long) The pitch of the rear rail is 34 degree's as measured from the driver side. I am at 31 now. I need to drop the front ever so slightly (1/4 inch). This is imperitive for suspension geometry. Then I trimmed another 1/2 inch at the front long connection to get a verticle flush/ butt connection. (I still have to do some fine tuning with a grinder) This will need to be sleeved (double walled) as it is a highly stressed joint) I was hoping as I timmed back the new rear rail I could lap weld the joint but the convolutions did not allow that. No worry. I will modify the aftermarket part to incorporate the factory type reinforcement. If you look at the second picture you will see the top of the panel connection is really close. The bottom is way off. This is a manufacturing issue. I will adjust and weld the top first, then splay the rail (box) open some more to fit the bottom. As the fit process came to conclusion I held the new panel in with a C-clamp and cleco's. This is only a rough fit and not tack welded until I complete the adjustments by lowering rear rail by 1/4 of an inch at the front long connection. Attached image(s) 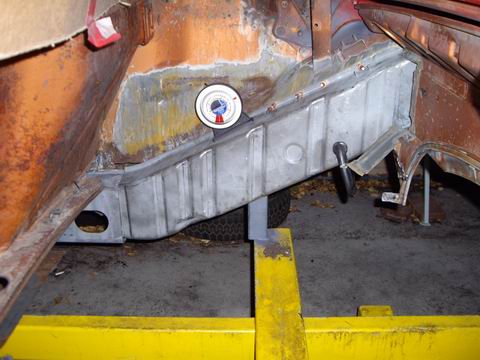 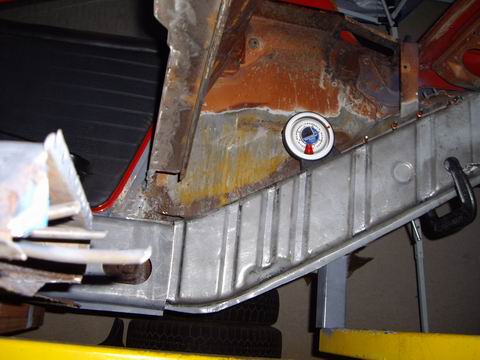 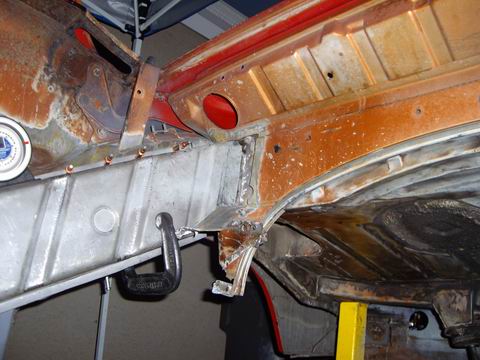 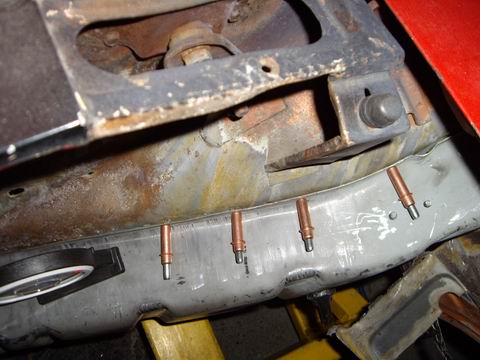
|
|
|
|
| Jeff Hail |
Nov 25 2007, 08:31 PM
Post
#125
|
|
Senior Member Group: Members Posts: 1,141 Joined: 3-May 07 From: LA/ CA Member No.: 7,712 |
For this installation a protractor or (inclination gauge) is worth it's weight in gold ($18). I can take fast comparitive measurements from side to side.
I have not been able to find specifications in print for this area from Celette, Mitchell or even the factory so it pays to have a tool for comparison. By making some fixtures for the control points prior this will alleviate any problems later. I also have an aftermarket suspension console to use for fit purposes. This will provide fit and additional comparison measurements for correct suspension geometry. Attached image(s) 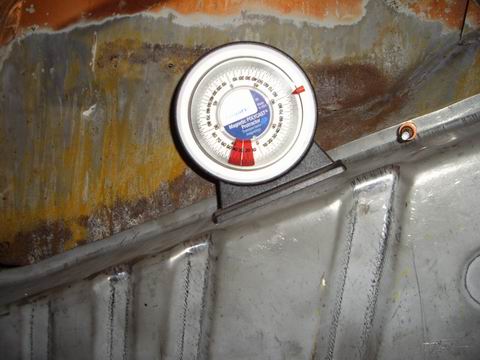 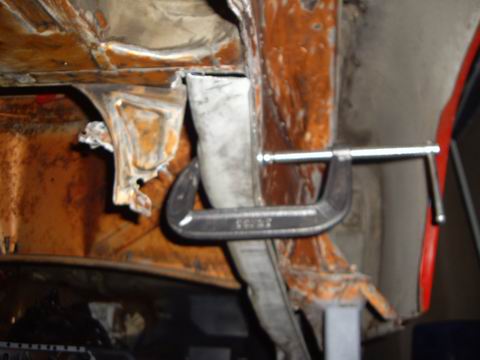 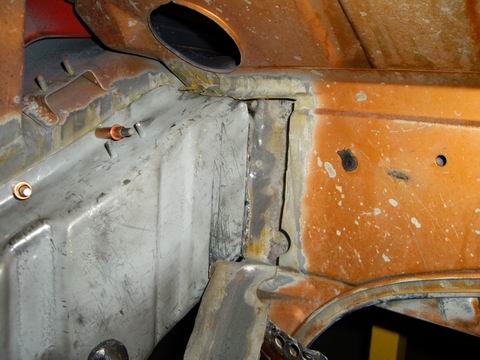 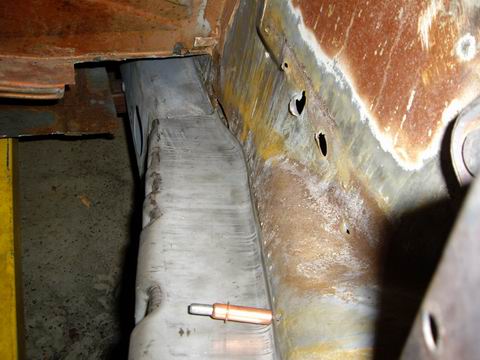
|
|
|
|
| Jeff Hail |
Nov 25 2007, 08:52 PM
Post
#126
|
|
Senior Member Group: Members Posts: 1,141 Joined: 3-May 07 From: LA/ CA Member No.: 7,712 |
Clecos are easier to work with than self-tapping screw's. They plug in and out. Cleco's have enough "slop" in them to allow slight adjustment if only a few are used. The more are used the more rigid the mock up. Once I get the position
of the part where it needs to be I will tack it with the MIG. Attached image(s) 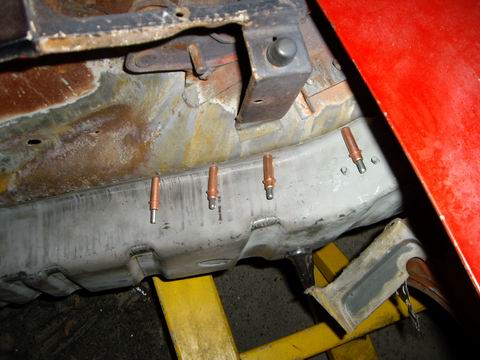
|
|
|
|
| Jeff Hail |
Nov 25 2007, 09:41 PM
Post
#127
|
|
Senior Member Group: Members Posts: 1,141 Joined: 3-May 07 From: LA/ CA Member No.: 7,712 |
The original outer wheelhouse has a reinforcement (double wall) welded to the inside. It has a ledge that locates the inner rail's top flange (highlighted). This was my reference point to measure the pitch of the original rail design along with the opposite left rail.
Nothing better than a factory template! Once I tack the rail at the trunk bulhead and top of the rail the lower flange will be a cinch to tweak as I go. I wish I had more daylight. I want my summer hours back! Attached image(s) 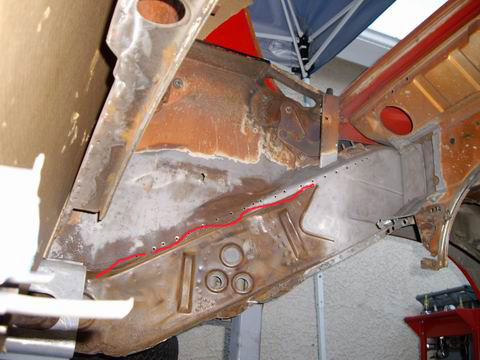
|
|
|
|
| Jeff Hail |
Nov 25 2007, 10:21 PM
Post
#128
|
|
Senior Member Group: Members Posts: 1,141 Joined: 3-May 07 From: LA/ CA Member No.: 7,712 |
Interesting Vitaloni's found in the box of extra's. I have not seen these since 1983. They are in perfect shape. No scratches on the glass or housings. Rubber in good perfect condition. Not California's, not Baby Turbos, not Classics.........That blue tinted glass is so 80's. They are actually pn# a right and left (not universal) pair.
They are marked Vitaloni Bravo III's which were standard on the the Lancia Zegato and Alfa Romeo's. What the hell were these doing on a German car? Attached image(s) 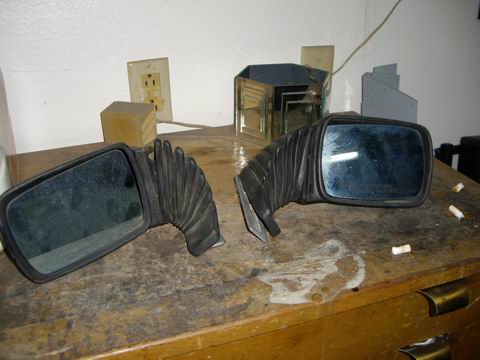 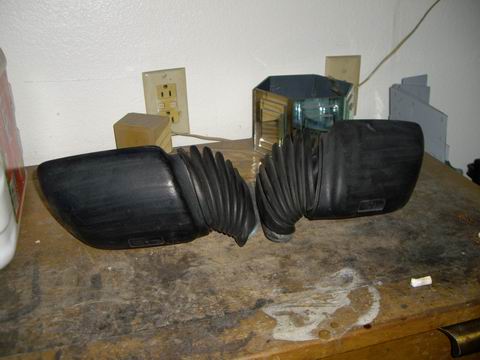
|
|
|
|
| Aaron Cox |
Nov 26 2007, 09:25 PM
Post
#129
|
|
Professional Lawn Dart Group: Retired Admin Posts: 24,541 Joined: 1-February 03 From: OC Member No.: 219 Region Association: Southern California |
wow jeff.
wow. I just read your whole thread, after clayton told me about his visit to su casa. Quite the craftsman!!! Keep up the good work buddy! Aaron |
|
|
|
| Jeff Hail |
Dec 2 2007, 08:04 PM
Post
#130
|
|
Senior Member Group: Members Posts: 1,141 Joined: 3-May 07 From: LA/ CA Member No.: 7,712 |
Busy week and weekend. No time to play. Work, birthdays, meetings etc.
Finished fitting the rear frame rail and punched the flange holes. Some minor adjustments to the rail with a grinder to improve the fit and butt joints. Used some stock to square up the joints and clamped everything in place. Not 100% happy with the fit. The AA part dimensionally has some issues. The arc of the rail itself is not right and will have to be adjusted once I make some tacks. Then I can twist it into place. These things come up even with new oem parts so it just part of the process. That's why they call it work. Attached image(s) 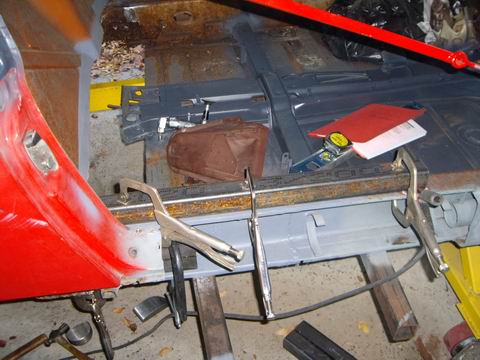 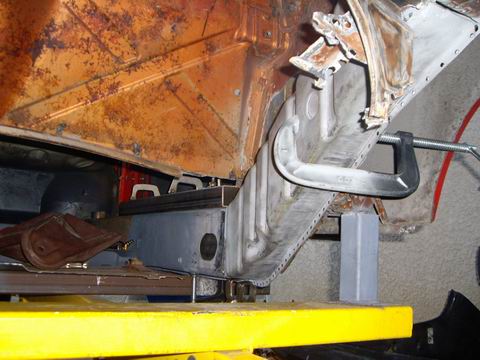 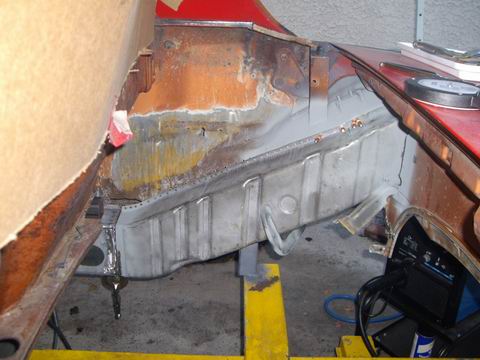 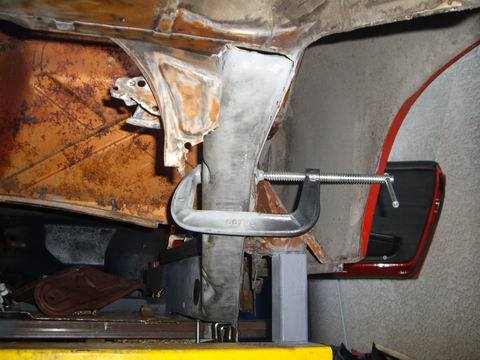
|
|
|
|
| Jeff Hail |
Dec 2 2007, 08:23 PM
Post
#131
|
|
Senior Member Group: Members Posts: 1,141 Joined: 3-May 07 From: LA/ CA Member No.: 7,712 |
More stock to square the inner long to the rear rail and clamp in place. You will notice the rectangle inside the long. Just some scrap that I can clamp in place to keep the panels straight and tight. Once you start tack welding metal tends to draw together. This just helps keep things in place so things don't go sideways.
Another tip is to keep the welder close enough that the controls are in arms reach. One thing about welding on the 914 is you have the longs and rails which are about 17 gauge oem and 18 gauge non oem steel. The wheelhouse and trunk bulkhead are the same. The joint at the shock tower is close to 15 gauge. A few small heat adjustments are necessary on the fly. Old 914 sheetmetal even when really clean can still have some issues. I have learned on many a Porsche that the best steel (Krupp and Thyssen) was not utilized and can be "dirty". During the manufacturing process the alloy can vary and this sometimes means more or less sulpher. Some parts such as the longs and rails are an early form of HSLA steel. (High strength low alloy) which mean's it is harder and stiffer. If you have ever tried welding a new steel panel to old steel on a 914 you know what I mean. A great weld, then a little popping and sputter here, blow a hole there. Its all part of the game. Prep metal and get it as clean as possible for welding. Attached image(s) 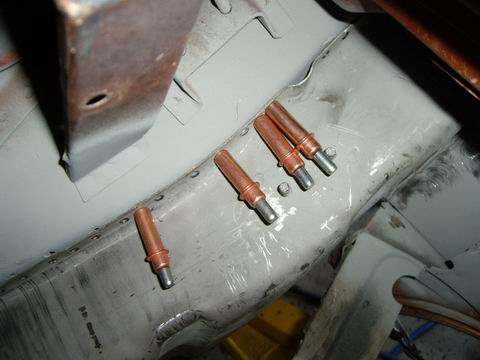 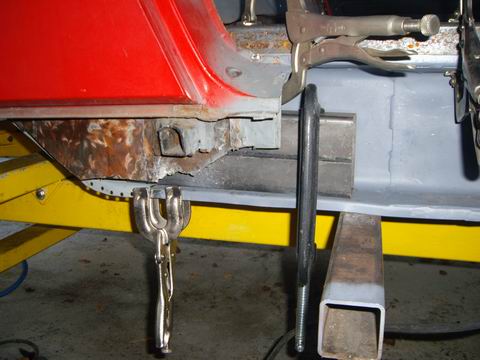 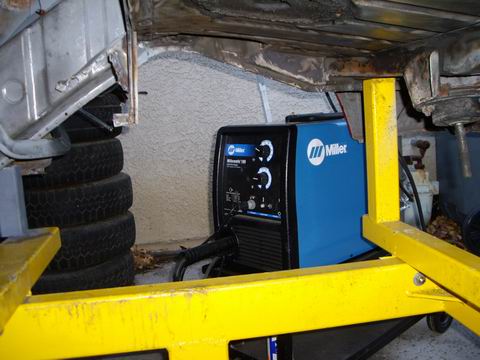
|
|
|
|
| Jeff Hail |
Dec 2 2007, 08:38 PM
Post
#132
|
|
Senior Member Group: Members Posts: 1,141 Joined: 3-May 07 From: LA/ CA Member No.: 7,712 |
Enough talk. Time to burn some metal.
Tacked the rear at the bulhead then tacked the front at the bottom of the long. Re-check fit and then lay on the heat. I like to seam weld thin sheetmetal in 1/2 to 1 inch burst's. This way I do not oveheat and warp the area but still get enough heat for proper penetration. You will notice the top of the mid inner long is not tacked to the rear rail. This is where I have a little twist in the rail that needs some fitment. With the rear and lower tacked in I can get some leverage on the top and fit the butt joints better. The outer wheelhouse is getting a section so no plug welds were made except for where the Cleco's were pinned. Attached image(s) 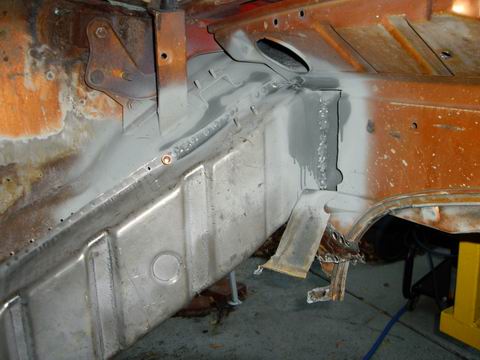 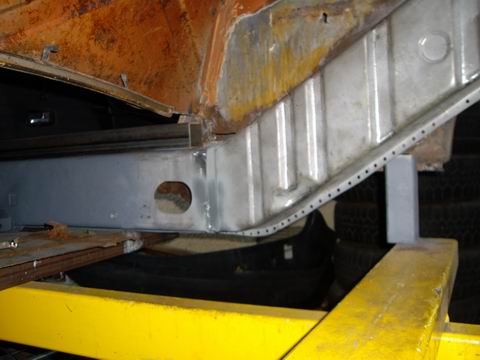 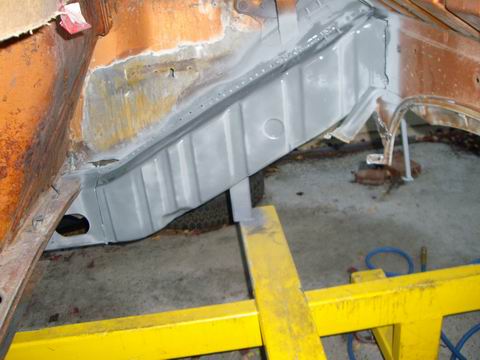 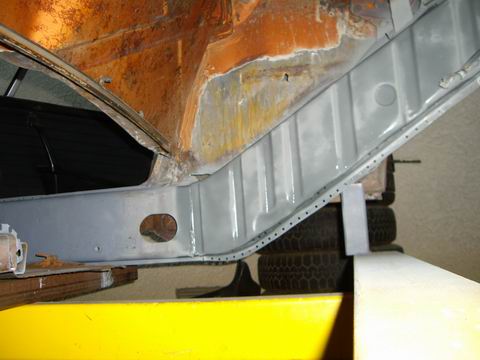
|
|
|
|
| Jeff Hail |
Dec 2 2007, 09:11 PM
Post
#133
|
|
Senior Member Group: Members Posts: 1,141 Joined: 3-May 07 From: LA/ CA Member No.: 7,712 |
Crud!!!!!went to make another post and the site went dead for a minute. Lets try again.
The area's highlighted in yellow have no welds, plugs or tacks. Area's in red have been tacked, seam welded and plugged. I now have structural integrity again (sort of). The top of the rail at the top of the long is free. I need some adjustment room when I install the wheelhouse section The entire right qtr panel, wheelhouse at the long / firewall junction have been held together with one single tack weld at the inside of the door jamb/ dogleg. I could not perform these operations on jackstands. The door bars kept the door gaps open and everything rigid on the upper body. The rack below kept everything level. Attached image(s)  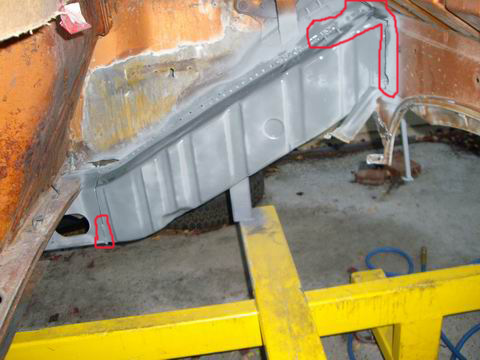
|
|
|
|
| Jeff Hail |
Dec 2 2007, 09:24 PM
Post
#134
|
|
Senior Member Group: Members Posts: 1,141 Joined: 3-May 07 From: LA/ CA Member No.: 7,712 |
One single weld holding the qtr panel/ dogleg this whole time. (highlighted)
Now that structural integrity is back I will move to the wheelhouse. Another piece that will require fitting. It is easier to go back to something that was partially completed then going backwards and doing something over if it doesn't come out right. Take your time and be patient. Couple of things. Most of the prior welding on the longs was done at about 70-80 degree's. The rail was done at 48 degree's. Metal cools much faster and draws together quicker. This is noticable and it will affect gaps. That single weld will save me hours of future fitting and headaches. The other one is the mid long and rail joint is butt welded. This will get a double wall sleeve just like the factory design. Do not butt weld a rocker without a sleeve. This is for any car with a structural roof or not. It is one of those things you do not ask why, just do it. Attached image(s) 
|
|
|
|
| Twystd1 |
Dec 3 2007, 12:20 AM
Post
#135
|
|
You don't want to know... really..... Group: Members Posts: 2,514 Joined: 12-September 04 From: Newport Beach, California Member No.: 2,743 |
QUOTE The other one is the mid long and rail joint is butt welded. This will get a double wall sleeve just like the factory design. Do not butt weld a rocker without a sleeve. This is for any car with a structural roof or not. It is one of those things you do not ask why, just do it. Jeff, explain that further. As I think I know what you mean. But I want to be exactly clear on what you are saying.. (pics would be good for this nut head) Ohh.. I found a Cellete bench with both the 911 and the 914 jigs in Buena Park.. In a Porsche mechanics garage.... No shit.... Now how do I tell the guy I need it for my bros...???? And where the hell do I put it on the assumption he will sell it to me...????? Ya got any ideas...????? Oh... Before I forget... I LOVE THIS SHIT.......!!!!!!!!!!!!!!! Carry on sir. Clayton |
|
|
|
| Jeff Hail |
Dec 3 2007, 01:37 AM
Post
#136
|
|
Senior Member Group: Members Posts: 1,141 Joined: 3-May 07 From: LA/ CA Member No.: 7,712 |
QUOTE(Twystd1 @ Dec 2 2007, 10:20 PM) QUOTE The other one is the mid long and rail joint is butt welded. This will get a double wall sleeve just like the factory design. Do not butt weld a rocker without a sleeve. This is for any car with a structural roof or not. It is one of those things you do not ask why, just do it. Jeff, explain that further. As I think I know what you mean. But I want to be exactly clear on what you are saying.. (pics would be good for this nut head) Ohh.. I found a Cellete bench with both the 911 and the 914 jigs in Buena Park.. In a Porsche mechanics garage.... No shit.... Now how do I tell the guy I need it for my bros...???? And where the hell do I put it on the assumption he will sell it to me...????? Ya got any ideas...????? Oh... Before I forget... I LOVE THIS SHIT.......!!!!!!!!!!!!!!! Carry on sir. Clayton It's pretty much a re-hash of Page 4 on this thread. Mid long =longitudinal under the door. Rear long =rear frame rail This is nuts. They should call the bolt on rocker the rocker molding. Then the outer rocker would be the piece the sills and triangles weld to. The inner long should really be called the inner rocker panel. Every other manufacturer uses this terminolgy. Why can't we? Organized chaos theory interpretation by Porsche? In the collision repair industry if you refer to an inner rocker as a longitudinal you are going to get that "what the f up" look. Celette? How much? 20K minimum for a 20 year old bench with full set of obsolete fixtures is my guess and that is low if the guy is not using it. Maybe he moved in and the old tenant left it there (ha, ha). Even used they are spendy. The cheapest bench they sell are like the one below that the 356 is on. The other one that the 911 sits on is quite a few duckets more. A bare Celette bench with nothing, no fixtures, no rocker clamps/ perch's- nothing is about 16k today for a new roller. For restoration work you do not need towers (for pulling). A good Port-A Power set is cheap for jacking stuff around. Then if you do buy a dedicated bench how are you going to get home? Your red toy isnt going to do it. Attached image(s) 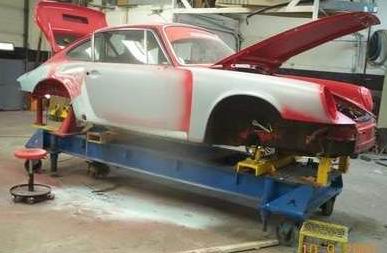  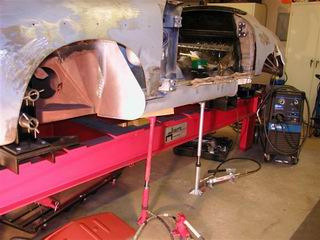
|
|
|
|
| Jeff Hail |
Dec 3 2007, 02:20 AM
Post
#137
|
|
Senior Member Group: Members Posts: 1,141 Joined: 3-May 07 From: LA/ CA Member No.: 7,712 |
[quote name='Jeff Hail' date='Dec 2 2007, 11:37 PM' post='973233']
[quote name='Twystd1' post='973215' date='Dec 2 2007, 10:20 PM'] [quote]The other one is the mid long and rail joint is butt welded. This will get a double wall sleeve just like the factory design. Do not butt weld a rocker without a sleeve. This is for any car with a structural roof or not. It is one of those things you do not ask why, just do it.[/quote] Jeff, explain that further. As I think I know what you mean. But I want to be exactly clear on what you are saying.. (pics would be good for this nut head) Clayton, Did I loose you along the way? The rear long will be butt welded and sleeved just like the inner long section that is already done. Same procedure except about 16 inches farther back. I included a photo of the old piece to show the double wall. Only difference is instead of a single wall I will double the layer at the butt weld on 3 sides of the box. Clayton? Clayton? Attached image(s) 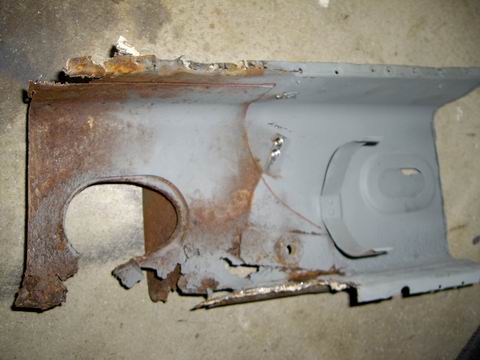 
|
|
|
|
| Sarastro |
Dec 3 2007, 12:59 PM
Post
#138
|
|
Member Group: Members Posts: 54 Joined: 10-September 07 From: Dallas Member No.: 8,103 Region Association: None |
I don't know why I find your work so fascinating. Maybe I'm someone who likes to see things done the way they should be (and not so often are). As a long time 914 owner (since 1973) I really appreciate what you are able to do to conserve these cars.
I am not a mechanic and I haven't done any welding since High School autoshop in the 60's but after watching you work, I feel like buying a Miller and joining metal. |
|
|
|
| Jeff Hail |
Dec 8 2007, 04:50 PM
Post
#139
|
|
Senior Member Group: Members Posts: 1,141 Joined: 3-May 07 From: LA/ CA Member No.: 7,712 |
Sheet happens!
Ever wonder how much force is on a door bar when welding? Ever wonder how much energy is moving when metal draws together? Ever wonder how much a 914 shrinks when welding in the long area? My passenger side door opening brace snapped. I am underneath and hear this BANG! Scared the crap of me and hit my head. The turnbuckle gave way. It was only 3/8 but it was forged. I have used them on another 914 and also a 911. They lived a good life. Attached image(s) 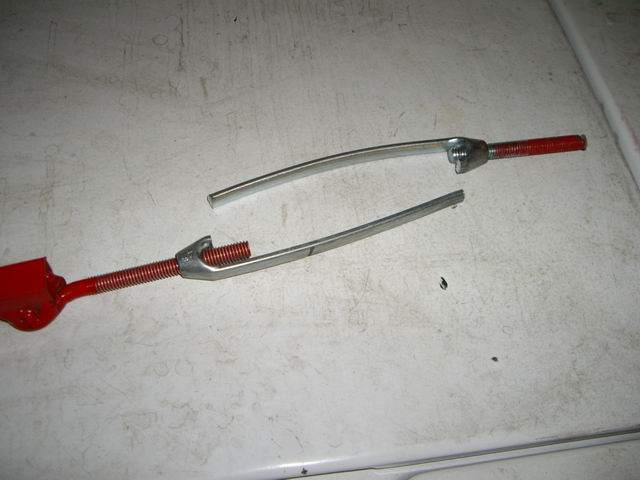
|
|
|
|
| Jeff Hail |
Dec 8 2007, 04:52 PM
Post
#140
|
|
Senior Member Group: Members Posts: 1,141 Joined: 3-May 07 From: LA/ CA Member No.: 7,712 |
Built another set of door braces. This time I used 5/8 inch cold rolled solid rod and 1/2 inch rod ends. Of course they have to look good too (waiting on paint to dry).
Attached image(s) 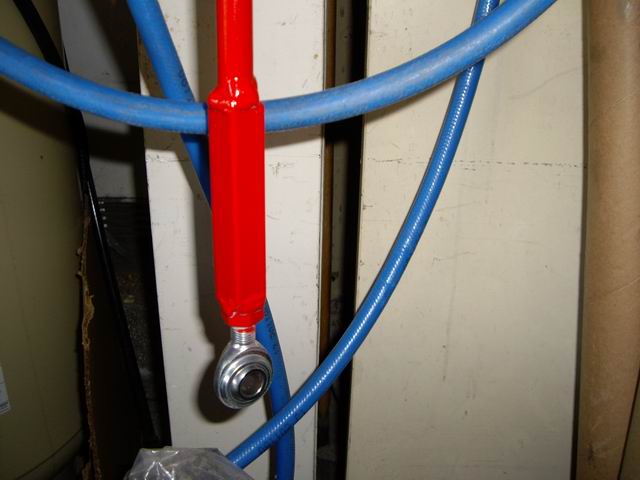
|
|
|
|
|
1 User(s) are reading this topic (1 Guests and 0 Anonymous Users)
0 Members:

|
Lo-Fi Version | Time is now: 17th May 2024 - 06:20 PM |
Invision Power Board
v9.1.4 © 2024 IPS, Inc.