|
|
|
Porsche, and the Porsche crest are registered trademarks of Dr. Ing. h.c. F. Porsche AG.
This site is not affiliated with Porsche in any way. Its only purpose is to provide an online forum for car enthusiasts. All other trademarks are property of their respective owners. |
|
|

  |

| Jeff Hail |
 Nov 4 2007, 07:46 PM Nov 4 2007, 07:46 PM
Post
#81
|
|
Senior Member  Group: Members Posts: 1,141 Joined: 3-May 07 From: LA/ CA Member No.: 7,712 |
Wondering how I flaired the tube? After rummaging through the tool and junk box's for something shaped like a ball or cone I decided on a ballpeen hammer.
I knew that round end was good for something! Put the 1-1/4 inch long stub on the ground. Put the round head inside and smacked it a few times with an even bigger hammer until I reached the desired shape. That myth of hitting a hammer with another hammer is BS by the way. Attached image(s) 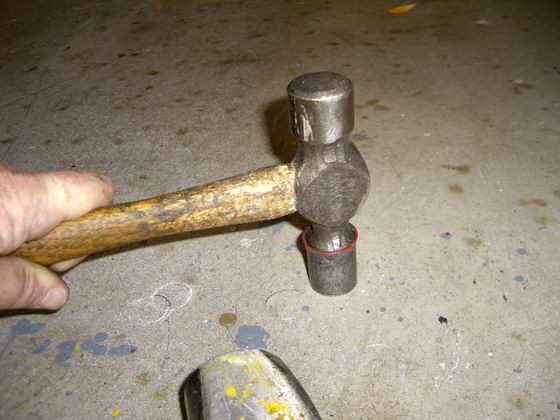
|
   |

 
|
| Jeff Hail |
Nov 4 2007, 07:48 PM
Post
#82
|
|
Senior Member Group: Members Posts: 1,141 Joined: 3-May 07 From: LA/ CA Member No.: 7,712 |
Mig welded the spigot to the firewall and some primer. Done!
Don't forget to remove any burrs or sharp edges from the inside of the tube. Attached image(s) 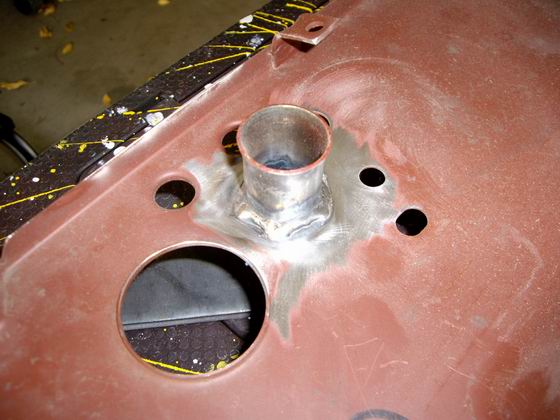 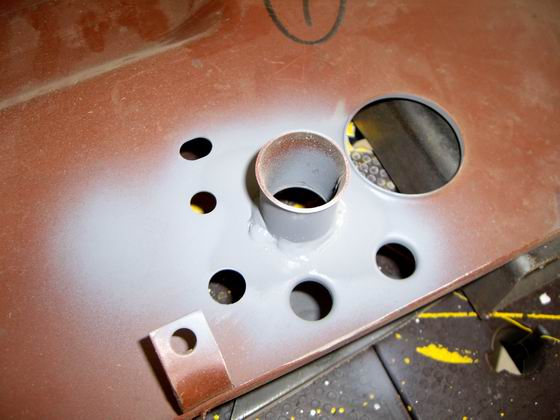
|
|
|
|
| Jeff Hail |
Nov 4 2007, 07:55 PM
Post
#83
|
|
Senior Member Group: Members Posts: 1,141 Joined: 3-May 07 From: LA/ CA Member No.: 7,712 |
Moving along to the E-Brake Cable delete.
Cut out a rectangle of sheetmetal and punched some holes in it. Spot weld it to the firewall. I almost tacked it to the wrong side! Ooops. Caught in time. Attached image(s) 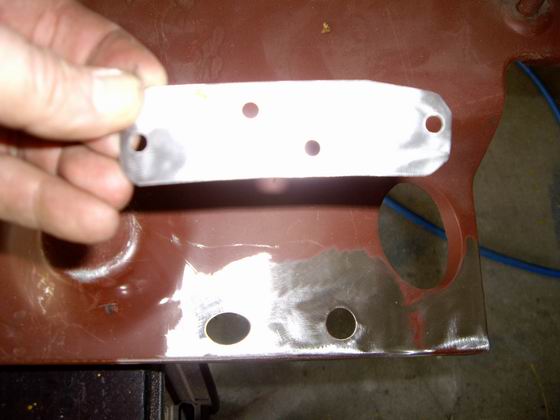 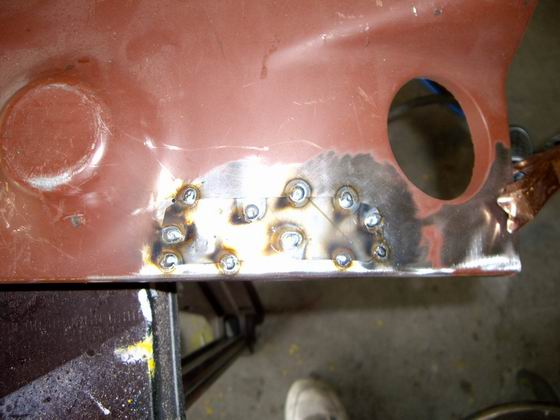  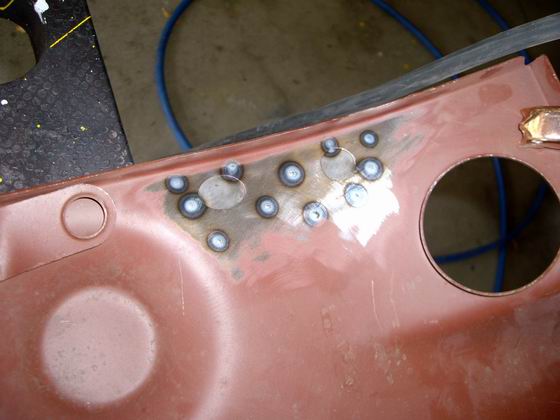
|
|
|
|
| Jeff Hail |
Nov 4 2007, 08:03 PM
Post
#84
|
|
Senior Member Group: Members Posts: 1,141 Joined: 3-May 07 From: LA/ CA Member No.: 7,712 |
A little finishing with a grinder and conditioning pad. Looks like factory "knockouts" on the engine compartment side. Porsche never had knockouts here except for the 6 cylinder oil tank holes on the driver side wheelhouse. Still looks clean.
If for some reason my E-Brake conversation to the 1995 993 center pull becomes a problem I can always resort back to the original design and add the elbows back in with minimal work. Always plan ahead for curves in the road. Attached image(s) 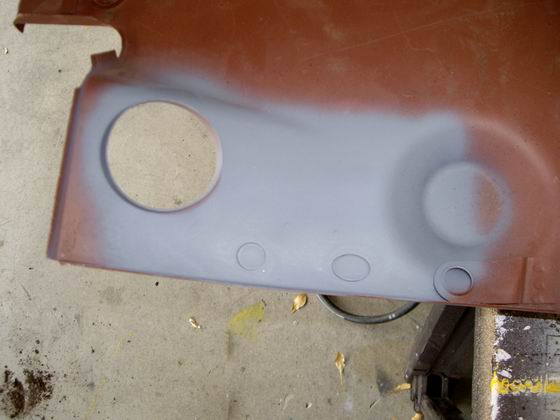
|
|
|
|
| Jeff Hail |
Nov 4 2007, 08:20 PM
Post
#85
|
|
Senior Member Group: Members Posts: 1,141 Joined: 3-May 07 From: LA/ CA Member No.: 7,712 |
Some more holes that need to go away.
The mystery hole to the left of the shiftrod exit on the outer firewall. Gone! Inner lower driver side firewall matching mystery hole. Gone! I kind of like the "knockout look". These don't show so I am not going to waste time metal finishing the recess. Also the two holes on the inner firewall for the E-Brake cable delete. Gone! Same procedure. Fab a plate and punch some holes. Spot weld it to the backside. Wait! those two holes have a raised boss. Better get rid of those also and make it smooth. Hammer and dolly. A great tool is the Punch/ Flanger. On one side it has a hole punch which really is an effortless time saver. After drilling out over 500 spot welds at this point in the project I look forward to it. On the other side of the head is a flanger. Great for lapping panels and floors. Makes a nice finished step in sheetmetal and looks professional. Attached image(s) 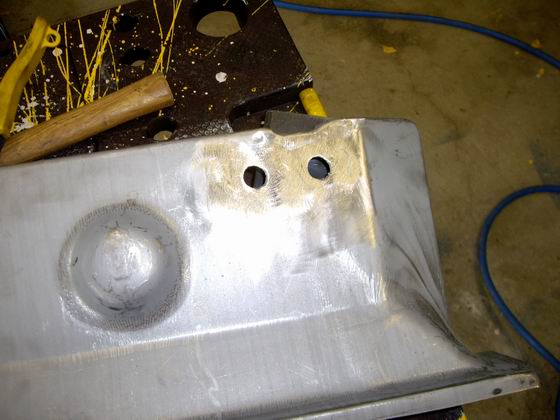 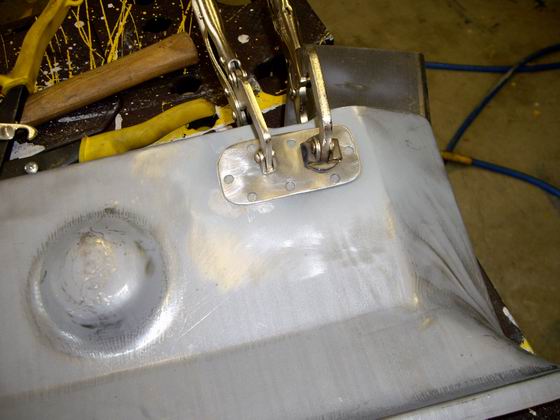 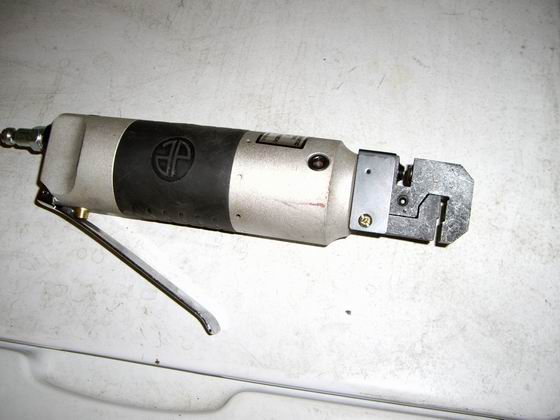
|
|
|
|
| Jeff Hail |
Nov 4 2007, 08:30 PM
Post
#86
|
|
Senior Member Group: Members Posts: 1,141 Joined: 3-May 07 From: LA/ CA Member No.: 7,712 |
Corrosion Protection:
I cannot stress enough about corrosion protection on a 914. These little buggers rust from the inside out. All area's that were welded get a coat of primer. I then went over the primer and spotted with Wurth Seam Sealer. This sealer looks like the OEM sealer Porsche used on all the seams and under the rockers where the floor connects. Today it is the factory recommended sealer for Porsche, Mercedes and BMW. As Snoop Dog would say "this is the shizzle". It cannot be beat. Most of the area's coated will never be seen so appearance wasnt a priority. Doesnt matter, it still needs to be sealed. Primer alone doesnt cut it. Even between the firewalls a few minutes spent will last a lifetime. Attached image(s) 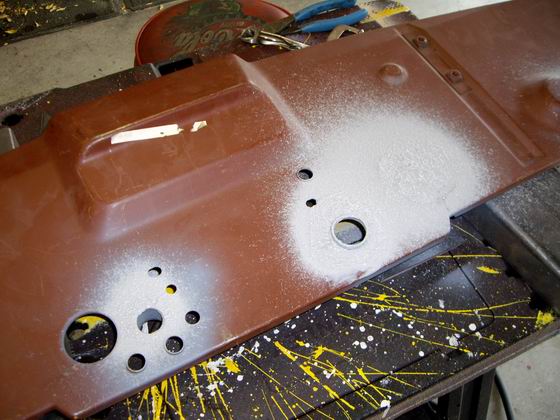 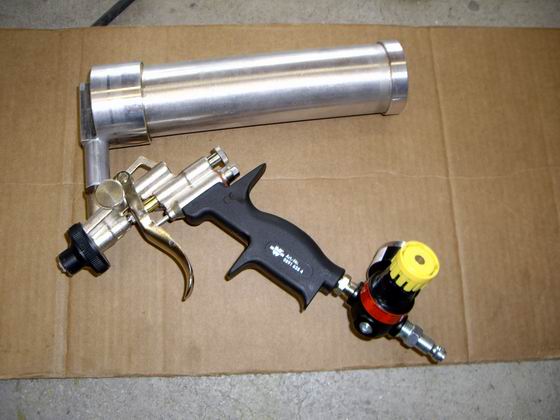 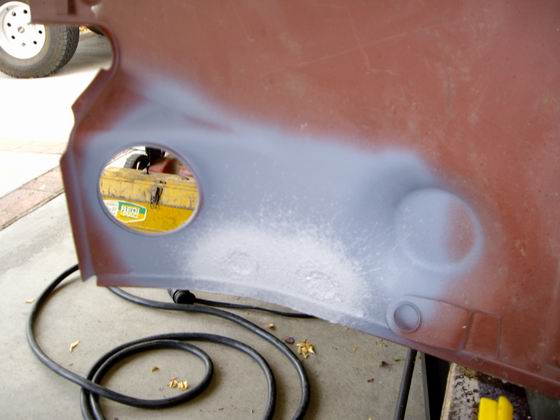 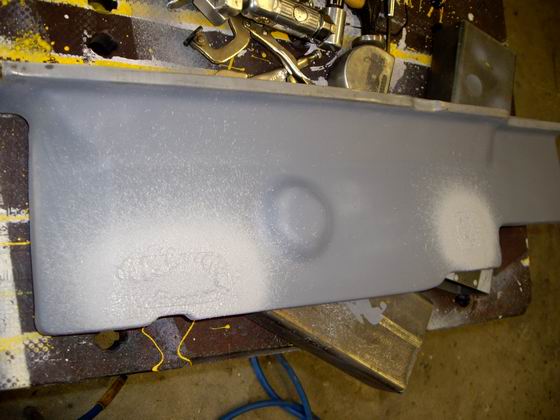
|
|
|
|
| Jeff Hail |
Nov 4 2007, 08:38 PM
Post
#87
|
|
Senior Member Group: Members Posts: 1,141 Joined: 3-May 07 From: LA/ CA Member No.: 7,712 |
I decided to leave the early boot cup on the shift shaft housing instead of swapping to the late round style. The early firewall has about 40 resistance welds holding it in and would do more damage to the firewall removing it and installing the later one so I left it in.
Notice the hole to the left of the shift shaft has been deleted. Fitting a bushing to the shift shaft will not be an issue. The early bushing is larger and can easily me made from Delrin or a sealed bearing installed. I have seen the Patrick Motorsports Bulkhead Bearing on another car it it is superior to the OEM application in every way. For $43 the PMS is a no brainer. Attached image(s) 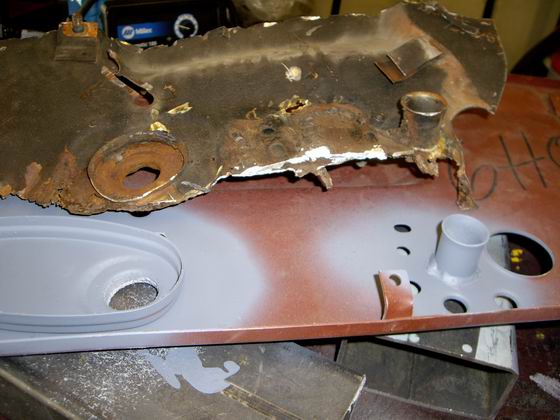 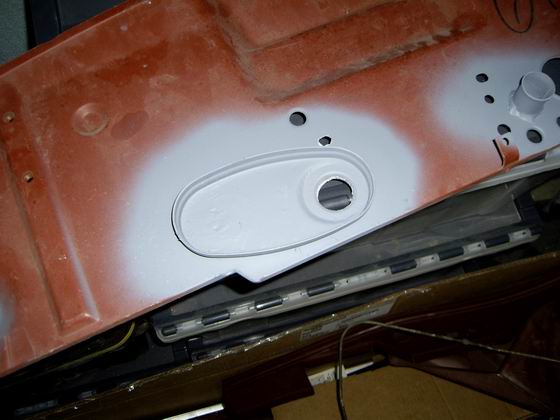
|
|
|
|
| Jeff Hail |
Nov 10 2007, 09:50 PM
Post
#88
|
|
Senior Member Group: Members Posts: 1,141 Joined: 3-May 07 From: LA/ CA Member No.: 7,712 |
Didnt get any work done on the tub during the week and forgot to order the tubing from McMaster Carr soooooooooo I can't work on the throttle and clutch tubes. I can't finish the inner and outer firewalls until the tunnel work is completed yada yada.......
Ok sheetmetal happens! Move forward to the mid-floors. I like to focus on an area and set small goal's. More seems to get done that way instead of jumping around. Lets get to work. Today I worked on the passenger front 1/4 floor, tunnel and floor crossmembers. Stripped everything to bare metal. I was surprised this area was not bad at all. I little flash and surface rust but easily prepared. I still have to section a piece in the drivers side rear tunnel at the firewall junction due to corrosion but that can be done later. Might as well get some thing done while I am waiting for parts. The driver and passenger side rear floor will get replaced. I do not want to make the cut until I have the firewall tacked in and positioned. I stripped the rt/ qtr front floor with a scraper long ago. I then went over it with a 3 inch wire wheel on a die grinder to remove any scale. Then removed all the sealer up to the front bulkhead with the Wurth (Flail). Any remaining glue/adhesive for the floor pads removed with Lacquer Thinner. Then used a conditioning pad on a die grinder to knock everything down smooth. I want to leave as much original zinc and factory primer as possible since it is still in good condition up to about an inch in front of the floor/ seat crossmember. Attached image(s) 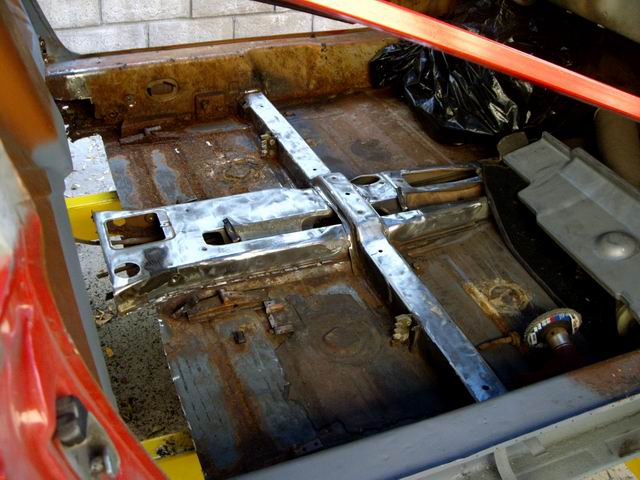 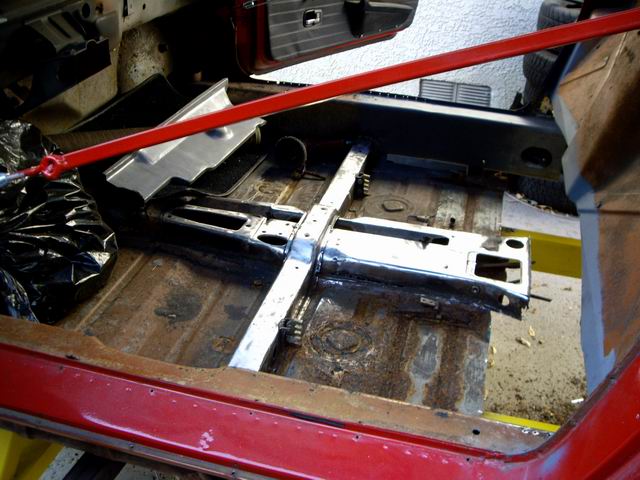 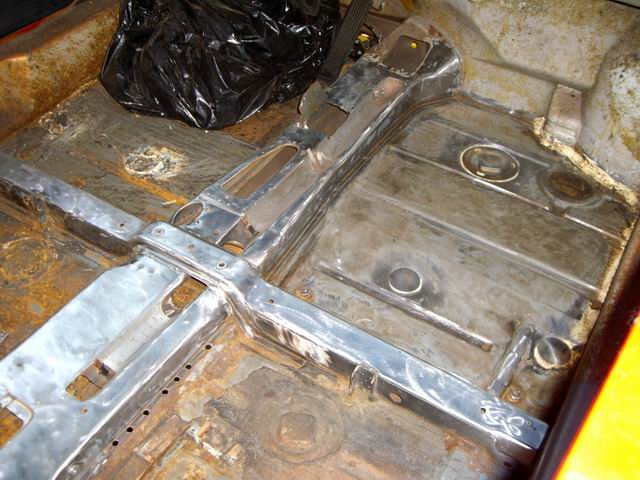
|
|
|
|
| Jeff Hail |
Nov 10 2007, 10:14 PM
Post
#89
|
|
Senior Member Group: Members Posts: 1,141 Joined: 3-May 07 From: LA/ CA Member No.: 7,712 |
Again the rear floor behind the seat crossmember is getting replaced. It's only function is to link the longs to the tunnel for support while I work in other areas for now.
Back to the front right 1/4 floor area. Stripped and all tunnel connections (flanges) prepped with a solution of phosphoric acid/ zinc phosphate (same thing as Metal Ready), let sit for a half an hour and go hit a couple cups of Java. Once the etching solution has converted any flash rust that I couldn't remove by machine (Which was very little) I wipe with a dry towel. The solution is still working. Then I go over it with a wet rag and let it air dry. I really don't like introducing water to the interior but it is the only way to make sure any residual is nutralized. I then force out any liquid residue with compressed air that may be hiding. I aid evaporation with a propane plumbers torch just warming any area's that liquid may be hiding in the tunnel/ floor flanges. Attached image(s) 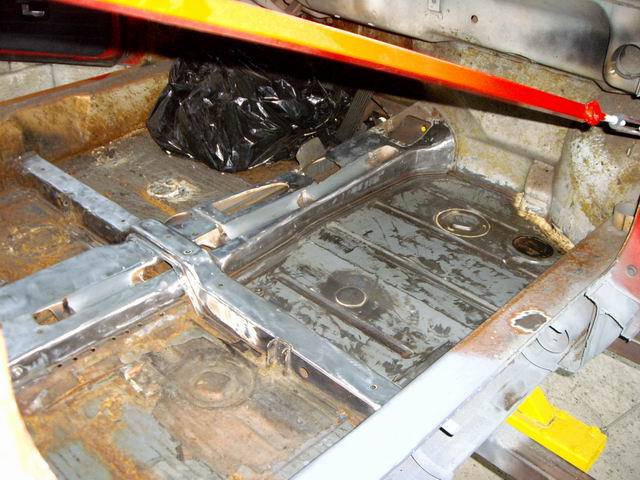 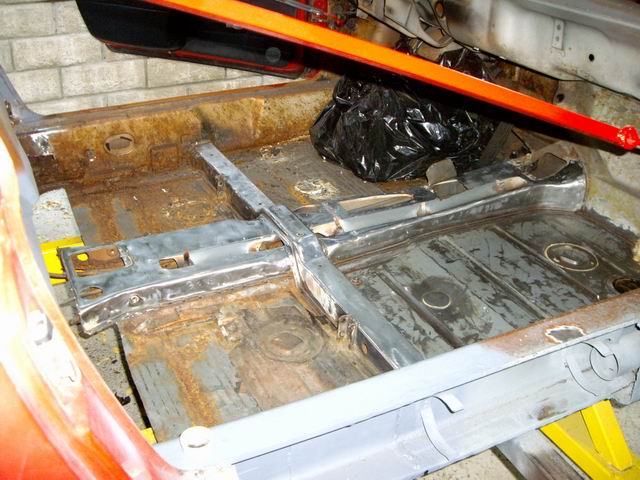
|
|
|
|
| Jeff Hail |
Nov 10 2007, 10:24 PM
Post
#90
|
|
Senior Member Group: Members Posts: 1,141 Joined: 3-May 07 From: LA/ CA Member No.: 7,712 |
Once everything has sat a little while it is then sanded. First 220 and then 320 to accept epoxy primer for proper adhesion.
If you want primer to stick don't put it directly over a converted surface. You need to sand and abrade the surface first. Not course enough to remove any conversion coating but enough to rough it up. The Mini DA works great on the floor's. It's small enough to get into the recess's yet still large enough to work quickly. A normal DA sitting next to it's little brethren. Attached image(s) 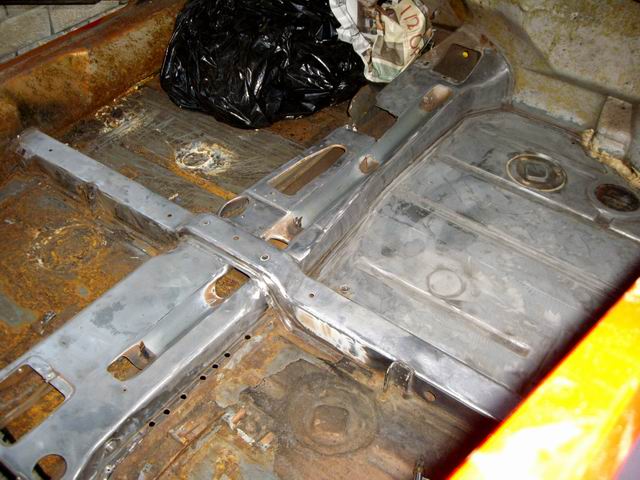 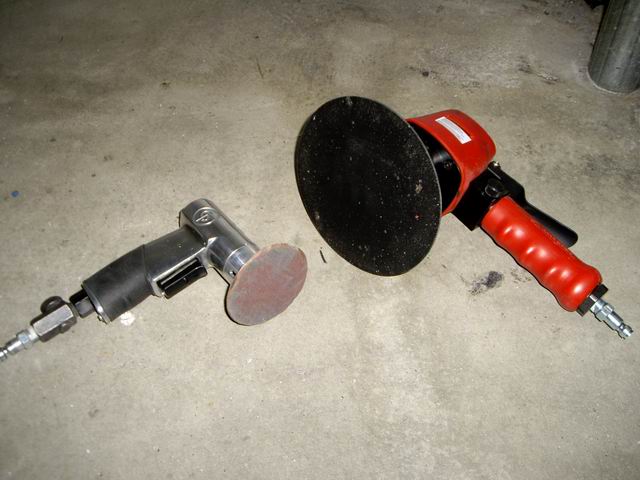
|
|
|
|
| Jeff Hail |
Nov 10 2007, 10:48 PM
Post
#91
|
|
Senior Member Group: Members Posts: 1,141 Joined: 3-May 07 From: LA/ CA Member No.: 7,712 |
Working in smaller area's makes it easier to manage and focus than large surface area's. Might be some overlap but when a week may go by between work on the project results happen. Unless you are doing this in a production shop set goals and smaller area's to work on.
After the application of epoxy primer. Helpful advise....DO NOT SPRAY THIS TYPE OF PRODUCT UNLESS YOU HAVE A POSITVE PRESSURE RESPIRATOR. A PPR uses a forced fresh air supply and is the only way to save your lungs, brain and life. Catalyzed Epoxy Primers and Isocyanates will take your life if you do not follow the proper safety measures for body and respitory protection. No car is worth your health, brain or life! Attached image(s) 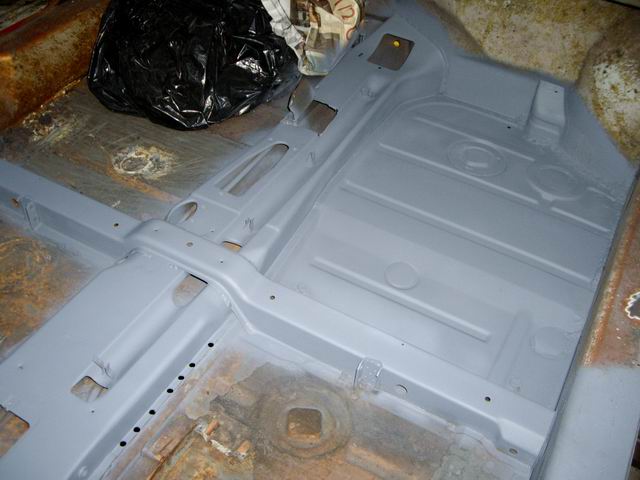  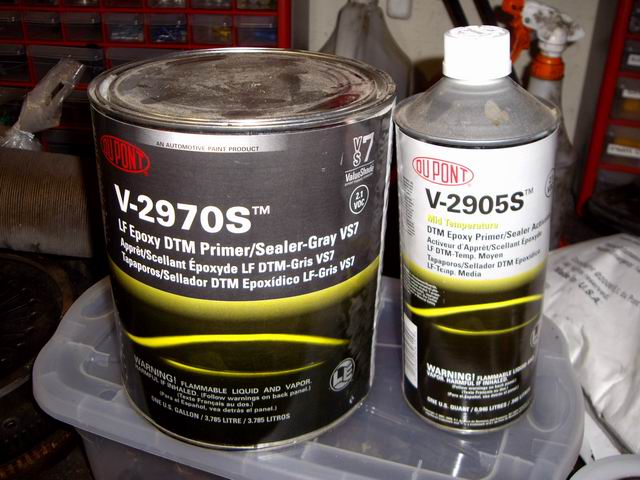 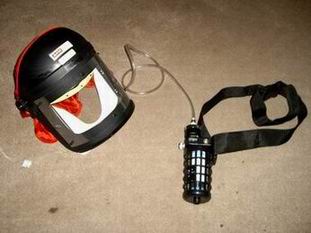
|
|
|
|
| stateofidleness |
Nov 10 2007, 11:15 PM
Post
#92
|
|
Senior Member Group: Members Posts: 810 Joined: 1-September 07 From: Canyon Lake, Texas! Member No.: 8,065 Region Association: None |
hey jeff, question. you are about where im at on my interior and im a complete noob to this stuff.
now that i know that it is ok to primer a little at a time, will you go back and reprimer the entire thing when you're done or only the areas not done? another thing, those removable hole covers in the pans on mine are all bent and mis-shaped. is it better to try to reshape them and get a good seal on the hole (while also needs to be straightened out) or just weld a piece of flat sheet metal over the hole? i did 2 coats of this rust converter which turned the "rust" to a primer black color. so all i need to do is light sand it and then prime? or should i do that acid thing and then sand? really impressed with your work and focus. very inspirational. |
|
|
|
| Jeff Hail |
Nov 11 2007, 12:30 AM
Post
#93
|
|
Senior Member Group: Members Posts: 1,141 Joined: 3-May 07 From: LA/ CA Member No.: 7,712 |
QUOTE(stateofidleness @ Nov 10 2007, 09:15 PM)  hey jeff, question. you are about where im at on my interior and im a complete noob to this stuff. now that i know that it is ok to primer a little at a time, will you go back and reprimer the entire thing when you're done or only the areas not done? another thing, those removable hole covers in the pans on mine are all bent and mis-shaped. is it better to try to reshape them and get a good seal on the hole (while also needs to be straightened out) or just weld a piece of flat sheet metal over the hole? i did 2 coats of this rust converter which turned the "rust" to a primer black color. so all i need to do is light sand it and then prime? or should i do that acid thing and then sand? really impressed with your work and focus. very inspirational. Being it is winter hours I find my daylight is short. I try to set a goal I know I can complete in a given amount of time. When I repair an area such as the right front floor I knew I am going to have some overlap into an adjacent area. No big deal. Any primer overlap/overspray will sand off and be re-applied for instance when I do the drivers floor. I am only talking a few inches of coating so I do not worry about masking anything off here. The need to get this area primed was it is bare and we have been having humidity in the air lately in sunny California. Moist cold air and bare metal are not friends even if it has a zinc coating. As far as the factory resistance welder access covers I did not remove them. I removed most of the surface sealer around them but did not find any scale or corrosion. Obviously they have not leaked. I left them in and primered over them. I will apply some sealer to replace what was removed. The small 3 inch cover next to the long on mine was a little tweaked. I just took a hammer and dolly to flatten it out. No rust so no need to remove it. These will also have new seam sealer applied over these. Rust converter is the "acid thing". You are two step's ahead. I have to say this rust converters are a misconception. They do not turn rust back to good metal. All that is happening is the iron oxide (rust) is being converted to an iron phosphate "layer" ( a different kind of rust) similar to rust bluing on a firearm. The key to rust converters are the chemical conversion of surface scaling and then sealing it from oxygen via zinc phosphate. Without oxygen rust cannot continue. Adding a zinc layer by conversion is part of the sealing process. Zinc does not oxidize like iron will. Zinc is also used for adhesion. Best bet is to remove as much rust as possible with wire wheels, conditioning and grinding disc's. If metal has become structurally unsound, brittle or weakened due to corrosion the only way to properly repair it is to replace it. A good example is if you look at metal that is rusted and it looks like a bunch of rotten leaves in layers it is done and cannot be saved. Pits and deep scale are another thing. These can be normally ground away and or filled with welding if enough metal is present. Ok - If it looks like all the rust is converted to rough black primer I would use an abrasive from 150 to 220 grit paper on it and score the surface lighly, just skim it. If you start seeing carrot colored rust again it was not treated sufficiently. If you see this do the conversion again. Then lightly go over it with 320. Do not worry if you remove a little of the coating. Then prime it quickly. Another thing on converters make sure it is nutralized correctly. If it is not done right you will end up fighting two kinds or corrosion. Rust and chemical. Can you tell I am not a big fan of rust converters? They do have there place though. Something I learned a long time ago welding. Steel melts and rust will burn (oxide). |
|
|
|
| Twystd1 |
Nov 11 2007, 01:54 AM
Post
#94
|
|
You don't want to know... really..... Group: Members Posts: 2,514 Joined: 12-September 04 From: Newport Beach, California Member No.: 2,743 |
Jeff,
When I was up at your house checking out your teener. I didn't realize how proficient you were at the written oratory thing. This thread is invaluable to guys like me. I can't thank you enough for doing this. Tis very good stuff indeed. Clayton |
|
|
|
| Twystd1 |
Nov 11 2007, 01:55 AM
Post
#95
|
|
You don't want to know... really..... Group: Members Posts: 2,514 Joined: 12-September 04 From: Newport Beach, California Member No.: 2,743 |
Before I forget............
I owe you a cup "O" coffee. Can't wait to get together and buy ya one....!!!!!!!!!! Clayton |
|
|
|
| HalM |
Nov 11 2007, 08:29 AM
Post
#96
|
|
Green Skull 003 Group: Members Posts: 127 Joined: 19-January 05 From: The 'Burg Member No.: 3,472 Region Association: None |
Just tuned into this thread and al I can say is WOW! Terrific job.
|
|
|
|
| restore2seater |
Nov 11 2007, 12:27 PM
Post
#97
|
|
Future 914 copilot. Group: Members Posts: 311 Joined: 30-October 04 From: Dunlap,IL Member No.: 3,037 Region Association: None |
QUOTE(Jeff Hail @ Nov 10 2007, 10:48 PM) Helpful advise....DO NOT SPRAY THIS TYPE OF PRODUCT UNLESS YOU HAVE A POSITVE PRESSURE RESPIRATOR. A PPR uses a forced fresh air supply and is the only way to save your lungs, brain and life. Catalyzed Epoxy Primers and Isocyanates will take your life if you do not follow the proper safety measures for body and respitory protection. No car is worth your health, brain or life!  Jeff, What brand of respirator is this? If you don't mind me asking what was the cost? I've looked for those types of respirators and most are over $1,000. |
|
|
|
| Jeff Hail |
Nov 11 2007, 02:43 PM
Post
#98
|
|
Senior Member Group: Members Posts: 1,141 Joined: 3-May 07 From: LA/ CA Member No.: 7,712 |
QUOTE(restore2seater @ Nov 11 2007, 10:27 AM) QUOTE(Jeff Hail @ Nov 10 2007, 10:48 PM) Helpful advise....DO NOT SPRAY THIS TYPE OF PRODUCT UNLESS YOU HAVE A POSITVE PRESSURE RESPIRATOR. A PPR uses a forced fresh air supply and is the only way to save your lungs, brain and life. Catalyzed Epoxy Primers and Isocyanates will take your life if you do not follow the proper safety measures for body and respitory protection. No car is worth your health, brain or life! Jeff, What brand of respirator is this? If you don't mind me asking what was the cost? I've looked for those types of respirators and most are over $1,000. Sata Vision 2000. They retail for $800, I found mine on ebay for $300 new in sealed box. |
|
|
|
| Jeff Hail |
Nov 11 2007, 03:11 PM
Post
#99
|
|
Senior Member Group: Members Posts: 1,141 Joined: 3-May 07 From: LA/ CA Member No.: 7,712 |
QUOTE(Twystd1 @ Nov 10 2007, 11:55 PM) Before I forget............ I owe you a cup "O" coffee. Can't wait to get together and buy ya one....!!!!!!!!!! Clayton Back at ya Clayton Attached image(s) 
|
|
|
|
| Jeff Hail |
Nov 11 2007, 10:49 PM
Post
#100
|
|
Senior Member Group: Members Posts: 1,141 Joined: 3-May 07 From: LA/ CA Member No.: 7,712 |
"While you're in there"
Had second thoughts on the prior owner repairs to the clutch and throttle conduits. Someone put about 2lb's of crap in the tunnel. Looks like it was repaired twice. First time a gob of coat hanger and fire were done, then later a bracket added with a wire welder. This has got to go! I can hear Steve Martin now....."stay away from the tubes"! Clutch conduit removed. Pretty easy actually. The front was held in pretty well. Looks like the second repair was overkill. I still do not like it. The rear clutch tube bracket was intact but the factory bracket which looks like formed 20 gauge steel is going to get a make over. Too wimpy in my opinion. I am going to leave the throttle cable conduit as is. It is intact and does not have pressure on the tube like the clutch cable does. It is still solid. One less thing to replace. Attached image(s) 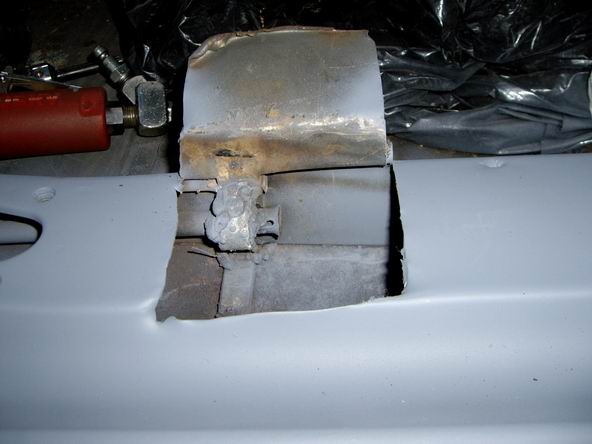  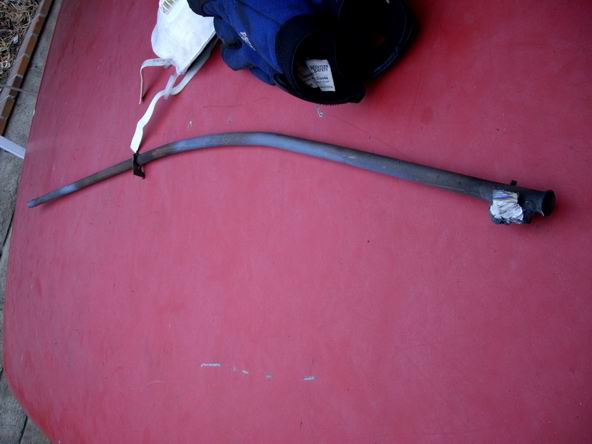 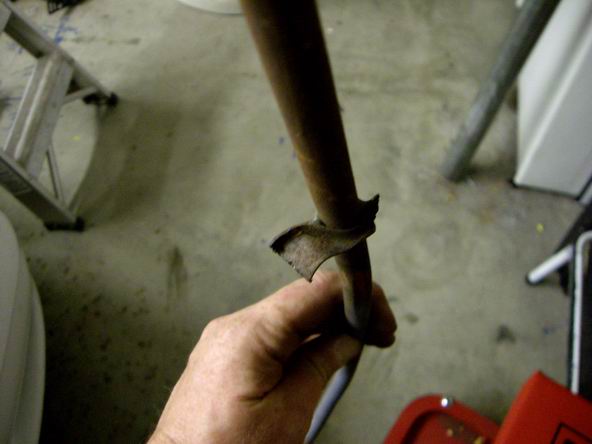
|
|
|
|
|
2 User(s) are reading this topic (2 Guests and 0 Anonymous Users)
0 Members:

|
Lo-Fi Version | Time is now: 3rd May 2024 - 07:57 AM |
Invision Power Board
v9.1.4 © 2024 IPS, Inc.